Trickfish Amplification BULLHEAD 1K User manual

BH1K Guide 04272105
1
Thank you for choosing Trickfish, we hope you fall in love with your new amp and enjoy a lovely life together. The
Bullhead 1K is a truly dynamic piece of gear and nothing will take the place of spending time playing and
experimenting with it as you learn about the amp, your basses and maybe yourself.
This manual contains valuable safety instructions, operational information, some insights we’ve gained over the
years and some suggested settings that may help you get where you want to be just a bit quicker. Who needs a
manual, right? Humor us and look through it –you might be surprised!
About us: Trickfish Amplification is dedicated to delivering a collection of killer products that will serve as valuable
tools for discriminating bassists as they seek inspiration for their artistic vision. We share a common vision of
intelligent design, precision, delectable tone and rugged durability in everything we build and we’re committed to
providing impeccable customer service, service that’s commensurate with the quality we strive to deliver in every
design we offer.
Trickfish products are designed and manufactured for discerning musicians looking for accuracy, power and
reliability while in pursuit of their artistic vision. We strive to deliver intelligently designed product that is easy to
operate, is beautiful to look at and yet without compromise, reveals the nuance and subtlety of the player and their
instrument. We have a passion for what we do and that love is channeled through strong principles and ideals. We
demand the best out of ourselves because without that resolve, the product would be only average –we are not
striving to be average.
Quality: We believe that the best quality products only come to fruition when the time is taken to ensure that the
concept, design, components, manufacturing processes, testing and packaging are the best they can be –
regardless of the price.
Passion: We love our work. We believe that work should be fun and that all creative work is an adventure and a
challenge. Our real rewards come when the challenges we set are met and our customer’s expectations are
exceeded.
Vision: While we are pragmatic about the work of the day we don’t forget to dream, to explore the stream of
consciousness and most importantly, to listen. Creativity is elusive and at times you have to stop and just listen to
the world around you to find inspiration. This is where the new realities, ideas and concepts reveal themselves.
Originality: We’re not afraid to do things differently than others have in the past. We’re not trying to just meet the
standards that have come before us –at our best we hope to set new standards. We may do things differently and
that may not sit well with those who are comfortable with the status quo –so be it. If we choose to do something
different it’s because it’s a better way.
Intelligence: We push our minds every day. We learn new things every day. We possess an insatiable, natural
curiosity for technology (Geeks) and we simply live to grow because we believe you live well when you grow.
Honesty: We embrace complete honesty and integrity in all we do.
Respect: We respect our customers and practice the golden rule in all aspects of our day-to-day business.
Excellence: We believe that excellence isn’t a destination, but a way of life and we bring that to work every day. It
permeates all that we do and is a prerequisite to becoming a strategic partner or an employee. And we expect this
standard when we communicate with our dealers, distributors and customers.
Diligence: We’re diligent, hardworking and will accept only the best efforts from ourselves as well as our strategic
partners.
Gratitude: We believe that we are privileged to have customers for what we love to do - that philosophy is the basis
for our mission statement:
BH1K Guide 04272105
2
The lightning flash with arrowhead symbol within an
equilateral triangle is intended to alert the user to the
presence of uninsulated dangerous voltage within the
product's enclosure that may be of sufficient magnitude to
constitute a risk of electric shock to persons.
Unpacking your unit
IMPORTANT NOTE: Your Trickfish Amplification product was originally packaged in a specially designed
carton and included special packing materials. Please save these items. They should be used when
shipping your Trickfish Amplification product.
Please inspect the shipping carton - If the packaging seems damaged please return this item to the
shipper.
Warning:
TO REDUCE THE RISK OF FIRE OR ELECTRIC
SHOCK, DO NOT EXPOSE THIS APPARATUS TO
RAIN OR MOISTURE.
Caution:
TO REDUCE THE RISK OF FIRE OR ELECTRIC
SHOCK DO NOT REMOVE THE COVER. NO USER-
SERVICEABLE PARTS INSIDE. REFER SERVICING
TO A QUALIFIED SERVICE PROFESSIONAL
WARNING!
RISK OF ELECTRIC SHOCK
DO NOT OPEN
The exclamation point within an equilateral triangle is
intended to alert the user to the presence of important
operating and maintenance (servicing) in the literature
accompanying this device.

BH1K Guide 04272105
3
Important Safety Instructions
•Read these instructions.
•Keep these instructions
•Heed all warnings.
•Follow the instructions.
•Do not use this apparatus near water.
•Clean only with a dry cloth.
•Do not block any ventilation openings. Install in
accordance with the manufacturer's
instructions.
•Do not install near any heat sources such as
radiators, heat registers, stoves, or other
apparatus that produce heat.
•Do not defeat the safety purpose of the
grounding type plug. A grounding type plug has
two blades and a third grounding prong and is
used for your safety.
•Protect the power cable from being walked on
or pinched particularly at the plugs or at the
point where they exit the device.
•Unplug this apparatus during lightning storms
or when unused for long periods of time.
•Object and Liquid entry: Never push any
foreign objects of any kind into the openings as
they may touch dangerous voltage points that
could result in fire or electric shock. The
apparatus shall not be exposed to dripping or
splashing and no objects filled with liquids such
as a beverage shall be placed on top.
•When the apparatus exhibits a distinct change
in performance this indicates a need for
service.
•There are NO USER SERVICABLE PARTS
•Refer servicing to all qualified service
personnel. Servicing is required when the
apparatus has been damaged in any way, such
as the power cable has been damaged or liquid
has been spilled or objects have fallen into the
apparatus or the apparatus has been exposed
to rain or moisture, does not operate normally
or has been dropped.
•Damage requiring service: Unplug the apparatus
from the wall outlet and refer servicing to qualified
service personnel under the following conditions.
a) When the power supply cord has been
damaged.
b) If liquid has been spilled, or objects have fallen
into the apparatus.
c) If the apparatus has been exposed to rain or
moisture.
d) If the apparatus does not operate normally by
following the operating instructions. Adjust
only those controls that are covered by the
operating instructions as an improper
adjustment of other controls may result in
damage and will often require extensive work
by a qualified technician to restore the
apparatus to its normal operation.
e) If the apparatus has been dropped or
damaged.
•Connecting: When you connect the Amplifier Unit
to other equipment, turn off the power and unplug
all of the equipment from the supply source.
Failure to do so may cause an electric shock and
serious personal injury. Read the User's Manual of
the other equipment carefully and follow the
instructions when making the connections.
•Sound Volume: Reduce the volume to minimum
before you turn on the amplifier to prevent sudden
high levels of noise which may cause hearing or
speaker damage.
•SpeakON connectors: WARNING: speakON
connectors marked with the lightning flashes
indicate high voltages that are potentially life
threatening. Wiring to these terminals requires
installation by an instructed person and the use of
ready-made leads or cords.
•Custom wiring should only be carried out by
qualified personnel.
•To prevent electric shock, do not operate the
product with any of the conductor portion of the
speaker wire exposed.
•NOTE: For reasons of safety and performance, use
only high-quality fully insulated speaker cables of
stranded copper wire. Use the largest wire size that
is economically and physically practical, and make
sure the cables are no longer than necessary.

BH1K Guide 04272105
4
EC Declaration of Conformity in accordance to EC Directives
Electro-magnetic compatibility (Council Directive 89/336/EEC, as amended by
Directives 92/31/EEC and
93/68/EEC);
Low-voltage electrical equipment (Council Directive 73/23/EEC)
This product conforms to the following standards:
EN55103-1 Emission
EN55103-2 Immunity
FCC Part 15 Class B Compliance
This equipment has been tested and found to comply with the limits for a class B digital device, pursuant
to part 15 of the FCC Rules. These limits are designed to provide reasonable protection against harmful
interference in a residential installation. This equipment generates, uses and can radiate radio frequency
energy and if not installed and used in accordance with the instructions, may cause harmful interference
to radio communications. However, there is no guarantee that interference will not occur in a particular
installation. If this equipment does cause harmful interference to radio or television reception, which can
be determined by turning the equipment off and on, the user is encouraged to try to correct the
interference by one or more of the following measures
•Reorient or relocate the receiving antenna
•Increase the separation between the equipment and receiver
•Connect the equipment into an outlet on a circuit different from that to which the receiver is connected
•Consult the dealer or an experienced radio/TV technician for help
This equipment has been verified to comply with the limits for a class B computing device, pursuant to
FCC Rules. In order to maintain compliance with FCC regulations, shielded cables must be used with this
equipment. Operation with non-approved equipment or unshielded cables is likely to result in
interference to radio and TV reception. The user is cautioned that changes and modifications made to the
equipment without the approval of manufacturer could void the user’s authority to operate this
equipment.
BH1K Guide 04272105
5
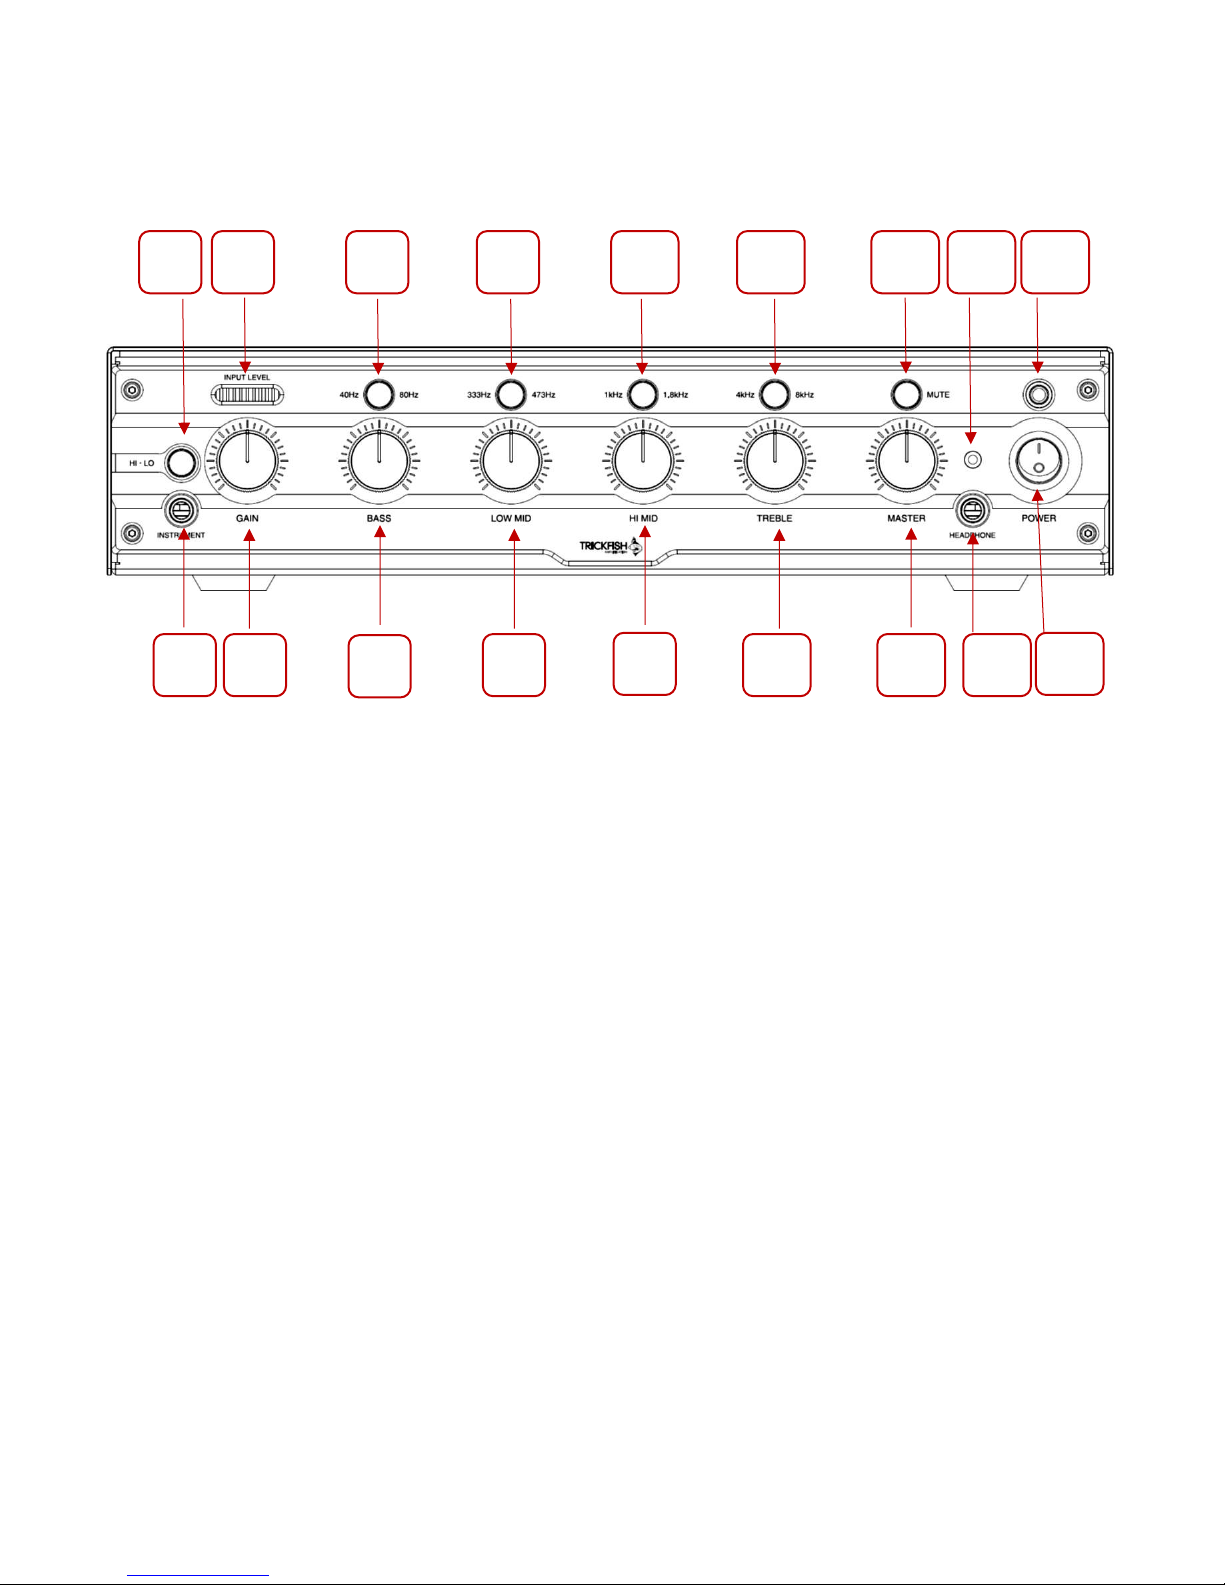
Bullhead 1K Front Panel Features
1. Instrument Input: ¼” phone plug line input
2. Input Attenuator: +/- 9db of gain to accommodate active or passive inputs
3. Input Level Indicator: 10 segment LED ladder indicates amount of gain after EQ circuit
4. Input Gain: Input level adjust
5. Bass EQ Cut/Boost: Center detent is flat. Counter clockwise cuts, clockwise rotation boosts
6. Bass EQ Frequency Select: Selects frequency for the shelving bass EQ
7. Low Mid Cut/Boost: Center detent is flat. Counter clockwise cuts, clockwise rotation boosts
8. Low Mid Frequency Select: Selects the frequency for the Low-Mid Bandpass EQ
9. Hi Mid Cut/Boost: Center detent is flat. Counter clockwise cuts, clockwise rotation boosts
10. Hi Mid Frequency Select: Selects the frequency for the Hi-Mid Bandpass EQ
11. Treble EQ Cut/Boost: Center detent is flat. Counter clockwise cuts, clockwise rotation boosts
12. Treble EQ Frequency Select: Selects the frequency for the shelving Treble EQ
13. Master Volume: Controls the overall volume of the amplifier
14. Amplifier Mute: Mutes the signal to the amplifier
15. Headphone Output: ¼” stereo phone plug for headphone monitoring
16. Line Input: 1/8” mini plug accommodates MP3 players and any other input sources
17. AC Mains on/off: Power on/off
18. Power on/off LED indicator: Illuminated blue LED indicates power is on no light means power is off
1
2
3
4
5
6
7
8
9
10
11
15
13
14
12
16
18
17

BH1K Guide 04272105
6
Bullhead 1K Rear Panel Features
1. AC Mains Input: Attach supplied cable firmly into socket
2. Parallel Speaker Outputs: Neutrik Combi-connectors accommodate both Speakon and ¼” phone plugs
3. EFX Loop Series/Parallel select switch: Switches the EFX Loop from parallel operation to serial operation
4. EXF Loop Ground Lift: Ground lift dedicated to EFX Loop
5. EFX Loop Send: ¼” phone jack routes the signal TO the destination device
6. EFX Loop Return: ¼” phone jack returns the signal FROM the destination device
7. Tuner Out: ¼” phone jack sends signal to tuner
8. Amplifier Mute Footswitch Jack: ¼” phone jack accommodates a latching footswitch and mutes the amp
when activated
9. Direct Out Level Control: Rotary knob controls the level of output to the intended destination
10. Direct Out Pre/Post select switch: Switches between a Pre-EQ or Post-EQ send
11. Direct Out XLR: Balanced Female XLR connection
12. Direct Out Ground Lift Switch: Ground lift dedicated to Direct Out
1
12
11
10
9
7
8
6
4
5
3
2

BH1K Guide 04272105
7
Connections:
1. Remove the AC cable from the package and firmly insert the female end in the AC receptacle located on the
back panel of your amp.
2. With the amplifier in the "OFF POSITION" plug the male end of the AC cable into the wall outlet.
3. Connect the speaker using Neutrik Combi-Connectors on the rear panel (they will accommodate either Speakon
or ¼” phone plugs). *Make sure that you are using an "unshielded" speaker cable and that the polarity of the
cable is correct. Do not use a shielded instrument cable to connect speakers to an amplifier. Ensure that the cable
is good quality and that there are no nicks or abrasions of the insulation that could expose people or equipment
to the electrical potential that is present on the speaker conductors. Never allow speaker connections to short or
contact other metal objects. Do not connect output to anything other than a proper speaker load. Do not use a
shielded instrument cable to connect speakers to an amplifier.
4. Now you can connect your instrument to the amplifier. Make certain that you are using a "shielded"
instrument cable to connect your instrument to your amplifier. If you are unsure of the type of cables you
currently own, we advise you take a trip to your local music store and purchase the appropriate cables.
5. If you have a passive instrument plug it into the instrument input and select the “HI” setting on the attenuator
switch (no blue light). If you have an active instrument then depress the attenuator switch until you see the
blue light come on, indicating “LO” gain.
Powering Up:
1. When the Bullhead 1K is powered up by switching the AC Mains on the right hand side of the head, it will go
through a power-up sequence. The lights will blink and you’ll see one of the red LED’s in the “Input Level
Indicator” flash. The amplifier is giving itself a test to make certain everything is functioning correctly. If the
amp is functioning properly the all of the blue LED’s will be on.
2. The Bullhead 1k always comes up in mute to protect your speaker system and your friendly audio engineer. Be
certain all is as you expect before you press the mute button –this helps to prevent your speakers from being
abused –and your friendly sound engineer will love you for it.
3. Turn the volume on your instrument to the loudest position.
4. Next, set the EQ controls (bass, mid, and treble) to zero (twelve o’clock position) and begin playing aggressively
while turning up the Gain control of the appropriate channel (as indicated by the LED bar graph). When the
LED meter lights are green to yellow there is still potential to increase the Gain. When the graph gets into the
red your input is probably too hot and your signal will distort.
5. Next, disengage the “MUTE” button and slowly turn the Master Control clockwise to the desired listening
volume. At this point you should be hearing your instrument amplified through the system.
6. As you ADD EQ you are also adding gain and so, once you’ve turned up the Master and start to EQ, be aware
that the signal will INCREASE as EQ is added. You may have to re-adjust the “Input Gain” once you’ve added
EQ.
7. Read the next section for some details on how to maximize the experience with the Bullhead 1K.

BH1K Guide 04272105
8
Bullhead 1K
Your amplifier is essentially the brain and brawn of your rig. The head determines the potential volume and
dynamic range before distortion, let’s you shape and contour the sound, and routes the signal to multiple
locations. A good head layout should be logical and easy to operate on stage. And when on you’re on the gig you
shouldn’t have to compromise your playing style to accommodate the shortcomings of the amp. We’ve all
experienced that moment in the middle of a tune when you’re staring at the amp and thinking “What knob can I
possibly turn to make this sound good?”
The Trickfish team has put all of our experience and skill into making the Bullhead 1K a truly musical piece of
equipment. The design goals were modest: build a pre-amp that had the lowest noise floor possible so when we
record it’s nice and quiet, employ powerful EQ’s so we can shape the sound in the most musical way possible and
utilize a stout, no-nonsense power amp that delivers when you’re digging in and pouring on the heat. We kept it
simple and clean so that it would be easy to operate on stage –big knobs that are easy to grab and full size
switches to minimize fumbling.
We spent the money on very high quality components and deliberately skipped many of the on-board effects and
signal processing features found on a lot of amps because to add them would raise the overall price. As players
ourselves if we want compression we’ll go buy a really good compressor; if we want an octaver or analog filter,
we’ll go buy the real deal.It’s actually pretty simple – great tone in a lightweight, durable package that’s at home
on any stage or in any studio. When you have a chance to get familiar with this head we hope you’ll agree that
we’ve met our goals and built something pretty unique.
How the Bullhead Works
There’s just 3 meaningful sections to any bass head:
1. The Instrument Input and Gain section:
a. A common misconception is that this is just a jack where you plug the bass in and volume knob –
it is, but it’s really much more. This is the first block in building what is commonly called “Gain
Structure”. The signal (your instrument) plugs into the jack and depending on where you adjust
the input sensitivity - in the case of our amps it is labeled “HI/LOW”, and here is where you set
the first block of gain in the amplifier. The Bullhead input is designed to accept a wide range of
sources from passive to active instruments as well as from a piezo acoustic bass pickup. This
input is AC coupled to prevent unknown sources from damaging the input circuitry with DC or
spikes.
b. The Gain Control sets the gain level into the EQ. If you under-power the signal into the EQ
section you just won’t have enough voltage to get the EQ to work to its fullest potential and
you’ll add noise. Over-power the input to the EQ section and you’ll simply have distortion. By
adding EQ you also increase the Gain. On the Bullhead we’ve included a multi-segment LED
ladder that shows you just how much gain created after you’ve adjusted the input attenuator,
gain knob and EQ. *Tech Geek Stuff) Input gain is staged in a special multiplicative arrangement.
The first stage is a fixed gain multiplier and the second is a continuously variable gain control. The
gain OR attenuation in the input stage is achieved actively. As the Input gain control is increased,
the gain produced is multiplied by the fixed gain in the first stage. The advantage is that neither
stage is burdened with the duty of producing all of the input gain. This allows the already high
performance circuits to operate very comfortably without strain. The gain components chosen are
capable of performance that exceeds those found in the majority of bass preamps on the market
by factors of 10, and often by 100. The result is a super quiet, super clean signal path.
2. The EQ Section: Before we dissect the EQ circuit it should be noted that there are a couple schools of
thought on running the EQ section of any audio device but for simplicity sake, let’s discuss bass amps.

BH1K Guide 04272105
9
Some suggest that you should first set the instrument tone controls where you like them then adjust the
EQ to suit the cabinet and room characteristics. Others suggest that you leave the bass in a flat position
(this presumes you have an active EQ on the bass) and dial in the amplifier EQ first. It should be noted
that as you add volume (by turning up the master) you are changing the perceived tonality of the system.
You’ll hear more low frequency at higher volumes (research “Fletcher and Munson Curves”) so when
you’re setting up your amp you should try to approximate the volume levels at which you’ll be playing – a
good time to do this is at the sound check. When you add EQ you are also adding gain (the reverse is true
as well –cut EQ and you’re reducing gain). Think about this when judging the Gain Structure of the amp.
a. Bass Control: On most bass amplifiers and on the Bullhead 1K the bass filter is a shelving type of
EQ. In the 12:00 position there is no cut or boost on the Bullhead so essentially you’re just
passing a signal through. The Bullhead offers two low shelving frequencies” meaning that when
you add or subtract bass you are affecting a range frequencies below that frequency. On the
Bullhead those frequencies are 40Hz and 80 Hz –very musical frequencies as the low E string
fundamental frequency is 41.2 Hz. By selecting the 40Hz setting you’re essentially adding deep
bass and by selecting the 80Hz frequency you are affecting a warmer, punchier bass. As with
shelving EQ the frequency band that is controlled raises and lowers without affecting the out-of-
band frequencies.
b. Low-Mid Control: This filter could be characterized as a Variable Gain, Band-Pass filter. As with
all of the EQ controls when you have the knob in the 12:00 position you are simply passing a
signal through the circuit and leaving the signal unaffected. The Low-Mid control has a fixed
width depending on the frequency point you select –either 333Hz or 473 Hz and the Q of these
filters has been tuned for the most musical range. These frequencies were selected for their
particular sonic characteristics and are very “Bass Instrument” specific. If you’ve owned P-basses
or J-Basses you know that there are mid-range frequencies that make them ridiculously musical
or just difficult to listen to and when you experiment with cutting or boosting this filter you’ll
appreciate the control.
c. Hi-Mid Control: Just like the Low-Mid control this is a Variable Gain, Band-Pass filter and as with
all of the EQ controls when you have the knob in the 12:00 position you are simply passing a
signal through the circuit and leaving the signal unaffected. Unlike the bass and Lo-Mid controls,
the range of frequencies covered by the Hi-Mid and Treble include ONLY the harmonics, finger
and string noise and other “character” qualities of your bass signal. The Hi-Mid control has a
fixed width depending on the frequency point you select –either 1kHz or 1.8kHz. These
frequencies were selected for their particular sonic characteristics and again, are very “Bass
Instrument” specific. More often than not you’ll be cutting these frequencies to soften up the
sound or, if you slap and pop, scoop out the nasty bits. Cutting helps to eliminate string noise
without losing mid-range punch. This control can really help shape your sound.
d. Treble: Like the bass control, the treble control is a shelving type EQ and covers a wide swath of
frequencies and like the bass control, in the 12:00 position there is no cut or boost on the
Bullhead so essentially you’re just passing a signal through. Unlike the bass and Lo-Mid controls,
the range of frequencies covered by the Hi-Mid and Treble include ONLY the harmonics, finger
and string noise and other “character” qualities of your bass signal. The Bullhead offers two “hi-
pass frequencies”, 4kHz and 8kHz, and when you add or subtract treble you are affecting a range
of frequencies above the selected frequency. Most bass amp treble filters land in the 4kHz range
and is most likely a default position amplifier designer’s chose when most basses were passive.
With the advent of full-range bass instrument speaker cabinets and sophisticated on-board

BH1K Guide 04272105
10
active EQ circuits, basses now can reproduce very high frequencies. For an airy, glassy high-end
select the 8kHz setting. Want a bit more edge then you should select the 4kHz setting.
3. Power Amplifier/ Master Volume: The Master Volume is essentially the volume control for the power
amplifier –which is the engine of the head. When you turn up the Master you are sending a signal to the
input of the power amplifier and telling the amplifier to do its job, make things louder! The output of the
amp sends the signal to the speaker outputs. On the Bullhead 1K we feature a “mute switch” that
interrupts the signal to the power amp so that you can tune silently when your tuner is plugged into the
corresponding jack in the back.
Routing: The ability to route a signal to various places is essential if you’re to use the amp in the real world.
Digital tuners, effects, MP3 players, headphones –much of the technology we can use as musicians needs to
integrate with the amp. The Bullhead 1K offers the following integration options:
•Auxiliary line in for MP3 players, drum machines –any audio source. Note that the Aux input is not
routed to the DI but it IS routed to the speaker and headphone output. You can share that tune the
band is working on through your speaker. None of the volume or EQ controls affect the level of the
Aux input; you’ll control it via the volume on your audio source.
•Headphones for listening privately to practice sessions or for acoustic tuning
•Tuner out
•Amplifier Mute Jack –requires a latching switch. A latched foot switch will turn on when you press
the switch, and remain on after you release it (i.e., the "on" status is maintained after the switch is
released). When you press the switch again, it will turn off and stay off (i.e., the "off" status is
maintained after the switch is released). –Best practice with a mute pedal:
oPlug the mute pedal into the amplifier
oTurn amp on, wait for self-test.
oUn-mute amp from front panel
oNow mute pedal has control of the mute function
oIf you press the mute on the front panel again, it will take control of the mute function for
muting but you will still have to unmute via the pedal
•Selectable Series/Parallel EFX loop - Interrupt the signal path to insert signal processing like a
compressor or limiter or run effects like reverb alongside the pure signal.
oSeries operation cuts 100% of the signal off at the EFX Send. Once a cable is plugged into the
send jack when operating in Series mode there is no signal routed to the power amplifier
until you complete the circuit by returning the signal back into the circuit at the EFX Return
jack. Running the EFX loop works well when you want to integrate a signal processing device
like a compressor/limiter, an external EQ or an expander.
oParallel operation splits the signal and routes one of the splits to a destination of your
choosing and keeps the dry signal routed to the amplifier. This works best when using an
effects device like a reverb or delay. When using an effect in a parallel it’s optimal to return a
desired percentage of the wet signal to the amplifier. Typically this is an adjustment on the
effect device. If you are recording and don’t have an XLR input available you can take the
split off the EFX send and plug it into your recording interface
•Balanced Direct Output: Very low-noise, balanced output for routing the signal to a live console,
recording console of computer interface.

BH1K Guide 04272105
11
•Direct Output Level Control: Use this to determine an optimal output volume for the destination
device
•Direct Output Pre/Post: In rare cases it’s best to send an unprocessed signal to a recording or live
console where the engineer can adjust the EQ of the bass signal. The input gain and EQ does not
affect the “Pre” Direct Out signal. Conversely, the “Post” Direct Out signal is affected by input gain
and EQ.
•Direct Output Ground Lift: Use this if you hear a hum or buzz in the output signal. This can happen
when there is discrepancy between the power ground of the Bullhead 1k and the house sound
system or recording system.
BULLHEAD 1K Specs (preliminary)
Power Output: (8 Ohms) 1000 Watts Peak .05% THD, 4 Ohm minimum load
Power Amplifier: Class D
Power Supply: Switch-Mode Power Supply
Pre-Amp: Low noise solid state
Input: ¼’ Phone with switchable attenuation and rotary gain control
Input Level Indicator: 10 Segment LED Ladder
EQ: 4 Band Switchable
•Shelving Bass and Treble with selectable Hi-Pass frequencies
•Low-Mid and Hi –Mid - Variable Gain, Band Pass EQ with selectable frequency/ bandwidth options
Master Volume: Rotary Control
Line In: 1/8” mini jack
Headphone Out: Stereo ¼” Phone jack
Mute Switch
AC Mains Power Switch with LED Indicator
EFX Loop: Series/Parallel selectable, w/ground lift
Tuner Out: ¼” Phone Jack
Mute Footswitch: ¼” Phone Jack, Latching type switch
Direct Out: 600 Ohm Balanced, XLR, Pre/Post, Ground Lift and Level control
Speaker Outputs: 2 x Neutrik Combi-Connectors accept NL2, NL4 or ¼” Phone
Chassis: Aluminum
Removable Rubber Feet: Adhesive backed
Rack Ears (Optional)
Size: (H x W x D in.) 3.3 x 15.1 x 8
(H x W x D mm) 86.06 x 384.15 x 203.2
Weight: Net 6.2 lbs. Gross 9 lbs.

BH1K Guide 04272105
12
Additional Notes:
•Please remember that the BH1K will handle a minimum 4 Ohm load and is warrantied as such. Failure to
adhere to this impedance can void the manufacturer’s warranty
•The BH1K is passively cooled through the use of side panel vents and is constructed from aluminum which
is a metal that provides excellent heat transfer. Our heat tests revealed that the BH1K runs extremely cool
under normal circumstances but, the vents must remain clear for the heat to dissipate. Do not block these
vents as the over-stress of heat buildup will cause the amplifier to shut down until it has cooled to safe
operating temperature. When using the optional rack-ears leave enough room on the sides of the amp for
the heat to dissipate (Don’t pack foam, cables or use the space for storage of personal items.)
•ALWAYS use quality unshielded speaker cables (16GA pair minimum) and keep the runs as short as
possible
•Never use an unshielded cable for the instrument input, EFX loops or the DI out.
•Clip Indicators: The Bargraph on the BH1K is very quick and may pop into the red even though you don
not hear distortion –this is an OK situation. However, the last red LED in the input bargraph acts as a clip
indicator for both the pre-amp and power amp and if it glows brighter than the rest, you are clipping and
should back off the gain. If you are running the pre-amp cleanly and the last red LED glows brighter than
the rest you are most likely clipping the power amp and should turn down the master volume until the
condition disappears.
Warranty:
We proudly stand behind our products with a 5 year warranty against manufacturer defects with one exception;
drivers are warrantied against manufacturer defect for 90 days. This warranty extends to the original owner of the
product and the product must have been purchased from an authorized Trickfish Amplification dealer. The owner
must present to us the sales invoice that clearly shows the dealer's name, store location or website, product model
and date of purchase. We do not warranty against abuse, water damage, fire, physical force, modification,
improper installation, power surges or brownouts, or any other damage caused by a third party. Please contact
[email protected]m or call us at 281-220-7248 to obtain a Return Authorization number for the repair.
Depending on the nature of the repair we may have the unit sent to us or have the owner take it to a local repair
facility. The owner will be responsible for freight charges to the repair facility and if it is deemed, at our discretion,
that the repairs needed fall under the guidelines of the warranty, we will pay the return freight.
BH1K Guide 04272105
13
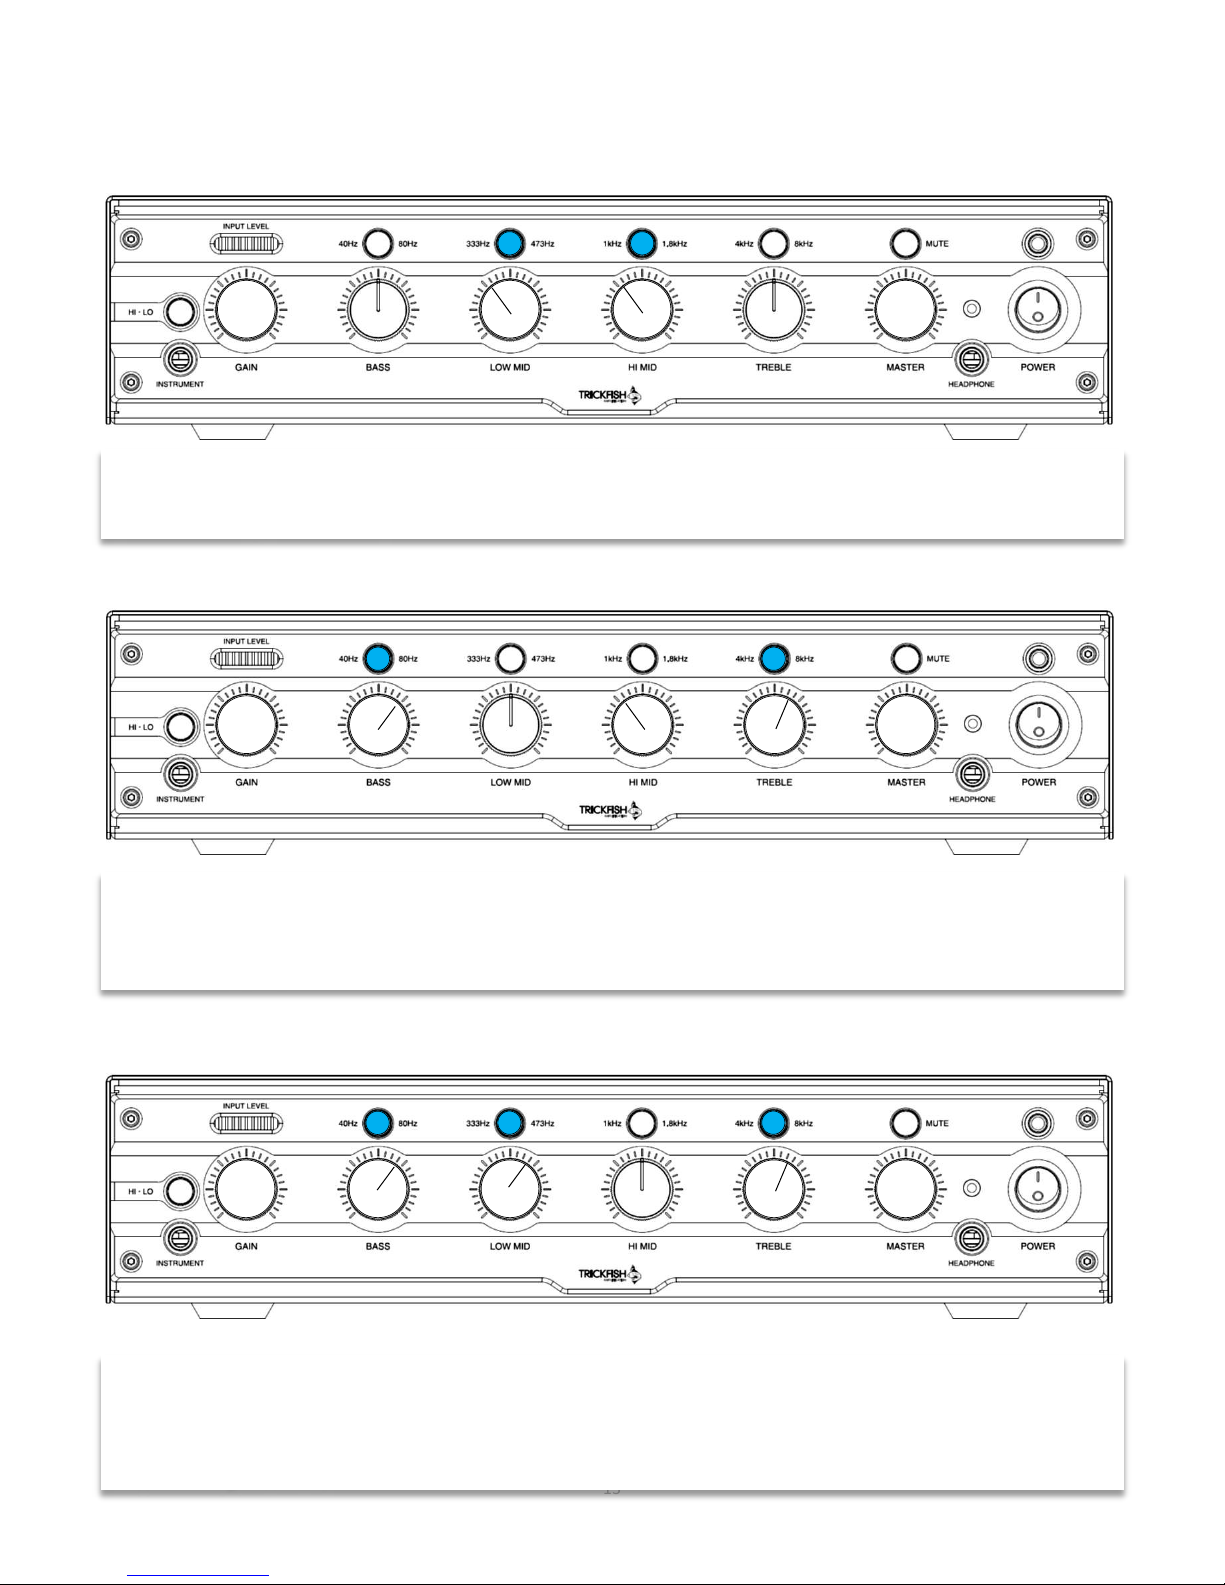
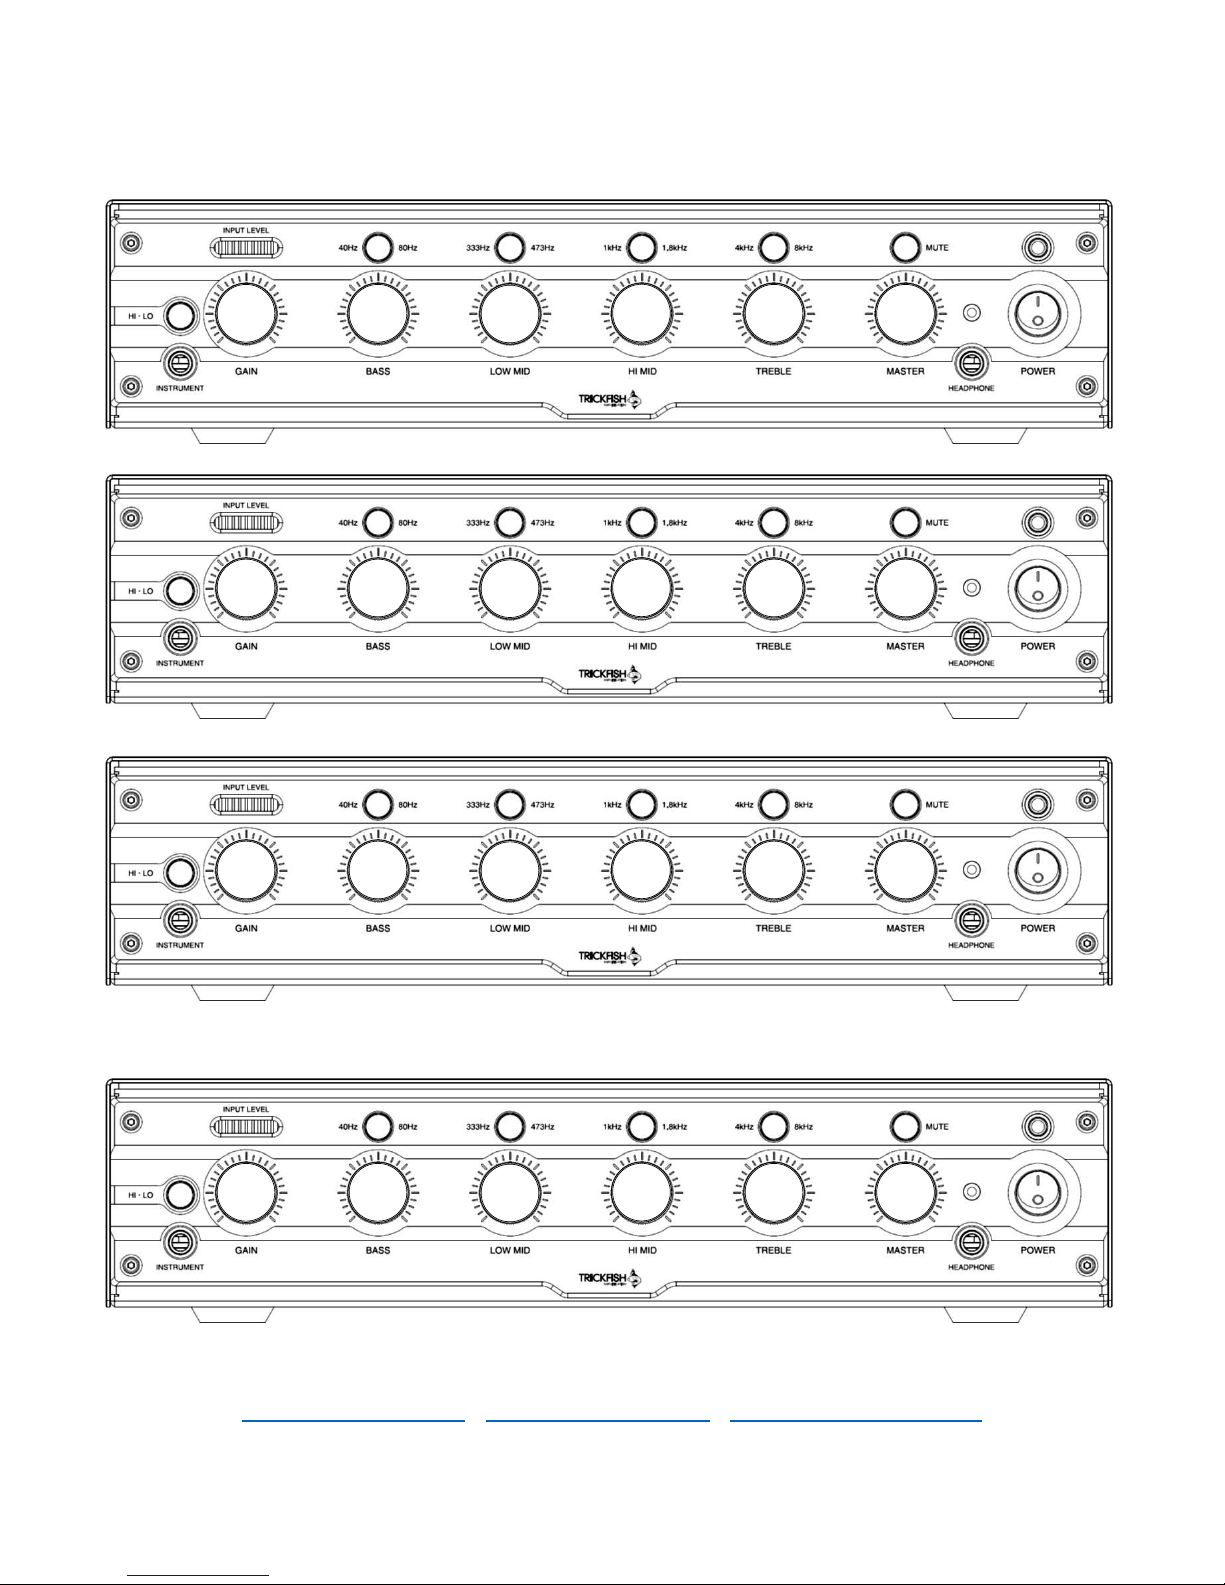
Suggested Settings
Just a simple cut of the mids will deliver a round, balanced tone. From there you can use the active tone controls on your
bass to dial in your tone. This is a great place to start when first getting familiar with the BH1K. *Remember, when you cut
you can add amp gain to make-up the loss in volume
For a very present finger and slap tone you can add bit of bass with the 80Hz button in, cut a little of the mid-range at
1kHz and get some airy highs by selecting the 8kHz setting and adding a little gain. *Remember, when you add gain in the
EQ section you’re also adding overall gain to the signal path and you should take a look at the bargraph to see if you’re not
overdriving the circuit.
This setting achieves a good, aggressive tone and sounds great with a P-Bass and a pick. The Bass setting gives you enough
bottom to still be the bass player and the Low Mid setting gives you the growl and attack. By selecting the 8kHz setting on
the Treble EQ you get a glassy high end that brings out the chimes if you play a chord. *Remember, when you add gain in
the EQ section you’re also adding overall gain to the signal path and you should take a look at the bargraph to see if you’re
not overdriving the circuit.

BH1K Guide 04272105
14
Suggested Settings
This is the “lite” version of the classic scooped bass tone preferred by slap & pop players. The Bass control is on the 40Hz
setting for true low-frequencies, both Mid-Range controls are cut and the Treble is on the 8kHz setting for a sophisticated
“pop” sound. This setting also warms up the back pick-up tone of a J-Bass without killing the growl. *Remember, when you
cut you can add amp gain to make-up the loss in volume
This is a very bass heavy setting that works nicely for Reggae, Salsa etc. where that velvety, almost blurry tone fits the
music. *Remember, when you add gain in the EQ section you’re also adding overall gain to the signal path and you should
take a look at the bargraph to see if you’re not overdriving the circuit.
Mike Pope’s setting for his Acoustic Bass: The LF on an acoustic bass can get out of control quickly and as the setting
shows we’re cutting the Bass a bit at the 40Hz setting. Mike adds a little cutting, punchy goodness at the 1.8kHz setting on
the Hi-Mid EQ and suggests that the Treble frequency at 8kHz can be adjusted to taste. Acoustic basses differ dramatically
so your settings may be radically different.
BH1K Guide 04272105
15
Personal Settings
Trickfish™Amplification USA LLC • 1410 Brittmoore Road • Houston, Texas 77043
www.trickfishamps.com • info@trickfishamps.com • service@trickfishamps.com
This manual suits for next models
1
Table of contents
Other Trickfish Amplification Amplifier manuals


