TrimmerPlus INSTRUCTION MANUAL User manual

FOR QUESTIONS, CALL 1-800-345-8746 in U.S. or
1-800-668-1238 in CANADA
www.TrimmerPlus.com
IMPORTANT MANUAL DO NOT THROW AWAY
Hedge Trimmer
OPERATOR'S MANUAL
HS720r

2
I. Rules for Safe Operation . . . . . . . . . . . . . . . . . 3-6
A. Important Safety Information . . . . . . . . . . . . 3-4
B. Safety and International Symbols . . . . . . . . 5
C.Know Your Unit . . . . . . . . . . . . . . . . . . . . . . 6
II. Operating Instructions . . . . . . . . . . . . . . . . . . . 7-8
A. Assembling the Coupler . . . . . . . . . . . . . . . 7
B. Preparing for Operation . . . . . . . . . . . . . . . . 8
C.Operating Tips . . . . . . . . . . . . . . . . . . . . . . . 8
III. Maintenance and Repair Instructions . . . . . . . 9-11
A. Lubricating Cams . . . . . . . . . . . . . . . . . . . . . 9
B. Blade Replacement . . . . . . . . . . . . . . . . . . . 9
C.Lubricating Blade . . . . . . . . . . . . . . . . . . . . . 10
D.Storage . . . . . . . . . . . . . . . . . . . . . . . . . . . . 11
E. Transporting . . . . . . . . . . . . . . . . . . . . . . . . . 11
F. Accessories/Replacement Parts . . . . . . . . . 11
IV. Specifications . . . . . . . . . . . . . . . . . . . . . . . . . . 11
V. Warranty . . . . . . . . . . . . . . . . . . . . . . . . . . . . . . 12
CONTENTS OF CARTON
This unit should consist of the following:
•HS720r Hedge Trimmer Add-On
•Hanger
•Operator's Manual
•Product Registration Card
•Optional Scabbard
THANK YOU
Thank you for buying this quality product. This modern
outdoor power tool will provide many hours of useful
service. You will find it to be a great labor-saving device.
This operator’s manual provides you with easy-to-
understand operating instructions. Read the whole
manual and follow all the instructions to keep your new
outdoor power tool in top operating condition.
PRODUCT REFERENCES, ILLUSTRATIONS AND
SPECIFICATIONS
All information, illustrations and specifications in this
manual are based on the latest product information
available at the time of printing. We reserve the right to
make changes at any time without notice.
Copyright ©2001 MTD SOUTHWEST INC
All Rights Reserved.
TrimmerPlus® is a registered trademark of
MTD SOUTHWEST INC
SERVICE INFORMATION
Service on this unit both within and after the warranty
period should be performed only by an authorized and
approved service dealer.
Dial:
•1-800-345-8746 in the United States
Or
• 1-800-668-1238 in Canada to obtain the listing of
the authorized service dealer nearest you.
DO NOT RETURN THE UNIT TO THE RETAILER.
NOTE: PROOF OF PURCHASE WILL BE REQUIRED
FOR WARRANTY SERVICE.
Make sure this manual is carefully read and understood
before starting or operating this equipment.
THIS PRODUCT IS COVERED BY ONE OR MORE US
PATENTS. OTHER PATENTS PENDING.
INTRODUCTION TABLE OF CONTENTS
Read the Operator’s Manual(s) and follow all
warnings and safety instructions. Failure to do
so can result in serious injury to the operator
and/or bystanders.
WARNING!
DANGER: Failure to obey a safety warning
will result in serious injury to yourself or to
others. Always follow the safety precautions
to reduce the risk of fire and personal injury.
WARNING: Failure to obey a safety warning
can result in injury to yourself and others.
Always follow the safety precautions to
reduce the risk of fire and personal injury.
CAUTION: Failure to obey a safety warning
may result in property damage or personal
injury to yourself or to others. Always follow
the safety precautions to reduce the risk of
fire and personal injury.
The purpose of safety symbols is to attract your
attention to possible dangers. The safety symbols, and
their explanations, deserve your careful attention and
understanding. The safety warnings do not by
themselves eliminate any danger. The instructions or
warnings they give are not substitutes for proper
accident prevention measures.
SYMBOL MEANING
SAFETY ALERT SYMBOL: Indicates
danger, warning, or caution. Attention is
required in order to avoid serious personal
injury. May be used in conjunction with other
symbols or pictographs.
NOTE: Advises you of information or instructions vital
to the operation or maintenance of the equipment.
RULES FOR SAFE OPERATION

READ ALL INSTRUCTIONS
WARNING: When using the unit, the safety
rules must be followed. For your own safety
and that of bystanders, please read these
instructions before operating the unit. Please
keep the instructions safe for later use.
BEFORE OPERATING
•Carefully read and understand the operator's manual
of the unit that powers this attachment.
•Read this operating instruction manual carefully. Be
thoroughly familiar with the controls and the proper use
of the equipment. Know how to stop the unit and
disengage the controls quickly.
•Do not operate this unit when tired, ill, or under the
influence of alcohol, drugs, or medication.
•Never allow children to operate the equipment. Never
allow adults unfamiliar with the instructions to use the
unit. Never allow adults to operate the equipment
without proper instruction.
•All guards and safety attachments must be installed
properly before operating the unit.
•Inspect the unit before use. Ensure the blade is
installed correctly and secure.
•Clear the area to be hedged before each use. Remove
all objects such as rocks, broken glass, nails, wire, or
string which can be thrown or become entangled in the
hedge trimmer attachment.
SAFETY WARNINGS FOR GAS POWERHEADS
AND HEDGE TRIMMERS
WARNING: Gasoline is highly flammable, and its vapors
can explode if ignited. Take the following precautions:
•Store fuel only in containers specifically designed and
approved for the storage of such materials.
•Always stop the engine and allow it to cool before
filling the fuel tank. Never remove the cap of the fuel
tank, or add fuel, when the engine is hot. Never
operate the unit without the fuel cap securely in place.
Loosen the fuel tank cap slowly to relieve any pressure
in the tank.
•Mix and add fuel in a clean, well-ventilated area
outdoors where there are no sparks or flames. Slowly
remove the fuel cap only after stopping engine. Do not
smoke while fueling or mixing fuel. Wipe up any spilled
fuel from the unit immediately.
•Avoid creating a source of ignition for spilled fuel. Do
not start the engine until fuel vapors dissipate.
•Move the unit at least 30 feet (9.1 m) from the fueling
source and site before starting the engine. Do not
smoke. Keep sparks and open flames away from the
area while adding fuel or operating the unit.
•Never start or run the unit inside a closed room or
building. Breathing exhaust fumes can kill. Operate this
unit only in a well ventilated area outdoors.
3
• IMPORTANT SAFETY INFORMATION •
SAFETY WARNINGS FOR ELECTRIC
POWERHEADS AND HEDGE TRIMMERS
WARNING: To reduce the risk of electrical
shock, use only extension cords approved for
outdoor use, such as an extension cord of cord
type SW-A, SOW-A, STW-A, STOW-A, SJW-A,
SJOW-A, SJTW-W or SJTOW-A. Extension
cords are available from your local retailer. Use
only round-jacketed extension cords approved
for outdoor use.
•CORD SETS: Make sure your cord set is in good
condition. When using a cord set, be sure to use a
cord that is heavy enough to carry the current that your
unit will draw. An undersized cord set will cause a drop
in line voltage resulting in loss of power and
overheating. See the operator’s manual for the unit that
will power this add-on for the recommended cord size.
•Inspect all extension cords and the unit power
connection periodically. Look closely for deterioration,
cuts or cracks in the insulation. Also inspect the
connections for damage. Replace the cords if any
defects or damage appear.
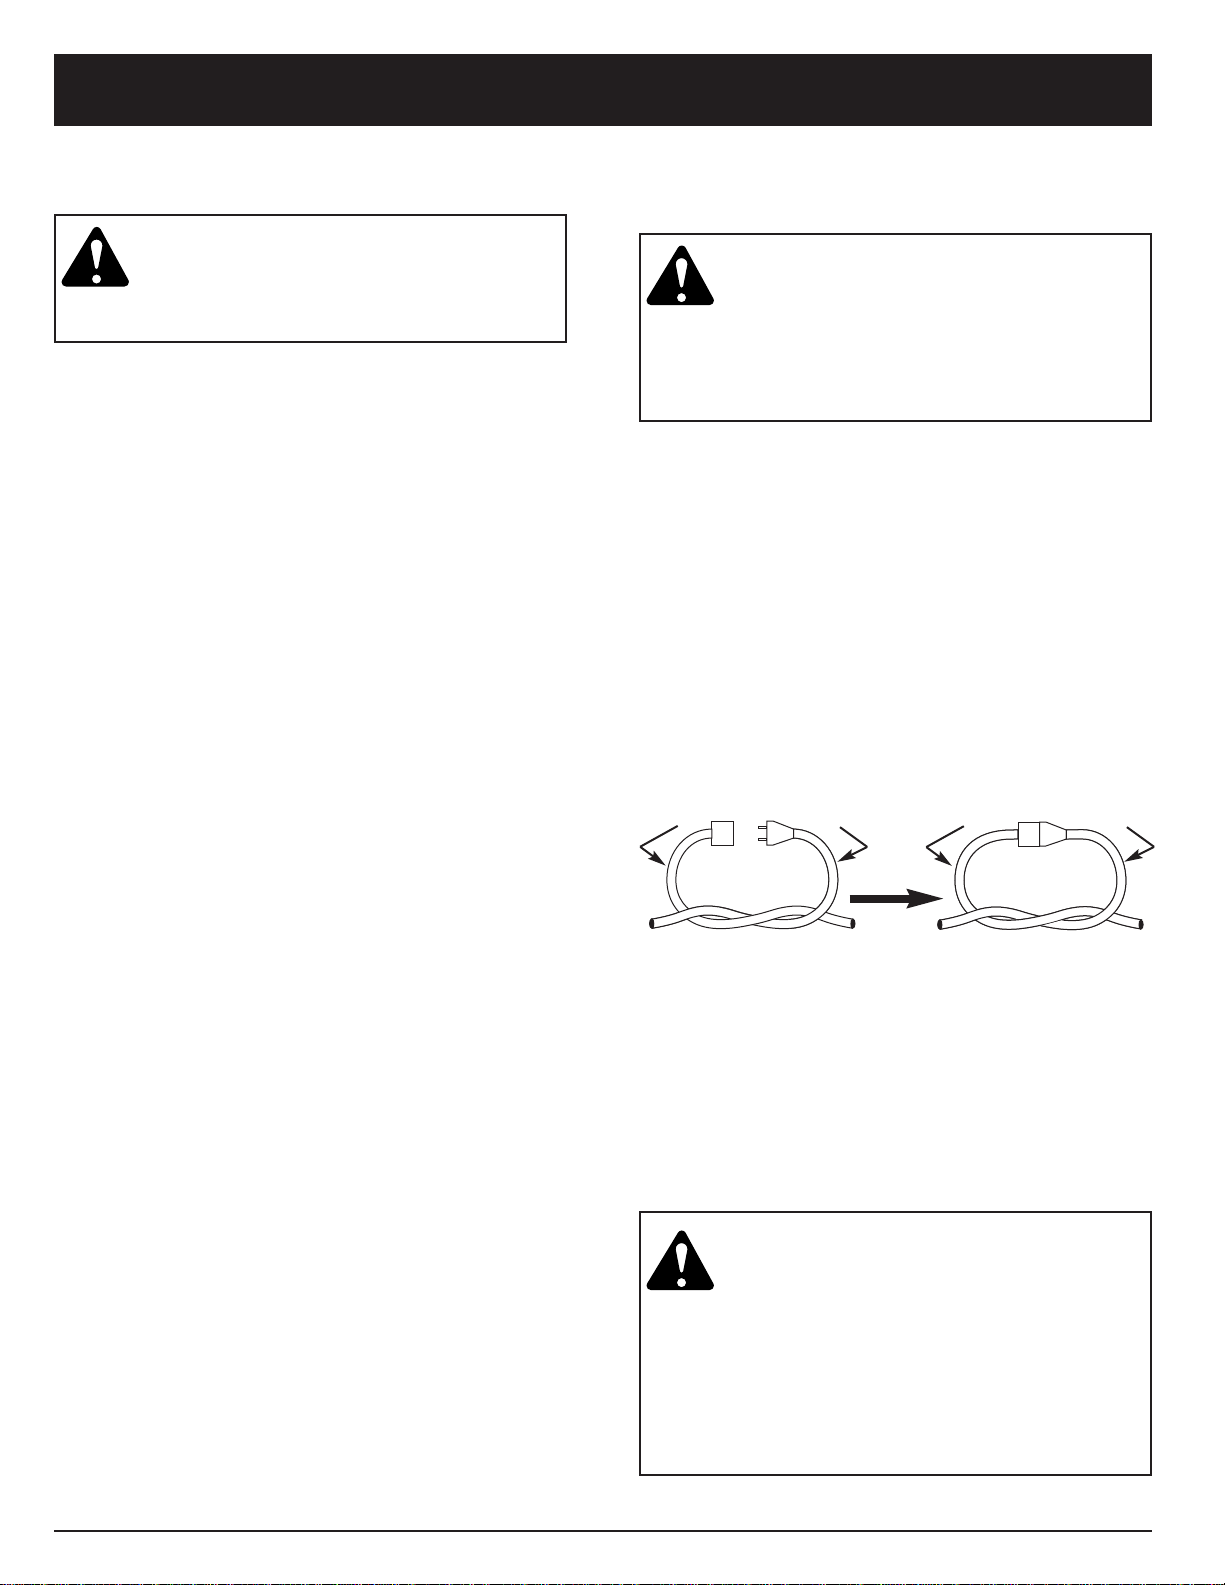
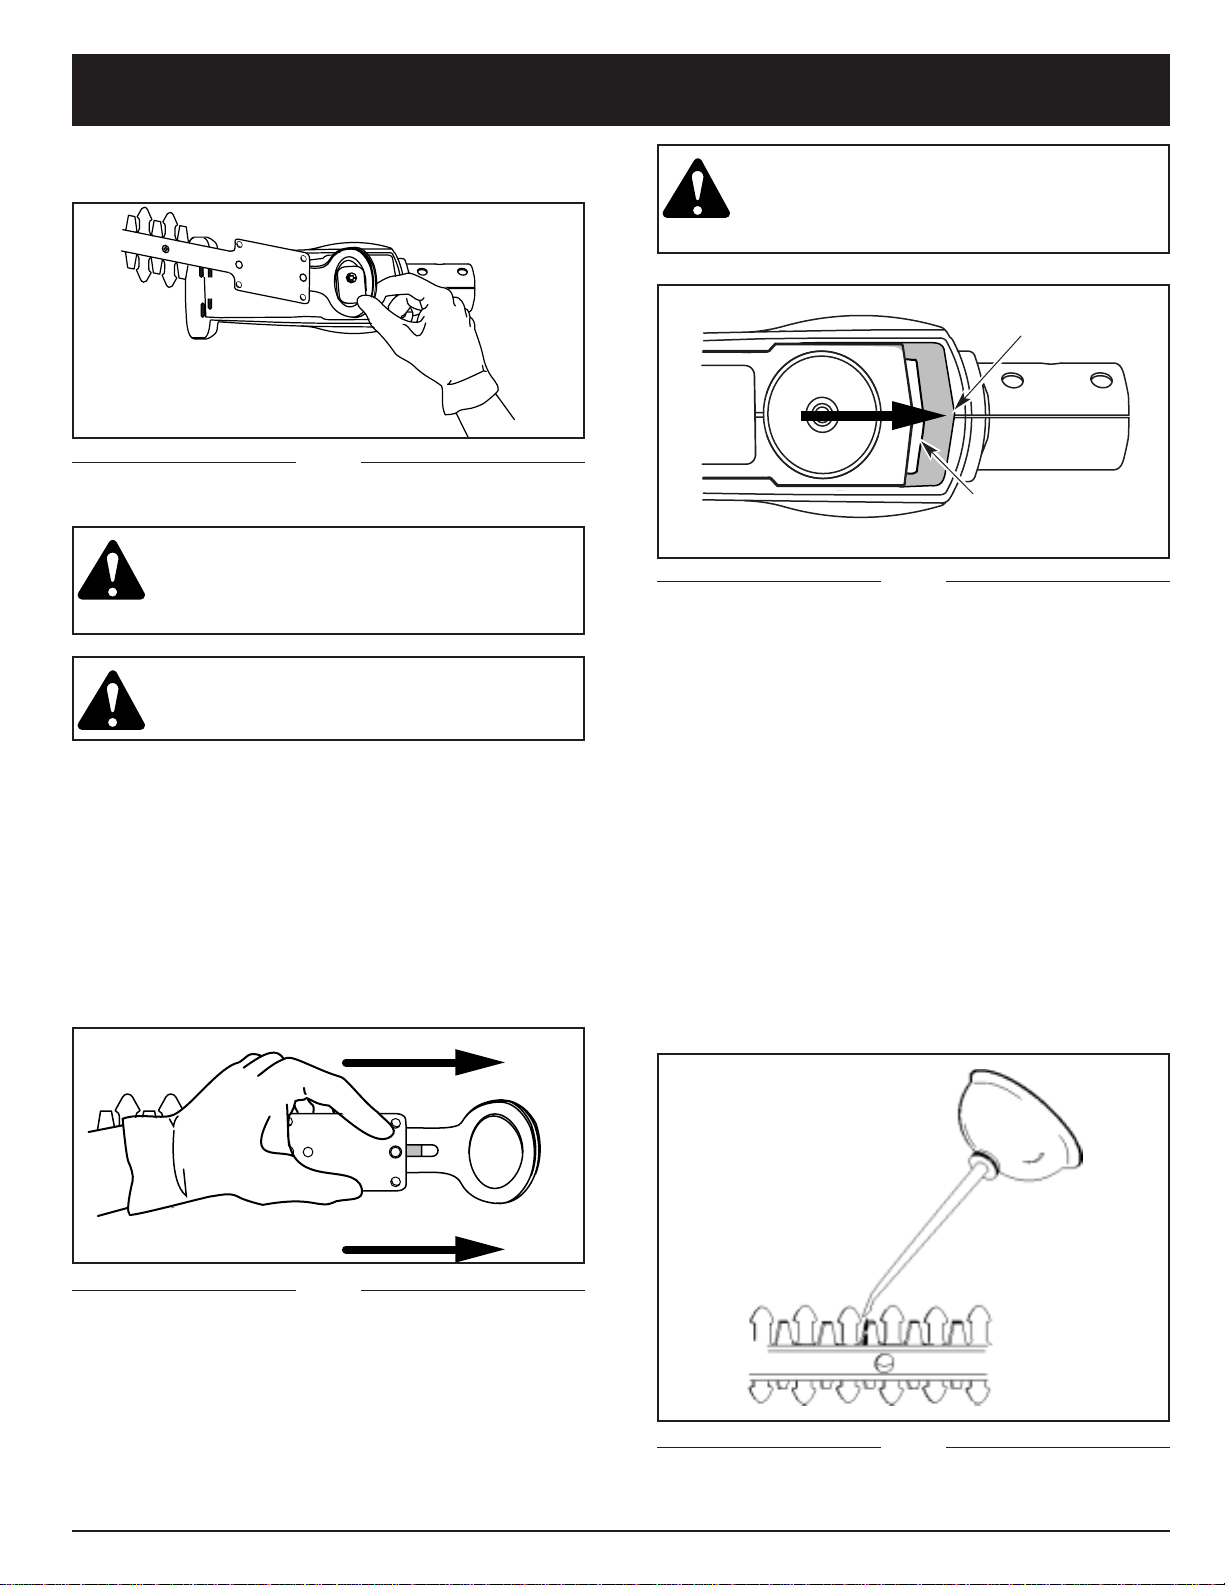
•Prevent disconnection of the hedge trimmer
powerhead from extension cord during operation by
using a plug-receptacle retaining strap, connector, or
by making a knot as shown below:
•Avoid dangerous environments. Never operate your
unit in damp or wet conditions. Moisture is a shock
hazard.
•Do not use the unit in the rain. Do not use in or around
water. Do not use on wet hedges or shrubbery.
•Do not handle the plug or unit with wet hands or
standing on any wet surfaces.
•Do not leave the unit plugged in when not in use,
changing attachments or add-ons, or while being
serviced.
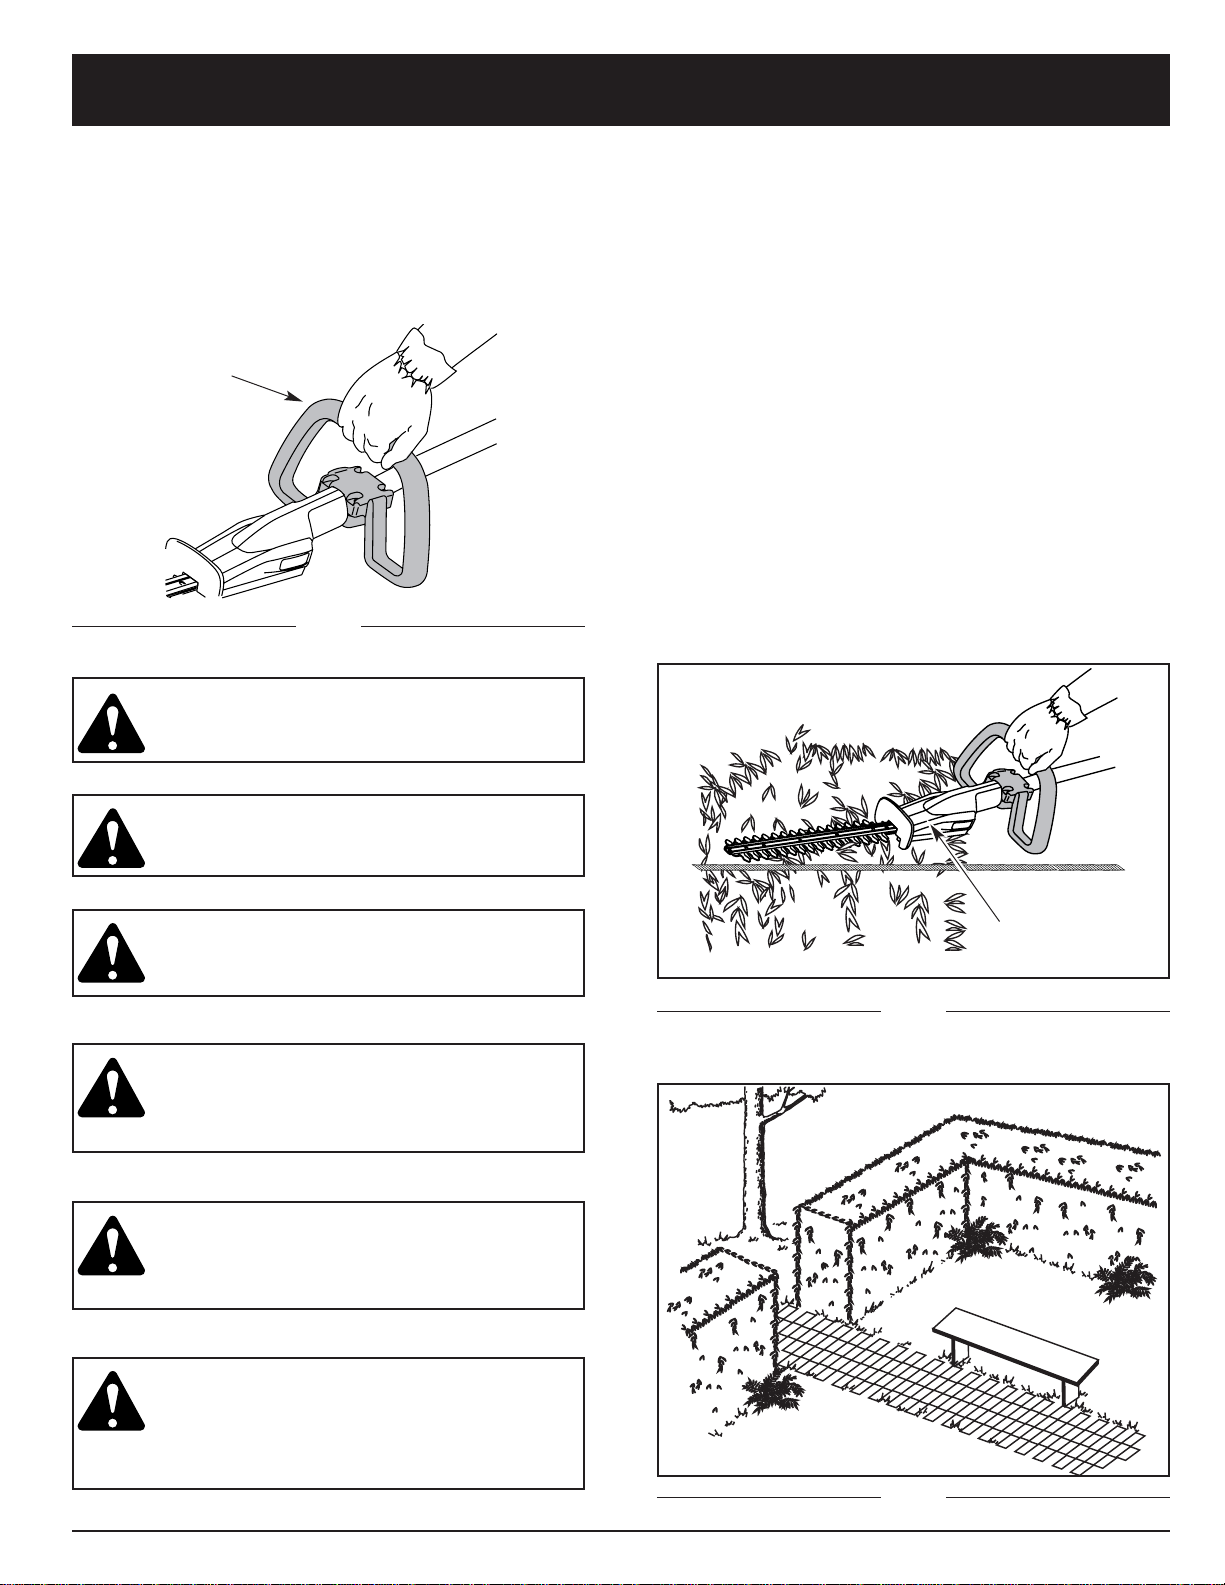
DANGER: RISK OF CUT OR SHOCK — Keep
hands away from blades. Keep one hand on
assist handle on the powerhead or on the loop
handle of attachment when power is on. Do
not attempt to remove cut material or hold
material to be cut when blades are moving.
Make sure the switch on the power unit is off
when clearing jammed material from blades.
Do not grasp the exposed cutting blades or
cutting edges of the hedge trimmer. Wear
gloves when handling the blade.
Extension
Cord Hedge
Trimmer Cord Hedge
Trimmer Cord
Extension
Cord
RULES FOR SAFE OPERATION

RULES FOR SAFE OPERATION
4
WHILE OPERATING
•Keep bystanders, especially children and pets, at least
50 ft (15 m) away.
•Wear safety glasses or goggles that are marked as
meeting ANSI Z87.1 standards, and ear/hearing
protection when operating this unit. Wear a face or
dust mask if the operation is dusty.
•Wear heavy, long pants, boots, gloves and a long
sleeve shirt. Do not wear loose clothing, jewelry, short
pants, sandals or go barefoot. Secure hair above
shoulder level.
•Use the unit only in daylight or good artificial light.
•Use hedge trimmer properly. Only use this tool for the
purpose intended. Use only for trimming the type of
shrub, growth, etc., described in the operating
instructions.
•Do not force unit. It will do the job better and with less
likelihood of injury at a rate for which it was designed.
•Use extreme caution when reversing or pulling the unit
towards you.
•Do not overreach, take extra care when working on
steep slopes or inclines. Always keep proper footing
and balance.
•DO NOT stand on an unstable support. Do not use on
a ladder.
•Always hold the unit with both hands when operating.
Keep a firm grip on both the front and rear handle or
grips.
•Keep hands, face, and feet at a distance from all
moving parts. Do not touch or try to stop the blades
when they are moving.
CAUTION: Blades will coast after powerhead
is in the "off" position.
•Do not operate the engine faster than the speed
needed to do the job. Do not run the engine at high
speed when not in use.
•Always stop the engine/motor when operation is
delayed or when walking from one location to another.
•Stop the engine/motor for maintenance, repair, to
install or remove the blades. The unit must be stopped
and the blades no longer moving to avoid injury.
•Always wear heavy gloves when handling, removing,
installing or cleaning the blades.
•If you strike or become entangled with a foreign object,
stop the engine/motor immediately and check for
damage. Have any damage repaired before attempting
further operations.
•Stop the unit IMMEDIATELY if you feel excessive
vibration. Vibration is a sign of trouble. Inspect
thoroughly for loose nuts, bolts or damage before
continuing. Repair or replace affected parts as
necessary.
•Stop and switch the unit to off for maintenance, repair,
or for changing add-ons or other attachments.
•Maintain hedge trimmer with care. Keep blades sharp
at all times, and clean for best and safest performance.
Follow maintenance instructions. Always use a clean
cloth when cleaning. Never use brake fluid, gasoline,
petroleum-based products, or any strong solvents to
clean your unit.
•Use only genuine MTD replacement parts and
accessories for this unit. These are available from
your authorized service dealer. Use of any non-MTD
parts or accessories could lead to serious injury to the
user or damage to the unit, and void your warranty.
OTHER SAFETY WARNINGS
•Allow the unit to cool before storing or transporting. Be
sure to secure the unit while transporting.
•Store the unit in a locked up and dry or high and dry
place to prevent unauthorized use or damage, out of
the reach of children.
•Never douse or squirt the unit with water or any other
liquid. Keep handles dry, clean and free from debris.
Clean after each use.
•Keep these instructions. Refer to them often and use
them to instruct other users. If you loan someone this
unit, also loan them these instructions.
•Only qualified personnel should perform any repairs
or maintenance procedures that are not described
in this manual.
•Check engine mounting bolts and other bolts at
frequent intervals for proper tightness to be sure the
equipment is in safe working condition.
•Inside a building store the machine away from ignition
sources. Allow the engine to cool before storing in any
enclosure.
•Always refer to the Operator’s Manual instructions for
important details if the unit is to be stored for an
extended period.
•Do not attempt to repair the machine unless you have
the proper tools, and instructions for disassembly and
repair of the machine.
SAVE THESE INSTRUCTIONS

SAFETY AND INTERNATIONAL SYMBOLS
This operator's manual describes safety and international symbols and pictographs that may appear on this product.
Read the operator's manual for complete safety, assembly, operating and maintenance and repair information.
SYMBOL MEANING
•SAFETY ALERT SYMBOL
Indicates danger, warning, or caution. May be used in conjunction with other symbols or
pictographs.
•WARNING - READ OPERATOR'S MANUAL
Read the Operator’s Manual(s) and follow all warnings and safety instructions. Failure to do so
can result in serious injury to the operator and/or bystanders.
•WEAR EYE AND HEARING PROTECTION
WARNING: The operation of any power tool can be the source of thrown objects and loud
noise which can cause severe eye injury and hearing loss. Always wear safety glasses or
goggles eye protection meeting ANSI Z87.1 standards and ear protection when operating this
unit. Use a full face shield when needed.
•KEEP BYSTANDERS AWAY
WARNING: Keep all bystanders, especially children and pets, at least 50 feet (15 m) from the
operating area.
•THROWN OBJECTS CAN CAUSE SEVERE INJURY
WARNING: Do not operate unit without proper attachments and guards in place.
•KEEP HANDS AWAY FROM BLADES
MOVING BLADES CAN CAUSE SEVERE INJURY. Do not put hands on blades when
starting the engine or while operating hedge trimmer attachment.
•ATTACHMENT IS HOT!
Surface of attachment is hot. To avoid serious injury, do not hold attachment while operating.
Use designated handles only.
5
RULES FOR SAFE OPERATION

6
RULES FOR SAFE OPERATION
KNOW YOUR UNIT
APPLICATIONS
With Hedge Trimmer Add-On:
•Trimming hedges and shrubs.
Housing
Blades
Loop Handle
Shaft Housing
Hanger

7
OPERATING INSTRUCTIONS
CAUTION: The add-ons with the coupler
system are to be used in the primary hole only.
Using the wrong hole could lead to personal
injury or damage to the unit.
The hedger trimmer add-on should be installed with the
release button in the primary hole.
Check Flex Shaft Engagement Prior to Using
1. Start the unit.
2. Briefly engage and release the trigger.
3. Check that add-on is operating.
4. If the add-on is not operating, remove add-on and
repeat steps for installing the add-on.
5. Recheck operation of add-on attachment.
3. Turn the knob clockwise to tighten (Fig. 3).
CAUTION: Lock the release button in the
primary hole (Fig. 2) and securely tighten the
knob before operating this unit.
ASSEMBLING THE COUPLER
The TrimmerPlus® system enables the use of these
optional add-ons.
Blower/Vacuum . . . . . . . . . . . . . . . . . . . . . . . . . . BV720r
Cultivator . . . . . . . . . . . . . . . . . . . . . . . . . . . . . . . GC720r
Edger . . . . . . . . . . . . . . . . . . . . . . . . . . . . . . . . . . .LE720r
Sweeper/Blower . . . . . . . . . . . . . . . . . . . . . . . . . . SB720r
Straight Shaft Trimmer . . . . . . . . . . . . . . . . . . . . . SS725r
Snow Thrower . . . . . . . . . . . . . . . . . . . . . . . . . . . ST720r
Turbo Blower . . . . . . . . . . . . . . . . . . . . . . . . . . . . TB720r
Tree Pruner . . . . . . . . . . . . . . . . . . . . . . . . . . . . . .TP720r
WARNING: Read and understand operator’s
manual for unit to be used with this add-on
prior to operation.
Removing the add-on:
1. Turn the knob counterclockwise to loosen (Fig. 1).
2. Press and hold the release button (Fig. 1).
3. While firmly holding the upper shaft housing, pull the
snow thrower attachment out of the coupler (Fig. 2).
Installing the add-on:
WARNING: To avoid serious personal injury
and damage to the unit, shut unit off before
removing or installing add-ons.
NOTE: To make installing or removing the add-on
easier, place the unit on the ground or on a
work bench.
1. Remove the hanger from the top of the shaft housing.
2. Turn knob counterclockwise to loosen (Fig. 1).
3. While firmly holding the add-on, push it straight into
the coupler (Fig. 2).
Fig. 1
Coupler Release Button Guide Recess
Knob
Primary Hole
Upper Shaft
Housing
Coupler
NOTE: Aligning the release button with the guide recess
will help installation (Fig. 1).
Fig. 2
Fig. 3
Knob
Lower Shaft
Housing
Release Button
Knob
ClockwiseCounterclockwise

8
PREPARING FOR OPERATION
For ease of operation, your hedge trimmer has a loop
handle. For ease of operation and best balance of the
unit. we recommend that you use the loop handle on the
hedge trimmer attachment rather than the assist handle
on the powerhead (Fig. 4).
Loop
Handle
CAUTION: Do not use any part of the housing
as a gripping surface.
CAUTION: Do not operate if blade guard
breaks or gets damaged.
WARNING: Check loop handle before each
use. Make sure it is securely fastened to your
hedge trimmer attachment before using.
WARNING: If any parts are missing, damaged,
or broken, do not operate your hedge trimmer
until they have been replaced. Failure to do so
could result in possible serious personal injury.
WARNING: Keep hands and fingers away from
moving parts. Any part of body coming in
contact with moving parts could result in
serious injury.
DANGER: If blade jams on any electrical cord
or line, DO NOT TOUCH THE BLADE! IT CAN
BECOME ELECTRICALLY LIVE AND VERY
DANGEROUS. Release the unit in the safest
manner possible, and turn off power source.
OPERATING TIPS
NOTE: Do not operate unit with the hedge trimmer
attachment at full engine speed. Best
performance occurs at 1/2 to 3/4 speed.
1. Wear gloves when trimming thorny or prickly growth.
When trimming new growth, use a wide sweeping
action, so that the stems are fed directly into the
cutting blade. Older growth will have thicker stems
and will be trimmed easiest by using a sawing
movement. Do not try to cut stems that are larger
than 3/8 inch thick, or those obviously too large to
feed into the cutting blade. Use a non-powered hand
saw or pruning saw to trim large stems.
2. If desired, you can use a string to help cut your
hedge level. Decide how high you want the hedge.
Then, stretch a piece of string along the hedge at this
height. Trim the hedge just above this guide line of
string (Fig. 5). Trim the side of a hedge so that it will
be slightly narrower at the top (Fig. 6). More of the
hedge will be exposed when shaped this way, and be
more uniform.
Housing
Fig. 4
Fig. 5
Fig. 6
OPERATING INSTRUCTIONS

Fig. 8
MAINTENANCE AND REPAIR INSTRUCTIONS
9
IMPORTANT!
LUBRICATING CAMS
The cams are lubricated with a sufficient amount of high-
temperature grease. To keep the attachment operating
efficiently, apply a high-temperature grease to the cams,
and in between the yokes every 6 hours of use. (Fig. 7)
Cams
Yokes
6. Remove the blade by lifting and rotating it so that the
blade yokes clears the lower cam first (Fig. 11).
45°ROTATE
5. Push the red end of the blade bar towards the cams.
This will loosen the blade plate so that it can be
removed easily from the cams (Fig. 10).
3. Align the cams (Fig. 9).
4. Remove the four (4) blade screws (Fig. 9).
Blade Screws
Cams
Bottom Plate
Bottom Plate Screw
Fig. 7
WARNING: Failure to apply high-temperature
grease every 6 hours of operation can result in
failure of cams and blade, and will void your
warranty.
BLADE REPLACEMENT
NOTE: We recommend that you take the hedge trimmer
attachment to your nearest authorized service
dealer to replace the blade.
NOTE: Disconnect the hedge trimmer attachment from
the powerhead before replacing the blade.
REMOVING BLADE
WARNING: Blades are sharp. When handling
blade assembly, do not place your hand or
fingers between blades or in any position
where they could get pinched or cut.
1. Place hedge trimmer upside down on workbench and
remove two (2) bottom plate screws (Fig. 8).
2. Remove bottom plate.
Fig. 9
Fig. 10
Fig. 11

10
INSTALLING BLADE
WARNING: Blades are sharp. When handling
blade assembly, do not place your hand or
fingers between blades or in any position
where they could get pinched or cut.
WARNING: To prevent serious injury, wear
gloves when removing or installing the blade.
1. Slide the blade plate all the way forward towards the
yokes (Fig. 13). The red end of the bar should be
covered by the blade plate.
2. Align the cams (see Fig. 9).
3. Place new blade into the housing and squeeze the
yoke to drop it into place (see Fig. 12).
4. Rotate the blade so that it drops past the lower cam
(see Fig. 11).
5. Install the four (4) blade screws. Torque screws to
10-15 in•lbs.
7. Squeeze the yokes and remove the blade from the
housing (Fig. 12).
6. Install the bottom plate lip into the slot of the housing
(Fig. 14). Install the two (2) bottom plate screws.
Torque screws to 10-15 in•lbs.
NOTE: If binding occurs after replacing the blade
assembly, repeat the steps under Removing
Blade and Installing Blade.
LUBRICATING BLADE
1. For easier operation and longer blade life, lubricate
the hedge trimmer attachment blade before and after
each use. Before lubricating, be sure the switch is in
the OFF position on the powerhead. Apply light
machine oil along the edge of the top strap (Fig. 15).
2. Occasionally, you should oil your hedge trimmer
attachment during use. Before oiling, stop hedge
trimmer, then oil. You then can resume trimming. Do
not oil while hedge trimmer attachment is running.
NOTE: Avoid using solvents when cleaning plastic parts.
Most plastics are susceptible to damage from
various types of commercial solvents, and may
be damaged by their use. Use clean cloths to
remove dirt, carbon dust, etc.
NOTE: Only the parts shown on the parts list, page 9,
are intended to be repaired or replaced by the
customer.
Bottom Plate Lip
Housing Slot
MAINTENANCE AND REPAIR INSTRUCTIONS
Fig. 12
Fig. 13
WARNING: When servicing, use only identical
OEM replacement parts. Use of any other parts
may create a hazard or cause product damage.
Fig. 14
Fig. 15

11
CUTTING HEAD
Attachment Weight . . . . . . . . . . . . . . . . . . . . . . . . . . . . . . . . . . . . . . . . . . . . . . . . . . . . . . . . . . 4.625 lbs (2.10 kg)
Cutting Mechanism . . . . . . . . . . . . . . . . . . . . . . . . . . . . . . . . . . . . . . . . . . . . . . . . . . . . . . . . . . . . . . . .Dual Action
Blade Length . . . . . . . . . . . . . . . . . . . . . . . . . . . . . . . . . . . . . . . . . . . . . . . . . . . . . . . . . . . . 16 inches (40.64 cm)
Drive Shaft Housing . . . . . . . . . . . . . . . . . . . . . . . . . . . . . . . . . . . . . . . . . . . . . . . . . . . . . . . . . . . . . . . . .Steel Tube
SPECIFICATIONS
MAINTENANCE AND REPAIR INSTRUCTIONS
STORAGE
•Check unit before storage to be sure the equipment is
in safe working condition.
•Stop the engine or motor.
•Store the unit indoors, in a dry and locked place, out of
the reach of children.
•Maintain or replace safety and instruction labels, as
necessary.
For gas powerhead units:
•Allow the unit to cool before storing in any enclosure.
•Drain fuel from unit. Never store the unit with fuel in the
fuel tank inside a building where ignition sources are
present such as hot water and space heaters, clothes
dryers, etc.
TRANSPORTING
•Allow the unit to cool before transporting.
•Secure the unit while transporting.
For gas powerhead units:
•Drain fuel from unit.
•Tighten fuel cap before transporting.
ACCESSORIES/REPLACEMENT PARTS
Replacement Blade . . . . . . . . . . . . . . . . . . . .791-
181660
Blade Screws (4 required) . . . . . . . . . . . . . . .791-
181827
Loop Handle Assembly . . . . . . . . . . . . . . . . .791-
180869
Handle Mounting Hardware
(4 screws, 4 nuts) . . . . . . . . . . . . . . . . . . .791-
180870
Bottom Plate . . . . . . . . . . . . . . . . . . . . . . . . .791-
181849
Bottom Plate Screws (2 required) . . . . . . . . .791-
181827
Use only original MTD replacement parts.

SAVE THESE INSTRUCTIONS FOR FUTURE REFERENCE.
FOR QUESTIONS CALL 1-800-345-8746 IN U.S.
OR 1-800-668-1238 IN CANADA
OPERATOR’S MANUAL PART NO. 769-01463
9/04
MANUFACTURER’S LIMITED WARRANTY FOR:
No implied warranty, including any implied warranty of
merchantability or fitness for a particular purpose,
applies after the applicable period of express written
warranty above as to the parts as identified. No other
express warranty or guaranty, whether written or oral,
except as mentioned above, given by any person or
entity, including a dealer or retailer, with respect to any
product shall bind MTD. During the period of the
Warranty, the exclusive remedy is repair or replacement
of the product as set forth above. (Some states do not
allow limitations on how long an implied warranty lasts, so
the above limitation may not apply to you.)
The provisions as set forth in this Warranty provide the
sole and exclusive remedy arising from the sales. MTD
shall not be liable for incidental or consequential loss or
damages including, without limitation, expenses
incurred for substitute or replacement lawn care
services, for transportation or for related expenses, or
for rental expenses to temporarily replace a warranted
product. (Some states do not allow limitations on how long
an implied warranty lasts, so the above limitation may not
apply to you.)
In no event shall recovery of any kind be greater than the
amount of the purchase price of the product sold. Alteration of
the safety features of the product shall void this Warranty. You
assume the risk and liability for loss, damage, or injury to you
and your property and/or to others and their property arising
out of the use or misuse or inability to use the product.
This limited warranty shall not extend to anyone other than
the original purchaser, original lessee or the person for
whom it was purchased as a gift.
How State Law Relates to this Warranty: This warranty
gives you specific legal rights, and you may also have other
rights which vary from state to state.
To locate your nearest service dealer dial
1-800-345-8746 in the United States or
1-800-668-1238 in Canada.
MTD SOUTHWEST INC
550 N. 54th Street
Chandler, AZ 85226 U.S.A.
The limited warranty set forth below is given by MTD
SOUTHWEST INC (“MTD”) with respect with new
merchandise purchased and used in the United States, its
possessions and territories.
MTD warrants this product against defects in material and
workmanship for a period of two (2) years commencing on the
date of original purchase and will, at its option, repair or
replace, free of charge, any part found to be defective in
material or workmanship. This limited warranty shall only apply
if this product has been operated and maintained in
accordance with the Operator’s Manual furnished with the
product, and has not been subject to misuse, abuse,
commercial use, neglect, accident, improper maintenance,
alteration, vandalism, theft, fire, water, or damage because of
other peril or natural disaster. Damage resulting from the
installation or use of any accessory or attachment not
approved by MTD for use with the product(s) covered by this
manual will void your warranty as to any resulting damage.
This warranty is limited to ninety (90) days from the date of
original retail purchase for any MTD product that is used for
rental or commercial purposes, or any other income-
producing purpose.
HOW TO OBTAIN SERVICE: Warranty service is available,
WITH PROOF OF PURCHASE THROUGH YOUR LOCAL
AUTHORIZED SERVICE DEALER. To locate the dealer in your
area, please check for a listing in the Yellow Pages or contact
the Customer Service Department of MTD SOUTHWEST INC
by calling 1-800-345-8746 or writing to 550 N. 54th Street,
Chandler, Arizona 85226 or if in Canada call 1-800-668-1238.
No product returned directly to the factory will be accepted
unless prior written permission has been extended by the
Customer Service Department of MTD SOUTHWEST INC.
This limited warranty does not provide coverage in the
following cases:
A. Wear items - Bump Knobs, Outer Spools, Cutting Line,
Inner Reels, Starter Pulley, Starter Ropes, Drive Belts
B. MTD does not extend any warranty for products sold or
exported outside of the United States of America, its
possessions and territories, except those sold through
MTD’s authorized channels of export distribution
MTD reserves the right to change or improve the design of
any TrimmerPlus® Product without assuming any obligation
to modify any product previously manufactured.

SI VOUS AVEZ DES QUESTIONS, APPELEZ LE 1-800-345-8746 aux ÉTATS-UNIS,
ou le 1-800-668-1238 au CANADA
site web : www.TrimmerPlus.com
MANUEL IMPORTANT À NE PAS JETER
MANUEL DE L'UTILISATEUR
HS720r
Taille-haies

2
TOUS NOS REMERCIEMENTS
Nous vous remercions d'avoir acheté ce produit de
qualité. Cet outil moderne de plein air est conçu pour
vous rendre service pendant longtemps. Il vous sauvera
beaucoup de temps comme vous pourrez vous en rendre
compte. Ce manuel de l'utilisateur comporte un mode
d'emploi facile à comprendre. Prenez soin de le lire au
complet et de respecter toutes les instructions pour
conserver votre outil en excellant état de
fonctionnement.
RÉFÉRENCES, ILLUSTRATIONS ET SPÉCIFICATIONS
RELATIVES AU PRODUIT
Toutes les informations, illustrations et spécifications
contenues dans ce manuel tiennent compte des
dernières informations techniques disponibles au
moment de mettre sous presse. Nous nous réservons le
droit de les modifier à tout moment, sans préavis.
Copyright ©2001 MTD SOUTHWEST INC
Tous droits réservés.
TrimmerPlusMD est une marque déposée de
MTD SOUTHWEST INC
INFORMATIONS RELATIVES À L'ENTRETIEN
Tout entretien effectué sur cet appareil pendant et après la
période de garantie doit être entrepris uniquement par un
distributeur agréé et approuvé.
Composez :
•le 1-800-345-8746 aux États-Unis
ou
• le 1-800-668-1238 au Canada pour obtenir la liste des
distributeurs agréés les plus proches de vous.
NE RETOURNEZ PAS L'APPAREIL AU DÉTAILLANT.
REMARQUE : TOUT SERVICE SOUS GARANTIE
NÉCESSITE UNE PREUVE D'ACHAT.
Prenez soin de lire et de bien comprendre ce manuel
avant de démarrer ou de faire fonctionner cet équipement.
CE PRODUIT EST COUVERT PAR UN OU PLUSIEURS
BREVETS AMÉRICAINS, ET D’AUTRES SONT EN INSTANCE.
DANGER : le non-respect d’un avertissement
entraînera des blessures graves pour tous.
Respectez toujours les consignes de sécurité
afin de réduire les risques d'incendie, de choc
électrique et de blessures.
AVERTISSEMENT : le non-respect d’un
avertissement peut entraîner des blessures
graves pour tous. Respectez toujours les
consignes de sécurité afin de réduire les risques
d'incendie, de choc électrique et de blessures.
MISE EN GARDE : le non-respect d’un
avertissement risque d’entraîner des
dommages matériels ou des blessures graves
pour tous. Respectez toujours les consignes de
sécurité afin de réduire les risques d'incendie,
de choc électrique et de blessures.
Les symboles de sécurité attirent votre attention sur des
dangers potentiels. Ces symboles et leurs détails
explicatifs méritent que vous les lisiez et compreniez bien.
Les avertissements de sécurité ne peuvent éviter les
dangers de par eux-mêmes. Les consignes ou mises en
garde qu'ils donnent ne remplacent pas des mesures
préventives appropriées contre les accidents.
SYMBOLE SIGNIFICATION
SYMBOLE D’ALERTE DE SÉCURITÉ : indique
un danger, un avertissement ou une mise en
garde. Soyez vigilant afin d'éviter toute blessure
grave. Ce symbole peut être combiné à d'autres
symboles ou pictogrammes.
REMARQUE : donne des informations ou des instructions
vitales pour le fonctionnement ou l'entretien de
l'équipement.
I. Consignes de sécurité . . . . . . . . . . . . . . . . . . . 3-6
A. Importantes consignes de sécurité . . . . . . . 3-4
B. Symboles de sécurité et internationaux . . . 5
C.Familiarisez-vous avec votre appareil . . . . . 6
II. Mode d'emploi . . . . . . . . . . . . . . . . . . . . . . . . . 7-8
A. Montage du coupleur . . . . . . . . . . . . . . . . . . 7
B. Préparation avant l'utilisation . . . . . . . . . . . 8
C.Conseils pour bien élaguer . . . . . . . . . . . . . 8
III. Entretien et réparations . . . . . . . . . . . . . . . . . . 9-11
A. Lubrification des cames . . . . . . . . . . . . . . . . 9
B. Remplacement de la lame . . . . . . . . . . . . . . 9
C.Lubrification de la lame . . . . . . . . . . . . . . . . 10
D.Nettoyage . . . . . . . . . . . . . . . . . . . . . . . . . . 11
E. Entreposage . . . . . . . . . . . . . . . . . . . . . . . . . 11
F. Accessoires/Pièces de rechange . . . . . . . . 11
V. Caractéristiques . . . . . . . . . . . . . . . . . . . . . . . . 11
VI. Garantie . . . . . . . . . . . . . . . . . . . . . . . . . . . . . . 12
CONTENU DE L'EMBALLAGE
Cet appareil comporte les éléments suivants :
•Accessoire de taille-haies HS720r
•Crochet
•Manuel de l'utilisateur
•Carte d'enregistrement du produit
•Protège-lame en option
AVERTISSEMENT !
Lisez le(s) manuel(s) de l'utilisateur et suivez tous les
avertissements et consignes de sécurité. Vous pourriez
à défaut entraîner des blessures graves pour vous ou
d'autres personnes.
INTRODUCTION TABLE DES MATIÈRES
CONSIGNES DE SÉCURITÉ

LISEZ TOUTES LES INSTRUCTIONS
AVERTISSEMENT : suivez soigneusement les
consignes de sécurité lorsque vous utilisez cet
appareil. Dans l'intérêt de votre sécurité et de
celle des personnes à proximité, prenez soin de
lire ces instructions avant de faire fonctionner
l’appareil. Veuillez les conserver en lieu sûr pour
usage ultérieur.
AVANT L'UTILISATION
•Prenez soin de bien lire et comprendre le manuel de
l'appareil qui alimente cet accessoire.
•Veuillez lire le manuel de l'utilisateur attentivement.
Familiarisez-vous avec les commandes et l'utilisation
correcte de l’appareil. Sachez comment arrêter l’appareil
et désactiver les commandes rapidement.
•N'utilisez pas l'appareil si vous êtes fatigué, malade ou
sous l'effet de l'alcool, de drogues ou de médicaments.
•Ne laissez pas les enfants faire fonctionner l’appareil. Ne
laissez jamais des adultes qui ne se sont pas familiarisés
avec les instructions utiliser l’appareil. Ne laissez jamais
des adultes n'ayant jamais reçu les instructions
nécessaires faire fonctionner l’appareil.
•Tous les accessoires de sécurité et protections doivent
être correctement installés avant d'utiliser cet appareil.
•Inspectez l'appareil avant utilisation. Assurez-vous que la
lame est bien mise.
•Dégagez la zone à tailler avant chaque usage. Enlevez
tous les objets pouvant être projetés ou happés par le
taille-haies : cailloux, verre brisé, clous, fil ou ficelle.
AVERTISSEMENTS DE SÉCURITÉ SPÉCIAUX
POUR LES TÊTES D’ENTRAÎNEMENT À ESSENCE
ET LES TAILLE-HAIES
AVERTISSEMENT: l'essence est extrêmement inflammable
et ses vapeurs peuvent exploser si on y met le feu. Veuillez
prendre les précautions suivantes :
•Ne stockez le carburant que dans des contenants
spécialement conçus et homologués pour le stockage
de ce type de matières.
•Arrêtez toujours le moteur et laissez-le refroidir avant de
remplir le réservoir de carburant. N'enlevez jamais le
bouchon du réservoir et n'ajoutez jamais de carburant
pendant que le moteur est chaud. Ne faites jamais
fonctionner l'appareil sans que le bouchon de carburant
soit bien mis. Desserrez lentement le bouchon afin de
réduire la pression du réservoir.
•Mélangez et ajoutez le carburant dans un endroit bien aéré et
propre en plein air à l'abri des étincelles ou des flammes.
N'enlevez lentement le bouchon du réservoir d'essence
qu'après avoir arrêté le moteur. Ne fumez pas pendant le
remplissage ou le mélange de carburant. Essuyez
immédiatement tout déversement de carburant de l'appareil.
•Évitez de créer une source d'allumage pour le carburant
déversé. Ne démarrez pas le moteur avant que les
vapeurs de carburant ne se soient dissipées.
•Éloignez l'appareil d'au moins 9,1 m (30 pi) de la source
de ravitaillement en carburant avant de démarrer le
moteur. Ne fumez pas et éloignez toute source
d'étincelles ou de flammes vives du lieu de ravitaillement
ou de fonctionnement de l'appareil.
3
• IMPORTANTES CONSIGNES DE SÉCURITÉ •
•Évitez de démarrer ou de faire marcher l'appareil à l'intérieur
d'une pièce ou d'un bâtiment fermé. La respiration de
fumées d'échappement peut tuer. Ne faites fonctionner cet
appareil qu'à l'extérieur, dans un endroit bien aéré.
AVERTISSEMENTS DE SÉCURITÉ SPÉCIAUX
POUR LES TÊTES D’ENTRAÎNEMENT
ÉLECTRIQUES ET LES TAILLE-HAIES
AVERTISSEMENT : afin de diminuer les risques
d'électrocution, utilisez uniquement des rallonges
homologuées pour l’usage à l’extérieur : type SW-
A, SOW-A, STW-A, STOW-A, SJW-A, SJOW-A,
SJTW-W ou SJTOW-A. Vous pourrez vous en
procurer chez votre détaillant. Utilisez uniquement
des rallonges à prise ronde, homologuées pour
l'usage à l'extérieur.
•CORDONS : assurez-vous que votre cordon est en bon
état et assez solide pour transporter le courant nécessaire
à l'appareil. Il peut sinon provoquer une chute de tension
entraînant une panne de courant et une surchauffe.
Reportez-vous au calibre de cordon recommandé dans le
manuel de l’utilisateur de l’appareil motorisé.
•Inspectez régulièrement toutes les rallonges ainsi que la
connexion d’alimentation de l’appareil. Soyez à
l’affût de signes de détérioration, de coupures ou de
fissures dans l’isolation. Vérifiez aussi que les
connexions ne sont pas endommagées. Remplacez les
cordons défectueux ou endommagés.
•Évitez que la tête d'entraînement du taille-haies ne se
déconnecte de la rallonge en utilisant une sangle de
fixation ou un connecteur de retenue de la fiche et de la
prise, ou en faisant un nœud comme indiqué ci-dessous :
•Évitez les lieux dangereux. N’utilisez jamais l’appareil
dans des conditions humides ou mouillées. L’humidité
peut provoquer l’électrocution.
•N’utilisez pas l'appareil sous la pluie. Ne l’utilisez pas à
proximité de l’eau.
•Ne manipulez pas la prise ou l'appareil les mains
mouillées ou debout sur une surface mouillée.
•Ne laissez pas l'appareil branché quand il ne sert pas, lors
d’un entretien ou d’un changement d’accessoires.
DANGER : RISQUE DE COUPURE OU DE CHOC -
Éloignez les mains des lames. Gardez une main sur
la poignée de maintien de la tête d'entraînement ou
sur la poignée en boucle de l'accessoire lorsque
l'appareil est allumé. N'essayez pas de retirer les
matériaux coupés ou de tenir les matériaux à
couper lorsque les lames tournent. Assurez-vous
que l'interrupteur de l'appareil est éteint avant de
dégager des matériaux coincés dans les lames. Ne
saisissez pas les lames de coupe ou les bords
tranchants du taille-haies. Portez des gants lorsque
vous manipulez la lame.
Rallonge Cordon du
taille-haies Cordon du
taille-haies
Rallonge
CONSIGNES DE SÉCURITÉ

4
PENDANT L'UTILISATION
•Tenez les visiteurs, surtout les enfants et les animaux
familiers à une distance d'au moins 15 m (50 pi).
•Portez des lunettes de sécurité conformes aux normes
ANSI Z87.1 ainsi que des protège-oreilles durant
l'utilisation de l'appareil. Portez un masque facial ou
antipoussières si vous travaillez dans un lieu
poussiéreux.
•Portez des pantalons épais et longs, des bottes et des
gants. Ne marchez pas pieds nus et ne portez pas les
articles suivants : vêtements lâches, bijoux, pantalons
courts, sandales. Relevez les cheveux au-dessus du
niveau des épaules.
•N'utilisez l'appareil qu'en plein jour ou avec un bon
éclairage artificiel.
•Utilisez le taille-haies correctement. N'employez cet
outil que pour son usage prévu. Utilisez-le uniquement
pour tailler le type d'arbuste, de végétation, etc. décrit
dans le mode d'emploi.
•Ne forcez pas ni ne surchargez l’appareil. Il accomplira
un travail de meilleure qualité, en présentant moins de
dangers, si vous respectez la cadence nominale pour
laquelle il a été conçu.
•Soyez très prudent lorsque vous faites marche arrière
ou que vous tirez l'appareil vers vous.
•Ne vous étirez pas et faites très attention lorsque vous
travaillez sur des pentes ou inclinaisons abruptes.
Tenez-vous toujours bien campé, en position
d'équilibre.
•NE vous tenez PAS debout sur un support instable.
N'utilisez pas d'échelle.
•Tenez toujours l'appareil des deux mains lorsque vous
le faites marcher. Agrippez fermement les poignées
avant et arrière.
•Gardez les mains, le visage et les pieds éloignés des
pièces mobiles. Ne touchez pas les lames et n'essayez
pas de les arrêter lorsqu'elles tournent.
MISE EN GARDE : les lames continuent de
tourner à vide une fois la tête d'entraînement
éteinte.
•Ne faites pas tourner le moteur à un régime excessif
pour l’élagage. Ne faites pas tourner l'appareil à haut
régime si vous ne faites pas d’élagage.
•Arrêtez toujours l’appareil si vous suspendez la coupe
ou si vous vous déplacez d'un lieu de travail vers un
autre.
•Arrêtez le moteur en cas d'entretien, de réparation,
d'installation ou de retrait des lames. L'appareil et les
lames doivent être arrêtés pour éviter toute blessure.
•Portez toujours des gants lorsque vous manipulez,
retirez, installez ou nettoyez les lames.
•Si vous heurtez ou happez un corps étranger, arrêtez le
moteur immédiatement et vérifiez que rien n'a été
endommagé. Réparez tout dommage éventuel avant
de poursuivre le travail.
•Arrêtez le moteur IMMÉDIATEMENT si vous ressentez
une vibration excessive car cela indique un problème.
Vérifiez soigneusement qu'il n'y a ni écrous ni boulons
desserrés, ni aucun dommage avant de continuer.
Réparez ou remplacez au besoin les pièces affectées.
•Arrêtez et éteignez l’appareil dans ces cas-ci :
entretien, réparation, changement d'accessoires ou
autres.
•Entretenez le taille-haies avec soin. Gardez les lames
affûtées et propres en tout temps pour assurer un
rendement excellent, en toute sécurité. Respectez les
consignes d'entretien. Utilisez toujours un tissu propre
pour le nettoyage en évitant les liquides pour freins,
l'essence, les produits à base de pétrole et les solvants
concentrés.
•Utilisez uniquement des pièces de rechange et
accessoires MTD d’origine pour cet appareil. Vous les
trouverez auprès de votre distributeur agréé.
L’utilisation de pièces ou d’accessoires autres que
ceux de MTD peut causer des blessures graves ou
endommager l’appareil et annuler sa garantie.
AUTRES AVERTISSEMENTS DE SÉCURITÉ
•Laissez l’appareil refroidir avant de l'entreposer ou de
le transporter. Attachez bien l'appareil pendant le
transport.
•Rangez l'appareil dans un lieu sec, verrouillé ou élevé
pour éviter les accidents ou une utilisation non
autorisée. Gardez hors de portée des enfants.
•Ne trempez et n'arrosez jamais l'appareil avec de l'eau
ou un liquide quelconque. Gardez les poignées sèches,
propres et exemptes de débris. Nettoyez après chaque
utilisation.
•Conservez ces instructions. Consultez-les souvent et
servez-vous en pour instruire d'autres usagers. Si vous
prêtez l'appareil à quelqu'un, prêtez-lui également ces
instructions.
•Les réparations ou les procédures d'entretien qui ne
sont pas décrites dans le manuel doivent être
strictement confiées à des techniciens qualifiés.
•Vérifiez à intervalles fréquents que les boulons des
forces à tondre et les boulons de montage du moteur
et autres sont bien serrés afin de vous assurer que
l'équipement fonctionne correctement.
•Àl'intérieur d'un bâtiment, rangez l'appareil à l'écart
des sources d'allumage. Laissez le moteur refroidir
avant de l'entreposer dans une enceinte.
•Reportez-vous toujours aux importantes instructions
du manuel de l'utilisateur si vous prévoyez
d'entreposer l'appareil pendant une durée prolongée.
•N'essayez pas de réparer l'appareil à moins de
disposer des outils appropriés et des instructions de
démontage et de réparation de la machine.
CONSERVEZ CES INSTRUCTIONS
CONSIGNES DE SÉCURITÉ

SYMBOLES DE SÉCURITÉ ET INTERNATIONAUX
Ce manuel de l'utilisateur décrit les symboles et pictogrammes de sécurité et internationaux pouvant apparaître sur ce
produit. Consultez le manuel de l'utilisateur pour les informations concernant la sécurité, le montage, le fonctionnement,
l'entretien et les réparations.
SYMBOLE SIGNIFICATION
•SYMBOLE D’ALERTE DE SÉCURITÉ
Indique un danger, un avertissement ou une mise en garde. Ce symbole peut être combiné
à d'autres symboles ou pictogrammes.
•AVERTISSEMENT - LISEZ LE MANUEL DE L'UTILISATEUR
Lisez le manuel de l'utilisateur et suivez tous les avertissements et consignes de sécurité.
Vous pourriez à défaut entraîner des blessures graves pour vous ou d'autres personnes.
•PORTEZ DES PROTECTIONS (YEUX ET OREILLES)
AVERTISSEMENT : les outils électriques peuvent projeter des objets et faire beaucoup de bruit,
ce qui peut gravement blesser les yeux et endommager l’ouïe. Portez toujours des lunettes de
sécurité conformes aux normes ANSI Z87.1 ainsi que des protège-oreilles durant l’utilisation de
l’appareil. Protégez-vous le visage avec un masque intégral au besoin.
•ÉLOIGNEZ LES SPECTATEURS
AVERTISSEMENT : éloignez les spectateurs, les enfants et les animaux domestiques
en particulier, d'au moins 15 m (50 pi) de la zone de coupe.
•LES OBJETS PROJETÉS PEUVENT PROVOQUER DES BLESSURES GRAVES
AVERTISSEMENT : ne faites pas fonctionner l'appareil sans les accessoires et protections
nécessaires.
•ÉLOIGNEZ LES MAINS DES LAMES
LES LAMES MOBILES PEUVENT PROVOQUER DES BLESSURES GRAVES. Ne posez pas
les mains sur les lames lorsque vous démarrez le moteur ou pendant l'utilisation du taille-
haies.
•ACCESSOIRE CHAUD!
La surface de l'accessoire est chaude. Pour éviter des blessures graves, ne tenez pas
l'accessoire pendant son utilisation. Tenez-le uniquement par les poignées prévues à cet effet.
5
CONSIGNES DE SÉCURITÉ

6
APPLICATIONS
Avec le taille-haies :
•taille des haies et des arbustes.
Boîtier
Lames
Poignée en boucle
Corps de l'arbre
Crochet
CONSIGNES DE SÉCURITÉ
FAMILIARISEZ-VOUS AVEC L’APPAREIL

7
MISE EN GARDE : les accessoires avec
coupleur doivent utiliser le trou principal
uniquement. L'utilisation du mauvais trou
pourrait causer des blessures ou
endommager l'appareil.
Le taille-haies doit être installé avec le bouton de
déclenchement dans le trou principal.
Vérifiez que le bras flexible est bien engagé
avant l’utilisation
1. Démarrez l’appareil.
2. Appuyez brièvement sur la détente, puis relâchez-la.
3. Vérifiez le fonctionnement de l’accessoire.
4. S’il ne fonctionne pas, retirez-le et répétez la
procédure d’installation.
5. Vérifiez de nouveau le fonctionnement de l’accessoire.
MODE D'EMPLOI
3. Serrez le bouton en le tournant à droite (fig. 3).
MISE EN GARDE : verrouillez le bouton de
déclenchement dans le trou principal (fig. 2)
et vissez bien le bouton avant de faire
marcher l'appareil.
Coupleur Bouton de
déclenchement Renfoncement-
guide
Bouton
À droiteÀ gauche
Trou principal
Corps de l'arbre
supérieur
Coupleur
Corps de l'arbre
inférieur
Bouton de déclenchement
Bouton
MONTAGE DU COUPLEUR
Le système TrimmerPlusMD permet d'utiliser ces
accessoires optionnels :
Souffleuse/aspirateur . . . . . . . . . . . . . . . . . . . . . . BV720r
Cultivateur . . . . . . . . . . . . . . . . . . . . . . . . . . . . . . GC720r
Coupe-bordure . . . . . . . . . . . . . . . . . . . . . . . . . . . LE720r
Balayeuse/souffleuse . . . . . . . . . . . . . . . . . . . . . . SB720r
Désherbeuse à arbre droit . . . . . . . . . . . . . . . . . . SS725r
Souffleuse à neige . . . . . . . . . . . . . . . . . . . . . . . . .ST720r
Élagueuse . . . . . . . . . . . . . . . . . . . . . . . . . . . . . . .TB720r
Turbosouffleuse . . . . . . . . . . . . . . . . . . . . . . . . . . TB720r
AVERTISSEMENT : veuillez bien assimiler le
manuel des accessoires avant utilisation.
Retrait de l'accessoire :
1. Dévissez le bouton vers la gauche (fig. 1).
2. Appuyez sur le bouton de déclenchement et
maintenez-le enfoncé (fig. 1).
3. Tenez fermement le corps de l'arbre supérieur et retirez
l'accessoire d’élagage du coupleur (fig. 2).
Installation de l'accessoire :
AVERTISSEMENT : pour éviter des blessures
graves, éteignez l'appareil avant d'enlever ou
d'installer des accessoires.
REMARQUE : pour faciliter l'installation ou le retrait
d'accessoires, placez l'appareil au sol ou sur un
établi.
1. Enlevez le crochet de la partie supérieure du corps
de l'arbre.
2. Dévissez le bouton vers la gauche (fig. 1).
2. Tenez fermement l'accessoire et enfoncez-le tout
droit dans le coupleur (fig. 2).
Fig. 1
Fig. 2
Fig. 3
REMARQUE : alignez le bouton de déclenchement avec
le renfoncement-guide pour faciliter l'installation
(fig. 1).
Bouton

8
PRÉPARATION AVANT L'UTILISATION
Pour faciliter le fonctionnement et assurer l'équilibre du
taille-haies, celui-ci est doté d'une poignée en boucle
que nous vous conseillons d'utiliser au lieu de la poignée
de maintien de la tête d'entraînement (Fig. 4).
Poignée
en boucle
MISE EN GARDE : n'utilisez aucune partie du
boîtier comme point de saisie.
MISE EN GARDE : n'utilisez pas l'appareil si le
protège lame se brise ou devient endommagé.
AVERTISSEMENT : vérifiez la poignée en
boucle avant chaque utilisation. Assurez-vous
qu'elle est bien fixée au taille-haies avant
d'utiliser l'appareil.
AVERTISSEMENT : si des pièces sont
manquantes, endommagées ou brisées,
n'utilisez pas le taille-haies jusqu'à ce qu'elles
aient été remplacées. Il pourrait en résulter des
blessures graves sinon.
AVERTISSEMENT : gardez les mains et les
doigts éloignés des pièces mobiles. Toute
partie du corps en contact avec des pièces
mobiles peut entraîner des blessures graves.
DANGER : NE TOUCHEZ PAS LA LAME si elle
coince sur un cordon électrique! ELLE
POURRAIT ÊTRE SOUS TENSION ET
DEVENIR TRÈS DANGEREUSE. Relâchez
l'appareil de la manière la plus sécuritaire
possible, puis éteignez-le.
CONSEILS D'UTILISATION
REMARQUE : ne faites pas fonctionner l'appareil avec
le taille-haies à plein régime moteur. Vous
obtiendrez de meilleures performances en
tournant à la 1/2 ou aux 3/4 du régime.
1. Portez des gants si la végétation à couper est
épineuse ou piquante. Coupez la jeune végétation
d'un large mouvement de balayage permettant à la
lame de couper les tiges directement. Il vaut mieux
utiliser un mouvement de sciage pour couper les
épaisses tiges caractérisant une végétation plus
vieille. N'essayez pas de couper les tiges de plus
d'un centimètre (3/8 po) de diamètre ou celles qui
sont de toute évidence trop grosses pour la lame de
coupe. Utilisez plutôt une scie manuelle ou une scie à
élaguer pour couper les grosses tiges.
2. Vous pouvez utiliser, si vous le désirez, une ficelle
pour déterminer le niveau de coupe de la haie.
Décidez de la hauteur de celle-ci, puis étendez une
ficelle indiquant la hauteur idéale. Taillez ensuite la
haie juste au-dessus de la ficelle (Fig. 5). Taillez la
bordure de la haie de manière à ce que celle-ci soit
légèrement plus étroite au sommet (Fig. 6), ce qui
permet d'exposer une plus grande partie de la haie et
de lui donner une apparence plus uniforme.
Boîtier
Fig. 4
Fig. 5
Fig. 6
MODE D'EMPLOI
This manual suits for next models
1
Table of contents
Languages:
Other TrimmerPlus Trimmer manuals