Trinity Trailer Eagle Bridge 2014 User manual
Jun 2014 Rev
Thank You for Purchasing an Eagle Bridge™ Trailer
The purpose of this manual is to address:
•Safety
•Warranty Information
•Service and Maintenance
•General Care and Use
•Conveyor Operating Instructions
•Rear Door Operating Instructions
•General Support Information
Please refer to the Table of Contents to locate the needed information. If you have questions about
the trailer which are not covered in this manual, please call us at (208) 336-3666 or toll free at
(800) 235-6577. Our hours of operation are Monday through Friday, 8:00 a.m. to 5:00 p.m., MST.
This manual is written to cover many versions of Eagle Bridge™ trailers. Because of this, some
sections are not applicable to your trailer. Thoroughly review the manual and any attached
supplements to determine what is applicable to your trailer.
Two print copies along with two CD’s are supplied with each trailer upon delivery; one copy with
the paperwork and the second in the registration box located on the front fender of the trailer,
shown in the figure below. This manual is considered a permanent part of the trailer and should
remain with the trailer if ownership is transferred in any way. To replace a missing or destroyed
manual, call 800-235-6577 or download at www.trinitytrailer.com\downloads.
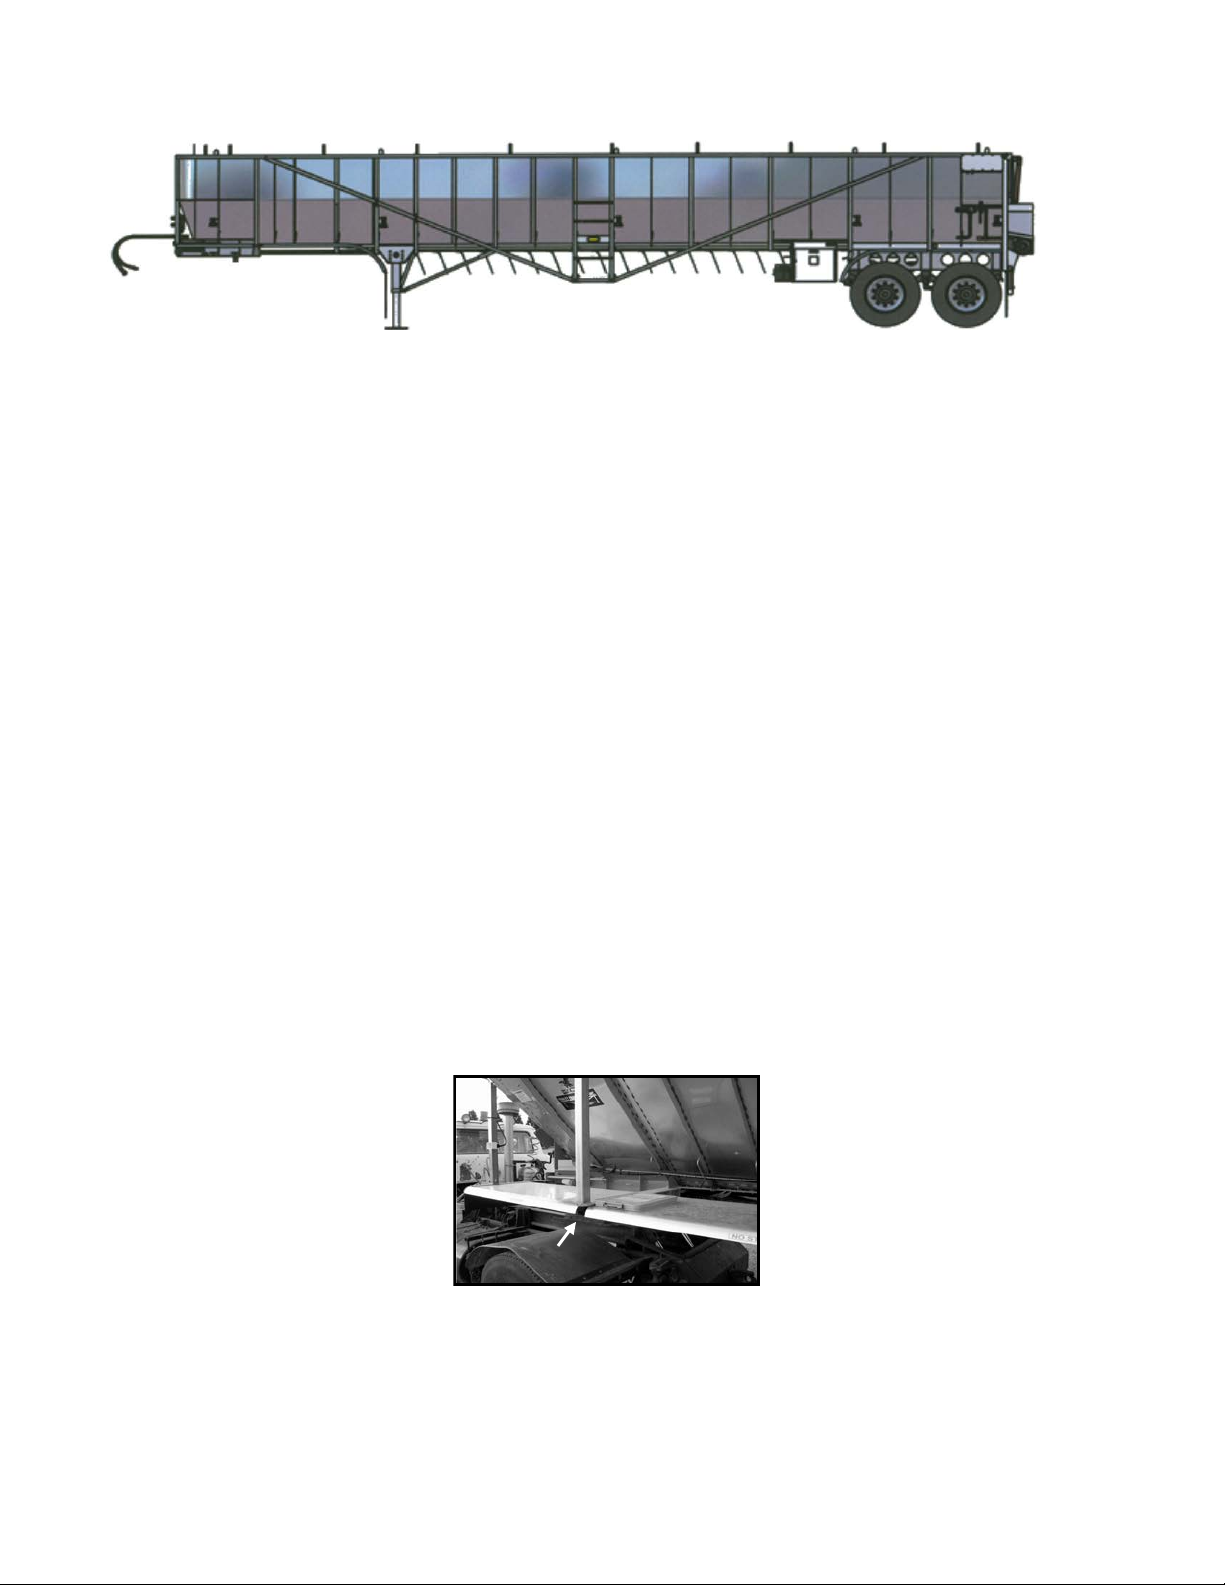
Registration Box Location
Notice: Contents of this manual are subject to change without notice!
Registration Box
I
©2014-2015 Trinity Trailer Mfg., Inc.

Jun 2014 Rev
TABLE OF CONTENTS
TABLE OF CONTENTS II, III, IV
LIMITATION OF WARRANTIES V
IMPORTANT SAFETY INFORMATION VI
WARNING SYMBOLS USED IN THIS MANUAL 1
SAFETY LABELS 1
INSPECTION, SERVICE AND MAINTENANCE 2
DAILY INSPECTION 2
PREVENTATIVE MAINTENANCE SCHEDULE 2
After the first 50 to 100 miles 2
After the first 1,000 miles 2
After the first 50 hours of operation 2
Every 100 hours of operation 3
Every 250 hours of operation 3
Every 5,000 miles or once a month (whichever comes first) 3
Every 15,000 miles or three months 3
Once a year 4
HONDA 20HP GASOLINE ENGINE MAINTENANCE SCHEDULE 4
FIFTH WHEEL AREA INSPECTION 5
ADJUSTING AND LUBRICATING THE CONVEYOR SYSTEM 6
Conveyor Chain Adjustment 6
Adjusting the Chain 7
Removing Chain Links 7
Welding Chain Pins 7
Conveyor Chain Lubrication 9
Bearings and Sprockets 10
Planetary Gearbox 10
Changing Planetary Oil 11
LUBRICATION OF THE DOOR(S) 12
CARE OF THE PLASTIC LINER 12
High Molecular Weight (HMW) and Ultra-High Molecular Weight (UHMW) Liner12
COATING CARE AND CORROSION PREVENTION 13
STAINLESS STEEL BODIES 13
CLEANING THE INTERIOR14
SPRING SUSPENSION INSPECTION AND MAINTENANCE 15
Spring Suspension Inspection 15
Axle Clamps and Springs 16
Radius Rods 17
Rocker Bushings 17
Hangers 18
Spring Suspension Alignment 18
AIR-RIDE SUSPENSION INSPECTION AND MAINTENANCE 20
Air-Ride Suspension Inspection (Hendrickson HT Series, INTRAAX®,
Composilite™ and Ingersoll ISS Series) 20
Hendrickson Suspension Torque Requirements 21
II
©2014-2015 Trinity Trailer Mfg., Inc.

Jun 2014 Rev
Composilite™ Torque Requirements 22
ISS Series Torque Requirements 23
Air-Ride Suspension Alignment 24
Quick-Align Connection 24
Composilite™ Alignment 27
ISS Series Alignment 27
ISS Series SSA Alignment 29
HUB AND WHEEL INSTALLATION AND MAINTENANCE 32
Pilot Mount Wheels 32
Recommended Procedure for Replacing Studs 34
HYDRAULIC SYSTEM SERVICING 34
Tractor Hydraulic System Requirements 34
Pressure Filters 34
Hydraulic Cylinder Maintenance 35
Hydraulic Lines and Fittings 36
Hydraulic Fluid Recommendations 36
Hydraulic Valve Maintenance 36
GASOLINE ENGINE SERVICING 37
ANTI-LOCK BRAKE SYSTEM (ABS) 38
Ignition Power Activation 40
REAR IMPACT GUARD 40
OPERATING INSTRUCTIONS 41
COUPLING THE TRAILER 41
A NOTE ON AIR PRESSURE 43
LOADING THE TRAILER 43
ELECTRONIC SCALES 45
LIFT AXLE CONTROLS 45
Equalizing Lift Controls 45
AKAD2010 Lift Control 46
LSAS (Load Sensing Axle System) Lift Control 46
RA016SRA-32L Suspension Control 47
Regulating Lift Controls 50
HAC-USO/LSO Lift Control 50
AKAD2011 Lift Control 51
TIRE INFLATION SYSTEMS 52
TIREMAAX® PRO 52
DRIVE AND HYDRAULIC SYSTEMS 53
Supplying Power to the Electric Motor 53
OPERATING THE REAR DOOR(S) AND UNLOADING SYSTEM 54
Door and Conveyor System Component Identification 55
Lower Door Identification 55
Lower Door Component Identification 56
Upper Door Identification 56
Upper Door Component Identification 58
Unload Drive System Identification 61
Door and Conveyor Control Identification 62
GENERAL DOOR SAFETY 64
III
©2014-2015 Trinity Trailer Mfg., Inc.

Jun 2014 Rev
GENERAL CONVEYOR SAFETY 65
UNLOAD OPERATING PROCEDURES 66
Electric Motor-Driven Hydraulic System Operation 66
Gas Engine-Driven Hydraulic System Operation 66
Tractor-Driven PTO Hydraulic System Operation 67
Tractor-Driven PTO Wireless Remote Control Hydraulic System Operation 67
Combination Tractor-Driven PTO Hydraulic System and Gas Engine-Driven
and/or Electric Motor-Driven Hydraulic System Using Electric Motor-Driven
or Gas Engine-Driven Hydraulic System Operation 68
Combination Tractor-Driven PTO Hydraulic System and Gas Engine-Driven
and/or Electric Motor-Driven Hydraulic System Using Tractor-Driven PTO
Hydraulic System Operation 68
DOOR PROCEDURES 69
Lower Door Procedures 69
Manual Flip-Up Door 69
Hydraulic Operated Lower Door (Flip-Up or Slider) 70
Upper Door Procedures 72
Fold-Down Spud Door 72
Full-Swing Door 73
Top-Hinged Door 73
Fold-Down Extension (Sideboard) Door 77
OPERATING THE PNEUMATICALLY-ACTUATED FRONT WET SEAL 78
USING THE REMOVABLE TAIL FINS 79
TARP SYSTEMS 80
LADDER, WALKWAY AND CATWALK SAFETY 83
LADDER USE PROCEDURE 86
TRAILER MODIFICATIONS 88
REPORTING SAFETY DEFECTS 89
IV
©2014-2015 Trinity Trailer Mfg., Inc.

Jun 2014 Rev
LIMITATION OF WARRANTIES
Goods manufactured by Trinity Trailer Manufacturing, Incorporated (“Trinity Trailer”) are warranted to
be free from defects in workmanship or material under normal use and service for a period of One (1)
year to THE ORIGINAL OWNER or any remaining time on the warranty period for SUBSEQUENT
OWNERS.
This warranty is applicable if the owner has, as a minimum:
Properly maintained the trailer
Not overloaded the trailer (i.e. Exceeded the GVWR* or the GAWR*)
Not transported corrosive cargo
Adequately restrained the load
Loaded the trailer properly
The warranty period begins on the date the vehicle is delivered and ends at the expiration of the coverage
period.
THERE ARE NO WARRANTIES OF MERCHANTABILITY AND FITNESS FOR A
PARTICULAR PURPOSE, OR OTHER WARRANTIES, EXPRESSED OR IMPLIED, UNLESS
OTHERWISE EXPRESSLY SPECIFIED HEREIN.
Trinity Trailer’s sole obligation under this warranty is to repair or exchange, at its option, any such
goods manufactured which are found by Trinity Trailer to be defective in workmanship or materials.
Trinity Trailer reserves the right to require any products to be returned for inspection at the buyer’s
expense to our facility in Boise, Idaho. The foregoing shall be the sole and exclusive remedy for any
such defects, whether in contract, tort, warranty or otherwise.
In no event shall Trinity Trailer be liable for indirect, special, incidental or consequential damage in
connection with or arising out of the sale of goods or furnishing services.
The warranty herein does not apply to and Trinity Trailer makes no warranties, expressed or implied
with respect to:
Items manufactured by other parties
Items that have been modified by other parties
Goods which wear out and have to be replaced during the warranty period. These goods include
but are not limited to: tires, plastic liner, chains, flaps, tarp, light bulbs, electrical or hydraulic
receptacles, paint, brakes, linings, drums and return springs, equalizer, torque rod, camshaft
bushings, camshafts, slack adjusters, brake cylinder diaphragms, springs, slider pads, wheel
bearings, oil and oil seals, door seals, rim clamps and studs, gaskets and sealers, etc.
*GVWR (Gross Vehicle Weight Rating)-The structural capability of the trailer when supported by the kingpin and axles
with the load uniformly distributed throughout the cargo space.
*GAWR (Gross Axle Weight Rating)-The structural capability of the lowest rated member of the running gear components-
suspension and spring system, hub, wheels and drums, rims, bearings, brakes, axles or tires.
V
©2014-2015 Trinity Trailer Mfg., Inc.

Jun 2014 Rev
IMPORTANT SAFETY INFORMATION
Before attempting to operate, load, unload or do anything with or to the trailer, YOU MUST
READ THIS MANUAL and become completely familiar with all of its operating instructions
and safety precautions.
To avoid serious injury or death, ALWAYS FOLLOW THESE PRECAUTIONS:
1. Do not allow unqualified, untrained or careless personnel to operate the trailer. Do not use
the trailer for a purpose for which it was not intended.
2. Each person at the user’s facility who may be involved with installing, operating, servicing,
inspecting, maintaining or repairing the trailer must read the complete operating
instructions and carefully study and understand the safety instructions. All actual and
potential operators should confirm their having done so in writing.
3. The trailer must be serviced and maintained only by authorized and properly trained
personnel. Such personnel must have undergone training by a factory-trained
representative concerning the proper and safe operation of the trailer. Only the
manufacturer or factory-trained technicians should carry out more than minor repairs.
4. Do not allow anyone who is not physically fit or mentally alert near the trailer or its
operating area. Be constantly alert to possible hazards on or around the trailer.
5. Keep a safe distance at all times from any moving parts, including the conveyor.
6. When unloading the trailer:
a. Long hair must be protected by headgear.
b. Do not wear loose apparel such as ties, scarves, etc.
c. Remove all wristwatches and jewelry.
d. Wear only approved industrial grade eye protection or a face guard to protect against flying
debris.
7. Do not allow tools or other loose objects to be placed on top of or around the trailer.
8. At the very first sign of any problem and before attempting any troubleshooting or
maintenance, the conveyor must be stopped.
9. Safety features must not be removed, dismantled, altered, put out of operation or relocated.
All guards and safety devices are to be re-fitted and in place after changeovers, servicing or
making repairs and before the trailer is used. All safety devices must be checked at regular
intervals for correct operation.
10. Do not remove safety signs or warning decals from the trailer. Product safety signs should
be periodically inspected and cleaned as necessary. Product safety signs should be
replaced when they are no longer legible at a normal viewing distance. Replacements are
available from Trinity Trailer Mfg., Inc.
11. Follow all workplace safety and accident prevention regulations applicable to the operation
of the trailer. Comply with local, state and/or federal environmental regulations, including
those governing airborne dust particles.
12. Designate a person to be responsible at any given time for installation, commissioning,
operating and repair of the trailer so the responsibility for safety will not be lost.
13. The trailer has been designed and built with original Trinity Trailer Mfg., Inc. parts only.
Only original Trinity Trailer Mfg., Inc. parts must be used for maintenance or repair. Use
of other parts will void your warranty.
14. Do not perform modifications to or reconstruction of the trailer without first getting written
approval from Trinity Trailer Mfg. Inc.
15. The cleanliness and tidiness of the trailer and its surrounding area must be ensured through
appropriate instructions, routine inspections and cleaning.
VI
©2014-2015 Trinity Trailer Mfg., Inc.

Jun 2014 Rev
WARNING SYMBOLS USED IN THIS MANUAL
Eagle Bridge™ trailers have inherent hazards associated with their use. We have made
efforts to minimize these risks through the use of engineering controls. There are certain
risks, however, which cannot be completely eliminated if the design is to remain
functional.
The following symbols and classifications of hazards are used in this manual and on the
safety labels on the trailer.
This is a safety alert symbol. It is used to alert you to potential personal injury hazards.
Obey all safety messages that follow this symbol to avoid possible injury or death.
!WARNING
!CAUTION
CAUTION
SAFETY LABELS
Your trailer had numerous safety labels affixed to it when it was built; they are shown
throughout this manual. It is important that these labels remain visible and legible throughout
the life of the trailer. To help ensure they are visible, the trailer should be cleaned regularly with
water and a mild detergent. Over time the condition and/or color of the labels may deteriorate
due to use of the trailer and the environment in which it is used. If the labels should become
illegible or lose their color, it is the owner’s responsibility to replace them. Contact our customer
service department at (800) 235-6577 to order replacements.
This indicates a potentially hazardous situation which,
if not avoided, could result in death or serious injury.
This indicates a potentially hazardous situation which,
if not avoided, could result in minor or moderate
injury.
A caution statement used without the safety alert symbol
indicates a potentially hazardous situation which, if not
avoided, may result in property damage.
1
©2014-2015 Trinity Trailer Mfg., Inc.

Jun 2014 Rev
INSPECTION, SERVICE AND MAINTENANCE
It is important that your Eagle Bridge™ trailer be inspected and serviced on a regular
basis to keep it in a safe and functional condition. Regular maintenance will also save
you money in costly repairs over time.
DAILY INSPECTION
A daily inspection of the following items should be performed before using the trailer:
•Bin and Support
Members
•Belt Return Slides
•Bolts and Fasteners
•Brake Adjustment
•Brake Pad Thickness
•Brake System
•Conveyor System
•Coupler Plate
•Fasteners
•Framework
•Hub Oil Level
•Hydraulic System
•Kingpin
•Ladders
•Lights and Wiring
•Mud Flaps
•Plastic Liner
•Pneumatic System
•Suspension System
•Tarp Hardware
•Tarps
•Tires
•Wheels
•Wheel Seals
PREVENTATIVE MAINTENANCE SCHEDULE
We recommend that you follow the general preventative maintenance schedule below.
The intervals given are for nominal operating conditions; service more frequently if the
trailer is used in an overly humid or dusty condition.
AFTER THE FIRST 50 TO 100 MILES
•Check torque of cap nuts or flange nuts on each wheel
AFTER THE FIRST 1,000 MILES
•Check torque of suspension hardware
•Check alignment of suspension
AFTER THE FIRST 50 HOURS OF OPERATION
•Replace the hydraulic oil and filter
•Replace the oil in the planetary gearbox
2
©2014-2015 Trinity Trailer Mfg., Inc.

Jun 2014 Rev
EVERY 100 HOURS OF OPERATION
•Clean the spark arrester on the gasoline engine (if applicable)
EVERY 250 HOURS OF OPERATION
•Replace the hydraulic oil filter
EVERY 5,000 MILES OR ONCE A MONTH (WHICHEVER COMES FIRST)
•Wash trailer thoroughly with a mild detergent and water
•Check general structural condition for corrosion or cracks
•Inspect kingpin area
•Check clearances and torque of air-ride suspension system (if applicable)
•Visually check alignment of suspension
•Check condition of lights
•Check security of registration box and required paperwork
•Check wiring harness for cracking or chafing
•Check hydraulic and pneumatic lines for signs of leakage or wear
•Drain moisture from air reservoirs
•Check hinges on rear door(s) for signs of damage
•Lubricate hinges, latches and bearings (if applicable) on rear door(s)
•Inspect brake components for proper adjustment and for any sign of damage
•Check tires for excessive wear and proper inflation
•Check wheel nuts for proper torque
•Check wheel seals for leaks
•Check level of oil in axles
•Check conveyor system for excessive wear or damage
•Check condition of tarp system, if installed
•Check condition and security of mud flaps
•Check oil level in planetary gear on conveyor hydraulic and add if necessary
EVERY 15,000 MILES OR THREE MONTHS
All items listed above plus:
•Check all hardware; replace any which are damaged or missing; tighten any loose
bolts or nuts
•Clean grease off kingpin plate and inspect for excessive wear or cracks
•Measure alignment of suspension; adjust if out of allowable tolerance
•Inspect all welded connections and joints on suspensions
•Check for proper torque of all bolts and nuts on the suspension system
•Replace hub bearing lubricant
•Lubricate automatic slack adjusters
•Inspect brake drums, lining and shoes
3
©2014-2015 Trinity Trailer Mfg., Inc.
Jun 2014 Rev
•Test operation of brakes
•Inspect brake lines for wear or chafing
•Lubricate conveyor chains and front shaft bearings
•Check condition of front and rear chain sprockets and bearings for wear or damage
•Check lining of the trailer for cracks or damage; check floor lining for excessive wear
•Check condition of gladhand seals
•Lubricate the door seals
•Service gasoline engine in accordance with the manufacturer’s recommended
procedures (if applicable)
•Check aluminum sidewall extensions for damage or cracking (if applicable)
ONCE A YEAR
All items listed above plus:
•Drain and replace hydraulic fluid from reservoir
•Replace hydraulic oil and filter (or every 1,000 hours, whichever is first)
•Replace oil in the planetary gearbox (or every 1,000 hours, whichever is first)
•Lubricate landing legs
HONDA 20HP GASOLINE ENGINE MAINTENANCE SCHEDULE
Figure 1-Honda 20HP Gasoline Engine Maintenance Schedule
REGULAR SERVICE PERIOD (3)
Perform at every indicated month or
operating hour interval, whichever
comes first.
ITEM
Each
Use
First
Month or
20 Hrs
Every 6
Months
or
100 Hrs
Every
Year
Or
300 Hrs
Every 2
Years or
500 Hrs
Engine Oil
Check Level
ο
Change
ο
ο
Engine Oil Filter
Replace
Every 200 Hrs
Air Cleaner
Check
ο
Clean
ο (1)
Replace
ο *
Spark Plug
Check/Adjust
ο
Replace
ο
Spark Arrester
(Applicable Types)
Clean
ο
Idle Speed
Check/Adjust
ο (2)
Valve Clearance
Check/Adjust
ο (2)
Combustion
Chamber
Clean
After Every 1000 Hrs (2)
Fuel Filter
Replace
ο (2)
Fuel Tube
Check
Every 2 Years (Replace if necessary) (2)
*Replace the paper filter element only.
(1) Service more frequently when used in dusty areas.
(2) These items should be serviced by your Honda servicing dealer, unless you have the proper tools and are mechanically
proficient. Refer to the Honda shop manual for service procedures.
(3) For commercial use, log hours of operation to determine proper maintenance intervals.
4
©2014-2015 Trinity Trailer Mfg., Inc.

Jun 2014 Rev
FIFTH WHEEL AREA INSPECTION
The fifth wheel area must be kept clean and free of dirt and foreign materials. This
includes the area between the kingpin plate and the body of the trailer where the
conveyor chains and flaps travel. Buildup of snow, ice or other foreign materials can
cause binding or other serious damage if allowed to remain in this area. Any binding can
place excess stress on the front shaft, which can result in any of the following:
•The shaft to bend or break
•The bearings or adjustment mechanisms to be damaged
•The chain to stretch excessively, resulting in premature failure
Daily inspect the kingpin and kingpin plate for the following:
•Wear, cracks or other damage
•Damaged or missing parts
•Bent belt return slides (Figure 2); these can be bent during normal operation and must
be straightened before use
Keep the fifth wheel plate lubricated in accordance with the tractor manufacturer’s
recommendations.
Figure 2-Belt Return Slides
Belt Return Slides
5
©2014-2015 Trinity Trailer Mfg., Inc.

Jun 2014 Rev
ADJUSTING AND LUBRICATING
THE CONVEYOR SYSTEM
CONVEYOR CHAIN ADJUSTMENT
It is normal for the chain to "stretch" as it is used. The amount of "stretch" will be greater
when the chain is new as the pins get seated against the barrel of the chain. It is important
to keep the chain adjusted to prolong the life of the chain. The chain should be operated
within the two pointers on the chain adjustment gauge (Figure 3), which is located on the
roadside of the trailer between the front of the suspension and the center of the trailer.
Figure 3 - Chain Adjustment Gauge
Jam Nut
Adjuster Bolt
Figure 4 - Chain Adjustment Assembly
6
©2014-2015 Trinity Trailer Mfg., Inc.

Jun 2014 Rev
ADJUSTING THE CHAIN
1. Loosen the jam nut in the chain adjustment assembly (Figure 4).
2. Tighten the adjuster bolt, alternating sides so that one side of the shaft does exceed
1/4" ahead of the opposite side, until the chain is between the two pointers on the
chain adjustment gauge (Figure 3).
3. If the chain adjustment assembly is out of adjustment and the chain is not within the
two pointers, you will have to remove some chain links. (Procedure to follow)
4. Measure the distance from front of trailer to the shaft on each side and adjust so that
there is no more than 1/8" difference.
5. Tighten the jam nut.
REMOVING CHAIN LINKS
1. Rotate the conveyor until there is a master pin 3 - 5 feet in front of the suspension.
The master pin can be identified by the head of the pin (Figure 5).
2. Loosen the jam nut in the chain adjustment assembly (Figure 4).
3. Loosen the adjuster bolt, alternating sides so that one side of shaft does not exceed
1/4" behind the opposite side, until the sprocket teeth are just in front of the trailer
floor.
4. Verify that the shaft can rotate without the sprockets hitting the trailer floor.
5. In front of the suspension connect a Come-Along into the chain links of each chain
with the master pin centered between the connection points.
6. Pull up all of the slack chain (Figure 6).
7. Grind the weld off of the master pins.
8. Drive out the pin using a punch.
9. Pull up the slack to determine how much of the chain to remove (Figure 7). You may
have to remove links from both sides of the split. You should remove links so that
you do not have more than 5 links between flaps.
10. Grind off the head of the pin you need to remove (Figure 8).
11. Drive out the pin using a punch.
12. Connect the chain using a new pin and cotter pin.
13. Weld the chain pins using the following procedure.
14. Remove the Come-Along from each chain.
15. Adjust the chain using the previous procedure.
WELDING CHAIN PINS
The pin must be secure and should not be able to freely rotate within the link as this can
cause accelerated wear and result in failure of the pin.
1. Place the ground clamp from the welder on the chain itself near the link to be welded.
Placing the ground on the body of the trailer will not allow enough current to pass
through the link to obtain a sufficient weld.
2. Weld the pin on the "trailing" edge of the pin. Weld between the pin and the link, not
just the pin and the cotter pin (Figure 9).
7
©2014-2015 Trinity Trailer Mfg., Inc.

Jun 2014 Rev
3. No weld is required on the opposite side of the chain where the head of the pin meets
the link (Figure 5).
.
Master Pin
Figure 5 - Master Pin Identification
Figure 6 - Using Come-Along To Pull Up Chain Slack
Figure 7 - Determine How Much Chain To Remove
8
©2014-2015 Trinity Trailer Mfg., Inc.

Jun 2014 Rev
CONVEYOR CHAIN LUBRICATION
The conveyor chain must be inspected regularly and lubricated using a high quality oil.
Do not use grease. Any type of lubricant may be used depending on products hauled and
individual preference. A good general purpose lubricant is chain and cable fluid, which
has penetrating qualities as well as dust repellent. Use Table 1 to determine which grade
of lubricant to use based upon the operating temperature.
Table 1-Chain Lubricant Guide
Temperature
(Degree °F)
Recommended
Lubricant
-20 to 20
SAE 10
20 to 40
SAE 20
40 to 100
SAE 30
100 to 120
SAE 40
120 to 140
SAE 50
Figure 8 - Chain Pin With Head Ground Off
Figure 9 - Properly Welded Pin
9
©2014-2015 Trinity Trailer Mfg., Inc.

Jun 2014 Rev
How often the chains need lubrication is dependent upon the amount of use and the type
of product carried.
•Under daily use or in harsh environments, daily inspection is required. Lubricate as
needed.
•Under all other uses, weekly inspection should be sufficient. Lubricate as needed.
•If a food-grade lubricant is used, you may need to apply it more often. It is your
responsibility to determine how often lubrication is required.
!WARNING
Remember, proper lubrication can extend chain life, reduce down time and save you
money.
BEARINGS AND SPROCKETS
The bearings on the front and rear conveyor shafts must be inspected and lubricated at
regular intervals using an NLGI Grade 2 general-purpose grease. As with chain
lubrication, the amount of lubrication is dependent upon the amount of use.
•Under daily use, daily inspection is required. Lubricate as needed.
•Under all other uses, weekly inspection should be sufficient. Lubricate as needed.
•Inspect sprockets for excessive wear or damage.
!WARNING
PLANETARY GEARBOX
When using the planetary gearbox under normal temperature ranges between 0-120 °F,
the gearbox is to be half full of SAE 80/90 oil. Use the lower of the two plugs to check
the level of the oil. Oil is to be changed after the first 50 hours of operation with
subsequent changes every 1000 hours or yearly, whichever comes first.
Attempting to lubricate the chains while they are in motion
can result in serious bodily injury or death. Stay clear of the
chains while they are in motion. Position the chains and
completely disable the hydraulic system before doing any
maintenance.
Attempting to lubricate the bearings while the shaft is
rotating can result in serious bodily injury or death. Stay
clear of the bearings while they are rotating. Completely
disable the hydraulic system before doing any maintenance
on the bearings.
NOTE
There is absolutely no warranty, expressed or implied, on the chain or
drive system if the system is not maintained properly, is misused or is
overloaded. This includes, but is not limited to the hauling of corrosive
materials such as fertilizer, sludge, brewer’s mash or corn gluten.
10
©2014-2015 Trinity Trailer Mfg., Inc.
Jun 2014 Rev
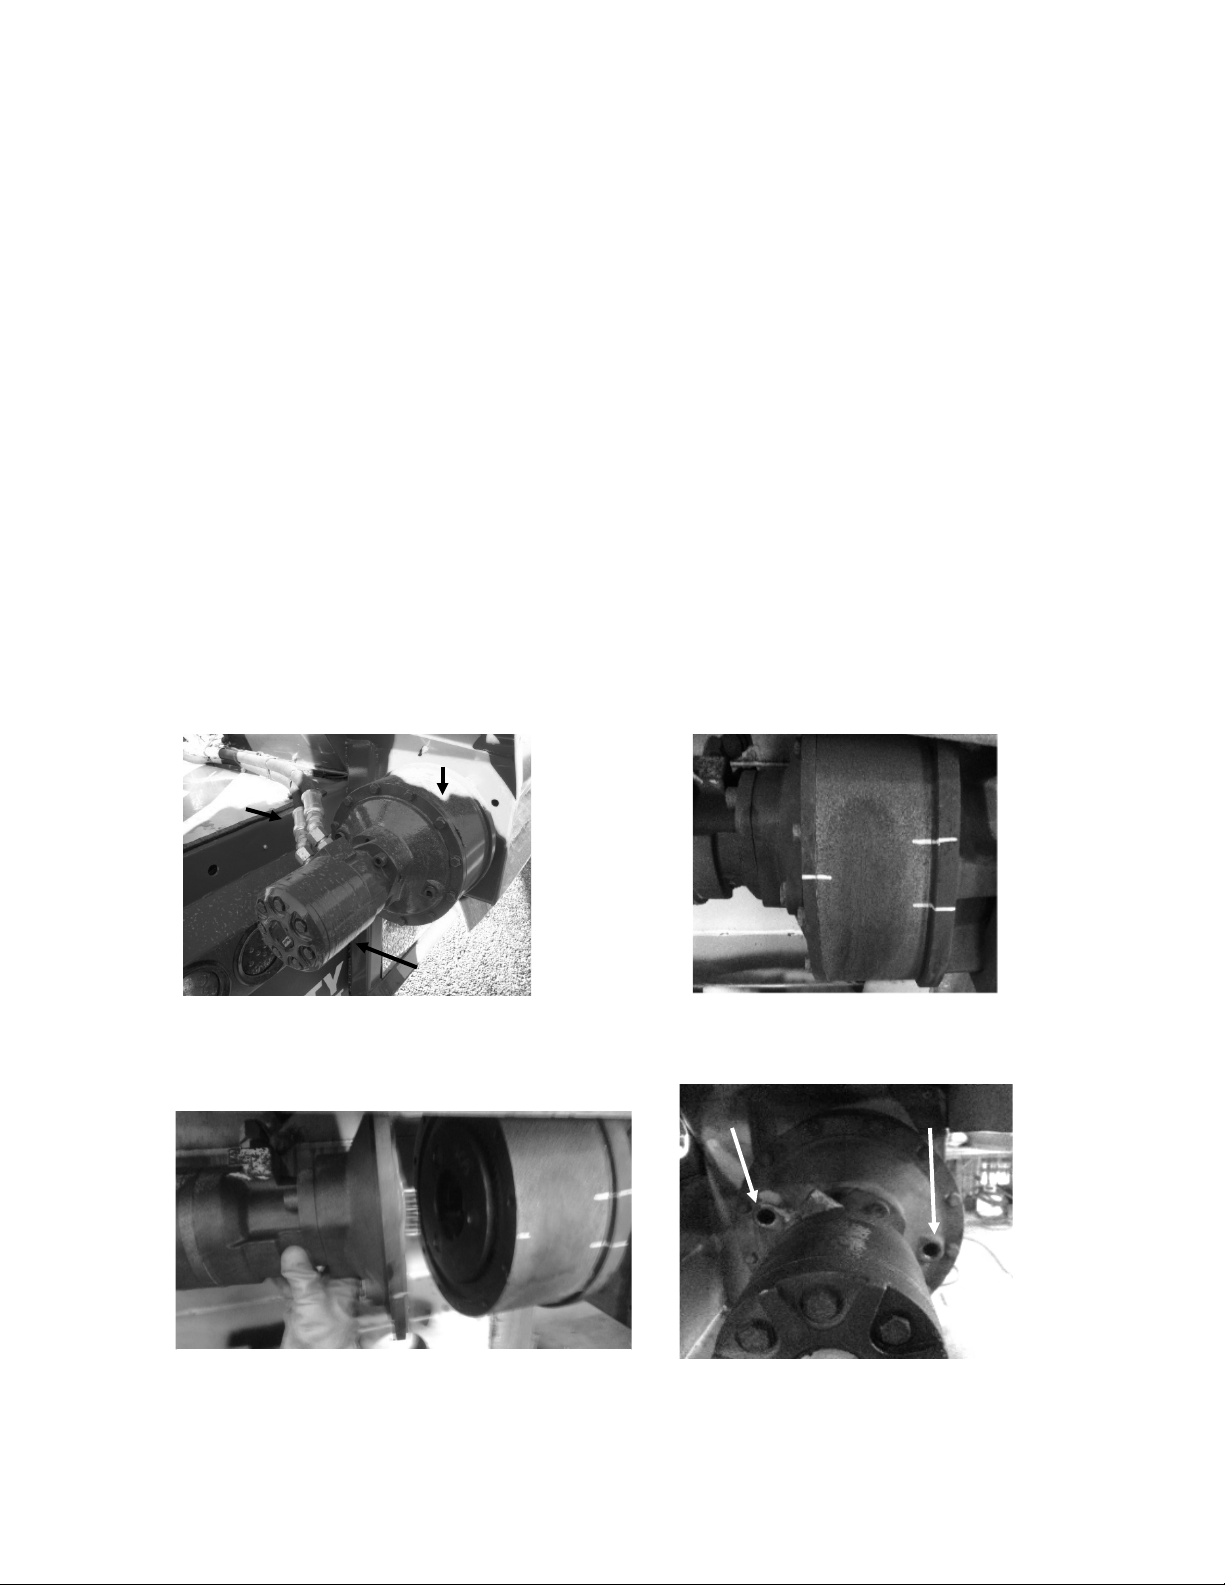
CHANGING PLANETARY OIL
The following are basic instructions for changing the oil in the planetary. For more
detailed instructions see the Planetary Disassembly procedure or the Planetary Service
Manual found on the CD provided with this manual.
1. Label and remove the hydraulic lines from the hydraulic motor (Figure 10).
2. Mark position of the planetary cover and ring gear for reassembly (Figure 11).
3. Remove the cover with motor attached (Figure 12).
4. Remove all gear sets.
5. Remove the ring gear.
6. Clean and inspect all gears for chipped, cracked, pitted, or rusty teeth.
7. Apply a small bead of silicone to all sealing surfaces.
8. Install ring gear.
9. Install all gear sets.
10. Install cover and torque all bolts to 45 lb-ft.
11. Remove the fill and full plugs from the cover (Figure 13).
12. Add SAE 80/90 gear oil through the fill hole until oil comes out of full hole.
13. Reinstall plugs into cover.
14. Reconnect the hydraulic lines to the hydraulic motor.
FULL
Figure 10 - Planetary
Hydraulic
Lines
Planetary
Hydraulic
Motor
Figure 11 - Planetary Position Marking
Figure 12 - Planetary Cover Removal
Figure 13 - Planetary Plugs
FILL
FULL
11
©2014-2015 Trinity Trailer Mfg., Inc.

Jun 2014 Rev
LUBRICATION OF THE DOOR(S)
Door hinges and bearings must be lubricated regularly, especially if the trailer has been
operated or stored for an extended period of time in a humid or wet environment.
Corrosion can lead to the failure of door hinges if they are not maintained properly. As a
general rule with the rear doors, as with the entire trailer, “if it moves, lubricate it.” Use a
NLGI Grade 2 general-purpose grease on all shafts and grease zerks.
The seals on most doors should have silicone grease or spray-on lubricant applied to them
once every three months. This will help them last longer and will help them provide a
better seal. During cold, damp weather or under heavy use, apply the grease more
frequently.
CARE OF THE PLASTIC LINER
HIGH MOLECULAR WEIGHT (HWM) AND
ULTRA-HIGH MOLECULAR WEIGHT (UHMW) LINER
The plastic liner under the chain (and on the slopes, if applicable) must be inspected for
damage and wear. Replace the liner if it is worn through at any spot. If any foreign
material should become lodged between the liner and the body of the trailer, remove it by
blowing or vacuuming it out.
!
CAUTION
!WARNING
Use eye protection when using air to blow material from
underneath the liner to help prevent injuries from flying
particles.
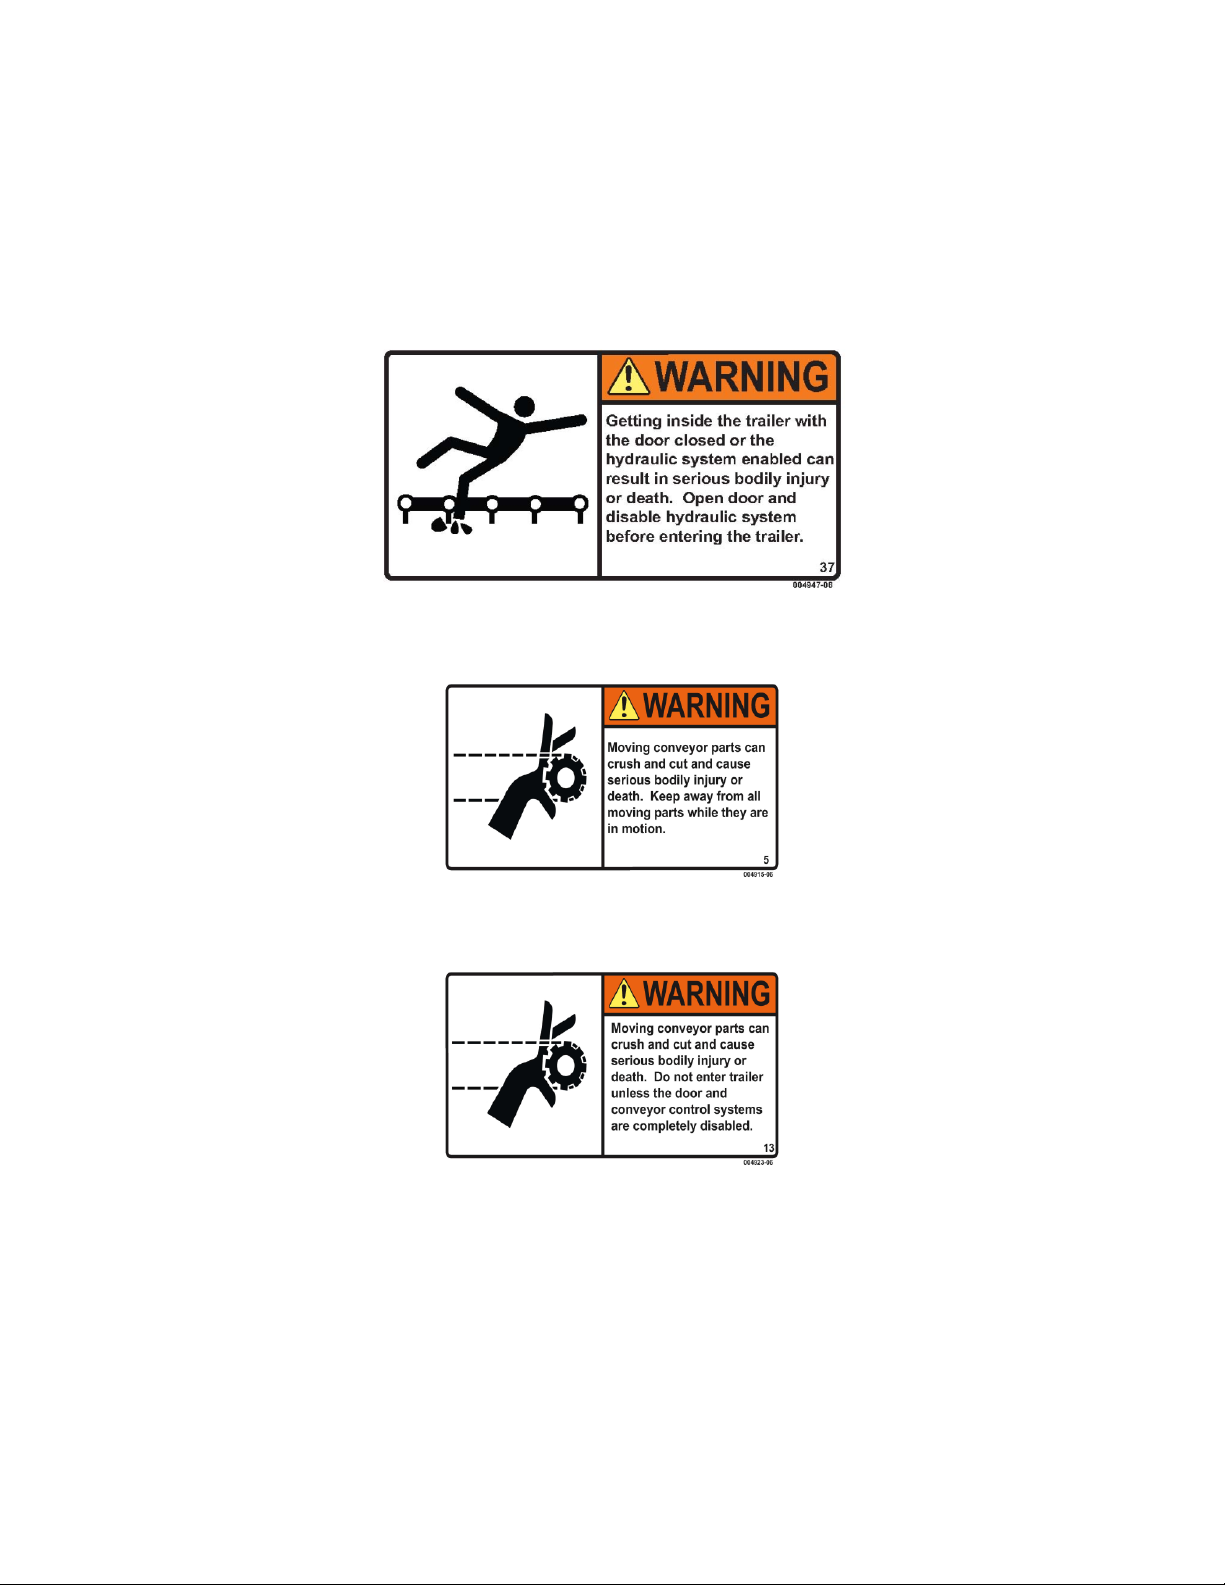
Getting inside the trailer with the door(s) closed or the
hydraulic system energized can result in serious injury or
death. Open door(s) and disable all hydraulic systems
before entering the trailer.
12
©2014-2015 Trinity Trailer Mfg., Inc.

Jun 2014 Rev
COATING CARE AND CORROSION PREVENTION
Your Eagle Bridge™ trailer is coated with a high-performance polyurethane paint. This
paint is designed to give you durable performance in the rugged environments
encountered by your trailer.
The best way to preserve the finish on your trailer and help prevent corrosion is to wash it
regularly, especially after it has been used around road salt or other ice melting agents,
road oil or tar, or any other potentially corrosive material. Use warm water with a mild
detergent and allow the trailer to air dry. Use of abrasive or caustic cleaning agents will
void the paint warranty. Hauling corrosive products such as salts and fertilizers will also
void the paint warranty.
Small nicks or chips in the paint can occur with normal use. Any chips or scratches in
the finish should be repaired with matching touch-up paint. This is especially important
for carbon steel trailers, as even small areas of bare metal can corrode quickly. The cost
of repairing any chips is the responsibility of the owner.
Removal or disrepair of mud flaps on either the tractor or the trailer will void the paint
warranty. Frequent use of the trailer on gravel roads will also void the warranty.
If your trailer has aluminum wheels, you should clean them regularly with mild detergent
and water to prevent corrosion. Use a non-abrasive, non-acidic cleanser to remove heavy
build-up when necessary. Do not use abrasive metal polishes or scouring pads.
STAINLESS STEEL BODIES
Trailers with stainless steel bodies require the same care as painted trailers. Regular
washings to remove road grime and remnant corrosive material will help maintain the
finish and help prevent corrosion. Use warm water with a mild detergent and allow the
trailer to air dry. Use of abrasive cleaning agents will dull and scratch the finish. Use of
carbon steel utensils will result in surface contamination.
It is particularly important to rinse off the trailer after hauling any material containing
chlorides as prolonged contact with chlorides may dull the finish and leave it subject to
pitting.
Carbon contamination of stainless steel will cause localized rust spots. The breakdown of
the carbon on the surface of stainless steel does not affect the structural integrity of the
trailer.
13
©2014-2015 Trinity Trailer Mfg., Inc.
Jun 2014 Rev
CLEANING THE INTERIOR
If product accumulates underneath the chain and flaps, it can usually be removed by
lifting each flap and vacuuming, sweeping or blowing the material out. Under no
circumstances should you get into the trailer with the conveyor system running or
enabled (Figure 14). For your safety, completely disable the hydraulic system
before entering the trailer (Figures 15 and 16).
Figure 14 - Entry into Trailer Decal
Figure 15 - Moving Conveyor Parts Decal
Figure 16 - Moving Conveyor Parts Decal
14
©2014-2015 Trinity Trailer Mfg., Inc.
Table of contents
Popular Utility Vehicle manuals by other brands


Toro
Toro Workman GTX Operator's manual

Humbaur
Humbaur 1000 Series operating instructions

Taylor-Dunn
Taylor-Dunn C0-014-32 Operation, t roubleshooting and replacement parts manual

Clam
Clam POLAR TRAILER LG 1300 manual

Carry Freedom
Carry Freedom Y-Frame instructions

Sodi
Sodi mini 950 User maintenance guide