manuals.online logo
Brands
  1. Home
  2. •
  3. Brands
  4. •
  5. Carry Freedom
  6. •
  7. Utility Vehicle
  8. •
  9. Carry Freedom Y-Frame User manual

Carry Freedom Y-Frame User manual

Welcome
Congratulations on purchasing an
exceptional award winning trailer from a
trail blazing company.
These instructions talk you through how
to get the most out of your new Y-Frame
trailer. Read them carefully before using
your new trailer.
If you need help or advice with this
manual either:
Contact your dealer/distributor,
Visit www.CarryFreedom.com or
Email [email protected]
Carry Freedom
High Clunch Farm
Stewarton
Ayrshire
KA3 5JT
United Kingdom
+44 (0)1560 600 369
WARNING
It is your responsibility to
understand these instructions. We do not
accept responsibility for how you use,
modify, ride, or load the trailer. You must
decide whether what you are doing with
the trailer is safe, within your ability, and
within the law.

 

  
 
    
    
  
   
    
 
      
    
 
     
   

     
   

       
       
      
Page
1
Contents
The box the Y-Frame came in will contain
the components represented here.
The larger components are, where
apropriate, individualy wrapped, while
the smaller components are bagged in
groups, an contained within an accessory
bag/box.
2X
Wheels
1X
Handle
1X
Frame
1X
Load Bed
2X
Load Straps
2X
QR Axles
2X
Hub Caps
2X
Shaft Pins
4X
Box QR Bolts
nuts & washers.
4X
Box QR Feet
4X
Load Bed bolts
nuts & washers

 

  
 
    
    
  
   
    
 
      
    
 
     
   

     
   

       
       
      
Page
2
3X
3X
Bike Bracket
Assembly
Bolt Load bed to Frame
The load bed is attached via four counter
sunk allan head bolts along with four lock
nuts, and four washers. The load bed’s grip
surface should face away from the frame.
Pin Handle to Frame
Slide the handle into the main frame until
its hole aligns with the frame hole.
Slide a shaft pin through the frame and
handle holes to secure the handle.
close the spring gate on the shaft pin.
NB:
The handle is normally  tted to the
left, but can also be  tted to the right side.

 

  
 
    
    
  
   
    
 
      
    
 
     
   

     
   

       
       
      
Page
3
1.
Lay Load bed face down with its four
bolts protruding through their holes.
2.
Place the frame over the bolts, then
put a washer on each bolt
4.
Insert the handle until the holes line up
5.
Slide the shaft pin through the frame
and clip its spring gate in place
3.
Tighten each nut, so the frame is tight
against the load bed
→
→
Assembly
Pin Wheels to Frame
Push the button on the end of the axle.
Insert the axle into a wheel.
Put the rubber hub cap over the axle end.
Push center of rubber hub cap, and insert
axle & wheel into the trailer frame.
NB:
Once fully inserted, pull the wheel
to make sure it is secure. If they pull away
the axle may need to be adjusted longer.
If the axle length needs adjusted see
“adjusting axle length” on page 8.

 

  
 
    
    
  
   
    
 
      
    
 
     
   

     
   

       
       
      
Page
4
6.
Push the button on the end of the axle,
and insert into the wheel.
7.
The nutted end of the axle should sit in
the recessed side of the wheel
9.
Push the center of the hub cap and
insert the wheel into the trailer frame
10.
Pull at the wheel to ensure it is se-
cure. See page 8 if it isn’t
8.
Insert a rubber hub cap to cover the
axle end
Hitch
Your bike has a “Bike Bracket”
permanently  xed to it. The trailer hooks
to this, and is secured by a pin. The bike
bracket will  t almost all axle types, both
threaded and quick release.
The bike bracket uses your existing quick
release skewer, or wheel axle. Try and
avoid removing any existing washers/
springs on the bikes axle assembly.
NB:
Make sure there is enough thread on
your QR skewer, or axle. You will need a
spare 3mm of thread for your hitch.
Be careful that the hitch does not affect
the function of the axle assembly.
After the 1
st
mile cycled with a trailer
inspect the hitch to make sure the hitch
has not twisted, and the bikes wheel has
not moved.
Contact [email protected] if the
hitch does not  t your bike.

 

  
 
    
    
  
   
    
 
      
    
 
     
   

     
   

       
       
      
Page
5
11.
The Bike bracket attached to the left
chain stay using the rear wheels axle.
12.
With nutted axles the bracket sits
between essential washers and the nut
14.
Slide the bar into the hook
15.
Pin to secure, close the spring gate
13.
With QR Skewers the bracket  ts
between the skewer and frame
→
→
CARGO CONTAINERS
The Y-Frame can accept most loads. You
can bolt containers directly to the frame
or load bed, strap things down, or  t a
box with our box quick release system.
Contact [email protected] for
really unusual loads.
Loading directly
Any load can be tied down onto the anti
slip surface of the load bed. The four holes
in the load bed can be used as tie down
points, as can the aluminium frame below
the load bed. Regularly check the load is
secure and has not slipped.
Bags
Most bags can be strapped directly to the
load bed using the enclosed straps, but
the grip surface can abrade bags quickly.
Place a matt between bag and the trailer,
if this is a problem.
Water proof Ortlieb Rack Packs can
clip directly to the load bed, the 48L
for the Y-Small, and the 90L for the
Y-Large. See www.Ortlieb.com or
www.CarryFreedom.com for full details.
Boxes
Mant  at bottomed boxes will  t. The
maximum box footprint is around 450mm
X 900mm for the Y-Small and 600mm X
900mm for the Y-Large.
A box may be bolted permanently to the Y-
Frame or  tted with our box quick release.
The Center of the box should lie ahead of
the trailer axle, and the front of the box
must be clear of your bicycles wheel.
To  t a box permanently secure it at least
four points, as close to its corners as
practical. Boxes may need penny washers
 tted to stop the bolt pulling through the
box’s base.
Secure weak boxes to the load bed, strong
boxes may be bolted directly to the frame.

 

  
 
    
    
  
   
    
 
      
    
 
     
   

     
   

       
       
      
Page
6
16.
Tied down load
18.
Box bolted to the load bed
17.
Bag. Ortlieb Rack Pack compression
straps feed through the Load bed holes
to easily hold the bag on the trailer
Box Quick release
This simple system allows  at bottomed
hard body boxes to attach and detach
from the Y-Frame quickly and easily.
Fitting
The trailer should be positioned so the
front edge of the box runs along the front
edge of the load bed, and the box sits
centrally between the two wheels. Mark
the rough centre of the load beds four
holes. Remove the trailer and drill four
6mm holes. Bolt the location feet to the
box using the following sequence:
INSIDE Nut-washer-box-Location foot. OUTSIDE
Using
Fit the two load straps to the left and right
load bed holes. Attach one strap with its
buckle the other with its velcro. Place the
box so the four feet sit in the four load bed
holes. Secure the box with the straps
.
The straps will retain any lid on the box.

 

  
 
    
    
  
   
    
 
      
    
 
     
   

     
   

       
       
      
Page
7
19.
Place trailer on upturned box and
mark feet locations holes
20.
Drill four 6mm holes
22.
Fit straps to the holes.
NOTE
: Attach
one strap with velcro, & one with buckle
23.
Place the four feet in the four holes
and strap the box to the trailer.
21.
Bolt the feet to the box:
IN
Bolt-Washer-Box-Foot-Nut
OUT

 

  
 
    
    
  
   
    
 
      
    
 
     
   

     
   

       
       
      
Loading Rules
Loading
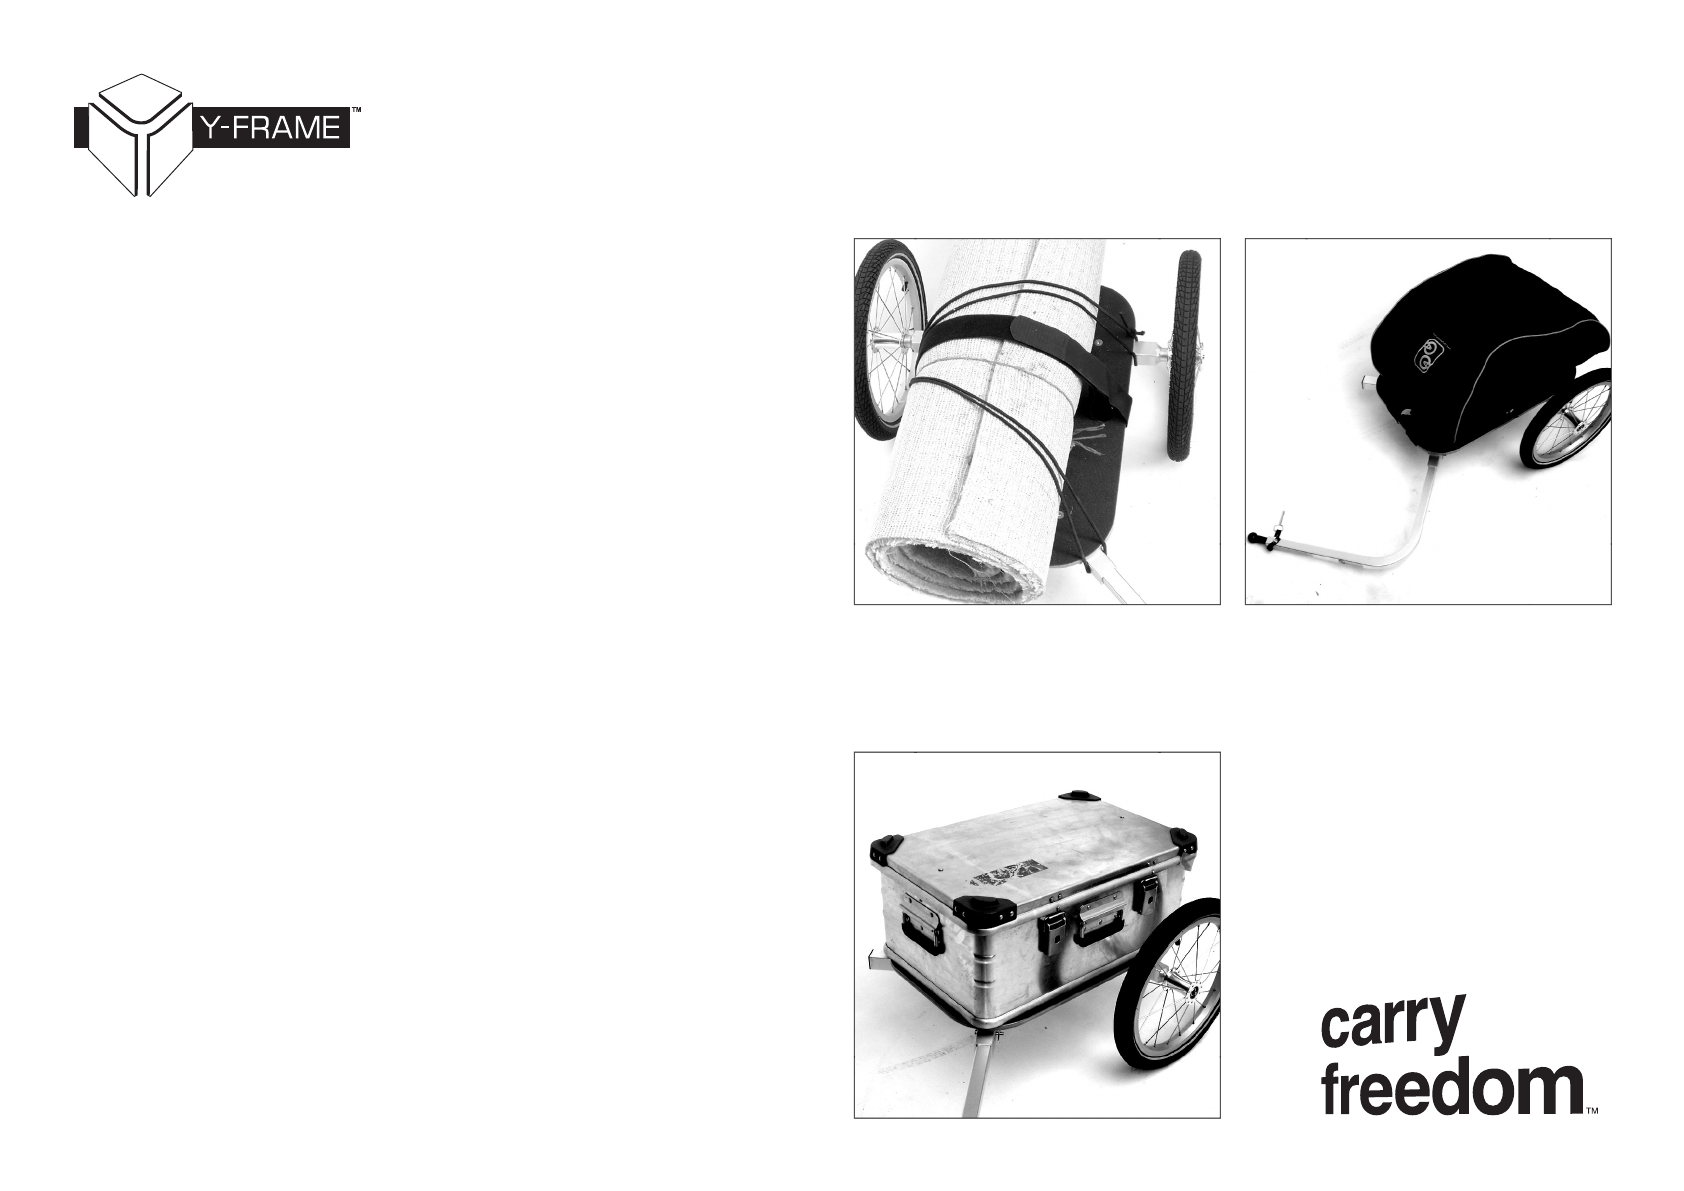
Do not carry more than 90kg of luggage
when cycling.
Keep the trailers centre of gravity lower
than 0.6m, and in front of its axle.
Cycle slower, as you carry more.
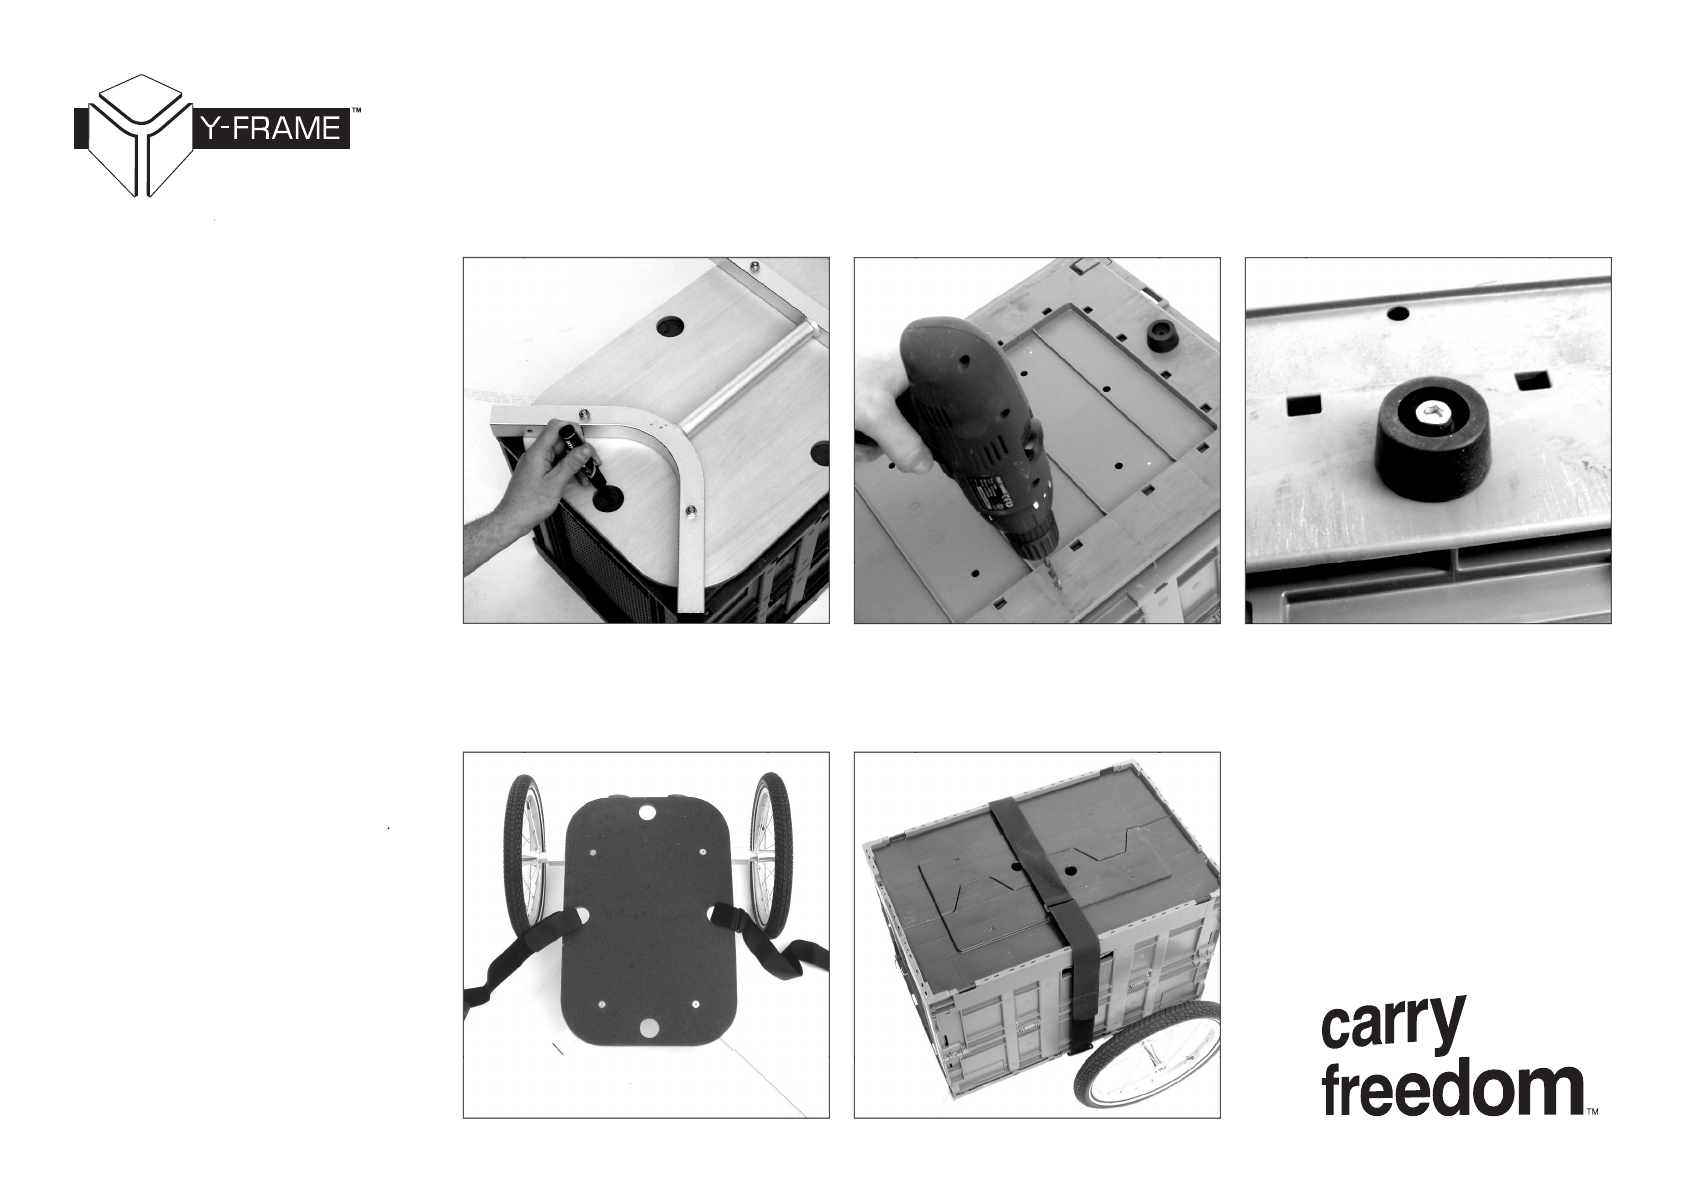
Make sure your load is secure, and that
nothing can catch in the wheels, or drag
on the ground.
Adjust tyre pressures to match the load,
higher pressures for heavier loads.
No rigid load should be closer than 25mm
to any wheel, and no  exible load should
be closer than 50mm to any wheel.
Never use the trailer to carry live animals.
Riding Rules
Before every ride
Make sure the trailer is correctly hitched,
loaded, and assembled.
Pull at the trailer wheels to make sure they
are secure.
Check your brakes are in
good working order.
Inspect the hitch before every ride to make
sure the hitch is safe.
Once on the move check your stopping
distance for trailer weight, and road
conditions.
Remember
It is easy to forget you are towing a trailer.
With a heavy trailer it takes longer than
normal to stop.
The trailer turns tighter than the bike, be
careful in corners.
Stop if you hear an unusual noise, or
notice a change in handling.
Practice with an empty trailer away from
traf c until you are comfortable using it.
Adjusting Axle Length
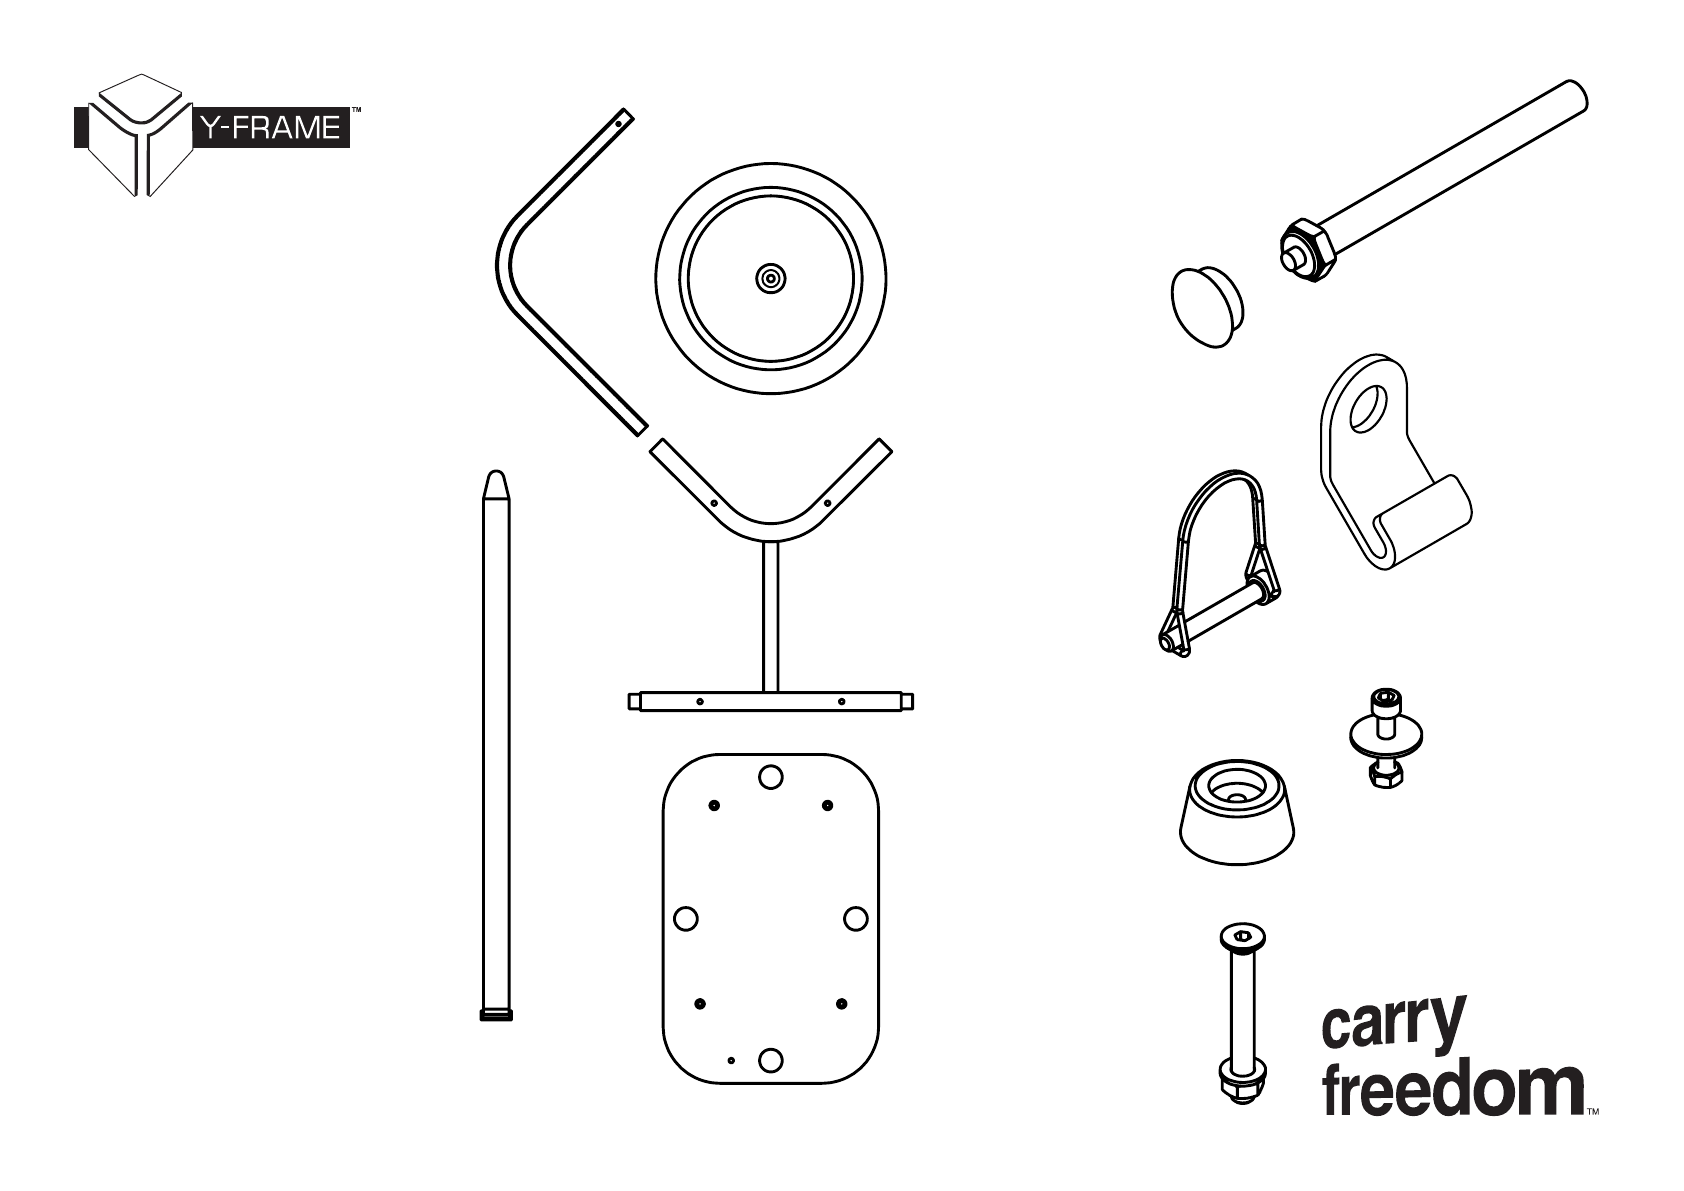
If an axle is too short the wheel and axle
will fall of, if the axle is too long the
wheel will rattle against the frame, it is
better to be too long than too short.
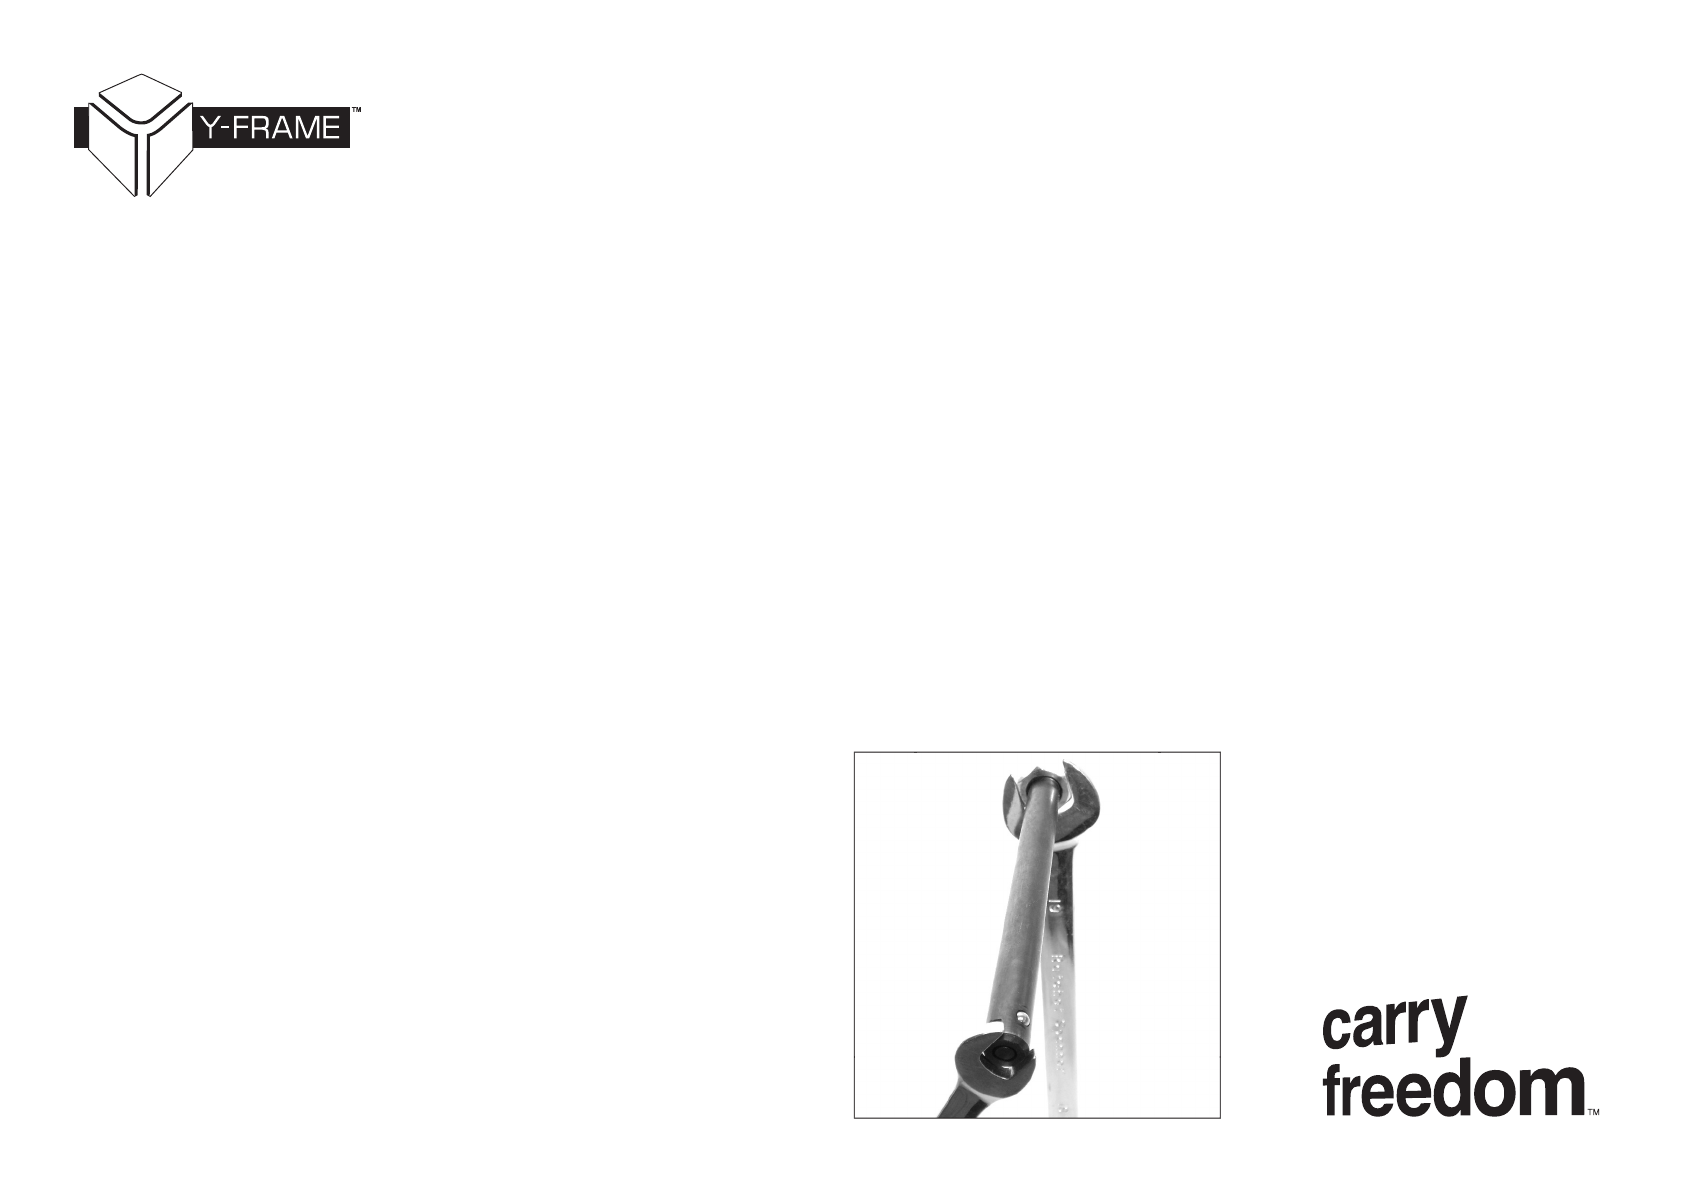
To adjust the axle length,  t a 10mm
spanner to the  ats at the end of the axle
and a 19mm spanner to the lock nut at the
other end. Twist the lock nut to lengthen
or shorten the axle.
Adjust by small increments only, checking
the axle in the frame until it’s secure and
does not rattle excessively.
Maintainence Tips
Monthly maintainence
The Y-Frame needs very little maintenance,
however its reliability and length of
service can be dramatically improved by
following these simple steps:
Regularly clean and grease the axle shafts.
Clean the trailer and look
for damage/wear.
NEVER Grease or oil the hitch
Grease
attracts grit and shortens the hitches life.
If you do want to lubricate it use graphite
powder.
Check wheel condition. Are the spokes
tensioned, how worn are the tyres, is there
any looseness in the wheel bearing’s? If
you do not feel comfortable performing
these checks consult your
nearest bike dealer.
Are any of the nuts or bolts on
the trailer loose?
Inspect for any signs of damage on the
frame or load bed.
Page
8
24.
Adjusting the axle length

Popular Utility Vehicle manuals by other brands

CHICAGO 42709 Set up and operating instructions

CHICAGO

CHICAGO 42709 Set up and operating instructions

Massimo BUCK 250 Owner's/operator's manual

Massimo

Massimo BUCK 250 Owner's/operator's manual

Humbaur 2000 Series operating instructions

Humbaur

Humbaur 2000 Series operating instructions

MDC Robson XTT 2015 owner's manual

MDC

MDC Robson XTT 2015 owner's manual

Flatworks plyfly Assembly manual

Flatworks

Flatworks plyfly Assembly manual

Atlas Copco CP275 Tier II instruction manual

Atlas Copco

Atlas Copco CP275 Tier II instruction manual

Toro Workman 07170 installation instructions

Toro

Toro Workman 07170 installation instructions

Novatech 11.569.00-B owner's manual

Novatech

Novatech 11.569.00-B owner's manual

GEDA 01181 instruction manual

GEDA

GEDA 01181 instruction manual

Moni FEVER Operating instructions and assembly manual

Moni

Moni FEVER Operating instructions and assembly manual

Columbia ParCar Gasoline ParCar Service manual

Columbia ParCar

Columbia ParCar Gasoline ParCar Service manual

Sealey TBB300 Instructions for

Sealey

Sealey TBB300 Instructions for

pronovost P-511-60 Operator's manual

pronovost

pronovost P-511-60 Operator's manual

PROALL G Series Operator's manual

PROALL

PROALL G Series Operator's manual

Ultra-tow 49804 owner's manual

Ultra-tow

Ultra-tow 49804 owner's manual

byox Adrenaline Manual instructions for use

byox

byox Adrenaline Manual instructions for use

Stinger Can-Am Owner's manual & warranty information

Stinger

Stinger Can-Am Owner's manual & warranty information

Komatsu D37EX-24 Operation & maintenance manual

Komatsu

Komatsu D37EX-24 Operation & maintenance manual

manuals.online logo
manuals.online logoBrands
  • About & Mission
  • Contact us
  • Privacy Policy
  • Terms and Conditions

Copyright 2025 Manuals.Online. All Rights Reserved.