Tristel Stella System A User manual

1
USER GUIDE
System

CONTENTS
PAGE NO.
SECTION 1 INTENDED USE 1
SECTION 2 COMPONENTRY 3 - 7
SECTION 3 GETTING STARTED 9
SECTION 4 HOW TO USE 11- 17
Stella System A 11-12
Stella System B 13-14
Stella System C
15-17
SECTION 5 MAINTENANCE 19-24
Battery Management 19
Lubing IQ Process 19
Bluetooth Pairing Process 20
Barcode Validation 20-21
Downloading 21-22
Replacing the Pump Hose and Tube Set 23
Cleaning and Disinfecting Stella 24
SECTION 6 TROUBLESHOOTING AND FREQUENTLY ASKED QUESTIONS 26-29
SECTION 7 WARRANTY 31
SECTION 8 COMPLIANCE 33-41
SECTION 9 STELLA AGENTS 43-44
The Operating Instructions in this manual outline general safety guidelines for the correct operation
of the Stella System, applicable to all variants.
Ensure the instrument for disinfection is compatible with the Stella System and process chemicals prior to use.
Carefully read and understand the user instructions before attempting to operate Stella, IQ or Pulse.
Never use Stella, IQ, Pulse or Cradle for any purpose other than the Intended Purpose.
Do not use Stella, IQ, Pulse or Cradle, including the IQ or Pulse power adaptors, if they have been
damaged or have changed in performance.
Should the unit(s) appear to malfunction, download the data and observe the LCD graphic messages.
This will allow you to take appropriate corrective action or to arrange for repair.
All repairs must be carried out by an approved and qualied service technician.
The Stella System can only be used in combination with Tristel Fuse for Stella for automated disinfection.
The Stella System can only be used in combination with Tristel Clean for Stella for automated cleaning.
Refer to the Safety Data Sheet of the approved disinfectant product to be used prior to use.
For professional use only.
Do not use Stella for the disinfection of surgical equipment or medical instruments intended for autoclaving.

3
SECTION ONE
INTENDED USE
1
SECTION ONE: INTENDED USE
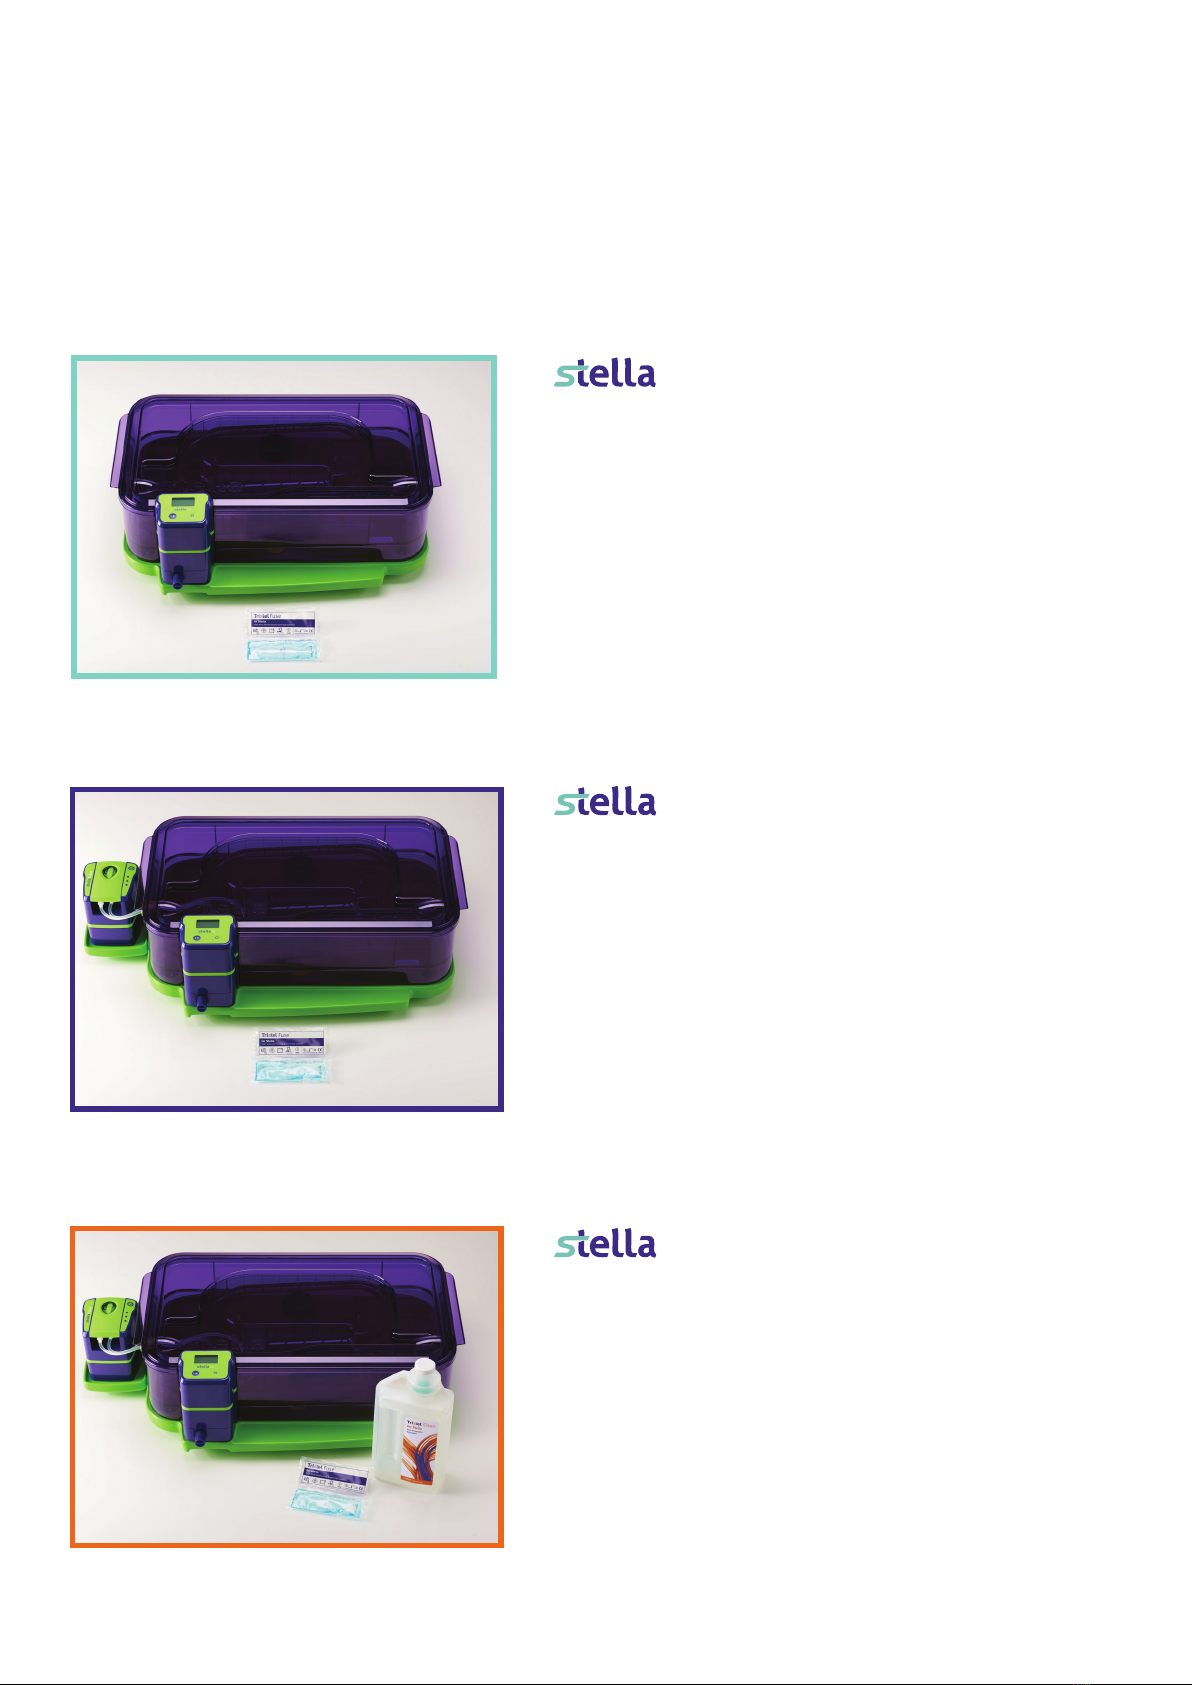
The Stella System is a semi-automated washer disinfector designed specically for the disinfection of
invasive and non-invasive, heat sensitive, non-lumened and single-lumened medical devices.
TM
TM
TM
System B
System A
System C
Indication for Use: For the high-level disinfection of
non-lumened medical devices, such as nasendoscopes,
transoesophageal echocardiogram probes, transvaginal
probes, transrectal probes, manometry catheters and
laryngoscopes.
Indication for Use: For the high-level disinfection of
non-lumened (see above) and single-lumened medical
devices, such as hysteroscopes, cystoscopes, intubation
endoscopes and bronchoscopes.
Indication for Use: For the cleaning and high-level
disinfection of single-lumened and non-lumened medical
devices, such as those listed above.
PRODUCT VARIANTS

2
SECTION TWO
COMPONENTRY
3
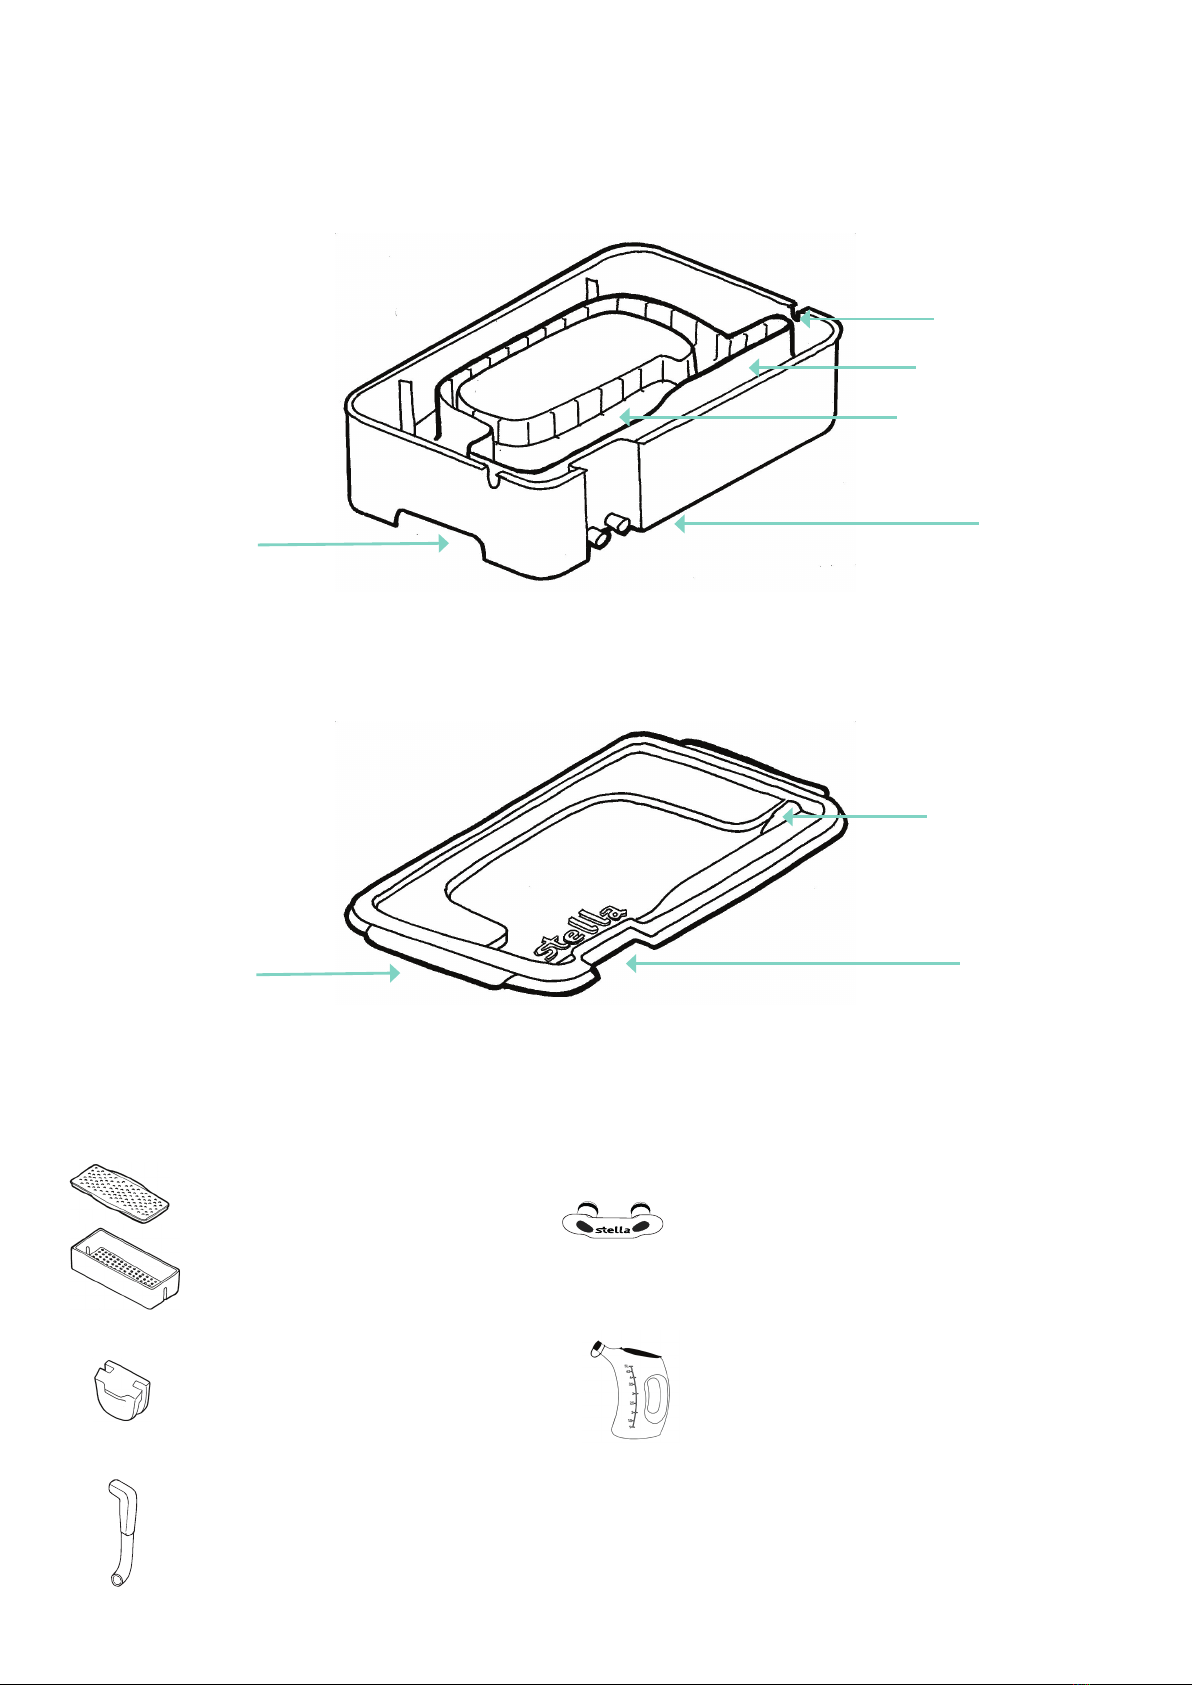
Small Parts Tray and Lid for securing
instruments’ accessories in the Base.
Drainage Outlet Cap for covering outlets of the
Base during transportation. The Cap should not be
used on a full tray of disinfectant. It is for containing
disinfectant residues only.
The grommets close the cut-outs
when they are not being used.
Cut-outs (both sides)
Overow compartment
Instrument compartment
Overow outlet
Cut-outs (both sides)
Cut-out for the IQ
Handles (both sides)
STELLA BASE
STELLA LID
ACCESSORIES
Handles (both sides)
SECTION TWO: COMPONENTRY
The Stella Jug for preparation of Tristel
Fuse for Stella and Tristel Clean for
Stella working solutions.
The Drainage Hose for draining out any
excess liquid, and disinfectant after the
completed contact time.
4
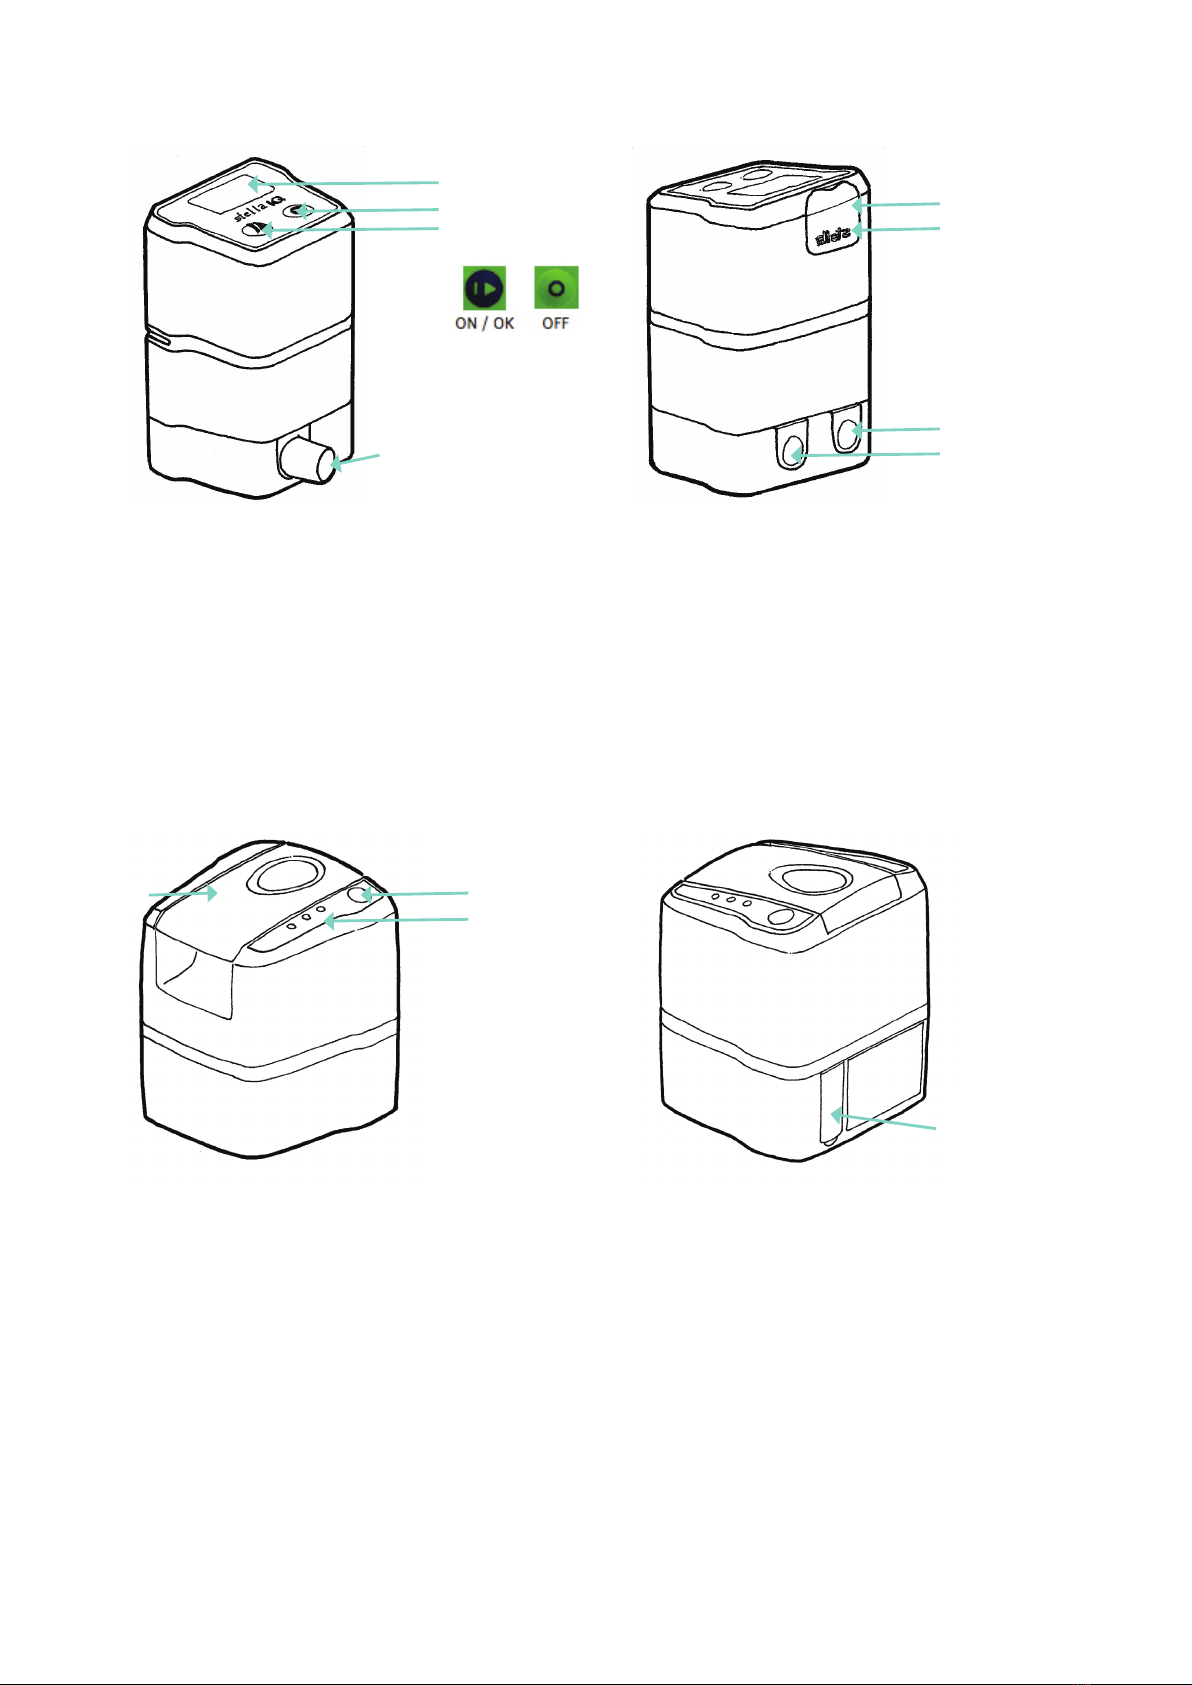
STELLA PULSE
IQ Display
ON / OK button
OFF button
IQ Drainage outlet
(connect to the
Drainage Hose)
IQ Drainage inlets
(connect to the Base)
USB port and power
port behind cover.
Note: Only Stella
adaptors should be
used, which have
an input power of:
100-240V, 50-60Hz).
LED light indicators
ON / OFF button
Pulse lid
USB port and power
port behind cover
(Input power
requirements:
100-240V, 50-60Hz)
STELLA IQ
Note: Only Stella
adaptors should be
used, which have
an input power of:
100-240V, 50-60Hz).
5
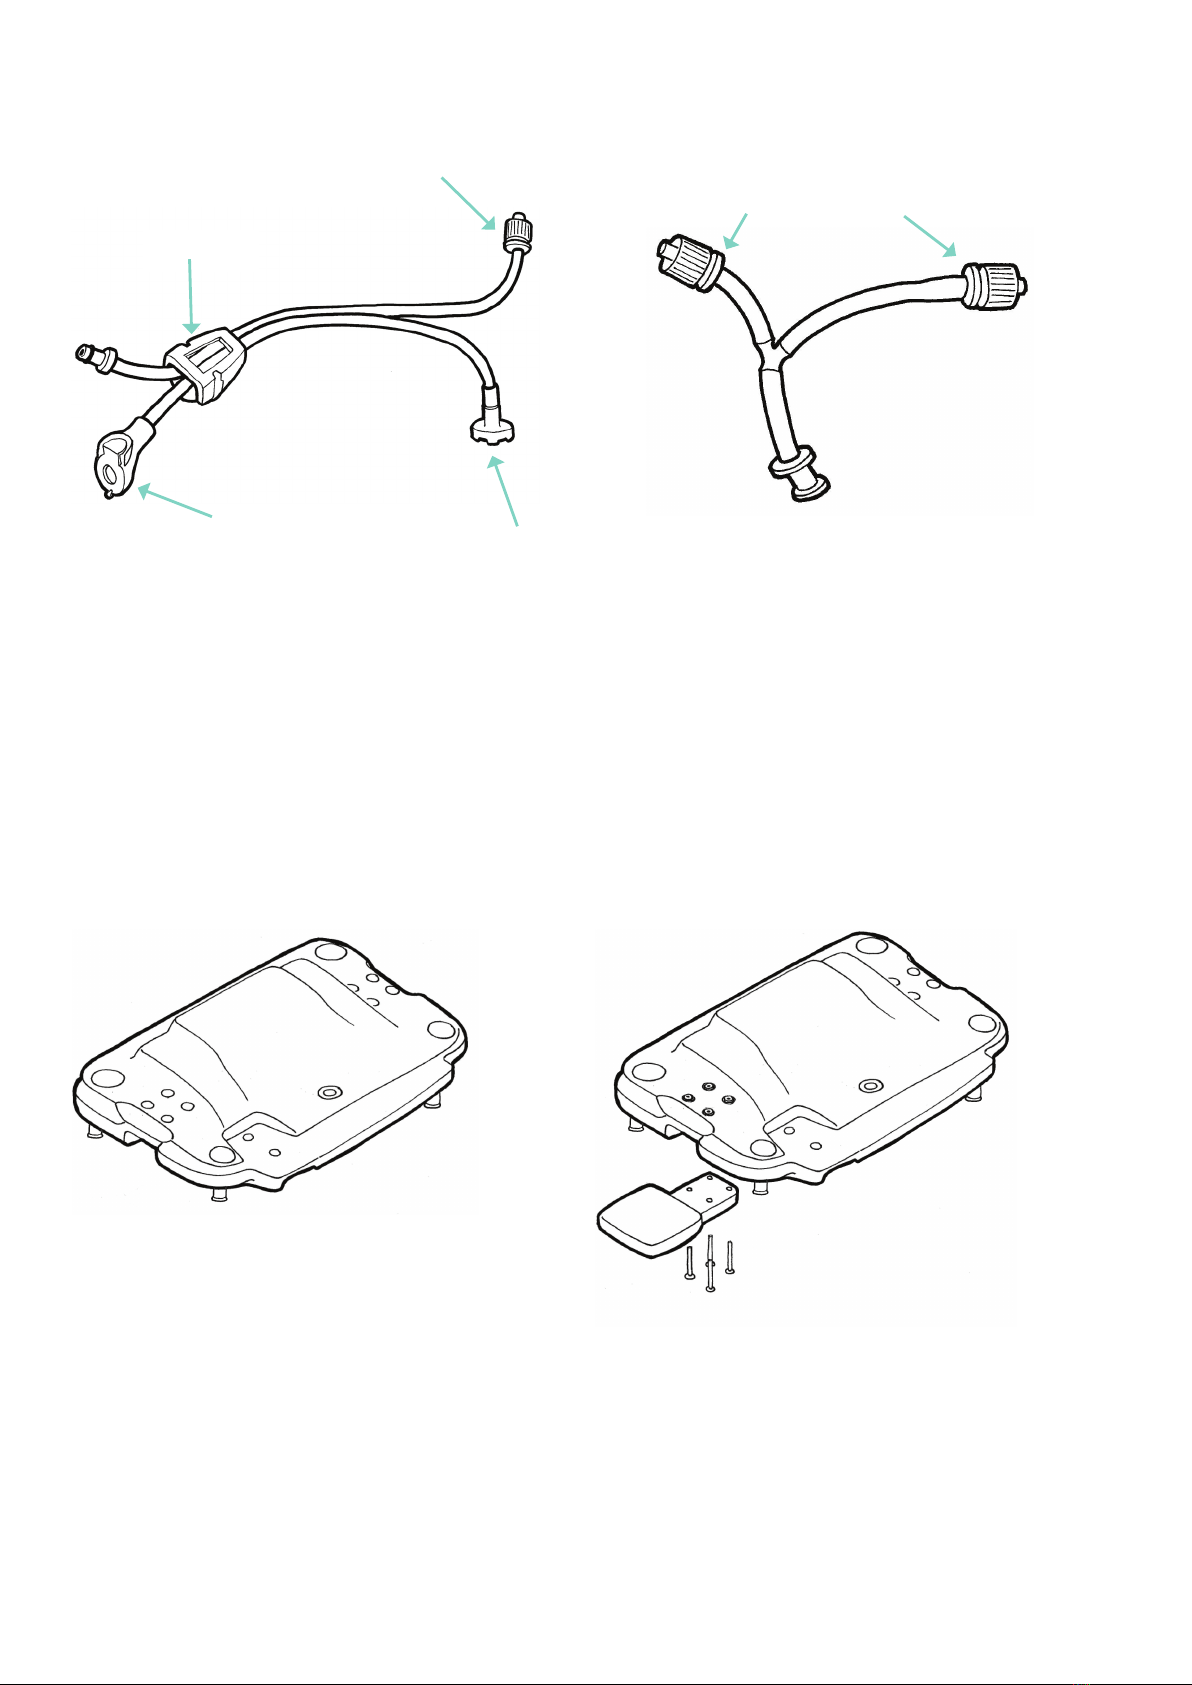
STELLA CRADLE
Connectors to Pulse unit
Tube mount
Luer lock for connection
to lumen
Disinfectant pick-up / lter
Dual Luer lock connector
(optional) for instruments
with non-removable tap
PULSE TUBE SET
STELLA A STELLA B AND C

6
Components Stella A Stella B Stella C
Stella Pack
Stella IQ Pack
Stella IQ
Power Adaptor
USB Cable
Base (Tray)
Lid
Drainage Hose
Instructions for Use
Quick Guide Wall Chart
Help Guide Wall Chart
Stella Pulse Pack
Stella Pulse
Stella Pulse Tube Set
Power Adaptor
Stella Cradle Pack
Cradle
Assembly Instructions
Stella Cradle Shelf Pack
Cradle Shelf
Shelf Fixings
Assembly Instructions
Stella System Toolbox
Small Parts Tray and Lid
Stella Lube
Grommets (2)
Drainage Outlet Cap
Stella Pump Hose Replacement Kit
Surrogate Lumen Kit
Dual Luer Lock Connector
Stella Jug
Manual Emergency Kit
TABLE OF COMPONENTS
7
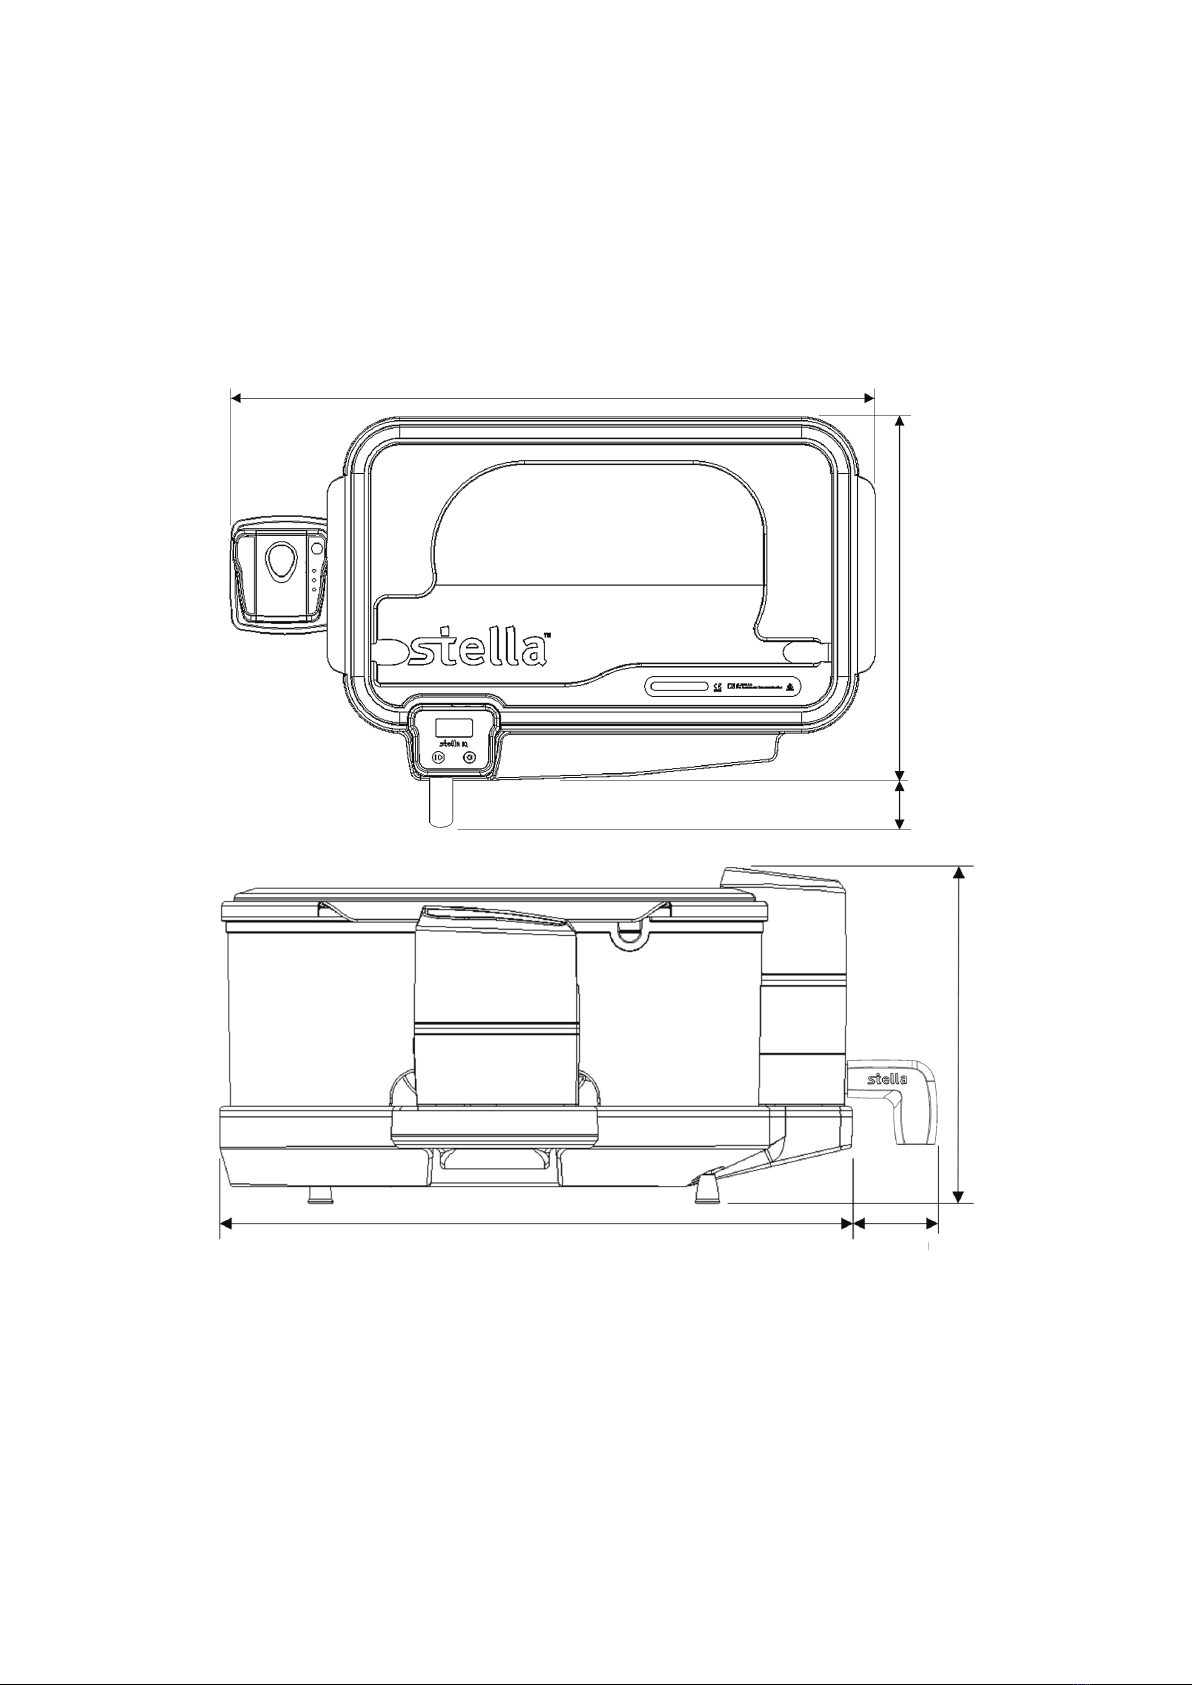
Stella System A: 70cm x 46cm x 24cm (avg.)
Stella Systems B and C: 82cm x 46cm x 24cm (avg.)
Base and Lid: 70cm x 48cm x 18cm
Drainage Hose: 6cm
SPECIFICATIONS AND STORAGE
The Base and Lid can be easily stacked and transported. When empty the weight is 5.5kg.
The drainage outlet cap can be used when transporting the Base to contain
any small droplets of disinfectant left in the Base.
IQ and Pulse should be operated and charged in temperatures between 10-35°C
with a maximum allowable humidity of 90%.
IQ and Pulse should be stored in temperatures between 10-40°C.
6cm
6cm
46cm
24cm
46cm
82cm

8
SECTION THREE
GETTING STARTED

9
INSTALLING THE STELLA SUITE SOFTWARE
Stella Suite is the software that allows the user to download important information relating to the IQ and
Pulse, and events relating to the disinfection cycle.
Windows is a supported operating System for Stella Suite, Apple is not supported.
Stella Suite Software is available via the Stella product page on www.tristel.com/stella, please download it
using a PC or Laptop prior to using the Stella System, following the instructions on the screen.
If an update or additional components are purchased, please ensure you install the relevant rmware
for your Stella package. Refer to your local Stella Agent if you are unsure.
• Remove all components from their packaging.
Ensure all components of the Stella System are clear and free of debris.
• Inspect components for damage. If damaged, report to a local Stella Agent.
• Use the supplied power adaptors to charge the IQ and Pulse for 12 - 16 hours before rst use.
• Install the Stella Suite Software.
SETTING UP THE STELLA SYSTEM
Assemble the Cradle as illustrated in the Componentry section. Once the cradle is positioned for use,
adjust the feet using the spirit level.
It is important to ensure that Stella is operated on a stable and level surface.
Otherwise, the automatic sensor that triggers the cycle will not operate reliably.
SECTION THREE: GETTING STARTED
Firmly connect the Drainage Hose to the
IQ and ensure the end of the tube is
directed into a sink or waste container.
Ensure that the end of the Drainage Hose is in
a downward position and not immersed in the
waste solution, i.e. ensure there is an air gap.
Remove the grommet nearest to the Pulse.
Attach the Tube Set to Pulse by matching
the male and female connectors. Place the
green tube mount provided rmly on to
the Base cut-out.
Ensure that the disinfectant pick-up/lter is
sitting in the inner compartment of the Base.
3
6
Once level, place the Base onto the
Cradle. Stand the Lid in an upright
position at the rear of the Base.
Apply the grommets into the tray
cut-outs.
Firmly attach the IQ to the Base.
Failure to ensure the correct connection
may result in a leak.
The drainage outlets from the Base
slide into the drainage inlets in the IQ.
Step 5 and 6 relate to Stella B and C
only. Place Pulse on the Cradle Shelf
1
4
2
5

10
SECTION FOUR
HOW TO USE

11
• Ensure the medical instrument has been cleaned according to the hospital standard procedures before
performing high-level disinfection with Stella System A. Tristel Clean for Stella, Tristel Pre-Clean Wipe or
Tristel Clean are recommended. Please refer to the medical device manufacturer’s care card or material
compatibility approval list.
• Disinfect hands and wear appropriate Personal Protective Equipment (PPE) when handling disinfectants
and medical devices.
• Do not attempt to move Stella whilst it is lled with solution.
Step 1
Push the ‘ON’ button on the IQ until you hear a beep and follow the instructions shown on the screen.
IQ performs a short self-check.
Step 2
When prompted by IQ, place the clean instrument into the Base inner compartment. Position the instrument
in a way that best ts the shape of the compartment, ensuring any connecters or non-immersible parts are
placed outside of the tray via the designated cut-outs. If the instrument is completely submersible, seal the
cut-outs with the grommets provided.
Instruments that do not t correctly in the instrument compartment must not be used in the Stella System. Ensure that
the Stella lid can be completely closed.
Step 3
Any small re-usable parts from the instrument should be placed in the Small Parts Tray with the Lid closed
and positioned into one of the two positions available within the Base inner compartment, to the left or right
of IQ.
Step 4
Prepare Tristel Fuse for Stella working solution in accordance with the user instructions.
Step 5
When prompted by IQ pour ve litres of Tristel Fuse for Stella disinfectant into the Base inner compartment.
It is recommended to position the Stella Jug on the outer wall of the Base, just right of IQ, and tilt the Jug
slowly, supporting the base of the Jug with one hand. All ve litres must be added. The disinfectant will
overow over the edges of the inner compartment into the overow compartment of the Base.
It will drain out immediately.
Step 6
Allow up to 10 seconds for the liquid sensor to detect the Tristel Fuse for Stella working solution in the Base.
The correct level of disinfectant automatically triggers the contact time count down. An audible beep
conrms the start of the ve-minute disinfection cycle.
If Tristel Fuse for Stella is not added to Stella within 10 minutes,
the cycle will be automatically aborted by IQ.
Step 7
Place the Lid onto the Base, ensuring it is closed tightly. Closing the Lid will displace more disinfectant
solution into the overow compartment. IQ displays the ve-minute contact time countdown.
Do not turn off IQ during the contact time as this will lead to ineffective disinfection and the
disinfection cycle will be recorded as invalid, with no validation code.
SECTION FOUR: HOW TO USE
STELLA SYSTEM A

12
SHUTDOWN PROCEDURE FOR STELLA SYSTEM A
Turn off IQ by pressing the OFF button. You will hear a beep indicating that IQ
is switching off.
If IQ is not turned off manually, it will automatically shut down after 15 minutes to save
the battery. It is recommended to turn off IQ immediately after use to save the battery life.
After IQ has been switched off, it can be detached from the Stella Base.
With the drainage outlet cap tted into place, the Base can be used as a transportation
unit. Wipe the unit down with a paper towel to remove any drops or spills from the drain.
A new cycle can immediately be started by pressing the OK button again.
Step 10
Press the OK button again to conrm the removal of the instrument, prompting IQ to display a Validation
Code. This Validation Code should be noted in the Stella Quality Audit Trail Record Book.
Failure to conrm the removal of the instrument will result in the IQ display back light shutting down after 15 minutes.
After 30 minutes IQ will also shut down. When the unit is turned on again, the Validation Code can still be retrieved by
pressing the OK button.
Step 9
When the Base is empty, you will hear a beep indicating that the cycle is complete. Press the OK button to
acknowledge that the cycle is complete. The disinfected instrument can now be removed for immediate use
or placed in storage.
Follow hospital procedures for instrument drying and storage.
Step 8
After the completed contact time, Stella drains the disinfectant automatically. The draining process may
take up to one minute.
Tristel Fuse for Stella does not require rinsing*.
*Based on clinical and toxicological studies. NOTE: for ophthalmology devices a rinsing step IS required. Follow your
hospital and manufacturer guidelines for information on rinsing requirements.

13
STELLA SYSTEM B
• Ensure the medical instrument has been cleaned according to the hospital standard procedures before
performing high-level disinfection with Stella System B. Tristel Clean for Stella is recommended. Please
refer to the medical device manufacturer’s care card or material compatibility approval list.
• Disinfect hands and wear appropriate Personal Protective Equipment (PPE) when handling disinfectants
and medical devices.
• Do not attempt to move Stella whilst it is lled with solution.
Step 1
Push and hold the ON button on IQ until you hear a beep. Push and hold the ON button on Pulse until
you hear a beep. IQ performs a short self-check. IQ automatically connects to Pulse and a Bluetooth sign
conrms the connection. This will remain visible throughout the operation. Follow the instructions shown
on the IQ screen.
Step 2
When prompted by IQ, place a clean instrument into the Base inner compartment. Position the instrument
in a way that best ts the shape of the compartment, ensuring any connectors or non-immersible parts are
placed outside of the tray via the designated cut-outs. If the instrument is completely submersible, seal the
cut-outs with the grommets provided.
Instruments that do not t correctly in the instrument compartment must not be used in the Stella System. Ensure the
Lid can be completely closed.
Step 3
Attach the Pulse Tube Set Luer lock connector to the instrument’s lumen port.
Step 4
Any small re-usable parts from the instrument should be placed in the Small Parts Tray with the lid closed
and positioned into one of the two positions available within the Base inner compartment, t0 the left or
right of IQ.
Step 5
Prepare Tristel Fuse for Stella working solution in accordance with the user instructions.
Step 6
When prompted by IQ pour ve litres of Tristel Fuse for Stella working solution into the Base inner
compartment.
It is recommended to position the Stella Jug on the outer wall of the Base, just right of IQ, and tilt the Jug slowly,
supporting the base of the Jug with one hand. All ve litres must be added. The disinfectant will overow over the
edges of the inner compartment into the overow compartment of the Base. It will drain out immediately.
If Tristel Fuse for Stella is not added to Stella within 10 minutes,
the cycle will be automatically aborted by IQ.
Step 7
Allow up to 10 seconds for the liquid sensor to detect the Tristel Fuse for Stella solution in the Base.
The correct level of disinfectant automatically triggers the contact time count down. An audible beep
conrms the start of the disinfection cycle.

14
Step 9
After the completed contact time Stella drains the disinfectant automatically. The draining process may
take up to one minute.
Tristel Fuse for Stella does not require rinsing*.
*Based on clinical and toxicological studies. NOTE: for ophthalmology devices a rinsing step IS required. Follow your
hospital and manufacturer guidelines for information on rinsing requirements.
Step 10
When the Base is empty, you will hear a beep indicating that the cycle is complete. Press the OK button
to acknowledge that the cycle is complete. The disinfected instrument can now be removed for
immediate use or placed in storage.
Follow hospital procedures for instrument drying and storage.
Step 11
Press the OK button again to conrm the removal of the instrument, prompting IQ to display a Validation
Code. This Validation Code should be noted in the Stella Quality Audit Trail Record Book.
Failure to conrm the removal of the instrument will result in the IQ display back light shutting down after
15 minutes. After 30 minutes IQ will also shut down. When the unit is turned on again, the Validation Code can still
be retrieved by pressing the OK button.
Turn off IQ by pressing the OFF button. You will hear a beep indicating that IQ
is switching off. When IQ is turned off, Pulse will switch off automatically.
If IQ is not turned off manually, it will automatically shut down both IQ and Pulse after
15 minutes to save the battery life. It is recommended to turn off IQ immediately after use
to save the battery.
After IQ has been switched off, it can be detached from the Base.
With the drainage outlet cap tted into place, the Base can be used as a transportation unit.
Wipe the unit down with a paper towel to remove any drops or spills from the drain.
SHUTDOWN PROCEDURE STELLA SYSTEM B
Step 8
Place the lid onto the Base, ensuring it is closed tightly. Closing the lid will displace solution into the
overow compartment. IQ displays ve-minute contact time countdown.
Do not turn off IQ during the contact time as this will lead to ineffective disinfection
and the disinfection cycle will be recorded as invalid, with no validation code.

15
• Ensure the medical instrument has been pre-cleaned according to the hospital standard procedures
before performing decontamination or cleaning and high-level disinfection with Stella System C. Tristel
Clean for Stella is recommended.
• Disinfect hands and wear appropriate Personal Protective Equipment (PPE) when handling chemical
agents and medical devices.
• Do not attempt to move Stella whilst it is lled with solution.
Step 1
Push and hold the ON button on IQ until you hear a beep Push and hold the ON button on Pulse until
you hear a beep. IQ performs a short self-check. IQ automatically connects to Pulse and a Bluetooth sign
conrms the connection. This will remain visible throughout the operation. Follow the instructions shown
on the IQ screen.
Step 2
When prompted by IQ, place a manually pre-cleaned instrument into the Base inner compartment.
Position the instrument in a way that best ts the shape of the compartment, ensuring any connectors
or non-immersible parts are placed outside of the tray via the designated cut-outs. If the instrument is
completely submersible, seal the cut-outs with the grommets provided.
Instruments that do not t correctly in the instrument compartment must not be used in the Stella System.
Ensure the Stella lid can be completely closed.
Step 3
Attach the Pulse Tube Set Luer lock connector to the instrument’s lumen port.
Step 4
Any small re-usable parts from the instrument should be placed in the Small Parts Tray with the lid closed
and positioned into one of the two positions available within the Base inner compartment, to the left or
right of IQ.
Step 5
Prepare ve litres of Tristel Clean for Stella solution in accordance with the user instructions.
Step 6
When prompted by IQ, pour ve litres of Tristel Clean for Stella working solution into the Base inner
compartment.
It is recommended to position the Stella Jug on the outer wall of the Base, just right of the IQ, and tilt the Jug slowly,
supporting the base of the Jug with one hand. All ve litres must be added. The detergent solution will overow over the
edges of the inner compartment into the overow compartment of the Base. It will drain out immediately.
Step 7
Place the lid onto the Base ensuring it is closed tightly. Closing the lid will displace more detergent solution
into the Base overow compartment. IQ displays the ve-minute contact time countdown.
STELLA SYSTEM C

16
If Tristel Fuse for Stella is not added to Stella within 10 minutes,
the cycle will be automatically aborted by IQ.
Do not turn off IQ during the contact time as this will lead to ineffective disinfection
and the disinfection cycle will be recorded as invalid, with no validation code.
Step 11
Allow up to 10 seconds for the liquid sensor to detect the Tristel Fuse for Stella working solution in the
Base. The correct level of disinfectant automatically triggers the contact time count down. An audible
beep conrms the start of the ve-minute disinfection cycle.
Step 12
Place the Lid onto the Base ensuring it is closed tightly. Closing the Lid will displace more disinfectant
solution into the overow compartment. IQ displays the ve-minute contact time countdown.
Step 10
When prompted by IQ pour ve litres of Tristel Fuse for Stella working solution into the inner instrument
compartment.
It is recommended to position the Jug on the outer wall of the Base, just right of the IQ, and tilt the Jug slowly, supporting
the base of the Jug with one hand. The disinfectant solution will overow over the edges of the inner compartment into the
overow compartment of the Base. It will drain out immediately.
Step 8
After the completed contact time Stella drains the detergent solution automatically. The draining process
may take up to one minute.
If a disinfection cycle does not follow within 15 minutes IQ will go to sleep to maintain battery life. If a disinfection cycle
does not follow within 30 minutes the cycle will be automatically aborted by IQ, a new cleaning cycle must be started.
Step 9
Prepare Tristel Fuse for Stella working solution in accordance with the user instructions.
Step 13
After the completed contact time Stella drains the disinfectant automatically. The draining process may take
up to one minute.
Tristel Fuse for Stella does not require rinsing*.
*Based on clinical and toxicological studies. NOTE: for ophthalmology devices a rinsing step IS required. Follow your
hospital and manufacturer guidelines for information on rinsing requirements.
Step 14
When the Base is empty, you will hear a beep indicating that the cycle is complete. Press the OK button to
acknowledge that the cycle is complete. The disinfected instrument can now be removed for immediate use
or placed in storage.
Follow hospital procedures for instrument drying and storage.

17
Step 15
Press the OK button again to conrm the removal of the instrument, prompting IQ to display a Validation Code.
This Validation Code should be noted in the Stella Quality Audit Trail Record Book.
Failure to conrm the removal of the instrument will result in the IQ display back light shutting down after 15 minutes.
After 30 minutes IQ will also shut down. When the unit is turned on again, the Validation Code can still be retrieved by
pressing the OK button.
SHUTDOWN PROCEDURE STELLA SYSTEM C
Turn off IQ by pressing the OFF button. You will hear a beep indicating that IQ is
switching off. When IQ is turned off, Pulse will switch off automatically.
If IQ is not turned off manually, it will automatically shut down both IQ and Pulse
after 15 minutes to save the battery life. It is recommended to turn off IQ immediately
after use to save the battery life.
After IQ has been switched off, it can be detached from the Base.
With the drainage outlet cap tted into place, the Base can be used as a transportation unit.
Wipe the unit down with a paper towel to remove any drops or spills from the drain.
A new cycle can immediately be started by pressing the OK button again.
Other manuals for Stella System A
1
This manual suits for next models
2
Table of contents
Popular Laboratory Equipment manuals by other brands

BioLAB
BioLAB BIFL-205 Operation manual

ThermoFisher Scientific
ThermoFisher Scientific iS20 with OMNIC user guide

Qiagen
Qiagen QIAcuity 911000 Information and installation guide

Affymetrix
Affymetrix DMET Plus Array user guide

Grant
Grant SUB Aqua Plus operating manual

AS
AS QC2 Series operating instructions


