Troyer Birds Paradise Convert A Rack User manual
Convert A Rack®
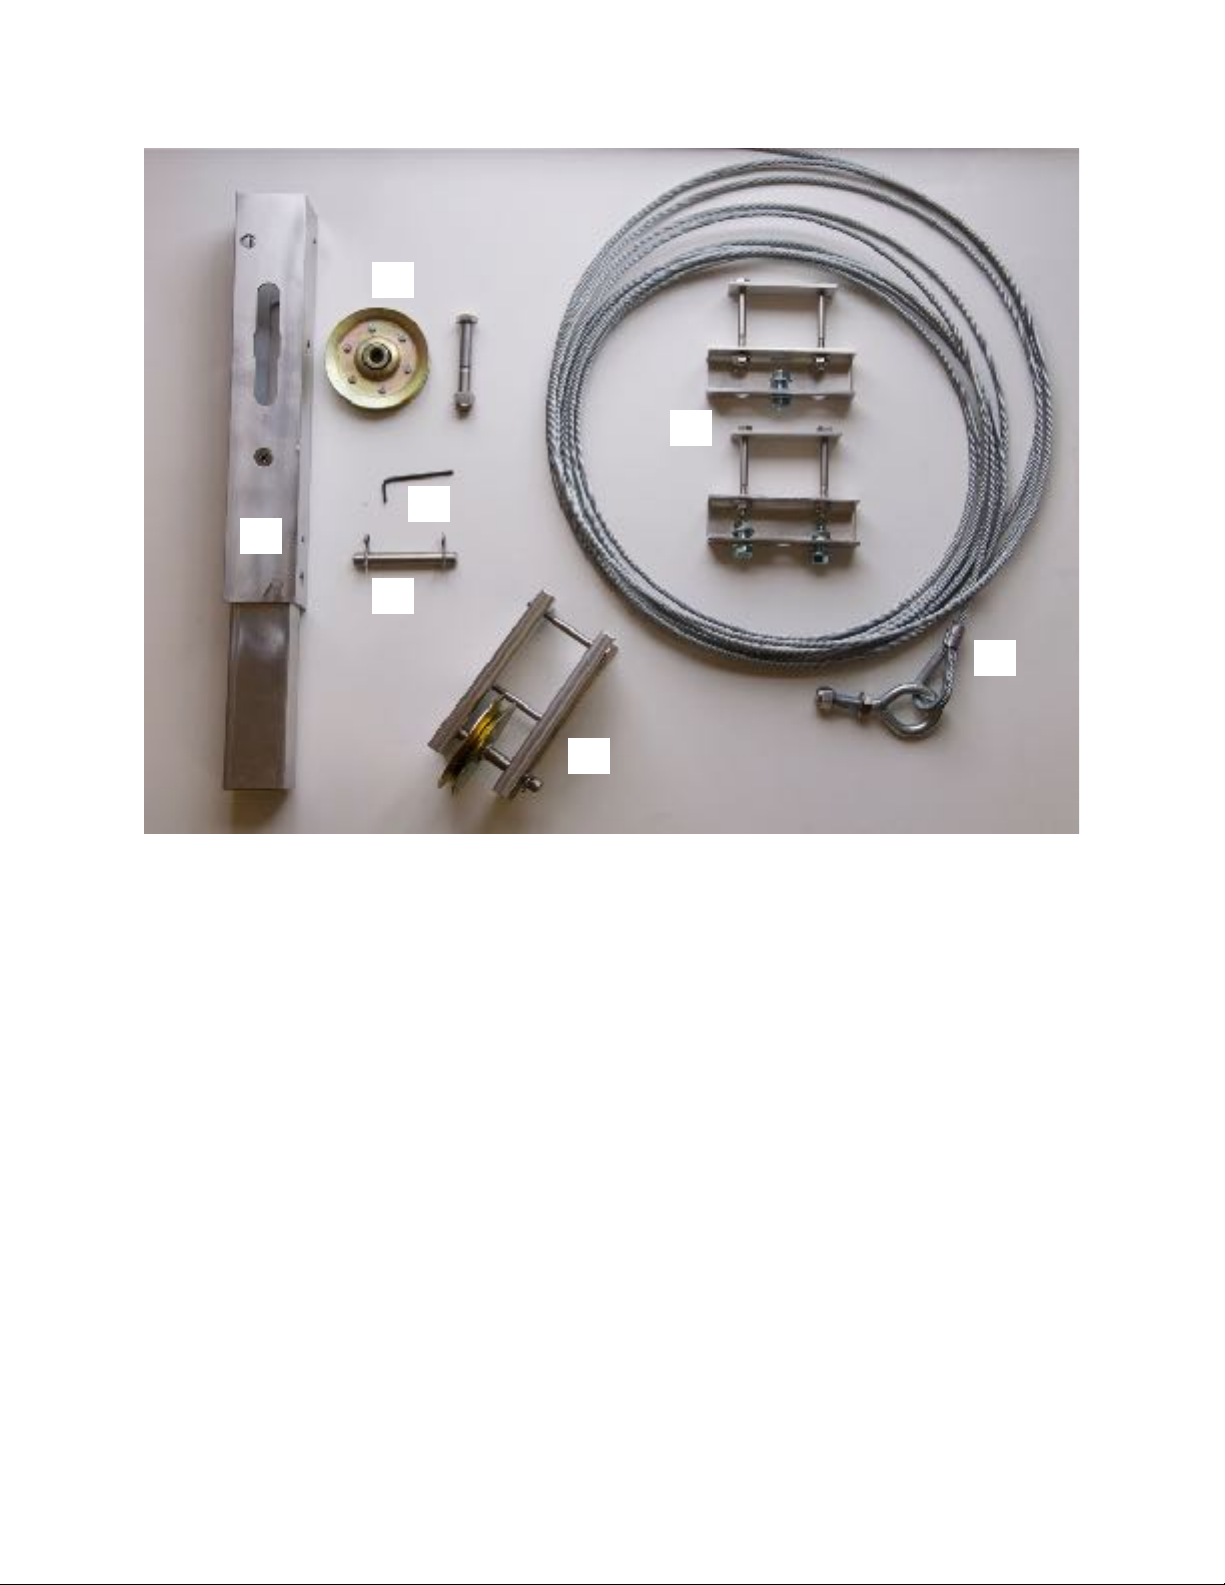
Parts
A) Extension Piece. Has slot, splice and various drilled holes.
B) 3 inch pulley with ⅜” stainless bolt with lock nut
C) 2 inch pulley guide
D) Stop pin with stainless hitch pins
E) Winch Brackets. One unit with 4 bolts and nuts the other with three
F) Allen wrench
G) Cable
H) D&L Brake Winch (optional)
Tools Needed
7/16” box wrench
9/16” box wrench
½” box wrench
⅛” allen wrench (optional depending on type of pole)
File
WD-40
© 2018 Troyer’s Birds’ Paradise 814-587-2756 Page 1
A
B
F
D
C
E
G
Use with: AAA, Multi-House & Round Rack
Convert A Rack®
Begin by removing gourds from the hub and
then your rack from the ground stake.
Depending on the year of buy you have either
a steel ground stake or aluminum. The racks
that use aluminum ground stakes may have 4
set screws that snug the pole to the stake.
Remove these set screws using a ⅛” allen
wrench (not provided). Set the set screws
aside.
You will find it so much easier to place the
rack on an overturned 33 gallon or larger
trash can. Lean the upper section on the
trash can.
Remove the rope and pulley and the eyebolt
that connects to the angle arm near the hub.
Use your 9/16” box wrench to remove both
eyebolts; one from the top of the pole the
other at the angle. You won’t be using any
of these parts and they can be discarded.
Remove the top cap from the pole. If it
doesn't wiggle o$you can use a flat headed
screw driver and pop it o$.
Remove the top perch rods using the allen
wrench provided (F). Loosen and remove the
set screws from the drilled and tapped holes.
You will be reusing these set screws and top
perch rods.
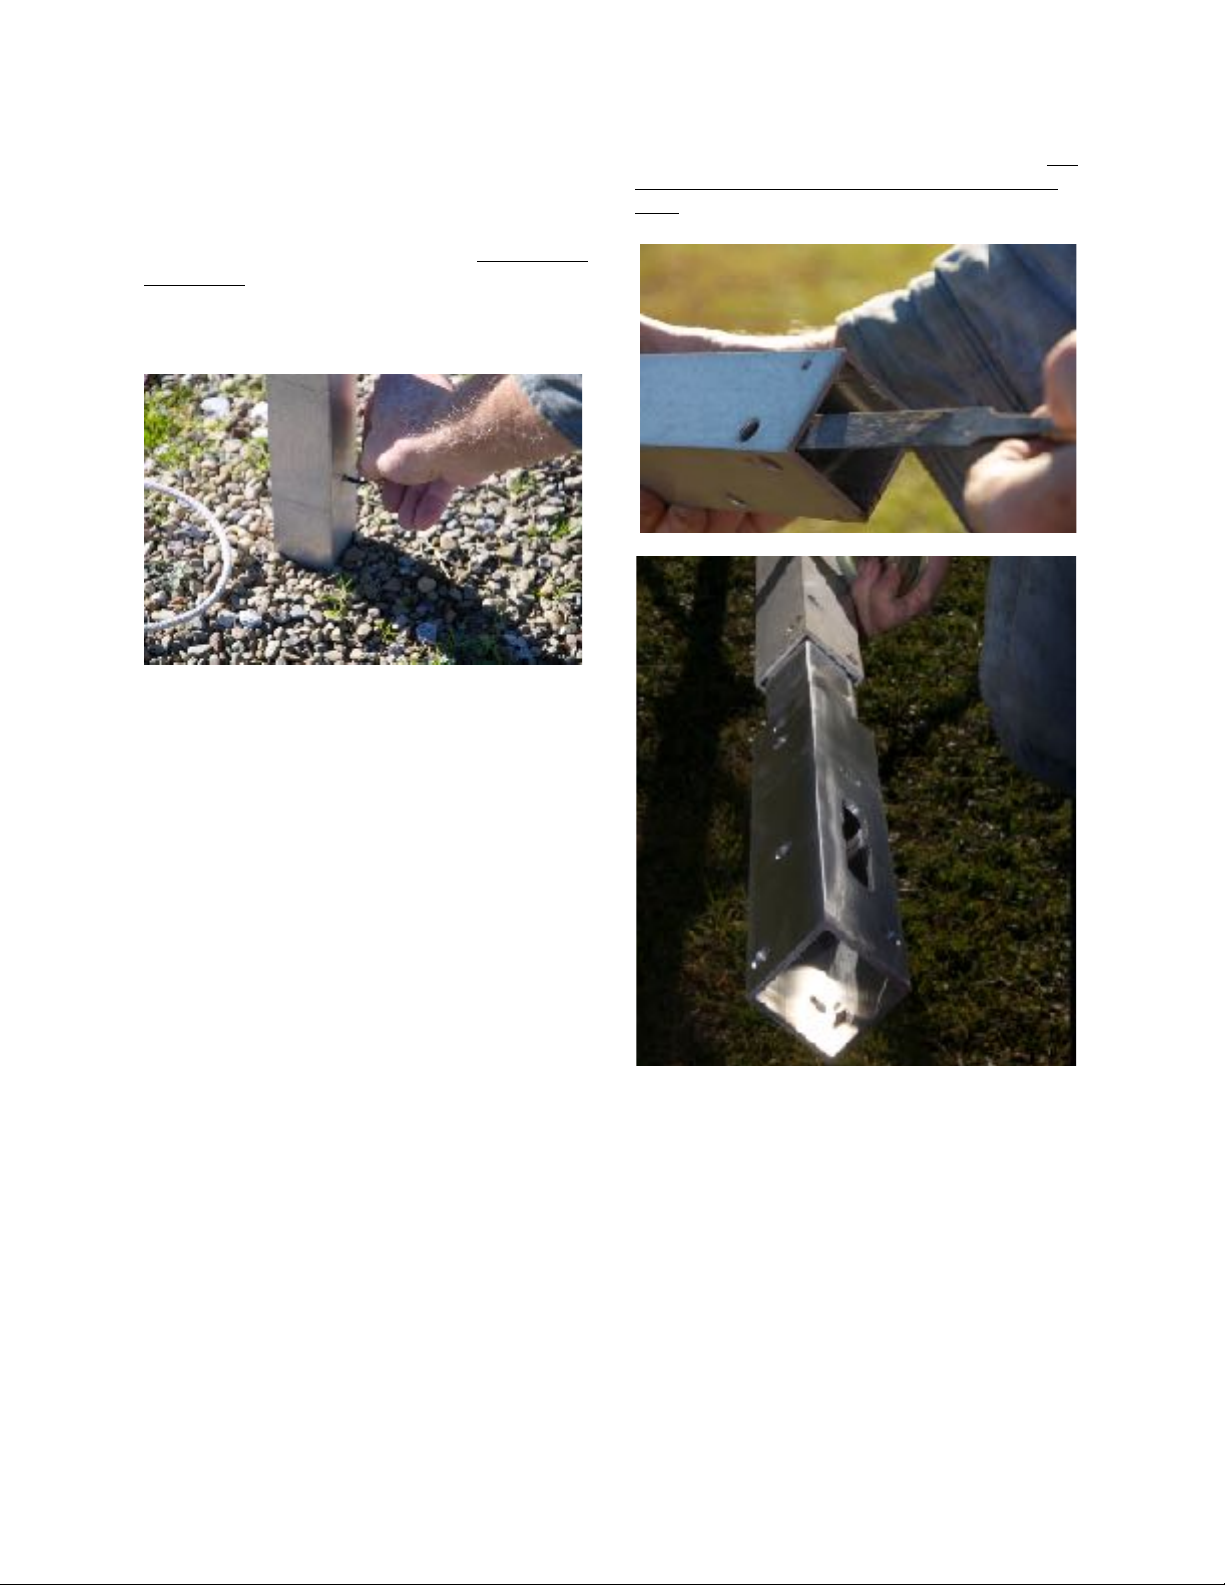
Before we can insert the extension piece (A)
we will need to remove all the burrs from
inside the top of the existing pole. Using a
flat file run the file around the edges of the
top of the pole, then insert the file into the
upper section and make sure that the
existing drilled holes are de-burred and
clean. Spray a bit of WD-40 onto the splice
end of the extension piece (A). You will need
to insert the splice so that the side that has
the slotted opening (see photo) will be on the
same side as the eyebolt hole that is on the
hub.
You can now replace the top perch rods and
top cap into the extension piece.
Next we will place the pulley into the milled
slot. Holding the edge of the pulley slip it
into the milled slot. Align the center of the
pulley to the holes drilled thru the pole.
Place the ⅜” bolt thru the pole (the hole is
drilled for you), pulley and out the opposite
end of the pole. Thread on the lock nut, but
don’t tighten yet.
Now we want to insert the stop pin. Remove
one of the inserted hitch pins, place the pin
© 2018 Troyer’s Birds’ Paradise 814-587-2756 Page 2

Convert A Rack®
in the hole below the the pulley slot. Replace
the hitch pin.
Get you cable. Unwrap the cable and lay it
out. Attach the eyebolt with nuts into the
hole on the angle which is attached to your
hub. Remove only the lock nut from the
eyebolt, slip the eyebolt into the hole, and
replace the lock nut and tighten. Use a 9/16”
wrench on the lock nut and use another open
end wrench to hold the eyebolt in place.
Tighten the lock nut all the way to the angle.
Run your cable up the pole to where the 3
inch pulley is. Place the stop nut end of the
cable thru the top of the pulley and milled
slot. If the cable is a tight fit, you can
remove the pulley by removing the bolt and
nut and then place the cable, then the pulley
and replace the bolt. Once the cable is in
place be sure to tighten the bolt and nut that
hold the pulley in place. Make sure the lock
nut is tightened all the way to the pole.
You may want to flip the pole over because
we want to run the cable inside the hub,
between the hub and the pole. The cable
must go thru the center and be in between
any glide buttons found on your hub. It may
take a few tries till the cable comes out
where needed. Once the cable is thru the
hub pull on the cable and remove the slack.
We are going to continue to work on this side
of the pole, only we are going to place our
attention at the bottom half. First we want to
remove the rope winder. Use your 7/16”
wrench to loosen the bolt and nut. You wont
be using the rope winder any more, it is
aluminum and can be recycled or you can
keep it for another project.
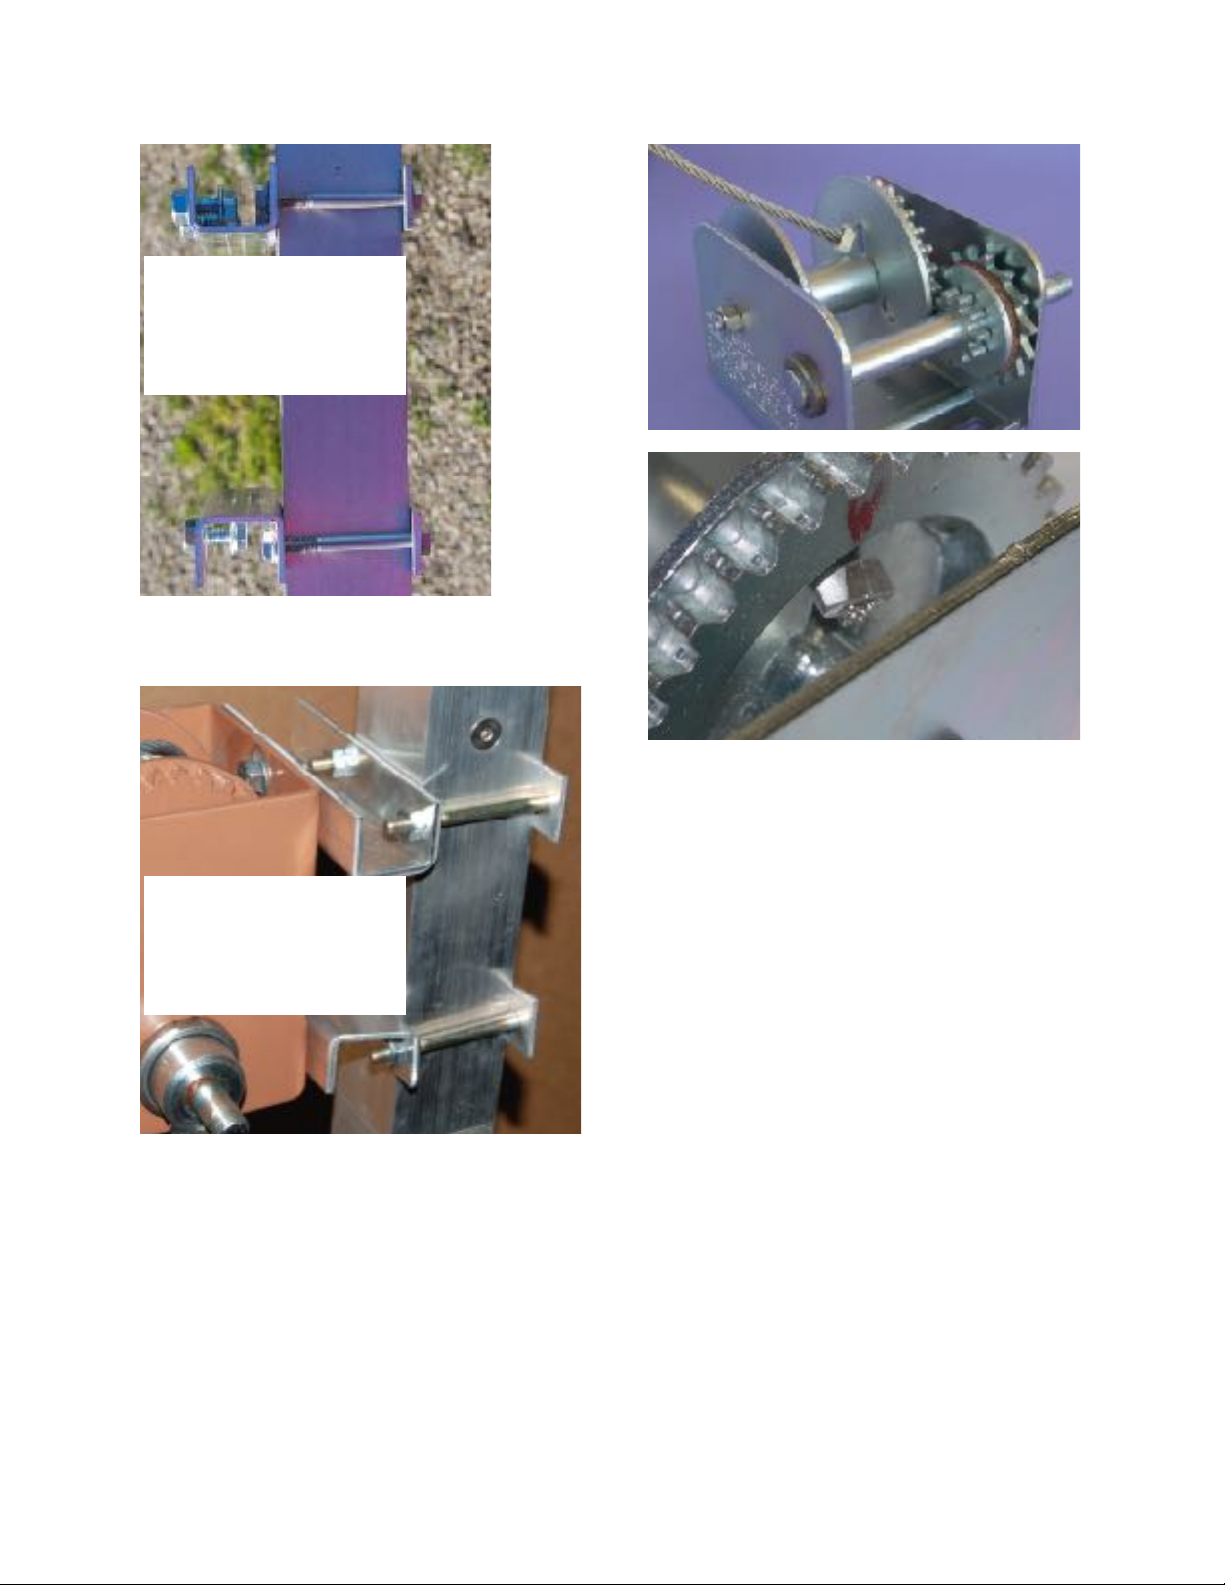
It is time to install the 2 inch pulley guide on
to the pole. The pulley guide is assembled.
Notice that one of the bolts behind the pulley
is low and one is high. You want to place the
pulley guide on the pole so that the lower
bolt is butted against the pole. Remove the
nut from the higher bolt, pull the pulley
guide open and slip the entire pulley guide
over the pole. Insert the bolt and nut and
tighten. Make sure the pulley guide is level
using a square.
The cable will then slip behind the pulley and
in front of the bolt that butts up against the
pole.
Winch brackets and winch. When assembling
the winch brackets to the winch and onto the
pole, you will want the winch bracket with
the one single bolt to face towards the
ground, as well as the other winch bracket,
with 2 bolts should also face the ground.
It is much easier to attach the winch brackets
first to the winch then the entire assembly on
to the pole. The small bolts on the brackets
will align with the holes found on the D&L
brake winch. If using another brand name
brake winch, you may need to drill the winch
to match the bracket.
© 2018 Troyer’s Birds’ Paradise 814-587-2756 Page 3
Convert A Rack®
Install
the
entire
winch
with
brackets
onto the
pole,
about
6-8”
below
the
pulley
guide. A
second
person
holding
the
winch
assembly while you install the unit will make
it much easier.
It’s now time to attach the cable to the brake
winch. We have installed a stop nut on to the
end of the cable. Insert the end of the cable
with the stop nut into the OVAL hole on the
gear side of the brake winch. Insert the stop
nut from
the inside of the winch so that it goes thru
the oval hole and out. Turn the cable so that
stop nut is horizontal to the hole and when
you pull on it it won’t come back out thru the
oval hole. Attach the handle of the winch
following the instructions provided with the
brake winch. Once the cable is on remove
any slack in the cable. Stand your pole up
and have your helper hold the pole. You will
be placing the entire unit back over your
ground stake but before you do so make
sure that the hub is up high enough on the
pole so that as you lower the unit over the
ground stake it won’t bonk you on the head.
Use your helper as it will take both of you to
raise the entire unit.
IMPORTANT!!! There is a 50 pound
minimum load with the winch. You must put
your gourds on before raising or lowering the
hub.
When raising your hub, stop when you feel
the hub hit the stop pin. Never over tighten
the winch. It places to much stress on the
entire unit.
If your unit had the 4 set screws on the
bottom of the pole, replace them.
© 2018 Troyer’s Birds’ Paradise 814-587-2756 Page 4
Updated: The Upper
Winch Bracket should
face down towards the
ground.
Updated: The Upper
Winch Bracket should
face down towards the
ground.
Popular Lawn And Garden Equipment manuals by other brands

Sunforce
Sunforce SOLAR user manual

GARDEN OF EDEN
GARDEN OF EDEN 55627 user manual

Goizper Group
Goizper Group MATABI POLMINOR instruction manual

Rain Bird
Rain Bird 11000 Series Operation & maintenance manual

Cub Cadet
Cub Cadet BB 230 brochure

EXTOL PREMIUM
EXTOL PREMIUM 8891590 Translation of the original user manual


Vertex
Vertex 1/3 HP Maintenance instructions

GHE
GHE AeroFlo 80 manual

Land Pride
Land Pride Post Hole Diggers HD25 Operator's manual

Yazoo/Kees
Yazoo/Kees Z9 Commercial Collection System Z9A Operator's & parts manual

Premier designs
Premier designs WindGarden 26829 Assembly instructions

Snapper
Snapper 1691351 installation instructions