true-i HMBS-200 User manual

true-i 차량용 영상 블랙박스 HMBS-
200 사용자 설명서
true-i Vehicle Blackbox HMBS-200
User Manual
B 급 기기(가정용 방송통신기기)
이 기기는 가정용(B급)으로 전자파적합등록을 한 기기로서 주로 가정에서 사용하는
것을 목적으로 하며, 모든 지역에서 사용할 수 있습니다.
Caution : Any changes or modifications in construction of this device which are not expressly
approved by the party responsible for compliance could void the user's authority
to operate the equipment.
This device complies with part 15 of the FCC Rules. Operation is subject to the following two
conditions: (1) This device may not cause harmful interference, and (2) This device must accept
any interference received, including interference that may cause undesired operation.
NOTE: This equipment has been tested and found to comply with the limits for a Class B digital
device, pursuant to Part 15 of the FCC Rules. These limits are designed to provide reasonable
protection against harmful interference in a residential installation. This equipment generates, uses
and can radiate radio frequency energy and, if not installed and used in accordance with the
instructions, any cause harmful interference to radio communications. However, there is no
guarantee that interference will not occur in a particular installation. If this equipment does cause
harmful interference to radio or television reception, which can be determined by turning the
equipment off and on, the user is encouraged to try to correct the interference by one or more of
the following measures:
-- Reorient or relocate the receiving antenna.
-- Increase the separation between the equipment and receiver.
-- Connect the equipment into an outlet on a circuit different
from that to which the receiver is connected.
-- Consult the dealer or an experienced radio/TV technician for help.

사용하기 전에 Disclaimer
본 기기를 사용하는 데 있어 유의 사항이니 반드시 읽어 주시기 바랍니다.
Please read the following “TERMS OF USE” prior to opening of the packaging.
TERMS of USE
1. 기기의 동작 Device Operation
본 제품의 고장 및 오동작에 의한 손해, 저장된 데이터의 손실에 의한 손해, 기타 본 제품을 사
용하면서 발생되는 손해에 대해서는 제조사는 그 책임을 지지 않습니다.
HMBS-200 차량용 영상 블랙박스는 사고 발생 시에 사고 전후의 영상 및 기타 데이터를 저장
하는 것을 목적으로 제작된 기기이나, 모든 사고에 대하여 사고 영상 및 기타 데이터를 저장하는
것을 보장하지는 않습니다.
Hanman Technology is not liable for any compensation or legal responsibility of unexpected
device malfunction or loss of important data at any instance. Please read through whole user
manual including safety guidelines and operation. HMBS-200 blackbox is designed to record
video before and after events at normal operation condition; however, the blackbox does not
guarantee video record for all events at any conditions.
2. 부적절한 사용 Product abuse
본 제품을 이용하여 부적절한 영상 및 음성 촬영 시 사용자에 의한 저작권, 초상권, 사생활 침
해에 대해 제조사는 책임을 지지 않습니다. 또한 본 기기의 사용 규격이나 조건 이외의 환경에서
사용하여 발생하는 사용자의 상해, 손상 등에 대해서도 책임을 지지 않습니다.
Hanman Technology is not liable for any compensation or legal responsibility of individual,
privacy, copyright infringement that arise through user abuse by taking inappropriate video or
audio. In addition, Hanman Technology is not liable for any compensation or legal responsibility
of product damage or personal injury that arise through use of the device in an environment not
defined by the product use guideline.
3. 안전 운행 For safe driving
본 기기를 운전 중 조작하면 사고의 원인이 될 수 있으므로 안전한 장소에 주/정차한 후 기기를
조작하여 주십시오. 운행 중 기기 조작에 의한 사고로 발생하는 모든 피해에 대해 제조사는 손해
배상을 하지 않습니다.
Please park your vehicle at a safe place before operate the device. Hanman Technology is
not liable for any compensation or legal responsibility of vehicle accidents that caused by
operating the device when vehicle was in motion.
4. 사양 변경 Device specification change
본 기기의 규격, 소프트웨어, 매뉴얼의 내용, 구성품은 사용자의 사전동의나 사전통보 없이 변

경될 수 있습니다.
Product spec, software, user manual and/or others related to product can be changed without
prior notice.
본 기기의 포장을 개봉하는 것은 위에 대해 사용자가 동의하는 것으로 간주합니다. 만약 위 내
용을 동의하지 않으면 개봉을 하지 않은 채로 본 제품을 반품하여 주시기 바랍니다.
By opening the plastic wrap of the device, user has agreed to the all terms as outlined above.
For any reason user does not agree the above mentioned, please do not open the device wrap
and return the device to where the product was purchased from.

안전을 위한 주의사항 Safety Guidelines
사용자의 안전을 지키고 부주의나 사고로 인한 재산상의 손해 및 불편을 방지하기 위한 내용입니
다. 반드시 아래 내용을 읽고 올바르게 사용해주십시오.
For your safety and to protect the device from mishandling and through unintended incident,
please read and follow instructions as outlined below.
절대로 분리, 수리, 개조하지 마십시오.
제품의 오동작 혹은 고장을 유발할 수 있으며 당사가 책임지지 않습니다
Do not open, repair and/or make any change to the device
It can lead to system malfunction or defects which Hanman Technology will not be liable for.
차량 내부 또는 제품을 청소할 경우 물이나 휘발성 약품으로 청소하지 마십시오.
제품의 고장을 유발할 수 있으며 화재 및 감점을 일으킬 수 있습니다.
Do not use water or flammable substance when cleaning the device.
It can cause system defect as well as potential fire or electronic short circuit.
제품에 무리한 충격이나 이물질을 투입하지 마십시오.
제품이 손상되거나 화재 및 감전의 위험이 있습니다.
Do not apply intentional shocks or insert substance into the device.
It can cause fire and/or electronic short circuit.
본체의 카메라에 이물질이 끼거나 시야를 가리지 않도록 주의하십시오.
카메라 촬영이 정상으로 되지 않아 올바른 영상을 얻을 수 없습니다.
(※ 창문에 반사되어 보일 수 있으니 제품 주변에는 가급적 다른 물건을 놓지 마십시오.)
Please keep the camera lens clean and free of any obstacles within the lens’ viewing angle,
to obtain clean and precise video during the recording.
(※ It is suggested not to place objects near the blackbox and windshield as they can be seen in
the video through reflection from the windshield.)
심한 진동이나 충격에 장시간 노출된 경우 장치의 위치를 다시 확인해 주십시오.
심한 진동에 노출된 경우 장치의 위치변경에 따른 오작동이 발생할 수도 있습니다. 안전한 장소
에 정차하시고 제 위치를 바로잡아 주십시오.
Please check and reposition the device when it is exposed to extreme shocks or vibration for
a period of time.
Device will not record appropriate videos if the orientation of blackbox is out from user’s
intention or holder is loose due to the extreme shocks or vibration. In this case, user shall park
the vehicle at safe place for correction.
과도하게 썬팅한 차량에는 촬영 영상이 희미하거나 왜곡될 수 있습니다.
썬팅 차량은 반드시 촬영 영상 결과를 확인한 후 설치해 주시기 바랍니다
Recording of video quality may be affected for vehicle having heavily tinted windshield.

Please check the windshield condition before installing the device.
제공된 케이블만 사용하고, 지시된 차량 전원만 사용하여 주십시오.
동봉된 케이블 이외의 케이블을 사용하거나 케이블을 다른 전원에 연결하면, 고장 및 화재의 원
인이 될 수도 있습니다.
Please use the power cable supplied for device power from vehicle and power supply shall
not exceed indicated voltage range in the specification.
Using other cable aside from cable supplied, or attaching the device to a wrong power supply can
lead to system defect/malfunction and can cause fire.
차량 내 다른 제품 부착 시 본 제품을 가리지 않도록 설치하여 주십시오.
GPS가 수신되지 않을 수 있습니다.
Please do not place any other device or object in front or top of the device after installation.
GPS signal may be hindered or affected when obstacles are placed along the signal path or
sun protection film is installed on windshield.
터널, 역광이 심한 곳, 야간에는 영상이 정상적으로 녹화되지 않을 수 있습니다.
극단적인 상황에서 녹화된 영상이 평소보다 불량할 우려가 있으므로 유의하여 주시길 바랍니다.
Please take note that a video may not be recorded correctly when driving through tunnel,
under high-beam from other side of the road, against the direct sunlight and during the
night.
운전 중에 제품을 조작하거나 응시하지 마십시오.
교통사고의 원인이 될 수 있습니다.
Do not operate or look at the device when driving.
It can lead to unwanted vehicle accident.
과도한 충격으로 오작동을 일으킬 수 있습니다.
이러한 경우 제품 자체의 손상 등의 원인으로 본 제품에 데이터가 기록되지 않을 수 있으므로 이
점 유의하여 주시길 바랍니다.
Please take note that under extreme shock, the device may not record video by device
breakdown.

구성품 Contents
본체 Main device 거치대 Holder
차량용 어댑터(시가잭) Power cable USB 케이블 USB Cable
SD 메모리 카드 SD memory card 사용자 설명서 1권 User Manual
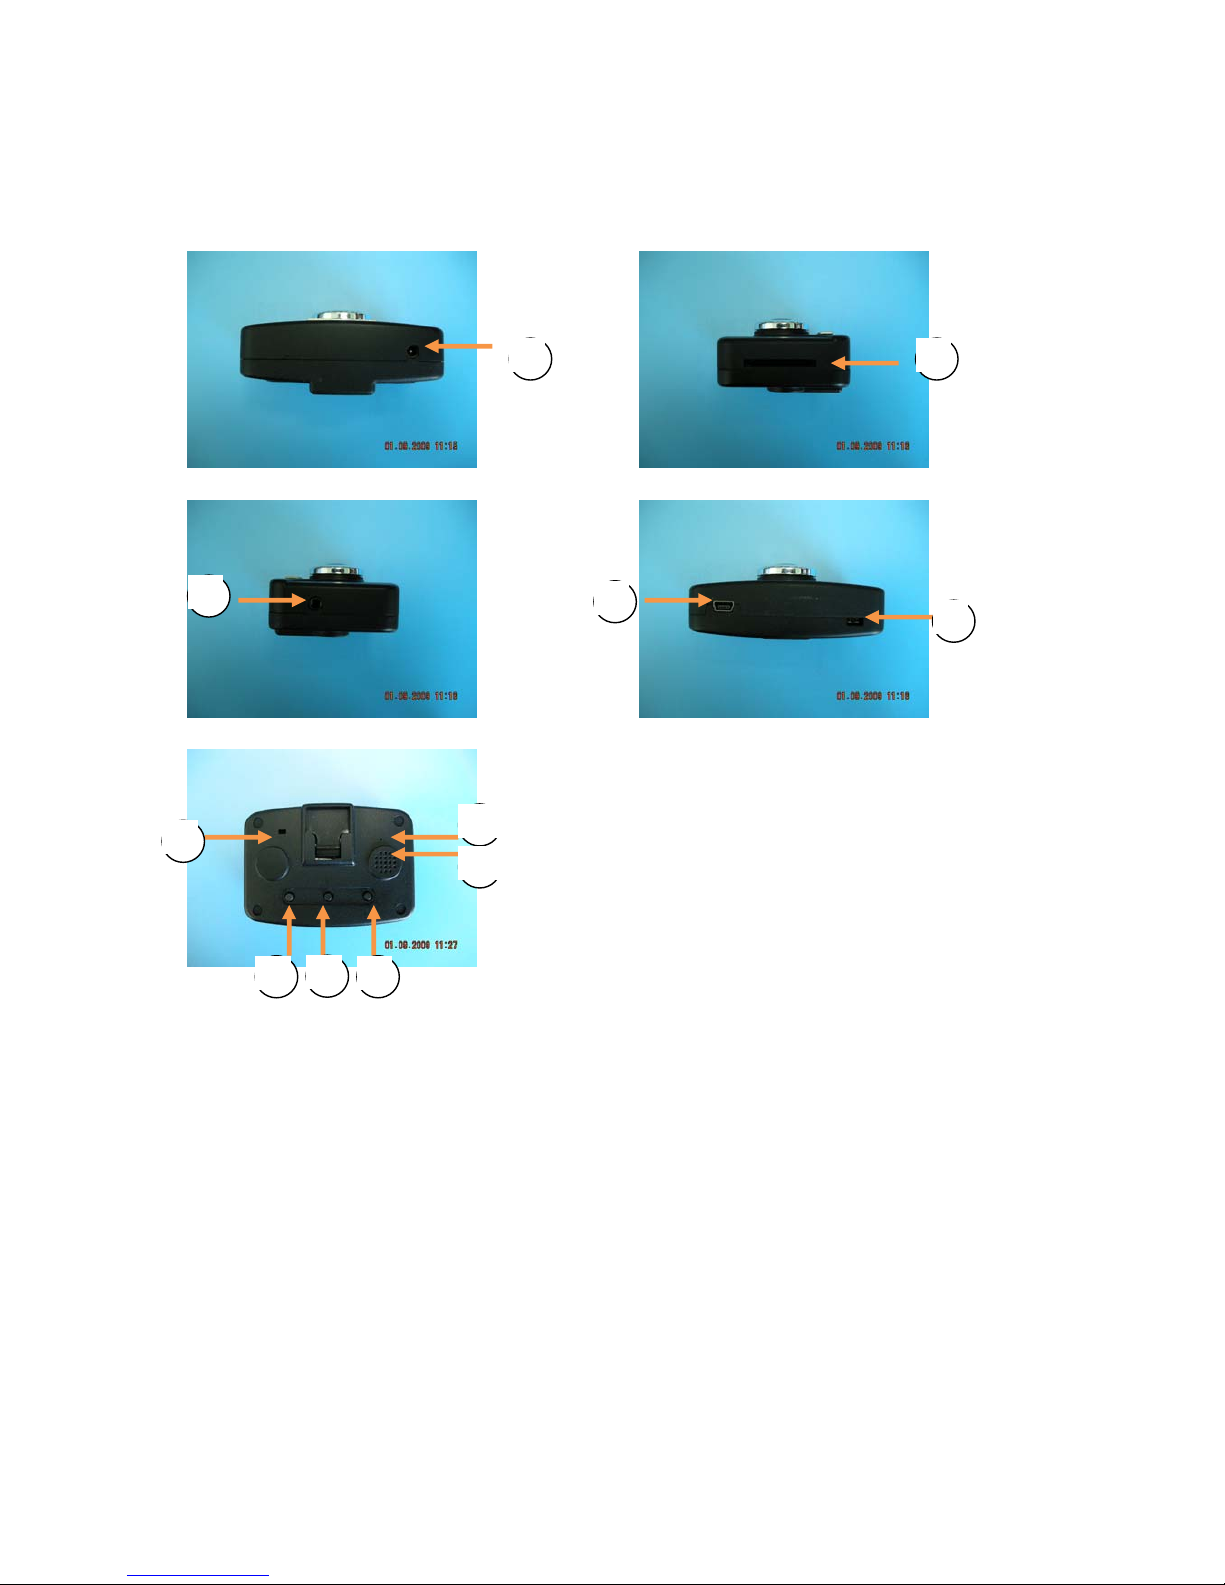
각 부분의 명칭 Device Features
12
3 5
4
10
9
11
7
6 8
1. 전원 어댑터 단자 Power Input
2. SD 카드 슬롯 SD memory card slot
3. AV-OUT 단자 (외부 영상/음성 출력 단자) AV-OUT
4. 전원 버튼 Power button
5. USB 단자 USB slot
6. 모드 버튼 (블랙박스 모드 전환/ 재생 파일 탐색)
Mode button (blackbox mode/ playback list backward)
7. 재생 버튼 (블랙박스 파일 재생)
Play button (play/stop blackbox event video)
8. 영상 녹화 버튼 (상시녹화모드/ 재생 파일 탐색)
Record button (continuous record/ playback list forward)
9. 상태 LED Status LED

10. 마이크 Microphone
11. 스피커 Speaker

제품의 특징 Technical Details
1. 카메라 모듈 Camera Module
zVGA(가로 640, 세로 480 화소수)급 CMOS 센서와 시야각 160.5° (수평 121°, 수직 88°), F/# 1.8 의
고급 렌즈 사용.
VGA (640x480) CMOS sensor and F/# 1.8 hi-end lens with 160.5° viewing angle (121° horizontal, 88°
vertical)
z상시 초당 15 프레임의 영상을 저장(주간/야간/주차감시 모드 시 동일).
15fps video record speed at daylight/night/parking mode
2. G-Sensor
z전후/좌우/상하 3 방향의 가속도 값을 중력의 최대 8 배까지 측정 가능.
-Max 8G measuring capability at forward/backward, up/down and left/right direction.
z초당 100 회의 가속도 정보를 측정하여 보다 정밀한 사고 충격 상황을 기록.
-Max 100 point of measurement data per second for more accurate record during accident/event.
3. GPS
zSirfStar III 내장. 위도/경도/속도/방향/고도정보 제공.
-SirfStar III supported. Provide Longitude/angle/speed/direction/altitude information.
z지도 데이터와 연동하여 사고 위치 추적 가능.
- Capable of tracking actual location of event/accident by connecting to local road/street map
information.
4. 내부 및 외장 메모리 (internal and external memory)
z내부 1GB NAND 플레시 메모리 장착. 외부 SD/SDHC 카드 지원.
-1GB internal NAND flash memory. Able to support SD/SDHC memory card.
z사고 시 내부 플레시 메모리에 저장함으로써 외장 메모리에 직접 저장하는 것 보다 안정적으로
Event 상황을 기록.
-Records all event/accident into built-in internal memory for more accurate/reliable data record.
z 내부 플레시 메모리에 저장된 파일을 자동으로 외장 메모리 카드에 복사 가능.
- All event/accident information can also automatically be saved into external memory card.
5. 비디오/오디오 출력
Video/Audio output
z자체 비디오/오디오(Mono) 출력 단자를 제공하여 네비와 연동 가능.
- Can link to external video/audio devices with A/V IN, e.g. car navigator (Not included) using built-
in video/audio output socket (mono)
6. 비상 보조 배터리 내장
Built-in Emergency back-up battery
z리튬 폴리머 전지를 내장하여 사고 시 차량의 전원이 차단되어도 안전하게 사고 상황을 저장.
With Lithium-polymer battery built-in, Can record event/accident even without power supply from
external power source.
z최대 10 분간 기기 동작(완전 충전 시).
- Maximum 10min battery life (after fully charged)

z자체 온도 감지를 통한 배터리 보호.
- Battery protection through built-in thermal sensing capability.
7. 내장 스피커
Built-in internal speaker
z0.4W 의 내장 스피커를 통해 각종 상황을 음성으로 안내.
-0.4W speaker for event alarming/sound
8. USB 저장 장치 기능
USB slot for external memory
zPC USB 포트에 연결하여 내부 1GB 메모리를 USB 저장 장치로 사용 가능.
-For file transfer to PC from built-in 1GB internal memory through PC USB slot
-Can be used as external memory device
9. 소형/경량 사이즈
Compact and Light weight
z가로 77mm, 세로 54mm, 최소두께 18mm, 최대두께(렌즈 및 거치대 돌출 부분 포함) 33mm 로
소형/경량(거치대 포함 100g 이하) 사이즈 구현.
-Compact : 77mm (H) x54mm (V) x18mm (T) and 33mm (incl. lens and holder)
-Lightweight : less than 100g (incl. holder)
10. Event 저장 모드
Event record mode
zEvent (충격/가감속) 전후 총 40 초의 영상/음성/가속도/GPS 정보 저장.
-Record total 40sec of video/audio/acceleration/GPS information before/after event at 15fps
11. 상시 녹화 모드 Continuous record mode
zMPEG4 압축 코덱을 사용 영상(VGA) 및 음성(192Kbps Mono)을 최대 초당 25 프레임으로 저장.
-Max 25 fps video and 192kbps mono audio record capability using MPEG4 codec
z저장 시간은 사용자 설정 가능.
- User configurable record time length
12. 주차 감시 모드 Parking monitoring mode (Surveillance mode)
z상시 전원 사용 시 주차 감시 기능 제공.
-Can monitor events during parking mode when continuous power is available (vehicle power)
z별도 전원 관리 기능으로 소비 전력 최소화(1W 이하).
-Low power consumption (less than 1W) by build-in Special power saving feature
zEvent (충격)가 발생하거나 차에 근접한 움직임이 감지되면 전후 총 40 초간 영상/음성/가속도 정보
저장.
-Can record total 40sec video/audio/acceleration information before and after event or when motion
is detected on the camera viewing span/angle.
z상시 전원의 전압을 측정하는 기능 내장. 차량 배터리 방전을 방지.
-Built-in power monitoring feature and auto power cut-off to prevent full vehicle battery discharge.
z자동으로 Event 저장 모드 및 주차 감시 모드 전환 기능.
-Can interchange automatically between event record mode and parking monitoring mode.
13. 비상 저장 버튼 Emergency event recording control button

z외부 비상 저장 버튼 연결 가능.
-Link available for external emergency control button (not provided, optional)
z사용자가 기기의 버튼이나 외부 비상 저장 버튼을 누르면 전후 총 40 초의 영상/음성/가속도/GPS
정보 저장.
-Can record total 40sec video/audio/acceleration/GPS information through internal record button or
external emergency button (required optional emergency recording button).
14. 내장 재생기
Built-in video/audio player
z자체 블랙박스 플레이어를 내장 AV 출력을 통해 동영상 및 음성 데이터를 재생할 수 있음.
-Can play video/audio using its built-in player through AV output socket.
z네비게이션의 AV 입력 단자에 바로 연결하여 사용 가능.
-Can link directly to display device or GPS navigator through AV input socket.
z사고 시 별도의 PC 가 없어도 네비게이션에 연결하여 즉시 상황을 재생할 수 있음.
- Can be readily displayed on display device or GPS navigator’s monitor screen without PC.
설치 방법 Device installation
1. 거치대 설치 How to attach device holder
거치대는 본 기기가 운전자의 시야를 가리지 않는 범위 내에서 카메라가 차량의 주행방향을
향하도록 부착하여 주십시오. 거치대에 부착되어 있는 양면테이프를 제거한 후 원하는 위치의
유리에 간단히 부착할 수 있습니다.
Attach device holder on the windshield facing user. Make sure that the holder does not
block or obstruct the camera lens viewing angle. Once proper location is found, user can
easily attach the holder onto the front windshield after removing the protection layer from
3M’s tape.
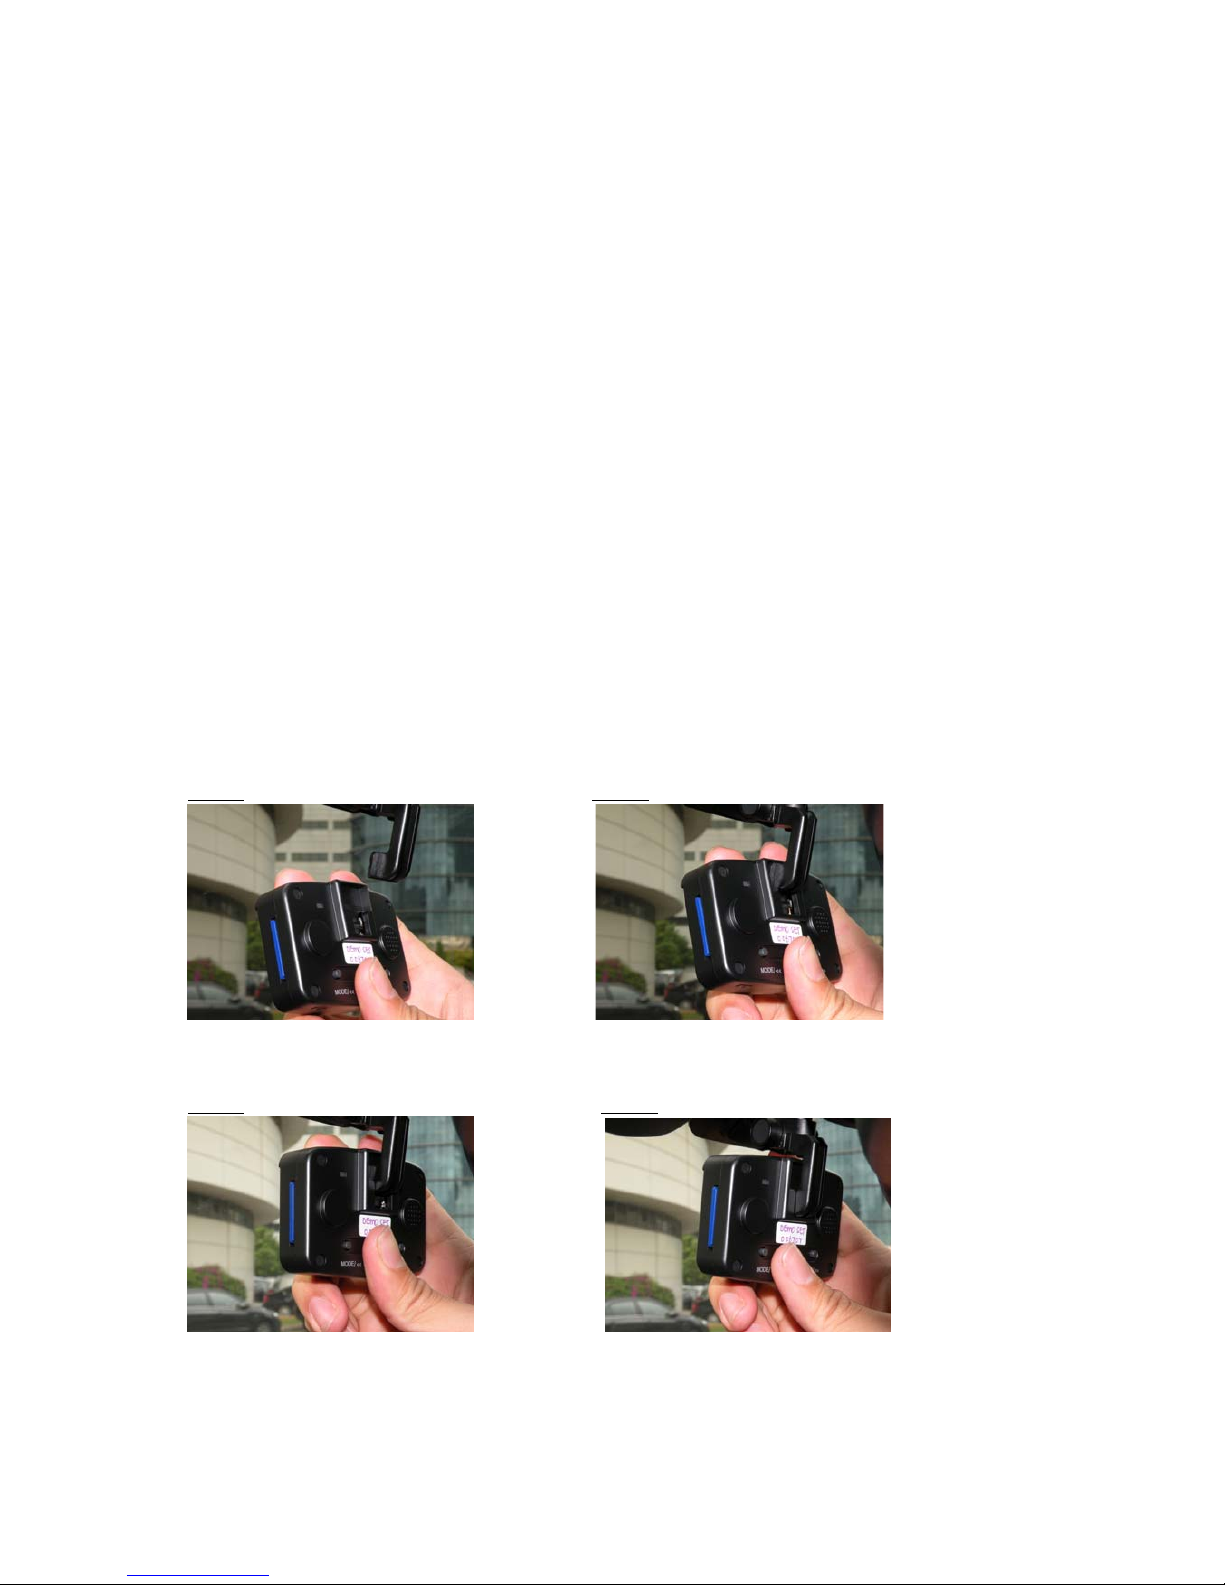
2. 본체와 거치대 결합 How to mount device to the holder
거치대와 본체를 결합할 때에 그림과 같이 거치대를 앞으로 약간 기울여 본체를 밀어 넣어
주십시오. 본체와 거치대가 주행 중 분리되지 않도록 잠금장치가 되어 있어 거치대를 수평으
로 밀어 넣으면 본체와 결합이 되지 않을 수 있습니다.
When attaching holder to the main device, please tilt and push in the holder to the device as
shown in the picture below. The device has a locking mechanism to keep the holder in place.
Please be warned that the holder or device can be damaged when used with excessive force.
Step 1 Step 2
본체의 홈과 거치대를 일치시키세요. 그림과 같이 본체를 기울이세요.
Align the device to the device holder. Tilt the device before insert
Step 3 Step 4
본체를 거치대에 밀어 넣으세요. 본체를 거치대에 완전히 체결하세요.
Slide in the device. User will be able to feel Slide in the device to fully lock the device in.
the device is locked onto the locking mechanism.

3. 본체와 거치대 분리 How to detach device from holder
본 기기를 거치대에서 분리할 경우에는 본 기기를 앞으로 약간 기울인 다음 거치대에서 제거
하여 주십시오.
When detaching the device from the holder, user should tilt the device slightly. After the
holder is tilted, user should use his/her thumb to hold on to the front of the device and use
your index finger to push the device down from the holder as shown as in the picture below:.
Step 1 Step 2
그림과 같이 본체와 거치대를 잡아 주세요. 본체를 약간 기울여 주세요.
Place your index finger on top and user your Push with your index finger downward and
use your thumb to support the holder as shown thumb to support.
in the picture.
Step 3 Step 4
본체를 밑으로 당겨 주세요. 본체가 거치대에서 분리됩니다.
After it passes through the first locking You can now successfully remove the device.
mechanism tilt the device as shown.
4. 카메라 각도 조정 Adjustment of camera angle
본 기기의 거치대를 조절하여 카메라의 각도를 상하 및 좌우로 조절할 수 있습니다. 원하는
각도를 맞추고 시계방향으로 고정 손잡이를 돌려 단단히 고정하여 주시기 바랍니다. 카메라의
각도를 다시 조절하려면 고정 손잡이를 시계 반대방향으로 돌린 후 원하시는 각도로 조절하
여 주십시오.
Using provided 2 directional holder, the device lens viewing angle can be adjusted. User can
find the desirable viewing angle and rotate the knob clock-wise to fix the viewing angle. If
viewing angle requires new adjustment, rotate the knob counter clockwise to release the
angle.
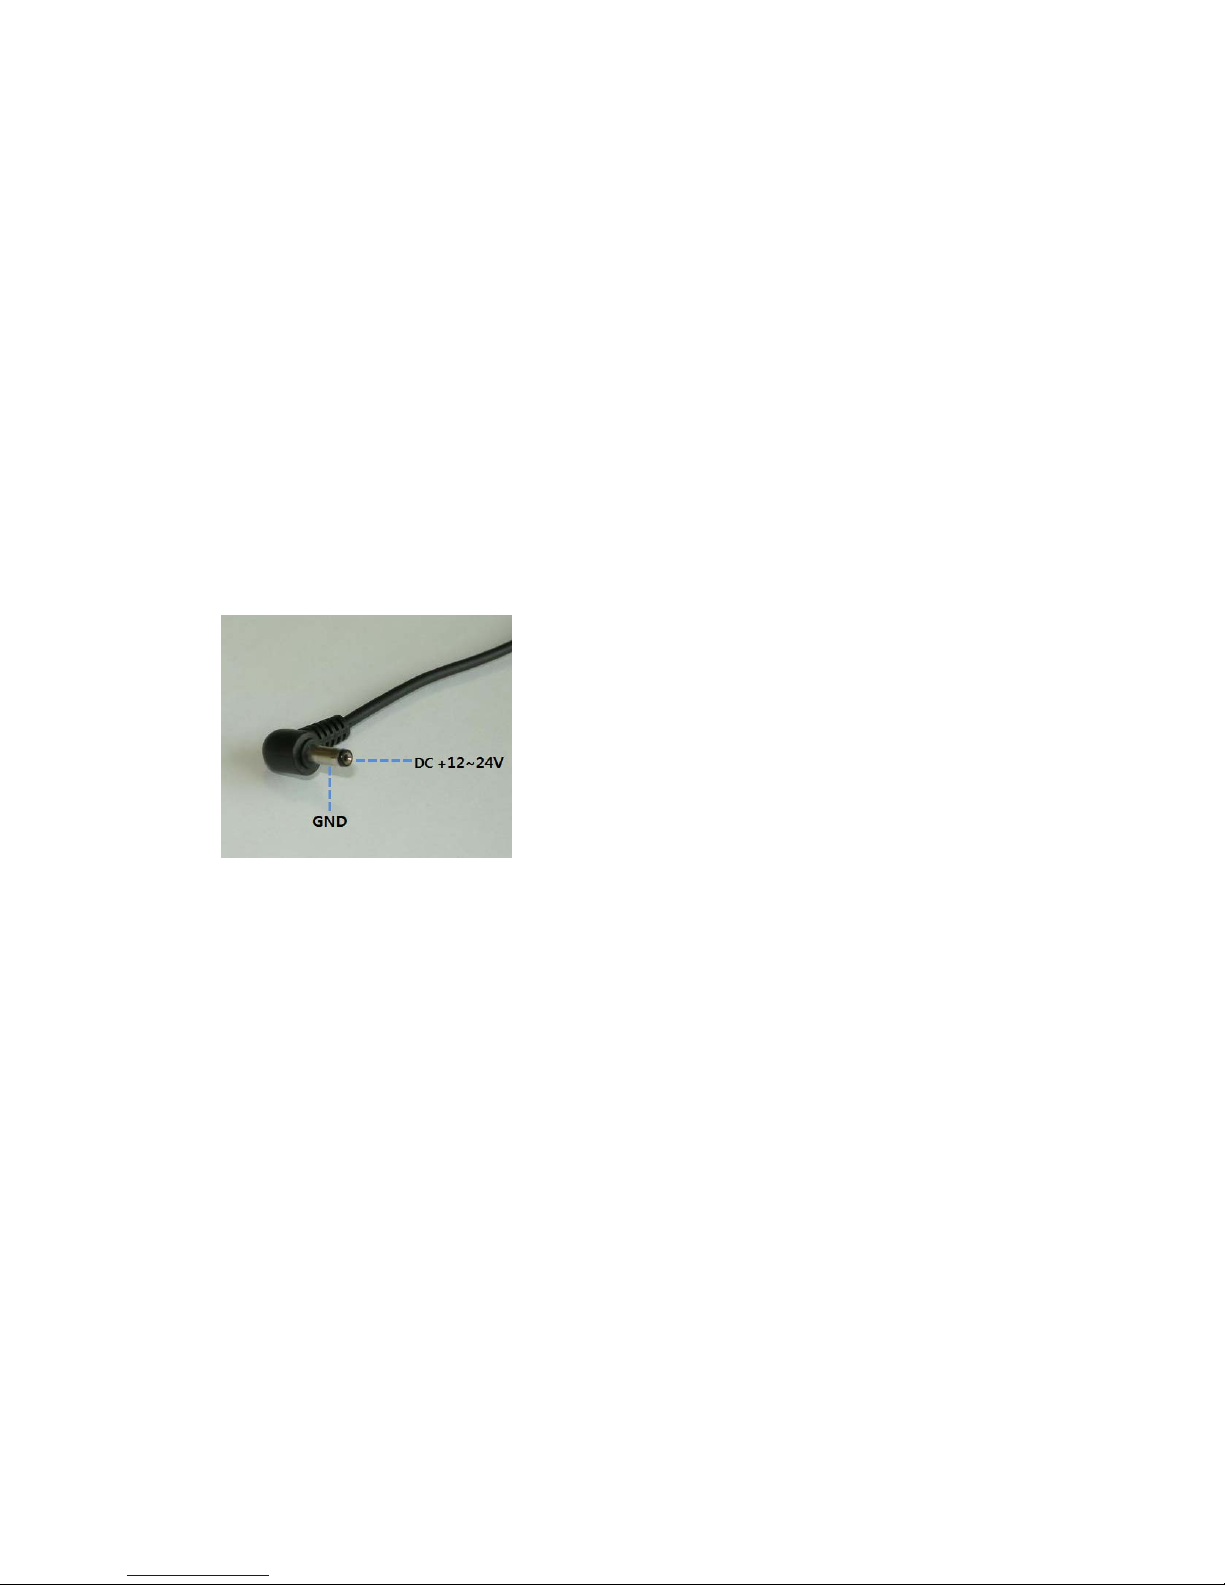
5. 전원케이블 연결 Plug in of the power cable
전원케이블은 제품에 포함된 시가잭 전원 케이블을 사용하여 주십시오. 시가잭을 통하여 전원
을 공급하기 위해서는 차량의 시가잭 코넥터에 연결하여 주시고, 상시 전원을 사용할 경우에
는 시가잭 전원 케이블의 시가잭을 절단한 후 차량의 상시전원 단자에 전원 극성에 유의하여
연결하여 주십시오. 전원 극성을 잘 못 연결하면 본 기기의 손상을 줄 수 있으며, 이로 인한
고장의 책임은 사용자에게 있습니다. 상시전원의 연결 방법은 차량의 종류에 따라 다를 수 있
으며 자세한 내용은 해당 전문가에 문의하여 주시기 바랍니다.
Use only the cigarette power cable provided. User must use cigarette power cable for power
supply from vehicle’s cigarette lighter socket. For continuous power supply, user will need to
detach cigarette converting plug and attach the cable to appropriate power supply source in
the vehicle. User must take responsibility for any device defect or malfunction from
connecting power cable with wrong polarity. For appropriate power cable installation, please
consult with an experience automobile mechanics or professionals as the power supply can
vary from vehicle to vehicle.

제품 연결하기 Connecting accessories to the
device
1. SD 메모리 카드 삽입/분리 방법 How to insert/removing SD memory card
SD 카드를 삽입 분리할 경우에는 전원을 끈 후에 사용하시기 바랍니다.
삽입방법: SD 메모리 슬롯에 SD 카드의 앞면이 본 기기의 전면을 향한 후, 소리가 날 때까지
밀어 넣으십시오.
분리방법: SD 메모리 카드의 끝부분을 살짝 누르면 자동으로 조금 튀어 나오게 됩니다. SD 메
모리 카드를 완전히 꺼냅니다.
Device must be turned off before inserting or removing SD card from the device.
When inserting SD card : Push the SD memory card into SD memory slot on the side of the
device until a click is heard or felt through hand.
When removing SD card : Push the SD memory card further into SD memory slot. SD
memory card will automatically be pushed out enough for user to hold and pull the card out
from the slot completely.
※ SD 메모리 카드를 무리한 힘을 주어 넣거나 뒤집거나 거꾸로 삽입할 경우 메모리 카드
혹은 본 기기의 손상을 가져올 수 있으며 이로 인한 고장의 책임은 사용자에게 있습니다.
* Caution!!!
Do not apply too much force when pushing the card into slot or inserting the card. User will
take responsibility for device malfunction or defect due to user mishandling.
2. USB 케이블 연결/분리하기 Connecting or removing USB cable
USB 케이블을 먼저 본 기기에 연결한 후 PC에 연결하여 주십시오. USB 케이블을 분리할 경
우에는 PC에서 먼저 케이블을 분리한 후 본 기기의 케이블을 분리하여 주십시오.
User must connect USB cable into the device before attaching the device to PC. When
attempting to detach the USB cable, user has to detach the USB cable from PC first before
removing the cable from the device.
3. AV OUT 단자 연결하기 Connecting AV out cable.
본체의 AV OUT 단자에 AV 케이블을 연결합니다. 플러그 타입은 4극 3.5 스테레오 to 3RCA
케이블입니다. 노랑색 단자는 영상, 빨간색 단자는 음성, 그리고 흰색 단자는 외부 비상 스위
치입니다. 흰색 단자는 외부 비상 스위치를 연결할 경우에만 사용하시기 바랍니다.
※ 반드시 표준 AV 케이블을 사용하십시오. 그러지 않을 경우에는 본 기기에 큰 손상이 올
수 있으며 이로 인한 고장의 책임은 사용자에게 있습니다.
The AV out socket is located at the side of the device. The cable is known as 4pole 3.5 Stereo
to 3RCA cable. Yellow plug is for video, red for audio and white for external emergency
recording button. User can use AV cable when external trigger is needed.

* Caution !!!
Use only standard AV cable as specified in the above. Use of non-complied AV cable will cause
damage to the device. User has to take responsibility for device damage or malfunction by use of
inappropriate AV cable.

제품 사용하기 User manual
1. 전원 켜기와 끄기
Power ON/OFF
①전원 켜기 Power on
본 제품은 전원 어댑터 단자에 전원을 인가하면 자동으로 켜지게 되어 있습니다. 또한 외
부 전원이 인가되지 않았을 경우 전원 버튼을 누르면 내장 배터리에 의해 제품이 켜지게
됩니다. 내장 배터리에 의해 전원을 켰을 경우에는 블랙박스 파일 재생 이외의 다른 모든
동작을 하지 않으니 주의하시기 바랍니다.
-Device activates itself when the power is connected. In addition, device activates with its
internal battery by pressing device power button, even when it is not connected to
external power supply (e.g. vehicle battery power supply). In this case, no other feature
other than video/audio player will be enabled.
②전원 끄기 power off
전원 어댑터 단자의 전원을 차단하면 수초 후 자동으로 전원을 끄게 됩니다. 또한 전원
버튼을 2초 이상 눌러도 전원을 꺼지게 됩니다. 차량의 상시 전원에 연결한 경우 차량 배
터리의 방전을 방지하기 위하여 일정 전압 이하로 떨어지면 자동으로 이를 감지하여 전원
을 끄게 됩니다. 또한 내장 배터리로 동작할 경우에도 배터리의 전압이 낮으면 전원을 강
제로 끄게 되어 있습니다. 전원이 꺼질 때는 빨간색과 초록색 LED가 교대로 빠르게 깜박
거립니다.
※ 강제로 전원 끄기: 본 기기가 응답하지 않거나 올바르게 동작하지 않을 경우에 전원
버튼을 5초 이상 누르면 본 기기는 강제로 전원을 끄게 됩니다. 정상적인 동작을 할
경우에는 강제로 전원을 끄지 말아 주십시오.
-When power is disconnected, device will automatically be deactivated after few seconds.
The device can also be deactivated by pressing device’s power button for 2 seconds or
longer. During continuous power supply mode from corresponding vehicle, device will
monitor vehicle’s battery level and deactivates itself when the battery drops below
specified voltage level. Similarly, devices will also deactivate itself when it detects low
battery on built-in battery power supply mode. The green and red LED will blink in turns
fast before it turns off completely.
* How to turn power off manually : User can deactivate device manually by pushing
power button and hold for more than 5 seconds. Recommended not to deactivate
device manually when the device is recording the event.
2. 블랙박스 모드 Blackbox Mode
③충격감지 모드
Event record Mode

LED가 적색으로 켜졌을 때에는 충격감지 모드입니다. 이 때부터 차량에 일정량의 충격이
감지되면 충격 전 20초, 충격 후 20초 간 영상/음성/가속도/GPS 정보가 저장됩니다. 저장
중에는 적색 LED가 점멸하고 저장이 끝나면 다시 적색 LED가 켜진 상태로 됩니다.
Red lighted LED signals that the blackbox is in event record mode. When event such as
specified acceleration or impact is detected on its corresponding vehicle, 20sec
video/audio/accel/GPS info is recorded each before and after the event. During event
recording interval, red LED will be flickered and it will go back to stable RED LED again
when the record is completed.
④주차감시 모드 Parking monitoring mode (Surveillance mode)
충격감지 모드에서 “MODE” 버튼을 길게 누르면 버튼음이 들리고 LED가 초록색으로 켜
집니다. 이 때부터는 주차감시 모드가 됩니다. 주차감시 모드는 차량에 충격이 가해지거
나 카메라 시야에 동작이 감지되면 전, 후 20초간의 영상/음성/가속도/GPS 정보가 저장됩
니다. 저장 중에는 초록색 LED가 점멸하고 저장이 끝나면 다시 초록색 LED가 켜진 상태
로 됩니다.
-Parking monitoring mode activates with GREEN LED lighted when pressing “MODE”
button continuously until beep sound. In this parking monitoring mode, 20 secs
video/audio/accel/GPS info will be saved when shock is detected or visual motion is
detected on the camera viewing span/angle. During this record interval, the LED light
will be flickered and will activate again when record is completed.
-
⑤블랙박스 모드 전환 Mode interchangeability
충격감지 모드와 주차감지 모드는 “MODE” 버튼을 버튼음이 들릴 때까지 길게
누름으로써 순환적으로 바뀌게 됩니다. LED 의 색깔로 현재의 모드를 구별할 수 있습니다.
또한 충격감지 모드와 주차감지 모드는 차량의 주행 상태에 따라 자동으로 바뀌게 되어
있습니다.
※ 자동 모드 변환 기능은 기기의 사용 환경에 따라 사용자가 원하는 모드로 자동 전환되지
않을 수 있습니다. 주행 전이나 주차 시에 원하는 모드에 있는 지 확인하여 주시기 바랍니다.
- Can interchange event (shock) record mode and parking monitoring mode by pressing
“MODE” button continuously until a beep sound is heard. User can recognize each
mode by LED lighted color. Depending on car’s condition, device will automatically set
its record mode.
Note: Please check the device mode LED before you are driving or parking the vehicle.
Device may not interchange modes automatically in certain circumstance. You may set
appropriate mode by pressing the “MODE” button.
-
⑥수동 저장
Manual record
충격감지 모드나 주차감지 모드에서 버튼 1, 2, 3을 아무거나 짧게 누르거나 외부 저장 스

위치를 누르면 전, 후 20초간 블랙박스 정보를 저장합니다.
-In any mode, user can record 20 sec of video/audio/accel/GPS info by pressing any one
of three buttons or using external control button (optional).
3. 상시저장 모드
Continuous record mode.
“MOVIE” 버튼을 길게 누르면 버튼음이 들리고 LED는 주황색으로 깜박입니다. 이 때부터는 상
시저장 모드가 됩니다. 사용자가 설정한 시간 동안 영상 및 음성을 MPEG4 형식으로 녹화하
고 이 후 다시 새롭게 녹화를 시작하며 이를 반복합니다. 다시 “MOVIE” 버튼을 길게 누르면
버튼음이 들리고 상시저장 모드는 종료되며 충격감지 모드로 전환됩니다.
※ 상시저장 모드는 외부 SD 메모리에만 저장되므로 사용 전 반드시 SD 메모리를 설치하여
주시기 바랍니다.
Continuous record mode will be activated with orange LED flashing when pressing
“MOVIE” button continuously until beep. Depending on user configuration, MPEG4
quality video/audio can be recorded for user configured period of time until it’s
completed and repeat record again. Event record mode can be reverted back by
pressing “MODE” button continuously again and deactivates the continuous record mode.
-Note: SD (External) memory card must be inserted before activating continuous record
mode as it can only record into external memory card.
4. 블랙박스 파일 재생하기
Blackbox File viewing/playing Mode
① 먼저 AV-OUT 단자에 AV 케이블을 연결하고 영상 및 음성단자를 외부기기에 연결하여 주
십시오. AV케이블은 표준 영상기기 용 케이블을 사용하시기 바랍니다.
-Connect AV cable into device’s AV-OUT and external video/audio device at its appropriate
AV socket. Please use only standard AV cable as defined in this manual.
② “▶” 버튼을 길게 누르면 버튼음이 들리고 LED는 빨간색과 초록색이 교대로 깜박거리면서
내장 메모리에 저장된 블랙박스 파일을 재생합니다.
Blackbox events will be played through its built-in video/audio player by pressing ““▶”
player button on the blackbox with small button beep along with red and green LED
flashing back and forth continuously.
③ 화면에 저장된 블랙박스 파일이 재생되고 있습니다.
이 때 “<<” 혹은 “>>” 버튼을 짧게 누르면 이전 혹은 다음 블랙박스 파일을 재생합니다.
Prior or next blackbox file can be played by pressing “<<” or ““>>” button during file
viewing/playing mode.
④ “▶” 버튼을 다시 길게 누르면 버튼음이 들이고 충격감지 모드로 전환됩니다.
Event recode mode can be reverted back by pressing “▶” button continuously until beep
and deactivate file viewing/playing mode.

5. MPEG4 파일 재생하기
MPEG4 file player
MPEG4 파일 재생기는 본 사에서 제공하지 않습니다. 자세한 사항은 본 기기의 홈페이지
(http://www.true-i.com)에서 확인하여 주시기 바랍니다.
-MPEG4 file codec is not included. Please check our website. http://www.true-i.com for
more information.
6. USB 메모리로 사용하기
USB memory mode
① 동봉된 USB 케이블을 제품의 USB 포트에 연결한 후 PC의 USB 단자에 연결하면 자동으
로 USB 메모리 모드로 전환됩니다. 이때 본 기기의 LED는 주황색으로 켜지게 됩니다.
Device can be turned into USB memory device by connecting USB cable (provided) onto
device’ and PC’s USB port. At this event, orange LED will be turned on.
② PC의 탐색기에서 이동식 저장장치를 확인합니다.
Device will be recognized as USB memory device by PC.
③ 본 제품의 내부에 장착되어 있는 1GB의 메모리를 이동식 저장장치와 같이 사용할 수 있
습니다.
When in USB memory mode, 1GB of internal memory can all be used.
④ USB 케이블을 제거하면 수초 후 자동으로 본 제품의 전원이 꺼집니다.
USB memory mode can be deactivated automatically by disconnecting USB cable from its
device.
Other manuals for HMBS-200
1
Table of contents


