BEFORE USING
USER MANUAL
PRECAUTION
....................................... 1
..................................... 2~3
LCD MENU
MAIN SCREEN
LIVE SCREEN
DASH BOARD (OPTIONAL)
PLAYBACK
OBD(OPTIONAL)
CAMERA
TIME SETTING
SOUND
ADAS
EVENT
IMPACT / LED
VOLTAGE
MEMORY
LCD
VERSION
OBD SETTING (OPTIONAL)
OBD VERSION (OPTIONAL)
....................................... 22
........................................ 23
................... 24
............................................ 25
............................. 26~27
.......................................... 28~29
...................................... 30
................................................. 31
............................................... 32~33
.................................................. 34
........................................ 35
......................................... 36~37
.............................................. 38
................................................. 39~40
.............................................. 41
.................. 42
.................. 43
SYNCING WITH SMARTPHONE
.............................................................. 57
INDEX
PRODUCT INFORMATION
PRODUCT OVERVIEW
PACKAGE COMPONENT
NAME OF EACH PART
SPECIFICATION
............................ 4
......................... 5
............................. 6
...................................... 7
SETUP
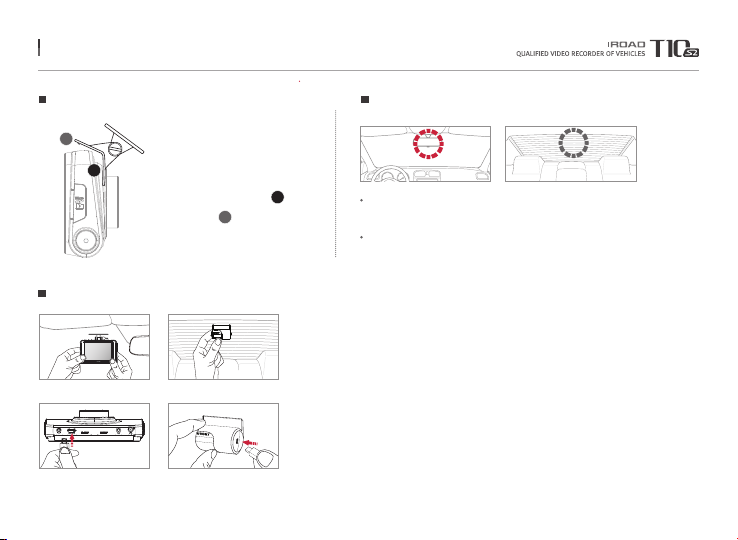
INSTALLATION
UNINTERRUPTED FUSE CABLE
OBDII SCANNER (OPTIONAL)
.................................... 8~9
........... 10
................ 11
USING THE DEVICE
PRODUCT OPERATION
BUTTON SCENARIO
RECORDING MODE
VOICE GUIDANCE
VIDEO FOLDERS IN SD MEMORY CARD
FIRMWARE UPDATE
........................ 12
....................... 13~14
................................15
........................... 16~17
..... 18
....................... 19~21
TROUBLESHOOTING ........... 72
HOW TO CONNECT
IOS
ANDROID
...................................................... 58
..............................................59
APPLICATION
MAIN MENU / LIVE VIEW
LIST OF RECORDINGS & PLAYBACK
SETTINGS
OBDII SCANNER APPLICATION
...................... 60
.... 61
....................................... 62~66
...... 67~71
DEDICATED PC VIEWER
INSTALLATION & RUNNING THE VIEWER
DEDICATED PC VIEWER
DEDICATED PC VIEWER SETTING
... 44
.................. 45~50
... 51~56