True Systems MSA Lite User manual

Portable Measurement Device
MSA Lite
Quick User’s Manual ver.0.92

1. Product summary
The MSA Lite is a sleek, light weight, portable device that analyzes the skin. The MSA
Lite measures skin texture, pigmentation, sebum, skin color/tone, keratin, pores, and
wrinkles. The cradle has a built in charging system for easy on counter powering.
1.1 Package contents
The MSA Lite consists of a main unit, a 50XPL lens, a cradle, a USB cable, and power
adapter (see image below).
Before using the MSA Lite, please confirm all parts have been received.
1.2 Major functions
The MSA Lite uses a 50X lens and two lighting modes, white and polarized, to
analyze each parameter. Captured images and values are stored onto the MSA Lite
and can be retrieved by plugging the unit to your PC with a USB cable.
Cradle
AC Adaptor
Main Unit

2. How to use the MSA lite
2.1 Parts name
2.2 Power ON/OFF
To power on the MSA Lite, press and hold the left button for about 2 seconds.
Home screen
2

Please note the battery needs to be charge sufficiently for the device to operate
properly.
When the MSA Lite is on and you press and hold the left button for about 2
seconds, the power will turn off.
The battery will charge automatically when put on the cradle. After 10 minutes on the
cradle, the MSA Lite will turn off.
2.3 Battery replacement
If you need to replace the battery, remove the
screw on the back of the MSA Lite towards the
bottom of the handle (see the picture at the right
for reference).
2.4 Attaching / Detaching the lens and adjusting focus
The lens can be detached and replaced with other lens magnifications for different
applications (i.e. skin, hair, and scalp). In order to detach the lens, turn the lens counter
clock wise at the base of the lens. To attach the lens, align the
mark of the lens with the five degrees left of the top position
on the figure, insert the lens and turn to clock wise direction.
To adjust focus, turn the dome little by little so that the image
can be seen clearly.
Please note if you change the lens with a different
3

magnification, you will also need to change the software with the appropriate mode.
See the SYSTEM set up for more information.
2.5 Connection with PC via USB
Stored data on the MSA Lite can be transferred to a computer by connecting the USB
cable to the computer. The embedded software of the device can also be updated by
connecting to computer using a USB interface. The USB port is located at the bottom
of the device.
①

2.6 SYSTEM Set up
At the home screen, if the below keys are pressed in sequential order the System Setup
screen will appear.
Left button(mode button)->Front button(capture button)->Right button(freeze button)
▶Lens ▶USB
[Lens] : to change the magnification
[USB] : to enable the USB mode to communicate with
computer.
Selection of 30x, 50x,
120x lens
The USB connection
mode enabled

②
3. MSA lite program
3.1 How to use embedded software
The MSA lite has software for skin imaging and analysis. The home screen below will
appear once the unit has been successfully booted and you can choose the [START] or
[SCOPE] menu with the navigation switch.
3.2 How to use Scope
By selecting the [SCOPE] menu in the home screen, you can see a live image of
customer’s skin. In the scope menu, you can also change the lighting mode (normal for
skin texture, PL for pigmentation) with left button and can choose live or freeze mode
for imaging with right button.
3.3 Measurement software
After choosing the [START] menu in the home screen, select the customer’s age range
by using the navigation switch. Once the customer’s age range has been selected the
measurement screen will appear.
Start measurement
View scope

③
The software measures seven parameters, which are all displayed in the measurement
screen. Select any parameter icon you want to measure by clicking the center of
navigation switch.
After selecting the icon, the software will automatically turn to the correct lighting
mode. At this mode, the left button can be used to “go back to the measurement
screen,” the right button will “freeze the image or go to the live image mode”, and the
center of navigating switch will “analyze the captured image”.
After you have measured the desired parameters, you can see the results by
selecting [Results] by clicking on the right button (see below for reference). If you
want to go back to the home screen, choose [Home] with the left button.
By navigation switch
By key buttons

⑤
For example, if you would like to measure and analyze skin texture, choose the [Skin
Texture] icon. You can see a live image of the skin, capture the image by pressing the
freeze button, and analyze the image by selecting the [Analysis] button. Once the image
has been analyzed, go back to the parameter screen by pressing [Prev].
Once a parameter has been measured a yellow check mark will appear on the
parameter icon to clearly indicate what has been analyzed.

⑥
▶Pigmentation
Pigmentation Analyzed image
▶Sebum
Sebum Analyzed image
▶Skin Color
Skin Color
With the pigmentation
measuring process, images are
captured with the polarized
lighting mode.
In the sebum mode, the
device measures and analyzes
sebum by taking an image of
the Sebutape, which is used
by pressing the gray box on
the Sebutape against the
customer’s skin.
For skin tone, there is no
analyzed image shown;
however, the results are stored
on the device.

⑦
▶Keratin
Keratin Analyzed image
▶Pore
Pore Analyzed image
▶Wrinkle
In the keratin mode, the device
measures through an image of
keratin tape, which is a black
tape that is placed on the
customer’s skin to remove
dead skin cells.
For the pore mode, the
device measures the pores of
skin.
At wrinkle mode, the device
measures the wrinkle of skin.
⑧
Wrinkle Analyzed image
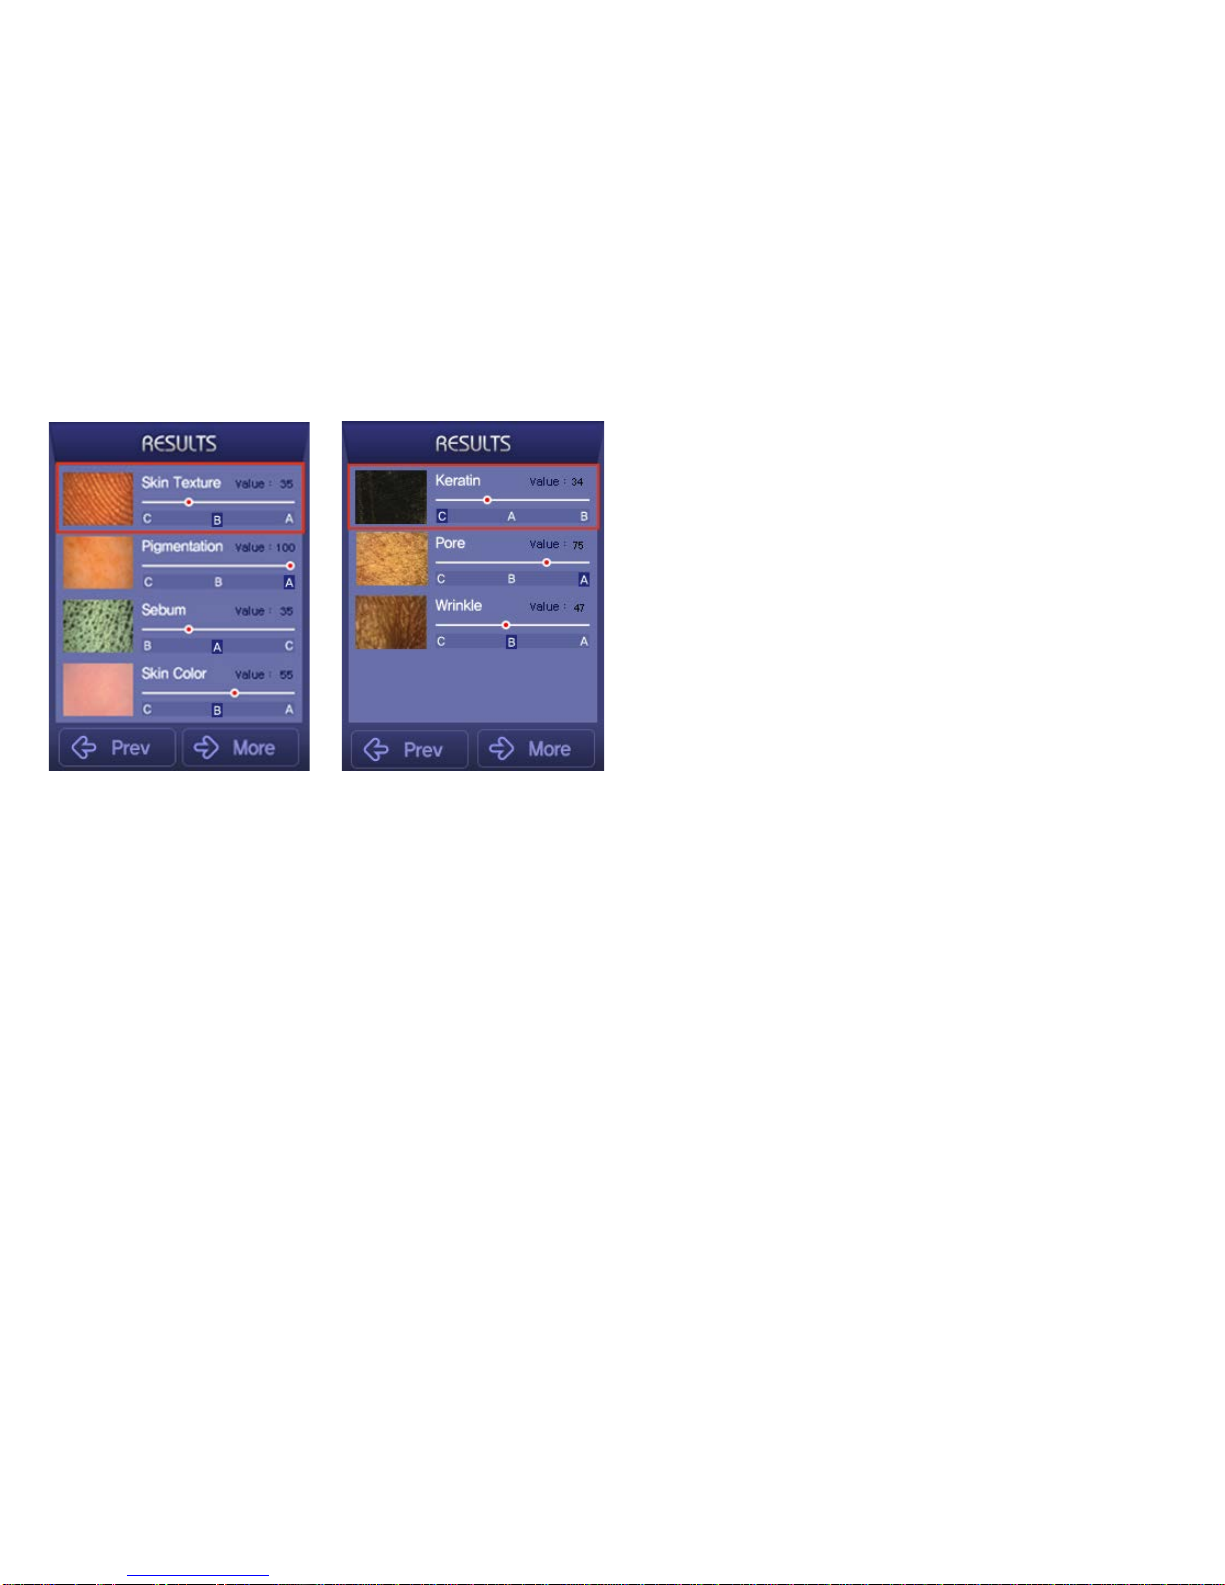
3.4 Results
The analyzed results of each parameter are displayed on two pages.
The Results section has two screens. One result screen has four results of items and the
other has three results of items. You can toggle the result screen by choosing the [More]
button by pressing the left button. The result screens show all the results with the
analyzed value and grade, which is categorized as A, B, C. Each grade stands for good(A),
normal(B) and below normal(C).
If you choose the thumbnail
image of any item by pressing
the center of the navigation
switch, you can check the
original image.
⑨
4. Specification
2011 True Systems Co., Ltd. All rights reserved.
All designs and other registered symbols are the property of True Systems.
True Systems reserves the right to change the specification without notice.
One year warranty.
True Systems Co., Ltd.
www.truesystem.co.kr
info@truesystem.co.kr
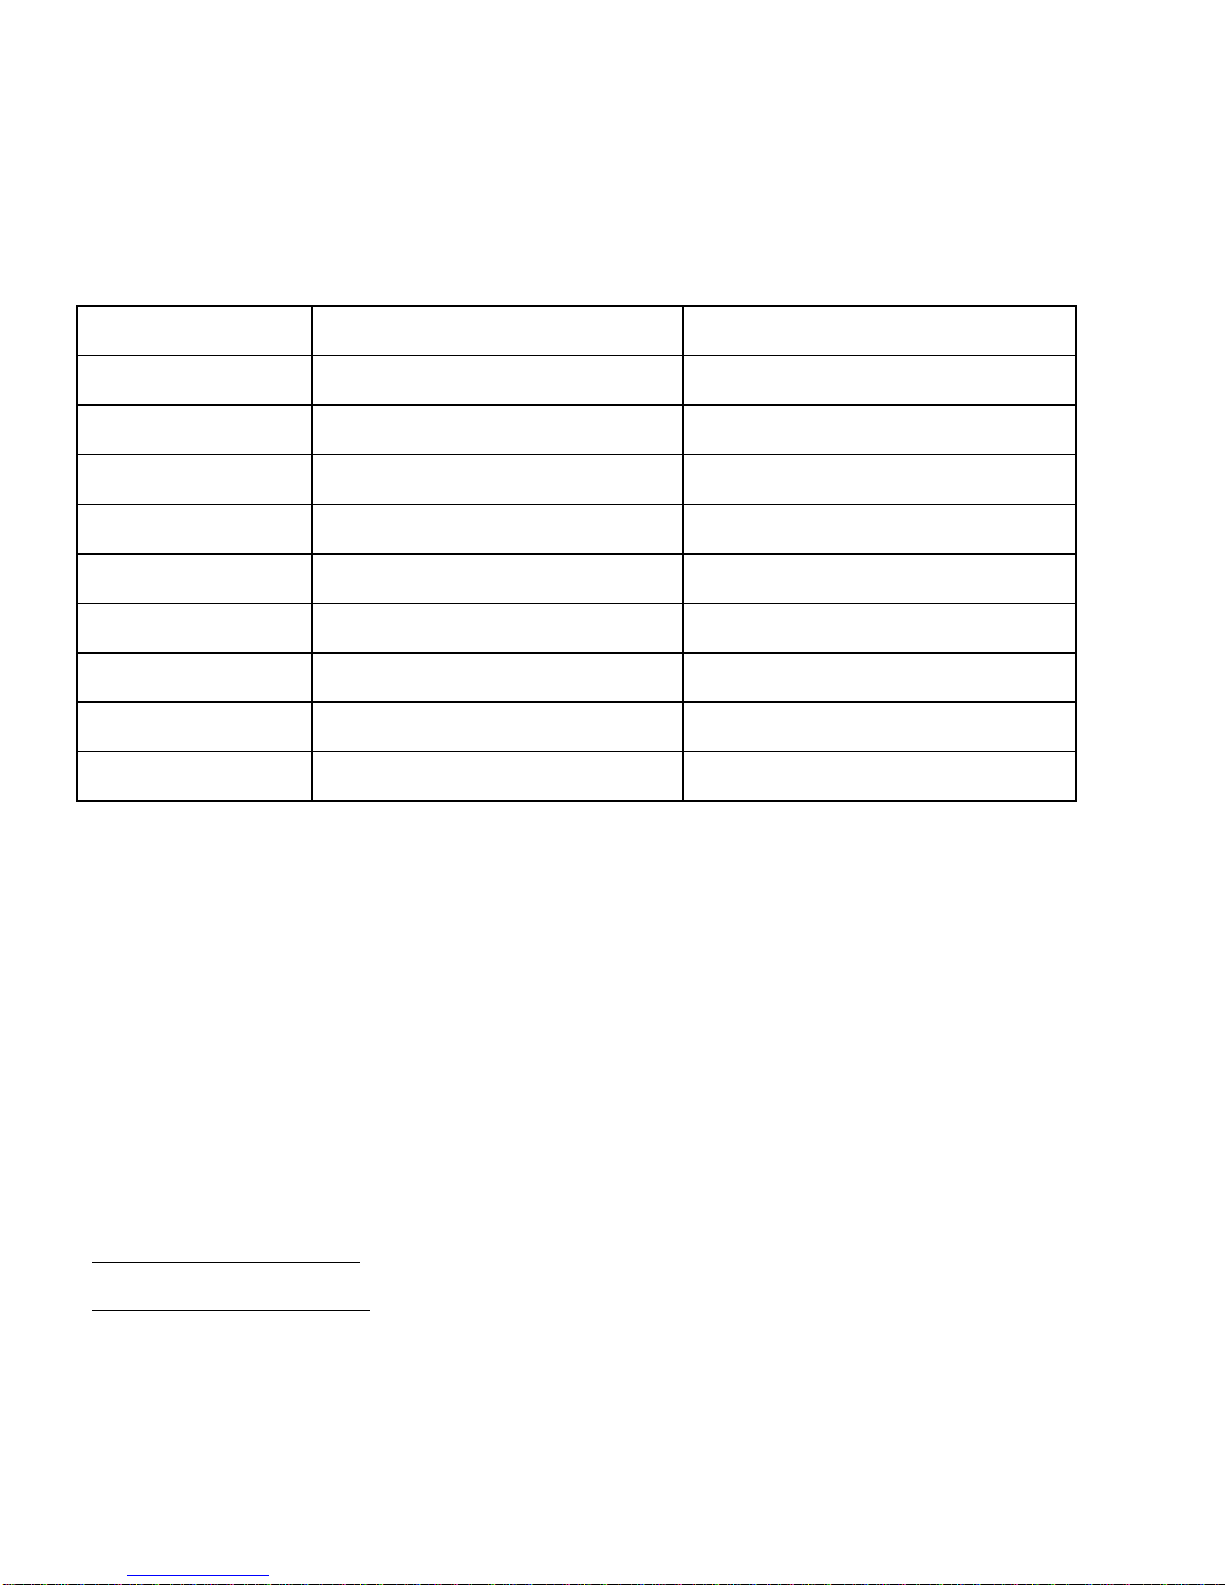
Details Remarks
CPU ARM 500 MHZ ARM 500 MHZ
OS Linux
LCD 2.8 inch TFT LCD without touch function
Camera 1.3MP CMOS
Memory 2GB NAND internal External SD card(optional)
Lighting 6 / 9 white LEDs Normal / PL mode
Battery Li-Polymer, 1,200mAh Rechargeable
External I/F USB / WiFi(optional )
Charging Charged on cradle AC adaptor, 5V DC, 2A
Table of contents
Popular Measuring Instrument manuals by other brands


Cal Test Electronics
Cal Test Electronics CT4447 Series user manual

Sper scientific
Sper scientific 800020 instruction manual

Martin Lishman
Martin Lishman Protimeter Balemaster instruction manual

Major tech
Major tech MT874 instruction manual

DAKOTA ULTRASONICS
DAKOTA ULTRASONICS MX-2 Operation manual

WATERGUARD
WATERGUARD V21I installation guide

Mid-Continent Instrument
Mid-Continent Instrument MD23-104 user guide

Desoutter
Desoutter CVILeco Original instructions

Camille Bauer
Camille Bauer SINEAX DM5000 Device handbook

Lindab
Lindab UltraLink FTMU technical information

Bartec
Bartec RDW 03 operating instructions

Agilent Technologies
Agilent Technologies 81200 installation guide