TrueGuard Mini-SD-ZBS User manual

Mini Smoke Detector (Mini-SD-ZBS)
The Mini SD-ZBS Mini Smoke Detector is a ZigBee Smoke and Heat Detector, it is capable of sending wireless signals to the coordinator in the
ZigBee network upon detection of smoke particles or abnormal high heat to protect house from fire hazards. The Mini Smoke Detector’s alarm
situations, battery condition, operating conditions, supervisory data and general fault information are sent to the ZigBee Control Panel wirelessly.
The Mini Smoke Detector also features IR detection. The it detects infrared signature to pick up movements within an assigned area and signals
the Control Panel to activate the alarm if an intruder crosses its’ path of detection.
The Mini Smoke Detector utilizes ZigBee technology for wireless signal transmission. ZigBee is a wireless communication protocol that is reliable
and has low power consumption and high transmission efficiency. Based on IEEE802.15.4 standard, ZigBee allows a large amount of devices to
be included in a network and coordinated for data exchange and signal transmission
The Mini Smoke Detector serves as an end device in the ZigBee network. It can be included in the ZigBee network to transmit signal upon
activation, but cannot permit any other ZigBee device to join the network through the Mini Smoke Detector.
Parts Identification
1. IR lens
2. LED Indicator / Test Button
Red LED
Turns ON briefly: Transmitting signal.
Quick flash: Alarming.
Flashes every 2 seconds: Mini Smoke Detector under warmup and calibration process.
Flashes every 1 second: Mini Smoke Detector under Sleep Mode
Flashes every 4 seconds: battery exhausted.
Flashes once every 20 minutes: the Mini Smoke Detector has lost connection to its current ZigBee network.
Orange LED
Flash every second: Device power on/Calibration failed.
Flashes every 5 seconds: Detecting smoke failed or device malfunctioning.
Flashes every 4 seconds: battery exhausted.
Flashes every 45 seconds: Low battery condition
Test Button
Press and hold the button for 10 seconds then release to reset the Mini Smoke Detector.
Press and hold the button for 20 seconds to enter calibration process.
Press the button once to send a supervision signal/test Mini Smoke Detector
Transmit a radio signal for testing the radio communication range.
Test if the Mini Smoke Detector is functioning normally.
Silence the Mini Smoke Detector’s alarm.
3. Buzzer
4. Mounting Holes (for Hooks)
The Hooks of the Mounting Bracket can hook into this Mounting Hole.
5. Battery compartment
6. Hooks
7. Mounting Holes
Features
Battery
A 3V CR123A Lithium Battery is used to supply power to the Mini Smoke Detector.
When the Mini Smoke Detector is low on battery, a low battery signal will be transmitted along with regular signal transmissions.
The Orange LED will flash with accompanying low-volume beep once every 45 seconds.
The Red and Orange LED will flash once every 4 seconds when the battery is exhausted.
<NOTE>
When changing the battery, after removing the old battery, press the Test Button twice to fully discharge before inserting new
battery.
Testing the Mini Smoke Detector
By pressing the Test Button on the Mini Smoke Detector, you can test if the Mini Smoke Detector is functioning normally.
If the Mini Smoke Detector functions normally, the Red LED will be on for 2 seconds followed by a 2-tone beep.
If the buzzer sounds 2-tone beeps 3 times, the “Optical Chamber” on the Mini Smoke Detector is either dirty or out-of-order.
If the Red LED doesn’t light and no beep is sounded, it means the Mini Smoke Detector is out-of-order.

Mini Smoke Detector (Mini-SD-ZBS)
Sleep Timer
The Mini Smoke Detector has a “sleep time” of approximately 1 minute to conserve power. After 1 minute any detected movement
will be transmitted.
Test Mode
The Mini Smoke Detector can be put into Test mode by pressing the Test Button. In Test mode, it will disable the sleep timer and will
enable the LED indicator to flash every time a movement is detected. Every time the Test Button is pressed, the Mini Smoke Detector
will transmit a test signal to the Control Panel for radio range test and enter the test mode for 3 mins. It will exit Test Modeautomatically
after 3 minutes and return to normal mode.
Supervision
The Mini Smoke Detector will transmit a supervision signal to report its condition regularly according to user setting. The factory
default interval is 30 minutes. The user can also press the Test Button once to transmit a supervision signal manually.
Temperature Detection
The Temperature Sensor will transmit temperature signals regularly according to setting. The factory default interval is 10 minutes.
The Mini Smoke Detector will also send temperature signal when temperature changes by +/- 2°C.
You can also press the Test Button once to transmit a temperature signal manually.
The temperature detection range is about -10°C ~ 50°C.( 14°F ~ 122°F)
Alarm Detection
The Mini Smoke Detector will activate fire alarm when either of its smoke detection or high heat detection function is triggered. When an
alarm is activated, the Mini Smoke Detector will transmit alarm signal and raise alarm with its built in buzzer, the Red LED will flash
rapidly. The alarm sound will repeat in pattern of 3-second alarm and 1-second pause.
Smoke Detection:
The Alarm is activated whenever the smoke concentration exceeds the detection threshold.
The Mini Smoke Detector will check some concentration every 8 seconds, the alarm will continue until the smoke concentration
drops below alarm threshold.
Heat Detection:
Rate of Rise: When the temperature rises by 8.25°C per minute.
High Heat: When the temperature exceeds 57.3°C
The Mini Smoke Detector will check temperature every 10 seconds. It will only stop alarming if the temperature drops below alarm
threshold:
If the alarm was triggered by Rate of Rise condition (8.25°C per minute or more): The temperature must drop to 4°C below highest
temperature detected for the Detector to stop alarming.
If the alarm was triggered by High Heat condition (57.3°C): The temperature must drop below 49°C for Mini Smoke Detector to
stop alarming.
For both Smoke alarm and Heat Alarm, a restore signal will be transmitted if no smoke is detected again for 160 seconds.
(TrueGuard Control Panel Only)
The Smoke and Heat Detection function of the Mini Smoke Detector can be disabled by sending ZigBee command from the Control
Panel if needed to accommodate different installation environment. To disable the Smoke or Heat detection function:
1 Go to the Device List in the Control Panel setting, select “Edit Device” and find the “Bypass” option.
2 Before sending command from the Control Panel, press the Function Button on Smoke Detector once.
3 Select the function to be disabled from the Bypass option and confirm to send command.
IR Detection:
The Mini Smoke Detector will only transmit burglar alarm signal to the Control Panel if any movement is picked up within the IR
detection coverage, the buzzer will not sound and the LED will not flash. (Please refer to your Control Panel for details).
Alarm Silence
After alarm activation, the Smoke Detector can be silenced temporarily by pressing the button.
1. If the button is pressed within 1 minute after alarm activation, the alarm will be silenced 1 minute after button press. E.g. If the
button is pressed 30 seconds after alarm activation, then the alarm will be silenced at 1 minute and 30 seconds after alarm
trigger.
2. If the button is pressed when the alarm has been activated for more than 1 minute, the alarm silenced immediately and will
enter Alarm Silence mode for 9 minutes.
The Alarm Silence mode lasts 9 minutes, the Red LED will flash every second during this period.
During the Alarm Silence period, f the smoke concentration or temperature continue to rise, the Smoke Detector will sound the
alarm again and cannot be silenced by button press. The alarm condition must subside for the alarm to stop
When the 9-minute Alarm Silence period expires:
If the smoke concentration or temperature has dropped below alarm threshold, the Smoke Detector will sound a 2-tone beep and,
transmits an alarm restore signal and returns to normal operation mode.
If the smoke concentration or temperature is still above alarm threshold, the Mini Smoke Detector will sound the alarm again.
Recalibration
As the operation condition of the Mini Smoke Detector may vary after being installed for some time, you may wish to recalibrate the Mini
Smoke Detector to take a new smoke detection threshold value and ensure optimal performance of the Mini Smoke Detector. To do this:
Press 20 seconds on the Test Button and hold until the Red LED starts to flash. The Mini Smoke Detector will sound 3 short beeps
then follow the calibration process to take the new reference value the Red LED will flash every 2 seconds to indicate.
If calibration fails, the Mini Smoke Detector will continuously beep with Orange LED flashing every second, you need to remove
the battery, press the Test Button twice to fully discharge the battery, then reinsert the batteries to restart Mini Smoke Detector.

Mini Smoke Detector (Mini-SD-ZBS)
Every time the battery is removed and reinserted, the Mini Smoke Detector will also take the new threshold value following the
warming and calibration process.
ZigBee Network Setup
ZigBee Device Guideline
ZigBee is a wireless communication protocol that is reliable and has low power consumption and high transmission efficiency. Based on the
IEEE802.15.4 standard, ZigBee allows a large amount of devices to be included in a network and coordinated for data exchange and signal
transmission.
Due to the fundamental structure of ZigBee network, ZigBee device will actively seek and join network after powering on. Since performing
a task in connecting network may consume some power, it is required to follow the instructions to avoid draining battery of a ZigBee device
- Ensure your ZigBee network router or coordinator is powered on before inserting battery into the ZigBee device.
- Ensure the ZigBee network router or coordinator is powered on and within range while a ZigBee device is in use.
- Do not remove a ZigBee device from the ZigBee network router or coordinator without removing the battery from a ZigBee device.
Joining the ZigBee Network
As a ZigBee device, the Mini Smoke Detector needs to join a ZigBee network to transmit signal when smoke concentration or temperature
is detected. Please follow the steps bellow to join the Mini Smoke Detector into ZigBee network.
The Mini Smoke Detector has 3 ZigBee Endpoints for PIR, Smoke Detector and Temperature Sensor function. When joining ZigBee network,
it will be recognized as 3 separate ZigBee devices and will occupy 3 zones in your ZigBee network coordinator.
1. Insert the battery into the battery compartment to power on the Mini Smoke Detector.
2. The Mini Smoke Detector will emit 2 short beeps, and begin warm up for 1minute, LED flashes every 2 seconds.
3. After 1-minute warm up period expires, the Mini Smoke Detector will emit a beep to indicate it now enters calibration process. The
calibration process takes 1~7 minutes; the LED will continue to flash during calibration. Joining ZigBee network is prohibited during
warm up calibration process. After calibration process the Mini Smoke Detector will emit a 2-tone beep, LED will turn off.
4. The Mini Smoke Detector is only available for joining the ZigBee network 3 minutes after completing calibration
Press and hold the Test Button for 10 seconds and release to search for existing ZigBee network. Please make sure the permit-to-join
feature on the router or coordinator of your ZigBee network is enabled.
5. After joining the ZigBee network, the Mini Smoke Detector will be registered in the network automatically. Please check the ZigBee
coordinator, security system control panel or CIE (Control and Indicating Equipment) to confirm if joining and registration is successful.
6. When calibration is complete, the Mini Smoke Detector will emit 2 beeps and LED will stop flashing to indicate it is now under normal
operation. If calibration fails, the Mini Smoke Detector will sound continuous beep.
7. Under normal operation, if the Mini Smoke Detector loses connection to its current ZigBee network, the LED indicator will flash every 20
minutes to indicate the situation. Please check your ZigBee network condition and Mini Smoke Detector signal range to correct the
situation.
Removing Device from ZigBee Network (Factory Reset)
To remove the Mini Smoke Detector from current ZigBee network, the device must be put to Factory Reset to complete
device removal. Factory Reset function will clear the Mini Smoke Detector of its stored setting information and prompt the
device to search for new ZigBee network.
Before removing device, make sure the Mini Smoke Detector is within current ZigBee network signal range
1. Delete the Smoke Detector from current control panel / CIE.
2. The Mini Smoke Detector can only be reset within 3 minutes after power up. If it has been powered up for more than 3
minutes, remove and reinsert the batteries.
3. Press and hold the function button for 10 seconds, then release the button to reset Smoke Detector.
4. Upon reset, the Smoke Detector will clear current ZigBee network setting and transmit signal to ZigBee coordinator to
remove itself from current ZigBee network. It will then actively search for available ZigBee network again and join the
network automatically.
Installation
Installation Guideline
It is recommended that the installation site be in the center area of the ceiling.
Do not locate the detector in the following locations:
The Kitchen – Smoke from cooking might cause an unwanted alarm.
Near a ventilating fan, florescent lamp or air-conditioning equipment – air drafts from them
may affect the sensitivity of the detector.
Near ceiling beams or over a cabinet –stagnant air in these areas may affect the sensitivity
of the detector.
In the peak of an “A” frame type of ceiling.
Installation Recommendation
It is recommended to install the Mini Smoke Detector in the following locations.
In a ceiling area with full view of its detection coverage unobstructed by appliances and furniture.
Near the entrance of a room or house to monitor entry activity.

Mini Smoke Detector (Mini-SD-ZBS)
Limitations
Do not install the Mini Smoke Detector exposed to direct sunlight.
Avoid installing the Mini Smoke Detector in areas where devices may cause rapid change of temperature in the detection area,
i.e. air conditioner, heaters, etc.
Avoid large obstacles in the detection area.
Do not pointing directly at sources of heat e.g. Fires or boilers, and not above radiators.
Avoid moving objects in the detection area i.e. curtain, wall hanging etc.
Press the Test Button to enter Test Mode. Walk around the protected area noting when the LED lights up and check that the detection
coverage is adequate.
When detection coverage is found to be satisfying, installation is now completed.
Mounting the Mini Smoke Detector
Step 1. Place the Mini Smoke Detector at desired mounting location and use the Range Test function to make sure the Mini Smoked
Detector can be received by the Control Panel at mounting location.
Step 2. The Mini Smoked Detector has a mounting bracket for ceiling installation. Use the holes on the bracket as template; mark the
mounting location on ceiling.
Step 3. Screw the mounting bracket onto the ceiling according marked locations, drill holes in and insert wall plugs if required.
Step 4. Align the mounting holes on Mini Smoke Detector with the hooks on the mounting bracket. Fit the Mini Smoke Detector onto
bracket and rotate clockwise to lock the hook. Installation is now complete.
The Mini Smoke Detector is designed to be mounted on the ceiling.
The ideal mounting height for the Mini Smoke Detector is 2.4 meters to 3 meters. Mounting above 3 meters can affect detection
performace.
One side of the Mini Smoke Detector has less detection coverage (2.5 meters) due to Mini Smoke Detector Chamber blocking the
IR coverage range.
The detection coverage for the Mini Smoke Detector is 10 meters horizontally and 5.5 meters vertically when the Mini Smoke Detector
is mounted as the below picture:
For optimal performance, rotate the Mini Smoke Detector so that the intruder would move across its detection area from side to side.
<NOTE>
To find out the “sides” of the Mini Smoke Detector. Hold the Mini Smoke Detector with LED indicator pointing upward, and the left
and right sides of the Mini Smoke Detector are considered the Smoke Detector’s sides. The Mini Smoke Detector sensor is most
sensitive when the intruder is moving from one side to the other.
Refer to the diagrams below for more information.
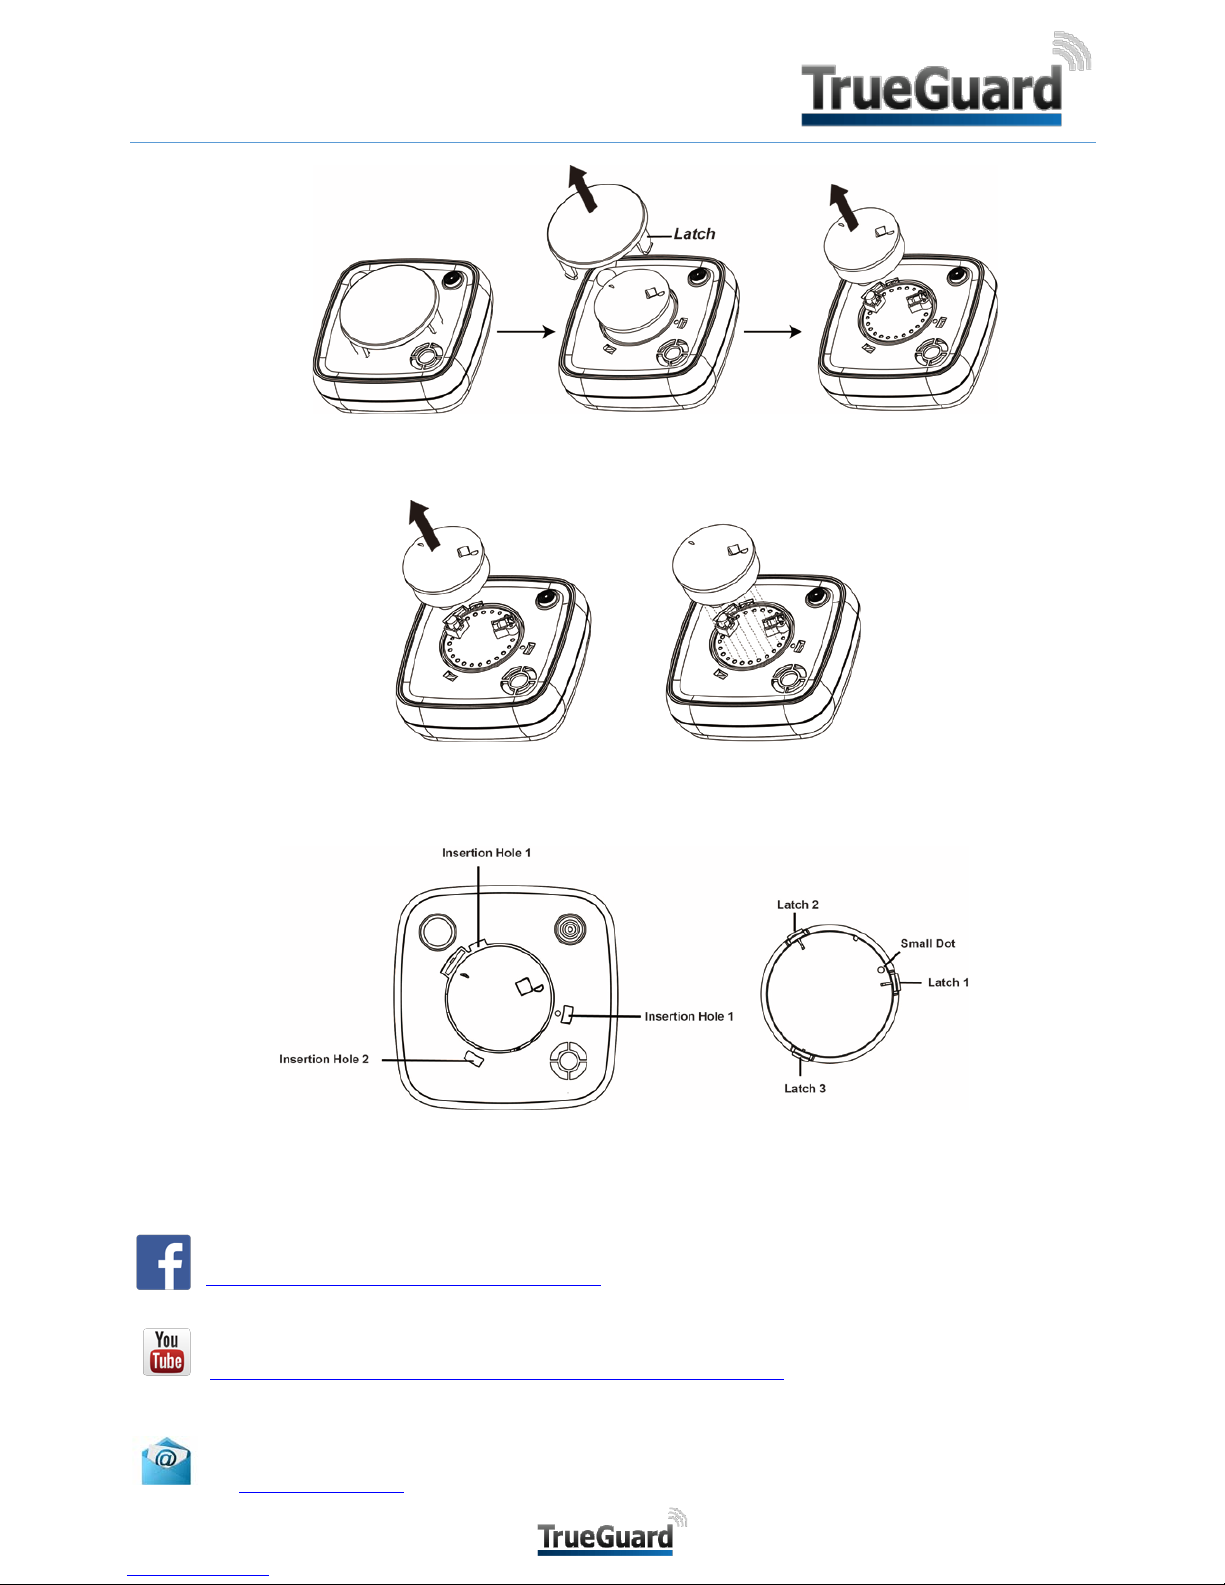
Maintenance
The top cover and the smoke detecting chamber can be detached from the Mini Smoke Detector for maintenance. Follow the steps
below to maintain the smoke detecting chamber:
Step 1. Remove the top cover by gently pressing the latches by using your fingers.
Step 2. Pull out the smoke detecting chamber.
Mini Smoke Detector (Mini-SD-ZBS)
Step 3. Pull out the anti-insect mesh inside the chamber and clean the chamber and mesh with brush or water.
Step 4. Re-insert the anti-insect mesh into the chamber and insert the chamber back onto the Mini Smoke Detector. Please make
sure the chamber is dry before re-inserting back onto the Mini Smoke Detector.
Step 5. Insert the top cover back onto the Mini Smoke Detector. The top cover includes 3 insertion latches to stabilize. Each
latch correspond to the insertion holes on the Mini Smoke Detector. Match the numbers as below picture shown to place
the top cover back to the Mini Smoke Detector. (Latch 1 is located next to a small dot)
Få meget mere ud af din TrueGuard alarm.
FACEBOOK: Her kan du følge os og få løbende tips og tricks på facebook :
https://www.facebook.com/TrueGuardAlarm/
YOUTUBE: Se også installations videoer og andre videoer på YouTube. Klik her:
https://www.youtube.com/channel/UCpHlY29gQAxOTsEeGAFHQew
NYHEDSBREV: Hold dig opdateret med nyheder og nyt tilbehør til din alarm. Tilmeld dig nyhedsbrevet
på www.TrueGuard.dk
Table of contents


