TruGolf TruBalance Mobile User manual

TRUBALANCEMOBILE.COM
GET THE APP

1
GETTING STARTED
In order to use the TruBalance insoles in conjunction with the TruBalance Mobile app, you must wirelessly
sync each respective insole to the TruBalance Mobile software.
CONNECTING THE INSOLES TO YOUR IOS DEVICE
1. Insert the insoles into your shoes. The TruBalance logo must be facing down so only the
gray side is visible. Once the insoles are in place, logo-side facing down, clip the wireless
transmitter to the outside edge of the shoe, or onto to the shoelaces.
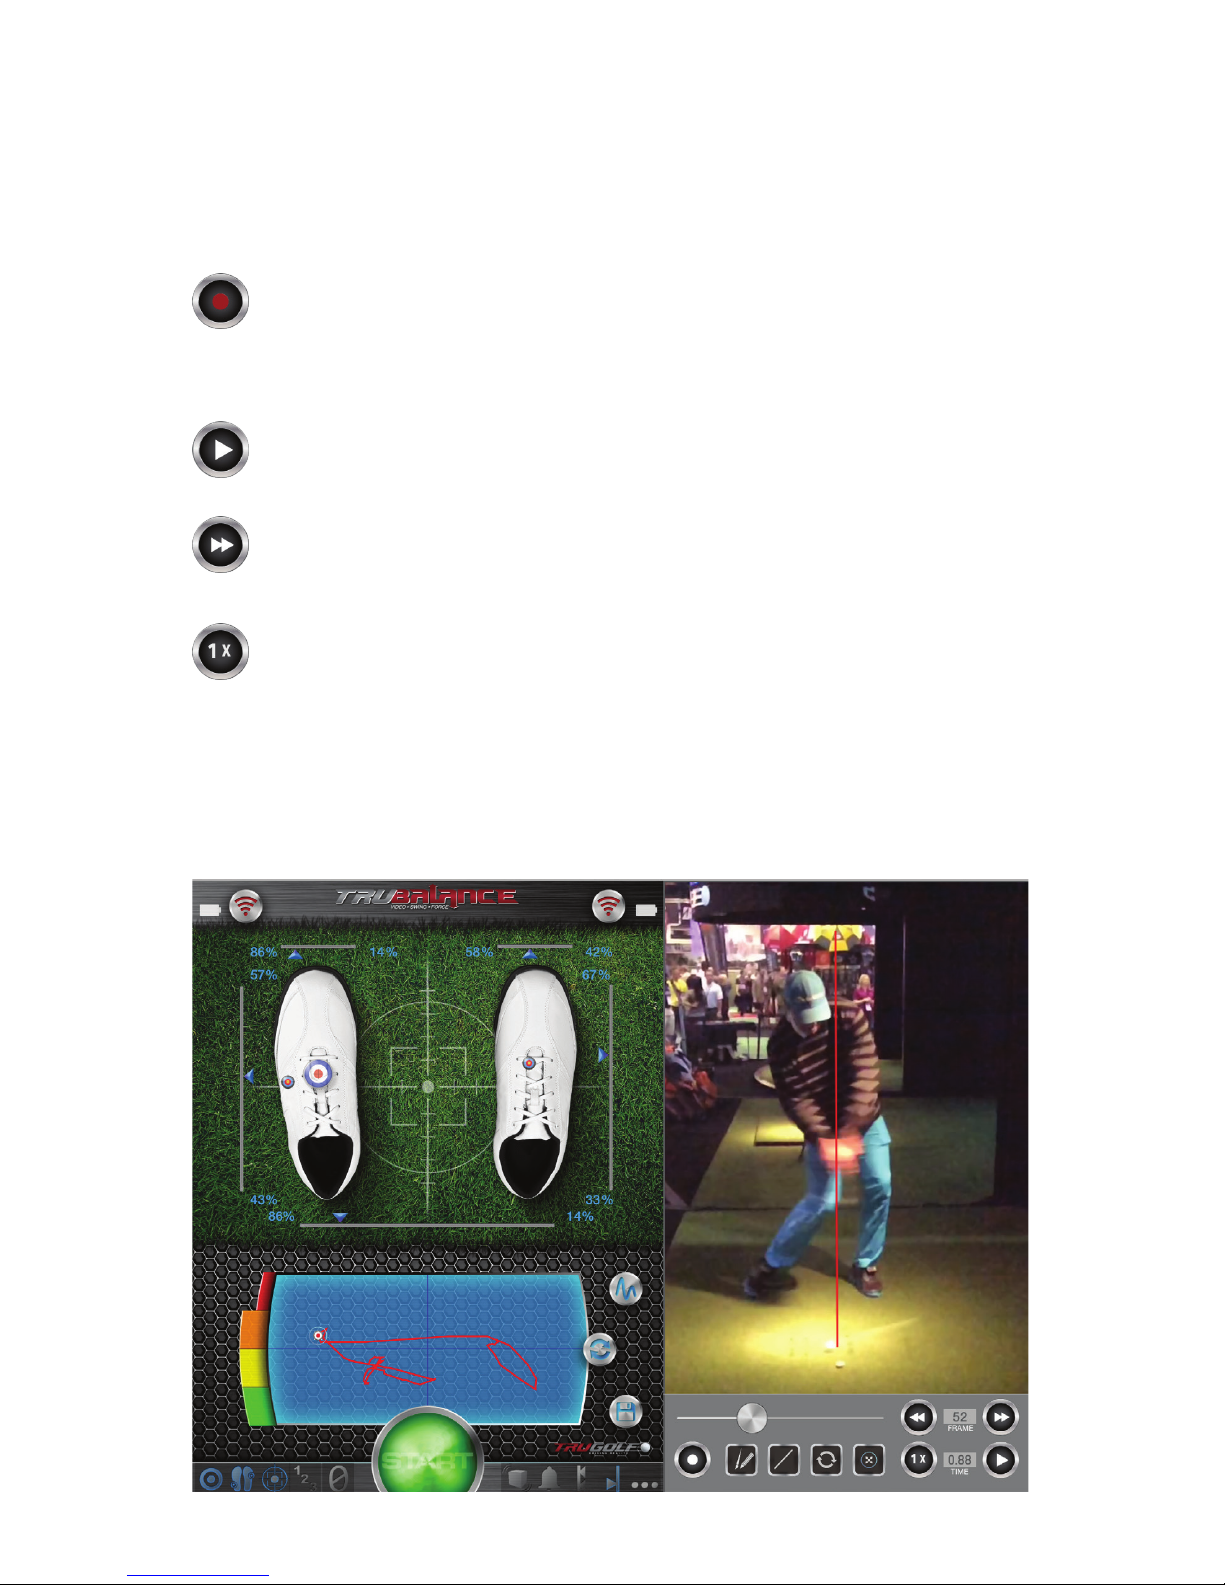
2. Open the TruBalance Mobile app on your iOS device. On the TruBalance
Mobile app’s home screen there are two wireless signal icons in the top two
corners of the left display. The wireless signal icons indicate the wireless
connection between each respective TruBalance insole and your iOS device.
Each of the wireless signal icons corresponds to an individual insole. The left
wireless signal icon is to be synched with the left insole, etc.
3. To sync, touch one of the wireless signal icons, then press and hold (for
approximately 1 second) the power button on the corresponding TruBalance
insole wireless transmitter. For best results, press and hold the transmitter
button soon (within 1 or 2 seconds) after touching the wireless signal icon.
Only sync one TruBalance insole at a time.
4. The wireless signal icon will turn from red, to green, once a successful wireless connection
has been established. Do this for both the right, and left, insole transmitters. If the
wireless connection is unsuccessful (the wireless signal icon doesn’t turn green), repeat
the connection sequence – step #3.
5. Once both signal icons are green, you are ready to use TruBalance Mobile to measure
swing information.
TRUBALANCE MOBILE
https://itunes.apple.com/us/app/trubalance/id902578640?mt=8
GET THE APP
Currently, the TruBalance Mobile app is only available for iOS devices:
i.e. iPad, iPad Mini, and iPhone models 4s or greater, that are running
iOS version 8.0 or greater. TruBalance insole hardware wirelessly syncs
with the TruBalance Mobile iOS application.
Scan the provided QR code with your device, or access the TruBalance
Mobile app from the App Store to download.
https://itunes.apple.com/us/app/trubalance-v/id958303997?mt=8

2
RECORD SWING DATA
1. The TruBalance system allows the golfer to record, save, and share weight-shift data.
Touch the ‘START’ icon, found on the TruBalance home screen to begin recording.
2. Touch the ‘STOP’ icon to end a recording.
3. Touch the ‘Save’ icon to preserve recorded data.
DESCRIPTION OF FEATURES
There are several icons on the TruBalance Mobile home screen that provide access to a
multitude of features and additional information.
Center Target: Displays a target that indicates the golfer’s real-time center of gravity.
Shoe Targets: Displays a target that indicates each respective foot’s center of pressure.
Centerline Grid: Displays a grid that separates the home screen interface into four quadrants.
The centerline grid provides the golfer an enhanced visual representation of his/her weight-
shift during a swing.
Raw Numbers: Displays “raw number” values for each respective insole sensor. Raw number
values are digital representations of analogue weight-shift data collected by the eight force
sensors in the TruBalance system.
Reset Numbers: Selecting this icon resets the current “raw-number” values of all insole sensors
to zero. For most typical applications of the TruBalance system, this feature should be left “o”.
Accelerometer: To be used for a future feature, which is not accessible at this time.
Alarm: Toggles the alarm on/o. When the ‘Limits Indicator’ parameters have been exceeded the
alarm will sound. The alarm volume can be modied in the ‘Settings and Conguration’ menu.
Limits Indicator: Displays sliders (red) that allow you to set parameters (limits) for weight
distribution. When the alarm icon is selected, exceeding any established parameters will cause
the alarm to sound.
Dynamic Indicator: Displays sliders (blue) that track real-time weight-shift relative to the
“Limits Indicator” settings.
Setting Menu: Settings and conguration menu.
GRAPHING AND SAVING SWING DATA
Graphing Button: Displays a comprehensive representation of all weight-shift data collected
during a recorded swing. Force is measured over time, for all sensors in each insole. From this
interface you can view, save, or share swing data.
Reset Button: Clears all data from the Pressure-Tracing Board on the TruBalance
home screen.
Save/Load Button: Save, load, or delete all data collected from a recorded session.

3
VIDEO PLAYBACK CONTROL ELEMENTS
Video Playback Mode
Avideo must rst be recorded, or uploaded from your iOS device, before any video playback options
are made available. Video playback features are not available when the Video Playback graphical control
elements are grayed-out.
Live Mode / Replay Mode Toggle Button: Once a video has been recorded, or uploaded,
the video content will appear in the Video Playback Interface. The toggle button allows you to
switch between “Live Mode” and “Replay Mode” while in the Video Playback Interface. A red icon
indicates “Live Mode” and a white icon indicates “Replay Mode”. “Live Mode” is used to preview
camera settings before recording video. Features such as “Pause/Play”, “Frame Advance/
Rewind”, “Playback Speed”, and “Video Scrub Bar” are only available when Replay Mode has
been selected.
Play / Pause: Play or pause recorded or imported video during playback.
Frame Advance/ Frame Rewind: Once video playback has been paused, the Frame Advance/
Rewind control element allows the user to advance or return to the next, or the previous, frame
of video. Selecting the Frame Advance/Rewind icon will load a single new frame per selection.
Rapid, multiple selections will not quickly advance through frames. The user must wait for a new
frame to load completely before advancing to a subsequent frame.
Playback Speed: Allows the user to toggle between playback speed options.
Video Scrub Bar: While in Replay Mode (the Video Playback Indicator is white), the user can
review any recorded video by dragging the icon along the playback line. A specic location (time)
in the video can be found and selected for user review faster than using the Frame Advance/
Frame Rewind control element.
Frame Number and Time Signature Displays: The Frame Number and Time Signature
Displays do not animate while video is playing. While in replay mode, these reference metrics
will be displayed.

4
Drawing Tools
Drawing tools can be used to apply supplemental graphical elements to any recorded video. Drawn
elements will overlay the video during Replay Mode. Multiple drawn elements (freehand lines) can be
applied. TruBalance Mobile only allows for a single Straight Line to be applied over video at any time. The
color of drawn elements can be selected and changed in the Weight Shift Graphing Interface.
Toggles Drawing Tools On or O
Straight Line / Freehand Drawing Toggle: User can toggle between Straight
Line and Freehand Drawing options. Lines are created by dragging across the Video
Playback Window.
Clear Lines: Deletes all drawn lines from the Video Playback Window.
Reference Mark Icon: Selecting the Reference Mark Icon applies a marker onto the Weight Shift
Graph. This feature is only available while user is in Replay Mode. Once the Reference Marker
has been applied onto the Weight Shift Graph, it represents the specic Video Time Signature
at which it was selected (i.e. if video playback is paused at the moment of club-ball impact and the
Reference Mark Icon is selected, a marker will appear on the Weight Shift Graph that indicates the
corresponding balance ratio at the point of club-ball impact). Once applied to the Weight Shift graph,
a reference mark is visible in all video playback modes. To remove a reference mark from the
Weight Shift Graph, the drawing tools must be toggled to “o” (grayed-out).
CAMERA CONTROL OPTIONS
While in Live Mode (the Video Playback Indicator is red) the user can open the Camera Control
Options menu.
Note: Not all devices can support all available Frames Per Second settings. If an unsupported FPS
rate is selected in the Camera Control Options Menu, the application will automatically revert to the
“30 fps” setting. Currently, the front camera on all iOS devices can only support 30 fps.
1. Auto: Selects default camera settings.
2. Gain, Shutter, and Focus: Manually set camera aperture gain, shutter speed and focus.
3. Rear and Front: Selects the camera from which video is recorded.

5
EXPORT VIDEO AND DATA
When in the Data Charting Menu (select the Graphing Button ), the Email icon is available. Emailed
les include a PDF le (plotted data), a CSV le (raw data that can read, and plotted, in spreadsheet
applications), and a MP4 le (video).
Note: You must have an email account established and linked to your iOS device in order for this feature
to work properly. iOS system settings include an option to always ‘bcc’ yourself on all emails sent from
the iOS device. TruBalance Mobile imports this iOS setting (when applicable) to all emailed les.
IMPORT VIDEO AND DATA
TruBalance Mobile users can open and import TruBalance Mobile video and data les from email. To
import data and video les to TruBalance Mobile, rst open and download TruBalance Mobile CSV (raw
data) and MP4 (video) les onto your iOS device. For each respective le (CSV and MP4) select “open
with”, then select “TruBalance Mobile”.
Note: Importing data to TruBalance Mobile does not automatically open the imported data in the
TruBalance Mobile interface. Imported CSV and MP4 les can be accessed by rst selecting the
“Save/Load Button”, then select the imported les that you which to view from the Save/Load Menu.

6
SETTINGS MENU
1. Theme: Select skin themes for TruBalance Mobile Weight Shift Interface.
2. Include Video in Email: Selecting this option will always apply video le to all le-sets exported
from TruBalance Mobile.
3. Show Weight Shift %: Selecting this option displays percentage values on the Drawing Area.
4. Always Draw Trace: When selected, a trace-line will always be drawn in the Drawing Area, even
when user is not recording data. The user can clear all trace-lines from the Weight Shift Graph
by selecting the “Clear Lines” icon.
5. Countdown Timer: Countdown settings are used to provide the user a time-delay between
the selection of the “Start” icon and the initiation of video/data recording. To apply a delay time,
select the Countdown Timer setting.
The “Delay Time” slider designates how much time will elapse between the selection
of the “Start” icon and the initiation of video/data recording. The “Sample Time” slider
designates how long the video/data will be recorded.
6. Alarm Tone: Sliders can be used to manually select the tone and volume of the Alarm function.
WIRELESS TRANSMITTER BATTERY LIFE
Once a TruBalance insole is successfully synched with the TruBalance Mobile software, the battery icon next
to the wireless signal icon will indicate the remaining battery life of the wireless transmitter.

DRIVING REALITY
trugolf.com
Customer Support please call
877-711-6691 or 801-677-1123
Contact Sales please call
866-711-GOLF or 801-298-1997
Table of contents
Popular Accessories manuals by other brands

Datalogic
Datalogic S5N-M Series instruction manual

Vimar
Vimar LINEA 30179 Series quick start guide

Comcast
Comcast Secromm XHS2-SE Installation

Endress+Hauser
Endress+Hauser Oxymax COS22D operating instructions

INNOLIVING
INNOLIVING INN-762NEWS user manual

Manitowoc
Manitowoc K00049 installation instructions