Trutone TT-1000 User manual
TRU-TONE
THIN Style Telephone
Owner’s Manual
Model TT-1000
IMPORTANT SAFETY INSTRUCTIONS
When using your telephone equipment, basic safety
precautions should always be followed to reduce the
risk of fire, electric shock and injury to persons
including the following:
1. Read and understand all instructions.
2. Follow all warnings and instructions marked on
the product.
3. Unplug this product from the wall outlet before
cleaning. Do not use liquid cleaners or aerosol
cleaners. Use a damp cloth for cleaning.
4. Do not use this product near water, for
example, near bath tub, wash bowl, kitchen sink, or
laundry tub, in a wet basement, or near a swimming
pool.
5. Do not place this product on an unstable cart,
stand, or table. The product may fall, causing
serious damage to the product.
6. Slots and openings in the cabinet and the back or
bottom are provided for ventilation, to protect it from
overheating. These openings, must not be blocked or
covered. The openings should never be blocked by
placing the product on the bed. Sofa, rug, or similar
surface. This product should never be placed near or
over a radiator or heat register. This product should
not be placed in a built-ininstallation unless proper
ventilation is provided.
7. Never push objects of any kind into this
productthrough cabinet slots as they may touch
dangerous voltage points or short out parts that could
result in a risk of fire or electric shock. Never spill
liquid of any kind on the product.
8. To reduce the risk of electric shock, do not
disassemble this product, but take it to a qualified
serviceman when some service or repair work is
equired. Opening or removing covers may expose
you to dangerous voltages or other risks. Incorrect
reassembly can cause electric shock when the
1
9. Unplug this product from the wall outlet and refer
servicing to qualified service personnel under the
following conditions:
A. When the power supply cord or plug is damaged
or frayed.
B.If liquid has been spilled into the product.
C.If the product has been exposed to rain or water.
D.If the product does not operate normally
following the operating instructions. Adjust only
those controls that are covered by the operating
instructions because improper adjustment of
other controls may result in damage and will
often require extensive work by a qualified
technician to restore the product to normal
operation.
E.If the product has been dropped or the cabinet
has been damaged.
F. If the product exhibits a distinct change in
performance.
10.Avoid using a telephone (other than a cordless
type) during an electrical storm. There may be a
remote risk of electric shock from lightning.
11. Do not use the telephone to report a gas leak in
the vicinity of the leak.
SAVE THESEINSTRUCTIONS
INSTALLATIONINSTRUCTIONS
1. Never install telephone wiring during a lightning storm.
2. Never install telephone jacks in wet locations
unless the jack is specifically designed for wet
locations.
3. Never touch uninsulated telephone wires or
terminals unless the telephone line has been
disconnected at the network interface.
4. Use caution when installing or modifying
telephone lines.
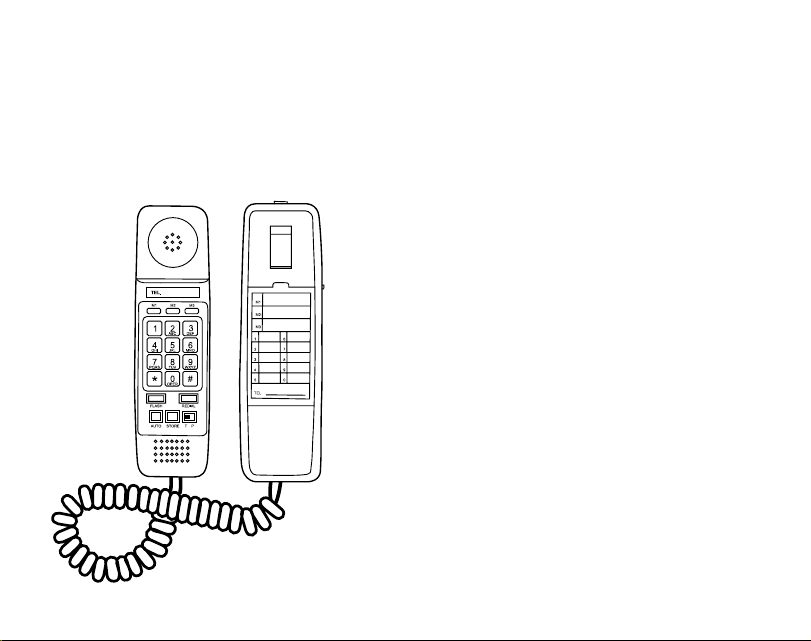
Preparation
First carefully remove your CLEAR TONE telephone
from the unit carton. In addition to the handset and
telephone base, each carton contains the following
accessories:
•One 7ft. fully modular telephone line cord (long,
straight cord)
•One 7ft. fully modular coil cord
•Owner’s Manual
•One 4 inch fully modular telephone line cord (short,
straight cord).
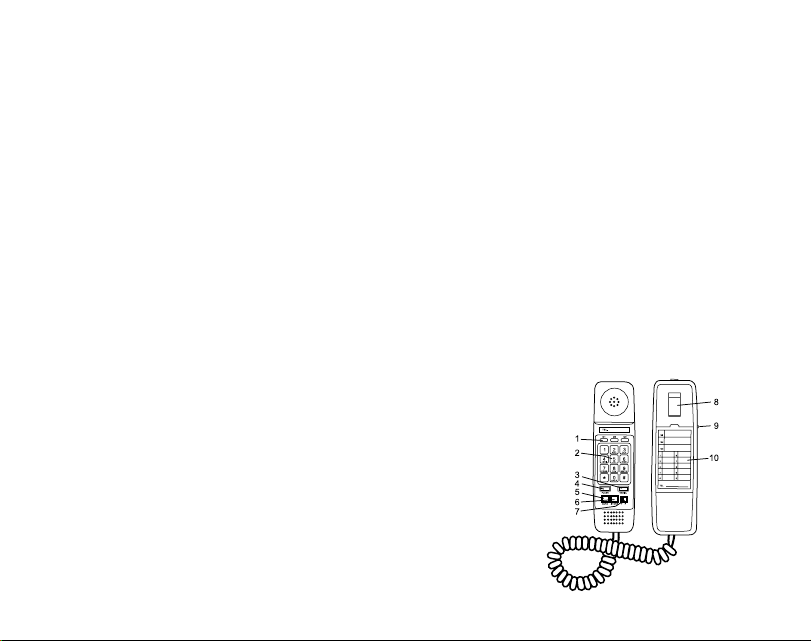
GET TO KNOW YOUR TELEPHONE
1. 3-ONE TOUCH MEMORY KEYS
2. LIGHTED DIAL KEY PAD
3. REDIAL BUTTON
4. FLASH BUTTON
5. AUTO BUTTON
6. STORE BUTTON
7. TONE / PULSE SWITCH
8. HOOK SWITCH
9. RINGER ON / OFF SWITCH
10.MEMORY INDEX
Diagram A
23
Important Notice
Your telephone will operate on all systems, tone or
rotary.
1. If your home is wired for rotary service, move
switch to pulse position (P).
2. If your home is wired for tone service, move switch
to tone position (T).
3. If you’re unsure of the type of service you have, ask
your local telephone company.
1. Pushbutton Dialing Convenience on Rotary Lines.
Your telephone can be used as a direct replacement
for rotary phones. If your home is wired for rotary
service, move switch to pulse position and enjoy
pushbutton dialing ease.
NOTE: Your telephone will pulse for a second or two
while you are dialing. This simulates the dialing
action.
2. Tone Dialing. If your home is wired for tone service,
move switch to tone position. This can be used as a
direct replacement for tone phones. Also allows use
of long distance dialing services and tone accessed
computer.
NOTE: If your home is not wired for tone service, you
will not be able to make outgoing calls while in the
tone mode. Slide the switch to the pulse position. You
have rotary service.
INSTALLATION
Coil Cord Connection
Insert coil cord into modular jack located on side of
housing. Connect the other end into the modular jack
located on handset.
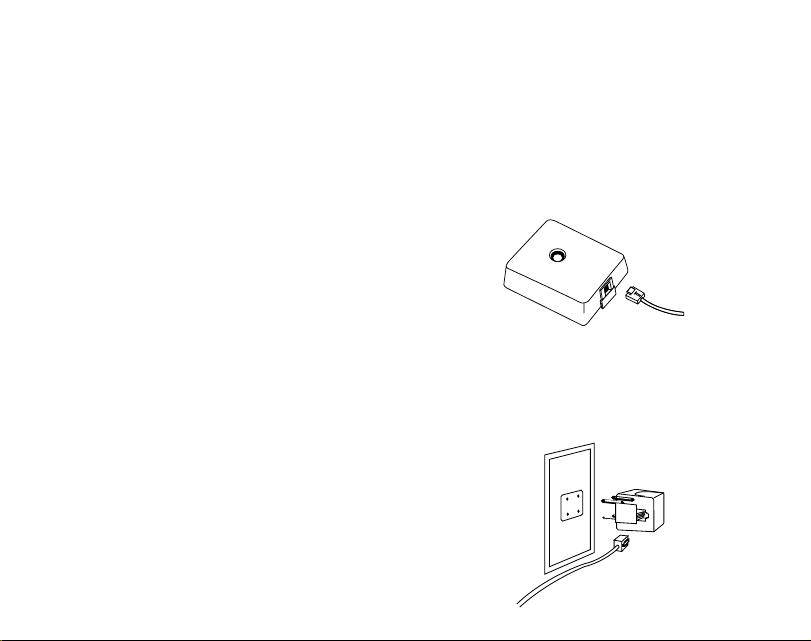
Line Cord Connection
With a modular jack telephone system, connect the
straight telephone line cord to the modular jack
located on the bottom of the base. Insert the other
end of cord into a modular wall jack. Make sure all
plugs snap firmly in place. (See Diagram B).
With a four prong style jack, simply use a plug in
modular adaptor (See Diagram C).
Diagram B
Diagram C
45

2. If you do not want anyone to know which number
you dialed last, pick up the phone and press any
number. and Hang up.
3. To redial numbers stored in memory, press the
memory buttons (not redial).
STORING TELEPHONE NUMBERS INTO MEMORY
LOCATIONS M1 OR M2 OR M3
NOTE: This phone has 3 one touch memories. This
is very useful for emergency numbers or numbers
you call frequently. To use the one touch numbers
just get a dial tone and press one of the 3 buttons. To
store a number into any of these 3 locations just
follow the instructions below, Remember to write the
names you stored onto the memory index. We
suggest you write these in pencil so you can change
them later.
STORING NUMBERS INTO MEMORY
To store numbers into the 3 one touch memory,
locations do the following
1. Pick up handset, listen for the dial tone.
2. Press store button once & release.
3. Dial number to be stored.
4. Press store button once & release.
5. Press M1 or M2 or M3 (location where you want the
number stored).
6. Hang up phone, & go back to step #1 again to
store other numbers.
EXAMPLE:
To store 5551212 into memory M2 do the following.
1. Pick up handset.
2. Press store
3. Dial 5551212
4. Press store
5. Press M2
6. Hang up
OPERATION
SETTING THE TONE/PULSE SWITCH (P/T)
Please ask your local telephone company whether
your phone service is PULSE (Rotary) dialing or
TONE DIALING. Set the switch at T position for TONE
type, or set the switch at P position for PULSE
(Rotary) type.
RINGER ON/OFF SWITCH
When you don’t want to be disturbed by incoming
calls, slide the ringer switch on the base to the “OFF”
position, you can still use the phone to make out-
going calls but any in-com-ing call will not activate
the bell Remember to return the switch to the “ON”
position when you are ready to receive calls.
Select the desired function of the bell ringer.
-OFF the ringer does not sound, for undisturbed
privacy. Only on THIS PHONE, other phones in your
home will continue to ring normally.
-ON Normal setting rings on incoming calls.
RECEIVING CALLS
When the phone rings
1. Lift the handset and speak into the mouth piece of
the handset.
2. Hang up the handset to release the telephone line
when conversation is completed.
PLACING CALLS
1. Select the desired dialing mode with the (P/T)
2. Pick up the handset and listen for a dial tone.
3. Dial your call
LAST NUMBER REDIALING
The last number you called can be redialed using
this telephone.
This is useful especially if the line is busy.
1. To Redial the last number, press the HOOK
SWITCH, listen for the dial tone, then press the
REDIAL BUTTON. 67

TO DIAL FROM M1 OR M2 OR M3
1. Pick up handset - for dial tone
2. Press M1 or M2 or M3
3. Your phone will dial the number you stored into M1
or M2 or M3 automatically.
EXAMPLE: Pressing M2 will dial (in TONE or PULSE)
the number you stored in M2 to be dialed.
TO STORE A NUMBER INTO THE 10 TWO TOUCH
MEMORY LOCATIONS -DO THE FOLLOWING
STORING TELEPHONE NUMBERS
NOTE: This telephone will store up to 16 digits in
each memory position. Follow this simple step by
step method.
1. Pick up the handset to get a dial tone.
2. Press store button once & release.
3. Dial the number you want to store.
4. Press store button once & release.
5. Press a number from 1 to 0 (where you would like
your number stored).
6. Hang up the phone.
7. Repeat steps 1 to 6 to store the remaining numbers.
EXAMPLE: Suppose you want to store 555-1212 into
memory 3
1. Pick up handset.
2. Press store button once & release
3. Dial 5551212
4. Press store button once & release.
5. Press 3
6. Hang up phone.
TO DIAL NUMBER FROM MEMORY
1. Pick up receiver.
2. Press AUTO and numerical button in which the
number you want to dial is stored.
The unit will dial the number stored in the memory
you selected automatically.
EXAMPLE: Pressing AUTO 2 will dial (in TONE or
PULSE the number you stored in 2 to be dialed.
DIALING NUMBERS STORED IN 10 NUMBER MEMORY
NOTE 1. Emergency calling is an important safety
feature that should be used wisely. It you decide to
store emergency numbers into memory, use & label
them carefully. CLEAR TONE assumes no responsi-
bility for customer reliance on this memory feature. If
you want to test emergency numbers you stored,
please test them during non peak hours and tell the
emergency operator “This is a test” to avoid
dispatching of help.
NOTE 2. If you move your phone to another room or
disconnect. the phone line, your stored numbers will
remain in the memory for a short time, so quickly
reconnect it to the new jack, or you will have to
reprogram the memory numbers.
MEMORYDIALING
NOTE 3. If the operator comes on during storing
numbers with the message “your phone is off the
hook”, ignore this. During storing of numbers. the
circuit simulates an off hook condition. This is
normal. We suggest you program the numbers
quickly to avoid operator messages.
NOTE 4. In case you want to change a number,
simply store a new number, the old number will be
automatically erased.
MEMORY INDEX
1. Lift the plastic covering over index paper.
2. Write numbers on the index (in pencil so you can
change them later)
3. Replace paper and plastic cover.
Telephone Number Insert
An area for your phone number has been provided
just below the wall mount hook (Fig.1#1). Remove
theplastic window and write or type your area code
and phone number on the paper label and replace.
Slightly bend the plastic cover to slip back into
89
•Are cords damaged in any way?
•Try another phone jack. If your TRU-TONE
TELEPHONE works on another jack, it is likely that
there is a problem with your wiring.
Problem:I hear my phone dialing, but I cannot get
past the dial tone.
•Check the tone/pulse switch. If positioned in Tone
(T) mode, switch to Pulse (P). You may have pulse
dialing service. Problem: Phone doesn’t ring.
•Is ringer switch set to the “OFF” position?
•How many extensions are connected to your line? If
more than five telephones are installed on the same
line, you may need to contact your local telephone
company to determine the maximum number of
extensions for your calling area.
Problem: The sound volume is too low.
•Is another extension off hook? If so, hang up extension.
FCC and Phone Company Information
Your telephone company is required by the Federal
Communications Commission to allow you to
connect FCC registered telephones to their lines.
The FCC requires you to provide information, if
requested by the local telephone company, about the
connection of an FCC registered telephone to their
lines. They may ask you for the FCC registration
number and the ringer equivalence number (REN):
both are on the bottom of the base. They may also
ask for the Universal Service Order Code (USOC).
which is
RJ-11C.
The REN is used to determine the quantity of devices
which may be connected to the telephone line.
Excessive REN’s on the telephone line may result in
the devices not ringing in response to an incoming
call. In most. but not all areas, the sum of the REN’s
should not exceed five (5.0). To be certain of the
number of devices that may be connected to the line,
position.
INSTALLATION SECTION
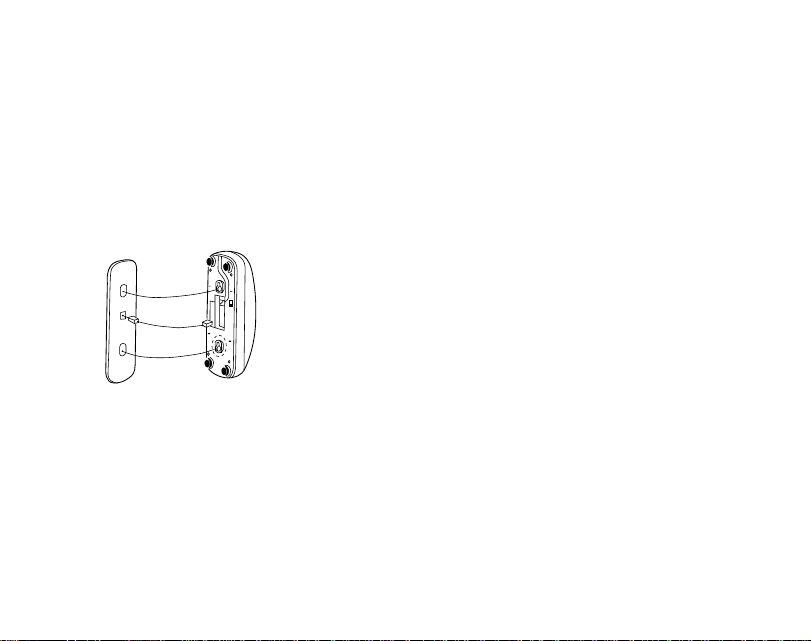
Wall Mounting
Your telephone is also designed to mount on a wall
surface over a modular wall jack. Simply connect the
short telephone line cord to the modular jack located
on the bottom of the base. Insert the other modular
plug into the wall jack, making sure it snaps firmly in
place. Position the wall mount slots on the bottom of
the base over the two studs of the wall plate. Pull
down to lock in place (see Diagram D).
Diagram D
Desk or Wall Mount
Keep the Desk/Wall hinge in a flush position for Desk
Top use. To use with a Wall Mount simply flip hinge
out. This will hold the handset.
Hearing Aid Compatibility
Your telephone is compatible with inductively coupled
hearing aids.
Trouble Shooting Guide
Problem: No dial tone
•Check all modular plugs to be sure they have clicked
into place. 10 11

D. Connecting this telephone to a coin operated
telephone or a party line is prohibited by law.
E. If it is determined that your telephone is
malfunctioning, the FCC requires that it be
disconnected from the modular outlet until the
problem has been corrected.
for the calling area. Should your equipment cause
trouble on your line which may harm the telephone
network, the telephone company shall, where
practicable, notify you that temporary discontinuance
of service may be required. Where notice is not
practicable and the circumstances warrant such
action, the telephone company may temporarily
discontinue service immediately. In case of such
temporary discontinuance, the telephone com-
pursuant must: (1) promptly notify you of such
temporary discontinuance: (2) aftord you the
opportunity to correct the situation: (3) inform you of
your right to bring a complaint to the Commission
Ipursuant to procedures set forth in Subpart E of Part
68. FCC Rules and Regulations.
The telephone company may make changes in its
communications facilities. equipment operations or
procedures where such action is required in the
operation of its businesses not inconsistent with
FCC Rules and Requlations. If these changes are
expected to affect the use or performance of your
telephone equipment. The telephone company must
give you adequate notice, in writing, to allow you to
maintain uninterrupted service.
This equipment cannot be used on telephone
Company provided coin service. Connection to Party.
Line Service is subject to state taritfs. Any changes or
modifications not expressly approved by (state party
responsible for compliance) can void the user’s
authority to operate the equipment.
Additional Information
A. When your CLEAR TONE telephone is not in use,
make sure the handset is engaged into the base unit.
B. Avoid rough handing, areas with excessive
moisture, heavy dust or extreme temperature.
C. To clean, use a mild detergent and slightly damp
cloth, never use strong solvents or abrasives.
13
12
Table of contents


