TST TM-510 User manual

Wireless Tire Pressure and Temperature
Monitoring System Instrucon Manual
Model #: TM-510
510 Cap Sensors
Thank you for purchasing the TST Tire Pressure Monitoring
System. With minimal care, your new TPMS will
provide reliable service for many years. Please read and
understand the informaon contained within this manual.
Keep this manual for future reference.
Telephone: 770.889.9102
Website: www.tsruck.com
TST-Doc-510 Manual-(A)
Truck System Technologies - 4250 Keith Bridge Road, Suite 200, Cumming, GA 30041
1

INDEX
Page 1 - Sensor Features
Page 1 - Display Features
Page 2 - System Components in Kit
Page 3 - Display Controls/Display Components and Icons
Pages 4 - 6 - Programming Sensor Codes Into the Display
- Manual Coding (Opon #1)
- Automac Code Learning (Opon #2)
Page 7 - Sensor Installaon
Page 8 - Display Installaon
Pages 8 - 11 - Parameter Sengs (Pressure & Temperature)
Page 12 - Monitor Alerts
Page 13 - Other Funcons
Page 14 - Troubleshoong Tips/Sensor Baeries
Pages 16 - 18 - Common Quesons
Page 19 - Repeater
Page 19 - Sensor Specicaons
Page 20 - Display Specicaons
Page 21 - Notes
TST-Doc-510 Manual-(A)
Truck System Technologies - 4250 Keith Bridge Road, Suite 200, Cumming, GA 30041
2

SENSOR FEATURES
1. Sensors easily install on the valve stem.
2. Sensors are water resistant.
3. Pressure and temperature data is read every two (2)
minutes.
4. Removal of a sensor (0 lbs. pressure) will shut o the sensor
baery.
5. Tire leaks and high-temperatures are detected quickly.
6. Each sensor has a unique, four (4) digit code for programming.
7. Sensor baeries last approximately 3-4 years.
8. Sensors feature an an-the cap.
DISPLAY FEATURES
1) Easy to read display.
2) Mount included.
3) Integrated lithium-ion baery that is rechargeable with
provided cord.
4) Wake-up acvaon of display when in moon.
5) Automac display illuminaon in dark condions.
6) Programable high and low-pressure alarm thresholds.
7) Programmable high-temperature alarm.
8) Visual and audible warning alarms when temperature or
pressure exceeds thresholds.
9) Mulple pressure units: PSI, BAR, Kpa and Kgf/cm2.
TST-Doc-510 Manual-(A)
Truck System Technologies - 4250 Keith Bridge Road, Suite 200, Cumming, GA 30041
3

10) Selectable temperature unit: °C or °F
11) Program up to 22 res.
12) Tire pressure and temperature is displayed simultaneously
for quick viewing of each re.
13) The trailer display can be electronically removed from the
screen when not towing.
14) Push buon programming.
15) A fully charged display will connuously operate 5-7 days on
baery power.
16) Tire temperature and pressure sengs are congured “per
axle.”
SYSTEM COMPONENTS IN KIT
Display
Power Adapter
Hard Wire Kit
Display Holders Long Antenna
Sensors Installation Tools
TST-Doc-510 Manual-(A)
Truck System Technologies - 4250 Keith Bridge Road, Suite 200, Cumming, GA 30041
4

DISPLAY CONTROLS
•There are four (4) programming buons located across
the lower front face of the display. They are: “MODE,”
(+), (-) and “SET.”
•The power switch is the (-) buon on the front of the
display. Hold it for approximately six (6) seconds to turn
on the display. To turn o the display, press and hold the
same (-) buon for about six (6) seconds.
NOTE: The power switch will not turn o the monitor when
constant power is applied to the unit either by the power adapter
or the hardwire kit.
Pressure Unit: BAR, PSI, Kpa or Kgf/cm2, user-selectable.
Temperature unit: C° or F°, user-selectable.
DISPLAY COMPONENTS AND ICONS
Tire Indicator
Low Sensor Baery
Fast Leakage
High Pressure
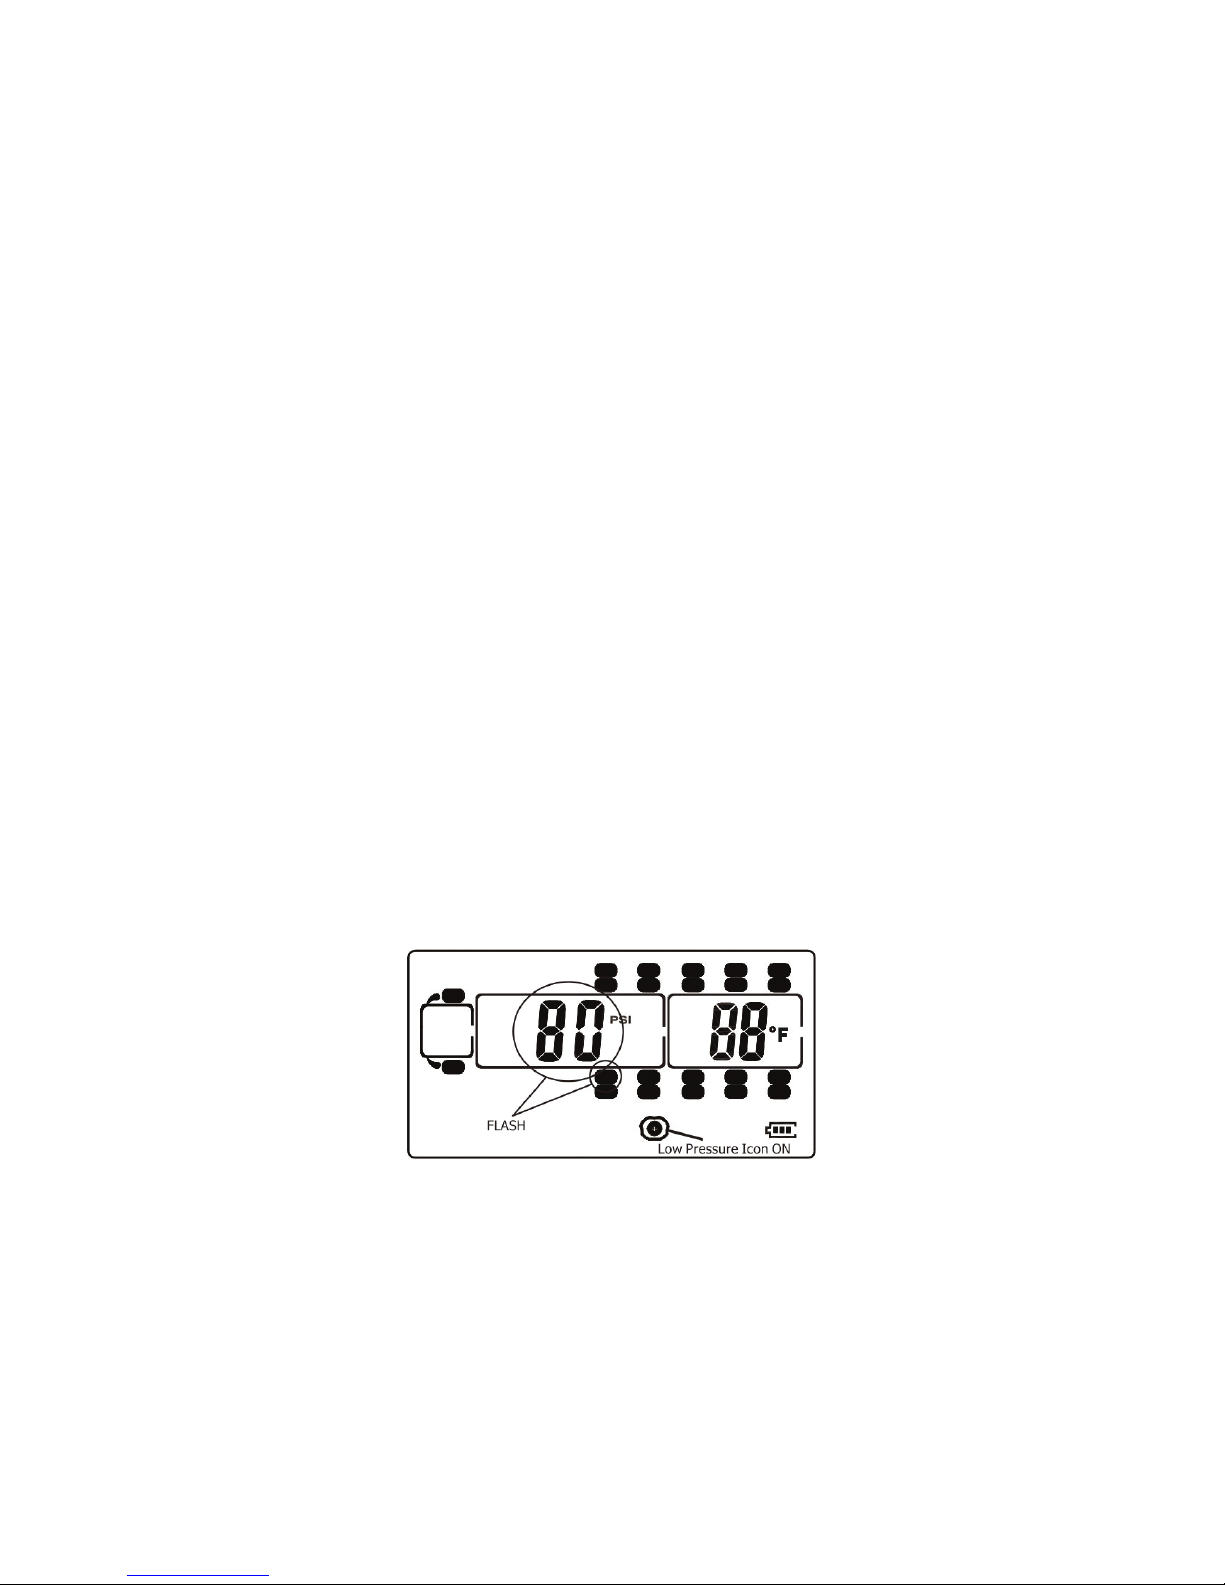
Low Pressure
High Temperature
Display Baery
TST-Doc-510 Manual-(A)
Truck System Technologies - 4250 Keith Bridge Road, Suite 200, Cumming, GA 30041
5

PROGRAMMING SENSOR CODES INTO THE DISPLAY
Note: It is recommended to label each sensor rst with the
provided numbering code sckers, similar to the following
paern, before you code the sensors. This allows you to know
which sensor is programmed to which re posion. You can also
write in your sensor number paern.
SENSOR MANUAL CODING (Opon #1)
Note: Code all the sensors to the display BEFORE screwing them
onto the re valve stem unless otherwise noted.
Also…A code of all F’s (FFFF) means the re icon will NOT show up
on the display screen. If any of the digits are not “F,” the system
will interpret this as a code and the re icon WILL show on the
screen. To delete any re posion, the code must be set to “FFFF.”
•Turn the display on by holding the (-) buon down unl
it beeps. You will now be on the Main Screen.
Or use your own paern:
TST-Doc-510 Manual-(A)
Truck System Technologies - 4250 Keith Bridge Road, Suite 200, Cumming, GA 30041
6

•Press and hold the “SET” buon unl it beeps and then
release it (approx. 5-7 seconds). You are now in the code
programming mode.
•A re icon will ash and all 22 res will be displayed.
“FFFF” should be displayed.
•Navigate to the re you want to code by quickly pressing
the “SET” buon unl you arrive at the re posion on
the screen.
•Enter the rst digit of the four-digit code from the sensor
using the (+) or (-) buons.
•Move to the next digit by quickly pushing the “MODE”
buon. Enter the second digit of the code with the (+) or
(-) buons.
•Press “MODE” to go to the third digit. Enter it.
•Press “MODE” and put in the fourth and nal digit for
that re posion. When done you can:
•Quickly press “SET” to move on to another re posion
to enter the next four-digit code.
OR
•Press and hold the “SET” buon to save the code you
entered.
Note: If the right front re is blinking and does not show all “F’s”
you can delete the factory test sensor code as follows:
•Press the “SET” buon unl it beeps (approx. 4-6
seconds). The display should now show a code other
than “FFFF.” This display indicates the re posion is
coded and will show on the Main Screen.
TST-Doc-510 Manual-(A)
Truck System Technologies - 4250 Keith Bridge Road, Suite 200, Cumming, GA 30041
7

•To remove the re icon from the screen, the four-digit
code has to display all F’s. With the rst digit ashing, set
it to “F” using the (+) or (-) buons.
•Press “MODE” to move to the next digit. Set that to “F.”
•Connue to set all the digits to “F.” When done and with
“FFFF” showing on the screen, press and hold the set
buon unl it beeps. This will save the code you entered
and exit the programming mode.
Note: When in the coding mode, the display will me-out within
approximately one (1) minute if no buons are pushed. At that
point, you will have to again hold the “SET” buon down and
start the coding process again.
AUTOMATIC CODE LEARNING (Opon #2)
•Be sure your display is ON and it is showing the main
screen.
•Be sure your sensors are numbered. Screw the sensors
partly onto each valve stem in the order you numbered
them. Do NOT screw them down far enough to hear air
hissing out.
•Hold the “SET” buon down unl you hear a second
beep and then release.
•Navigate to the re icon you want to code that sensor to
on the display.
•Stand by that re and screw the sensor all the way down
to seat it.
•The sensor will immediately transmit its four-digit code
to the display and it will be displayed.
•Physically move to the next re posion you want to
code.
TST-Doc-510 Manual-(A)
Truck System Technologies - 4250 Keith Bridge Road, Suite 200, Cumming, GA 30041
8

•Using the (+) or (-) buon, navigate to the re on the
monitor you are standing at.
•Again, nish screwing that sensor down to seat it. That
code now will appear on the monitor.
•Connue this procedure unl you have coded all the
sensor posions.
•Finally, press the “SET” buon unl it beeps to save all
the sensor codes in the monitor.
SENSOR INSTALLATION
•Be sure to write down your sensor code in this manual in
the correct re posion for future reference.
•Using one of the tools included with your kit, slip the
sensor into the tool.
•Screw the correct sensor onto the valve stem for that re
posion. Tighten the sensor unl the air stops leaking
and the sensor booms-out on the valve stem. Then give
it a slight twist to seat it. Do Not Overghten!
•We suggest adding dielectric grease to the sensor threads
to prevent the threads from seizing to the valve stem
over me.
TST-Doc-510 Manual-(A)
Truck System Technologies - 4250 Keith Bridge Road, Suite 200, Cumming, GA 30041
9

DISPLAY INSTALLATION
•There are two ways to mount the display to your dash.
•The vent clip can be aached to the display and then
clipped inside one of the vehicle A/C vents.
•Oponally, the provided velcro pads can be used to
secure the display to the top of the dash.
•Plug the power cord into the vehicle’s power port and
then into the side of the monitor to charge the internal
lithium baery. Charge the display for four (4) hours the
rst me.
•An oponal hardwire cord is provided if you choose to
wire the display into your vehicle’s ignion switch. In this
case, the monitor will automacally come on when the
ignion is on.
PARAMETER SETTINGS (Seng the sensor alarms)
NOTE: The factory default sengs are:
Pressure Unit: PSI Temperature units: °C
High Pressure: 175 lbs. High Temperature: 70°C (158° F)
Low Pressure: 100 Lbs.
TST-Doc-510 Manual-(A)
Truck System Technologies - 4250 Keith Bridge Road, Suite 200, Cumming, GA 30041
10

•Be sure your monitor is ON and it is showing the main
screen.
•Press and hold the “MODE” buon unl the monitor
beeps (approx. 6 seconds)
•You should see “PSI” on the screen. If not, push and
release the (+) buon to scroll through the pressure units
unl “PSI” appears.
•Press and release the “MODE” buon (do not hold it
down). “C” for Cengrade (Celsius) will appear on the
screen. For Fahrenheit, press and release the (+) buon,
unless you want the monitor to read temperatures in
Cengrade (Celsius). An “F” will appear for Fahrenheit.
•Press and release the “MODE” buon. The rst axle
(steer axle) on the truck cab will appear and will ash and
show the high-pressure alarm seng. If you are pung
sensors on this axle, set this pressure alarm to 20-25%
above your normal re pressure for those res using the
(+) or (-) buons.
TST-Doc-510 Manual-(A)
Truck System Technologies - 4250 Keith Bridge Road, Suite 200, Cumming, GA 30041
11

•Again, press and release the “MODE” buon. The low-
pressure alarm seng will appear. Set this 10% below
the normal re pressure for this axle.
NOTE: If your normal re pressures are below 100 lbs., you must
rst set the low-pressure alarm and then go back to the same
axle (by clicking the “MODE” buon) and set the high pressure.
This must be done for any axle with pressures less than 100 lbs.
•Press and release the “MODE” buon. The next axle in
sequence will ash and the high-pressure alarm will be
displayed. Set the high-pressure alarm and press and
release the “MODE” buon. Set the low-pressure alarm
for that axle.
High Pressure-Front Axle
Low Pressure-Front Axle
High Pressure-2nd Axle Low Pressure-2nd Axle
TST-Doc-510 Manual-(A)
Truck System Technologies - 4250 Keith Bridge Road, Suite 200, Cumming, GA 30041
12

•Connue to set the high and low pressures for each axle.
•When you get to the Trailer Secon of the display,
all the res will ash. You can now set all the trailer
axle high and low pressures as one group. Set the
high-pressure alarm rst, than press and release
t h e “ M O D E ” b u o n a n d s e t t h e l o w - p r e s s u r e a l a r m .
•Press and release the “MODE” buon once again. The
Temperature icon appears and the default temperature
seng of 158° will display. Typically, do not change this
seng unless you have a special circumstance.
•Finally…IMPORTANT…Push and release the “SET” buon
to save all your parameter sengs in the monitor.
High Pressure-Trailer Low Pressure-Trailer
TST-Doc-510 Manual-(A)
Truck System Technologies - 4250 Keith Bridge Road, Suite 200, Cumming, GA 30041
13
MONITOR ALERTS
Out of Parameter Alert
The 510 Cap sensors send the re pressure and temperature
readings to the monitor every two (2) minutes. If a re is outside
the parameters that were set, an immediate audible alarm will
sound and the red LED light will immediately ash. The audible
alarm can be silenced for a short while by pushing any of the
four buons on the front of the monitor. The red warning light
will connue to ash unl the pressure or temperature issue is
resolved and brought back into your preset levels.
Fast Leak Alert
When a fast re leak is detected, the sensor will send that data
immediately to the display. You will see the problem re ash on
the display, the corresponding icon will be seen at the boom
of the screen and the pressure and temperature read-outs will
ash. You will also hear an audible alarm. Again, you can press
any of the four buons on the display face to silence the alarm
for a short while. The screen readout will connue to ash and
alarm unl the problem is corrected.
Sensor Low Baery Alert
The sensor low baery indicator will display when the internal,
non-replaceable baery is at the end of its life. The re aected
will ash along with the pressure and temperature read-out and
the low baery symbol in the lower le corner of the screen will
ash if your display is on. Replace the sensor as soon as possible.
Fast Leak Alert
TST-Doc-510 Manual-(A)
Truck System Technologies - 4250 Keith Bridge Road, Suite 200, Cumming, GA 30041
14

NOTE: This low baery alert will display for only a short me unl
the baery is exhausted. If you do not have the monitor on oen,
the indicator signal will be sent but not displayed on the screen
since it was o. If your sensor is not reporng to the display, you
may have to replace the sensor. Call TST for Tech Support.
OTHER FUNCTIONS
Normal Display Scrolling
The display will automacally scroll/cycle through the coded
res one by one. Each re will be displayed for approximately
5-6 seconds. You can manually cycle through the coded res
by pushing the (+) or (-) buons on the display. The display will
show the re you choose for approximately 10 seconds before
connuing to cycle.
Backlighng and Moon Detecon
The display is equipped with a light sensor and a moon sensor.
The backlight will turn on when the vehicle is in moon and there
is lile ambient light. If the vehicle has stopped for a while and
the display is on the internal baery, the display will “go to sleep”
unl the vehicle resumes moon. To shut the light sensor o,
press the “+” buon for approximately 4 seconds.
Disconnecng and Reconnecng a Towed Vehicle
When a towed vehicle is displayed on the screen and you
want to temporarily remove it (example: leaving a trailer at a
campground), press and hold the “MODE” and (-) buons unl
Low Sensor Battery Alert
TST-Doc-510 Manual-(A)
Truck System Technologies - 4250 Keith Bridge Road, Suite 200, Cumming, GA 30041
15

the trailer secon on the screen disappears. The sensors on the
trailer will not be read. To bring the trailer secon back on the
screen, again, push the “MODE” and (-) buons at the same me
unl the towed vehicle reappears.
Charging the Display
The display is powered by a non-replaceable, lithium-ion baery.
A baery level indicator is located on the lower right side of the
display. When the indicator shows one bar, it is recommended
you charge the monitor as soon as possible to avoid disrupon
when in use. It will take approximately four (4) hours to fully
charge. The display run me is 5-7 days on a full charge.
SENSOR BATTERIES
•Sensor baeries are not replaceable by the consumer.
Call TST at 770-889-9102 for sensor replacement.
TROUBLESHOOTING TIPS
•Label all your sensors with a silver sharpie rst so you will
know which sensor goes on which re posion or write
down your sensor code and re posion in this manual.
•If the sensor is not reading or reading a lower pressure,
try unscrewing the valve core in the valve stem a half
a turn. This may allow more air to get to the sensor.
CAUTION…Do not stand in front of the valve stem when
performing this procedure with a valve core tool!
•It may take up to 30 minutes for the sensor data to appear
on the display the rst me you set up the system. Leave
the display on unl all sensor data appears. Aer the
sensor data is received the rst me, subsequent system
use should only take minutes for sensor data acquision.
•Do not overghten the sensors on the valve stems. Make
sure they are snug on the valve stem.
TST-Doc-510 Manual-(A)
Truck System Technologies - 4250 Keith Bridge Road, Suite 200, Cumming, GA 30041
16

•When done programming the Parameters into the
display, remember to quickly push and release the “SET”
buon to save the Parameters.
•To save the sensor codes when done coding all the
sensors, press and hold the “SET” buon. The display will
beep and the codes are saved. You will then be returned
to the Main Screen.
•If your re pressure is under 100 lbs., you will have to
program the Low-Pressure alarm rst and then come
back around and program the High-Pressure alarm. The
high pressure cannot go lower than the low-pressure
seng, which defaults to 100 lbs.
•When the display is on and reading, you can press the (+)
or (-) buons to quickly scroll through the res on your
display. The automac scrolling funcon will resume
aer 10 seconds when no buons are pushed.
•If your sensor is not transming data to the display, try
removing the sensor from the re stem and, aer waing
5 seconds, screw the sensor back onto that stem. This
resets the sensor electronics.
•If your display is plugged into a constant 12v power
source, the power switch (“-“ buon) will not funcon.
To turn the monitor o, unplug the power supply and
then push the (-) buon to shut o the display.
•To extend the life of the sensor baery, remove the
sensor from the valve stem. The internal pressure switch
will shut the baery o. Note that, even though the
baery is o, it will sll degrade with me.
TST-Doc-510 Manual-(A)
Truck System Technologies - 4250 Keith Bridge Road, Suite 200, Cumming, GA 30041
17

COMMON QUESTIONS
•What do I do if my sensor is not reading?
1) Unscrew the sensor o the valve stem and then
reinstall it. The sensors are pressure sensive and
will reset once reinstalled.
2) If it sll does not read, try placing a working sensor
from another re on that valve stem. Keep in mind,
the sensor you just moved will connue to read in
its original re posion on the display. If that sensor
does not read normally, you may have a valve stem
problem. Try unscrewing the valve core as described
above. If the switched sensor reads normally, it may
be a sensor issue.
Call 770-889-9102 for more troubleshoong.
3) If your sensor is not transming data to the display,
check to see if your sensor code has been input into
the display correctly. A “d” and a “6” can look similar.
•Why does my display somemes “drop” sensor data
from a re posion?
1) If you have a unit that exceed 34’ in length, you may
need a repeater to amplify the sensor signals from
the res to the display. This issue is not limited to the
rear res on a vehicle. A unit with a lot of metal, like
an Airstream trailer, also needs a repeater.
2) Be aware that an indoor/outdoor thermometer with
an external temperature sensor may interfere with
the TST TPMS. Temporarily remove all the baeries
in the thermometer AND exterior sensor and see
if the problem is corrected. A thermometer with a
higher frequency (915 Mhz) may be required. Atomic
clocks can also cause interference with the sensors.
TST-Doc-510 Manual-(A)
Truck System Technologies - 4250 Keith Bridge Road, Suite 200, Cumming, GA 30041
18

•Why does my display somemes alarm while I am
sing sll in the evening?
As night approaches and outdoor temperatures decrease,
your re pressures may drop below the parameters
you have set, thus causing an out of spec alarm. When
temperatures drop, turn your monitor o overnight. As
the air temperature rises the next day or as you start
driving, the res will also heat up and come back into
your parameters. You can also add air to your res to
bring them back into the parameters you set up.
•Why can’t I set a lower pressure than 100 lbs. for the
high or low-pressure alarm?
The high-pressure alarm cannot go lower than the low-
pressure alarm default seng. If your re pressure
sengs are below 100 lbs., you must rst set the low-
pressure alarm and then come back to the high-pressure
sengs using the “MODE” buon and set the axles high-
pressure alarm. When done, be sure to press and release
the “SET” buon to save all the parameter sengs. See
“Parameter Sengs” above.
•What condions cause the display to alarm?
1. A rapid leak (icon at boom of screen).
2. A low sensor baery (lower le baery icon blinks).
3. An overheated re temperature (temperature icon
boom of screen).
4. A High or Low pressure reading (be sure your
parameters are set correctly).
In every instance, the re Pressure and Temperature
numbers will also ash when the re having the problem
ashes. The lower red alarm light will also ash.
TST-Doc-510 Manual-(A)
Truck System Technologies - 4250 Keith Bridge Road, Suite 200, Cumming, GA 30041
19

•How do I remove my trailer from the display screen
when I am not using it?
To electronically disconnect the trailer re icons from the
screen:
1. Press and hold the “MODE” and (-) buons.
2. When the trailer secon on the display disappears,
release the buons.
3. To electronically reconnect the trailer secon, again,
press and hold the same “MODE” and (-) buons.
4. When the trailer secon on the display reappears,
release the buons
•How do I remove an unwanted re icon from the dis-
play?
1. Hold down the “SET” buon unl it beeps and then
release it.
2. Navigate to the re you want to remove from the
screen by quickly pressing the “SET“ buon to move
through the re icons.
3. When at the correct re, use the (+) or (-) buons to
adjust the rst digit to an “F”.
4. Quickly push and release the “MODE” buon to
move to the next digit. Set that to “F”.
5. Connue unl all digits are set to “F”.
6. When “FFFF” is showing, press and hold the “SET”
buon unl it beeps to save the code.
7. You will be back to the Main Screen and the re icon
will be gone.
TST-Doc-510 Manual-(A)
Truck System Technologies - 4250 Keith Bridge Road, Suite 200, Cumming, GA 30041
20
Table of contents
Other TST Measuring Instrument manuals

Popular Measuring Instrument manuals by other brands


turck
turck IM21-14Ex-CDTRi manual

Brooks Instrument
Brooks Instrument GT 1305 Installation and operation manual

Renkforce
Renkforce GR2 operating instructions

Sierra
Sierra Multi-Trak 670S instruction manual

Dyacon
Dyacon Mi-Met WSD-1 manual

PCE Instruments
PCE Instruments Brookhuis FMC operating instructions

HydroPoint
HydroPoint WaterCompass FM300 installation instructions

TESTO
TESTO 550 quick start guide

Flybox
Flybox Omnia57 Fuel-P Installation and user manual

Endress+Hauser
Endress+Hauser Prosonic M FMU40 technical information

AquaLabo
AquaLabo CORAIL user guide

Turner Designs
Turner Designs Opti-Trace user manual