TTK Smart Series User manual


1
This is a listed appliance. The following safeguards are recommended by most portable appliance manufacturers
IMPORTANT SAFEGUARDSIMPORTANT SAFEGUARDS
IMPORTANT SAFEGUARDS
To reduce the risk of personal injury or property damage when using this appliance, basic safety precautions should always be
followed,including the following. You can get total satisfaction from your Manttra Smart pressure cooker if you follow the simple
instructions given below:
1. Read all instructions. In particular, remember to follow the safety precautions. Please do not tamper with the safety devices.
2. When using this appliance near children, it is necessary to keep a close watch.
3. Do not place dry / empty appliance on a heat source. Always use sufficient quantity of water, else, this will seriously damage the
appliance and also lead to fusing of safety
device.
4. Move the pressure cooker/pressure pan under pressure with greatest care. Do not touch hot surfaces. Use handles/knobs. If
necessary use gloves.
5. Do not use this appliance for other than intended use.
6. This appliance cooks under pressure. Improper use may result in scalding injury. Make sure that the cooker is properly closed
before operating. See the “Instructions for use”
7. Do not fill the cooker/pan more than two thirds capacity. For solids like rice, meat and vegetables, which expand during cooking
do not fill the unit over half full. Over filling may cause a risk of clogging the vent tube and developing excess pressure.
8. Do not open the cooker until the pressure has been reduced to zero. While there is still pressure in the cooker, do not remove the
pressure regulator. The Visual Pressure Indicator (VPI) provided in your cooker will indicate that the pressure has dropped to
“zero” (refer page 7). Only if no steam escapes, and the VPI drops below the surface of the lid handle, can the open-close knob
be turned and held to “open” position for opening the lid. The lid should, under no circumstances be forced open.
9. Please avoid direct cooking of foods that tend to foam, froth or sputter. They may block the vent tube.

2
10. Do not release the pressure quickly when cooking rice, dal as the liquid inside may froth over.
11. Be aware that certain foods such as applesauce, cranberries, pearl barley, oat meal or other cereals, split peas, or foods such as
noodles, macaroni, rhubarb or spaghetti can foam, froth and sputter and may block vent tube. These foods should not be cooked
in pressure cooker/pressure pan
12. Always make sure that the vent tube is clear before closing the lid for pressure cooking.
13. Do not use the body of the cooker for deep frying.
14. Do not use the pressure cooker/pressure pan for pressure frying with oil.
15. Never use the Quick Release System (QRS) for steam release in case of liquid or frothing foods.
16. Always make sure that the Zero Pressure Device (ZPD) and the space around the ZPD inside the lid is kept clean. Otherwise the
ZPD will not seal properly to build up pressure.
17. For proper closure, lid handle must be directly above the body handle with the lid handle stopper engaged in the body handle
slot, when the open-close knob will turn to “close” position.
18. For safe pressure cooking, we advise you to replace the ZPD once a year otherwise it may not function at the time of need and
may cause damage .
19. Extreme caution must be used when moving this appliance containing hot liquids.
20. Never place anything over the pressure regulator as the pressure regulator may not work at the desired pressure.
21. Always buy genuine Manttra spare parts. Use of duplicate parts may cause damage to the appliance. Write to Manttra Inc. for
spares.
22. When the normal operating pressure is reached, turn the heat down, so all the liquid which creates the steam, does not evoperate.
23. After cooking meat with skin (example: Ox tongue) which may swell under the effect of pressure, do not prick the meat while
the skin is swollen. You might get scalded.
24. Do not change the pressure settings, when the cooker is in use or while there is pressure inside the cooker.
SAVE THESE INSTRUCTIONSSAVE THESE INSTRUCTIONS
SAVE THESE INSTRUCTIONS

3
INTRODUCTION
MANTTRA SMART PRESSURE COOKER is brought to you by MANTTRA INC.
PRINCIPLE OF PRESSURE COOKING:
Under normal circumstances, most foods cook at 2120F ( 1000 C). This is because the water boils at this temperature
in normal atmospheric pressure.
If the temperature of cooking is raised, foods cook much faster. For example, an increase of 320F (180C)
temperature allows food to be cooked four times faster, retaining freshness and nutritional values of the food.
By increasing the steam pressure inside a pressure cooker to 12 lbs per square inch above the atmospheric
pressure, the temperature inside the pressure cooker increases by 320F (180C) roughly. Thus, at these higher
temperatures food cooks much faster.
This is the principle of pressure cooking.

4
DESCRIPTION OF PARTS
Note: Due to continuing improvment, actual parts in your cooker may differ slightly from the illustration
above. Optional items may not be available in some models.

5
SAFETY FEATURES
Your Smart Pressure Cooker comes with 7 safety
features:
a. Zero Pressure Device (ZPD)
b. The Pressure Regulator
c. The Gasket Release System (GRS)
d. Fusible Safety Device
e. Quick Steam Release
f. Visual Pressure Indicator (VPI)
g. Auto-Lock
a. Zero Pressure Device (ZPD)
For your safety, your Smart pressure
cooker has a Zero Pressure Device
(ZPD) on the lid, housed under the lid
handle.
The ZPD will allow the cooker to build up pressure
only when the cooker is completely closed when the
“open-close” knob turns to “Close” position. Similarly
the cooker will not open unless the pressure drops to
Zero and the “open-close” knob is aligned with the
“Open” position
b. The Pressure Regulator
This appliance is equipped with a 3
stage pressure regulator which is the
first safety device. This operates at two
pressure settings at 8 lbs. per sq. inch
and at 12 lbs. per sq. inch with the Quick
Release System (QRS) feature. If you want to cook at
lower pressure (8 psi) align the tang of the pressure
regulator to the notch on the cup in the lid handle
marked by “I” (a single line) and for cooking at higher
pressure (12 psi) align the tang to the notch on the cup
in the lid handle marked by “II” (two lines). When the
cooker reaches the set pressure the pressure regulator
will release the steam with a hiss safely in one direction
away from you. After the cooking is over, for Quick

6
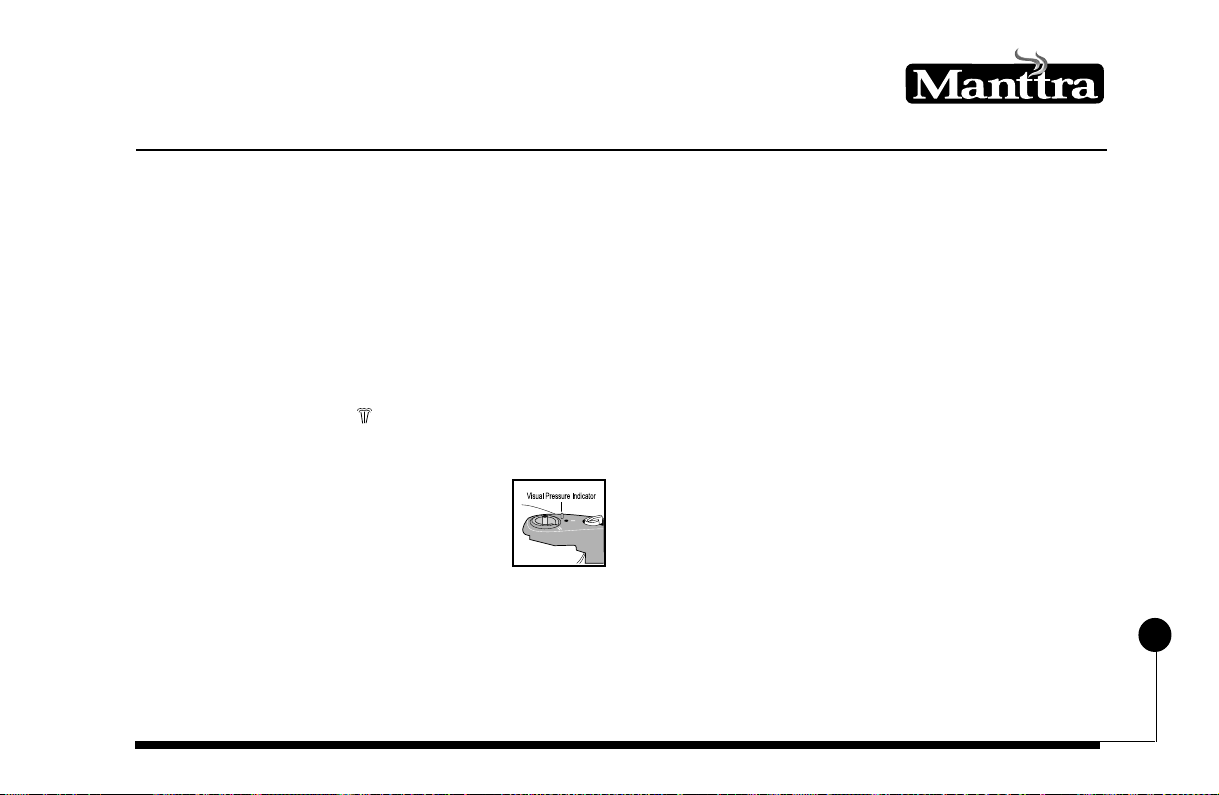
release of steam, align the tang of the pressure regulator
to the steam release position marked as “ ” on the lid
handle.
The Pressure regulator acts as both an excess pressure
releasing device and a pressure controlling device.
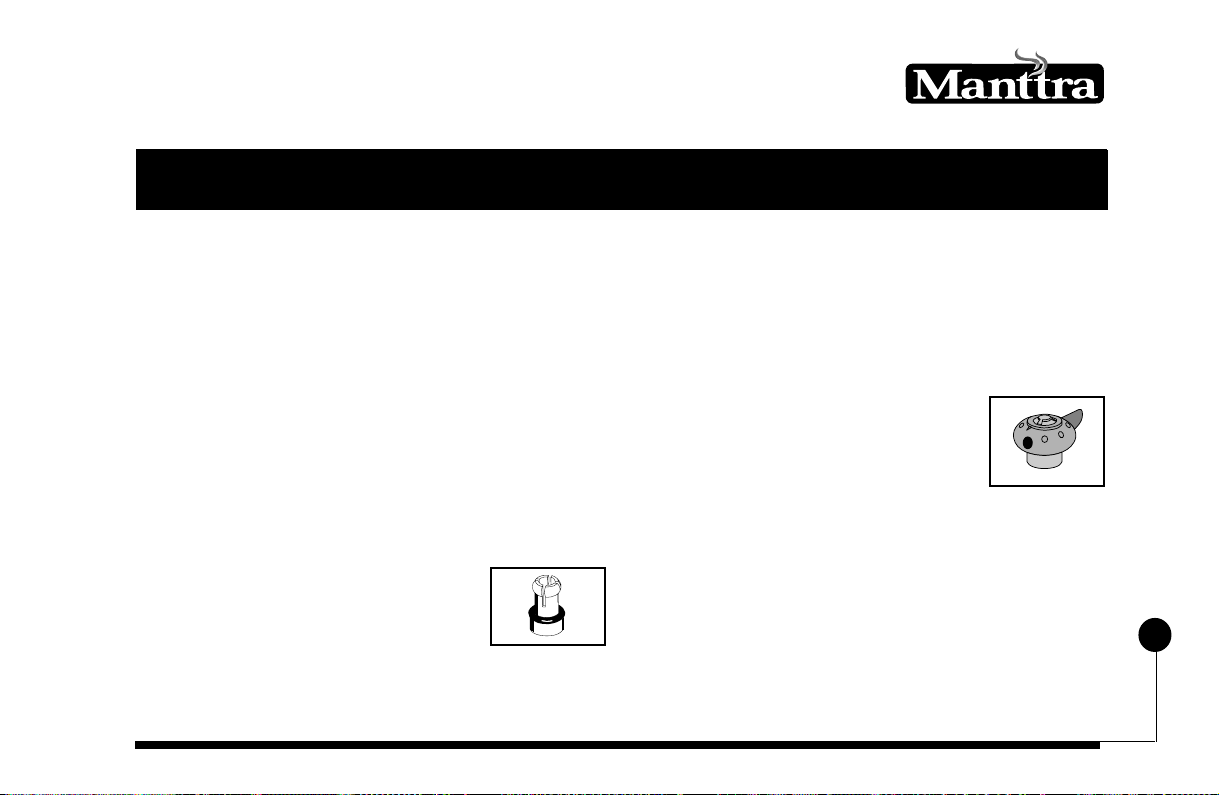
c. Gasket Release System (GRS)
This is a re-settable safety device. If the
pressure regulator fails to function due
to overload or blockage of the vent
tube, the pressure inside the cooker
goes above the normal level. At this
stage a portion of the gasket is pushed
out through the slot in the lid, releasing the steam
downwards safely. The stove should be immediately
switched off taking care to avoid contact with the line
steam issuing out of the slot. As there is no pressure
inside the pressure cooker, you may now open the
cooker. Follow instruction under section “How to open
your cooker”. If you find any difficulty in opening,
gently push the gasket in with a blunt instrument such
as the handle of a spoon or a fork. Please allow your
cooker to cool and ensure that there is no risk of
scalding while handling the cooker. Remove the
gasket, clean it and if necessary the gasket seating area
on the lid and body of the cooker. Reassemble the
gasket on to the lid. Please check and ensure that the
vent tube is clean and clear. If your cooker is
overloaded beyond recommended capacity, reduce
quantity appropriately before resuming cooking.
d. The Fusible Safety Device
A fusible safety device has been
incorporated as part of the ZPD (Zero
Pressure Device). The non-toxic fusible
alloy of the ZPD, floating freely near the
vent tube, is a backup safety device. In
the most unlikely event of the GRS failing to function
the special non-toxic fusible alloy of the ZPD will melt
and let off the steam safely. This could happen only
when the temperature / pressure rises beyond the

7
normal level due to the cooker having insufficient
water or food particles blocking / clogging the vent
tube.
e. Quick Steam Release
After cooking is over, if you want to quickly release
the steam, align the tang of the pressure regulator to
the position marked by ” ” on the lid handle.
f. Visual Pressure Indicator (VPI)
For your additional safety, your Smart
pressure cooker is equipped with a Visual
Pressure Indicator housed in the lid
handle. When the pressure starts building
up inside the cooker, the VPI is pushed
above and will rise above the surface of the lid handle.
This indicates that your cooker is under pressure.
Similarly, after cooking is over and the cooker is taken
off the heat source, the VPI will drop below the surface
of the lid handle when the pressure inside the cooker
drops to “zero”, giving you a visible indication that
you can safely open the cooker.
e. Auto-Lock
The Auto-Lock mechanism in the “open-close” knob
will keep the lid always in locked condition when the
cooker is fully closed and lid handle aligned with the
body handle.

8
33
33
3
11
11
1
22
22
244
44
4
HOW TO CLOSE YOUR SMART PRESSURE COOKER
Fill the cooker with required
quantity of food and water.
Place the lid on the body with the
arrow mark on the lid in line with
the arrow mark on the body
handle. Turn the lid handle to
your left (clockwise) till the lid
handle comes above the body
handle and is engaged by the
stopper.
The “open-close” knob will
automatically move to “Close”
position and lock the cooker.
Place the pressure regulator on
the vent tube in the lid, in such a
way that the steam outlet on the
regulator cowl is away from the
lid handle and align the tang to the
required setting on the cup in the
lid handle, depending on the
pressure at which you want to
cook.

9
GUIDELINES TO USE YOUR SMART PRESSURE COOKER
Your pressure cooker comes fully assembled and it is
ready to use.
1. WATER TO BE USED
Every recipe given in the Recipe Book ( separately
enclosed) includes adequate quantity of liquid for
cooking.When you are trying other recipes, make sure
that there is adequate liquid in the recipe for
cooking.As a guideline, when you are using the
pressure cooker, minimum quantity of 2 1/2cups (18
ozs) water must be used for the first 15 minutes of
pressure cooking. Add one cup (7 ozs) for every 15
minutes of additional cooking time (pressure cooking
times are shown in the recipes ). Please note the
cooking time and put in adequate water before starting
to cook. These quantities are in addition to the liquid
required for cooking.
2. Your pressure cooker should not be filled more
than two thirds its capacity for solids and half for
liquids. When cooking liquid foods, please use the
quantity of water as specified in the recipe. For cooking
milk dishes, start with low heat to bring the milk to
boil and then turn it upto pressure. When cooking
beans, lentils, etc. allow a few minutes before closing
the lid to avoid excess froth. Add a spoonful of oil or
any cooking medium while cooking.
3. PROCEDURE:
a. Put adequate quantity of water in the appliance.
Then add the food to be cooked
b. Ensure the gasket is inside the lid.
c. Follow the instructions given under section “How
to close your cooker”. Place the cooker on high heat.
d. As pressure builds up you will see initially, emission
of steam through the ZPD hole and the slot in front of
the lid handle as it takes a little while for the ZPD to
seal the cooker. During this period the steam may
condense and a few drops of water may also drip. This
will stop once the ZPD seals with the pressure build

10
up. Now, the VPI will get pushed above and will rise
above the surface of the lid handle. This indicates that
your cooker is under pressure. In the unlikely event of
the steam continuing for a long time and the VPI not
rising, tap it lightly with the tip of a knife/fork.Even
after tapping, if the VPI does not rise, the reason could
be due to one of the following:
i) The heat applied is not sufficient.
ii) The cooker is not fully closed.
iii) There is insufficient liquid in the cooker for steam
generation.
Switch off the heat source. Determine the reason and
take corrective action without touching any hot parts
of the cooker. Reset the cooker and start the cooking
process.
Once the pressure reaches the set level, the pressure
regulator will hiss continuously. Begin timing the
cooking period from this moment and lower the heat
sufficiently to maintain a gentle hissing sound and the
occasional escape of steam from the regulator.
e. After cooking, turn off the heat source, take the
appliance off the stove and allow it to cool. Do not
attempt to remove the pressure regulator when there
is pressure inside. You have the option of releasing
the steam by turning gently the pressure regulator to
your right (anti-clockwise) to the steam release position
marked as “ ” on the lid handle to release the steam
quickly.
f. Once the steam issue stops completely, the VPI will
drop below the top surface of the lid handle indicating
“zero” pressure inside. If the VPI is stuck in its raised
position for a long time, tap it lightly with the tip of a
knife/fork. Now turn and hold the “open-close” knob
to align to the “Open” position and open the lid. Refer
Instruction on “How to open your pressure cooker”.

11
g. After use wash the appliance in hot soapy water.
Remove the gasket, wash it and allow it to dry till next
use. Take care when washing the pressure cooker. Like
all fine cookware we recommend that you do not place
any parts in the dishwasher.
h. Store the pressure regulator safely on a shelf.
CAUTION:
Some foodstuffs with a lot of liquid tend to froth.
Users are therefore advised to take adequate care while
releasing the pressure and opening the pressure cooker
to avoid scalding injuries.
All metal surfaces of the appliance are likely to be
hot even after pressure inside the appliance drops to
zero. Therefore use handles on the appliance when
moving and take necessary care to avoid scalds/burns
on account of physical contacts with hot metal surface.

12
HOW TO OPEN YOUR PRESSURE COOKER
11
11
1
22
22
2
HOW TO OPEN YOUR SMART PRESSURE COOKER
33
33
3
Now open the cooker by turning the lid
handle to your right (anti-clockwise) by
holdingthe“open-close’knobat“Open”
position.
Note: There is no need to remove the pressure regulator.
However, if you want to remove, be careful as the
pressure regulator may be hot.
To clean the lid thoroughly after use, remove the pressure
regulator and direct a jet of water on to the hold down
cup to remove any trapped food particles.
Your cooker is equipped with “QUICK
STEAM RELEASE” mechanism to re-
lease steam. Once the time for cooking
is over, put off the heat.Turn the tang of
the pressure regulator to align to the
“Steam Release” position. The steam
will get safely released.
After the steam issue stops completely
the VPI will drop below the surface of
the lid handle indicating that the
pressure inside has dropped to “zero”.

13
HOW TO MAINTAIN YOUR
SMART
PRESSURE COOKER
Manttra Smart Pressure Cooker comes in 6 versions:
a. Polished Aluminum body and lid
b. Colored Aluminum body with polished
Aluminum lid
c. Colored Aluminum body with polished
Stainless Steel lid
d. Hard Anodized Aluminum body with polished
Stainless Steel lid
e. Hard Anodized Aluminum body and lid
f. Polished Stainless Steel body and lid
1. Stainless steel : The sparkling stainless steel body
is designed to retain its luster forever. This is made of
mirror finish food grade stainless Steel. The Stainless
Steel helps in retention of heat so that the food is kept
warm for a longer period of time. The cooker has a 3
ply clad base for enhanced thermal efficiency.
2. Hard Anodized: Anodizing is a widely used
electro-chemical process for producing a protective film
on aluminum. The resulting layer of aluminum oxide
on the aluminum plate imparts to it an amazing degree
of hardness, corrosion and abrasion resistance. In a
cooker, this translates into extraordinary stick
resistance and scratch resistance. With the anodized
surface, you still enjoy the high thermal conductivity
of aluminum.
3. Colored Aluminum: Coloring ensures improved
aesthetic appearance and long lasting looks. The
pressure cooker is color coated and protected by a
special process.
4. Polished Aluminum: The cooker is made of
Polished Aluminum alloy and its outer surface can be
kept shiny by just washing in hot soapy water and then
drying immediately. Never leave the cooker standing
in water as it will dull.

14
To keep your cooker always looking new, please
follow the instructions given below:
1. a) Avoid leaving foodstuff in the body overnight
as it may cause difficulty in cleaning.
b) After each use, wash it with hot soapy water,
rinse and dry thoroughly.
c) For stubborn stains it is recommended that you
use a nylon scrubber.
d) If the cooker body has burnt food residue stuck
on it, leave a strong solution of washing powder
in the cooker body overnight.
2. PRESSURE REGULATOR
To clean the pressure regulator, occasionally soak
it in soap water. However, clear out all traces of soap
before reuse.
3. GASKET
After cooking, remove the gasket from the lid.
Wash and allow to dry till next use. If after considerable
use, the rubber gasket leaks, lightly stretch gasket
diagonally to extend its life. The rubber gasket can also
be immersed in a basin of cold water to extend its life.
After 9 to 12 months use or if the appliance is not
used for a period of time, the gasket can harden and
this will prevent the appliance from sealing properly.
Then the gasket must be replaced with a new one.
4. STORING
Always put the cooker away after drying it
thoroughly. Do not store the cooker in a sealed or
closed condition. This will prevent mustiness as there
will be circulation of air. Always store the pressure
regulator separately on a shelf or drawer and not on
the lid.

15
5. SERVING
While using the cooker for direct cooking or serving,
care should be taken to see that spoons, ladles, forks
and other utensils are not tapped against the rim of
the body as this may nick its sealing surface and allow
the steam to escape even with a new gasket. We repeat,
avoid damage to sealing rims of the lid and body.
6. DISCOLORATION
Certain properties of water and certain minerals
of food may cause discoloration of the inside of the
cooker. This is quite harmless. This discoloration does
not affect the aluminum, anodizing, or the food cooked
in it, in any way. When this discoloration occurs, it
can be removed with any non-alkaline aluminum
cleaner. Otherwise, put a teaspoon of vinegar or a slice
of fresh lime in the water used in the cooker. This will
prevent discoloration.
7. FIXING OF SPARE PARTS
Always buy genuine spare parts.
a) If the ZPD cum Safety Plug of your cooker has
fused , do not try to repair it. Please purchase a new
ZPD. Remove the ZPD by pulling it from inside the
lid. Insert the new ZPD by pushing it firmly from
inside the lid . Ensure that the the blue washer comes
inside of the lid and the ZPD floats freely.
In stainless steel and duo-metal versions, first remove
the ZPD by pulling it from inside the lid. Then remove
the silicone grommet and fix the new grommet in its
position in such a way that the flat side of the grommet
comes under the lid. Now insert the ZPD into the
grommet and ensure that the ZPD floats freely.
b) The cooker comes with lid, body and back handles.
In case you want to fix spare handles;
i) To remove the body handle:

16
•Unscrew handle screw underneath the handle.
Align the new handle with the bracket fitted with the
body, insert screw and fasten tightly.
ii) To remove the lid handle:
•Remove the gasket and the pressure regulator.
•Unscrew the vent tube nut and remove the vent
tube. The hold down cup will come away along with
the vent tube and the stainless steel washer.
•Unscrew the lid handle screws from inside the lid.
•Make sure, the square nuts in the lid handle do
not fall while removing the handle. The VPI also will
come off.
Now to fix the new handle:
•Align the handle to the lid with the square nuts in
place and also the VPI in it’s position inside the lid
handle. Tighten the screws firmly from inside the lid.
•Place the hold down cup in position and place the
stainless steel washer inside the cup. Now refix the
vent tube from inside the cup onto the lid and tighten
the vent tube nut firmly from inside the lid.
iii) To remove the back handle:
•Unscrew the handle screw and take out the handle
from the bracket. Align the new handle with the
bracket, insert the screw and fasten tightly.

17
CUSTOMER SERVICE CELL (US)
MANTTRA INC.,
P.O.Box 5053
Virginia Beach, VA 23471
Tel: 757-318-7603
Fax: 757-318-7604
Toll Free No: 877-962-6887
email : service@manttra.com
Visit us at : www.manttra.com
8. ORDERING OF SPARE PARTS;
For genuine spare parts, write to the address given
below, giving name of part and SKU No.
For details on names of parts and SKU Nos., please
see “List of Spare Parts “ in this book.

18
LIST OF SPARE PARTS FOR
SMART
ALUMINUM
Note: For buying parts, call toll free: 877-962-6887. e-mail: [email protected]. Visit us at: www. manttra.com
Sl. No. Name of the Part SKU No. Suitable for Models Illustration
1. Gasket 90007
2. Gasket 90008
3. ZPD / Safety Plug 90609
4.
Pressure Regulator Assembly 91409
5.
Lid Handle Assembly
90208
6. Body Handle Assembly 90113
24X22, 25X22, 26X22,
26X39, 16601, 16631,
10521
18X33, 18X39
Common
Common
Common
( with pressure regulator assembly,
VPI, open-close knob, cam assembly
with Auto-Lock feature)
24X22, 25X22, 26X22,
26X39, 16601, 16631,
10521

19
7Body Handle Assembly 90112
8. Back Handle with Screw 90303
9. Back Handle with Screw 90306
10. Back Handle (A Type) 90307 common
11. Wire Trivet 91700 common
12. Smart Instruction Manual 90511 common
13. Recipe Book 90510 common
Note: For buying parts, call toll free: 877-962-6887. e-mail: [email protected]. Visit us at: www. manttra.com
18X39, 18X33
18X33, 18X39
Sl. No. Name of the Part SKU No. Suitable for Models Illustration
( for pressure pan)
24X22, 25X22, 26X22,
26X39, 16601, 16631,
10521
This manual suits for next models
22
Table of contents
Other TTK Electric Pressure Cooker manuals