Nesco NPC-9 Technical specifications
Guide de l’utilisateur et d’entretien
Care/Use Guide
The Smart Canner
Smart Canner par Nesco
TABLE DES MATIÈRES
Importantes Précautions..................................................................................................................14
Vue D’ensemble Des Pièces.............................................................................................................15
Avant La Prèmiere Utilisation...........................................................................................................16
Instruction D’opérations.............................................................................................................17-20
Préservation Des Aliments .......................................................................................................21-24
Garantie Limitée D’un An..................................................................................................................25
TABLE OF CONTENTS
Important Safeguards ...........................................................................................................................1
Overview of Components....................................................................................................................2
Before First Use........................................................................................................................................3
Operating Instructions.....................................................................................................................4-7
Food Preservation............................................................................................................................8-10
Recipes................................................................................................................................................... 11-12
One Year Limited Warranty..............................................................................................................13
Français
The Metal Ware Corp
1700 Monroe St., P.O. Box 237
Two Rivers, WI 54241-0237
Phone: 1-(800) 288-4545
Technical Specifications /
Caractéristiques
:
Model: NPC-9 / NESCO Smart Canner
Input - 120Volts / 60HZ / 1200Watts
English
POUR LES ACCESSOIRES ET
LES PRODUITS SUPPLÉMENTAIRES
“NESCO®” is a registered trademark of The Metal Ware Corp
“NESCO®” est une marque de commerce enregistrée
de la société The Metal Ware Corp

English
IMPORTANT SAFEGUARDS
When using any electrical appliance, basic safety precautions should
always be observed including the following:
• READ ALL INSTRUCTIONS.
• To protect against risk of electrical shock, DO NOT put appliance in water or other liquid.
• DO NOT touch hot surfaces. Use handles, knobs or oven mitts.
• Close supervision is necessary when any appliance is used by or near children. This
appliance is NOT recommended for use by children.
• Unplug from outlet when not in use, before putting on or taking o parts, and before cleaning.
• Allow to cool before putting on or taking o parts.
• Avoid contact with moving parts.
• Never put the unit near a hot burner or in an oven.
• DO NOT operate the appliance for any other purpose than the intended use. DO NOT use
electrical equipment with a damaged cord or plug or after the appliance malfunctions, is
dropped or damaged in any manner. Return unit to the nearest authorized service center for
examination, repair, or adjustment.
• DO NOT use outdoors.
• DO NOT let cord hang over edge of table or counter, contact sharp edges, or touch hot
surfaces.
• DO NOT pull on the power cord to disconnect.
• Never plug in the appliance where water may flood the area.
• Place the appliance on a firm and stable surface.
• Ensure that the appliance is not placed close to the edge of the table, worktop, etc. where it
can be pushed o or fall.
• The use of attachments not recommended or sold by the manufacturer may cause fire,
electric shock or injury.
• NEVER use abrasive cleaning agents or abrasive cloths when cleaning the unit.
• Only use the unit when completely assembled.
• DO NOT leave the appliance unattended while it is running.
• Before using for the first time, remove all packaging and wash parts.
• This appliance has a polarized plug (one blade is wider than the other). To reduce the risk of
electric shock, this plug will fit in a polarized outlet only one way. If the plug does not fit the
outlet perfectly, reverse the plug. If it should still not fit, contact a qualified electrician. Do not
modify the plug in any way.
• Prior to unplugging unit, turn power o.
• Do not place on or near hot gas, electric burner or in a heated oven.
• Extreme caution must be used when moving an appliance containing hot oil or other hot
liquids.
• To disconnect, turn any control to “o”, then remove plug from wall outlet.
• CAUTION: Turn unit on and o using timer or On/O button only.
WARNING
1

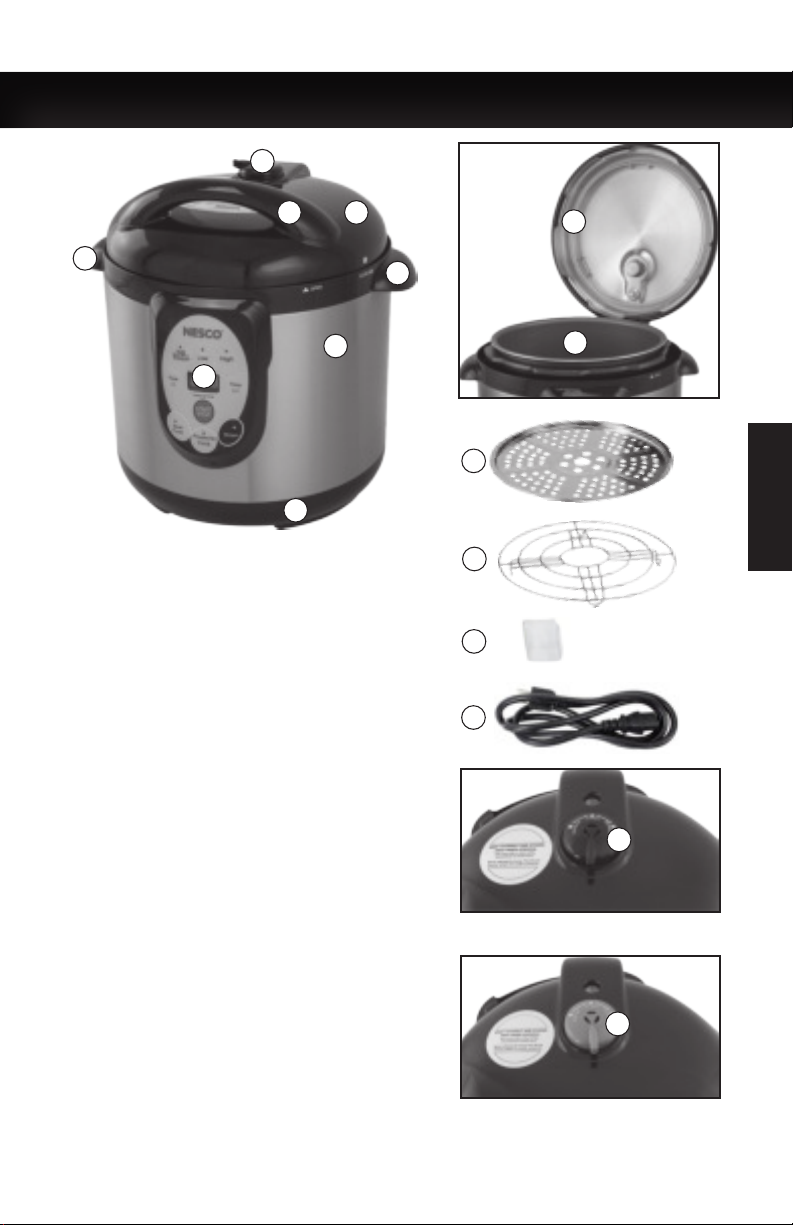
OVERVIEW OF COMPONENTS
English
1. LID HANDLE
2. LID
3. STEAM RELEASE VENT
4. BODY HANDLES
5. STAINLESS STEEL BODY
6. CONTROL PANEL
7. LOWER BODY BASE
8. REMOVABLE SILICONE LID
GASKET
9. REMOVABLE INNER POT
(Non-Stick Interior)
10. STEAMING RACK
11. CANNING RACK
12. REMOVABLE CONDENSATION
CATCHER
13. POWER CORD
14. BLACK PRESSURE LIMITING
VALVE - 10 PSI (Low Altitudes)
15. GREEN PRESSURE LIMITING
VALVE - 15 PSI (For Use at
Elevations Higher Than 1,000 Ft.
Above Sea Level)
13
BLACK PRESSURE LIMITING VALVE
10 PSI (Low Altitudes)
GREEN PRESSURE LIMITING VALVE
15 PSI (For Use at Elevations Higher
Than 1,000 Ft. Above Sea Level)
15
Already
attached
on unit.
14
12
11
10
9
8
7
6
5
4
12
3
4
2

BEFORE FIRST USE
• Remove packaging materials such as cardboard, plastics or
styrofoam and discard appropriately.
• Wipe clean all the parts with a soft damp cloth or sponge and dry
thoroughly.
• DO NOT immerse in water or place in dishwasher.
• The GASKET sets in behind the wire guide. Before your first use,
gently pull the GASKET out. (IMAGE 1)
• Hand wash in warm soapy water. Dry, then firmly press the
GASKET back in behind the wire guide. Make sure GASKET is
properly installed in groove inside the LID. (IMAGE 2)
HOW TO OPEN THE LID
When the LID of the cooker is at the “Closed-Lid Position”, hold the LID
HANDLE and turn it about 1/8 of a turn clockwise (IMAGE 3), until you
reach the “Open-Lid Position”. Lift up on the LID HANDLE.
NOTE: For brand new units, the seal of the LID may be slightly stronger
than normal and may be slightly dicult to unlock. Once the LID has
been opened and closed several times, it will loosen up.
BEFORE FIRST USE
WARNING - Hot steam will periodically be
released out of the STEAM RELEASE VENT. Be sure
nothing is directly above this area when using the
“Smart Canner”.
1.
3.
2.
HOW TO DISMANTLE THE LID
When the LID of the cooker is in the upright vertical position, hold the LID with both
hands, and adjust the height between the LID and the upper edge of the cooker to
around 4 inches (IMAGE 4). Then turn it in a counter clockwise direction until you reach
the “Closed-Lid Position” (IMAGE 5). Then lift the LID up and away from the SMART
CANNER body (IMAGE 6).
4.
HOW TO CLOSE THE LID
When the LID of the cooker is in vertical position hold the handle and close it downwards
at the “Open-Lid Position”. After that, turn it in a counter clockwise direction until you
reach the “Closed-Lid Position”.
5. 6.
English
3

OPERATING INSTRUCTIONS
4/5 RULE: NEVER fill a pressure cooker more than 4/5 full with food. Also,
don’t pack food tightly into a pressure cooker. These practices may cause
the pressure cooker to not operate correctly and it will aect the outcome of
your food.
IMPORTANT: Before you start select the BLACK LIMITING PRESSURE VALVE for
all usage unless you are located at altitudes above 1,000 feet above sea level. At
altitudes higher than 1,000 feet above sea level always use the GREEN LIMITING
PRESSURE VALVE. Avoid using metal utensils on the INNER POT, as you may
damage the non-stick surface.
Please Reference: http://nchfp.uga.edu/ for general rules on
safe canning guidelines.
5
1
4
English
4
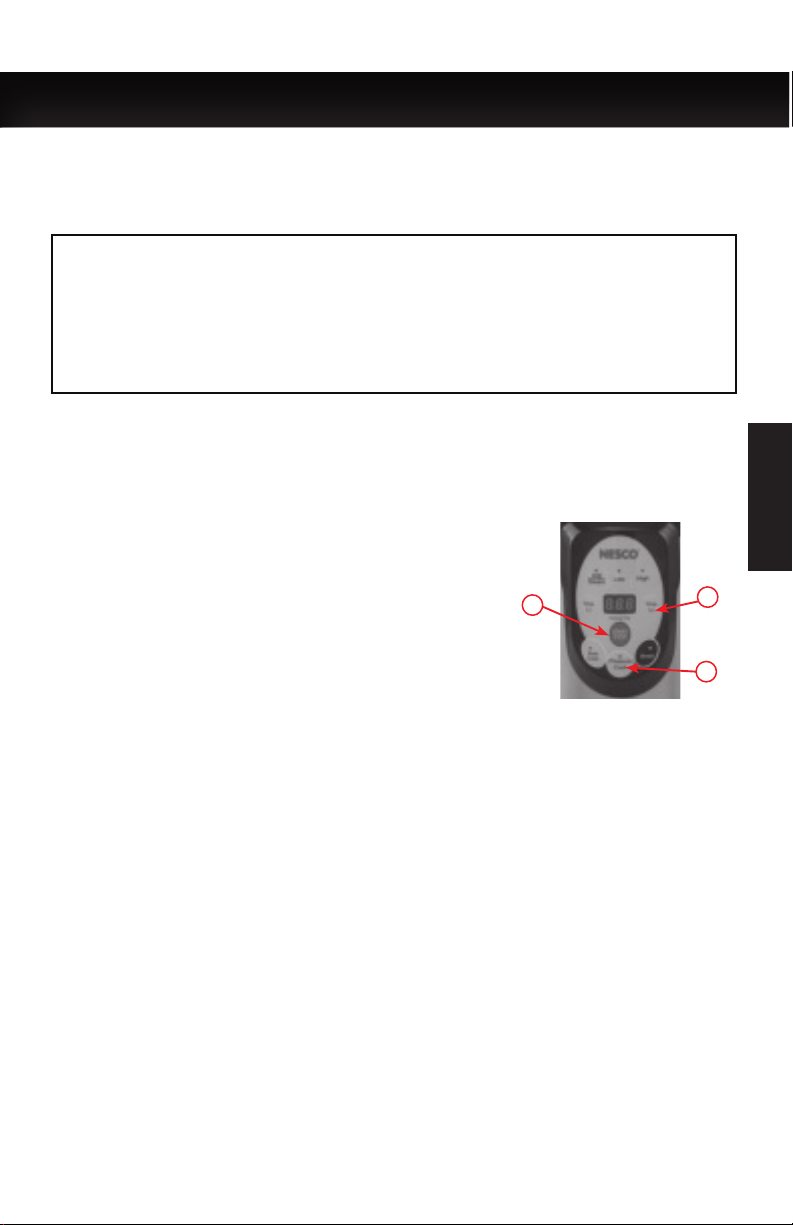
1. Press the “PRESSURE COOK” function button on the front
control panel.
2. Add the ingredients from your favorite recipe.
3. Close the LID, turn the LID about an 1/8 turn counter clockwise
into the “Closed-Lid” position. Set the PRESSURE LIMITING
VALVE to the “AIRTIGHT” position.
4. Press the TIME (+) to set time for what recipe calls for.
5. Press START to start the process. The display will circle until the
internal pressure is reached. You may notice some clicks as
the unit heats up, this is normal. Once the internal pressure is
reached, the “Cooking Time” will start counting down to “000”
and beep 3 times.
6. CAREFULLY move the PRESSURE LIMITING VALVE to the
EXHAUST position. A large amount of steam will be released
from the PRESSURE LIMITING VALVE, so make sure to keep your
face, body and fingers away from the steam.
7. Once the steam has been released, turn the LID HANDLE an 1/8
turn clockwise and open the LID.
PRESSURE COOKING
Pressure cooking is an easy way to seal in the flavor and nutrition of your favorite foods. You
can cook single foods like corn on the cob or rice, or an entire pot roast dinner.
SLOW COOKING
Sometimes it’s a desired option to slow cook dinners instead of pressure cooking. The “SMART
CANNER” allows this option. Simply add your favorite ingredients to the inner pot. Remember
not to exceed the 4/5 height rule for filling the cook pot.
HINTS: Consider browning meats that will be slow cooked first by using the BROWN function on
the SMART CANNER. It is usually not necessary to add cooking oil or butter to the bottom of the
INNER POT when browning meats, but a small amount of liquids such as water, soup stock or
fruit juices can help when SLOW COOKING. There are many resources for slow cooking recipes,
which can easily be adapted to use with the “Smart Canner”.
1
2
5
2
1. Press the BROWN function on the control panel.
NOTE: DO NOT close the LID while browning.
2. Place meat into the INNER POT. It is not necessary to add
butter or cooking oil, unless desired for flavor.
3. Turn and brown the meat as you would as if using a fry pan.
NOTE: You can brown an entire roast, or cut up meat into
smaller pieces before browning for stews.
1
OPERATING INSTRUCTIONS
English
5
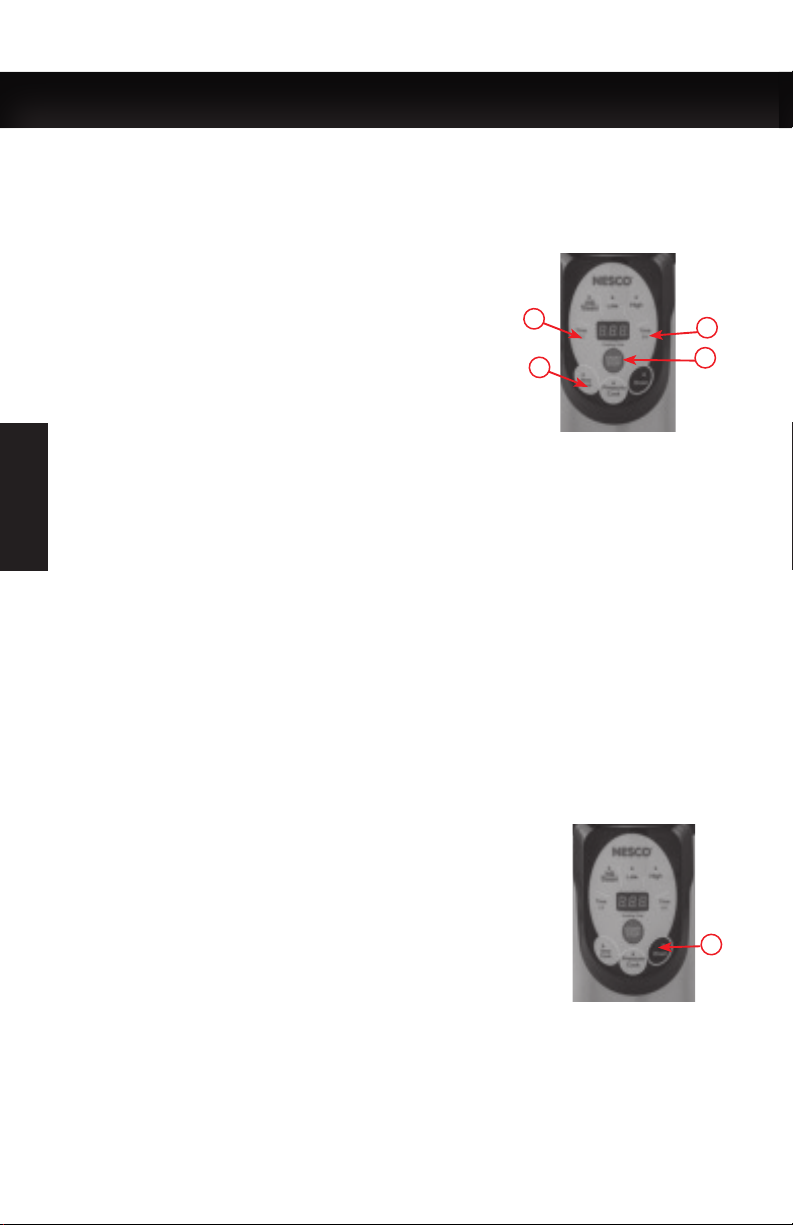
1. Press the SLOW COOK function button on the front panel.
2. The Cooking Time display will show 30 minutes, which can be
adjusted up (+) or down (-), to a max of 600 minutes (10 hours).
3. Close the LID, turn the LID about an 1/8 turn counter clockwise
into the “Closed-Lid” position.
4. Set the top limiting valve function to EXHAUST so the pressure
does not build up inside the cooker while slow cooking. You
will still seal in liquids for moisture to create the perfect slow
cooking environment.
5. Press START” to begin cooking. The “Smart Canner” will beep
three times once the time has finished.
BROWNING
The SMART CANNER is versatile enough to handle browning meats prior to slow
cooking or pressure cooking. Browning meats help release and develop the flavors you
expect and appreciate. The browning function on the SMART CANNER acts similar to a
standard fry pan.

OPERATING INSTRUCTIONS
6
STEAMING
Steaming foods oers a great way to save time, energy and nutritional benefits. Steamed
foods don’t require cooking oils, which can save both money and unwanted calories.
The steaming process keeps the foods from coming in direct contact with boiling water,
so foods cook evenly and gently in their own juices. Nutrients are less likely to be swept
away in the boiling water. Nearly all meats, vegetables, pasta, rice and seafood can be
steamed.
HINTS:
• Instant rice can be steamed, but long grain rice is best pressure cooked.
• Check your foods occasionally for desired doneness.
• When cooking several dierent types of foods, put the items that have the longest cook
time toward the bottom of the INNER POT.
HOW TO STEAM FOODS:
1. Place the CANNING RACK into the INNER POT.
2. Fill with hot water to the rack level. (approximately 4 cups)
3. Place the STEAM TRAY over the rack.
4. Press the WB/Steam function on the control panel.
5. Add foods that you wish to steam, not exceeding the
4/5 fill rule of the pressure cooking.
6. Close the LID, turn counter clockwise an 1/8 turn, set the PRESSURE LIMITING VALVE
to the EXHAUST position.
7. Press the TIME (+) to set time for what recipe calls for.
(Use chart on the next page as a
common guide.)
8. Press the START button.
9. Digital Dial Chase will begin to rotate. You will see a constant stream of steam coming
from the Pressure Exhaust Valve when boil has been reached.
10. Press START again when the constant stream of steam is seen. This will activate the
timer.
11. CAUTION: DO NOT HIT THE START BUTTON A 3RD TIME. This will result in the
unit shutting o.
4
7
8
English

Approximate Steaming Times for Vegetables
Vegetable Size/Preparation Time in minutes Suggested seasonings
Artichokes Steam whole artichokes 25-40 min extra virgin olive oil and lemon zest
Asparagus Whole spears, thick
spears peeled lightly
7-13 min olive oil combined with lemon zest or sesame
seeds
Beans, green Whole beans 6-10 min garlic
Beets, small or
medium-sized
Whole, un-peeled beets
scrubbed clean; peel o
the skins after steaming
35-50 min fresh thyme
Broccoli Trimmed stalks split in
half or florets
5-7 min extra-virgin olive oil, pumpkin seed oil, lemon
juice, lime juice, or balsamic vinegar
Brussels
sprouts
Whole, trimmed 8-15 min fresh thyme
Cabbage Cut in wedges 6-10 min lemon or lime juice
Carrots Cut into ¼-inch thick
slices
7-10 min honey combined with cinnamon or ginger
Carrots, baby Whole baby carrots 10-12 min honey combined with cinnamon or ginger
Cauliflower Florets 5-10 min lemon or lime juice
Corn on the cob Whole, husks removed 7-10 min chicken or vegetable stock
Okra Fresh whole okra, trimmed 6-8 min lemon/lime juice and parsley, or with
sauteed scallions
Onions, pearl Whole onions, peeled 8-12 min
Peas, green Fresh, shelled peas 2-4 min fresh herbs (such as mint) or lemon juice
Potatoes, all Peeled or scrubbed clean,
cut into ½ - inch slices
8-12 min fresh parsley, rosemary or dill
Potatoes, new Whole, scrubbed clean 15-20 min fresh parsley, rosemary or dill, or with
chopped red onions
Scallions Cut into ½ - inch slices 3-5 min
Spinach Cleaned, whole leaves 3-5 min olive oil and garlic, or sesame seeds
Squash,
butternut
Peeled and cut into 1- inch
cubes
7-10 min honey, lemon juice, and rosemary
Turnips Cut into ½ - inch cubes 8-12 min olive oil and fresh herbs
Turnip greens Cleaned and coarsely
chopped
4-6 min olive oil and garlic
Sweet potatoes Cut into large chunks 8-12 min honey and lemon juice
Zucchini Cut into 1 - inch slices 5-8 min olive oil, lemon/lime juice, and fresh herbs
(such as thyme or rosemary)
OPERATING INSTRUCTIONS
7
English

FOOD PRESERVATION
FOOD PRESERVATION
Ready to enjoy home canning with the SMART CANNER?
Few things are more satisfying than opening a jar of something you’ve canned yourself. Home
canning has a long and important legacy for families. You’ll be able to take advantage of
many benefits by canning your own fruits and vegetables. It’s more than just the great taste of
produce you’ve preserved at their peak, it’s the health benefits of controlling what goes in the
foods you eat. Plus, it’s a step toward self suciency. You can enjoy the taste of your garden all
year! Home canned products make thoughtful and healthy gifts.
The SMART CANNER helps make the process easy and safe. Digital controls will make the
process easier, even for first time home canners. The process of pressure canning safely
eliminates and protects against unwanted microorganisms. We’ve included some tips on the
basics of canning. Feel free to explore the many recipe resources available online or through
your local library. Join a club and learn even more.
BASIC CANNING TIPS
• We highly recommend that you familiarize yourself with the canning procedures, the
dierent acid levels of fresh foods and FDA guidelines that can be found on the Internet.
http://nchfp.uga.edu/
• There are a wide variety of products that can be successfully canned. However, not every
food item is suitable. Check for recipes before proceeding.
• Follow recipe directions carefully.
• Select jar sizes in servings that you and your family will be able to consume in a timely
manner. Make sure there are no small chips along the top of jars that would prevent
adequate sealing. With proper care, canning jars can be reused for many years. NEVER
ATTEMPT TO REUSE LIDS.
• Some handy items that you may normally need include saucepans, measuring cups and
measuring spoons, sharp kitchen knives, large spoons or ladles, cutting boards, non-
metallic spatula, funnels, jar lifters, oven gloves and clean rags. Also, adhesive labels can
add a nice look to your final product.
• Make sure all utensils, jars and lids are thoroughly clean before canning. It’s best to keep
your newly cleaned jars warm to help reduce chance of breakage caused by temperature
changes when adding hot foods.
• The “Smart Canner” can seal jars through both pressure canning and water bath
techniques—check with your recipe for suggested method.
• Follow guidelines for safety procedures from canning jar and lid manufactures. Never use
jars that are not designed for home canning.
HOW TO CAN WITH THE “SMART CANNER”
The SMART CANNER comes with 2 racks to use during the canning process. The CANNING
RACK must be used to keep the canning jars o the bottom of the INNER POT. The STEAMING
RACK can be used as a separation layer when stacking smaller size jars.
The SMART CANNER will hold and process:
Botulism spores must be killed at temperatures higher than boiling water (pressure canned)
or by extreme pH balance found in vinegar of pickled vegetables or sweet jams and jellies
(water bath).
·Up to 4 Quarts (WIDE MOUTHjars) or
·Up to 5 Pints (WIDE MOUTH jars) or
·16 - 4 oz jelly jars at a time
NOTE: There are many varieties of
canning jars available. Not all will fit
perfectly into the Smart Canner.
Please use WIDE MOUTH canning jars
for best results. QUART size jars cannot
be used with the Water Bath function.
8
English

WATER BATH (WB)
It is important in water bath canning, that the jars be covered with water. If your jars are too tall,
you should use the LOW pressure setting. This allows the use of much less water and gives you
more flexibility on the types of jars that can be used. It is recommended to use WIDE MOUTH
canning jars, designed for use in canning, to fit within the canner when top is closed.
NOTE: QUART size jars cannot be used with the Water Bath function.
High acid foods such as fruits, pickles and tomatoes prohibit the development of harmful
bacteria better than low acid foods. Therefore, water bath canning can be used to preserve
these foods.
1. Prepare your products following your recipe, following Federal Food and Drug
Administration guidelines.
2. Place food in canning jars and hand tighten following jar manufacturer guidelines.
3. Place the CANNING RACK into the bottom of the INNER POT. Set your filled jars on the
CANNING RACK.
4. Fill the INNER POT with water so that the jars are completely covered.
5. Close LID and ensure the PRESSURE LIMITING VALVE is set to EXHAUST.
CONTROL PANEL USE FOR WB
FOOD PRESERVATION
1. Press the WB/Steam button on top left of control panel.
2. Press the TIME (+) to set time for what recipe calls for.
IMPORTANT: Make sure the PRESSURE LIMITING VALVE is
set to EXHAUST.
3. Next press the START button. DO NOT press the Pressure Cook
button at bottom of control panel.
4. Digital Dial Chase will begin to rotate. The unit should begin to
boil in 20-25 minutes. You will see a constant stream of steam
coming from the Pressure Exhaust Valve when boil has been
reached.
5. Press START again when the constant stream of steam is seen.
This will activate the timer.
6. CAUTION: DO NOT HIT THE START BUTTON A 3RD TIME. This
will result in the unit shutting o.
1
2
3
5
WHEN BOILING IS COMPLETE:
• Carefully turn the LID clockwise 1/8 turn and open the LID.
• Carefully remove the jars from SMART CANNER; the jar’s lids will “pop” as they cool and seal.
If you see Err, an error has occurred. A common reason for seeing an error code is that the START
button was not pressed a second time when the Water Bath came to a boil.
The unit is designed to time out after 45 minutes without a second START button being pressed.
We recommend that if this occurs, you should dispose of all product being processed during that
batch and start fresh.
9
English

10
FOOD PRESERVATION
English
PRESSURE CANNING (HIGH & LOW)
The following instructions are for high pressure canning for low acid foods.
The Smart Canner make pressure canning safe and easy. You can HIGH PRESSURE
CAN most vegetables, fruits, sauces, meats, and soup stocks.
Refer to the USDA’s Complete Guide to Home Canning for tested recipes and follow
their instructions precisely.
https://nchfp.uga.edu/publications/publications_usda.html
1. Place your filled jars to be canned onto the rack in the Inner Pot.
2. Add 8 cups of hot water.
3. Close and lock the Lid.
4. Select the “High” button from the Control Panel.
5. Press the “Time” button to set the canning recipe required process time.
6. Set the Pressure Limiting Valve to “Exhaust”.
7. Press “Start” to begin the canning process.
The Control Panel LED Display will have lights rotating clockwise around the display,
this will continue until the correct internal temperature is reached and can take up
to 30 minutes.
Steam will begin venting through the Pressure Limiting Valve, this is normal. Once
the pressure canner reaches the correct internal temperature, the canner will
beep once, and the Control Panel LED Display will read “E10”. The pre-set “E10” code
means: (E) for exhaust mode and (10) equals the number of minutes that will count down.
8. The pressure canner will automatically countdown from “E10” to “E0”. Once the Control
Panel LED Display shows a blinking “E0” the canner will beep once. At this time the
Pressure Limiting Valve must be set to “Airtight”. Once the canner resumes, the Control
Panel will beep again.
The required process time entered earlier will now start to count down. During this time
your canner will begin to release steam even though the Pressure Limiting Valve is set
to “Airtight”, this is normal. The weighted venting ensures a consistent internal PSI.
When the countdown procedure is complete, the canner will beep three times and the
Control Panel LED Display will read “OFF”. The canning process is now complete.
If the Pressure Limiting Valve is not set to “Airtight” after the process time countdown reaches
“E0” and beeps once, the canner will then countdown and beep after 5 minutes has passed.
The canner will then countdown for an additional 5 minutes. The canner will then beep, and
the Control Panel LED Display will then display an “EEE” code and power down. If this occurs,
dispose all product being processed and start over with fresh ingredients. *
9. Unplug the pressure canner and allow the temperature and pressure inside the canner to
gradually decrease, do not manually release the pressure. The canner should be allowed
to cool for one hour before attempting to open the lid.
* If you see an “Err” or “EEE” code displayed on your Control Panel LED Display at any
time an error has occurred. If this occurs, dispose all product being processed and
start over with fresh ingredients.
BLACK PRESSURE LIMITING VALVE - 10 PSI (For Use at Low Altitudes, 1,000 Ft. or Below)
GREEN PRESSURE LIMITING VALVE - 15 PSI (For Use at Elevations Higher Than 1,000 Ft. Above
Sea Level)

RECIPES
BEEF CHILI (PRESSURE COOK)
1. Press SMART CANNER - BROWN setting. Press START. Brown meat and seasoning without the lid
on the canner. Cook until meat is browned.
2. Add 10 oz. of canned diced tomatoes and 4 oz. diced green chili peppers.
3. Stir, cover & lock the SMART CANNER LID. Press SMART CANNER - PRESSURE COOK setting.
Adjust “Cooking Time” to 25 minutes. Press START. The SMART CANNER will beep 3 times when
the cycle is complete and will display “OFF”.
4. Garnish with chopped fresh cilantro and green onions. Serve with corn chips, sour cream and
shredded cheese.
CANNED CHICKEN STOCK
(great use for the bones, skin and left-over meat of roasted chicken)
1. Put above ingredients into SMART CANNER. Lock lid and press PRESURE COOK setting. Set time
for 20 minutes. The SMART CANNER will beep 3 times when the cycle is complete and will display
“OFF”. Release pressure and cool. Strain and discard the bones and veggies. Place ice cubes in
the broth; the fat will solidify and can be removed/discarded.
2. Heat the canning lids. Pour the broth into pint canning jars. Wipe the tops of the jars, seal and
hand tighten rings on the canning jars. Place the jars on the CANNING RACK of the SMART
CANNER and add enough water to a level of about 1/3 of the height of the jars. Close and lock the
Smart Canner lid. Press PRESURE COOK and set for 15 minutes. Press start. The SMART CANNER
will beep 3 times when the cycle is complete and will display “OFF”.
3. Carefully remove the jars from SMART CANNER the jar’s lids will “pop” as they cool and seal. Use
within 6 months.
SIMPLE SLOW COOK CHICKEN & DUMPLINGS
1. Place in SMART CANNER. Press SLOW COOK and set time for 480 mins, (8 hours).
2. Open SMART CANNER and stir stew, pressing chicken into smaller pieces. The chicken will be very
tender.
3. Open 1 can of home-style refrigerator buttermilk biscuits. Roll each biscuit in flour shaping
them into sausages and cut them into 4 pieces. (The flour will thicken the stew.) Add the biscuit
dumplings to the top of the chicken stew and gently push them down to be covered with the stew
juice.
4. Close the SMART CANNER - LID and SLOW COOK & set time for 45 mins.
5. Press START.
6. The display will count down to “000” and beep 3 times when complete.
• 3 lbs. chuck roast, cut in 1- inch cubes
• 1 Tbls vegetable oil
• Salt and pepper to taste
• 1 large onion, diced
• 4 stalks of celery, diced
• 2 Tbls Italian Seasoning
• 2 Tbls chili powder
• 1/4 tsp cayenne pepper
• 1/2 tsp ground oregano
• 10 oz can of diced tomatoes
• 4 oz can of diced green chili peppers
• Left over bones, skin and meat of roasted
chicken
• 1 large onion, chopped
• 2 stalks of celery, chopped
• 1/2 C carrot, chopped
• 1/2 tsp of minced garlic
• 1/2 tsp cumin
• 1/2 tsp nutmeg
• Salt and pepper to taste
• Enough water to reach the “3/5”
full mark
• 1 - 1/2 lb. skinless, boneless chicken breasts, rinsed and
drained
• 2 cans of cream of chicken soup
• 3 carrots, diced
• 2 stalks of celery, diced
• 1 small onion, diced
• 2 Tablespoons of butter
• 1 can of refrigerator biscuits
11
English

RECIPES
SLOW COOKED BAKED ZITI
1. Mix the 3 cheese in a small bowl.
2. Rinse the zita under cold water. Evenly space one layer of zita in the bottom of the “Smart Canner”.
3. Spread one jar of marinara sauce over the ziti.
4. Add half the cheese mixture and half the basil.
5. Repeat the layering.
6. Add the water, but do not stir.
7. Close and lock the LID. Press SLOW COOK and set time for 150 minutes. (2 ½ hours)
8. Press START. The display will circle until the correct temperature is reached. The unit is
programmed to go into a “keep warm” state as it slow cooks your meal.
9. The display will count down to “000” and beep 3 times when complete.
• 1 lb. ziti
• (2) 25 oz. jars of marinara sauce
• 15 oz. ricotta cheese
• 1 cup shredded mozzarella cheese
• 1 cup grated Parmesan
• 2 tablesspoons fresh basil leaves, finely
chopped
• 2/3 cups of water
BBQ RIBS
1. Brown the ribs in the SMART CANNER first by following the steps on page 4.
2. Add the rest of the ingredients on top of the ribs. Close and lock the lid. Press PRESSURE COOK.
Adjust cooking time to 60 minutes. Press START. The display will change throughout the process
and will beep 3 times when the process is done.
3. Remove the ribs and place them on a foil lined pan. Cover with the remaining BBQ sauce. Broil for
approximately 10 minutes or until the BBQ sauce is browned to your liking.
• 3 to 4 #’s country style pork ribs
• ¼ C apple cider vinegar
• 1 C beer (darker is better)
• 1 large onion sliced
• 2 teaspoons of minced garlic
• Your favorite BBQ sauce. (3/4 will be used in the
Smart Cooker with the ribs and the rest will be
used just before serving)
PRESSURE CANNING SALSA
1. Mix all ingredients, and pour into canning jars.
2. Heat the canning lids.
3. Wipe the tops of the jars, seal and hand tighten rings on canning jars.
4. Place jars on the CANNING RACK and add enough water to a level of about 1/3 of the height of
the jars. Close the LID and slide it over to the lock position. Press PRESSURE COOK and adjust
“Cooking Time” to 15 minutes.
5. Press START.
6. The Carey SMART CANNER will beep 3 times when the cycle is complete and display “OFF”.
7. Carefully, remove the jars and set them aside to cool.
8. You will hear the lids “pop” as they seal.
• 12 cups (about 24 tomatoes) Roma
tomatoes, peeled, cored and chopped
• 3 green bell peppers, seeds removed
and chopped
• 2 large onions, chopped
• 5 or 6 large jalapeno peppers,
stemmed, seeded and chopped
(leave the seeds in for hotter salsa)
• 2 tablespoons salt
• 1 teaspoon black pepper
• 1 tablespoon garlic, minced
• ¾ cup lime or lemon juice
• 1 tablespoon sugar
English
12

ONE YEAR LIMITED WARRANTY
Your product warranty is good for one year from date of purchase against all
defects in material and workmanship. Should your product prove defective
within one year from date of purchase or receipt, return the unit, freight
prepaid, along with an explanation of the claim. Please package your product
carefully in its original box and packing material to avoid damage in transit. We
are not responsible for any damage caused to the product in return shipment.
Under this warranty, we undertake to repair or replace any parts found to be
defective.
This warranty is only valid if the product is used solely for household purposes
in accordance with the instructions. This warranty is invalid if the unit is
connected to an unsuitable electrical supply, or dismantled or interfered with in
any way or damaged through misuse.
We ask that you kindly fill in the details on your warranty card and return it
within one week from date of purchase. Send warranty card to:
NPC-9 / NESCO Smart Canner
C/O MW
PO Box 237
Two Rivers, WI 54241-0237
English
13

IMPORTANTES PRÉCAUTIONS
Lors de l’utilisation d’un appareil électrique, les précautions de sécurité de
base doivent toujours être observées, et inclus les suivantes :
• LIRE TOUTES LES INSTRUCTIONS.
• Pour éviter les risques d’électrocution, NE PAS placer l’appareil dans l’eau ou tout autre
liquide.
• NE PAS toucher les surfaces chaudes. Utiliser les poignées latérales et celle du couvercle,
ou des maniques.
• Veuillez être attentif lorsque l’appareil est utilisé par un enfant ou à proximité d’enfant.
L’utilisation de cet appareil par des enfants N’EST PAS recommandée.
• Débrancher la fiche du cordon d’alimentation électrique de la prise murale lorsque l’appareil
n’est pas utilisé, avant d’insérer ou de retirer des pièces et avant le nettoyage.
• Allouer une période de temps pour refroidir les pièces avant leur manipulation.
• Éviter de toucher les pièces mobiles.
• Ne jamais placer l’appareil près d’une surface chauante ou dans un four.
• NE PAS utiliser cet appareil pour un usage autre que celui auquel il est destiné. - NE
PAS utiliser un appareil si le cordon ou la fiche est endommagé, s’il ne fonctionne pas
correctement, s’il est tombé, ou endommagé de quelque façon que ce soit. Retourner
l’appareil dans un centre d’entretien autorisé pour un examen, la réparation ou un
ajustement.
• NE PAS utiliser à l’extérieur.
• NE PAS laisser le cordon dépasser sur le côté d’une table ou d’un comptoir, en contact avec
des objets tranchants ou des surfaces chaudes.
• NE PAS tirer sur le cordon d’alimentation électrique pour débrancher l’appareil.
• Ne jamais brancher l’appareil si l’endroit est susceptible d’être inondé.
• Placer l’appareil sur une surface ferme et stable.
• Placer l’appareil dans un endroit éloigné des bords de comptoir, de table, etc. pour éviter
qu’il tombe ou qu’il soit poussé.
• L’utilisation de pièces non recommandée ou non vendue par le fabricant peut causer des
incendies, des électrocutions ou des blessures.
• NE JAMAIS utiliser de produit ou lingette de nettoyage abrasif pour nettoyer l’appareil.
• Seulement utiliser l’appareil avec un assemblage complet.
• NE PAS quitter l’appareil lorsqu’il est en fonction.
• Avant la première utilisation, retirer tous les emballages et nettoyer les pièces.
• Cet appareil est muni d’une fiche polarisée (une lame est plus grande que l’autre). Pour
réduire les risques l’électrocution, cette fiche se branche dans les prises uniquement dans
la position appropriée. Si la fiche ne rentre pas dans la prise, essayer de brancher la fiche
dans l’autre sens. S’il est impossible d’insérer la fiche, veuillez contacter un électricien
certifié. Ne pas altérer la fiche.
• Avant de débrancher l’appareil, éteindre en appuyant sur le bouton d’alimentation.
• Ne pas placer près ou sur une surface de gaz chauant, d’un bruleur électrique ou dans un
four chauant.
• Soyez très vigilant lors du transport d’un appareil contenant de l’huile chaude ou tout autre
liquide chaud.
• Pour déconnecter, éteindre l’appareil avec le bouton (OFF), puis retirer la fiche de la prise
murale.
• AVERTISSEMENT : Allumer ou éteindre l’appareil à l’aide des boutons de minuterie ou
d’alimentation électrique (ON/OFF) seulement.
AVERTISSEMENT
Français
14
VUE D’ENSEMBLE DES PIÈCES
1. POIGNÉE DU COUVERCLE
2. OUVERCLE
3. ORIFICE À VAPEUR
4. POIGNÉE LATÉRALE
5. EXTÉRIEURE EN ACIER
INOXYDABLE
6. PANNEAU DE CONTRÔLE
7. BASE INFÉRIEURE
8. JOINT DE SILICONE RÉTRACTABLE
DU COUVERCLE
9. RÉCIPIENT (Intérieur avec une
couche anti-adhérente)
10. SUPPPORT POUR CUISSON À LA
VAPEUR
11. SUPPORT POUR CONSERVE
12. CAPTEUR DE CONDENSATION
RÉTRACTABLE
13. CORDON D’ALIMENTATION
ÉLECTRIQUE
14. VALVE DE LIMITATION DE
PRESSION NOIRE - 10 PSI
(basse altitude)
15. VALVE DE LIMITATION DE
PRESSION VERTE - 15 PSI (pour
utilisation en haute altitude, plus
de 300 mètres au-dessus du
niveau de la mer)
13
Français
VALVE DE LIMITATION DE PRESSION NOIRE
10 PSI (basse altitude)
VALVE DE LIMITATION DE PRESSION VERTE
15 PSI (pour utilisation en haute altitude
15
Déjà
fixé sur
l’appareil.
14
12
11
10
9
8
7
6
5
4
12
3
4
15

AVANT LA PREMIÈRE UTILISATION
• Retirer tous les emballages, soit le carton, le plastique, ou la
styromousse, et disposer de façon appropriée.
• Nettoyer toutes les pièces avec un linge doux ou une éponge puis
bien sécher.
• NE PAS immerger dans l’eau ou placer dans le lave-vaisselle.
• Le JOINT D’ÉTANCHÉITÉ se place derrière le guide du câble. Avant la
première utilisation, retirer doucement le JOINT. (IMAGE 1)
• Nettoyer à la main avec de l’eau savonneuse tiède. Essuyer puis
replacer fermement le JOINT derrière le guide du câble. Il est
important que le JOINT soit bien installé et fixé dans les sillons du
COUVERCLE. (IMAGE 2)
COMMENT OUVRIR LE COUVERCLE
Lorsque le COUVERCLE de la mijoteuse est en position « fermé », prendre
la POIGNÉE DU COUVERCLE et tourner 1/8 de tour dans le sens horaire
(IMAGE 3), pour obtenir la position de couvercle « ouverte ». Soulever la
POIGNÉE DU COUVERCLE.
REMARQUE: Pour les appareils neufs, le joint du COUVERCLE peut
être très étanche et plus dicile à déverrouiller. Une fois que le
COUVERCLE a été ouvert et refermé plusieurs fois, le joint devrait
être moins robuste.
AVANT LA PREMIÈRE UTILISATION
AVERTISSEMENT - De la vapeur chaude est
périodiquement évacuée de L’ORIFICE À VAPEUR.
Il est important que la zone au-dessus de l’orifice à
vapeur soit sans obstruction.
1.
3.
2.
COMMENT DÉMONTER LE COUVERCLE
Lorsque le COUVERCLE de la mijoteuse est en position verticale, prendre le COUVERCLE avec
vos deux mains et ajuster la hauteur entre le COUVERCLE et le bord supérieur de la mijoteuse
pour atteindre environ quatre pouces (IMAGE 4). Puis, tourner dans le sens antihoraire pour
atteindre la position « fermer » (IMAGE 5). Puis, retirer le COUVERCLE du « SMART CANNER » et
mettre de côté (IMAGE 6).
4.
COMMENT FERMER LE COUVERCLE
Lorsque le COUVERCLE de la mijoteuse est en position verticale, prendre la poignée et placer
vers le bas en position « ouverte ». Puis, tourner dans le sens antihoraire pour atteindre la
position « fermé ».
5. 6.
Français
16
Français
17
INSTRUCTION D’OPÉRATIONS
RÈGLE 4/5: NE JAMAIS remplir avec des aliments dépassé le 4/5 du récipient Deplus, ne pas
entasser les aliments dans la mijoteuse. Ces actions peuvent empêcher le bon fonctionnement
de la mijoteuse et aecter le résultat final de la cuisson de vos aliments.
CUISSON SOUS PRESSION
La cuisson sous pression est une technique facile pour renfermer les saveurs et les bienfaits
nutritionnels de vos aliments préférés. Vous pouvez cuire des aliments seuls, comme les épis
de maïs, ou un repas de bœuf braisé complet.
IMPORTANT: Avant de commencer, sélectionner la VALVE DE LIMITATION DE PRESSION
NOIRE pour toutes les utilisations régulières sauf si vous êtes situé à 300 mètres au-dessus
du niveau de la mer. Pour les altitudes supérieures à 300 mètres au-dessus du niveau de la
mer, il est important de toujours utiliser la VALVE DE LIMITATION DE PRESSION VERTE. Éviter
l’utilisation d’ustensiles métallique à l’intérieur du RÉCIPIENT, pour ne pas endommager le
fini antiadhésif.
Veuillez vous référer : http://nchfp.uga.edu/ pour des informations générales et
directives sur la mise en conserve.
5
1
4
1. Appuyer sur le bouton de cuisson « PRESSURE COOK »
situé sur le panneau frontal.
2. Ajouter les ingrédients de votre recette préférée.
3. Fermer le COUVERCLE, tourner le COUVERCLE dans le
sens antihoraire pour environ 1/8 de tour, jusqu’à ce que
le couvercle soit en position « fermé ». Régler la VALVE DE
LIMITATION DE PRESSION en position « hermétique ».
4. Appuyer sur le bouton « TIME (+) » pour régler la durée de
cuisson, selon la recette.
5. Appuyer sur le bouton « START » pour démarrer la cuisson.
Le témoin circulaire reste allumé jusqu’à ce que la
température interne soit atteinte. Il est normal d’entendre
des déclics pendant le réchauement de l’appareil.
Lorsque la pression interne est atteinte, la minuterie
démarre avec un comptage à rebours et émet trois bips.
6. Ajuster avec VIGILANCE la VALVE DE LIMITATION DE
PRESSION en position d’échappement (EXHAUST). Une
grande quantité de vapeur d’échappera de la VALVE DE
LIMITATION DE PRESSION, il est donc important de garder
votre visage, votre corps et vos doigts éloignés de la
vapeur.
7. Une fois la vapeur échappée, tourner la POIGNÉE DU
COUVERCLE de 1/8 de tour dans le sens horaire et ouvrir le
COUVERCLE.
1. Appuyer sur le bouton de fonction « BROWN » pour saisir
votre viande.
REMARQUE: NE PAS fermer le COUVERCLE lorsque vous
saisissez votre viande.
2. Placer directement votre viande dans le RÉCIPIENT. Il
n’est pas nécessaire d’ajouter du beurre ou de l’huile de
cuisson, sauf si désiré en assaisonnement.
3. Tourner et saisir la viande tout comme il est fait avec une
poêle.
REMARQUE: Vous pouvez saisir un rôti en entier, ou couper la
viande en cube avant de la saisir, pour la cuisson de ragout.
1
INSTRUCTION D’OPÉRATIONS
MIJOTEUSE
Il est parfois bien d’avoir une option de préparation de repas à la mijoteuse au lieu de la cuisson
sous pression. Le « SMART CANNER » ore cette option. Ajouter simplement vos ingrédients
préférés dans le récipient. Souvenez-vous de ne pas dépasser le 4/5 du récipient.
ASTUCES: Vous pouvez saisir les viandes avant la cuisson dans la mijoteuse avec la fonction
« BROWN » du « SMART CANNER ». Il n’est pas nécessaire d’ajouter de l’huile ou du beurre à
L’INTÉRIEUR DU RÉCIPIENT pour saisir les viandes, mais une petite quantité de liquide tel que
de l’eau, du bouillon ou du jus de fruit aide la cuisson lente de la MIJOTEUSE. Il existe plusieurs
recettes pour la mijoteuse, et elles sont facilement adaptables pour l’utilisation avec le « Smart
Canner ».
1. Appuyer sur le bouton de cuisson « MIJOTEUSE » situé sur le
panneau frontal.
2. La durée de cuisson indique 30 minutes, elle peut être ajustée
(+) ou (-), pour un maximum de 600 minutes (10 heures).
3. Fermer le COUVERCLE, tourner le COUVERCLE dans le
sens antihoraire pour environ 1/8 de tour, jusqu’à ce que le
couvercle soit en position « fermé ».
4. Régler la valve de limitation de pression sur l’échappement
(EXHAUST) pour ne pas créer de la pression à l’intérieur de
l’appareil durant la cuisson lente. Les liquides sont scellés
pour retenir l’humidité et créer le parfait environnement pour
la mijoteuse.
5. Appuyer sur démarrer (START) pour débuter la cuisson. Le
Smart Canner émettra un bip trois fois après la fin du temps
imparti.
1
2
5
2
SAISIR LES VIANDES
Le « SMART CANNER » est versatile et peut saisir vos viandes avant d’eectuer la cuisson
lente ou sous pression. Saisir les viandes aide à développer les saveurs que vous désirez et
appréciez. La fonction « BROWN » du « SMART CANNER » agit comme votre poêle.
Français
18
Other manuals for NPC-9
1
Table of contents
Languages:
Other Nesco Electric Pressure Cooker manuals


