TURBRO Finnmark FMP05AC User manual

USER
MANUAL
PORTABLE AIR
CONDITIONER
Model:
Finnmark FMP05AC
Finnmark FMP06AC
Before using TURBRO Portable
Air Conditioner, please read this
manual carefully and retain it for
future reference.

support@turbro.com www.turbro.com
Tips for First-Time Use
1. Allow the unit to sit upright for at least 3-4 hours before powering on. Shipping carriers may set the unit on
its side, which causes the refrigerant to pool in certain areas. Standing the unit upright for 3-4 hours allows
the refrigerant to move freely within the coils.
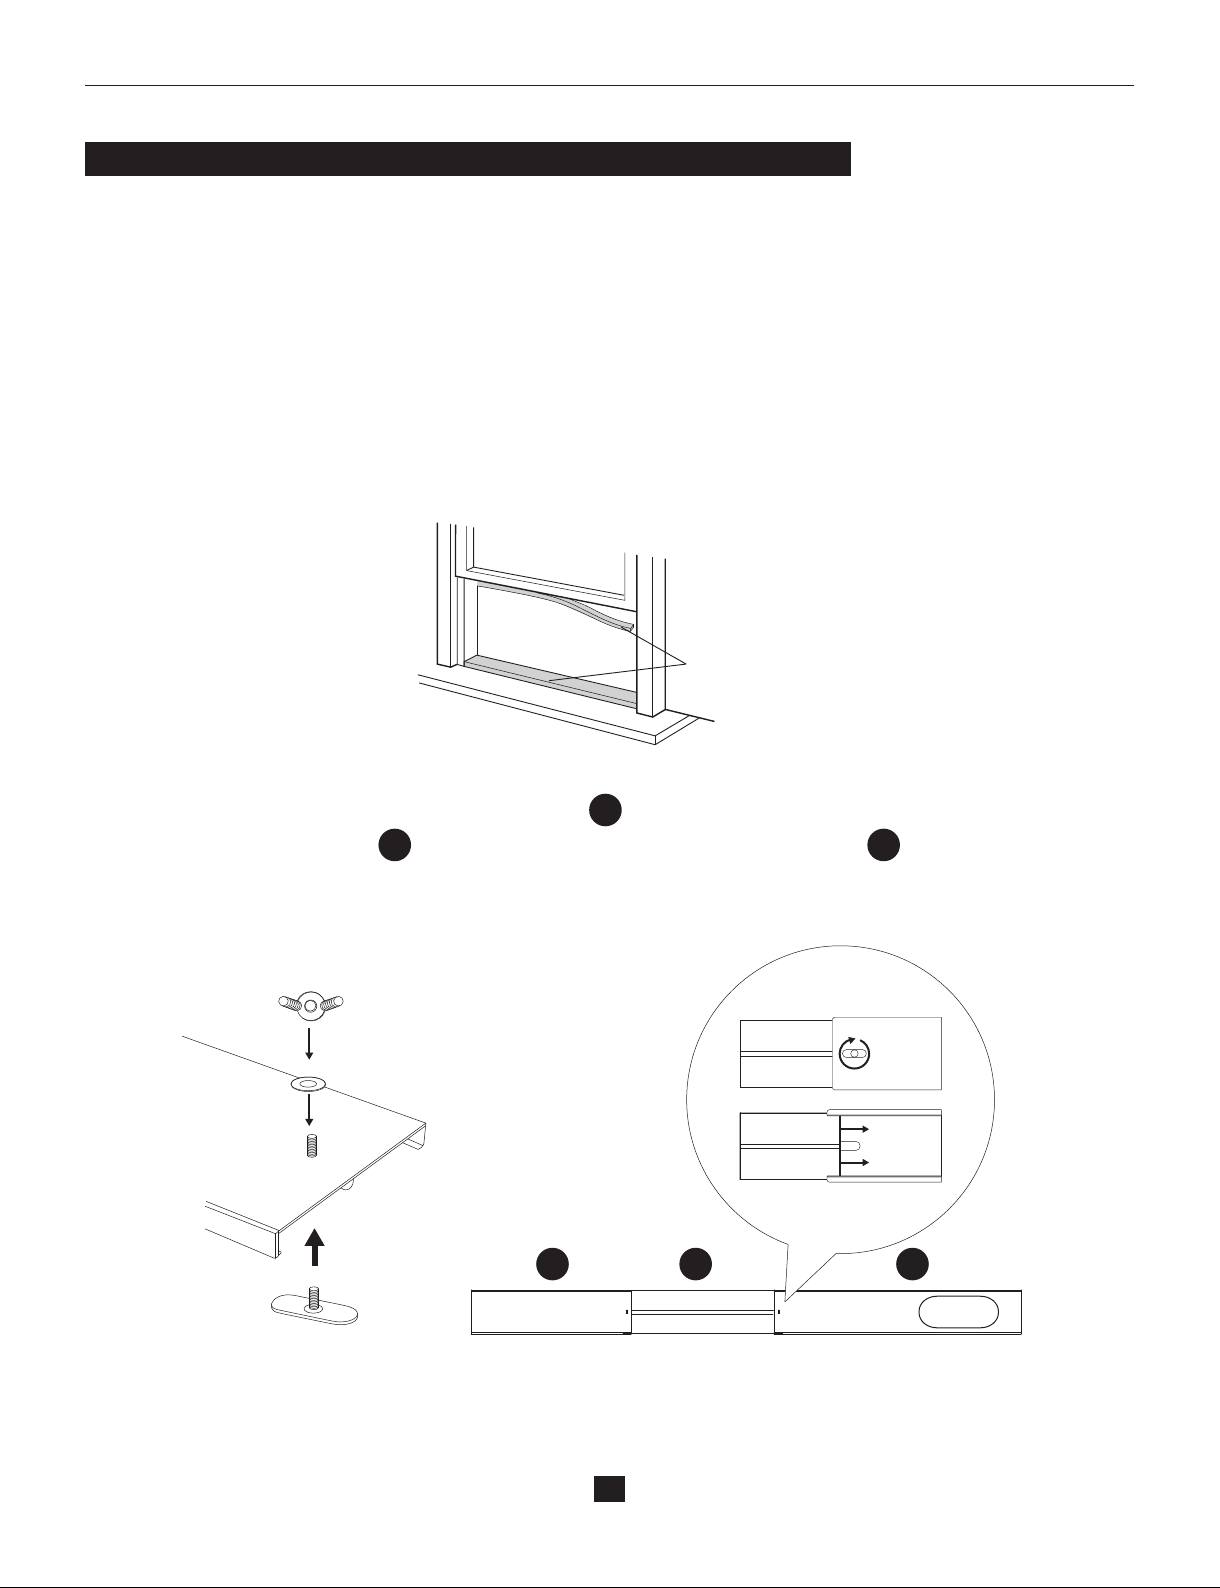
2. Some parts with sharp edges may cause injury, so gloves are highly recommended for unpacking and
installing.
3. Run the unit continuously for 24 hours after letting the unit stand upright for 3-4 hours. This allows the unit
to work out any “kinks” that may have resulted during shipping from our factory to your doorstep.
4. If you have any difficulties during installation, please contact Customer Support Team via
support@turbro.com for help.
5. If you have any problems with your product, please send us an email before submitting a return request, as
there might be a simple solution for your issue.
Please read this operating manual carefully before operating the unit.
This unit uses a flammable refrigerant.
Before using the appliance, read the owner's manual first.
Before installing the appliance, read the installation manual first.
Before repairing the appliance, read the service manual first.
The figures in this manual may be different from the material
objects, please refer to the material objects for reference.
Refrigerant Disclaimer
The refrigerant in this machine is fluoride R32, which is specially cleaned. The refrigerant is flammable
and does not have any odor. Furthermore, it can lead to explosions under certain conditions. The
flammability of the refrigerant is very low and can be ignited only by fire. Under normal operating
conditions, these issues should not be of any major concern.
Compared to common refrigerants, R32 is a nonpolluting refrigerant with no harm to the ozonosphere.
The effect on greenhouse effect is also lower than other common refrigerants. R32 has very good
thermodynamic features which lead to high energy efficiency. The units, therefore, need less refrigerant
filling than other common refrigerants.
1. Keep ventilation openings, in the appliance enclosure or in the built-in structure, clear of any debris or
obstructions.
2. Do not attempt to accelerate the defrosting process or clean the unit in any way other than those
recommended by the manufacturer. Should repair be necessary, contact TURBRO Customer Service Team.
3. Any repairs carried out by unqualified personnel may be dangerous.
4. Do not pierce or burn this appliance.
5. The appliance shall be installed, operated, and stored in a room with a floor area larger than 43ft²(4m²).
6. This appliance is filled with flammable gas R32. For repairs, strictly follow the manufacturer's instructions
only. Be aware that this refrigerant does not contain odor.
7. Read the user manual completely before using this appliance.
warning

support@turbro.com www.turbro.com
CONTENTS
SAFETY INFORMATION
PARTS DESCRIPTION
INSTALLATION INSTRUCTIONS
Installation Location
Tool Suggested (Not Included in package)
Installing in Double-Hung Sash / Sliding Casement Windows
Installing Exhaust Hose
OPERATING INSTRUCTIONS
Control Panel
Operating from the Control Panel
Operating from the Remote Control
Self-Diagnosis
Water Drainage Methods
Tips for Correct Use
CLEANING
Cleaning the Outer Case
Cleaning the Air Filters
Maintenance Checklists
TROUBLESHOOTING
WARRANTY & CUSTOMER SUPPORT
Warranty Information
Customer Support
···········································································································01
··············································································································03
····························································································05
·················································································································05
················································································05
······················································06
·············································································································08
··································································································09
···························································································································09
······························································································09
····························································································11
···························································································································13
············································································································13
···················································································································15
·································································································································16
············································································································16
··············································································································16
··············································································································17
················································································································18
···················································································20
···············································································································20
····················································································································20

support@turbro.com www.turbro.com
SAFETY INFORMATION
01
●Please read all instructions before use and save this user manual for future reference. A digital version can
be obtained from Customer Support.
●Your safety and the safety of others are very important to us. We have provided many important
safety messages throughout this manual and on the appliance itself. Always read and follow all posted safety
messages.
●To reduce the risk of fire, electric shock, injury, or death to persons using or near this appliance, please
follow some basic safety precautions. These precautions include, but are not limited to, the following:
Installation and Setup
●This appliance is not intended for use by any persons (including children) with reduced or restricted physical,
mental, or sensory capabilities, or lack of experience and knowledge, unless under the direct supervision
of a person responsible for their safety.
●Please keep plastic bags and sheets out of the reach of children as they might be mistakenly used for play.
Packaging materials can become airtight chambers and may pose a risk of suffocation if not disposed of
properly.
●When installing or moving the appliance, be careful not to pinch, crush, or damage the power cord.
●Never attempt to operate this appliance if it visibly damaged, malfunctioning, disassembled or has missing
or broken parts. This includes exposed wiring on a damaged cord or electrical plugin. All repairs and
servicing must be performed by qualified service personnel. Use only authorized TURBRO factory OEM
parts.
●Keep the product away from fire. Do not store or use flammable gases or materials near the appliance.
●Do not use heating equipment near the appliance.
●In the event of a gas leak (propane gas, LP gas, etc.) do not operate this or any other appliance. Open a
window or door to ventilate the area immediately.
●Only use the appliance in an upright position. Make sure the angle of inclination<10°. Always place the
appliance on a stable, flat, level surface to prevent the air conditioner from overturning.
Electrical Safety Warning
●Always plug into a fixed 115V AC ground outlet.
●Push the power plug all the way into the wall outlet so that it will not loose.
●Never plug or unplug the appliance with wet hands.
●Always grip the plug firmly and pull straight out from the outlet when taking it out.
●Never unplug the appliance by pulling on the power cord.
●Never use the appliance if the outlet is damaged or loose.

support@turbro.com www.turbro.com
02
●This product should be plugged directly into a power outlet. Power outlets should be properly rated,
protected, and sized in order to avoid electrical overload. Do not use a multiple-outlet power strip or
extension cord. Failure to do so may result in short-circuit or electrical shock.
●Do not use an AC plug adapter with this appliance.
●Do not cut or remove the third (ground) prong from the power cord.
●Your air conditioner must be used in a properly grounded wall receptacle. If the wall receptacle you intend
to use is not adequately grounded or not protected by a time-delay fuse or circuit breaker, have a qualified
electrician install the proper wall power receptacle before using this appliance.
●Be sure that the air conditioner is properly grounded. To minimize shock and fire hazards, proper grounding
is important. The power cord is equipped with a three prong grounding plug for protection against shock
hazards.
●Do not cover the power cord with a rug or carpeting.
●Do not rest hot or heavy objects on the appliance and power cord.
●If the power cable is damaged, it must be replaced by the manufacturer or an authorized technical service
center in order to avoid all risk.
●Do not damage, alter, excessively bend, twist, pull or heat the power cord.
●Do not run the air conditioner without the white plastic shell in place. This could result in mechanical damage
within the air conditioner.
●During the installing or moving the appliance, be careful not to pinch, crush, or damage the power cord.
●Always unplug the unit from the outlet before cleaning or maintenance operations.
Power Cord Operation (LCDI Plug)
The power cord used with this air conditioner contains a current detection device designed to reduce the risk
of fire. Always finish the test of the LCDI (Leakage Current Detection and Interruption) plug before use:
1. Plug in the Air Conditioner.
2. The power supply cord head has two buttons, a TEST button and a RESET button. Press the TEST button
and notice a click as the RESET button pops out.
3. Press the RESET button. Once again notice a click as the button engages.
4. The power supply cord will now supply electricity to the unit.

support@turbro.com www.turbro.com
PARTS DESCRIPTION
03
If the TEST button does not cause the circuit breaker trip or the RESET button will not stay engaged,
unplug the air conditioner immediately and contact TURBRO Customer Support.
NOTE:
• Do not use this device to turn the unit on or off.
• Always make sure the reset button is pushed in for correct operation
• The power supply cord must be replaced if it fails to reset when either the test button is pushed, or it cannot
be reset.
• If power supply cord is damaged, it cannot be repaired. It must be replaced by one obtained from the product
manufacturer.
01
02
01
02
03
04
03
04
08
05
Control Panel
Horizontal Airflow Louver
Handle (Both sides)
07
Air Intake Grille
05 Middle Condenser Drain
06 Caster Wheels
07 Air Outlet Grille
08 Condenser Drain
06

support@turbro.com www.turbro.com
04
Hose Inlet 1 unit
Exhaust Hose 1 unit
Hose Outlet 1 unit
Window Panel 1 unit
Adjustment Panel 1 unit
Extension Panel 1 unit
Screws and Nuts
for Adjustment Panel 2 units
Remote Control
(with 2x AAA Battery) 1 unit
Drainage Hose 1 unit
Self-adhesive Foam Seal 2 units
Foam Seal 2 units
PARTS PARTS NAME QUANTITY
Cool
Dry
Fan
Timer
Heat
Speed
Sleep
C/ F

support@turbro.com www.turbro.com
05
INSTALLATION INSTRUCTIONS
Installation Location
●The air conditioner should be placed on a firm floor to minimize noise and vibration. For safe and secure
positioning, place the unit on a smooth, level floor strong enough to support the unit.
●The unit must be installed near a properly rated grounded socket.
●Allow at least 19.7 inches / 50 cm of space away from the wall with the window for efficient working. The
height from the exhaust hose to the floor is 35.5 inches(90 cm).
●Never place any obstacles around the air inlet or outlet of the unit.
●The hose can be compressed or extended moderately, but it is desirable to keep the length to a minimum.
Also make sure the hose does not have any sharp bends or sags. See the image below.
Tool Suggested (Not Included in package)
The window panel kit has been designed to fit most standard windows that open vertically or horizontally;
however, it may be necessary for you to improvise/modify some aspect of the installation procedures for
certain types of window.
Minimum and maximum window openings: 11 - 67 Inches
NOTE: If the width of your window is smaller than 25.6 inches, please remove the adjustment panel and then
cut the window panel to make the width of the window panel the same width as your window.
Remember to measure twice and cut once so you don’t cut it too short.
Min 90cm/35.5in

support@turbro.com www.turbro.com
06
Installing in Double-Hung Sash / Sliding Casement Windows
A. Required Parts:
●Foam Seal
●Window Panel
●Adjustment Panel
●Extension Panel
●Screw and Nut
B. Assembly:
a. Cut the foam seal to the proper length and attach it to the window sash.
01
01
0203
02 03
b. Install the screws and nuts on the window panel and tighten them(don't tighten them completely).
Install the adjustable panel to the window panel and the extension panel by sliding the screw kit
into the groove of the adjustable panel.
Foam seal
(adhesive type)
step 1
step 2
step 3

Window width
67 inches Max./11 inches Min
Window width
67 inches Max./11 inches Min
01
02
03
0102
03
support@turbro.com www.turbro.com
07
c. Place the assembled window panels on the window sash and adjust until it fully covers the width of your
window.
NOTE:
If the width of your window is smaller than 25.6 inches, please remove the adjusting panel from the window
panel and then cut the window panel to make the width of the window panel the same width as your window.
d. Tighten the screw completely to fix the panel kit at the desired position.
e. Close the window securely against the assembled window panel kit.
f. Cut the foam seal to an appropriate length and seal the open gap between the top window sash and outer
window sash.

support@turbro.com www.turbro.com
08
Installing Exhaust Hose
COOL & DRY MODE: The air exhaust hose should be connected to the portable air conditioner.
FAN MODE: The air exhaust hose can be disconnected from the portable air conditioner in fan mode or left
connected.
A. Required Parts:
●Hose Inlet
●Exhaust Hose
●Hose Outlet
B. Assembly:
a. Rotate the hose inlet and the hose outlet clockwise to install them to the exhaust hose.
b. Install the hose inlet (the notched side on the left) into the groove at the back of the unit and extend the
exhaust hose.
c. Affix the Hose Outlet to the window panel.
NOTE: The exhaust hose can be compressed or extended moderately, but it is desirable to keep the length to
a minimum. Also, make sure that the hose does not have any sharp bends.
Slide into

OPERATING INSTRUCTIONS
01
04
07
02
05
Sleep Button
Fan Speed Button
Control Knob and Screen
Child Lock Button
Mode Button
03
06
Timer Button
Power Button
support@turbro.com www.turbro.com
09
Control Panel
Operating from the Control Panel
01 02 03 04 05 06 07
The control panel enables you to manage all the main functions of the appliance.
TURNING THE APPLIANCE ON
●Plug into the main socket, and all lights will flash once. Then the appliance is on standby mode.
●Press the ON/OFF Button then the display screen will light up.
●Never turn the air conditioner off by unplugging it from the power source. Always press the
Power Button , then wait for a few minutes before unplugging. This allows the appliance to perform a
cycle of checks to verify the operation.
●Pressing Mode Button will cycle through the following modes, as shown below:
FAN COOL DRY
FAN MODE
When using this mode, the unit doesn't need to be attached to the air exhaust hose.
●Press the Mode Button , and the default wind indicator lights up. The screen will show the current
room temperature.
●Press the Fan Speed Button to select the fan speed.
Low Speed
High Speed

support@turbro.com www.turbro.com
10
DRY MODE
Ideal to reduce room humidity (spring and autumn, rainy periods or in damp rooms, etc).
Note: Before using the dry mode, please make sure the air exhaust hose attached to the appliance to allow
the moisture to be discharged externally and the drain hose attached to avoid any leaking. (The Water
Drainage Methods will be mentioned in the following parts)
●Press the Mode Button until the water-drop indicator lights up. The screen will show the current
room temperature.
●In this mode, the unit will run at the low speed and the fan speed cannot be adjusted.
TIMER FUNTION
This timer can be used to delay the unit start up or shutdown, this avoids wasting electricity by optimizing
operating periods.
Setting the Timer to Power the Unit On
●When the unit is off, press the Timer Button , the clock indicator lights up, and the screen digital
flashes. Turn the knob to choose the delayed start-up time and wait for about 5 seconds. When the timer
is active, the clock indicator will stay on and the screen will display the countdown time.
●Press the Timer Button again to adjust the timer. Turn the knob until the digital shows “00”, the timer
will be canceled and the clock indicator will disappear.
Setting the Timer to Power the Unit Off
●With the unit on, please press the Timer Button , the clock indicator lights up, and the screen digital
flashes. Turn the knob left or right to choose the delayed shut-down time and wait for about 5 seconds.
When the timer is active, the clock indicator will stay on.
●Press the Timer Button again to adjust the timer. Turn the knob until the digital shows “00” and wait
for 5 seconds, the timer will be canceled and the clock indicator will disappear.
SLEEP FUNCTION
This function is useful to use at night as it maintains the room at optimum temperature without excessive
fluctuations in either temperature or humidity.
Note: Sleep function is available only on COOL mode. In this mode, the fan speed is always low. (After
running in sleep function for 12 hours, the unit will automatically shut down.)
●Press the Sleep Button and the moon indicator lights up with half-dim light. Other indicators will
also become half-dim. The beep sound will disappear.
COOL MODE
Ideal for hot muggy weather when you need to cool and dehumidify the room.
●Press the Mode Button until the snowflake indicator lights up. The screen will appear .
●Turn the knob left or right to select your desired temperature 61°F-90°F (16°C-32°C).
●Press the Speed Button to select the fan speed.
Note: The air conditioner will stop cooling but will still blow air if the room temperature is lower than the
selected temperature.
Low Speed
High Speed
To operate under low noise.
To reach the desired temperature as rapidly as possible.

support@turbro.com www.turbro.com
11
●In sleep function, the AC temperature will increase by 2°F in the first hour. After another hour the
temperature will increase by 2°F and then keep on running at this temperature.
●Press the Sleep Button again to cancel this function and the moon indicator will disappear.
CHILD LOCK FUNCTION
●Long press the Child Lock Button and the lock indicator lights up. Under this function, all buttons
are not available and settings cannot be changed.
●Long press the Child Lock Button again to cancel this function.
TEMPERATURE SCALE SWITCH
With the unit on, long press the Mode Button for 3 seconds, then you can switch the unit of
temperature.
For example:
-In Celsius, the digital displays like fig 1. The range is 16-32 degrees.
-In Fahrenheit, the digital displays like fig2. The range is 61-90 degrees. fig1 fig2
Operating from the Remote Control
To choose cool mode
To turn on/off the air conditioner
To choose dry mode
To adjust fan speed
To choose fan mode
To increase the set temperature or to
lengthen the time in timer setting
To decrease the set temperature or to
reduce the time in timer setting
To switch on/off the timer function
To switch on/off the sleep mode
Temperature Scale Switch
Cool
Dry
Speed
Fan
Timer
Sleep
°C/°F
FUNCTIONBUTTONS
Cool
Dry
Fan
Timer Sleep
Speed
C/ F
Heat

support@turbro.com www.turbro.com
12
TIMER FUNCTION
●Press the “Timer” Button, “TIME ON/ TIME OFF” will appear and digital will flash on the screen.
●Choose the required delayed time by pressing and buttons. Then wait for 5 seconds. The timer
will be activated, and the indicator will stay on and display your set timer.
●Press the “Timer” button twice to deactivate the timer function.
Using the remote control
The maximum range of the remote control is 23 feet / 7 meters away from the appliance (without obstacles
between the remote control and the receiver).
The remote control must be handled with extreme care. Do not
drop it or expose it to direct sunlight or sources of heat. If the
remote control do not work, please try to take out the battery,
and put it back.
Inserting or replacing the batteries
●Remove the cover on the rear of the remote control
●Insert two "AAA" 1.5V batteries in the correct position (see instructions
inside the battery compartment)
NOTE:
●If the remote control unit is replaced or disposed of, the batteries must be removed and discarded in
accordance with current legislation as they are harmful to the environment.
●Do not mix old and new batteries. Do not mix alkaline, standard (carbon-zinc) or rechargeable
(nickel-cadmium) batteries.
●Do not dispose of batteries in fire. Batteries may explode or leak.
●Remove the batteries if the remote control won’t be used for a long time, .
COOL MODE
DRY MODE
FAN MODE
FAN SPEED
Not available for this model
LOW HIGH
SIGNAL
TEMPERATURE SCALE SWITCH
TIMER
SLEEP FUNCTION
TEMPERATURE
MEANINGSYMBOLS MEANINGSYMBOLS
Max Range:
23 feet / 7 meters
reinstall
remove

support@turbro.com www.turbro.com
13
Water Drainage Methods
TURBRO portable air conditioner comes with an auto-evaporation system. The unit can automatically
evaporate the condensated water. There is no need to empty the water except in humid conditions.
When you run the dry mode, then it’s required to install the hose as the unit might pull more water
from the air.
When the water tank is full of water, the unit stops running and will show “ ”. The compressor and fan
won't restart until the water tank has been drained.
There are 2 ways to remove collected water from the air conditioner.
Method A: Manual Drainage
a. Unplug the unit from power source.
b. Place a receptacle pan (does not include) under the lower drain port.
c. Remove the cap from the lower drain port and allow the water to flow into the pan. Your pan may not hold
the full contents of the water tank. A number of fills of your pans may be required.
Self-Diagnosis
The unit has a self-diagnosis system to identify a number of malfunctions. Error messages will be displayed
on the display screen and beep 10 sounds. Press any button to stop the beep sounds.
IF IS DISPLAYED WHAT SHOULD I DO?WHAT DOES IT MEAN?
E0 Communication faults between
main PCB and display PCB.
If this is displayed,
contact TURBRO service team.
E1, E2 Sensor damaged. If this is displayed,
contact TURBRO service team.
The safety tank is full. Empty the internal safety tank, following the
instructions in the “Water Drainage Methods”.
Drain cap
Drain outlet
Drainage hose

support@turbro.com www.turbro.com
14
d. Tilt the unit by lifting it slightly upwards from the front until no more water drains from the outlet.
e. After the water is drained, firmly replace the cap on the lower drain.
f. Restart the air conditioner by pressing the power button. Ensure that the unit is in COOL or DRY mode. The
compressor will start approximately 3 minutes after the unit is turned on.
Method B: Continuous Draining
a. Unplug the unit from power source.
b. Remove the cap from the lower or middle drain port. During this step, some residual water may split so
place a receptacle pan (not included) under the drain port to collect water.
c. Insert the drain hose into the drain port. The water can be continuously drained through the hose to the
floor or a bucket.
NOTE: Please be sure that the height of the section of the drain hose should not higher than the drain outlet,
or the water tank may not be drained.
Drain cap
Drain outlet

support@turbro.com www.turbro.com
15
Tips for Correct Use
Follow these tips to get the best performance of your appliance:
●Close the windows and doors in the room to be cooling. When installing the appliance semi-permanently,
you should leave a door slightly open (as little as 0.4 inches / 1 cm) to guarantee correct ventilation.
●Close the windows and doors in the room to be cooled. Protect the room from direct exposure to the sun
by partially closing the curtains and blinds to make the appliance run more efficiently.
●Never set or rest objects of any kind on the appliance.
●Do not block the air inlet or outlet of the appliance. Reduced airflow will result in poor performance and
could damage the unit.
●Make sure there are no heat sources in the room.
●Never use the appliance in very damp rooms (for example laundries).
●Never use the appliance outdoors.
●Make sure the appliance is standing on a level surface.

support@turbro.com www.turbro.com
16
NOTE:
●Do not touch the metal fins in the air conditioner after removing the filter, as they may cause personal
injury.
●Do not attempt to dry the filter with a hairdryer or other heating elements as this may deform or ignite
the filter.
●Do not operate the air conditioner if the filter is missing.
Cleaning the Air Filters
To keep your appliance working efficiently, you should clean the filter every three months.
●The filter can be removed as shown in the picture below.
●Rinse the filter under running water a number of times.
●After the filter has dried completely, replace it back into the air conditioner.
CLEANING
Cleaning the Outer Case
You should clean the appliance with a slightly damp cloth then dry with a dry cloth.
●Never wash the appliance with water. It could be dangerous.
●Never use petrol, alcohol or solvents to clean the appliance.
●Never spray insecticide liquids or similar.
Before cleaning or maintenance, turn the appliance off and wait for a few minutes, then unplug from the
electrical outlet.

support@turbro.com www.turbro.com
17
Maintenance Checklists
Pre-Season Maintenance Checklist
●Check the power cord for any cuts or exposed wiring.
●Check the ground prong is still on your power plug.
●Clean the air filter.
●Check whether the hose adapters and exhaust hose are installed tightly and free of damage.
Post-Season Maintenance Checklist
●Disconnect unit from the power outlet.
●Clean air filter and exterior case.
●Drain any accumulated water from the air conditioner.
●Wrap the air conditioner in plastic to prevent the accumulation of dust.
Long-Term Storage Checklist
●Disconnect unit from the power outlet.
●Clean air filter and exterior case.
●Wrap and/or cover the unit to prevent the accumulation of dust within the unit.
●Do not attempt to dry the filter with a hairdryer or other heating elements as this may deform or ignite the
filter.
●Do not operate the air conditioner if the air filter is missing.
This manual suits for next models
1
Table of contents
Other TURBRO Air Conditioner manuals
Popular Air Conditioner manuals by other brands

Ingersoll-Rand
Ingersoll-Rand EBC180-300 Installation, operation and maintenance

LG
LG Multi V PRHR041 installation manual

LG
LG LAN090HSV Service manual

Mitsubishi Electric
Mitsubishi Electric MSZ-GL25VGD operating instructions

Fujitsu
Fujitsu Inverter 9316796003-01 operating manual

Sabiana
Sabiana JANUS 05 Installation and maintenance manual

Friedrich
Friedrich Vert-I-Pak A-Series Installation & operation manual

Mitsubishi Electric
Mitsubishi Electric PAC-KE250TB-F installation manual

CLIVET
CLIVET Box-SM 2 650x650 Installation and operating manual

Klarstein
Klarstein 10029808 user manual

Daikin
Daikin FVXS09NVJU Operation manual

Haier
Haier HW-18HI03 Operation manual