Turf Equipment Z-SEED User manual

Z-SEED™
ForSerialNos.
408,644,346&Higher
PartNo.4505-307Rev.A

WARNING
CALIFORNIA
Proposition65Warning
Theengineexhaustfromthisproduct
containschemicalsknowntotheStateof
Californiatocausecancer,birthdefects,
orotherreproductiveharm.
Useofthisproductmaycauseexposure
tochemicalsknowntotheStateof
Californiatocausecancer,birthdefects,
orotherreproductiveharm.
Important:ItisaviolationofCaliforniaPublic
ResourceCodeSection4442or4443touse
oroperatetheengineonanyforest-covered,
brush-covered,orgrass-coveredlandunlessthe
engineisequippedwithasparkarrester,as
denedinSection4442,maintainedineffective
workingorderortheengineisconstructed,
equipped,andmaintainedforthepreventionof
re.
Toacquireasparkarresterforyourunit,seeyour
EngineServiceDealer.
Pleaserefertotheenginemanufacturer’s
informationincludedwiththemachine.
Labeledpowerratingsaresuppliedbytheengine
manufacturerinaccordancewithSAEtesting
andgross/netpowerratingstandards(J1940,
J1995,J1349).
Exmarkreservestherighttomakechangesor
addimprovementstoitsproductsatanytime
withoutincurringanyobligationtomakesuch
changestoproductsmanufacturedpreviously.
Exmark,oritsdistributorsanddealers,accept
noresponsibilityforvariationswhichmaybe
evidentintheactualspecicationsofitsproducts
andthestatementsanddescriptionscontained
inthispublication.
©2020ZTurfEquipmentispartofthe
Exmark®familyofproducts
415IndustrialRow
Beatrice,NE683102
Contactusatwww.zturfequipment.com.
PrintedintheUSA
AllRightsReserved

Introduction
CONGRATULATIONSonthepurchaseofyour
Z-Seedslicerseeder.Thisproducthasbeencarefully
designedandmanufacturedtogiveyouamaximum
amountofdependabilityandyearsoftrouble-free
operation.
Thismanualcontainsoperating,maintenance,
adjustment,andsafetyinstructionsforyourZ-Seed
slicerseeder.
BEFOREOPERATINGYOURMACHINE,
CAREFULLYREADTHISMANUALINITS
ENTIRETY.
Byfollowingtheoperating,maintenance,andsafety
instructions,youwillprolongthelifeofyourZ-Seed,
maintainitsmaximumefciency,andpromotesafe
operation.
Tomaximizesafety,performance,andproper
operationofthismachine,itisessentialthatall
operatorscarefullyreadandfullyunderstandthe
contentsoftheOperator’smanualprovidedwith
theproduct.Failuretocomplywiththeoperating
instructionsorreceivepropertrainingmayresultin
injury.Gotowww .zturfequipment.comforadditional
safeoperationinformation,suchassafetytips,
trainingmaterials,andOperator’smanuals.
Ifadditionalinformationisneeded,orshould
yourequiretrainedmechanicservice,contactyour
authorizedZTurfEquipmentdealerordistributor.
AllZTurfEquipmentdealersanddistributorsare
keptinformedofthelatestservicemethods.Many
areequippedtoprovidepromptandefcientservice
intheeldorattheirservicestations.Theycarry
amplestockofservicepartsorcansecurethem
promptlyforyoufromthefactory.
AllZTurfEquipmentpartsarethoroughlytested
andinspectedbeforeleavingthefactory,however,
attentionisrequiredonyourpartifyouaretoobtain
thefullestmeasureofsatisfactionandperformance.
Wheneveryouneedservice,genuineZTurf
Equipmentparts,oradditionalinformation,contact
anAuthorizedServiceDealerorZTurfEquipment
CustomerServiceandhavethemodelandserial
numbersofyourproductready.
Figure1identiesthelocationofthemodelandserial
numbersontheproduct.Writethenumbersinthe
spaceprovided.
g021185
Figure1
1.Modelandserialnumberlocation
ModelNo.
SerialNo.
Forcompletewarrantydetails,see
https://www.zturfequipment.com.Youmay
alsocallus402-223-6375torequestawrittencopy
oftheproduct’swarranty.
3

Contents
Introduction...........................................................3
Safety.....................................................................5
SafetyAlertSymbol.........................................5
GeneralSafety.................................................5
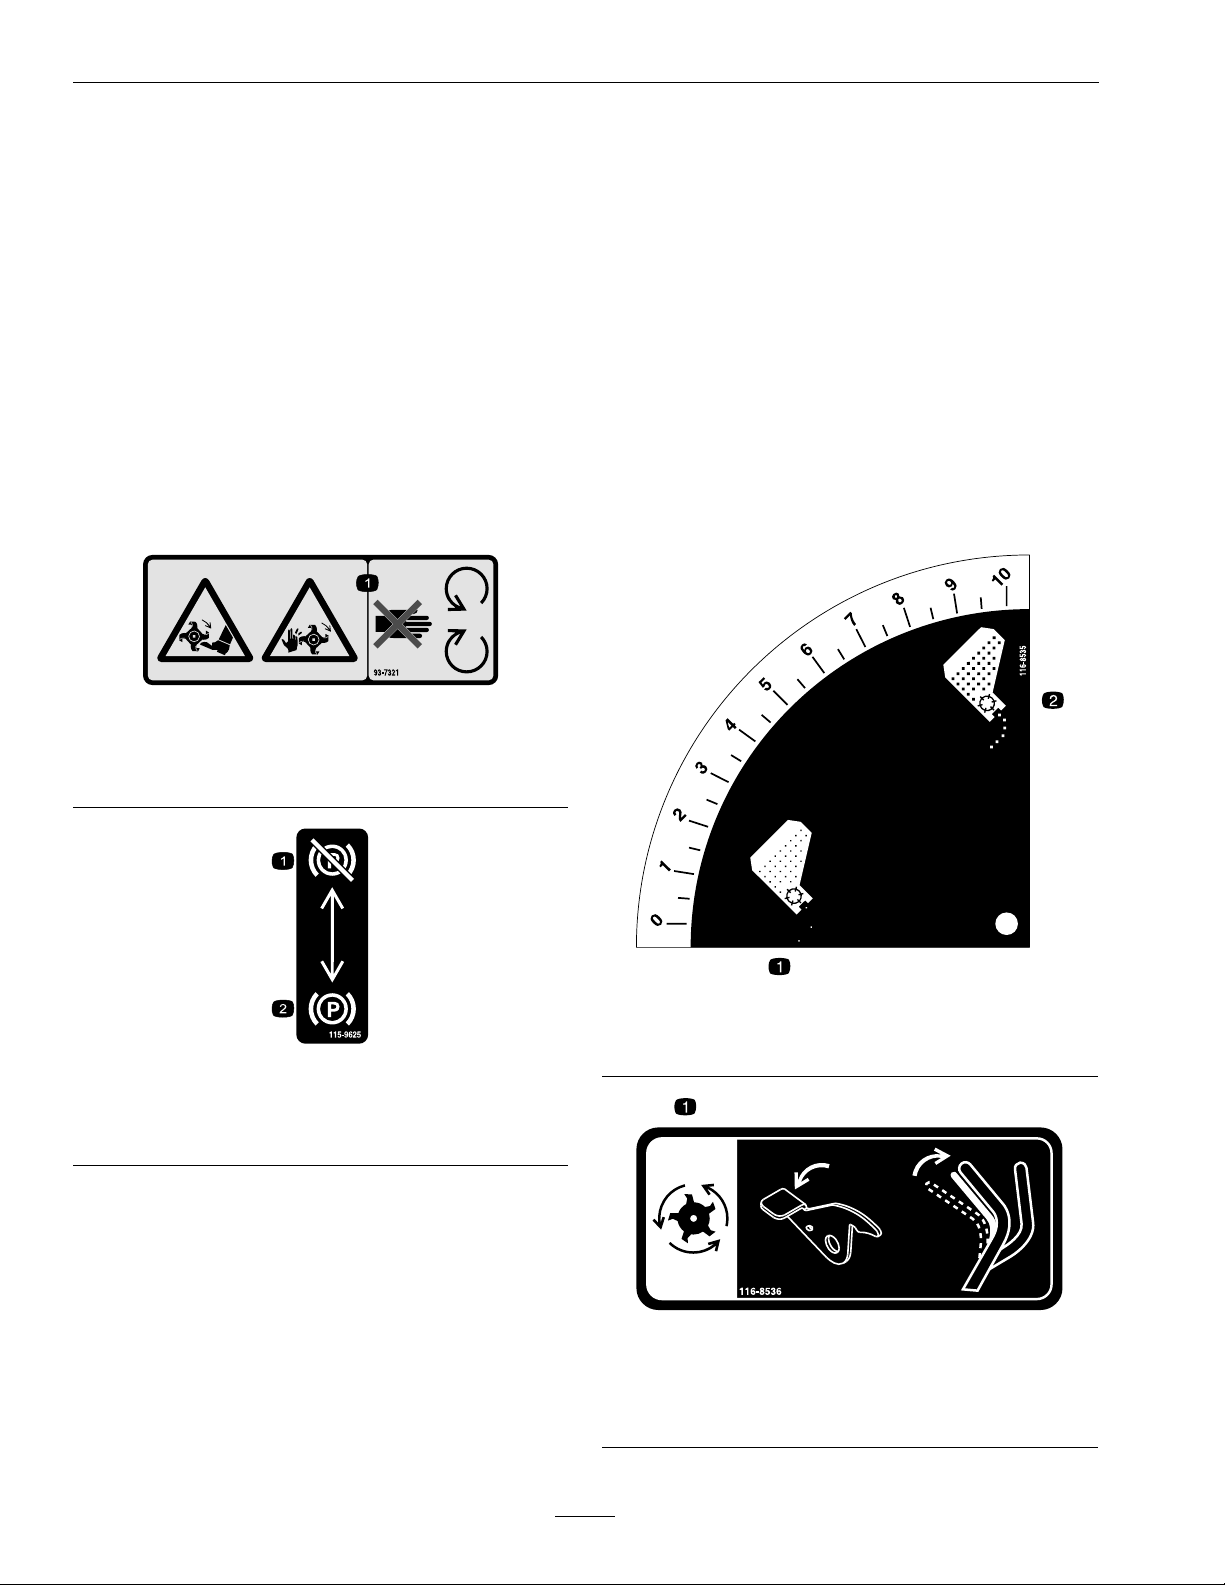
SafetyandInstructionalDecals.......................6
Specications.........................................................9
Systems...........................................................9
Dimensions.....................................................9
TorqueRequirements......................................9
Setup.....................................................................10
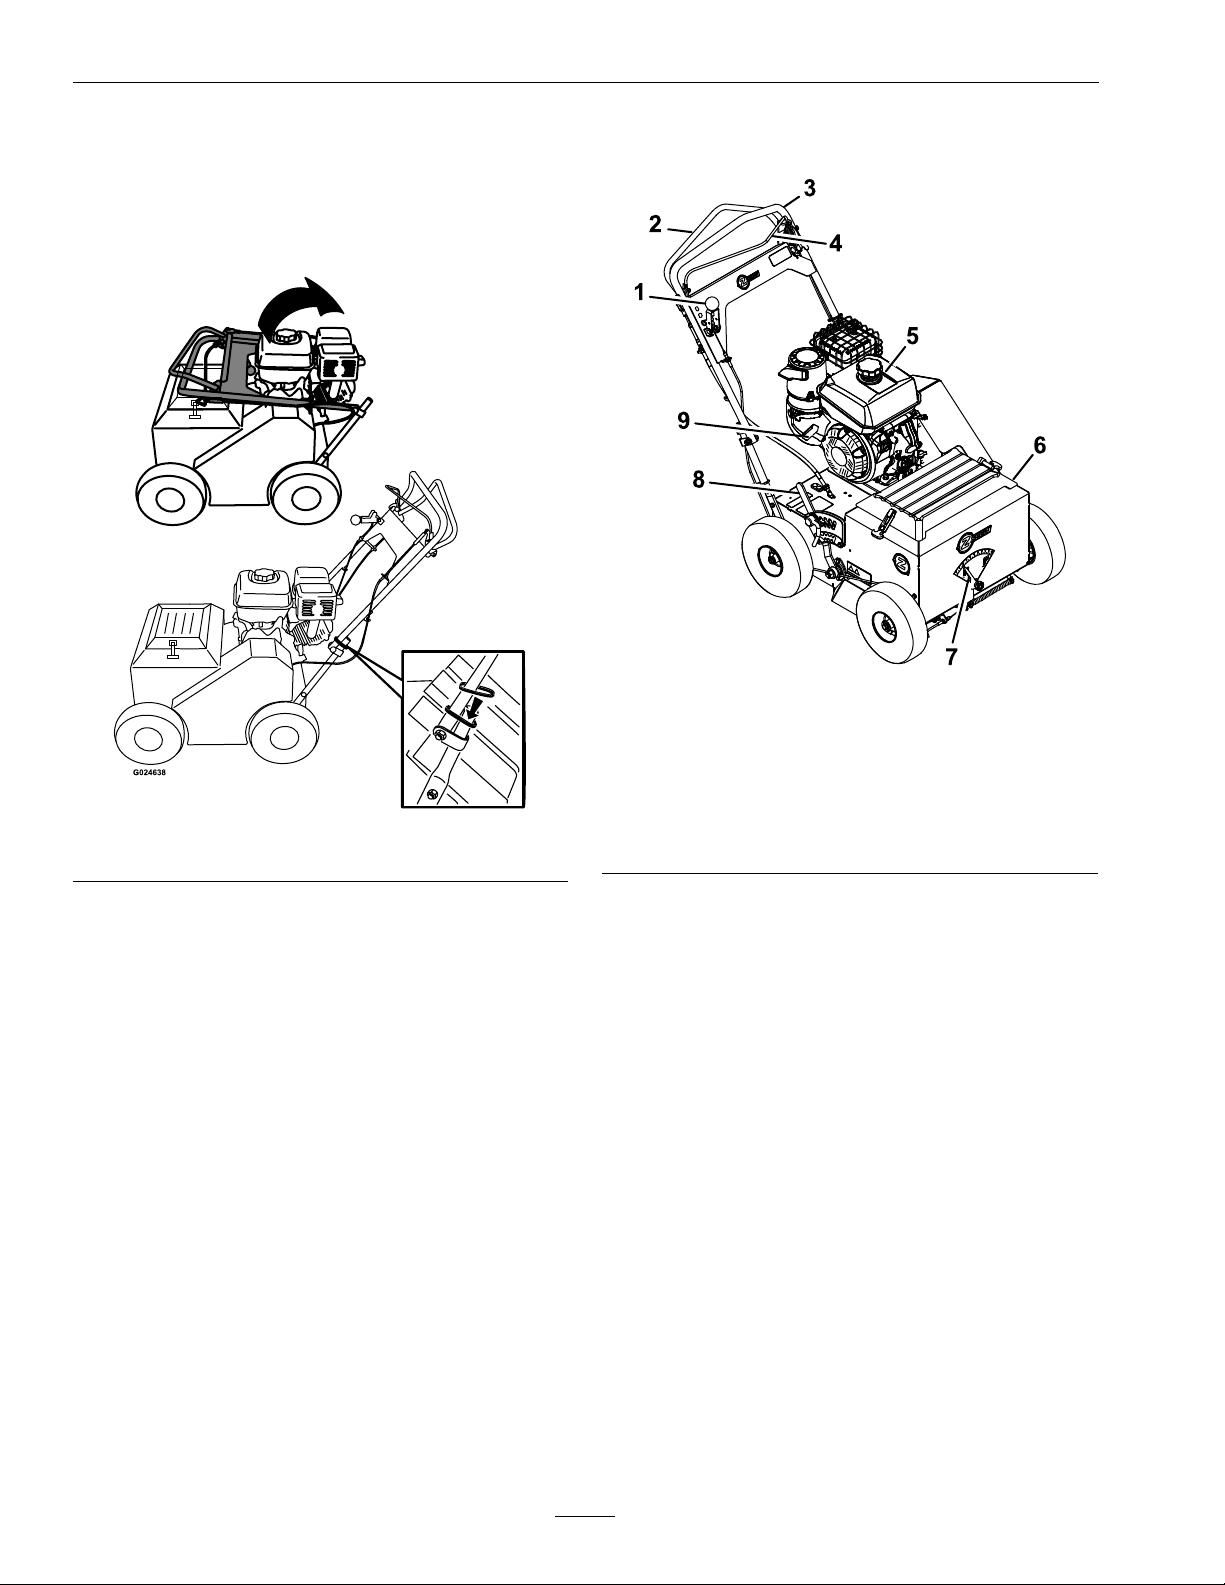
SetuptheHandle............................................10
ProductOverview.................................................10
Operation..............................................................11
Controls.........................................................11
BeforeOperation...........................................12
OperatingInstructions...................................14
DuringOperationSafety.................................14
OperatingTips...............................................18
AfterOperation..............................................19
Transporting..................................................19
Maintenance..........................................................20
MaintenanceSafety.............................................20
RecommendedMaintenanceSchedule(s)............20
PeriodicMaintenance........................................21
EngineMaintenance.......................................21
EngineSafety.................................................21
CheckEngineOilLevel..................................21
ChecktheBlades............................................21
CheckforLooseHardware.............................22
ServiceAirCleaner.........................................22
ChangeEngineOil.........................................23
CheckConditionOfBelts...............................23
LubricateGreaseFittings................................23
CheckSparkPlugs..........................................23
CheckSparkArrester(ifequipped)..................24
ChecktheSeedGate.......................................24
ThreadLockingAdhesives..............................24
Adjustments......................................................25
AdjustingtheSelf-PropelDrive......................25
AdjustingtheSelf-PropelDriveBelt
Tension......................................................25
AdjustingtheSeedGateClosed
Position......................................................26
Cleaning............................................................26
CleaningandStoringSafety.............................26
CleanEngineandExhaustSystem
Area...........................................................26
CleanDebrisFromMachine...........................27
CleanDebrisBuild-UpUnder
Machine.....................................................27
CleaningUndertheBeltCover.......................27
CleaningtheSeedGate...................................27
WasteDisposal...............................................27
Troubleshooting....................................................28
Schematics............................................................29
CaliforniaProposition65Warning
Information...............................................30
4

Safety
Safety
SafetyAlertSymbol
ThisSafetyAlertSymbol(Figure2)isusedbothin
thismanualandonthemachinetoidentifyimportant
safetymessageswhichmustbefollowedtoavoid
accidents.
Thissymbolmeans:ATTENTION!BECOME
ALERT!YOURSAFETYISINVOLVED!
g000502
Figure2
SafetyAlertSymbol
Thesafetyalertsymbolappearsaboveinformation
whichalertsyoutounsafeactionsorsituations
andwillbefollowedbythewordDANGER,
WARNING,orCAUTION.
DANGER:Indicatesanimminentlyhazardous
situationwhich,ifnotavoided,Willresultindeathor
seriousinjury.
WARNING:Indicatesapotentiallyhazardous
situationwhich,ifnotavoided,Couldresultindeath
orseriousinjury.
CAUTION:Indicatesapotentiallyhazardous
situationwhich,ifnotavoided,Mayresultinminor
ormoderateinjury.
Thismanualusestwootherwordstohighlight
information.Importantcallsattentiontospecial
mechanicalinformationandNoteemphasizes
generalinformationworthyofspecialattention.
GeneralSafety
Thismachineiscapableofamputatinghandsand
feetandofthrowingobjects.Alwaysfollowallsafety
instructionstoavoidseriouspersonalinjuryordeath.
•Read,understand,andfollowallinstructionsand
warningsintheOperator’sManualandother
trainingmaterial,onthemachine,engine,and
attachments.Alloperatorsandmechanicsshould
betrained.Iftheoperator(s)ormechanic(s)
cannotreadthismanual,itistheowner’s
responsibilitytoexplainthismaterialtothem;
otherlanguagesmaybeavailableonourwebsite.
•Onlyallowtrained,responsible,andphysically
capableoperatorsthatarefamiliarwiththesafe
operation,operatorcontrols,andsafetysignsand
instructionstooperatethemachine.Neverlet
childrenoruntrainedpeopleoperateorservice
theequipment.Localregulationsmayrestrictthe
ageoftheoperator.
•DoNotoperatethemachineneardrop-offs,
ditches,embankments,water,orotherhazards.
•Keepbystandersandchildrenoutoftheoperating
area.
•DoNotputyourhandsorfeetnearmovingparts.
•DoNotoperatethemachinewithoutallsafety
shields,guards,switches,andotherdevicesin
placeandinproperworkingcondition.
•Parkmachineonlevelground,stopengine,
anddisconnectsparkplugwire.Waitforall
movingpartstostopbeforeleavingtheoperator’s
position.Allowthemachinetocoolbefore
servicing,adjusting,fueling,cleaning,orstoring.
5

Safety
SafetyandInstructionalDecals
•Keepallsafetysignslegible.Removeallgrease,
dirtanddebrisfromsafetysignsandinstructional
labels.
•Replaceallworn,damaged,ormissingsafety
signs.
•Whenreplacementcomponentsareinstalled,be
surethatcurrentsafetysignsareafxedtothe
replacedcomponents.
•Ifanattachmentoraccessoryhasbeeninstalled,
makesurecurrentsafetysignsarevisible.
•Newsafetysignsmaybeobtainedfromyour
authorizedZTurfequipmentdealer.
•Safetysignsmaybeafxedbypeelingoffthe
backingtoexposetheadhesivesurface.Apply
onlytoaclean,drysurface.Smoothtoremove
anyairbubbles.
•Familiarizeyourselfwiththefollowingsafetysigns
andinstructionlabels.Theyarecriticaltothesafe
operationofyourZTurfcommercialequipment
decal93-7321
93-7321
1.Cutting/dismembermenthazardofhandsandfeet,
rotatingknives/blades—stayawayfrommovingparts.
decal115-9625
115-9625
1.Parking
brake—disengaged
2.Parkingbrake—engaged
decal116-8535
116-8535
1.Lowerseedowrate2.Higherseedowrate
decal116-8536
116-8536
1.Cuttingblades-pressdownonleverandpullblade
controlbailagainstthehandletoengagethecutting
blades.
6

Safety
decal133-8062
133-8062
decal117-4979
117-4979
1.Entanglementhazard,belt—keepawayfrommoving
parts;keepallguardsandshieldsinplace.
decal121-6203
121-6203
1.Bypassleverpositionfor
operatingthemachine
3.ReadtheOperator’s
manual
2.Bypassleverpositionfor
pushingthemachine
decal126-0296
126-0296
1.ReadtheOperator’s
Manualbefore
performingmaintenance.
4.Checkthetransmission
beltdrivetensionevery
25hours;readthe
Operator’sManualfor
moreinformation.
2.Checkthetirepressure
every50hours.
5.Operator’sManual
3.Greaseevery25hours.
decal126-2446
126-2446
1.Bladeup;“T”=Transport
position
3.“H”=deepestblade
setting;bladedown
2.“A”through“H”-
increasingdepthsettings
decal116-8648
116-8648
1.Tostarttheengine,readtheOperator’smanual-(1)Park
themachineonalevelsurface(2)Filltheenginewithoil
(3)Movethecontrolbarstoaneutralposition(4)Start
theengine.
3.Cuttingblades-releasethebladecontrolbail(neutral
position)todisengagethecuttingblades;holdtheblade
controlbailagainstthehandletoengagethecutting
blades.
2.Self-propeldrive-pushtheself-propeldrivebailforwardto
movethemachineforward;pulltheself-propeldrivebail
downwardtomovethemachinebackward.
4.Seedhopperon;seedhopperoff.
7

Safety
decal121-2011
121–2011
1.Warning—readthe
Operator’sManual.
3.Thrownobjecthazard;
pickupdebrisbefore
operating.
5.Thrownobject
hazard—keepbystanders
away.
7.Warning—stopthe
engineandremove
thesparkplugwire
beforeperformingany
maintenanceonthe
machine.
2.Warning—donotoperate
thismachineunlessyou
aretrained.
4.Warning—keephands
awayfrommovingparts,
keepallguardsand
shieldsinplace.
6.Warning—stopthe
enginebeforeleaving
themachine.
decal116-8537
116-8537
8

Specications
Specications
Systems
Engine
•EngineSpecications:SeeyourEngineOwner’s
Manual
•EngineOilType:Exmark4–CyclePremium
EngineOil
•RPM:FullSpeed:3800±100RPM(NoLoad)
FuelSystem
•Capacity:1.5gal.(5.6L)
•FuelRecommendations:
–Forbestresults,useonlyclean,fresh,unleaded
gasolinewithanoctaneratingof87orhigher
((R+M)/2ratingmethod).
–Oxygenatedfuelwithupto10%ethanolor
15%MTBEbyvolumeisacceptable.
–DoNotuseethanolblendsofgasoline(such
asE15orE85)withmorethan10%ethanol
byvolume.Performanceproblemsand/or
enginedamagemayresultwhichmaynotbe
coveredunderwarranty.
–DoNotusegasolinecontainingmethanol.
–DoNotstorefueleitherinthefueltankor
fuelcontainersoverthewinterunlessafuel
stabilizerisused.
–DoNotaddoiltogasoline.
•FuelShut-OffValve:1/4turnincrements
Transmission
Variable
SpeedsRange:0–4.0mph(6.4km/hr)
TiresandWheels
Pneumatic(Air-Filled)
Quantity4
TreadTurfTL
Size11x4.0-4
PlyRating2
Pressure13psi
(90kPa)
Dimensions
OverallWidth:
30.0inches(76cm)
OverallLength:
54.0inches(137cm)
OverallHeight:
44.5inches(113cm)
TreadWidth:(OutsidetoOutsideof
Tires,Widthwise)
30.0inches(76cm)
CurbWeight:
265lb(120.2kg)
TorqueRequirements
BoltLocationTorque
EngineMountingBolts27-33ft-lb(37-45N-m)
ClutchMountingBolts49-61ft-lb(66-83N-m)
SlicerShaftNut65-85ft-lb(88-115N-m)
9

ProductOverview
Setup
SetuptheHandle
1.Raisethehandletotheoperatingposition.
g024638
Figure3
2.Slidetheovallockingringsdowneachsideofthe
upperhandleoverthelowerhandle,lockingthe
handlesectionstogether.
ProductOverview
g340910
Figure4
1.Seedercontrollever6.Seedhopper
2.Drivebail7.Seedingrategauge
3.Handle8.Depthcontrollever
4.Bladecontrolbail9.Recoilstarterrope
5.Fueltank
10

Operation
Operation
Note:Determinetheleftandrightsidesofthe
machinefromthenormaloperatingposition.
Controls
Becomefamiliarwithallthecontrolsbeforestarting
theengineandoperatingthemachine.
ChokeControl
Locatedontheengine.
Thechokeisusedtoaidinstartingacoldengine.
Movingthechokeleverrearwardwillputthechoke
inthe“ON”positionandmovingthechokeleverto
theforwardwillputthechokeinthe“OFF”position.
DoNotrunawarmenginewithchokeinthe“ON”
position.
ThrottleControl
Locatedontheengine.
Thethrottleisusedtocontrolenginespeed.Moving
thethrottleleverrearwardwillincreaseenginespeed
andmovingthethrottleleverforwardwilldecrease
enginespeed.
EngineOn/OffSwitch
LocatedonthefrontRHsideoftheengine.
Rotatetheswitchclockwisetothe“ON”position
beforestartingtheengine.Rotatetheswitch
counterclockwisetothe“OFF”positiontoshutoff
theengine.
FuelShut-OffValve
Locatedontheengine.
Thefuelshut-offvalveisusedtoshutoffthefuel
whenthemachinewillnotbeusedforafewdays,
duringtransporttoandfromthejobsite,andwhen
parkedinsideabuilding.
Self-PropelDriveBail
Theself-propeldrivebail,locatedunderthehandle,
controlstheforwardandreversemotionofthe
machine.
Whentheself-propeldrivebailissqueezedagainst
thehandle,theunitgroundspeedwillchangedbased
onthedistancebetweenthebailandthehandle.
Whenthebailisreleased,theunitwillstopmoving.
g020976
Figure5
1.Seedercontrollever4.Self-propeldrivebail
2.Handle5.Bladecontrollocklever
3.Bladecontrolbail
BladeControlBail
Thebladecontrolbail,locatedinfrontofthehandle,
engagesordisengagestheblade.
Iftheengineisrunning,thebladeswillengagewhen
thebladecontrolbailisdepressed.
Whenthebladecontrolbailisreleased,theblades
willstop.
BladeControlLockLever
Thebladecontrollockleverislocatedontheleftside
ofthehandlenexttothebladecontrolbail.
Movingthebladecontrollockleverintothefull
forwardpositionallowsthebladecontrolbailtobe
depressed.
Squeezingthebladecontrolbailagainstthehandle
engagestheblade.Releasingthebladecontrolbail
automaticallydisengagestheblade.Thebladecontrol
lockleverwillresettolockthebladecontrolbail.
SeederControlLever
Theseedercontrolleverislocatedontherighthandle
bar.
11

Operation
Pushtheleverforwardtostarttheseedowandpull
itrearwardtostoptheseedow.
ParkBrakeLever
LocatedonthelowerrearpanelbytheLHreartire.
Thebrakeleverengagestheparkbrakeonthe
transmissionsothedrivetiresdonotrotate.
Toengagetheparkbrake,pulluponthelever,pull
outuntilthetwowashersareoutsidetheframe,and
pushtheleverdownintotheslot.
Todisengagetheparkbrake,pulluponthelever,
pushitinuntilthetwowashersareinsidetheframe,
andpushtheleverdownintotheslot.
g021332
Figure6
1.Parkbrakeleverout-engagedposition
2.Twowashersoutsideframe
3.Parkbrakeleverin-releasedposition
4.Twowashersinsideframe
Whenparkingonasteepslope,thewheelsmustbe
chockedorblockedinadditiontothebrakebeing
engaged.Theunitmustbetieddownandbrake
engagedwhentransporting.
DriveWheelReleaseLever
Locatedonthelowerrearpaneltotherightofthe
parkbrakelever.
Thedrivewheelreleaseleverisusedtoreleasethe
hydrostaticdrivesystemtoallowthemachinetobe
movedbyhandwithouttheenginerunning.
Fornormaloperatingposition,pulluponthehandle
andpushthehandleinuntilallthreenotchesare
insidetheframe.
Note:Thelastnotchonthehandledoesnotlatch
ontheslot.
Toreleasethedrivewheels,pulluponthehandle,
pullitoutuntilthelastnotchengagesintheslot.
Pushthehandledown.
g021333
Figure7
1.Handlein-normaloperatingposition
2.Allnotchesinsideframe
3.Handleout-drivewheelrelease
4.Lastnotchengagedinslot
BeforeOperation
BeforeOperationSafety
•Evaluatetheterraintodeterminewhataccessories
andattachmentsareneededtoproperlyand
safelyperformthejob.Onlyuseaccessoriesand
attachmentsapprovedbyZTurfEquipment.
•Inspecttheareawherethemachineistobeused
andremoveallrocks,toys,sticks,wires,bones,
andotherforeignobjects.Thesecanbethrown
orinterferewiththeoperationofthemachine
andmaycausepersonalinjurytotheoperatoror
bystanders.
•Markandavoidhiddenobjectssuchassprinkler
heads,undergroundwires/cables,invisiblefences,
etc.topreventdamagetothesesystems.
•Thismachinewasdesignedforoneoperatoronly.
DoNotcarrypassengers.
•Wearappropriatepersonalprotectiveequipment
suchassafetyglasses,longpants,substantial
slip-resistantfootwear,andhearingprotection.
Tiebacklonghairandavoidlooseclothingand
loosejewelrywhichmaygettangledinmoving
parts.
•Thismachineproducessoundlevelsinexcessof
85dBAattheoperator’searandcancausehearing
12

Operation
lossthroughextendedperiodsofexposure.Wear
hearingprotectionwhenoperatingthismachine.
•Checkthatthefollowingitemsareinplaceandin
properworkingcondition:theoperatorpresence
controls,safetyswitches,guards,andshields.Do
Notoperatethemachineunlesstheyareinproper
workingcondition.Replacewornordeteriorated
partswithgenuineZTurfEquipmentpartswhen
necessary.
DANGER
Itisessentialthatoperatorsafetymechanisms
beconnectedandinproperoperating
conditionpriortouse.Contactingtheblades
canresultinseriouspersonalinjury.
Shutofftheengineandwaitforallmoving
partstostopbeforeleavingtheoperating
position.Whentheengineswitchisturned
tothe“OFF”position,theengineshould
shutoff.Ifnot,stopusingthemachine
immediatelyandcontactanAuthorized
ServiceDealer.
•DoNotoperatethemachinewhenpeople,
especiallychildren,orpetsareinthearea.Shut
offthemachineandattachment(s)ifanyone
entersthearea.
•DoNotoperatethemachinewithoutthesafety
devicesinplaceandinproperworkingcondition.
Componentsaresubjecttowear,damageand
deterioration,whichcouldexposemovingparts
orallowobjectstobethrown.Frequentlycheck
forwornordeterioratingcomponentsandreplace
themwiththemanufacturer’srecommendedparts
whennecessary.
FuelSafety
DANGER
Gasolineisextremelyammableandvaporsare
explosive.
Areorexplosionfromgasolinecanburnyou,
others,andcausepropertydamage.
•Fillthefueltankoutdoorsonlevelground,
inanopenarea,whentheengineiscold.If
fuelisspilled,DoNotattempttostartthe
engine.Moveawayfromtheareaofthespill
andavoidcreatinganysourceofignitionuntil
fuelvaporshavedissipated.
•DoNotrellthefueltankordrainthe
machineindoorsorinsideanenclosedtrailer.
•Neversmokewhenhandlinggasoline,and
stayawayfromanopenameorwhere
gasolinefumesmaybeignitedbyspark.
•Addfuelbeforestartingtheengine.Never
removethecapofthefueltankoraddfuel
whenengineisrunningorwhentheengine
ishot.
•Storegasolineinanapprovedcontainerand
keepitoutofthereachofchildren.
•DoNotoperatewithoutentireexhaustsystem
inplaceandinproperworkingcondition.
•Incertainconditionsduringfueling,static
electricitycanbereleasedcausingasparkwhich
canignitegasolinevapors.
–DoNotllcontainersinsideavehicleorona
truckortrailerbedwithaplasticliner.Always
placecontainersonthegroundandawayfrom
yourvehiclebeforelling.
–Whenpractical,removegas-powered
equipmentfromthetruckortrailerand
refueltheequipmentwithitswheelsonthe
ground.Ifthisisnotpossible,thenrefuel
suchequipmentonatruckortrailerfroma
portablecontainer,ratherthanfromagasoline
dispensernozzle.
–Ifagasolinedispensernozzleisused,keepthe
nozzleincontactwiththerimofthefueltank
orcontaineropeningatalltimesuntilfueling
iscomplete.DoNotuseanozzlelockopen
device.
•DoNotoverllthefueltank.Fillthefueltankto
thebottomofthellerneck.Theemptyspacein
13

Operation
thetankallowsgasolinetoexpand.Overlling
mayresultinfuelleakageordamagetotheengine
oremissionsystem.
•Gasolineisharmfulorfatalifswallowed.
Long-termexposuretovaporsmaycauseserious
injuryandillness.
–Avoidprolongedbreathingofvapors.
–Keepfaceawayfromnozzleandgas
tank/containeropening.
–Keepawayfromeyesandskin.
•Tohelppreventres:
–Keepengineandengineareafreefrom
accumulationofgrass,leaves,excessivegrease
oroil,andotherdebriswhichcanaccumulate
intheseareas.
–Cleanupoilandfuelspillsandremovefuel
soakeddebris.
–Allowthemachinetocoolbeforestoringthe
machineinanyenclosure.DoNotstorethe
machineorfuelcontainer,orrefuel,where
thereisanopename,spark,orpilotlight
suchasonawaterheaterorotherappliance.
OperatingInstructions
DuringOperationSafety
GeneralSafety
Theoperatormustusetheirfullattentionwhen
operatingthemachine.DoNotengageinanyactivity
thatcausesdistractions;otherwise,injuryorproperty
damagemayoccur.
WARNING
Operatingengineparts,especiallythemufer,
becomeextremelyhot.Severeburnscanoccur
oncontactanddebris,suchasleaves,grass,
brush,etc.cancatchre.
•Allowengineparts,especiallythemufer,to
coolbeforetouching.
•Removeaccumulateddebrisfrommuferand
enginearea.
•Operatetheengineonlyinwell-ventilatedareas.
Exhaustgasescontaincarbonmonoxide,whichis
anodorlessdeadlypoison.
•Donotoperatethemachinewhileill,tired,or
undertheinuenceofalcoholordrugs.
•Operatethemachineonlyingoodvisibilityand
appropriateweatherconditions.Donotoperate
themachinewhenthereistheriskoflightning.
•Keepawayfromholes,ruts,bumps,rocks,and
otherhiddenhazards.Usecarewhenapproaching
blindcorners,shrubs,trees,tallgrassorother
objectsthatmayhideobstaclesorobscurevision.
Uneventerraincouldoverturnthemachineor
causetheoperatortolosetheirbalanceorfooting.
•Starttheenginewithyourfeetwellawayfrom
theblades.
•Donotoperatethemachinewithoutallsafety
shields,guards,switches,andotherdevicesin
placeandinproperworkingcondition.
•Keepyourhandsandfeetawayfromthemoving
parts.Keepclearofthedischargeopening.
•Neverattempttomakedepthofcutadjustments
whiletheengineisrunning.
•Beawareofthemachinedischargepathanddirect
dischargeawayfromothers.Avoiddischarging
materialagainstawallorobstructionasthe
materialmayricochetbacktowardtheoperator.
Stoptheblades,slowdown,andusecaution
whencrossingsurfacesotherthangrassandwhen
transportingthemachinetoandfromthework
area.
•Bealert,slowdownandusecautionwhen
makingturns.Lookbehindandtothesidebefore
changingdirections.DoNotoperateinreverse
unlessabsolutelynecessary.
•Parkthemachineonlevelground.Stopengine,
waitforallmovingpartstostop,andremovethe
sparkplugwire(s).
–Beforechecking,cleaningorworkingonthe
machine.
–Afterstrikingaforeignobjectorabnormal
vibrationoccurs(inspectthemachinefor
damageandmakerepairsbeforerestarting
andoperatingthemachine).
–Beforeclearingblockages.
–Wheneveryouleavethemachine.DoNot
leavearunningmachineunattended.
•Stopengine,waitforallmovingpartstostop:
–Beforerefueling.
14

Operation
–Beforemakingdepthcutadjustments.
•Tragicaccidentscanoccuriftheoperatorisnot
alerttothepresenceofchildren.Childrenare
oftenattractedtothemachineandtheworking
activity.Neverassumethatchildrenwillremain
whereyoulastsawthem.
–Keepchildrenoutoftheworkingareaand
underthewatchfulcareofanotherresponsible
adult,nottheoperator.
–Bealertandturnthemachineoffifchildren
enterthearea.
–Beforeandwhilebackingorchanging
direction,lookbehind,down,andside-to-side
forsmallchildren.
–Neverallowchildrentooperatethemachine.
–DoNotcarrychildren,evenwiththeblades
shutoff.Childrencouldfalloffandbe
seriouslyinjuredorinterferewiththesafe
operationofthemachine.Childrenthathave
beengivenridesinthepastcouldsuddenly
appearintheworkingareaforanotherrideand
berunoverorbackedoverbythemachine.
SlopeSafety
•Slopesareamajorfactorrelatedtolossofcontrol
androlloveraccidents,whichcanresultinsevere
injuryordeath.Theoperatorisresponsiblefor
safeslopeoperation.Operatingthemachineon
anysloperequiresextracaution.Beforeusingthe
machineonaslope,theoperatormust:
–Reviewandunderstandtheslopeinstructions
inthemanualandonthemachine.
–Evaluatethesiteconditionsofthedayto
determineiftheslopeissafeformachine
operation.Usecommonsenseandgood
judgmentwhenperformingthisevaluation.
Changesintheterrain,suchasmoisture,can
quicklyaffecttheoperationofthemachine
onaslope.
•Operateacrossslopes,neverupanddown.Avoid
operationonexcessivelysteeporwetslopes.Poor
footingcouldcauseaslipandfallaccident.
•Identifyhazardsatthebaseoftheslope.Do
Notoperatethemachineneardropoffs,ditches,
embankments,waterorotherhazards.The
machinecouldsuddenlyrolloverifawheelgoes
overtheedgeortheedgecollapses.Keepasafe
distancebetweenthemachineandanyhazard.
Useahandheldtooltooperateintheseareas.
•Avoidstarting,stoppingorturningthemachine
onslopes.Avoidmakingsuddenchangesinspeed
ordirection;turnslowlyandgradually.
•DoNotoperateamachineunderanyconditions
wheretraction,steeringorstabilityisinquestion.
Beawarethatoperatingthemachineonwetgrass,
acrossslopesordownhillmaycausethemachine
tolosetraction.Lossoftractiontothedrive
wheelsmayresultinslidingandalossofbraking
andsteering.Themachinecanslideevenifthe
drivewheelsarestopped.
•Removeormarkobstaclessuchasditches,holes,
ruts,bumps,rocksorotherhiddenhazards.Tall
grasscanhideobstacles.Uneventerraincould
overturnthemachine.
•Ifyoulosecontrolofthemachine,stepawayfrom
thedirectionoftravelofthemachine.
•Alwayskeepthemachineingearwhengoing
downslopes.DoNotcoastdownhill.
StartingtheEngine
1.Openthefuelshut-offvalve.
2.Makesurethetractioncontrolleverisinneutral
andthatthecuttingbladecontrolleveris
disengaged.
3.OnthefrontRHsideoftheengine,rotatethe
engineon/offswitchclockwisetothe“ON”
position.
4.OntherearRHsideoftheengine,movethe
chokeleverrearwardtothe“ON”position.On
awarmengine,leavethechokeinthe“OFF”
position.
5.Placethethrottlemidwaybetweenthe“SLOW”
and“FAST”positionslocatedonrearRHside
oftheengine.
6.Slowlypulltheenginerecoilhandleuntilyoufeel
resistanceandthenstop.Allowtherecoilhandle
toreturnandthensharplypullitstraightout.
Allowtheropetoreturnslowly.
7.Allowtheenginetowarmupforseveralminutes,
movethechoketowardthe“OFF”position.
8.Setthethrottletothedesiredspeed.
StoppingtheEngine
1.Bringtheunittoafullstop.
15

Operation
2.Releasethebladecontrolbail.Thebladesshould
stop;theenginewillcontinuetorun.
3.Placethethrottlemidwaybetweenthe“SLOW”
and“FAST”positions.
4.Allowtheenginetorunforaminimumof15
seconds,thenturntheengineon/offswitchto
the“OFF”positiontostoptheengine.
5.Waitforallmovingpartstostopbeforeleaving
theoperatingposition.
6.Closethefuelshut-offvalve,locatedbelow
thechoke,byrotatingup90degreeswhenthe
machinewillnotbeinuseforafewdays,when
transporting,orwhentheunitisparkedinside
abuilding.
OperatingtheSelf-PropelDrive
TheSlicerSeederisvariablespeed,themorethe
drivebailissqueezedagainstthehandlethefaster
theunittravels.
1.Starttheengine.
2.Movetheself-propeldrivebailfromtheneutral
position.
•Tomoveforward,squeezetheself-propel
drivebailagainstthehandle(seeFigure8).
g020893
Figure8
1.Drivebail(neutral
position)
3.Forward–pulltowards
handle
2.Reverse–pushdownand
awayfromhandle
4.Handle
Note:Thegroundspeedcanbevariedby
increasingordecreasingthedistancebetween
theself-propeldrivebailandthehandle.
Lowerthedrivebail,towardstheneutral
position,todecreasethegroundspeedwhen
makingaturnoriftheunitismovingtoo
fast.Ifthedrivebailisreleased,thedrive
bailreturnstoneutralandtheunitstops
self-propelling.Squeezethegroundspeed
controlbailclosertothehandletoincrease
thegroundspeed.Whenthedrivebailisheld
tightagainstthehandle,theunitself-propels
atthemaximumgroundspeed.Releasethe
drivebailtostopmovingorwheneveryou
leavetheunit.
•Toturnleftorright,decreasethespeed,push
downonthehandles,andturntheunitin
thedesireddirection;thenresumenormal
operation.
•Tomoveinreverse,releasethedrivebailand
allowittoreturntoneutral.Pushthedrivebail
downandawayfromthehandle.Theground
speedwillvaryasthedistanceincreasesor
decreasesfromtheneutralposition.
3.Todisengagetheself-propeldriveandplacethe
unitintotheneutralposition,releasethedrive
bail.
Note:Iftheunitcreepsforwardorrearward
whenthedrivebailisintheneutralposition,stop
theengineandadjusttheself-propeldrivecable
(seeAdjustingtheSelf-PropelDriveinthe
Adjustmentssection).
OperatingtheBladeControlLever
1.Starttheengine.
2.Pushandholdthebladecontrollockleverforward
toreleasethebladecontrolbail(Figure9).
16

Operation
g021243
Figure9
1.Bladecontrollocklever
(lockedposition)
3.Bladecontrolbail
2.Push4.Squeezeagainsthandle
3.Squeezethebladecontrolbailagainstthehandle
andreleasethebladecontrollocklever;theblades
willengage.
4.Releasethebladecontrolbailtodisengagethe
blades.Thebladecontrollockleverwillresetto
lockthebladecontrolbail.
OperatingtheSlicerSeeder
DANGER
Therotatingbladesunderthemachineare
dangerous.Bladecontactcancauseserious
injuryorkillyou.
DoNotputhandsorfeetunderthemachine
whenthebladesareengaged.
DANGER
Whenthemachineisinoperation,contactwith
rotatingormovingpartswillseverelyinjure
handsandfeet.
•Beforeadjusting,cleaning,inspecting,
troubleshooting,orrepairingthemachine,
stoptheengineandwaitforallmoving
partstostop.Disconnectthewirefromthe
sparkplugandkeepitawayfromtheplugto
preventsomeonefromaccidentallystarting
theengine.
•Staybehindthehandleandawayfromthe
seedmixerandcuttingbladeswhileoperating
themachine.
•Keepface,hands,feet,andanyotherpartof
yourbodyorclothingawayfromconcealed,
moving,orrotatingparts.
1.Ifseeding,lltheseedhopperandsettheseeding
rategauge(seeAdjustingtheSeedingRate
Gaugesection).
2.Adjustthecuttingbladedepthtothedesired
setting(seeAdjustingtheBladeCuttingDepth
section).
3.Starttheengine.
4.Settheenginethrottletothe“FAST”position.
5.Pushdownonthehandletoraisethefrontwheels
slightlyofftheground.
6.Squeezethebladecontrolbailagainstthehandle
toengagetheblades.Slowlylowerthefront
wheelstotheground,allowingthebladesto
graduallyworkintothegrassandsoil.
7.Ifseeding,pushtheseedercontrolleverforward
tostarttheseedow .
Note:Thereisnoneedtoturntheseedow
controlleveroffandonforeachturn.Theseed
owwillslowand/orstopwhenthemachineis
stoppedorslowedforturning.Toreduceseed
loss,raisethefrontwheelsasthemachineis
turned.
Note:Themachinewillseedatthesamerate
goingforwardorrearward.
Note:Ifthereisexcessivethatch,itmaybe
necessarytoremovethethatchpriortoseeding.
8.Engagetheself-propeldrivebailtobegin
operating.
17

Operation
AdjustingtheCuttingBladeDepth
1.Bringtheunittoafullstop.
2.Disengagethecuttingblades.
3.Stoptheengineandwaitforallmovingparts
tostopbeforeleavingtheoperatingposition.
Disconnectthewirefromthesparkplug.
4.Unlockthecuttingbladedepthhandlebypulling
upward.
g020903
Figure10
1.Unlock3.Lock
2.Cuttingbladedepth
handle
5.Movethelevertothedesiredworkingdepthslot
setting.Rotateandpushthehandledowntolock
thehandle.
6.Thesettingwillneedtobeadjustedasthecutting
bladeswear.
Adjustthesettingsasshownonthedecal:
g024586
Figure11
1.Bladeup;“T”=Transport
position
3.“H”=deepestblade
setting;bladedown
2.“A”through“H”-
increasingdepthsettings
AdjustingtheSeedingRateGauge
1.Bringtheunittoafullstop.
2.Disengagethecuttingblades.
3.Stoptheengineandwaitforallmovingpartsto
stopbeforeleavingtheoperatingposition.
4.Tochangetheseedingrate,loosentheknobon
theseedingrategaugelocatedonthefrontof
theseedhopper.Movethegaugepointertothe
desiredpositionandretightentheknob.
g013146
Figure12
1.Gaugepointer
Note:Refertotheseedinggraph,locatedonthe
machine,todeterminethecorrectgaugesettingfor
thetypeofgrassandthethicknesstobeplanted.
OperatingTips
OverSeeding
Whenoverseeding,setthecuttingbladestobe1/8
to1/4inch(3to6mm)intotheearth.
Important:DoNotputdownmoreseedthan
recommendedbytheseedcompany.Over
seedingcancausethegrasstobetoothickand
causeittobesusceptibletofungus.
Note:Themachinewillseedatthesamerategoing
bothforwardandrearward.
Note:Ifthereisexcessivethatch,itmaybenecessary
toremovethethatchpriortoseeding.
Dethatching
Setthecuttingbladestobe1/8to1/4inch(3to6
mm)pastthethatchlayer,intotheearth.Operatethe
machineovertheyardwiththeseedercontrollever
turnedoff.
PowerRaking/Renovation
Tobreaknewgroundortillanexistinglawn,setthe
cuttingbladestobe1/4to1/2inch(6to12mm)
18

Operation
intotheearth.Goforwardandbackwardsoverthe
areatobeleveled,ormakemultiplepassesfrom
differentdirections.
Themachinewillworkbestwhenthegroundishard
anddryandwillbemostaggressiveinbreakingup
thesoilinreverse.Ifthegroundissoftandcausesthe
enginetobogdown,raisethebladesabitandmakea
fewpassesbeforeloweringthemtothefulldepth.
AfterOperation
GeneralSafety
•Parkmachineonlevelground,stopengine,
anddisconnectsparkplugwire.Waitforall
movingpartstostopbeforeleavingtheoperator’s
position.Allowthemachinetocoolbefore
servicing,adjusting,fueling,cleaning,orstoring.
•Cleangrass,leaves,excessivegreaseoroil,and
otherdebrisfromthemufer,drives,andengine
areatohelppreventres.
•Closethefuelshut-offvalvebeforestoringor
transportingthemachine.
Transporting
TransportingtheMachine
WARNING
Loadingthemachineontoatrailerwithout
strongenoughorproperlysupportedramps
couldbedangerous.Therampscouldcollapse
causingtheunittofall,whichcouldcauseinjury.
•Useproperrampsthataresecuredtothe
truckortrailer.
•Keepfeetandlegsoutfromundertheunit
whenloadingandunloading.
•Ifnecessary,useassistancewhenloading.
Useaheavy-dutytrailerortrucktotransportthe
machine.Ensurethatthetrailerortruckhasall
necessarylightingandmarkingasrequiredbylaw.
Thoroughlyreadallofthesafetyinstructions.
Knowingthisinformationcouldhelpyou,your
family,pets,orbystandersavoidinjury.
Totransportthemachine:
•Usefullwidthrampswhenloadingthemachine.
•Besurethefuelshut-offvalveisclosed.
•Useaheavydutytrailertotransportthemachine.
•Securelyfastenthemachinetothetrailerwith
straps,chains,cables,orropes.Ifpossible,both
frontandrearstrapsshouldbedirecteddownand
outwardfromthemachine.
•Besurethatthetrailerhasallnecessarylighting
andmarkingasrequiredbylawandusesafety
chains.
19

Maintenance
Maintenance
Note:Determinetheleftandrightsidesofthemachinefromthenormaloperatingposition.
MaintenanceSafety
•Parkmachineonlevelground,stopengine,
anddisconnectsparkplugwire.Waitforall
movingpartstostopbeforeleavingtheoperator’s
position.Allowthemachinetocoolbefore
servicing,adjusting,fueling,cleaning,orstoring.
WARNING
Tippingthemachinemaycausethefuelto
leakfromthecarburetororthefueltank.
Gasolineisextremelyammable,highly
explosive,andundercertainconditions,can
causepersonalinjuryorpropertydamage.
Avoidfuelspillsbyrunningtheenginedryor
byremovingthegasolinewithahandpump;
neversiphon.
•Ifyouleavethewireonthesparkplug,someone
couldaccidentlystarttheengineandseriously
injureyouorotherbystanders.Disconnectthe
wirefromthesparkplugbeforeyouperformany
maintenanceorrepairs.
•Neverallowuntrainedpersonneltoservice
machine.
•Keepthemachine,guards,shieldsandall
safetydevicesinplaceandinsafeworking
condition.Frequentlycheckforwornor
deterioratingcomponentsandreplacethemwith
themanufacturer’srecommendedpartswhen
necessary.
WARNING
Removalormodicationoforiginal
equipment,partsand/oraccessoriesmay
alterthewarranty,controllability,andsafety
ofthemachine.Unauthorizedmodications
totheoriginalequipmentorfailuretouse
originalZTurfEquipmentpartscouldlead
toseriousinjuryordeath.Unauthorized
changestothemachine,engine,fuelor
ventingsystem,mayviolateapplicablesafety
standardssuchas:ANSI,OSHAandNFPA
and/orgovernmentregulationssuchasEPA
andCARB.
•Keephandsandfeetawayfrommovingparts.
Ifpossible,DoNotmakeadjustmentswiththe
enginerunning.
•Checkallboltsfrequentlytomaintainproper
tightness.
RecommendedMaintenanceSchedule(s)
MaintenanceService
IntervalMaintenanceProcedure
Aftertherst5hours•Changetheengineoil.
Beforeeachuseordaily
•Checktheengineoillevel.
•Checkthebladesforwearordamage.
•Checkforloosehardware.
•Checktheseedgate.
•Cleantheengineandexhaustsystemarea.
•Cleanthegrassanddebrisbuild-upfromthemachine.
•Cleanthedebrisbuild-upfromunderthemachine.
Every25hours•Checktheconditionofthebelts.
•Greasetheslicershaftbearings.
20
Table of contents
Other Turf Equipment Lawn And Garden Equipment manuals