Turfware TR460 User manual

O
P
E
R
A
T
O
R
S
M
A
N
U
A
L
Read this manual before using this product. Failure to follow the instructions
and safety precautions in this manual can result in serious injury or death.
Keep this manual in a safe location for future use.
Ride on Spreader & Sprayer
www.turfware.com
1049 McCauley Road • Stow, Ohio 44224 • Phone: 330-929-9000 • 1-800-637-4000

Table of ConTenTs
Table Of Contents
QR CODES………………………………………………………………………………………………3
INTRODUCTION AND OVERVIEW………………………………………………………..…………4
SAFETY SYMBOLS – IN THIS MANUAL…………………………………………………………….5
SAFETY LABLES – ON THE MACHINE…………………………………………………………..…6
WARNINGS AND PRECAUTIONS……………………………………………………………………7
WARNINGS AND PRECAUTIONS CONTINUED………………………………………………...…8
PRODUCT OVERVIEW…………………………………………………………………………….9-12
TR460 USE AND CARE………………………………………………………………………………13
STARTING AND STOPPING THE TR460 ENGINE……………………………………………….13
SPREADER OPERATION………………………………………………………………………..14-15
OPERATING THE SPRAYER……………………………………………………………………15-16
SPRAY-SPREAD PATTERNS……………………………………………………………………….17
APPLICATION CALIBRATION RATES……………………………………………………..………18
SERVICE PATH EXAMPLE…………………………………………………………………………..19
GREASE MAINTENANCE…………………………………………………………………………...20
HONDA ENGINE MAINTENANCE SCHEDULE / OIL CHANGE PROCEDURES…………….21
QR CODE FOR MAINTENANCE VIDEO PLAYLIST…………………………………………...…22
MAINTENANCE AND DAILY STORAGE……………………………………………………...…..22
HYDRAULIC SYSTEM MAINTENANCE DAILY………………………………………………..…22
MAINTENANCE RECORD……………………………………………………………………………23
MAINTENANCE CHART……………………………………………………………………………...24
TR460 SPECIFICATIONS…………………………………………………………………………....25
SPRAY SYSTEM NOZZLE SELECTION RATES………………………………………………….26
SAFE WORK PROCEDURES……………………………………………………………………….27
PARTS DIAGRAMS……………………………………………………………….………………28-44
CUSTOMER REGISTRATION…………………………………………………………………........45
TURFWARE WARRANTY……………………………………………………………………………46
TR460-12/21
2
TR460-12/21 Page 2

To use this QR Code to visit our Website, order Parts, and view the Full Maintenance Video Playlist...
1- Open QR code reader or your mobile device camera.
2- Hold your device so the code is visible on the screen.
3- Click the link when it pops up.
TR460-12/21
3
To use this QR Code to visit our Website, order Parts, and view the Full Maintenance Video Playlist...
1- Open QR code reader or your mobile device camera.
2- Hold your device so the code is visible on the screen.
3- Click the link when it pops up.
TR460-12/21
3
TR460-12/21 Page 3

Introduction
Safety Overview
Congratulations on the purchase of your TR360 ride-on spreader and sprayer from Turfware Equipment Com-
pany. We look forward to working with you and your organization to help meet your turf maintenance goals for
years to come.
The TR360 Operator’s Manual is part of this machine and must be available to the
operator at all times. Store this manual in the Operator’s Manual storage compart-
ment located on the left side of the machine.
This manual provides you with the information you need to understand the safety
requirements, operation, and features of the TR360 ride-on spreader and sprayer.
The TR360 should only be operated and maintained by thoroughly trained
individuals. All operators and maintenance personnel are urged to read this entire
manual for their personal safety, and to fully understand the machine operation.
Do not operate this machine unless all safety and warning labels are in place.
In addition to this manual, the Honda Owner’s Manual is included separately with your machine. Refer to the
Honda manual for more information about the care and servicing of the engine.
The safety symbols shown in this manual and the safety labels located on the machine are used to draw atten-
tion to potential safety hazards.
Please read and follow all safety label instructions to avoid injury to yourself and others, and to prevent ma-
chine damage.
If you discover a machine safety label is damaged, missing or scratched, order a replacement immediately and
do not operate the machine until the label has been replaced.
Safety Symbols - In this Manual
The safety symbols used in this manual are shown below.
The IMPORTANT symbol used in this manual identies information that
is critical for successful application and understanding of the product.
IMPORTANT
The WARNING symbol used in this manual identies information about
practices or circumstances that can lead to personal injury or death,
property damage, or economic loss.
TR460-12/21 Page 4

DANGER
NOTE: The engine manufacturer is responsible for all engine-related issues with regards to performance, pow-
er-rating, specications, warranty and service. Please refer to the Honda Owner’s Manual, included separately
with your machine, for more information.
Safety Labels - On the Machine
Safety labels found on your TR460 are illustrated in this section. Always follow their instructions and heed their
warnings.
A DANGER label indicates a hazardous situation that, if not avoided, will
cause death or serious injury. For your safety, locate and become familiar
with the hazardous areas of the machine.
A WARNING label indicates a hazardous situation that, if not avoided,
could result in death or serious injury.
The following Danger label is found on the dashboard. For your safety and protection, be sure to locate and
become familiar with all the dangerous areas of the machine.
DANGER
DANGER
TR460-12/21 Page 5
A DANGER label indicates a hazardous situation that, if not avoided,
will cause death or serious injury. For your safety, locate and become
familiar with the hazardous areas of the machine.
The following Danger label is found on the dashboard. For your safety and protection, be sure to
locate and become familiar with all the dangerous areas of the machine
.
Before operator steps away from and/or turns off equipment, parking brake must
be engaged, Can cause serious injury or death.
A WARNING label indicates a hazardous situation that, if not
avoided, could result in death or serious injury.
T
he following safety warning labels are found on the machine.
For your protection, locate and become familiar with the hazardous areas of
the machine.
NOTE: The engine manufacturer is responsible for all engine-related issues with regards to performance, power rating,
specifications, warranty and service. Please refer to the Honda Owner's Manual, included separately with your machine, for
more information.
Safety Labels - On the Machine
Safety labels found on your TR460 are illustrated in this section. Always follow their instructions and heed their warnings.
TR460-12/21
5

The following safety labels are found on the machine. For your protection, locate
and become familiar with the hazardous areas of the machine.
WARNING
Rotating parts
can cause
serious injury
Keep clear.
WARNING
Spinning impellar
can cause
serious injury
Keep hands clear.
WARNING
Pinch points.
Moving parts can
crush or cut.
Keep hands clear.
WARNING
Airborne particles
and loud noise
hazards
Wear ear and eye
protection.
HOT SURFACE
Do Not Touch
TR460-12/21 Page 6

Warnings and Precautions
•Do not operate the machine unless all safety devices are functioning properly.
•Keep adults, children and pets away from the area to be managed.
•Before working, inspect the work area and remove debris and other objects that may interfere with the machine.
•Watch for holes, sprinkler heads and other hidden hazards.
•Reduce speed when making turns.
•Use extra care when operating the machine with an empty hopper. This can affect the stability of the machine.
•Do not operate the machine on slopes exceeding 20 degrees.
•Do not operate the machine on steep slopes if you are uncertain about machine traction and stability.
• Do not operate the machine in wet or low light conditions.
•Slow down and use extra caution on hillsides. Go laterally or diagonally across the slope, not up and down the slope. Be
aware that turf conditions can affect the machine’s stability.
• Use caution while operating near drop-offs, ditches or embankments.
•Always have proper footing on slopes and hillsides, and never operate the machine when conditions are slippery. Be
very careful on wet grass.
•Use care when approaching blind corners, shrubs, trees or other objects that may obstruct your vision.
•Do not operate in reverse unless absolutely necessary. Look behind and down before backing up to be sure the path is
clear.
•Never carry passengers.
•Use care when loading or unloading the machine into a trailer or truck.
•Use care when crossing gravel paths or roadways.
•Always have your feet and hands clear of the controls when starting the engine.
•To avoid serious burns, do not touch the engine or muffler while the engine is running or until it has cooled for at least 30
minutes after it has been shut off.
•To prevent the engine from accidentally starting, always disconnect the spark plug wire before performing any mainte-
nance on this machine.
•Keep the machine, and especially the engine/transmission area, clean and free of grease, grass and leaves to reduce
the potential for overheating and re.
•Do not exceed the hopper capacity of 250 lbs.
•Read, understand and follow all instructions in this Operator’s Manual, the Honda Owner’s Manual, and on the
machine before starting the machine.
•Become familiar with the safe operation of the equipment, operator controls and safety labels.
•All operators and maintenance personnel should be trained before using the equipment.
• Do not operate this machine while under the inuence of alcohol or drugs.
•Never let children under the age of 18 years old or untrained people operate or service the equipment.
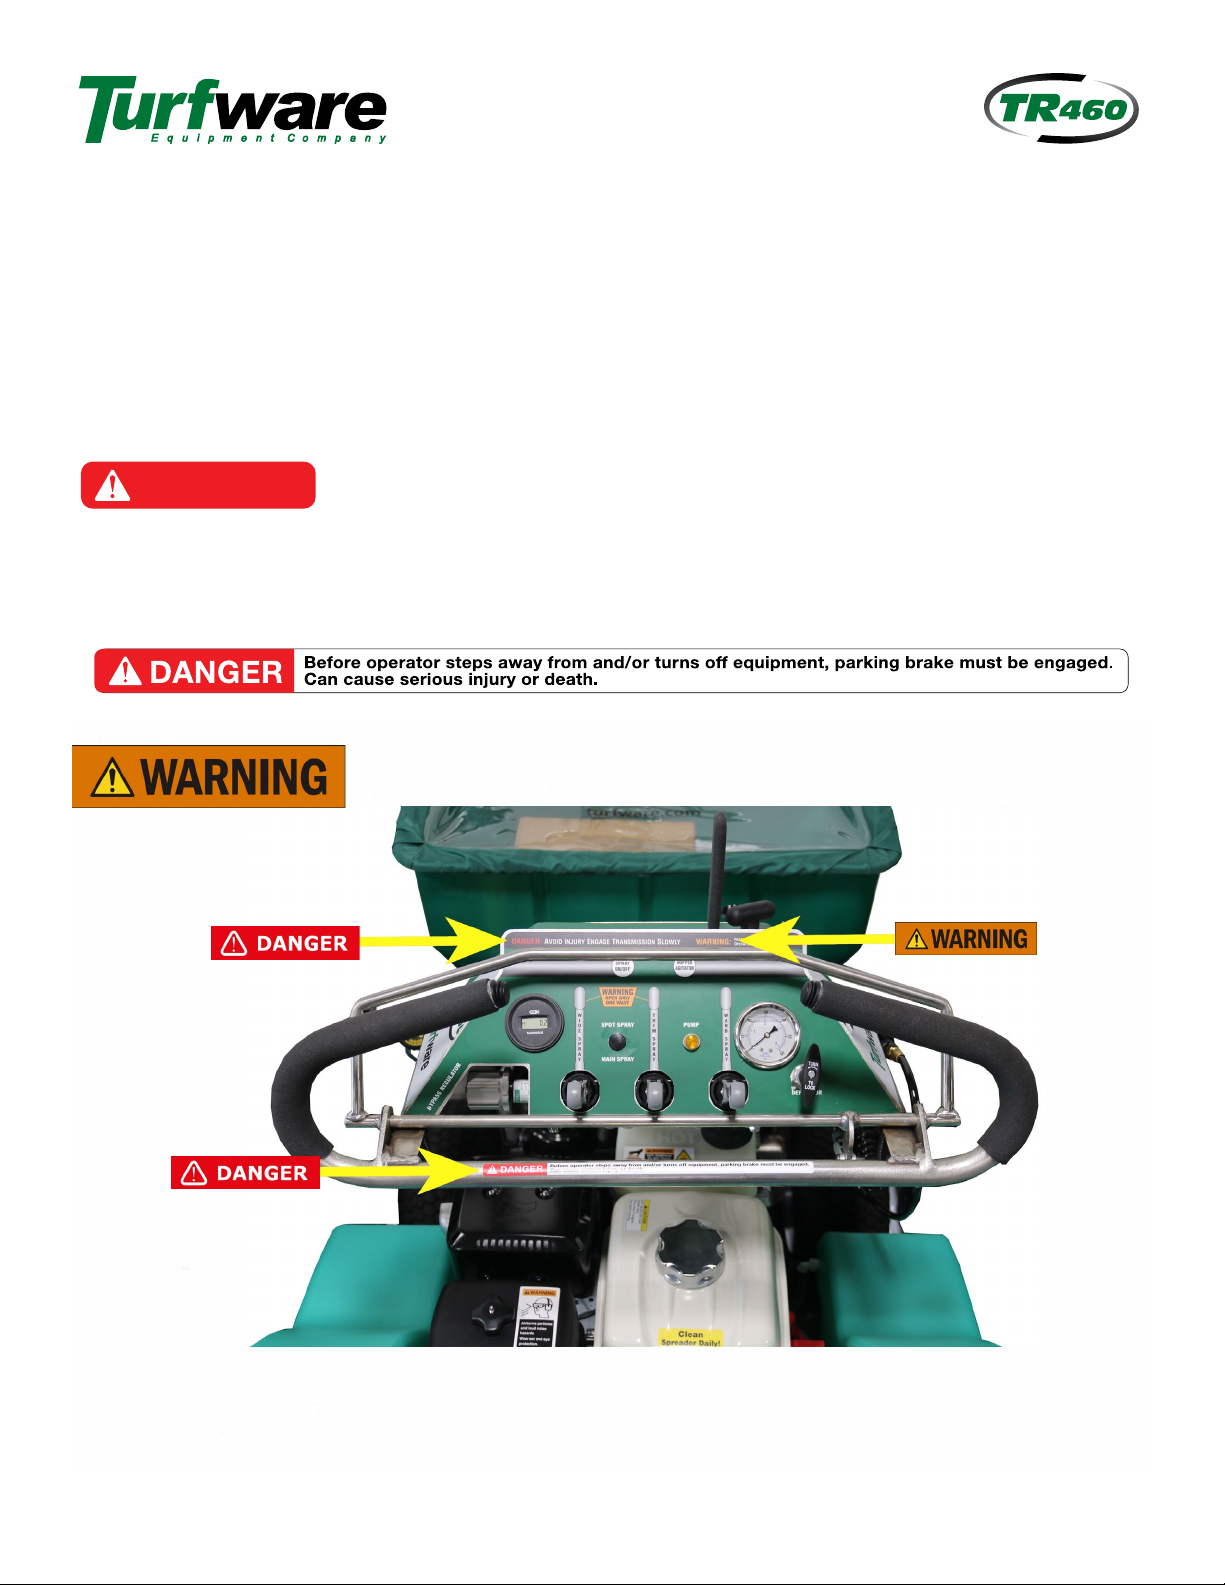
•Do not remove any shields, guards, labels or safety devices.
•Verify any shields, guards, labels or safety devices are in place and functioning properly. If needed, repair or replace
it before operating the equipment.
•Never run the engine indoors or in an enclosed area without adequate ventilation. Exhaust fumes are extremely
hazardous and can kill you.
•Exercise extreme caution when applying and handling chemicals. Chemicals can be dangerous; read the chemical
•MSDS (Material Safety Data Sheets) and container label for proper/safe handling instructions.
•Always wear safety glasses, long pants and safety shoes when operating or maintaining this equipment, and when
applying and handling chemicals. Use protective measures as directed by the MSDS.
•Do not operate this equipment while under the inuence of prescription medicines which may impair your
coordination.
Operation Precautions
General Safety Precautions
TR460-12/21 Page 7

Fuel Precautions
•Use extra care when handling gasoline and other fuels. Gasoline is highly ammable and vapors are explosive.
•Always stop the engine and allow it to cool before removing the fuel tank cap.
•Add fuel outdoors in an open area on level ground.
•Never add fuel while the engine is running.
• Never refuel or drain the machine indoors.
•When lling the fuel tank, stop when the gasoline reaches the maximum fuel level limit. Do not overll to allow for
expansion.
•Never use stale or contaminated gas.
•Never use an oil/gas mixture.
•Do not smoke or permit others to smoke while handling gasoline.
•Always use approved containers for gasoline.
•If the fuel container spout does not t inside the fuel tank opening use a funnel. Wipe up any spilled gasoline
immediately.
Refer to the Honda Owner’s Manual, included separately with your machine, for more
information about engine precautions.
•The engine exhaust emits toxic carbon monoxide gas. Do not run the engine in an enclosed area.
• Engine exhaust, some of its constituents and certain vehicle components contain or emit chemicals known to the State
of California to cause cancer and birth defects or other reproductive harm.
•Allow the engine parts, especially the muffler, to cool before touching to avoid burns.
• Before operating the machine check for worn tires. Tires with excessively worn tread are dangerous on slopes or inclines.
Replace as needed.
•Always maintain the tire pressure at max PSI of 22 lbs. Do not under or over inate the tires.
Engine Precautions
Tire Precautions
IMPORTANT
TR460-12/21 Page 8

Product Overview
1 - Spray On/Off Button
2 - Drive Bar
3 - Hopper Open/Closed Lever
4 - Pressure Gauge
5 - Hopper Agitation Button
6 - Deflector Shield Control
7 - Spray Wand Lever
8 - Trim Spray Lever
9 - Wide Spray Lever
10 - Tachometer/Hour Meter
11 - Pressure Regulator
12 - Spray Tank Lids
13 - Honda Engine
14 - Parking Brake
15 - Operator Platform
TR460-12/21
9
Product Overview
TR460-12/21 Page 9

Product Overview Continued
16 - Box of Spare Parts
(retail customers only)
17 - Spray Wand
18 - Air filter
19 - Fuel Tank
20 - Lovejoy Coupler
Assembly
21 - Pivot Point Assembly
22 - Hydraulic Pump
23 - Hydraulic System Filter
24 - Hydraulic Reservoir
TR460-12/21
10
Product Overview Continued
TR460-12/21 Page 10

TR460-12/21 Page 11
Product Overview Continued
25 - Hopper On/Off lever
26 - Product Rate Selector
27 - Impeller Speed Control
28 - Spray Wand
29 - Deflector Shield
30 - Spreader Impeller
31 - Wide Spray Nozzle
Assembly
32 - Trim Nozzle Assembly
TR460-12/21
11
Product Overview Continued
25 - Hopper On/Off lever
26 - Product Rate Selector
27 - Impeller Speed Control
28 - Spray Wand
29 - Deflector Shield
30 - Spreader Impeller
31 - Wide Spray Nozzle
Assembly
32 - Trim Nozzle Assembly
TR460-12/21
11

Product Overview cont.
TR460-12/21 Page 12
Product Overview Continued
32 - Spray Pump
33 - Battery
34 - Spray Tank Shut-off Valve
35 - Spray System Filter Housing/Clean-
out
36 - Hopper Slide Shutoff and
Flow Assembly
37 - Self Aligning Cap and
Nozzle
38 - Serial Number
TR460-12/21
12

TR360 Use & Care
TR460-12/21 Page 13
Use Care
( A WARN I NG )
1) Move the Fuel Valve Lever 1 to the ON position.
2) Always move the Choke Lever 2 to the Left/Closed position when
cranking starter, then move Choke lever 2 to the Right/Open position once
the engine is running.
3) Move the Throttle Lever 3 away from the MIN position to
about 1/3 of the way toward the MAX position.
4) Turn the engine switch 4 to START and hold it there until the engine
has started and allow the switch to return to the 5 ON position.
a) NEVER RUN THE STARTER FOR MORE THAN 5 SECONDS OR MOTOR DAMAGE MAY OCCUR. IF
ENGINE FAILS TO START WAIT 10 SECONDS BEFORE OPERATING THE STARTER AGAIN.
b) If using the recoil starter pull the pull cord toward you then return the pull cord gently.
c) If using the electric starter key turn the key to the START position and hold it there until the engine starts.
When the engine starts release the key, allowing it to return to the ON position.
6) If the choke lever is in the CLOSED position gradually move it to the OPEN position as the engine warms
up.
7) Set the throttle level to control the engine speed. Do not exceed 3200 RPMs.
&
8)
To move the machine:
a)
Forward - Pull the drive bar toward you.
b)
Reverse - Push the drive bar away from you.
c)
Release the drive bar to return to neutral and stop the forward/reverse motion.
MOVE THROTTLE TO THE MINIMUM POSITION TO REDUCE RPM's BEFORE TURNING OFF.
FAILURE TO DO SO WILL CAUSE CARBON TO BUILD UP ON THE ENGINE PISTON.
Turn the engine switch to the OFF position.
Turn the fuel valve lever to the OFF position (when stored)
Starting The Engine:
TR460-12/21
13
ALWAYS OPERATE THE DRIVE BAR SLOWLY AND GENTLY

Spreader Operation
Spreader Operation
The spreader unit is designed to handle dry, clean, free-flowing granular material only.
IMPORTANT
Spreader calibration should be performed as an ongoing process
throughout the day. Monitor material used versus area serviced and
adjust accordingly. The application rate will vary throughout the
application process. Factors affecting the calibration rate include
product rate selector setting, ground speed of the unit, impeller
speed, width of passes, humidity level, and treatment method.
NOTE:
The sprayer unit and the spreader unit can be operated at the same time to provide an even
distribution of both the sprayed and spread products to an area.
IMPORTANT
When spreading material fully engage the drive bar
or operate at your own application speed..
Refer to the TR460 calibration sheet for more information about granular
application.
1)
Fill the hopper with material. Do not exceed the maximum hopper weight
capacity of 250 lbs.
2)
Set the engine to the recommended 3200 RPMs. Confirm with the hour/
tachometer meter on the dashboard.
3)
Adjust the
Product Rate Selector,
1
located above the hopper lever, to
match the material coverage you desire.
NOTE:
The numbers are merely an indicator and have no bearing on material rate.
TIP:
For best results use a setting on the low side.
If
the setting proves to be too
low cover the area again. Once the desired setting is determined a higher setting
can be used.
4)
Adjust the variable
Impeller Speed Control
2
to achieve the desired
5)
Monitor and adjust the product rate selector as needed to maintain accurate coverage of material. The
product rate selector position determines the amount of material to be broadcast. The higher the number,
the heavier the application of material.
6)
Go to the spreading location.
7)
Ensure the area to be maintained is clear.
8)
Engage the drive bar fully when applying materials.
9)
Push the hopper lever to the OPEN position.
10)
Adjust the impeller speed control as needed to obtain coverage
width.
fertilizer spread width. The impeller speed control knob will increase or decrease the spread width to
your desired spread pattern.
NEVER RUN THE SPREADER WITH THE IMPELLER SHUT OFF AND NOT TURNING. THIS WILL
CAUSE DAMAGE TO THE HYDRAULIC PUMP AND VOID THE WARRANTY!
NOTE:
The spread pattern is independent of ground speed.
TR460-12/21
14
TR460-12/21 Page 14

TR460-12/21 Page 15
Operating the Spreader cont.
11)
Apply the granular material on 18-foot center passes. The outer edge of the fertilizer pattern should fall
between the wheel tracks of your previous pass(see diagram on page 17). This will require a total
spread width of 18'.
12)
Evaluate the spread pattern:
a)
If the spread pattern is good continue to spread at a recommended speed of 5 MPH.
b)
Adjust the spread pattern as necessary.
13)
When applicable, use the deflector shield to prevent granular material from being spread to the
right side of the machine.
NOTE:
When using the deflector be sure to reduce the fertilizer rate to avoid over fertilizing the area.
14)
Move the hopper lever to the CLOSED position.
15)
Clean the hopper after each day's use.
Cleaning the Spreader - Daily
Always empty and properly clean the spreader unit immediately after each use.
1)
Drive the machine to a designated cleaning area.
2)
Stop the machine on a level surface, turn off the engine and engage the parking brake.
3)
Empty the contents of the hopper and place the material into the original bag for future use.
4)
Using a garden hose, spray the inside and outside of the entire spreader with clean water.
·
IMPORTANT
Use caution when using a power washer to clean the machine. The high
pressure water may force residual corrosive materials into other parts of
the spreader and sprayer units.
5) Allow the machine to dry completely before the next use.
Sprayer Operation
The sprayer unit is designed to disperse liquid materials only.
NOTE:
The sprayer unit and the spreader unit can be operated at the same time to provide an even distribution
of both the sprayed and spread products to an area.
Refer to the TR460 Calibration Sheet on Page 18 for more information about the liquid application.
TR460-12/21
15

·
&
IMPORTANT
The spray system is not for use with wettable powders or water
dispersible
granules. All materials must be in liquid form and premixed prior
to adding them to the tank.
TR460-12/21
16
1) Make sure the machine is on level ground and apply the parking brake.
2) Open the tank cap on the spray tank and fill the tank with the pre-mixed liquid.
NOTE: Make sure the tank is at least half full before priming the spray system.
3) Set spray lever open for wand.
4) Turn the spray pump on.
5) Bleed the line by spraying the wand back into the tank in 3-4 short bursts.
6) Adjust regulator between 28 and 32 PSI, tighten the lock ring and turn off pump.
7) If pump still won’t pressurize...
8) remove cap on regulator, depress spring retainer 4-5 times until pressure resumes.
9) check supply lines to pump are securely sealed and there are no leaks.
10) also check that the O-Rings are properly seated in the filter housings. Once pressure resumes...
11) Go to the work area.
12) Ensure the area to be maintained is clear.
13) Select the appropriate spray pattern: wide, trim or wand.
a) To spray using the front sprayer nozzles:
i) Move the Wide Spray Lever forward.
ii) Press the spray button on the left handlebar to apply the solution to the work area.
b) To use the spray wand:
i) Remove the wand from the holder.
ii) Move the Wand Spray Lever forward.
iii) Hold the spray wand and point it in the direction to be sprayed.
iv) Squeeze the spray wand trigger to begin spraying.
Cleaning the Sprayer-Daily/Long Term
Always empty and properly clean the sprayer unit immediately after each use and prior to storage.
1) Spray all contents onto a turf area until the spray system is empty.
2) Fill the tank with fresh water.
3) Spray all contents onto a turf area again through the wide nozzle, narrow nozzle and spray wand until
fresh water flows through each. Repeat this cleaning process three times to ensure complete rinsing of the
spray system.
4) Remove, clean, and inspect the three nozzle screens located in the spray nozzle bodies and the main
spray system filter. Replace if necessary. When cleaning the screen be sure the screen housing GASKET
remains in place. The spray system will not build pressure without the gasket.
5) For long-term storage in freezing conditions add an RV type of anti-freeze and cycle it completely through
the spray system.
Refer to the Honda Owner's Manual, included separately with your machine, for more information about
proper long-term storage of the engine. MAINTENANCE AND STORAGE - DAILY
TR460-12/21 Page 16

TR460-12/21 Page 17
9'-0"
Passes
Granular
Pattern
Wide Nozzle
Pattern
SPRAY-SPREAD PATTERNS
TR460-12/21
17
Spray-Spread Patterns

TR460-12/21 Page 18
Application Calibration Rates
Calibration suggestions are based on known basic standards of use. Each operator MUST calibrate the machine to
his/her condition of use.
Operator ground speed, engine rpm, spray system pressure level, spread application pass width, terrain traveled,
ground moisture, and wind conditions affect the rate of application for both granular and liquid applications.
All spreaders must be calibrated to real use conditions. The recommended method of calibration fine tuning is to use
the products over a measured area and determine the actual rate of application.
Granular:
With all factory settings in place, the granular scale for application will deliver roughly the number of pounds product
(215-240 SGN) per thousand square feet as displayed on the rate scale.
To Verify Your Use Rate:
Measure 1000 square feet and determine the rate of application upon use. <OR> With a known quantity of product
(50 lbs.),apply over a flat turf area and measure the total square feet covered with the full amount of product.
Calculate your rate of application and adjust accordingly.
Liquid:
With all factory settings in place, the liquid rate of application will remain roughly 32 fluid ounces per 1000 square feet
of turf grass area.
To Verify Your Use Rate:
Capture the liquid from the nozzle for a one-minute period of time. Then operate your machine in a straight line under
your conditions over a one-minute period of time. This will provide the known total liquid coverage rate of application
for your machine.
Average Your Rates:
Measure the area treated by your machine using known quantities of both liquid material sprayed and granular
material applied. Average this calculation over various areas. Or, check your use rate after several lawns or areas are
treated throughout the day. This will ensure that the applicator knows the rates of application used throughout the day
and can make the fine turned adjustments as needed.
EVERY OPERATOR APPLIES PRODUCT DIFFERENTLY. MAKE SURE THE MACHINE OPERATOR VERIFIES
THEIR PERSONAL USE RATES ON AN ONGOING BASIS. EVERY DAY IS DIFFERENT.
TR460-12/21
18

Example Service Path
TR460-12/21
19
Example Service Path
TR460-12/21 Page 19

Grease Maintenance
IMPORTANT
There are only 3 Grease Fittings that require WEEKLY GREASE on the TR460.
THIS IS THE SINGLE MOST IMPORTANT CARE POINT FOR YOU TO FOCUS EFFORT ON.
Grease is like
preventative medicine. Liberal use of grease and care of the machines needs will prevent major costly issues.
It is always better to over grease than under grease.
FAILURE TO GREASE THE PIVOT AND FRONT WHEEL
BEARINGS HUBS WILL RESULT IN FAILURE AND EXPENSIVE REPAIR.
We do everything possible to utilize the
best tapered bearings, seals, and other wear items to prevent wear and provide long life. Please do your part!
You can ensure years of uninterrupted life from your
TR460
by simple greasing the Front Wheel Bearing Hubs and
adjusting and greasing the Pivot Point.
IMPORTANT
Pivot Point (1 Grease Fitting)
After the first
50
Hours of use (break in
period) adjust the Pivot Point. Remove
the Cotter Pin at the base of the Pivot
Point Spindle. Tighten (CW Turn) the
Castle Nut and replace the Cotter Pin
back in the Spindle. GREASE the Pivot
Point Heavily. Repeat this as necessary
to keep tension on the Pivot Point and
reduce sloppiness from being felt in the
Operator Steering Handle Bar.
KEEP THE PIVOT POINT GREASED ON
GOING! AT LEAST WEEKLY.
Front Wheel Bearings( 1 Grease Fitting
each side of the Spreader)
Grease the Fittings on the inside of the
Front Wheel Hubs
WEEKLY!
TR460-12/21
20
TR460-12/21 Page 20
This manual suits for next models
1
Table of contents