10
EASTMAN
count.Pressnumberofpliesdesired.Pressok?.Presssave
toload program.). Set edge control to AUTO by closing the
edge control actuator. Set cradle control to FEED ON
position. Program ply height and feed delay if required.
Manually drive the spreader into the right (stationary)
catcher.Stopwhenthepinbardropsontothefoldingblade.
This is your right end marker. Set spread length (Press
length.Presslengthposition.Pressok?.Presssavetoload
program.).PressthegreenSTARTbuttontobeginautomatic
spreading.Formanualspreading,use thethrottle.
Machine travels slowly to the right, then accelerates after
leaving end slowdown section. As spreader reaches end
slowdown section the spreader slows, the folding blades
engage catcher. As spreader enters catcher the cradle
allows a small amount of slack for a relaxed fold. The
spreaderthenreachestheendmarker,stoppingandrevers-
ingthespreader tocompletethefold.Asmachineleavesthe
catcher,the cradle compensates for slack cloth dispensed
(feed delay) and returns to the left. The elevator will raise
(step)asspreaderreturns.
Spreader will continue this sequence automatically until
manuallystopped, predeterminednumberofplieshavebeen
reached or machine is out of cloth.
IMPORTANT
To stop the
CR 500
at any point during spreading,
either:
- Twistandreleasethrottle.
- Press red “STOP” button on MAIN CONTROL
panel.
- Hitthe Main Power Button (red).
Face Up Spreading
(One-WayKnifeboxandMoveableCatcherRequired)
Caution:Knifeboxequippedwithsharpknife.
Warning: Safety Cams should always be checked for
proper operation before operating the
spreader..
AfterSafetyCamshavebeencheckedforproperoperation,
pulltheMainPowerbuttononandpressthegreenMainDrive
buttontoactivatepowertoallcircuits.SelectFaceUpmode
(Pressprogram.Pressmodetoselectfaceupmode.Press
savetoloadprogram.).Threadthespreader.Clampandcut
the beginning edge of the fabric. Set the counter to the
number of plies desired to spread (Press program. Press
count.Pressnumberofpliesdesired.Pressok?.Presssave
toload program.). Set edge control to AUTO by closing the
OPERATION
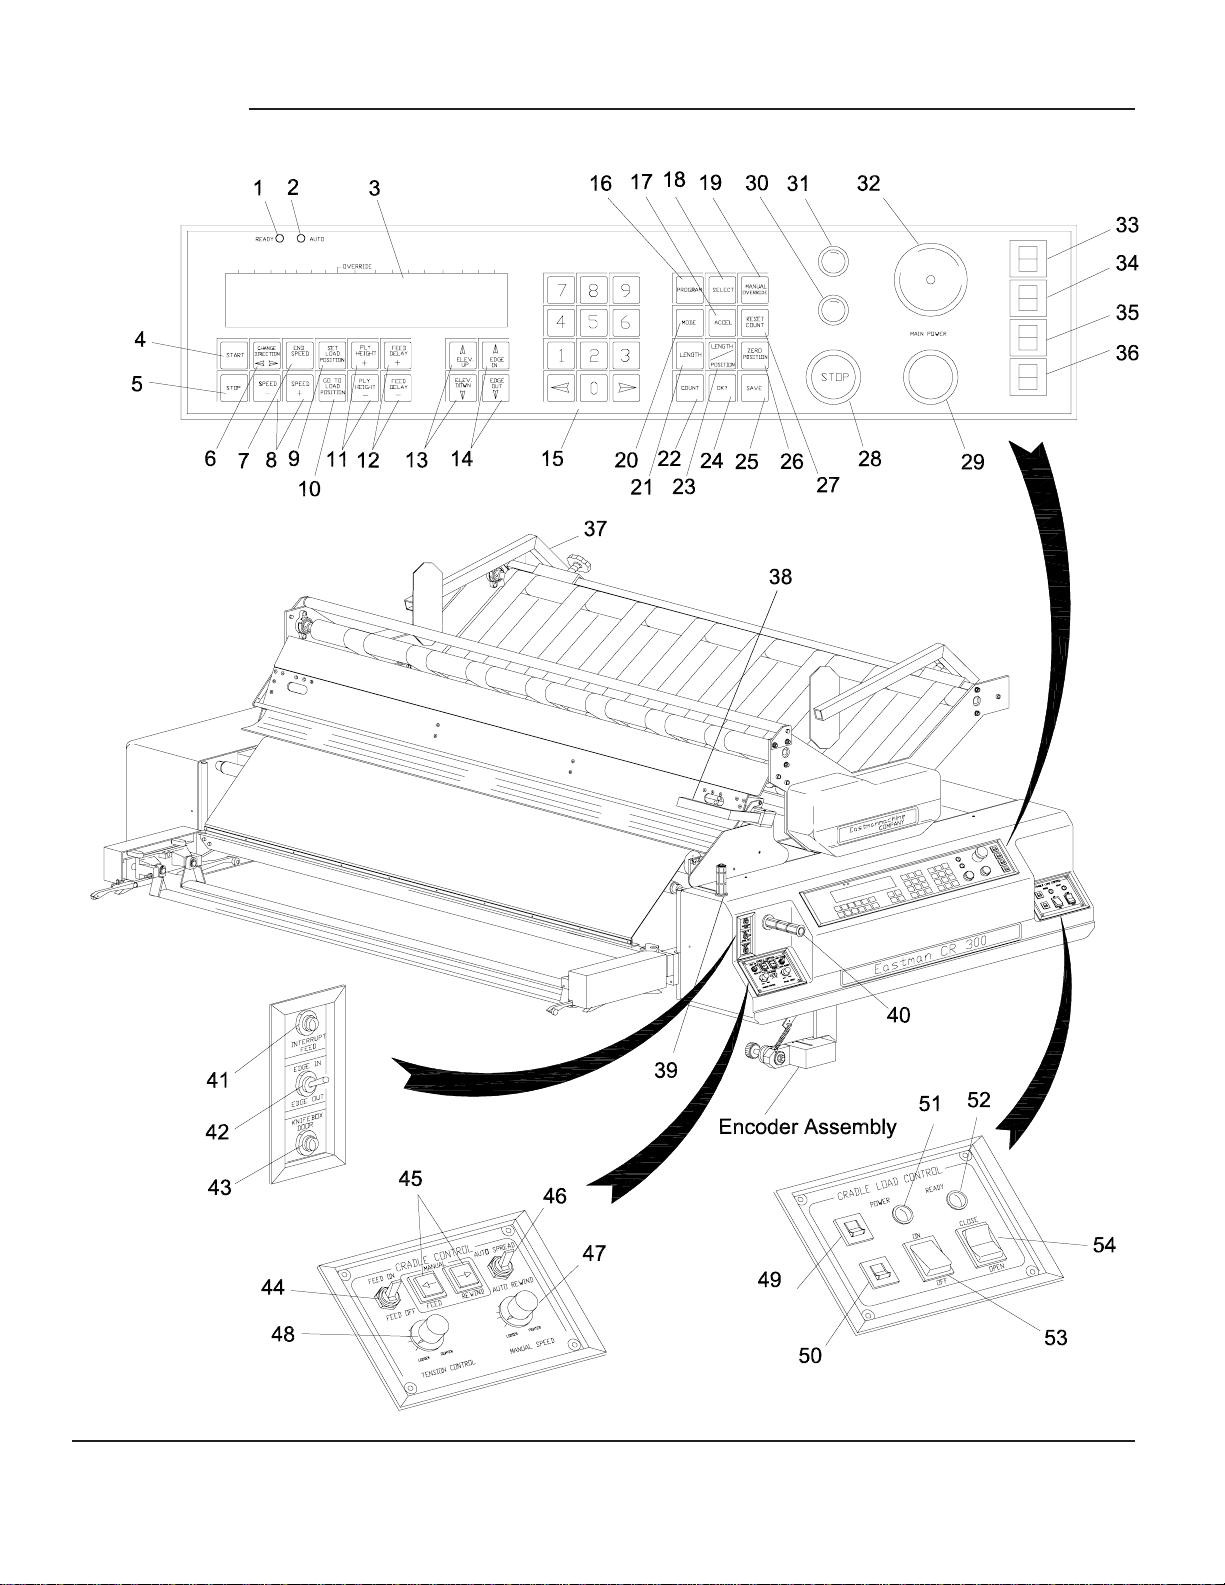
Loading
Activatepowertospreadingmachinebypullingmain power
(mushroom)switch.Red indicator lampadjacenttotheknob
willglowtoindicatepowerison.Pressgreen“MAINDRIVE”
button,toactivatecircuitformanualcontrol.Greenindicator
lamp adjacent to button will glow to indicate machine is
ready.
Gentlytwistthethrottleanddrivespreaderintothestationary
catcher. This is the Piece Goods Loading Area. Open the
edgecontrolreflectorswitchtodisengageautoedgecontrol
circuit. Activate cradle loading circuit by pressing on/off
power switch on the cradle load control panel. Power light
(red) will glow. If The green ready light is on, the cradle is
readyforLoading/Unloading.Ifnot,centerthecradleplatform
usingtheedgecontrolin/outbuttons.Whenthegreenready
light glows, press the Open/Close switch to open cradle.
Loadpiecegoodsroll.Moveclothalignmentarmsandsecure
inplace.Closecradle.Pressoffcradlepowerswitch.Close
theedgecontrolreflectorswitchandbeginspreadingopera-
tion.
CAUTION:Maximumweightofpiecegoodsrollis500lbs.
andextremecautionshouldbeusedwhenload-
ing maximum load rolls into cradle.
Threading
Afterpiece goods rollhas been loaded,threading can take
place. Press the manual feed button on the cradle control
panel. When feeding material, raise the dancer bar up and
guide fabric under dancer bar. Feed fabric into knifebox or
foldingblades.
Face To Face Spreading
(FoldingBlades&CatchersRequired)
Warning: Safety Cams should always be checked for
proper operation before operating the
spreader.
AfterSafetyCamshavebeencheckedforproperoperation,
threadthespreader.PulltheMainPowerbuttononandpress
thegreenMainDrivebuttontoactivatepowertoallcircuits.
Manually drive the spreader, by using the throttle, into the
Left (Moveable) catcher and place end of goods under
catcher pin bar. This is your left end marker. Press Zero
Positiononcontrolpanelsetposition.SelectFaceToFace
mode (Press program. Press mode to select face to face
mode.PressSavetoloadprogram.).Setthecountertothe
number of plies desired to spread (Press program. Press