Link
Heating
Force heating
1.Standard Accessories
Screw pack ManualProduct USB wrie
T9W /N& RC9-W i-F i
Version:1.0(01/2022)
RF SMART THERMOSTAT
Powered by
Intelligence
Inside
Super strong RF signal for sub1G Communication
Heating
Force heating
Link
2.Product Overview
Power supply
Temp. setting range
Operation temperature range
Measurement accuracy
Setting temp. accuracy
Transmission distance
Protection level
2 x 1.5 V alkaline AA batteries /
USB powered (Type C interface)
5~95℃
-5~50℃
0.1℃
0.5℃
IP20
≤200m in the open air
[ ]RF Thermostat
3.Display Symbols
[ ]RF Thermostat
[ RF Receiver ]
Power light on: Power on
Power light off: Power off
Red light on: heating on
Red light off: heating off Yellow light on:
forced heating mode is on
Yellow light off:
forced heating mode is off
Flashing green: pairing
Green light off: not paired
Green light on:
successful pairing
Heat in g
Forc e he ating
Link
Desktop Type RF Smart Thermostat
for wall-hung boiler
RF transmitter desktop design, compatible with wall-mounted
design, installation is very simple, flexible
The device has antifreeze function, child lock function
and humidity function (only Wi-Fi model)
Knob type control temperature setting is more convenient,
flexible, and more experience
Relying on stable RF wireless technology, the thermostat is paired
with the receiver, the signal is stable, and the pairing speed is fast
The equipment function is stable and reliable, and the
operation is simple and convenient
Dual mode settings, operation can be set at will, comfortable
Freedom and control of life
Heating
Force heat ing
Link
5.Auto-mode Setting
Press “knob key” for 3 seconds to edit auto-mode setting.
1
2
3
4
5
6
1
2
06:00
08:00
11:30
12:30
17:00
22:00
08:00
22:00
20℃ ( 68℉)
15℃(59℉ )
15℃(59℉ )
15℃(59℉ )
22℃ ( 72℉)
15℃ ( 59℉)
20℃ ( 68℉)
15℃ ( 59℉)
Rotate knob
Time
Default value Modify
Temperature
Default value Modify
Events Symbols
Weekends
Workdays
Rotate knob
Under power-off, press “Knod key” for 3 seconds to enter advanced setting mode, then repress
“Knob key” to switch to next mode. Press “power button” to save and exit advanced setting mode.
-1℃
0.5~10℃(1~10℉) ±1℃
5~95℃(41~199℉) 50℃
5~47℃(41~117℉) 5℃
OFF
℃/℉ ℃
00
00: Child-lock inactivate when screen off; lock all when child-lock activate
01: Child-lock activate when screen off; lock all when child-lock activate
02: Child-lock activate when screen off; lock all except Fan Speed,
Up and Down when child-lock activate
03: Child-lock activate when screen off; lock all except Power on/off
when child-lock activate
01
02
03
04
05
06
09
12
13 02
-9.9~9.9℃(-9~9℉)
19
/
Meaning
Code
Knob key “ ”
Default value
Temp. calibration
Temp. Dif.
Temp. upper limit
Temp. lower limit
Frost protection
Temperature unit
Weekly programming
setting
Child-lock
Power-on-reset
Reset
ON: frost protection on OFF: frost protection off
12345: 5/2 week mode 123456: 6/1 week mode
1234567: 7/0 week mode
12345
00: Power OFF
01: Power ON
02: The last status before power loss
Press “ ”for 3 seconds to reset
6.RF Thermostat advanced setting (Usually for Professional Technicians)
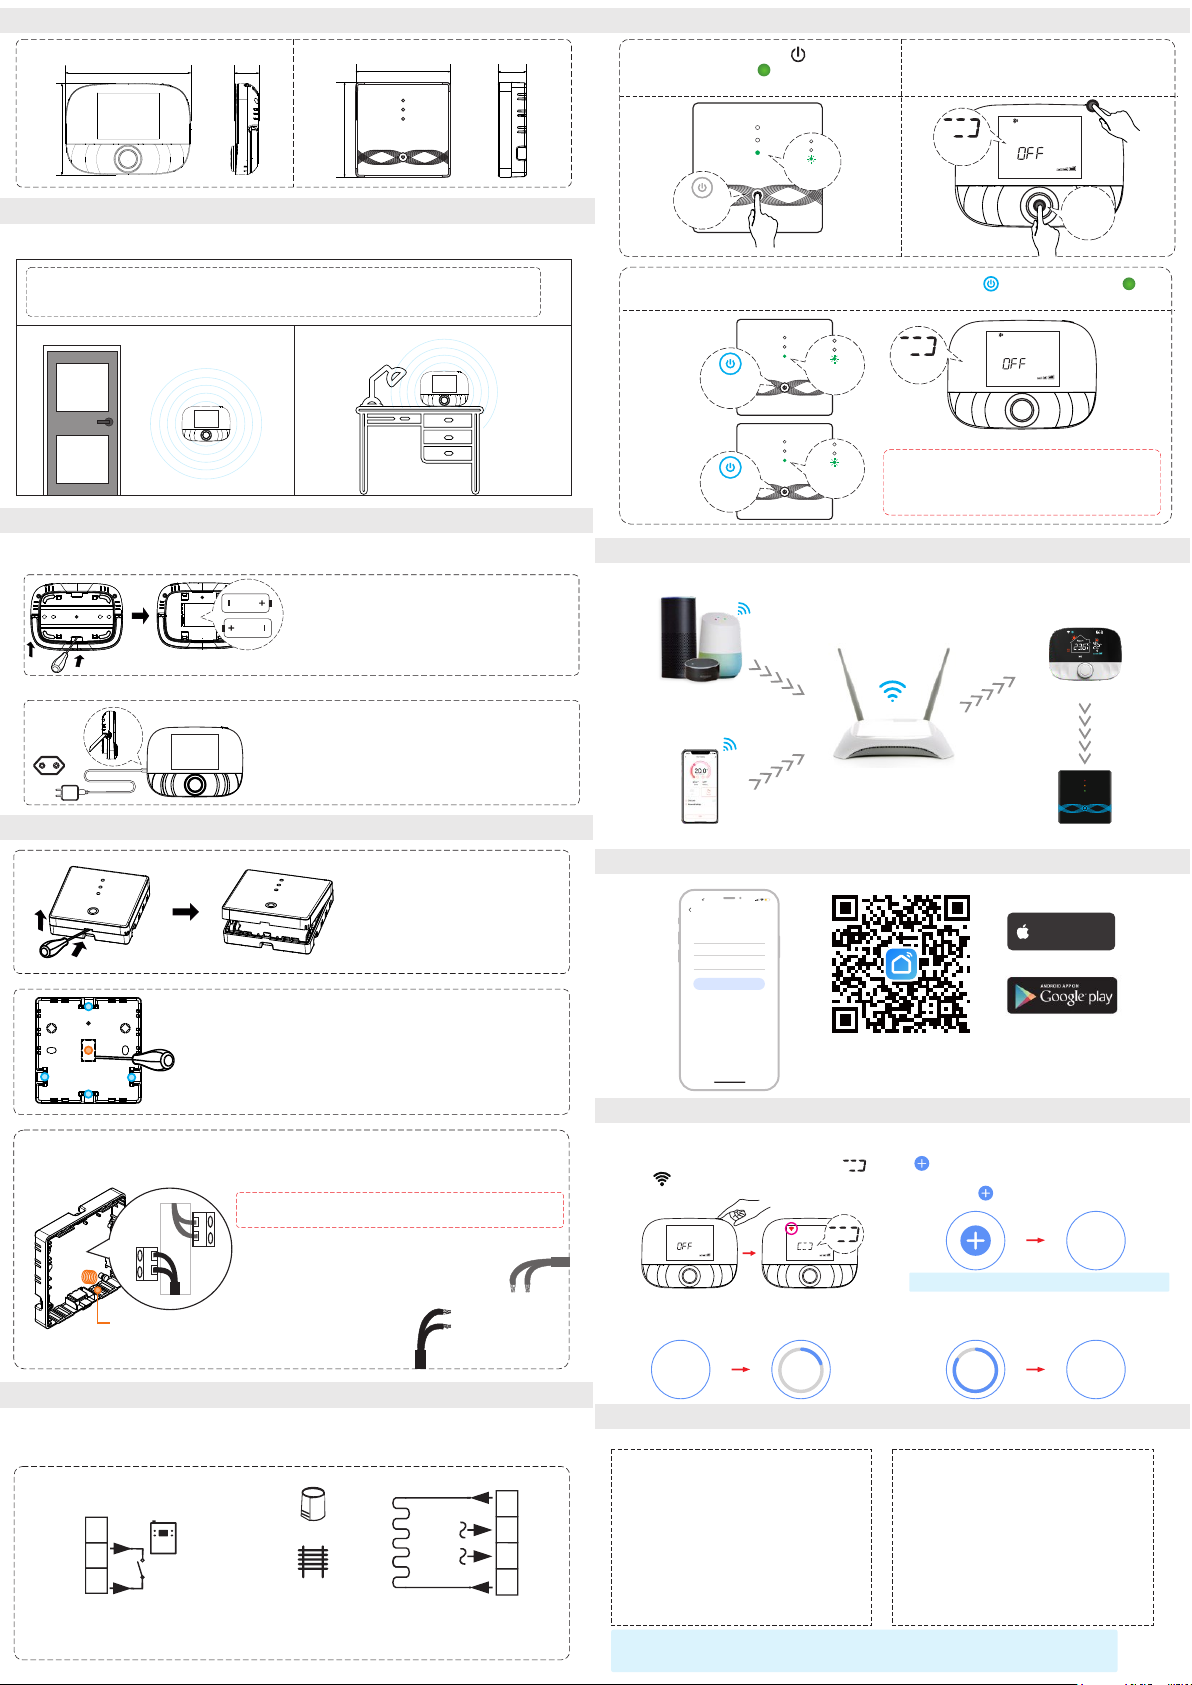
7.RF Receiver operating instructions
Function Steps Display state
Power on/off Press“ ”shortly Power light is always on/off
Pairing Under power-off, press“ ” for 3 seconds “ ”Green flashes quickly
Buzzer beeps “ ”light is on+
“ ”green light is on+
/
Distribution
network
is successful “ ”Red light on “ ”yellow light on +Under power-off, Double click the“ ”
Short press“ ”to exit the forced output and
return to the shutdown state The“ ”light goes out
Forced output
Reset Under power-off, press“ ”for 3 seconds,
After the green light flashes“ ”,
double-click the press“ ” again
“ ” lights flash once at the
same time
External probe
temperature
limit temp
setting
When powered on,
press“ ” for 3 seconds
“ ”Power light flashes
( No temperature limit, Default value)
“ ”Power light is flashing + “ ”
green light is on(30℃ temperature limit)
When the power light is flashing,
short press“ ” once
When the power light is flashing,
short press“ ” twice
“ ”Power light is flashing + “ ”
yellow light is on(40℃ temperature limit)
“ ”Power light is flashing + “ ”
red light is on(55℃ temperature limit)
Save and exit External sensor temperature
limit temperature setting
When the power light is flashing,
short three times press“ ”
When the power light is flashing, Long
press“ ”for 3 seconds
Power on/off
Auto-mode
Temp. control mode
Temp. setting
Child-lock
Time setting
Pairing mode
Wi-Fi setting
Function
Under power-off, press “knob key” + “power key” for 3 seconds to pairing mode.
Press “power key”for 3 seconds to set time.
Press “power key” shortly to turn on/off the thermostat.
Press “knob key” for 3 seconds to edit auto-mode settings.
Press “knob key” shortly to switch manual/auto mode.
Press “knob key” + “power key” for 3 seconds to activate child-lock.
Rotate “knob key” to change setting temperature by 0.5°C.
Under power-off, press “power key” for 3 seconds to Wi-Fi setting.
Steps
Low power
reminder
When the voltage is less than 2.3 V, the small icon of battery power flickers,
it is recommended to replace the new battery as soon as possible before use.
Backlight Control
4.RF Thermostat operating instructions
Wireless frequency 433MHz(FSK)/
433MHz(Bidirectional FSK)
[ RF Receiver ]
Lin k
Hea tin g
For e heati ng
Power supply
Device power consumption
Ambient temperature
ransmission distance
T
AC100~240V;50/60Hz
1W Max
-5~50℃
200m in the open air
≤
433MHz(FSK)/
433MHz(Bidirectional FSK)
Wireless frequency
Amazon Alexa
WORKS WITH
Google Assistant
WORKS WITH
Set to
Knob key
USB charge
(Type C interface)
Floor Heating
Child-lock
Floor Temp.
Room Temp.
Heating on
Week Display
Frost Protection
433MHz(FSK)
Time Display
Wake up; Event 1
Leave (am); Event 2
Return (am); Event 3
Leave (pm); Event 4
Return (pm); Event 5
Sleep; Event 6
Setting temp.
Auto Mode
Manual Mode
Temporary Mode
Battery power
Power key
Wi-Fi( )optional
Weather forecast
(optional)
lndoor humidity(optional)
Product Overview
This set is suitable for wall-hung boiler temperature control. As
long as you install the RF Receiver device near the wall-hung
boiler, even if the is placed in the living room or RF Thermostat
room (with an open distance of 200 meters), the RF Receiver
can be controlled by the .RF Thermostat
Link
Heat ing
Forc e heati ng
RF Thermostat
RF Receiver
After plugging in the Type-C USB cable, in the power-on state,
press “power key”fastly twice to backlight control setting.