TUYA MCS 750 Operation manual

WiFi Touch MCS 750
BENUTZERHANDBUCH
DE
Inhalt
Einführung..............................................................2
Lieferumfang..........................................................2
Besondere Merkmale.............................................2
Registrierung Tuya Smart App...............................2
App herunterladen ..........................................2
Konto registrieren ...........................................2
Wichtige Hinweise vor der Installation .................2
Montage..................................................................3
Installation Bodentemperaturfühler..............3
Thermostat anschließen.................................3
Thermostat einbauen .....................................3
Thermostat-Installation bei mehreren
Heizmatten ......................................................4
Übersicht Displaystruktur......................................4
Bedienung - Grundfunktionen...............................4
Ein- und Ausschalten.......................................4
Tastensperre aktivieren ..................................4
Ruhemodus Display ........................................4
Betriebsmodus wählen...................................4
Betriebsarten..........................................................4
Komfortmodus ................................................4
ECO Modus.......................................................4
Programmmodus............................................5
Urlaubsmodus.................................................5
Einstellungen..........................................................5
F1 - Datum und Uhrzeit einstellen ..................5
F2 - Programmmodus einstellen....................5
F3 - Betriebszeit ablesen.................................5
F4 - Erweiterte Einstellungen..........................5
F5 - WiFi-Verbindung .......................................7
Vorgaben für die WLAN-Verbindung,
Automatisches Verbinden mit Bluetooth,
Manuelles Verbinden
Alarmhinweise und Fehlerbehebung....................7
Tuya Smart App-Navigation ..................................8
Technische Daten ...................................................8
Beanstandungen....................................................8
Garantie..................................................................8
Garantieschein .......................................................9
INSTRUCTIONS FOR USE AND INSTALLATION
EN
Content
Introduction..........................................................10
Scope of delivery ..................................................10
Special features....................................................10
Registration Tuya Smart app...............................10
App download ...............................................10
User account registration .............................10
Important notes before installation....................10
Installation ...........................................................11
Floor temperature sensor installation .........11
Connect the thermostat................................11
Mounting the thermostat..............................11
Thermostat installation for two or more
heating mats .................................................12
Display structure ..................................................12
Operation - basic functions .................................12
Switching ON/OFF .........................................12
Activate key lock............................................12
Display sleep mode .......................................12
Select operating mode..................................12
Operating modes .................................................12
Comfort mode................................................12
ECO mode ......................................................12
Program mode ..............................................13
Holiday mode ................................................13
Settings.................................................................13
F1 - Date and time setting.............................13
F2 - Program mode setting...........................13
F3 - Operation time reading..........................13
F4 - Advanced setting....................................13
F5 - WiFi connection ......................................15
WiFi connection guidelines,
Automatic Add method via Bluetooth,
Manual Add method
Alarm indication and troubleshooting................15
Tuya Smart App navigation .................................16
Technical data......................................................16
Claims ...................................................................16
Warranty...............................................................16
Guarantee card ....................................................17
INSTRUCTIONS D'INSTALLATION ET D'UTILISATION
FR
Sommaire
Introduction..........................................................18
Contenu de la livraison........................................18
Caractéristiques particulières.............................18
Enregistrement de l'application Tuya Smart......18
Télécharger l'application..............................18
Enregistrement compte d'utilisateur...........18
Remarques importantes avant l'installation .....18
Installation ...........................................................19
Installation du capteur de tempér. au sol....19
Connectez le thermostat...............................19
Montage du thermostat ...............................19
Installation du thermostat pour deux ou
plusieurs nattes chau antes ........................20
Structure de l'écran..............................................20
Utilisation - fonctions de base.............................20
Mise en marche/arrêt....................................20
Activer le verrouillage des touches...............20
Mode veille d'écran .......................................20
Sélection du mode de fonctionnement........20
Modes de fonctionnement...................................20
Mode Confort.................................................20
Mode ECO.......................................................20
Mode Programme .........................................21
Mode vacances..............................................21
Paramètres...........................................................21
F1 - Régler la date et l'heure.........................21
F2 - Régler le mode programme...................21
F3 - Lire le temps de fonctionnement...........21
F4 - Paramètres avancés...............................21
F5 - Connexion WiFi .......................................23
Guide d'utilisation Wi , connecter
automatiquement avec Bluetooh,
connecter manuellement
Indications d'alarme et dépannage....................23
Navigation l'app Tuya Smart...............................24
Données techniques.............................................24
Réclamations .......................................................24
Garantie................................................................24
Certi cat de garantie...........................................25

2
Konto registrieren
Gehen Sie zur Registrierung eines Benutzerkontos in der „Tuya Smart“
App wie folgt vor.
1. Önen Sie die „Tuya Smart“ App auf Ihrem Smartphone und
tippen Sie auf „Erstellen eines neuen Kontos“, wenn Sie noch kein
Benutzerkonto besitzen.
2. Führen Sie anschließend in der App die erforderlichen Schritte zur
Einrichtung des Benutzerkontos durch, indem Sie den Anweisungen
auf dem Smartphone folgen. Die wesentlichen Schritte im Folgenden.
3. Verwenden Sie das Land oder die Region, die das System automatisch
erkennt und anzeigt, oder wählen Sie manuell ein Land oder eine
Region aus. Wichtig: Nach der Registrierung kann das Land oder die
Region nicht mehr geändert werden.
4. Geben Sie eine E-Mail-Adresse ein und tippen Sie auf „Verizierungs-
code abrufen“.
5. Geben Sie den Bestätigungscode ein, den Sie per E-Mail erhalten.
6. Sie gelangen nun zur Passwortvergabe. Geben Sie ein Kennwort ein,
das 6-20 Zeichen lang sein und sowohl Buchstaben als auch Zahlen
enthalten muss.
7. Nachdem Sie ein Anmeldekennwort zum Schutz Ihres Kontos ver-
geben haben tippen Sie auf „Fertigstellung“.
Wichtige Hinweise vor der Installation
Lesen Sie diese Anleitung vor dem Gebrauch sorgfältig durch und
bewahren Sie sie auf. Geben Sie die Anleitung gegebenenfalls an einen
nachfolgenden Benutzer weiter. Die Installation ist ausschließlich
durch eine Elektrofachkra sorgfältig nach den Regeln DIN-VDE und
unter Einhaltung der gültigen nationalen Gesetze, Bestimmungen und
Vorschrien auszuführen. Andernfalls erlischt die Garantie. Schalten
Sie Ihr lokales Stromnetz spannungsfrei, bevor Sie den Thermostat
installieren, überprüfen oder austauschen. Es dürfen nur Kunststo-
unterputzdosen für die Installation des Thermostats eingesetzt werden.
Einführung
Der Thermostat MCS 750 dient zur Regelung von elektrischen Fuß-
bodenheizsystemen in Innenräumen (Heizmatten, Heizfolien oder
Heizkabel). Der Thermostat hält die für den Fußboden oder die für den
Raum eingestellte Wunschtemperatur aufrecht und trägt zu einem
energiesparenden Betrieb Ihrer Fußbodenheizung bei. Der Thermostat
bietet die Möglichkeit einer Steuerung des Fußbodenheizsystems über
zwei Temperatursensoren: Bodensensor (im Lieferumfang enthalten) und
Raumsensor (fest im Gerät verbaut). Für die Heizungssteuerung können
entweder beide Temperaturfühler gleichzeitig ausgewählt (aktiviert)
werden, oder wahlweise lediglich einer der beiden Sensoren.
Der Thermostat wird in der Wand (Unterputz) an einer geeigneten Stelle
nahe der Anschlussleitung der elektrischen Fußbodenheizung montiert.
Lieferumfang
Thermostat - 1 Stück
Bodensensor - 1 Stück
Benutzerhandbuch - 1 Stück
Besondere Merkmale
Mit dem Thermostat MCS 750 können Sie ihre Fußbodenheizung entwe-
der direkt über das Touch-Display des Gerätes oder über Ihr Smartphone
mittels installierter „Tuya Smart“ App steuern. Um den Thermostat mit
Ihrem Smartphone zu verbinden, verwenden Sie ein WLAN-Netzwerk.
— Die unterstützten WLAN-Netzwerkstandards sind:
IEEE 802.11. b/g/n 2,4 GHz.
— Die Betriebssystemanforderungen für Smartphones:
Android 4.4 oder höher, iOS 10.0 oder höher.
Registrierung Tuya Smart App
App herunterladen
Scannen Sie den QR-Code mit Ihrem Smartphone oder Tablet oder
suchen Sie nach dem Stichwort „Tuya Smart“ im App-Store oder im
Google Play Store nach der kostenlosen App und laden Sie diese
herunter.
Vorhandenes Konto
nutzen
Neues Konto erstellen
DE

NNL L
t
L
O
A
D
L
O
A
D
NTC
230 VAC
Max. Last 16 A
Sensor
86.0
65.5
86.0
65.5
60.0
52.0
60.0
51.0
24.5
11.39.0
12
3
Aufnahme
Steckverbinder
vordere Abdeckung hintere Abdeckung
Display
3
Montage
Installation Bodentemperaturfühler
Die Fühlerleitung des Thermostats
muss in einem separaten Leerrohr
nach EN 61386-1 verlegt werden. Der
Fühler muss unmittelbar unter der
Heizmatte positioniert werden, indem
ein Schlitz im Boden aufgestemmt
und das Leerrohr darin versenkt wird.
Der Fühler sollte mittig zwischen zwei
Heizleitern positioniert werden, also
in der Mitte einer Heizkabelschlaufe.
Verlegen Sie den Kaltleiter (Netzanschlussleitung) seitlich bis zur An-
schlussdose und kreuzen Sie hierbei nicht den Heizleiter. Halten Sie
einen Mindestabstand von ca. 2 cm zu dem Heizleiter ein. Für das elek-
tronische Thermostat sollte an der ausgewählten Stelle eine handels-
übliche Kunststo-Unterputzdose mit 230 V AC Netzanschlussleitung aus
dem Hausnetz vorhanden sein. Ein Fehlerstromschutzschalter (30 mA)
ist vorzusehen. Stellen Sie während der Installation des Wellrohrs
(Ø16mm) und nochmals vor der Verlegung des Estrichs bzw. Boden-
belags sicher, dass der Sensor im Wellrohr verlegt ist und wieder
herausgenommen werden kann!
Thermostat anschließen
Wichtig!
Wir empfehlen, bei der Installation des Thermostats und der elektrischen
Fußbodenheizung die Dienste qualizierter Fachkräe in Anspruch zu neh-
men. Der elektrische Anschluss und der Anschluss an die Stromversorgung
dürfen ausschließlich durch eine Elektrofachkra unter Einhaltung der
gültigen nationalen Gesetze, Bestimmungen und Vorschrien durchgeführt
werden. Die Installationsanleitung und das Anschlussdiagramm ersetzen
nicht die Fachkenntnisse des Geräteinstallateurs. Schalten Sie Ihr lokales
Stromnetz spannungsfrei, bevor Sie den Thermostat installieren oder
bevor Sie ihn von der Stromversorgung trennen, um das Gerät zu
überprüfen oder um es auszutauschen.
Installieren Sie eine passende Unterputzdose mit Schraubenabstand
von 60 mm und gegebenenfalls zuvor eine separate Verteiler-Unterputz-
dose, sollte dies erforderlich sein (z.B. wenn mehrere Heizmatten über
ein Thermostat gesteuert werden sollen). Führen Sie das Stromver-
sorgungskabel und die Anschlussleitungen der Fußbodenheizung und
des Bodentemperaturfühlers zur Unterputzdose. Legen Sie kurzzeitig
Spannung an das Stromversorgungskabel an, um mit Hilfe eines Span-
nungsprüfers die Phase (L) und den Neutralleiter (N) zu identizieren;
markieren Sie beide entsprechend. Schalten Sie das Stromversor-
gungskabel anschließend unbedingt wieder spannungsfrei.
Verbinden Sie alle erforderlichen Kabel zum Thermostat und schließen
Sie diese vorschrismäßig an die entsprechenden Klemmen an.
• Der Bodentemperaturfühler muss an die beiden mit NTC markierten
Klemmen angeschlossen werden (die Polarität spielt keine Rolle).
Wichtig!
Ist die Installationsstrecke kürzer als die Sensor-Anschlussleitung
(werksseitig 3m), so ist das Sensorkabel entsprechend zu kürzen.
• Die Versorgungsspannung (230 V AC) wird an die Klemmen N und L
angelegt, wobei die Phase an die Klemme Lund der Neutralleiter an
die Klemme N angeschlossen wird.
• Die Anschlussleitung von Heizkreis oder Heizmatte ist an die Klemmen
N LOAD und LLOAD anzuschließen; der gelb-grün ummantelte Erdungs-
draht ist über eine externe Anschlussklemme (nicht im Lieferumfang
enthalten) mit der Schutzerdungsleitung (PE) zu verbinden.
Wichtig!
Um für den Fall einer unsachgemäßen Nutzung unter Dauerlast die ther-
mische Belastung für die relevanten Gerätekomponenten geringzuhalten
und um eine maximale Lebensdauer zu erreichen, wird empfohlen, eine
maximale Last von 13 A (2990 W) zu schalten bzw. anzuschließen.
Thermostat einbauen
1. Lösen Sie die vordere Abdeckung (Geräteteil mit Display). Drücken Sie
dazu vorsichtig mit einem dünnen Schlitzschraubendreher auf die
Schnappverriegelung an der Oberseite des Gehäuses und ziehen Sie
die vordere Abdeckung vorsichtig in Ihre Richtung ab.
2. Stellen Sie den elektrischen Anschluss her.
3. Setzen Sie die hintere Abdeckung des Gerätes in die Unterputzdose
ein und befestigen Sie sie mit zwei passenden Schrauben, links und
rechts auf gleicher Höhe.
4. Setzen Sie das Display in den Rahmen ein und bringen Sie die Kon-
takte des Steckverbinders auf der Rückseite in übereinstimmende
Position mit der Aufnahme auf dem hinteren Geräteteil.
5. Drücken Sie die vordere Abdeckung mit dem Rahmen vorsichtig an
die hintere Abdeckung (zuvor in die Unterputzdose eingesetzt) an,
bis die Verriegelung einrastet. Stellen Sie sicher, dass beide Geräteteile
wieder fest miteinander verbunden sind.
Wichtig!
Vermeiden Sie im Zuge der Montage Beschädigungen oder ein Verbiegen
der Kontakte des Steckeverbinders.

H = 30cm
1
2
3
1
2
3
4
5
6
7
8
9
10
11
12
13
14
15
16
MO TU WE TH FR ST SU
°C
°F
RT
FT
ST
P
Komfort
ECO
Programm
Urlaub
TU
°C
RT
P
RT
FT
ST
P
°C
°F
MO-SU
4
Thermostat-Installation bei mehreren Heizmatten
1. Elektronisches Thermostat;
Zuleitung NYM 3 x 1,5 mm² zur Verteilung.
2. Wellrohr für Temperaturfühler (Bodenfühler) oder
Kaltleiter (beide dürfen nicht zusammen in einem
Leerohr verlegt werden).
3. Verteiler-Unterputzdose (bei mehreren Heizmatten, die zu
einem Thermostat führen, ist eine separate Verteiler-
Unterputzdose erforderlich).
Übersicht Displaystruktur
9Wochentage Montag
(MO) bis Sonntag (SU)
10 WLAN-Anzeige
11 Bediensperre
(Kindersicherung)
12 Temperatureinheit
Celsius/Fahrenheit
13 Frostschutzmodus
14 Heizung AN
15 Urlaubsmodus
16
Programmereignis
AUFWACHEN
Programmereignis
GEHEN
Programmereignis
KOMMEN
Programmereignis
SCHLAFENGEHEN
1
Komfortmodus
ECO Modus
Programmmodus
Temporärer Modus
2Uhrzeit
3Temperatur
4
RT = Raumtemp.
FT = Bodentemp.
ST = eingestellte
Temperatur
5Fenster-O en-
Erkennung
6Wert verringern,
Auswahl „nach
unten“
7Ein/Aus-Taste,
Homebutton
8Wert erhöhen,
Auswahl „nach oben“
Bedienung - Grundfunktionen
Ein-/Ausschalten
Tippen Sie auf den Homebutton o und halten Sie ihn für etwa 3 Sekun-
den gedrückt, um das Thermostat ein- bzw. auszuschalten. Wenn das
Gerät ausgeschaltet (im Stand-by) ist, werden auf dem Display die
Informationen entsprechend der getro enen Auswahl in den erweiteren
Einstellungen F4, Code 16 angezeigt.
Hinweis:
Bei jedem Einschalten des Gerätes erscheinen für einen kurzen Moment
sämtliche Icons (vgl. Übersicht Displaystruktur) auf dem Display.
Tastensperre aktivieren
Gehen Sie zur Displayhauptanzeige und drücken Sie den
˄
Button für
etwa 3 Sekunden, um die Bediensperre (Kindersicherung) zu aktivieren.
Um die Bediensperre zu deaktivieren, drücken Sie den
˄
Button erneut
für 3 Sekunden. Das Thermostat lässt sich auch sperren bzw. entsperren,
wenn es sich im Stand-by be ndet.
Ruhemodus Display
Wird kein Button gedrückt, wird das Display nach etwa 25 Sekunden in
den Ruhemodus versetzt, indem es sich abdunkelt. Durch einfaches
Antippen einer der Eingabetasten
˅
o
˄
wird der Ruhemodus beendet.
Hinweis:
Ist das Thermostat eingeschaltet, wird im Ruhemodus der zuletzt aktive
Bildschirm angezeigt. Be ndet sich das Gerät im Stand-by, werden auf dem
Display die Informationen entsprechend der getro enen Auswahl in den
erweiteren Einstellungen F4, Code 16 angezeigt.
Betriebsmodus wählen
Gehen Sie zur Displayhauptanzeige, drücken Sie kurzzeitig den Home-
button o und wählen Sie eine der folgenden Betriebsarten aus:
Programm - Komfort - Eco - Urlaub.
Durch jeweils kurzzeitiges Drücken des Homebuttons o können Sie
zwischen den Betriebsarten wechseln.
Betriebsarten
Komfortmodus
In dieser Betriebsart hält der Thermostat eine zuvor eingestellte Tem-
peratur dauernd (rund um die Uhr) aufrecht. Die Temperatur kann mit
den Tasten
˄
und
˅
gewählt werden. Bestätigen Sie die Auswahl nicht
mit dem o Button, sondern warten Sie einen kurzen Moment, bis die
Temperaturanzeige von ST auf RT oder FT wechselt.
Die Temperatur ist einstellbar von +5 °C bis +35 °C.
Voreingestellt (Werkseinstellung) sind 23 °C.
ECO Modus
In dieser Betriebsart hält der Thermostat eine zuvor eingestellte Tem-
peratur dauernd (rund um die Uhr) aufrecht. Die Temperatur kann mit
den Tasten
˄
und
˅
gewählt werden. Bestätigen Sie die Auswahl nicht
mit dem o Button, sondern warten Sie einen kurzen Moment, bis die
Temperaturanzeige von ST auf RT oder FT wechselt.
Die Temperatur ist einstellbar von +5 °C bis +35 °C.
Voreingestellt (Werkseinstellung) sind 18 °C.
Hinweis:
Mit dem erstmaligen Einschalten des Gerätes beginnt die WLAN-Anzeige
dauernd zu blinken, solange, bis Sie es erfolgreich in ihr lokales WLAN ein-
gebunden haben (vgl. Einstellungen F5 - WiFi-Verbindung). Wenn das Gerät
Verbindung zum WLAN hat, wird das Symbol weiter angezeigt, hört aber
auf zu blinken. Falls kein Zugri auf das WLAN-Netzwerk besteht (z.B. Emp-
fang gestört, schwacher Signalpegel), wird das Symbol nicht angezeigt.

Ereignis
Tag
Zeitraum 1
AUF-
WACHEN
Zeitraum 2
GEHEN
Zeitraum 3
KOMMEN
Zeitraum 4
SCHLAFEN-
GEHEN
Mo. - Fr. 06:00 20 °C 08:30 15 °C 17:00 20 °C 23:00 15 °C
Sa. - So. 06:00 20 °C 08:30 20 °C 17:00 20 °C 23:00 15 °C
Code
ausgewählter
Wert
5
F2 - Programmmodus einstellen
Hinweis:
Sie können aus zwei verschiedenen Wochenprolen wählen, vgl. erweitere
Einstellungen F4, Code 05. Entweder 5 - 1 - 1 = Mo. bis Fr. - Sa. - So.,
oder 7= wochentagsindividuell, Mo. - Di. - Mi. - Do. - Fr. - Sa. - So.
Wählen Sie F2 und tippen Sie auf o. Wählen Sie mithilfe der Tasten
˄
und
˅
den Wochentag und den Zeitraum (Ereignis). Tippen Sie auf o.
Legen Sie nun mithilfe der Tasten
˄
und
˅
zuerst die Uhrzeit fest und
bestätigen Sie die Eingabe mit o. Legen Sie mithilfe der Tasten
˄
und
˅
als nächstes die Temperatur fest und bestätigen Sie die Eingabe mit
o. Mithilfe der Tasten
˄
und
˅
gelangen Sie zum nächsten Zeitraum
bzw. Wochentag. Nehmen die auf diese Weise die Einstellungen für
alle anderen Tage bzw. Zeiträume vor. Nachdem Sie alle Wochentage
programmiert haben, drücken Sie lange auf o, um die Einstellungen
zu verlassen. Andernfalls wechselt das Thermostat nach 5 Sekunden
automatisch zurück zum Hauptbildschirm.
Standard-Einstellungen (Werkseinstellungen) im Programmmodus:
F3 - Betriebszeit ablesen
Wählen Sie F3 und tippen Sie auf o. Mithilfe der Tasten
˄
und
˅
können
Sie nun die Betriebszeit für Tag, Monat und Jahr ablesen.
Um die Einstellungen zu verlassen, drücken Sie auf o.
F4 - Erweiterte Einstellungen
Hinweis:
Die erweiterten Einstellungen sollten nur von einer qualizierten Person
angepasst werden.
Wählen Sie F4 und tippen Sie auf o, um zum ersten Parameter (01 wird
auf dem Display angezeigt) zu gelangen. Mithilfe der Tasten
˄
und
˅
kann nun der entsprechende Wert angepasst werden. Tippen Sie auf o,
um zum jeweils nächsten Parameter zu gelangen. Um die erweiterten
Einstellungen zu verlassen, drücken Sie lange auf o.
Beispiel:
Hinweis:
Die verschiedenen Parameter (vgl. Code 01 - 18) der erweiterten Ein-
stellungen sind in einer festen Reihenfolge angeordnet. Sie können nur
zum jeweils nächsten Parameter wechseln, nicht aber zurück zu einem
vorhergehenden. Dafür müssen Sie entweder die erweiterten Einstellungen
verlassen und erneut F4 wählen oder so o auf o tippen, bis Sie wieder
beim entsprechenden Parameter angelangt sind (auf Code 18 folgt wieder
Code 01 .).
Hinweis:
Die in nachfolgender Tabelle mit *) gekennzeichneten Parameter lassen
sich nur direkt am Thermostat einstellen und können nicht über die „Tuya
Smart“ App angepasst werden.
Programmmodus
Im Programmbetrieb regelt der Thermostat die Heizung in Abhängigkeit
von Uhrzeit und Wochentag automatisch auf die eingestellte Temperatur.
Der Thermostat arbeitet nach einem 4-Phasen-Zeitplan. Eine Phase ist
ein geplanter Zeitraum des Tages. Entsprechend dem ausgewählten
Wochenprol (vgl. erweitere Einstellungen F4, Code 05) können für alle
Wochentage bzw. eine Gruppe von Wochentagen vier Zeiträume (Ereig-
nisse) mit Uhrzeit und Temperatur programmiert werden (vgl. Ein-
stellungen F2). Perfekt geeignet, wenn Ihr Tag wie folgt verläu: Sie ste-
hen morgens auf (Aufstehen), Sie gehen zur Arbeit (Gehen), Sie kommen
wieder nach Hause (Kommen) und Sie gehen schlafen (Schlafengehen).
Die Temperatur ist einstellbar von +5 °C bis +40 °C.
Mithilfe der Tasten
˄
und
˅
kann die Temperatur aus dem laufenden
Betrieb heraus jederzeit manuell angepasst werden. Bestätigen Sie die
Auswahl mit dem o Button oder warten Sie einen kurzen Moment, bis
die Temperaturanzeige von ST auf RT oder FT wechselt. Das Thermostat
wechselt infolgedessen in den Temporären Modus. Die geänderte Tem-
peratureinstellung wird nur vorübergehend und einmalig für die laufende
Heizphase angewendet und wird nicht dauerha in die Einstellungen
übernommen. Mit Beginn der darauolgenden Phase (Ereignis) kehrt der
Thermostat zum planmäßigen Betrieb zurück.
Urlaubsmodus
Mit dieser Betriebsart können Sie die Fußbodenheizung bei geplanter Ab-
wesenheit (z.B. Urlaub) auf Sparbetrieb einstellen, um Energie zu sparen.
Der Thermostat regelt die Heizung für die Dauer der Abwesenheit auf die
eingestellte Spartemperatur und hält diese dauernd (rund um die Uhr)
aufrecht. Für die Einstellung der Abwesenheitsdauer (Anzahl Abwesen-
heitstage) vgl. Einstellungen F4, Code 11. Die Temperatur kann mit
den Tasten
˄
und
˅
gewählt werden. Bestätigen Sie die Auswahl nicht
mit dem o Button, sondern warten Sie einen kurzen Moment, bis die
Temperaturanzeige von ST auf RT oder FT wechselt. Nach Ablauf der
Abwesenheitsdauer wechselt der Thermostat automatisch in den
Programmmodus, unabhängig davon, welche Betriebsart zuvor einge-
stellt war. Die Temperatur ist einstellbar von +5 °C bis +20 °C.
Voreingestellt (Werkseinstellung) sind 10 °C.
Einstellungen
Tippen Sie auf den Homebutton o und halten Sie ihn für 3 Sekunden
gedrückt, um das Thermostat auszuschalten. Tippen Sie danach gleich-
zeitig auf den
˄
und
˅
Button und halten Sie beide so lange gedrückt,
bis F1 auf dem Display angezeigt wird. Mit Hilfe der Tasten
˄
und
˅
können Sie anschließend zwischen F1, F2, F3, F4, F5 wählen.
Hinweis:
Wenn Sie während der folgenden Einstellungen F1 und F2 nach wenigen
Sekunden keine Eingabe vorgenommen haben, verlässt der Thermostat
automatisch die Einstellungen und kehrt zum Hauptbildschirm zurück.
Die bis zu diesem Zeitpunkt vorgenommenen Einstellungen werden
gespeichert. Kehren Sie bei Bedarf erneut zu den Einstellungen zurück.
F1 - Datum und Uhrzeit einstellen
Wählen Sie F1 und tippen Sie auf o. Legen Sie mithilfe der Tasten
˄
und
˅
zuerst den Wochentag und dann die Uhrzeit (Stunden, Minuten) fest.
Bestätigen Sie die Eingabe jeweils mit o. Nachdem Sie die „Minuten“ mit
o bestätigt haben gelangen Sie automatisch zurück zum Hauptbild-
schirm. Sie können die Einstellungen jederzeit verlassen, indem Sie o
lange drücken.
Code Parameter Erläuterung
F1 Datum, Uhrzeit einstellen Datum und Uhrzeit programmieren
F2 Programmmodus
einstellen
Wochenprogramm festlegen, Uhrzeit
und Temperatur für 4 Zeiträume
(Ereignisse) für alle Wochentage
programmieren
F3 Betriebszeit ablesen Betriebszeit Tag, Monat, Jahr ablesen
F4 Erweiterte Einstellungen Erweiterte Einstellungen vornehmen
F5 Wi-Fi-Verbindung 000: nicht zurücksetzen
001: Gerät zurücksetzen und Pairing
(Wi-Fi-Verbindung) im EZ-Modus
002: Gerät zurücksetzen und Pairing
(Wi-Fi-Verbindung) im AP-Modus

6
Code Parameter Werksein-
stellung
Einstell-
möglichkeiten
Erläuterung
01 Sensorwahl 01 01: Raumfühler
mit Bodentempe-
raturbegrenzung
02: Raumfühler
03: Bodenfühler
Das Gerät ermöglicht eine Steuerung des Fußbodenheizsystems über einen Boden- und
Raumtemperatursensor. Wahlweise kann entweder nur einer der beiden Sensoren aktiviert
werden oder es können beide Sensoren gleichzeitig ausgewählt werden. In diesem Fall regelt
der Raumfühler die Heizung in Abhängigkeit der eingestellten maximalen Bodentemperatur
(vgl. Code 04), die zur Begrenzung dient.
02 Raumfühler-
kalibrierung
0 °C -5 °C ... +5 °C Ermöglicht es Ihnen, den Raumfühler (fest im Gerät verbaut) zu kalibrieren, wenn die
gemessene Temperatur von der tatsächlichen Raumtemperatur abweicht. Die natürliche
Eigenerwärmung des Gerätes bei seinem normalen Betrieb kann die Temperaturmessung
ebenso beeinussen wie die Positionierung des Thermostats, etwa in der Nähe anderer
Wärmequellen, Fenstern, Türen usw.
03 Bodenfühler-
kalibrierung
0 °C -5 °C ... +5 °C Ermöglicht es Ihnen, den Bodenfühler zu kalibrieren, wenn die gemessene Temperatur von
der tatsächlichen Bodentemperatur abweicht.
04 Boden-
temperatur-
begrenzung
35 °C +5 °C ... +60 °C Ermöglicht es Ihnen, eine maximale Bodentemperatur als Temperaturobergrenze festzu-
legen. Dies ist vor allem dann von Vorteil, wenn z.B. Laminat- oder Klick-Vinyl-Fußböden vor
zu hohen Temperaturen geschützt werden sollen.
05 Wochenprol 5-1-1 5-1-1,
7
Entsprechend dem ausgewählten Wochenprol können entweder alle Tage individuell
programmiert werden oder die Werktage werden als eine Gruppe zusammengefasst.
5-1-1 = Mo. bis Fr. (als eine Gruppe) - Sa. - So. / 7 = Mo. - Di. - Mi. - Do. - Fr. - Sa. - So.
(wochentagsindividuell). Hinweis: Relevant nur für den Programmmodus.
06 Adaptiver Start
(Selbstlern-
funktion)
Aus (no) An (YES),
Aus (no)
Durch fortlaufende Analyse der bisherigen Heizcharakteristiken berechnet der Thermostat
automatisch die erforderliche Einschaltzeit (Vorheizzeit), damit rechtzeitig zur programmier-
ten Uhrzeit die eingestellte Temperatur erreicht werden kann. Ist diese Funktion AUS, schaltet
der Thermostat die Heizung genau zu der von Ihnen eingestellten Uhrzeit ein.
Hinweis: Relevant nur für den Programmmodus.
07 *) Adaptive
Startzeit
(Vorheizzeit)
20 Min. 0-40 Min. Wird die adaptive Startfunktion (vgl. Code 06) erstmals aktiviert, wird die Heizung entspre-
chend der unter diesem Punkt gewählten Vorheizzeit früher eingeschaltet. Durch die unter
Code 06 beschriebene fortlaufende Analyse wird die Vorheizzeit für zukünige Heizphasen
Schritt für Schritt an die Erfordernisse angepasst.
08 Fenster-Oen-
Erkennung Aus (OFF) An (on),
Aus (OFF)
Der Thermostat überwacht permanent die Raumtemperatur. Wenn diese innerhalb von
15 Minuten um mehr als 5 Grad gesunken ist, nimmt der Thermostat an, dass ein Fenster ge-
önet ist und schaltet die Heizung für 30 Minuten aus, um Energie zu sparen. Nach dieser Zeit
wird die Heizungssteuerung im zuletzt aktiven Betriebsmodus fortgesetzt. Wenn Sie während
der 30 Minuten den Betriebsmodus ändern, wird die Funktion aufgehoben, das entsprechen-
de Symbol auf dem Display erlischt. Hinweis: Die Fenster-Oen-Erkennung ist auch dann aktiv,
wenn nur der Bodensensor (vgl. Code 01, Einstellung 03) aktiviert wurde.
09 Bodensensor-
typ
10 kOhm 10 kOhm,
12 kOhm
Das Gerät unterstützt auch andere Typen von Bodentemperaturfühlern. Diese Einstellung
ermöglicht es Ihnen, den entsprechenden Bodenfühlertyp festzulegen, indem Sie den
entsprechenden Nennwiderstand auswählen.
10 Frostschutz-
funktion An (YES) An (YES),
Aus (no)
Diese dient dazu, die Temperatur über dem Gefrierpunkt zu halten, wenn ein Raum für
längere Zeit nicht genutzt wird. So wird z.B. ein Einfrieren von Leitungen verhindert. Der
Thermostat hält die Temperatur auf über +5 °C. D.h., bei ≤ +5 °C schaltet der Thermostat die
Heizung ein und bei Erreichen von +7 °C wieder aus. Wenn Sie diese Funktion aktiviert haben
„An (YES)“, ist sie auch dann aktiv, wenn sich das Thermostat im Stand-by bendet.
11 *) Urlaubszeit 1 Tag (01) 1-99 Tage Einstellung der Abwesenheitsdauer für den Betrieb der Heizung im Urlaubsmodus.
12 Schaltverzöge-
rung
1 °C 0.5 °C, 1 °C, 2 °C,
3 °C
Schaltverzögerung bedeutet, dass der Temperaturregler die Heizung nicht dann ein- bzw.
ausschaltet, wenn exakt die eingestellte Solltemperatur erreicht ist, sondern um den gewähl-
ten Schalttoleranzwert früher bzw. später. Bsp.: Solltemperatur 26 °C, Schaltverzögerung 1 °C,
der Regler schaltet die Heizung bei ≤ 25 °C ein und bei ≥ 27 °C aus.
Je geringer der Wert für die Schaltverzögerung, desto häuger schaltet der Regler.
Je größer der Wert gewählt wird, desto ungenauer die Temperatursteuerung.
13 *) Genauigkeit
Displayanzeige
0.5 °C 0.5 °C, 0.1 °C Einstellung, mit welchem Genauigkeitsgrad die Temperatur auf dem Display angezeigt
werden soll. Entweder 0.1 °C-Schritte (Bsp.: 23.1 °C, 23.2 °C) oder 0.5 °C-Schritte (Bsp.: 23.0 °C,
23.5 °C).
14 *)
Temperatur-
eingabeschritte
0.5 °C 0.1 °C, 0.5 °C, 1 °C Einstellung, in welchen °C-Schritten die Solltemperatur eingestellt werden kann.
15 Zurücksetzen Nein (no) Ja (YES),
Nein (no)
Bietet Ihnen die Möglichkeit, das Gerät auf die Werkseinstellungen zurückzusetzen.
Hinweis: Wenn „JA“ ausgewählt ist, zum Bestätigen oso lange drücken, bis die Displayhaupt-
anzeige erscheint. Das Gerät ist nun zurückgesetzt.
16 *) Displayanzeige
im Stand-by
02 01: Display AUS
02: Temperatur
wird angezeigt
Ermöglicht es Ihnen, die Information auszuwählen, die auf dem Startbildschirm im Stand-by
angezeigt werden soll.
17
Temperatureinheit
°C °C, °F Auswahl der Temperatureinheit, Celsius oder Fahrenheit.
18 *) Gerätestatus
beim Wieder-
einschalten
(nachdem das
Gerät von der
Stromzufuhr
getrennt war)
11: Zurückkehren
in den vorherigen
Betriebszustand
2: Gerät AUS
3: Gerät EIN
Einstellung, in welchen Status das Gerät versetzt werden soll, nachdem die Stromversor-
gung wiederhergestellt wurde (z.B. nach einem Stromausfall).
1: Das Gerät kehrt in den vorherigen Betriebszustand (von vor der Spannungsunterbrechung)
zurück. War das Thermostat ausgeschaltet, wird bzw. bleibt es ausgeschaltet. War das Gerät
eingeschaltet, kehrt es in den Betriebsmodus zurück, in dem es zuletzt aktiv war.
2: Das Gerät wird bzw. bleibt ausgeschaltet.
3: Das Gerät wird eingeschaltet und arbeitet im zuletzt aktiven Betriebsmodus weiter.

7
F5 - WiFi-Verbindung
Vorgaben für die WLAN-Verbindung:
• Vom Thermostat unterstützte WLAN-Standards: IEEE 802.11. b/g/n
2,4 GHz.
• Positionieren Sie die Antennen des WLAN-Routers gemäß den Empfeh-
lungen des Herstellers, um den maximal möglichen WLAN-Signalpegel
an der Stelle zu erreichen, an der der Thermostat installiert ist.
• Die Anzahl der Thermostate, die gleichzeitig an Ihr Heimnetzwerk
angeschlossen werden können, hängt vom verwendeten Routertyp ab.
• Wenn der WLAN-Signalpegel Ihres Heimnetzwerks am Einbauort des
Thermostats von anderen WLAN-Netzwerken oder Störquellen im
2,4 GHz Bereich gestört wird, empfehlen wir, auf einen weniger
ausgelasteten WLAN-Kanal zu wechseln, die Störquelle zu beseitigen,
die Position des Routers zu ändern oder Geräte für eine bessere Reich-
weite des Funksignals zu nutzen (Access Point, Repeater).
• Bei der Installation von Thermostaten in großächigen Räumen mit
komplizierter Geometrie oder bei Problemen mit der Konguration
der WLAN-Verbindung empfehlen wir, sich an einen Spezialisten für die
Konguration der WLAN-Geräte zu wenden.
Hinweis:
Sie können den WLAN-Signalpegel und die ausgelasteten WLAN-Kanäle
z.B. mit einer geeigneten Smartphone App (erhältlich für iOS und Android
Geräte) überprüfen, indem Sie Ihr Smartphone am Installationsort des
Thermostats platzieren. Auch bieten die meisten Router eine Möglichkeit
zur Überprüfung der Signalstärke verbundener WLAN-Geräte. Wenn der
Signalpegel geringer als erforderlich ist, ändern Sie die Position des
Routers oder verwenden Sie Geräte, um den Abdeckungsbereich des
WLAN-Netzwerks zu vergrößern (Access Point, Repeater usw.). Die WLAN-
Signalausbreitung wird durch Stahlbetonböden, Metallgegenstände
(Schränke, Kästen, Spiegel usw.) sowie durch Funkstörungen (z.B. Mikro-
wellengeräte) beeinusst. Eine Quelle für Funkstörungen können auch
WLAN-Zugangspunkte sein, die in benachbarten Räumen installiert sind.
Da der Thermostat bündig in der Wand (Unterputz) montiert ist, kann
der vom Gerät empfangene WLAN-Signalpegel niedriger sein als der vom
Smartphone angezeigte.
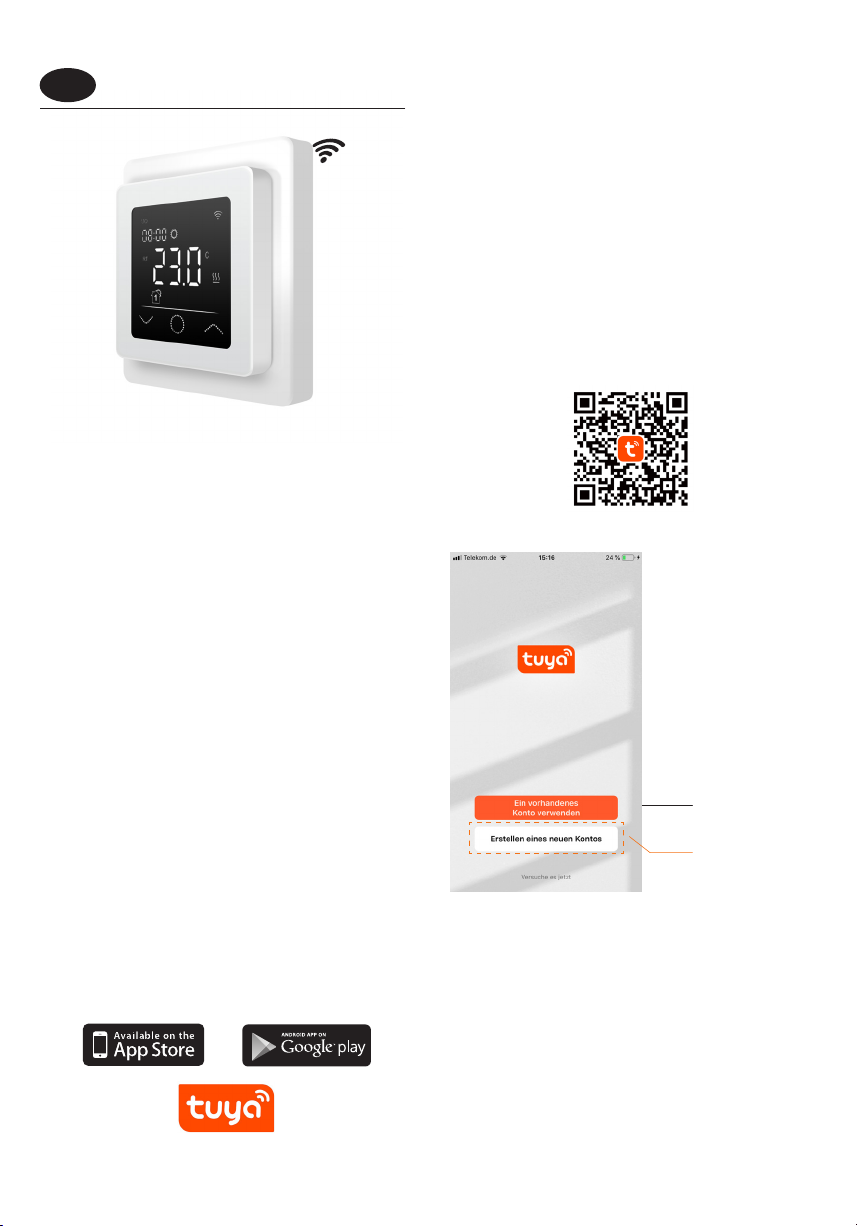
Ein Gerät hinzufügen
Um das Thermostat über die „Tuya Smart“ App einstellen und bedienen
zu können, müssen Sie es zunächst in der App hinzufügen und mittels
WLAN mit ihrem Smartphone oder Tablet verbinden. Dafür stehen zwei
Methoden zur Verfügung, ein „Automatisches Verbinden“ mittels Blue-
tooth und ein „Manuelles Verbinden“. Das „Automatische Verbinden“
wird empfohlen. Die manuelle Methode steht Ihnen als Alternative zur
Verfügung, sollte das automatische Verbinden nicht erfolgreich sein.
Methode 1: Automatisches Verbinden
1. Stellen Sie sicher, dass Ihr WLAN angeschaltet, funktionsfähig und auf
dem 2,4-GHz-Frequenzband aktiv ist.
2. Aktivieren Sie Bluetooth auf ihrem Endgerät.
3. Melden Sie sich mit Ihren Zugangsdaten in Ihrem „Tuya Smart“
Benutzerkonto an.
4. Das Thermostat wird automatisch von Ihrem Smartphone erkannt
und in der App angezeigt.
5. Tippen Sie auf „Hinzufügen“.
6. Geben Sie den Netzwerknamen und das Kennwort ein oder wählen
Sie ein zuvor bereits hinzugefügtes WLAN-Netzwerk aus und tippen
Sie auf „Weiter“.
7. Das Thermostat wird nun automatisch hinzugefügt.
8. Nachdem das Gerät erfolgreich hinzugefügt bzw. verbunden wurde,
tippen Sie auf „Fertigstellung“.
Hinweis:
Für das „Automatische Verbinden“ ist es zunächst nicht erforderlich, die
Einstellungen F5 aufzurufen.
Gehen Sie wie folgt vor, falls das Gerät nicht automatisch erkannt und in
der App angezeigt wird. Tippen Sie auf den Homebutton ound halten Sie
ihn für 3 Sekunden gedrückt, um das Thermostat auszuschalten. Tippen
Sie danach gleichzeitig auf den
˄
und
˅
Button und halten Sie beide
so lange gedrückt, bis F1 auf dem Display angezeigt wird. Wählen Sie F5
mit Hilfe der Tasten
˄
und
˅
. Wählen Sie in den folgenden Einstellungen
001 und bestätigen Sie die Auswahl mit o. Warten Sie einen Moment. Die
WLAN-Anzeige auf dem Display des Thermostats beginnt schnell zu
blinken. Önen Sie die „Tuya Smart“ App. Tippen Sie im Hauptbildschirm
auf die Schaltäche in der rechten oberen Ecke, anschließend auf
„Gerät hinzufügen“.
+
Methode 2: Manuelles Verbinden
Hinweis:
Der Thermostat unterstützt zwei Pairing-Modi, den EZ-Modus und den
AP-Modus.
EZ-Modus:
Wählen Sie F5 mit Hilfe der Tasten
˄
und
˅
. Wählen Sie in den folgen-
den Einstellungen 001 und bestätigen Sie die Auswahl mit o. Warten Sie
einen Moment. Die WLAN-Anzeige auf dem Display des Thermostats
beginnt schnell zu blinken. Önen Sie die „Tuya Smart“ App. Tippen Sie
in der App im Hauptbildschirm auf die Schaltäche in der rechten
oberen Ecke, dann auf „Gerät hinzufügen“. Wählen Sie anschließend als
Geräteart zuerst „Kleines Haushaltsgerät“ (linkes Auswahlmenü), dann
„Thermostat (Wi-Fi)“ in der Rubrik „HVAC“ im rechten Auswahlmenü.
Geben Sie den Netzwerknamen und das Kennwort ein oder wählen Sie
ein zuvor bereits hinzugefügtes WLAN-Netzwerk aus und tippen Sie auf
„Weiter“. Tippen Sie auf „Bestätigen Sie, dass die Anzeige schnell blinkt“
und in der nachfolgenden Ansicht auf „Blinkt schnell“. Der Verbindungs-
vorgang startet. Nachdem das Gerät erfolgreich hinzugefügt bzw.
verbunden wurde, tippen Sie auf „Fertigstellung“.
AP-Modus:
Wählen Sie F5 mit Hilfe der Tasten
˄
und
˅
. Wählen Sie in den folgen-
den Einstellungen 002 und bestätigen Sie die Auswahl mit o. Warten Sie
einen Moment. Die WLAN-Anzeige auf dem Display des Thermostats
beginnt langsam zu blinken. Önen Sie die „Tuya Smart“ App. Tippen
Sie in der App im Hauptbildschirm auf die Schaltäche in der rechten
oberen Ecke, dann auf „Gerät hinzufügen“. Wählen Sie anschließend als
Geräteart zuerst „Kleines Haushaltsgerät“ (linkes Auswahlmenü), dann
„Thermostat (Wi-Fi)“ in der Rubrik „HVAC“ im rechten Auswahlmenü.
Geben Sie den Netzwerknamen und das Kennwort ein oder wählen Sie
ein zuvor bereits hinzugefügtes WLAN-Netzwerk aus. Tippen Sie auf
„Bestätigen Sie, dass die Anzeige schnell blinkt“ und in der nachfolgen-
den Ansicht auf „Blinkt langsam“. Tippen Sie auf „Jetzt verbinden“. Die
WLAN-Einstellungen Ihres Smartphones werden nun automatisch geö-
net. Wählen Sie darin das WLAN-Netzwerk (Hotspot) „Smartlife-****“.
Der Verbindungsvorgang startet. Nachdem das Gerät erfolgreich hinzu-
gefügt bzw. verbunden wurde, tippen Sie auf „Fertigstellung“.
Alarmhinweise und Fehlerbehebung
Wichtig!
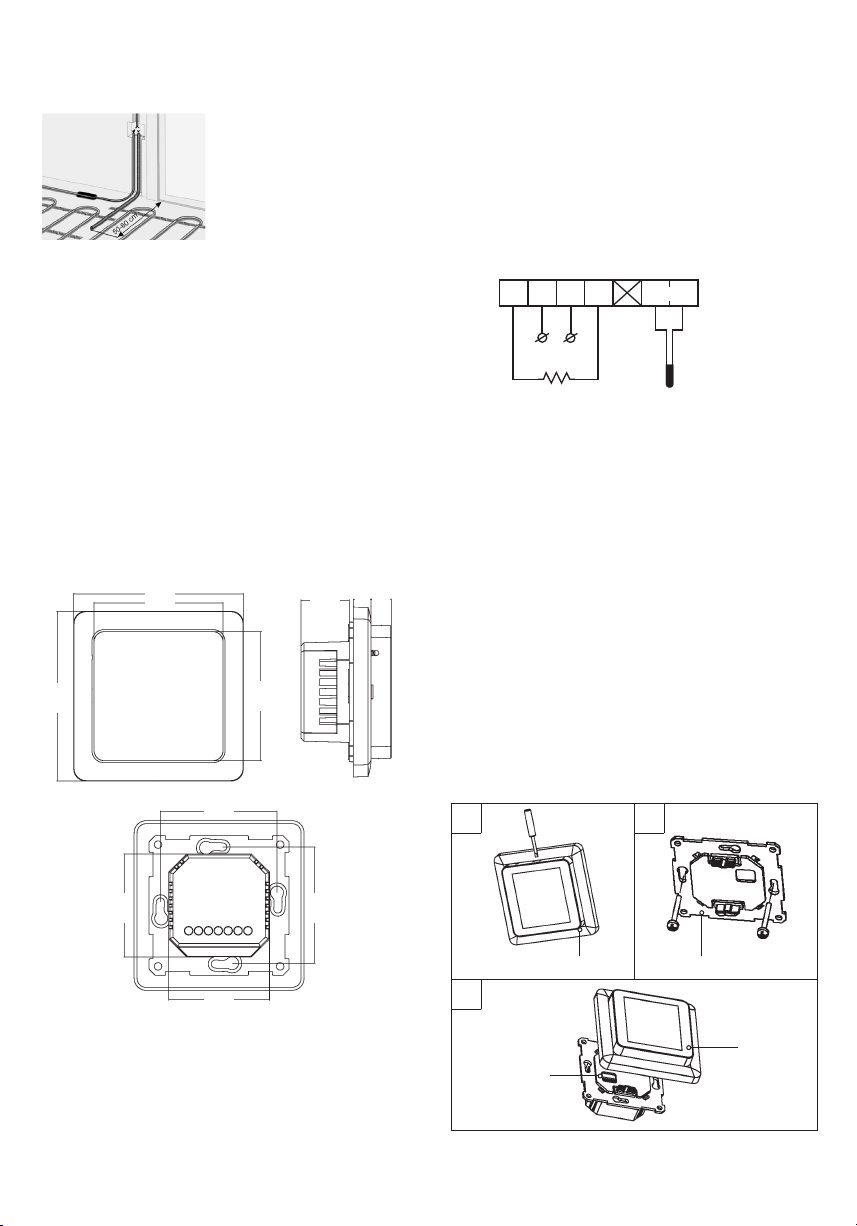
Arbeiten am Thermostat, den externen Bodentemperaturfühler einge-
schlossen, dürfen ausschließlich von einer qualizierten Fachkra
durchgeführt werden. Der elektrische Anschluss und der Anschluss an die
Stromversorgung dürfen ausschließlich von einer Elektrofachkra durchge-
führt werden, ebenso wie das Trennen des Gerätes von der Stromversor-
gung. Schalten Sie Ihr lokales Stromnetz spannungsfrei, bevor Sie den
Thermostat installieren oder bevor Sie ihn von der Stromversorgung
trennen, um das Gerät bzw. den externen Bodentemperaturfühler zu
überprüfen oder um es bzw. ihn auszutauschen.
Hinweis:
Nach einer Unterbrechung der Spannungszufuhr (z.B. bei Stromausfall
oder wenn das Thermostat von der Stromversorgung getrennt wurde,
um es zu überprüfen) bleiben die folgenden Einstellungen für 30 Tage
erhalten:
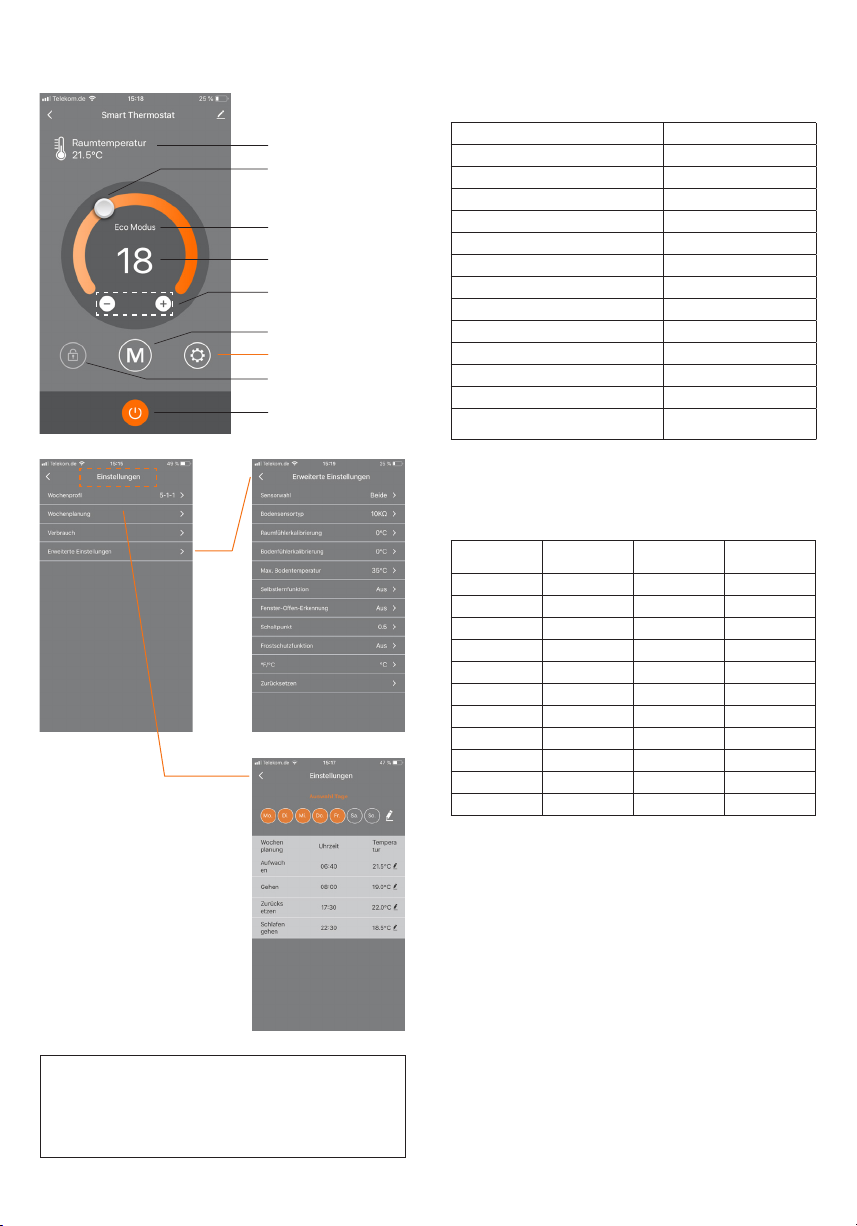
• F1 - Datum und Uhrzeit
• F2 - Einstellungen Programmmodus
• F4 - Erweiterte Einstellungen
• zuletzt aktiver Betriebsmodus
• eingestellte Temperatur
Alle übrigen Einstellungen gehen verloren und müssen neu vorgenommen
werden.
Fehlercode Fehlermerkmal Handhabung
Er1 Kurzschluss oder Defekt
des im Gerät verbauten
Raumsensors.
Thermostat oder Boden-
temperaturfühler überprü-
fen. Das Gerät darf erst
wieder in Betrieb genom-
men werden, wenn der
Fehler behoben wurde.
Die nachfolgenden
Sicherheitshinweise sind
zu beachten.
Er2 Kurzschluss oder Defekt
des externen Boden-
sensors oder Bruch des
Sensorkabels.
+
+

8
Vorbehalt
Alle Angaben entsprechen dem aktuellen Stand unserer Kenntnisse
und sind nach bestem Wissen richtig und zuverlässig. Änderungen,
Irrtümer und Druckfehler begründen keinen Anspruch auf Schadens-
ersatz. Für die Haung gelten ausschließlich die allgemeinen
Geschäsbedingungen. Technische Änderungen behalten wir uns
ohne entsprechende Vorankündigung vor.
Technische Daten
Thermostat MCS 750
*) Um für den Fall einer unsachgemäßen Nutzung unter Dauerlast die thermische
Belastung für die relevanten Gerätekomponenten gering zu halten und um eine
maximale Lebensdauer zu erreichen, wird empfohlen, eine maximale Last von
13 A (2990 W) zu schalten bzw. anzuschließen.
Bodentemperatursensor NTC 10 kOhm
Beanstandungen
Im Reklamationsfall während der Garantiezeit wenden Sie sich bitte an
den Verkäufer.
Um eine erfolgreiche Reklamationsbearbeitung zu gewährleisten ist es
notwendig, den Sensor zusammen mit dem Thermostat zurückzusenden.
Garantie
Der Hersteller garantiert die Übereinstimmung des Thermostats mit
der Konstruktionsbeschreibung unter der Annahme der Beachtung der
Montage- und Betriebsanleitung.
Garantiezeitraum – 2 Jahre ab Kaufdatum.
Tritt innerhalb des Garantiezeitraums ein Mangel auf, der auf eine fehler-
hae Herstellung zurückzuführen ist, so hat der Kunde das Recht auf
Nacherfüllung. Schäden aufgrund unsachgemäßer Handhabung,
Beschädigung durch Fremdverschulden, falscher Installation (nicht
der Anleitung folgend) oder deren Folgeschäden, sind von der Garantie
ausgenommen. Bitte bewahren Sie Ihren Kaufbeleg auf.
Garantieleistungen werden nur gegen Vorlage des Kaufbelegs erbracht.
Versorgungspannung 230 VAC, 50 Hz
Maximaler Schaltstrom (Schaltlast) 16 A *)
Stromverbrauch < 2 W
Gewicht 140 g
Abmessungen 86x86x48 mm
IP Schutzklasse IP21
Geräteschutzklasse II
Bodentemperatursensor NTC 10 kOhm
Länge Anschlussleitung Sensor 3 m
Zul. Umgebungstemperaturbereich +5...+55 °C
Max. zul. relative Lufeuchtigkeit 60% (nicht kondensierend)
Temperatureinstellbereich +5...+40 °C
Unterstützte WLAN-Netzwerkstandards IEEE 802.11. b/g/n 2.4 GHz
Weitere unterstützte Typen
von Bodentemperaturfühlern 12 kOhm
Temperatur
[°C]
Widerstand
[kW]
Temperatur
[°C]
Widerstand
[kW]
10 19,46 - 20,11 21 11,82 - 12,09
11 18,65 - 19,27 22 11,30 - 11,55
12 17,80 - 18,37 23 10,81 - 11,04
13 17,00 - 17,52 24 10,35 - 10,56
14 16,23 - 16,71 25 9,90 - 10,10
15 15,50 - 15,95 26 9,47 - 9,66
16 14,81 - 15,22 27 9,06 - 9,25
17 14,15 - 14,53 28 8,67 - 8,86
18 13,52 - 13,87 29 8,30 - 8,49
19 12,92 - 13,25 30 7,95 - 8,14
20 12,36 - 12,65 31 7,61 - 7,80
Tuya Smart APP-Navigation
Auswahlmenü „Erweiterte
Einstellungen“.
Für die Erläuterung der
einzelnen Parameter und
die entsprechenden
Einstellmöglichkeiten vgl.
Tabelle unter „F4 - Erweiterte
Einstellungen“ in diesem
Handbuch.
Gemessene Temperatur
Schieberegler zur
Temperatureinstellung
Ausgewählte Betriebsart
Eingestellte Temperatur
Tasten zur
Temperatureinstellung
Auswahl Betriebsart
Einstellungen
Tastensperre
Ein/Aus-Taste
Hauptbildschirm
Einstellungen
Einstellung Programmmodus
Erweiterte Einstellungen

9
BODENTEMPERATURSENSOR
BESTÄTIGUNG 1 = VOR UND NACH VERLEGUNG DER HEIZMATTE BZW. DES HEIZKABELS
Der Sensor kann in das Wellrohr (Leerrohr) eingesetzt und wieder herausgenommen werden.
BESTÄTIGUNG 2 = VOR UND NACH VERLEGUNG DES FUSSBODENBELAGES
Der Sensor kann in das Wellrohr (Leerrohr) eingesetzt und wieder herausgenommen werden.
Der Thermostat MCS 750 hat alle Tests erfolgreich bestanden.
Thermostat
(Typ-Bezeichnung, Artikelnummer)
KUNDE
Name ___________________________________________ Telefon _________________________________________
Straße ___________________________________________ E-Mail __________________________________________
Postleitzahl, Stadt _________________________________
Land ____________________________________________ Unterschrift Kunde________________________________
Kaufdatum ______________ 20______
INSTALLATEUR
Name ___________________________________________ Telefon _________________________________________
Firmenname _____________________________________ E-Mail __________________________________________
Postleitzahl, Stadt _________________________________
Installationsdatum ______________ 20______ Unterschrift Installateur____________________________
Firmenstempel
Ausgefüllter Garantieschein/Prüfprotokoll ist Grundlage für Garantieanspruch.
Garantieschein

10
Introduction
The MCS 750 is designed to control electrical underoor heating systems
indoors (heating mats, lm heaters or heating cable sections). The
thermostat maintains a comfort temperature set for the oor or room
and contributes to energy-saving operation of your oor heating. The
thermostat oers temperature control using two sensors: oor sensor
(included in the scope of delivery) and air sensor (built-in). For heating
control, either both temperature sensors can be selected (activated)
simultaneously, or optionally only one of the two sensors.
The thermostat is mounted onto a wall (ush-mounting) in close proxi-
mity to installation wires of the heating system used.
Scope of delivery
Thermostat - 1 piece
Floor sensor - 1 piece
Instructions for use and installation - 1 piece
Special features
The thermostat MCS 750 enables to control your oor heating either
directly from the device touch screen or by using the “Tuya Smart”
app installed on a smartphone. The thermostat shall be connected to a
smartphone via Wi-Fi.
— The WiFi network standards supported by the device are:
IEEE 802.11. b/g/n 2.4 GHz.
— The operating system requirements for smartphones:
Android 4.4 or higher, iOS 10.0 or higher.
Registration Tuya Smart app
App download
Scan the QR code with your smartphone or tablet or search for the
keyword “Tuya Smart” in the App Store or the Google Play Store for the
free app and download it.
User account registration
The following steps are to be performed for user accont registration in
the “Tuya Smart” app.
1. Run the “Tuya Smart” app on your smartphone and tap “Register” if
you don't have an account yet.
2. Then perform the necessary steps in the app to create the user
account by following the instructions on the smartphone.
The main steps are as follows.
3. Use the country or region that the system automatically identies and
displays or manually select a country or a region.
Important: Aer registration, the country or region cannot be changed.
4. Enter an email address and tap “Get Verication Code”.
5. Enter the conrmation code that you will receive by email.
6. Now, the password settings appear. Set a password. The password
requires 6-20 characters, and must contain both letters and digits.
7. Aer you have assigned a password to protect your account and tap
“Done”.
Important notes before installation
Read these instructions carefully before use and retain. If necessary,
pass the instructions on to a subsequent user. The installation must be
performed by a professional electrician in compliance with DIN-VDE
norms and applicable national laws, rules and regulations. Otherwise
the warranty invalidates. Switch o power from all wiring before ins-
talling, testing or replacing the thermostat. Only use electrical plastic
wall mounting boxes for the thermostat installation.
Use existing account
Register new account
EN

NNL L
t
L
O
A
D
L
O
A
D
NTC
230 VAC
Max. Load 16 A
Sensor
86.0
65.5
86.0
65.5
60.0
52.0
60.0
51.0
24.5
11.39.0
12
3
Receptacle of
the connector
Front cover Rear cover
Display
11
Installation
Floor temperature sensor installation
The oor temperature sensor cable
has to be placed into a separate
conduit according to EN 61386-1.
It should be placed at heating level
directly underneath the heating mat
by chiselling out a channel in the
suboor. The sensor should be
centrally positioned between two
heating conductors, which is in
the middle of a cable loop. Route the
heating mat cold lead through the second corrugated tube. Do not cross
the cold lead over or place it closer than about 2 cm to the mat heating
wires. Thermostat installation requires a standard plastic wall mounting
box with 230 V AC mains connection cable from the local wiring at the
intended location. A fault-current circuit breaker (30 mA) has to be used.
Double-check that the oor sensor is positioned in a corrugated tube
(Ø16mm) and can be easily removed from; check this during installa-
tion of the tube and again before installation of the screed and oor
covering respectively!
Connect the thermostat
Important!
We recommend to use the services of qualied specialists when installing
the thermostat and heating system. The electrical connection and
connection to the power supply must be performed by a professional
electrician in compliance with the applicable national laws, rules and
regulations. The installation instructions and wiring diagram do not
replace the professional skills of the device installer. Disconnect your
local wiring from the mains before connecting the thermostat or
disconnecting the device to check or replace it.
Install the mounting box with suitable screw spacing of 60 mm and the
intermediate junction box if necessary (e.g. if two or more heating mats
are to be connected and controlled with one thermostat). Lead power
supply cable, installation wires of the oor heating, and temperature
sensor installation wire to the box. Energize the supply cable and nd
the phase wire and the neutral wire using voltmeter; mark these wires.
Aerwards, de-energize the power supply cable.
Connect all required wiring to the thermostat using its terminals with
screw fastening.
• The oor temperature sensor must be connected to the two terminals
marked with NTC (polarity does not matter).
Important!
If the installation distance is shorter than the sensor installation wire
(standard 3m), the sensor cable must be shortened accordingly.
• The supply voltage (230 V AC) is applied to terminal N and L, with the
phase wire (detected by voltmeter) – to terminal L, and the neutral
wire – to terminal N.
• The heating element installation wires are to be connected to termi-
nals N LOAD and LLOAD; the screening braid output (yellow-green wire)
must be connected to the protective earthing (PE) line via an external
terminal contact (not included in the scope of delivery).
Important!
In order to keep the thermal impact on the relevant device components
low in the event of improper use under continuous load and to achieve
maximum service life, it is recommended to switch (connect) a maximum
load current of 13 A (2990 W).
Mounting the thermostat
1. Remove the front cover (part with display). Carefully press the latch
on the upper side of the front cover using a thin slot screwdriver and
gently pull the front cover o in your direction.
2. Make the electrical connection.
3. Insert the rear cover of the device into the wall mounting box and
fasten with two screws, le and right at the same height.
4. Insert the display into the frame and align the connector contacts on
the rear with the connector receptacle on the rear cover.
5. Carefully press the front cover with the frame against the rear cover
(inserted in the ush-mounted box before) until the latch lock in
place. Make sure that the front cover tightly adjoins the rear part of
the thermostat.
Important!
Avoid damaging or bending the contacts of the connector during
installation.

H = 30cm
1
2
3
1
2
3
4
5
6
7
8
9
10
11
12
13
14
15
16
MO TU WE TH FR ST SU
°C
°F
RT
FT
ST
P
Comfort
ECO
Program
Holiday
TU
°C
RT
P
RT
FT
ST
°C
°F
P
MO-SU
12
Note:
When the device is switched on for the rst time, the Wi-Fi signal starts
ashing continuously until having connected successfully to your local
Wi-Fi network (cf. settings F5 - Wi-Fi connection). If the device is connected
to the Wi-Fi, the icon will continue to be displayed, but will stop ashing.
If there is no access to the Wi-Fi network (e.g. reception disturbed, weak
signal level), the icon will not be displayed.
Thermostat installation for two or more heating mats
1. Electrical thermostat; power supply cable
NYM 3 x 1.5 mm².
2. Corrugated tube for the temperature sensor ( oor sensor)
or the cold lead (both are not to be installed inside the
same tube).
3. Flush-mounted junction box (if two or more heatings mats
are to be connected to the same thermostat, a separate
ush-mounted junction box is required).
Display structure
1
Comfort mode
ECO mode
Program mode
Temporary mode
2Time
3Temperature
4
RT = Room temp.
FT = Floor temp.
ST = Set temperature
5Open window
detection
6decrease value,
selection
“down”
7“ON/OFF” button,
Home button
8increase value,
selection
“up”
9Weekday Mon (MO) to
Sun (SU)
10 WiFi signal
11 Key lock
(child lock)
12 Temperature unit
Celsius/Fahrenheit
13 Anti-freezing mode
14 Heating ON
15 Holiday mode
16
Program mode event
WAKING UP
Program mode event
LEAVING HOME
Program mode event
COMING HOME
Program mode event
GOING TO SLEEP
Operation - basic functions
Switching ON/OFF
Tap the home button o and keep pressed for about 3 seconds to switch
the thermostat on or o . When the device is switched o (stand-by), the
display shows the information according to what has been selected in
advanced settings F4, code 16.
Note:
Each time the device is switched on, all the icons (see overview of display
structure) appear on the display for a short moment.
Activate key lock
Switch to the display main screen and tap the
˄
button for about
3 seconds to activate the key lock (child lock). To disable the key lock,
tap the
˄
button for another 3 seconds. The thermostat can also be
locked or unlocked in standby mode.
Display sleep mode
If no button is tapped, the display will switch to sleep mode a er about
25 seconds by dimming. With tapping one of the input keys
˅
o
˄
the
sleep mode ends.
Note:
If the thermostat is on, the last active screen is displayed in sleep mode.
When the device is in standby mode, the display shows the information
according to what has been selected in advanced settings F4, code 16.
Select operation mode
Switch to the display main screen, tap the home button o and select
one of the following operating modes:
Program - Comfort - Eco - Holiday.
Switch between the operating modes by repeatedly tapping the home
button o.
Operating modes
Comfort mode
Using comfort mode, the thermostat permanently (24/7) maintains the
desired temperature. The temperature can be selected with the
˄
and
˅
buttons. Do not con rm the selection with the o button, but wait a short
moment until the temperature display changes from ST to RT or FT.
Temperature setting is possible in the range of +5 °C bis +35 °C.
The default setting (factory setting) is 23 °C.
ECO mode
Using ECO mode, the thermostat permanently (24/7) maintains the
desired temperature. The temperature can be selected with the
˄
and
˅
buttons. Do not con rm the selection with the o button, but wait a short
moment until the temperature display changes from ST to RT or FT.
Temperature setting is possible in the range of +5 °C bis +35 °C.
The default setting (factory setting) is 18 °C.

Event
Day
Period 1
WAKING UP
Period 2
LEAVING
HOME
Period 3
COMING
HOME
Period 4
GOING TO
SLEEP
Mon - Fri 06:00 20 °C 08:30 15 °C 17:00 20 °C 23:00 15 °C
Sat - Sun 06:00 20 °C 08:30 20 °C 17:00 20 °C 23:00 15 °C
Code
Selected value
13
Program mode
Using program mode, the thermostat automatically controls the heating
to the set temperature depending on the time and day of the week. The
thermostat operates on a 4-phase schedule. A phase means a planned
period of the day. According to the selected week prole (cf. advanced
settings F4, code 05), four periods (events) with time and temperature
can be programmed for all weekdays or a group of weekdays (cf. set-
tings F2). Best solution for a daily routine as follows: waking up in
the morning, going to work, coming back home and going to sleep.
Temperature setting is possible in the range of +5 °C bis +40 °C.
Using
˄
and
˅
buttons, the temperature can be manually adjusted
from the running mode at any time from the running mode. Conrm the
selection with the o button or wait a short moment until the tempe-
rature display changes from ST to RT or FT. As a result, the thermostat
switches to Temporary mode. The changed temperature setting is only
applied temporarily for the running heating period (event) but will not
be saved in the settings. With the beginning of the following period, the
thermostat returns to set week programm.
Holiday mode
This operating mode allows to set the oor heating to economy mode
during planned absence (e.g. vacation) in order to save energy. The
thermostat permanently (24/7) controls the heating for the duration
of absence to the set economy temperature maintains it permanently
(around the clock). For setting the duration of absence (number of days
of absence) cf. settings F4, code 11. The temperature can be selected
with the
˄
and
˅
buttons. Do not conrm the selection with the o
button, but wait a short moment until the temperature display changes
from ST to RT or FT. If the absence period is expired, the thermostat auto-
matically switches to the program mode, regardless of which operating
mode has been previously selected. Temperature setting is possible in
the range of +5 °C bis +20 °C.
The default setting (factory setting) is 10 °C.
Settings
Tap the home button o and keep pressed for about 3 seconds to switch
the thermostat o. Then tap the
˄
and
˅
button at the same time and
hold them down until F1 appears on the display. Using the
˄
and
˅
buttons, you can select between F1, F2, F3, F4, F5.
Note:
If in F1 and F2 settings there is no request made for a few seconds, the
thermostat will automatically exit the settings and return to the main
screen. The settings made up to this point will be saved. Return to the
settings again if necessary.
F1 - Date and time setting
Select F1 and tap o. Use the
˄
and
˅
buttons to select the day of the
week rst and then the time (hours, minutes). Conrm both setting each
with tapping o. As soon as the “Minutes” have been conrmed with o
you will automatically return to the main screen. You can exit the settings
at any time by long tapping o.
Code Parameter Comment
F1 Date and time setting Set date and time
F2 Program mode
setting
Schedule week program, set date
and temperature for 4 periods
(events) for each weekday
F3 Operation time reading Read operation time day, month,
year
F4 Advanced settings Eect advanced settings
F5 WiFi connection 000: no reset
001: Reset device and pairing (WiFi
connection) using EZ mode
002: Reset device and pairing (WiFi
connection) using AP mode
F2 - Program mode setting
Note:
You can choose from two dierent week proles, cf. advanced settings
F4, code 05. Either 5 - 1 - 1 = Mon to Fri - Sat - Sun, or 7= each weekday
individually, Mon - Tue - Wed - Thu - Fri - Sat - Sun.
Select F2 and tap o. Use the
˄
and
˅
buttons to select the day of the
week and the period (event). Tap o. Now use the
˄
and
˅
buttons to
set the time rst and conrm with o. Next, set the temperature using
the
˄
and
˅
buttons and conrm with o. Use the
˄
and
˅
buttons
to move to the next period and day of the week respectively. Proceed
with the settings for all other days and periods in the same way. Aer
you have programmed all the days of the week, long tap o to exit the
settings. Otherwise, the thermostat will automatically switch to the
main screen aer 5 seconds.
Default settings (factory settings) for Program mode:
F3 - Operation time reading
Select F3 and tap o. Using the
˄
and
˅
buttons, you can read the
operating time for day, month and year. To exit the settings, tap o.
F4 - Advanced settings
Note:
Changes to the advanced settings should only be performed by a qualied
person.
Select F4 and tap o to move to the rst parameter (01 is shown on the
display). Using the
˄
and
˅
buttons allow to adjust the value now. Tap
o to move to the next parameter. To exit the advanced settings, long
tap o.
Example:
Note:
The various parameters (cf. codes 01 - 18) of the advanced settings are
arranged in a xed order. You can only switch to the next parameter, but
not return to a previous one. To do this, you must either exit the advanced
settings and select F4 again or tap orepeatedly until you reach the corres-
ponding parameter again (code 18 is followed by code 01 . again).
Note:
The parameters marked with *) in the following table can only be set
directly on the thermostat and cannot be adjusted via the “Tuya Smart”
app.

14
Code Parameter Factory
setting
Possible settings Comment
01 Sensor
selection
01 01: Room sensor
with oor tempe-
rature limitation
02: Room sensor
03: Floor sensor
The device oers control of the underoor heating using a oor and a room temperature
sensor. Optionally, either only one of the two sensors can be activated or both sensors can be
selected at the same time. In this case, the room sensor controls the heating depending on
the set maximum oor temperature (cf. code 04), which is used for limitation.
02 Room sensor
calibration
0 °C -5 °C ... +5 °C Allows you to calibrate the room sensor (integrated in the device) if the measured
temperature diers from the actual room temperature. The usual self-heating of the device
during its normal operation can aect the temperature measurement, as well as the
positioning of the thermostat, e.g. near other heat sources, windows, doors.
03 Floor sensor
calibration
0 °C -5 °C ... +5 °C Allows you to calibrate the oor sensor if the measured temperature diers from the actual
oor temperature.
04 Floor
temperature
limitation
35 °C +5 °C ... +60 °C Allows you to set a maximum oor temperature as the upper temperature limit. This is
particularly benecial when, for example, laminate or click vinyl ooring is to be protected
from excessively high temperatures.
05 Week prole 5-1-1 5-1-1,
7
According to the selected week prole, either all weekdays can be programmed individually
or the working days are combined as one group.
5-1-1 = Mon to Fri (as a group) - Sat - Sun / 7 = Mon - Tue - Wed - Thu - Fri - Sat - Sun (each
weekday individually). Note: Relevant only for Program mode.
06 Adaptive start
(self-learning
mode)
O (no) On (YES),
O (no)
By continuously analyzing the previous heating characteristics, the thermostat automatically
calculates the required turn-on time (preheating time) so that the set temperature can be
achieved in time until the programmed time. If this function is OFF, the thermostat will turn
on the heating exactly at the programmed time.
Note: Relevant only for Program mode.
07 *) Adaptive
start time
(preheating
time)
20 Min. 0-40 Min. When the adaptive start function (cf. code 06) is activated for the rst time, the heating is
switched on earlier according to the preheating time selected under this item. Through the
continuous analysis described under code 06, the preheating time for future heating periods
will be adapted step by step to the requirements.
08 Open window
detection O (OFF) On (on),
O (OFF)
The thermostat permanently monitors the room temperature. If it has dropped by more than
5 degrees within 15 minutes, the thermostat assumes that window is open and turns o the
heating for 30 minutes to save energy. Aer this time, the heating control continues in the last
active operating mode. If you change the operating mode during the 30 minutes, the open
window detection will be cancelled immediately and the symbol on the display goes out.
Note: Open window detection is active even if only the oor sensor (cf. code 01, setting 03)
has been activated.
09 Floor sensor
type
10 kOhm 10 kOhm,
12 kOhm
The device also supports other types of oor temperature sensors. This setting allows you to
specify the type of oor sensor by selecting the appropriate nominal resistance.
10 Anti-freezing
mode On (YES) On (YES),
O (no)
Used to keep the temperature above the freeze point when a room is is not used for a longer
period of time. This prevents e.g. pipes from freezing. The thermostat keeps the temperature
above +5 °C. It means, at ≤ +5 °C the thermostat switches heating on, and switches o when
+7 °C is reached. If you have activated this function by selecting “On (YES)”, it will be active
even if the thermostat is in stand-by.
11 *) Holiday time 1 day (01) 1-99 days Setting of time of absence for the operation of the heating system in holiday mode.
12 Switching delay 1 °C 0.5 °C, 1 °C, 2 °C,
3 °C
Switching delay means that the thermostat does not switch the heating on or o when exactly
the set target temperature is reached, but earlier or later by the selected switching tolerance
value.
Example: Set temperature 26 °C, switching delay 1 °C, the thermostat switches the heating on
at ≤ 25 °C and o at ≥ 27 °C.
The lower the set value for the switching delay, the more circuits of the controller.
The larger the set value, the less accurate the temperature control.
13 *) Display
accuracy
0.5 °C 0.5 °C, 0.1 °C Setting at which degree of accuracy the temperature is to be shown on the display. Either 0.1
°C steps (e.g. 23.1 °C, 23.2 °C) or 0.5 °C steps (e.g. 23.0 °C, 23.5 °C).
14 *) Temperature
input steps
0.5 °C 0.1 °C, 0.5 °C, 1 °C Setting in which °C steps the set temperature can be adjusted.
15 Reset No (no) Yes (YES),
No (no)
Allows to reset the device to factory settings.
Note: If “YES” is selected, long tap o to conrm until the main screen appears.
The device is now reset.
16 *) Display
indication in
stand-by mode
02 01: Display OFF
02: Temperature
is displayed
Allows you to select the information to be displayed on the home screen
in stand-by mode.
17 Temperature
unit
°C °C, °F Selection of the temperature unit, Celsius oder Fahrenheit.
18 *) Device status
at restart (aer
the device was
disconnected
from the power
supply)
11: Return to
previous
operating state
2: Device OFF
3: Device ON
Setting to which status the device is to be set aer the power supply has been restored
(e.g. if a power failure occured).
1: The device returns to the previous operating state (from before the power interruption). If
the thermostat was switched o, it remains switched o. If the device was turned on, it returns
to the previous active operating mode.
2: The device is or remains switched o.
3: The device is switched on and continues to operate in the previous active operating mode.

15
Method 2: Manual Add
Note:
The thermostat supports two pairing modes, EZ mode and AP mode.
EZ mode:
Select F5 using the
˄
and
˅
buttons. Select 001 in the following settings
and conrm with tapping o. Wait a moment. The WiFi signal on the
display of the thermostat starts ashing quickly. Open the “Tuya Smart”
app. On the main screen, tap the button in the upper right corner,
then tap “Add Device”. Next select “Small household appliances” as the
device type rst (le menu), then “Thermostat (Wi-Fi)” in the “HVAC”
group of the right selection menu. Enter the network name and password
or select a WiFi network which has already been added and tap “Next”.
Tap “Conrm that the signal ashes quickly” and then tap “Flashing
quickly” in the subsequent view. The connection process starts. Aer the
device has been added successfully, tap “Done”.
AP mode:
Select F5 using the
˄
and
˅
buttons. Select 002 in the following settings
and conrm with tapping o. Wait a moment. The WiFi signal on the
display of the thermostat starts ashing slowly. Open the “Tuya Smart”
app. On the main screen, tap the button in the upper right corner,
then tap “Add Device”. Next select “Small household appliances” as the
device type rst (le menu), then “Thermostat (Wi-Fi)” in the “HVAC”
group of the right selection menu. Enter the network name and password
or select a WiFi network which has already been added and tap “Next”.
Tap “Conrm that the signal ashes quickly” and then tap “Flashing
slowly” in the subsequent view. Tap on “Connect now”. The WiFi settings
of your smartphone will now be opened automatically. Select the WiFi
network (hotspot) “Smartlife-****”. The connection process starts. Aer
the device has been added successfully, tap “Done”.
Alarm indication and troubleshooting
Important!
Working on the thermostat including the external oor temperatur sensor
must only be performed by a professional electrician. The electrical
connection and connection to the power supply as well as disconnection of
the device from power supply must be performed by a professional elec-
trician. Disconnect your local wiring from the mains before installing
the thermostat or disconnecting from power supply to check or replace
the device or the external oor temperature sensor.
Note:
In case of an interruption of the power supply (e.g. in the event of a power
failure or if the thermostat has been disconnected from power supply to
check it), the following settings will be retained for 30 days:
• F1 - Date and time
• F2 - Program mode settings
• F4 - Advanced settings
• Last active operating mode
• Set temperature
All other settings will be lost and have to be made new.
+
F5 - WiFi connection
WiFi connection guidelines:
• WiFi network standards supported by the device: IEEE 802.11. b/g/n
2.4 GHz.
• Position the antennas of the WiFi router according to the manufactu-
rer‘s recommendations in order to achieve the maximum WiFi signal
level at the place where the thermostat is installed.
• The number of thermostats connected to the home network at the
same time depends on the type of your router.
• If the WiFi signal level of your home network at the place of installation
is interfered by other WiFi networks or sources of interference in the
2.4 GHz range, we recommend changing the WiFi channel to a less
busy one, eliminating the source of interference, changing the position
of the router, or using equipment to expand the radio coverage area
(access points and repeaters).
• When installing thermostats in rooms of a large area, complex con-
guration, or in case of problems with setting up a WiFi connection, it is
recommended to contact a specialist in setting up WiFi equipment.
Note:
The Wi-Fi signal strength, as well as the occupied Wi-Fi channels, can
be checked e.g. using a suitable smartphone App (available for iOS and
Android devices) by holding the smartphone next to the place where
the thermostat is installed. Also most routers oer the ability to analyse
the signal strength of connected WiFi devices. If the signal level is less
than desired, reposition the router, or use equipment to increase the
coverage of the WiFi network (access point, repeater, etc.). WiFi signal
propagation is aected by concrete oors, metal objects (cabinets,
boxes, mirrors, etc.), as well as sources of interference (e.g. microwave
ovens). WiFi access points installed in adjacent rooms can also be a
source of radio interference. Since the thermostat is deepened into the
wall, the perceived WiFi signal level may be lower than that shown by a
smartphone.
Adding a device
To be able to program and operate the thermostat with the “Tuya
Smart” app, you must rst add the device to the app and connect it
to your smartphone or tablet via WiFi. There are two options available:
“Automatic Add” method via Bluetooth and “Manual Add” method. The
“Automatic Add” method is recommended. The manual method is
available as an alternative in case the automatic connection has not
been successful.
Method 1: Automatic Add
1. Make sure that your WiFi is switched on, is in workable condition, and
is active on the 2.4 GHz frequency band.
2. Activate Bluetooth on your end device.
3. Log in to your “Tuya Smart” user account with your login details.
4. The thermostat will be automatically identied by your smartphone
and displayed in the app.
5. Tap “Add device”.
6. Enter the network name and password or select a WiFi network which
has already been added. Then tap “Next”.
7. The thermostat will now be added automatically.
8. Aer the device has been added successfully, tap “Done”.
Note:
Using “Automatic Add”method does not require to open settings F5.
Proceed as follows if the device is not automatically identied and
displayed in the app. Tap the home button oand keep pressed for about
3 seconds to switch the thermostat o. Then tap the
˄
and
˅
button at
the same time and hold them down until F1 appears on the display. Select
F5 using the
˄
and
˅
buttons. Select 001 in the following settings and
conrm with tapping o. Wait a moment. The WiFi signal on the display
of the thermostat starts ashing quickly. Open the “Tuya Smart” app. On
the main screen, tap the button in the upper right corner, then tap
“Add Device”.
Error code Defect characteristic Handling
Er1 Short circuit or defect
of the room sensor
installed in the device.
Check thermostat or oor
temperature sensor. The
device must not be put into
operation again until the
fault has been rectied.
The following safety
instructions must be
observed.
Er2 Short circuit or defect
of the external oor
temperature sensor or
breakage of the sensor
cable.
+
+

16
Measured temperature
Scroll bar for temperature
setting
Selected operating mode
Set temperatur
Button for temperature
setting
Operating mode selection
Settings
Key lock
ON/OFF button
Technical data
Thermostat MCS 750
*) In order to keep the thermal impact on the relevant device components low in
the event of improper use under continuous load and to achieve maximum service
life, it is recommended to switch (connect) a maximum load current of 13 A
(2990 W).
Floor temperature sensor NTC 10 kOhm
Claims
In case of a claim during the warranty period please contact the seller.
The sensor will need to be sent back together with the thermostat for
processing a claim.
Warranty
The manufacturer guarantees the conformity of the thermostat with
the design description, assuming compliance with the installation and
operating instructions.
Warranty period – 2 years from date of purchase.
In case of a defect during guarantee period caused by a manufacturing
defect, the customer has the right to supplementary performance. The
warranty does not cover any defects due to inadequate handling, dama-
ges through a third party, wrong installation (not following the manual)
or its consequential damages. Please keep your sales receipt.
For any warranty claims you have to show your sales receipt.
Tuya Smart APP navigation
Main screen
Settings
“Advanced settings” menu.
For an explanation of the
individual parameters and
their setting options, refer
to the table under “F4 -
Advanced settings” in this
manual.
Advanced settings
Temperature
[°C]
Resistance
[kW]
Temperature
[°C]
Resistance
[kW]
10 19.46 - 20.11 21 11.82 - 12.09
11 18.65 - 19.27 22 11.30 - 11.55
12 17.80 - 18.37 23 10.81 - 11.04
13 17.00 - 17.52 24 10.35 - 10.56
14 16.23 - 16.71 25 9.90 - 10.10
15 15.50 - 15.95 26 9.47 - 9.66
16 14.81 - 15.22 27 9.06 - 9.25
17 14.15 - 14.53 28 8.67 - 8.86
18 13.52 - 13.87 29 8.30 - 8.49
19 12.92 - 13.25 30 7.95 - 8.14
20 12.36 - 12.65 31 7.61 - 7.80
Reservation
All information given are believed to be reliable and correct and
correspond to the current state of our knowledge. Modications,
mistakes and printing errors do not justify claims for compensation.
Liability is governed exclusively by the general terms and conditions.
Specications are subject to change without prior notice.
Program mode setting
Supply voltage 230 VAC, 50 Hz
Maximum load current 16 A *)
Power consumption < 2 W
Weight 140 g
Dimensions 86x86x48 mm
IP rate IP21
Protection class II
Floor temperature sensor NTC 10 kOhm
Sensor installation wire length 3 m
Permissible ambient air temp. range +5...+55 °C
Permissible relative air humidity 60% (non-condensing)
Temperature setting range +5...+40 °C
WiFi network standards supported IEEE 802.11. b/g/n 2.4 GHz
Other oor temperature sensor types
supported 12 kOhm

17
FLOOR TEMPERATURE SENSOR
CONFIRMATION 1 = BEFORE AND AFTER INSTALLATION OF THE HEATING MAT OR HEATING CABLE
The sensor can be inserted in and removed from the corrugated tube (conduit).
CONFIRMATION 2 = BEFORE AND AFTER INSTALLATION OF THE FLOORING
The sensor can be inserted in and removed from the corrugated tube (conduit).
The thermostat MCS 750 has passed all the tests successfully.
Thermostat
(Type name, Article number)
CLIENT
Name ___________________________________________ Telephone_______________________________________
Street ___________________________________________ E-Mail __________________________________________
Postal code, city __________________________________
Country _________________________________________ Client's signature _________________________________
Date of purchase ______________ 20______
INSTALLAER
Name ___________________________________________ Telephone_______________________________________
Company name ___________________________________ E-Mail __________________________________________
Postal code, city __________________________________
Date of installation ______________ 20______ Installer's signature _______________________________
Company stamp
Completed guarantee card/test protocol is necessary for warranty claims.
Guarantee card

18
Utiliser un compte
existant
Créer un nouveau
compte
FR
Introduction
Le MCS 750 est conçu pour contrôler les systèmes de chauage par le
sol électrique domestique (tapis chauants, lms chauants ou sections
de câbles chauants). Le thermostat maintient une température de
confort de la surface chauée et assure une consommation d‘énergie
rationnelle. Le thermostat assure la commande à l‘aide de deux capteurs
de température : un capteur de sol (inclus dans la livraison) et un capteur
d‘air (xe dans l'appareil). Pour la régulation du chauage, il est possible
de sélectionner (activer) simultanément les deux capteurs de tempéra-
ture ou, en option, un seul des deux capteurs.
Le thermostat est monté sur un mur à proximité immédiate des ls
d‘installation du système de chauage utilisé.
Contenu de la livraison
Thermostat - 1 pièce
Capteur de sol - 1 pièce
Instructions d'utilisation et d'installation - 1 pièce
Caractéristiques particulières
Le thermostat MCS 750 permet de contrôler votre plancher chauant
à la fois directement depuis l‘écran tactile de l‘appareil et en utilisant
l‘application « Tuya Smart » installée sur un smartphone. Le thermostat
doit être connecté à un smartphone par WiFi.
— Les normes de réseau WiFi supportées par l‘appareil sont :
IEEE 802.11. b/g/n 2,4 GHz.
— Le système d‘exploitation pour smartphone requis est
Android 4.4 ou supérieur, iOS 10.0 ou supérieur.
Enregistrement de l'application Tuya Smart
Télécharger l'application
Scannez le code QR avec votre smartphone ou recherchez l'application
gratuite « Tuya Smart » dans l'App Store ou Google Play Store et
téléchargez-la.
Enregistrement compte d'utilisateur
Les étapes suivantes doivent être eectuées pour l'enregistrement du
compte utilisateur dans l'application « Tuya Smart ».
1. Ouvrez l'application « Tuya Smart » sur votre smartphone et tapez sur
« Créer un nouveau compte » si vous n'avez pas de compte utilisateur.
2. Eectuez ensuite les étapes nécessaires dans l'application pour créer
le compte utilisateur en suivant les instructions sur le smartphone.
Les étapes essentielles sont les suivantes.
3. Utilisez le pays ou la région que le système détectera et aichera
automatiquement, ou sélectionnez manuellement un pays ou une
région. Important : Une fois celui-ci enregistré, le pays ou la région ne
peut pas être modié.
4. Saisissez une adresse électronique et tapez sur « Récupérer le code
de vérication ».
5. Saisissez le code de conrmation que vous recevrez par courriel.
6. Vous arrivez maintenant à l'attribution du mot de passe. Entrez un
mot de passe. Le mot de passe doit comporter de 6 à 20 caractères et
contenir des lettres et des chires.
7. Après avoir déni un mot de passe pour protéger votre compte,
cliquez et appuyez sur « Terminer ».
Remarques importantes avant l'installation
Lisez attentivement ces instructions avant d'utiliser l'appareil et
conservez-les. Si nécessaire, transmettez les instructions à un utilisateur
ultérieur. Le branchement électrique et le raccordement au réseau
électrique ne peuvent être eectués que par un électricien qualié,
conformément aux normes DIN-VDE et aux lois, règles et réglementations
nationales applicables. Dans le cas contraire, la garantie ne sera plus
valable. Mettez votre réseau électrique local hors tension avant d'in-
staller, de vérier ou de remplacer le thermostat. Utilisez uniquement
des prises encastrées en plastique pour installer le thermostat.

NNL L
t
L
O
A
D
L
O
A
D
NTC
230 VAC
Charge max. 16 A
Capteur
86.0
65.5
86.0
65.5
60.0
52.0
60.0
51.0
24.5
11.39.0
12
3
Logement du
connecteur
Couverture avant Couverture arrière
Aichage
19
Installation
Installation du capteur de température au sol
Le câble du capteur de température
du sol doit être placé dans un tube
ondulé séparé conformément à la
norme NF EN 61386-1. La sonde de sol
doit être positionnée directement
sous la natte chauante en préparez
une rainure dans le sol. Le capteur
doit être installé à équidistance de
deux conducteurs chauants, c‘est-à-
dire au milieu d‘une boucle de câble
chauant. Posez le câble de raccordement de la natte en parallèle
jusqu‘au boîtier encastré plastique standard et ne la faites pas se croiser
avec le conducteur chauant. Conserver une distance minimale de 2 cm
entre les deux. Pour le thermostat électronique, une boîte d‘encastre-
ment standard en plastique avec un câble d‘alimentation de 230 V AC
au réseau domestique doit être présente. Un disjoncteur à courant de
défaut (30 mA) doit être prévu. Assurez-vous pendant l‘installation du
tube ondulé (Ø16mm) puis avant la pose de la chape ou du revête-
ment de sol que le capteur peut être placé dans le tube ondulé et en
être retiré !
Connectez le thermostat
Important !
Nous vous recommandons de faire appel à des professionnels qualiés
pour l‘installation du thermostat et du système de chauage. Le branche-
ment électrique et le raccordement au réseau électrique ne peuvent être
eectués que par un électricien qualié, conformément aux lois, règles et
réglementations nationales applicables. Les instructions d‘installation et
le schéma de connexion ne remplacent pas les connaissances spécialisées
de l‘installateur de l‘appareil. Débranchez votre câblage local du secteur
avant de brancher le thermostat ou de le débrancher pour le vérier
ou le remplacer.
Installez le boîtier de montage avec un espacement approprié des
vis de 60 mm et la boîte de jonction intermédiaire si nécessaire (par
exemple, si deux ou plusieurs nattes chauantes doivent être connectées
et contrôlées par un seul thermostat). Conduisez le câble d‘alimentation
électrique et les câbles de raccordement du chauage par le sol et de
la sonde de température du sol jusqu‘à la boîte encastrée. Alimentez le
câble d‘alimentation et trouvez le l de phase et le l neutre en utilisant
l‘indicateur de phase du secteur ; marquez ces ls. Mettez hors tension
le câble d‘alimentation.
Raccordez tous les ls nécessaires au thermostat à l‘aide de ses bornes
à vis.
• Le capteur de température du sol doit être connecté aux deux bornes
marquées NTC (la polarité n‘a pas d‘importance).
Important !
Si la distance d'installation est plus courte que le câble de raccorde-
ment du capteur (réglage d'usine : 3m), le câble du capteur doit être
raccourci en conséquence.
• La tension d‘alimentation (230 VAC) est appliquée aux bornes N et L, la
phase (identiée par le testeur de tension) étant connectée à la borne
Let le conducteur neutre à la borne N.
• Les ls d‘installation des éléments chauants doivent être connectés
aux bornes N LOAD et LLOAD ; la sortie de la tresse de blindage (l
jaune-vert) - vers la ligne de terre de protection (PE) via le contact
terminal externe (non compris dans la livraison).
Important !
An de limiter la charge thermique des composants de l'appareil en cas
d'utilisation inappropriée en charge continue et d'atteindre une durée
de vie maximale, il est recommandé de commuter ou de raccorder une
charge maximale de 13 A (2990 W).
Montage du thermostat
1. Retirez le couvercle avant (partie avec l'écran). Appuyez délicatement
sur le loquet situé sur la partie supérieure du couvercle avant à l'aide
d'un tournevis à fente ne et tirez doucement le couvercle avant vers
vous.
2. Eectuez le raccordement électrique.
3. Placez la partie arrière de l‘appareil dans le boîtier de montage et
xez-le au moyen deux vis, à gauche et à droite.
4. Insérez l'écran dans le cadre et faites coïncider les contacts du
connecteur à l'arrière avec le logement du connecteur sur la partie
arrière de l'appareil.
5. Pressez délicatement le couvercle avant avec le cadre contre le
couvercle arrière (inséré dans la boîte d'encastrement avant) jusqu'à
ce que le loquet se verrouille en place. Veillez à ce que le couvercle
avant soit bien ajusté à la partie arrière du thermostat.
Important !
Évitez d'endommager et de plier les contacts du connecteur au cours du
montage.

H = 30cm
1
2
3
1
2
3
4
5
6
7
8
9
10
11
12
13
14
15
16
MO TU WE TH FR ST SU
°C
°F
RT
FT
ST
P
Confort
ECO
Programme
Vacances
TU
°C
RT
P
RT
FT
ST
P
°C
°F
MO-SU
20
Installation du thermostat pour deux ou plusieurs
nattes chau antes
1. Thermostat électronique; câble d‘alimentation
NYM 3 x 1,5 mm² pour la répartition.
2. Tube ondulé pour le capteur (de sol) ou pour le conducteur
froid (il ne faut pas les poser dans le même tube).
3. Prise encastrée (si plusieurs nattes chau antes sont reliées
au même thermostat, une prise encastrée séparée est requise).
Structure de l'écran
1
Mode confort
Mode ECO
Mode programme
Mode temporaire
2Heure
3Temperature
4
RT = Température ambiante
FT = Température du sol
ST = Température réglée
5Détection de fenêtre
ouverte
6Diminuer la valeur,
sélection « en bas »
7
Bouton «ON/OFF» (marche/
arrêt), bouton « HOME »
8
Augmenter la valeur,
sélection « vers le haut »
9
Jours de la semaine lundi
(MO) au dimanche (SU)
10 Signal WiFi
11 Verrouillage
(sécurité enfants)
12 Unité de température
Celsius/Fahrenheit
13 Mode antigel
14 Chau age en marche
15 Mode vacances
16
Événement du mode
programme RÉVEIL
Événement du mode
programme PARTIR
Événement du mode
programme RETOUR
Événement du mode
programme COUCHER
Remarque :
Lorsque l'appareil est allumé pour la première fois, le signal WiFi com-
mence à clignoter en continu jusqu'à ce que vous vous soyez connecté avec
succès à votre réseau WiFi local (cf. paramètres F5 - Connexion WiFi). Si
l'appareil est connecté au WiFi, l'icône continuera à s'a icher, mais cessera
de clignoter. S'il n'y a pas d'accès au réseau WiFi (p.e., réception perturbée,
niveau de signal faible), l'icône ne s'a ichera pas.
Utilisation - fonctions de base
Mise en marche/arrêt
Appuyez sur le bouton d'accueil o et maintenez-le enfoncé pendant
environ 3 secondes pour allumer ou éteindre le thermostat. Lorsque
l'appareil est éteint (veille), l'écran a iche les informations en fonction
de ce qui a été sélectionné dans les paramètres avancés F4, code 16.
Remarque :
Chaque fois que l'appareil est mis en marche, toutes les icônes (voir
l'aperçu de la structure de l'écran) apparaissent à l'écran pendant un court
instant.
Activer le verrouillage des touches
Passez à l'écran principal de l'a ichage et appuyez sur le bouton
˄
bouton pendant environ 3 secondes pour activer le verrouillage de la clé
(sécurité enfant). Pour désactiver le verrouillage des touches, appuyez
sur le bouton
˄
pendant 3 secondes supplémentaires. Le thermostat
peut également être verrouillé ou déverrouillé en mode veille.
Mode veille d'écran
Si aucun bouton n'est appuyé, l'écran passe en mode veille après environ
25 secondes en s'assombrissant. Il su it d'appuyer sur l'un des boutons
d'entrée
˅
o
˄
pour quitter le mode veille.
Remarque :
Si le thermostat est allumé, le dernier écran actif s'a iche en mode veille.
Lorsque l'appareil est en mode veille, l'écran a iche les informations en
fonction de ce qui a été sélectionné dans les paramètres avancés F4,
code 16.
Sélection du mode de fonctionnement
Passez à l'écran principal de l'a ichage, appuyez sur le bouton d'accueil
o et sélectionnez l'un des modes de fonctionnement suivants :
Programme - Confort - Eco - Vacances.
En appuyant brièvement sur le bouton d'accueil o, vous pouvez passer
d'un mode de fonctionnement à l'autre.
Modes de fonctionnement
Mode Confort
En utilisant le mode confort, le thermostat maintient en permanence
(24/7) la température souhaitée. La température peut être sélectionnée
avec les boutons
˄
et
˅
. Ne con rmez pas la sélection avec le bouton
o, mais attendez un court instant que l'a ichage de la température
passe de ST à RT ou FT.
La température est réglable de +5 °C à +35 °C. Le réglage par défaut
(réglage d'usine) est de 23 °C.
Mode ECO
Dans ce mode de fonctionnement, le thermostat maintient en perma-
nence (24 heures sur 24) une température préalablement réglée. La
température peut être sélectionnée à l'aide des boutons
˄
et
˅
. Ne
con rmez pas la sélection avec le bouton o, mais attendez un court
instant que l'a ichage de la température passe de ST à RT ou FT.
La température est réglable de +5 °C à +35 °C. Le réglage par défaut
(réglage d'usine) est de 18 °C.
Table of contents
Languages:
Other TUYA Thermostat manuals
Popular Thermostat manuals by other brands

Wittmann
Wittmann Tempro basic C 90 Translation of original operating manual

Roth
Roth Minishunt Plus Installation

Signature
Signature TSTSC operating instructions

Danfoss
Danfoss Icon Master user guide

Lux Products
Lux Products PSD111 SERIES Installation and operating instructions

Braeburn
Braeburn Premier Series quick start guide

Purmo
Purmo TempCo Comfort 24V user manual

ClimateMaster
ClimateMaster iGate ATC32U03 installation manual

Honeywell
Honeywell TL8230A user guide

Elnur Gabarron
Elnur Gabarron CTM21 Installation and use manual

S+S Regeltechnik
S+S Regeltechnik FST-3 Operating Instructions, Mounting & Installation

Salus
Salus ERT20RF instruction manual