TV Ears Voice Clarifying Headphone User manual

Quick Installation Guide
Easy to setup. Easy to use.

Place the transmitter close enough so that
you can connect it to the television.
STEP 1
Place the transmitter
1
Using the provided USB to USB-C cable, please connect the cord to the supplied power block.
Plug the AC adapter into a standard electrical outlet or surge protector (a surge protector
is recommended to protect against power surges). Plug the other end of the AC adapter into
the port labeled “Power” on the back of the transmitter.
STEP 2
Plug in
2
Mini Transmitter Setup

Connection for Digital Audio
Sometimes located underneath plastic tray
Remove the plastic caps from both
ends of the digital audio cord.
Plug either end of the digital audio cord into the
“Digital Audio Out” port on the back of the TV.
Plug the other end of the digital audio cord into
the port on the back of the transmitter labeled
“Optical”. You should hear and feel a ‘click’ when
it has been pushed in all the way.
Connection for Analog Audio
Plug one end of the Analog Audio Cord (black) in the
“Audio Out” port on the back of the television, satellite
box, or cable box.
Plug the other end of the Analog Audio Cord (black) into
the port labeled “Analog” on the back of the transmitter.
The correct port has a green border around it.
If you connect to your Headphone port of your TV, the
port is usually labeled with an icon that looks like the
following: , your TV may be muted. If this is the case
then connect using the RCA Analog Installation method.
AUDIO
OUT
DIGITAL
AUDIO OUT
OPTICAL
Your TV’s digital audio out format may be set to
Dolby digital or DTS. If you get static from your TV
Ears after installing the digital audio cord, you need
to change this option to PCM in your TV’s setup
menu. The setup menu is dierent per brand but it
should be similar to the following sequence — Audio
Settings>Additional Audio Settings>Digital Audio Out
Format>Change format from Dolby or DTS to PCM.
NOTE: The optical plug and jack are not square. Position the optical
plug so it matches the orientation of the optical jack, then push the
plug into the jack. You should hear and feel a “click” when the plug
is correctly inserted into the optical jack.
NOTE: If the Digital Audio Out port is a round
hole (rare occurrence), purchase and use a
Coaxial audio cord instead of the optical.
AUDIO
OUT
DIGITAL
AUDIO OUT
OPTICAL
AUDIO
OUT
DIGITAL
AUDIO OUT
OPTICAL
STEP 3
Installation of the Transmitter
3
Mini Transmitter Setup
RCA Analog Installation
Plug the dual end of the 3.5mm RCA cord (red and black
ends) into the analog “Audio Out” ports on the back of
the television, satellite, or cable box.
Plug the single (black) end of the 3.5mm RCA cord into
the Analog Audio Cord (green). Plug the other end of the
Analog Audio Cord (green) into the port labeled “Analog”
on the back of the transmitter. The correct port has a
green border around it.
OR
AUDIO OUT
L
R
LR
AUDIO OUT

“THEATER SOUND”
Button
“MUTE” Button
Main Volume
Knob
“VOICE CLARIFYING”
Button
Adjustable headband
Left Ear Pad Right Ear Pad
USB-C charging port
AUX-in
3.5mm jack
Power ON/OFF & 5.8G
indicator (Blue LED)
Battery charging indicator
(Red/Green LED)
1. “VOLUME” knob and power ON/OFF:
a. Turn the volume knob clockwise to click the
headphones into the on position, causing a
blue LED to illuminate. It will ash to show the
headphones are connecting, then turn solid.
b. Keep turning the volume knob clockwise to turn
up the volume, or turn the knob anti-clockwise
to turn the volume down.
c. Turn the volume knob all the way down until it
clicks to turn o the headphones, the blue LED
should then turn o.
2. AUX-IN 3.5mm jack:
a. To receive audio from another audio device such
as a tablet or laptop, connect a 3.5mm cable from
that device’s headphone jack to the AUX-IN
port of the headphones. When connected
the headphones will not receive audio from
the television until that cord is disconnected.
3. USB-C Battery charging indicator
(Red/Green LED):
a. When the battery is below 20% of its
charge, the red LED turns on.
b. While the battery is charging,
the LED will turn yellow.
c. Once the battery is fully charged,
the LED will become green.
d. The USB-C charging port supports either
USB-A to USB-C or USB-C to USB-C charging
cords.
4. “THEATER SOUND” button:
a. Press to activate the Theater Sound mode. In
this mode, bass and audio quality are enhanced.
b. Press again to resume the Voice Clarifying mode.
5. “VOICE CLARIFYING” button
a. Press once to activate the Voice Clarifying mode.
In this mode, voice clarity is enhanced.
b. Press again to resume the Theater Sound mode.
6. “MUTE” button:
a. Press once to mute the volume,
press again to restore it.
Features

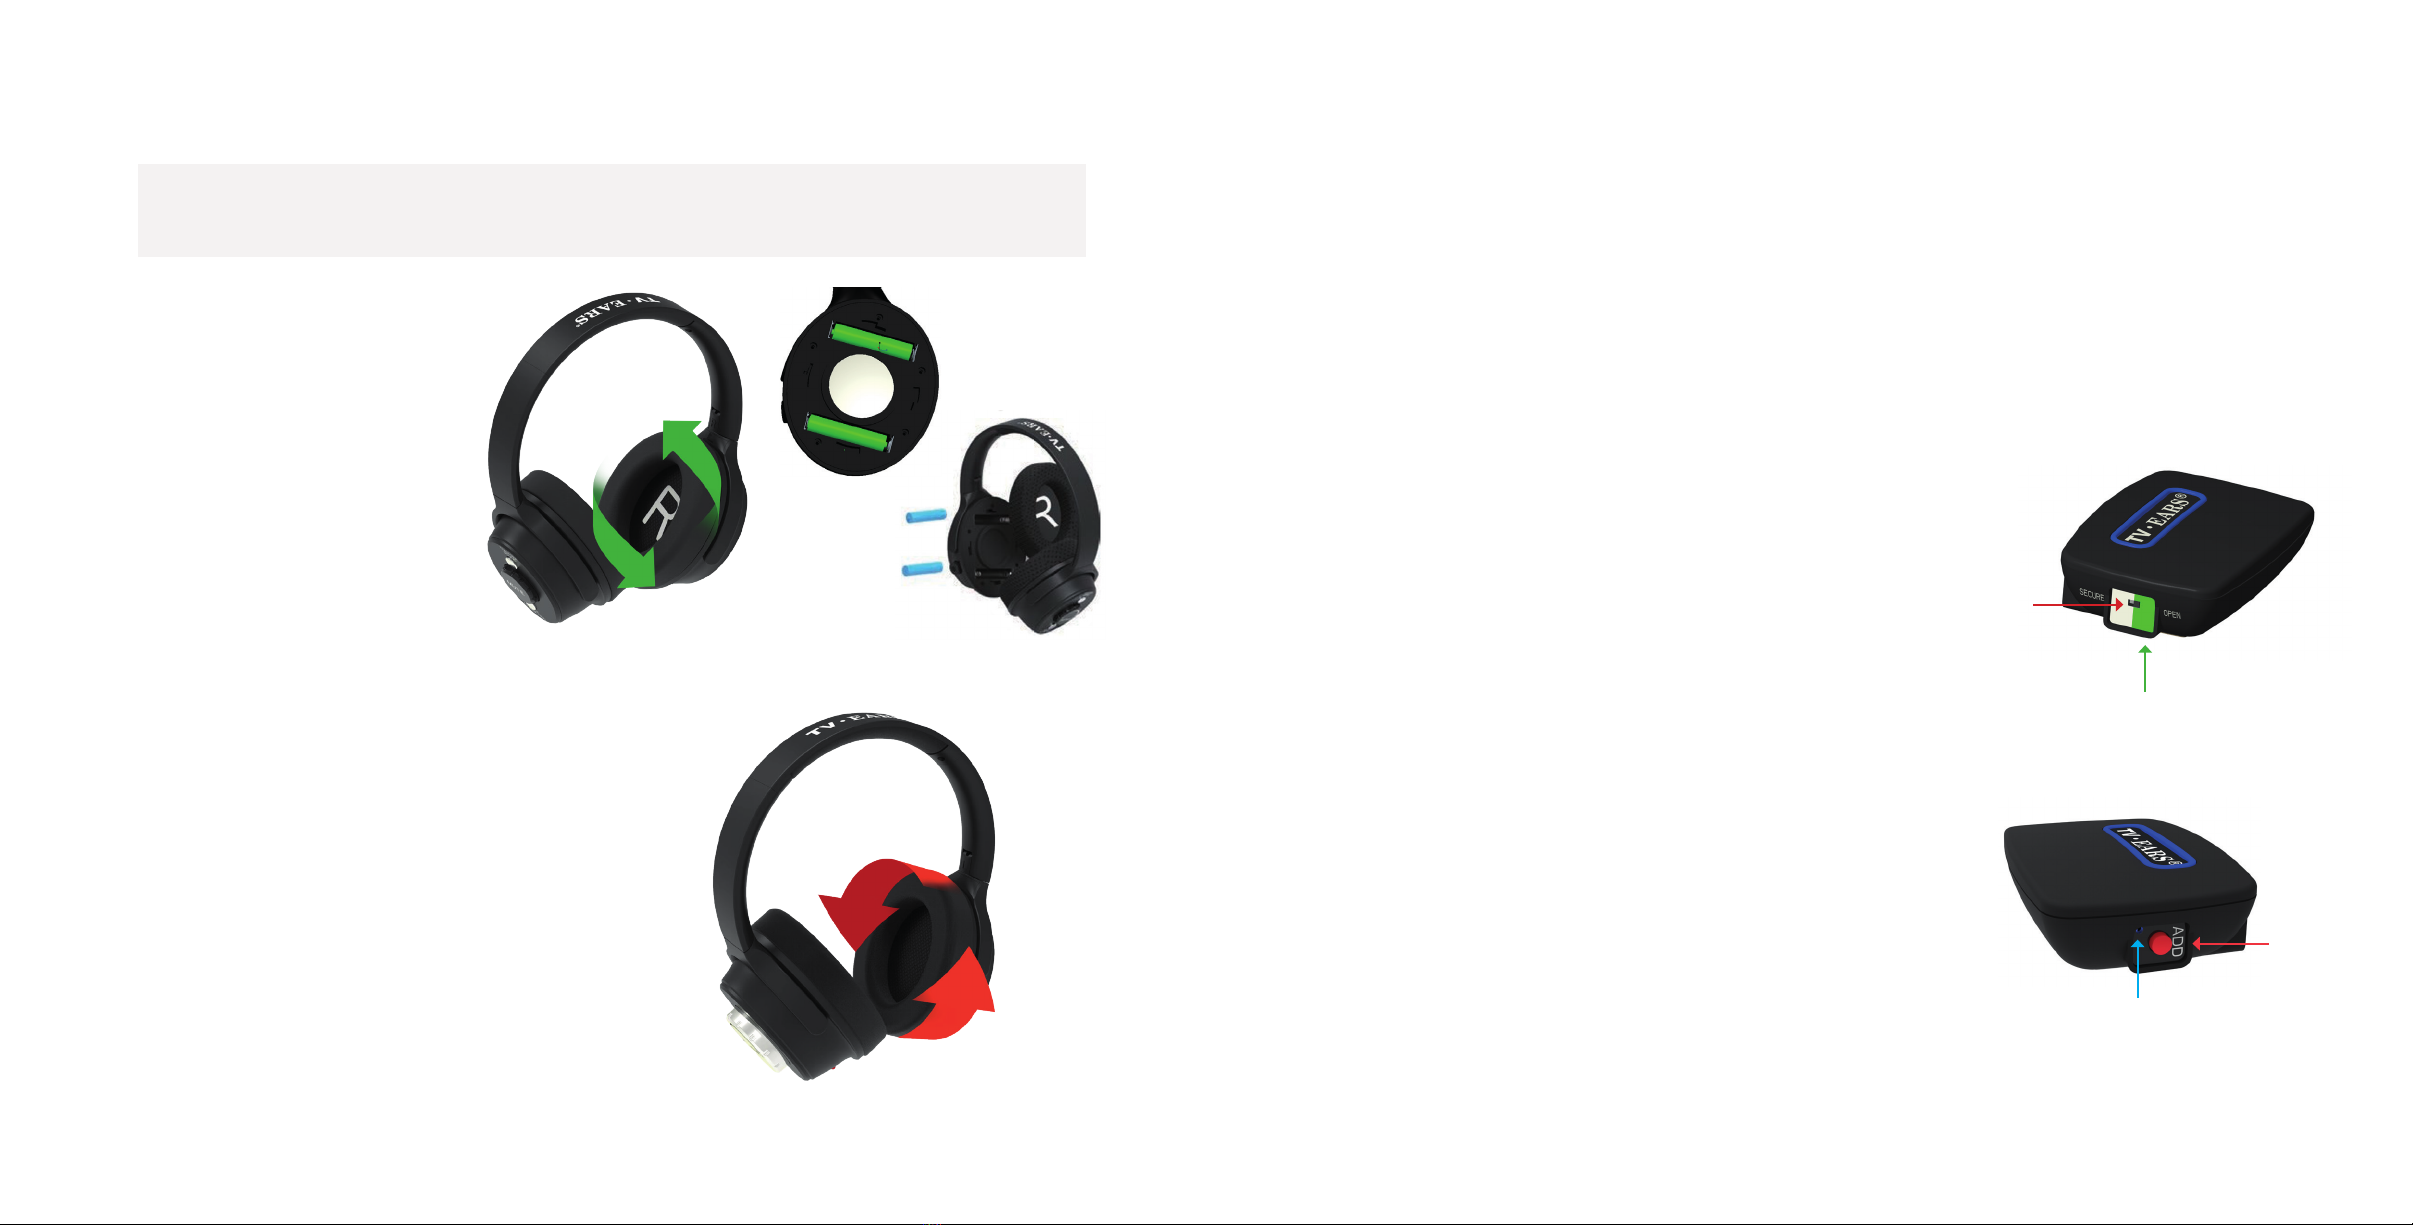
Battery Replacement Secure Mode / Open Mode
Ear Pad Replacement
1. Turn the right ear pad
counterclockwise to unlock
the ear pad (refer to the
adjacent diagram).
2. Remove the old batteries
and replace with new ones.
Only batteries from TV Ears are
compatible with the charger.
3. Replace the ear pad and rotate
clockwise to lock it into place.
Battery type: NI-MH, AAA/HR03
Capacity: 1000 mAh x 2
Charging time: 3.5 hours
Working time: 8 ~ 10 hours
Voltage: 1.2V x 2
1. Turn the ear pad counter-clockwise to remove it from
the headphones.
2. Replace it with a brand new one and rotate clockwise
to lock it into place.
Note: It is not necessary to match the “L” or “R” sign on
each side of the headband. Aside from the labeling,
the two pads are identical.
Open Mode
This is what the transmitter is set to by default.
In this mode, TV•Ears products will automatically
pair with the transmitter, working by just turning
them on in the same room as the television. Under
normal circumstances, this should not be changed.
Secure Mode
This mode enables manual pairing of up to 2 TV•Ears
products with the transmitter. The only advantage of
this is it strengthens the signal, helping prevent
interference from other wireless devices.
Activating Secure Mode (Supports up to 2 receivers)
Only do this if your headphones are either cutting in and out, or getting
a “popping” sound while in use.
1. Move the “Secure/Open” switch to the Secure (White) side on the transmitter.
2. Place the headphones close to the transmitter.
3. Press and hold the ADD button on the transmitter for 3-5 seconds.
The blue LED on the transmitter will begin ashing, beginning pairing.
4. Turn on the headphones, the blue LED on the headphones will also start ashing.
5. When done the blue LED on the headphones will become solid,
and the transmitter blue LED will go o.
Re-Activating Open Mode
This is to re-enable the transmitter’s auto-pairing function or to connect
more than two receivers.
1. Move the “Secure/Open” switch to the Open (Green) side on the transmitter.
2. Place the headphones close to the transmitter.
3. Press and hold the ADD button on the transmitter for 3-5 seconds.
The blue LED on the transmitter will begin ashing, beginning pairing.
4. Turn on the headphones, the blue LED on the headphones will also start ashing.
5. When done the blue LED on the headphones will become solid, and the
transmitter blue LED will go o.
*It may take longer when switching to Open mode from Secure mode, a few tries may be required.
**When activating or deactivating secure mode, make sure only the long range transmitter being paired is turned on in the household.
ADD
BUTTON
ADD
LED
SECURE
Mode
OPEN
Mode

What are the terms of the warranty:
This 5 year limited warranty covers product failures for a period of 5 years after the original
purchase. The warranty is only valid if the product is purchased from TV•Ears directly or from one
of the TV•Ears authorized resellers. During the 5 year warranty, If the product fails within the first
year of the original purchase date, it will be replaced once at the cost of shipping and handling
with the same or newer model. Subsequently, for the remainder of the 5 year warranty period, if
the product fails it will be replaced for 50% o MSRP with the same or newer model of equal value.
The following items are NOT covered under this warranty: ear tips, batteries, and shipping charges.
Any replacement parts purchased at 50% o automatically extends your warranty into a new 5
year limited warranty.
How to receive warranty service or return product:
To receive warranty service or for returns, call 1-866-611-9934 to speak to our friendly American
based customer support representatives. For returns, you will need to receive an RMA number
and place it clearly and legibly on the outside of the package otherwise returns are not accepted.
All shipping charges are NOT covered by TV•Ears
To activate your FREE 5 Year limited warranty:
Call: 1-866-611-9934
Go online: tvears.com/warranty-registration
Or Mail to: TV Ears, Inc.
2701 Via Orange Way, Suite 1
Spring Valley, CA 91978
TV•Ears 5 Year limited warranty:
Welcome to the TV•Ears family and thank you for purchasing our product!
TV•Ears Digital 5.0
Item Number — 11741 | MSRP $16995
This is advanced television listening system with digital and analog connectivity.
Includes one 5.0 Headset, one Digital Transmitter, and accessories.
TV·Ears 5.8 Headphone Replacement Ear Pads
Item Number — 50888 | MSRP $1995
A pair of replacement Ear Pads compatible with the TV·Ears 5.8 Headphone only.
Ear Pads normally last up to 2 years depending on use and could be replaced
individually or in pairs as needed.
TV·Ears Long Range Headset System
Item Number — 22741 | MSRP $19995
Our new and improved voice clarifying long range digital headset system allows
you to enjoy listening to the TV at up to 100 ft away from your TV – Works on any TV.
Includes one 5.8 Headset, one Long Range TV Transmitter, and accessories.
TV·Ears 5.8 Headphone Batteries
Item Number — 40888 | MSRP $1995
Replacement battery compatible with the TV·Ears 5.8 Headphone ONLY.
Batteries last up to 1-2 years depending on use and should only be replaced
after speaking with a TV·Ears technician.
Disposable batteries are usable if
needed but are not the preferred batteries for optimal performance.
TV•Ears Products and Accessories

Sales Main Line:
1-888-883-3277
Fax:
1-888-958-7899
Support:
1-866-611-9934
Email:
info@tvears.com
tvears.com | Facebook.com/tvearsinc | Twitter: @tvears
Any changes or modifications not expressly approved by
the party responsible for compliance could void the user’s
authority to operate the equipment.
This device complies with Part 15 of the FCC Rules.
Operation is subject to the following two conditions:
(1) this device may not cause harmful interference, and
(2) this device must accept any interference received,
including interference that may cause undesired
operation.
Note: This equipment has been tested and found to comply
with the limits for a Class B digital device, pursuant to Part
15 of the FCC Rules. These limits are designed to provide
reasonable protection against harmful interference in a
residential installation. This equipment generates, uses, and
can radiate radio frequency energy, and if not installed and
used in accordance with the instructions, may cause harmful
interference to radio communications.
However, there is no guarantee that interference will not
occur in a particular installation. If this equipment does cause
harmful interference to radio or television reception, which can
be determined by turning the equipment o and on, the user is
encouraged to try to correct the interference by one or more of
the following measures:
– Reorient or relocate the receiving antenna.
– Increase the separation between the equipment and
receiver.
– Connect the equipment into an outlet on a circuit
dierent from that to which the receiver is connected.
– Consult the dealer or an experienced radio/TV technician
for help.
Table of contents
Other TV Ears Headphones manuals