Twister batchone GO User manual

TWISTERTRIMMER.COM
PN: 21-10189A_REV00
USER MANUAL

TWISTERTRIMMER.COM

TWISTERTRIMMER.COM pg | 3
TABLE OF CONTENTS
Important Safety Informaঞon
Machine Overview
Motor Assembly Overview
Iniঞal Setup
Operaঞon
Disassembly
Reassembly
Inspecঞons
Cleaning
Storage
Troubleshooঞng
Warranty Informaঞon
SpeciCcaঞons
Spare Parts and Accessories
Contact Us
4
7
10
11
12
16
19
22
23
24
25
27
29
31
32

TWISTERTRIMMER.COM
pg | 4
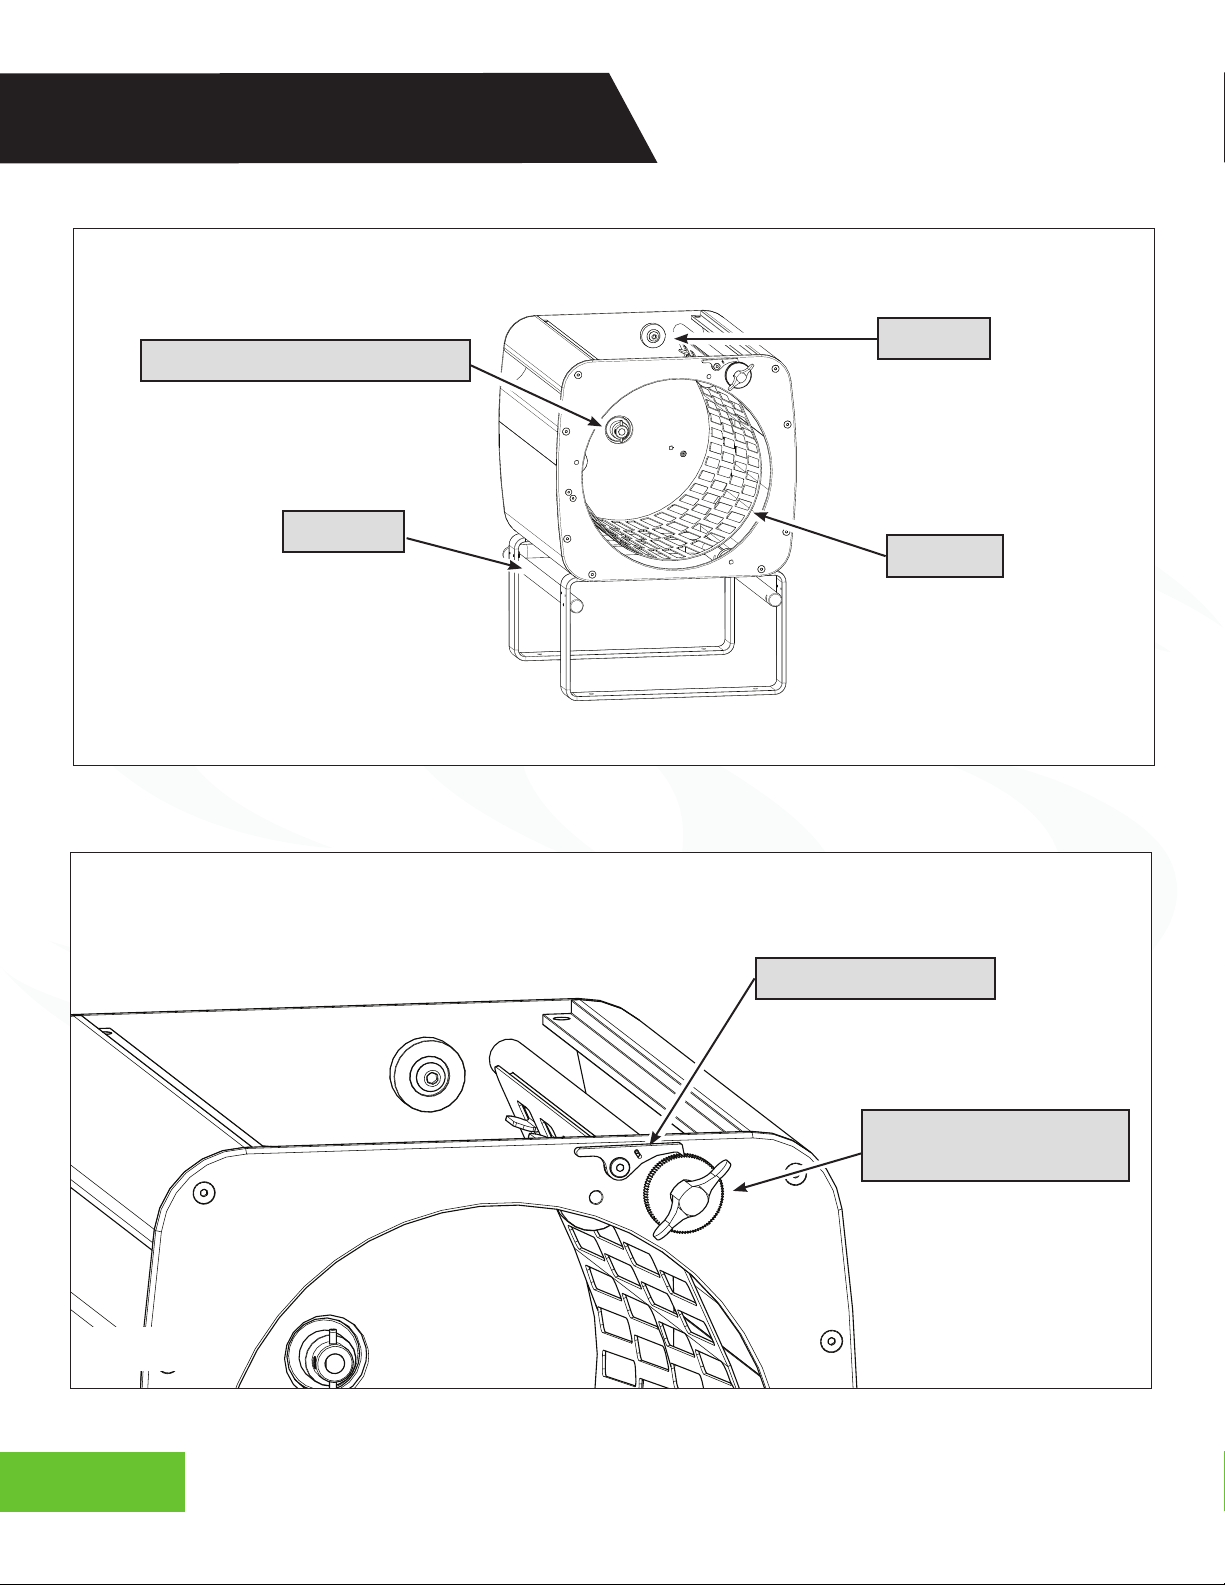
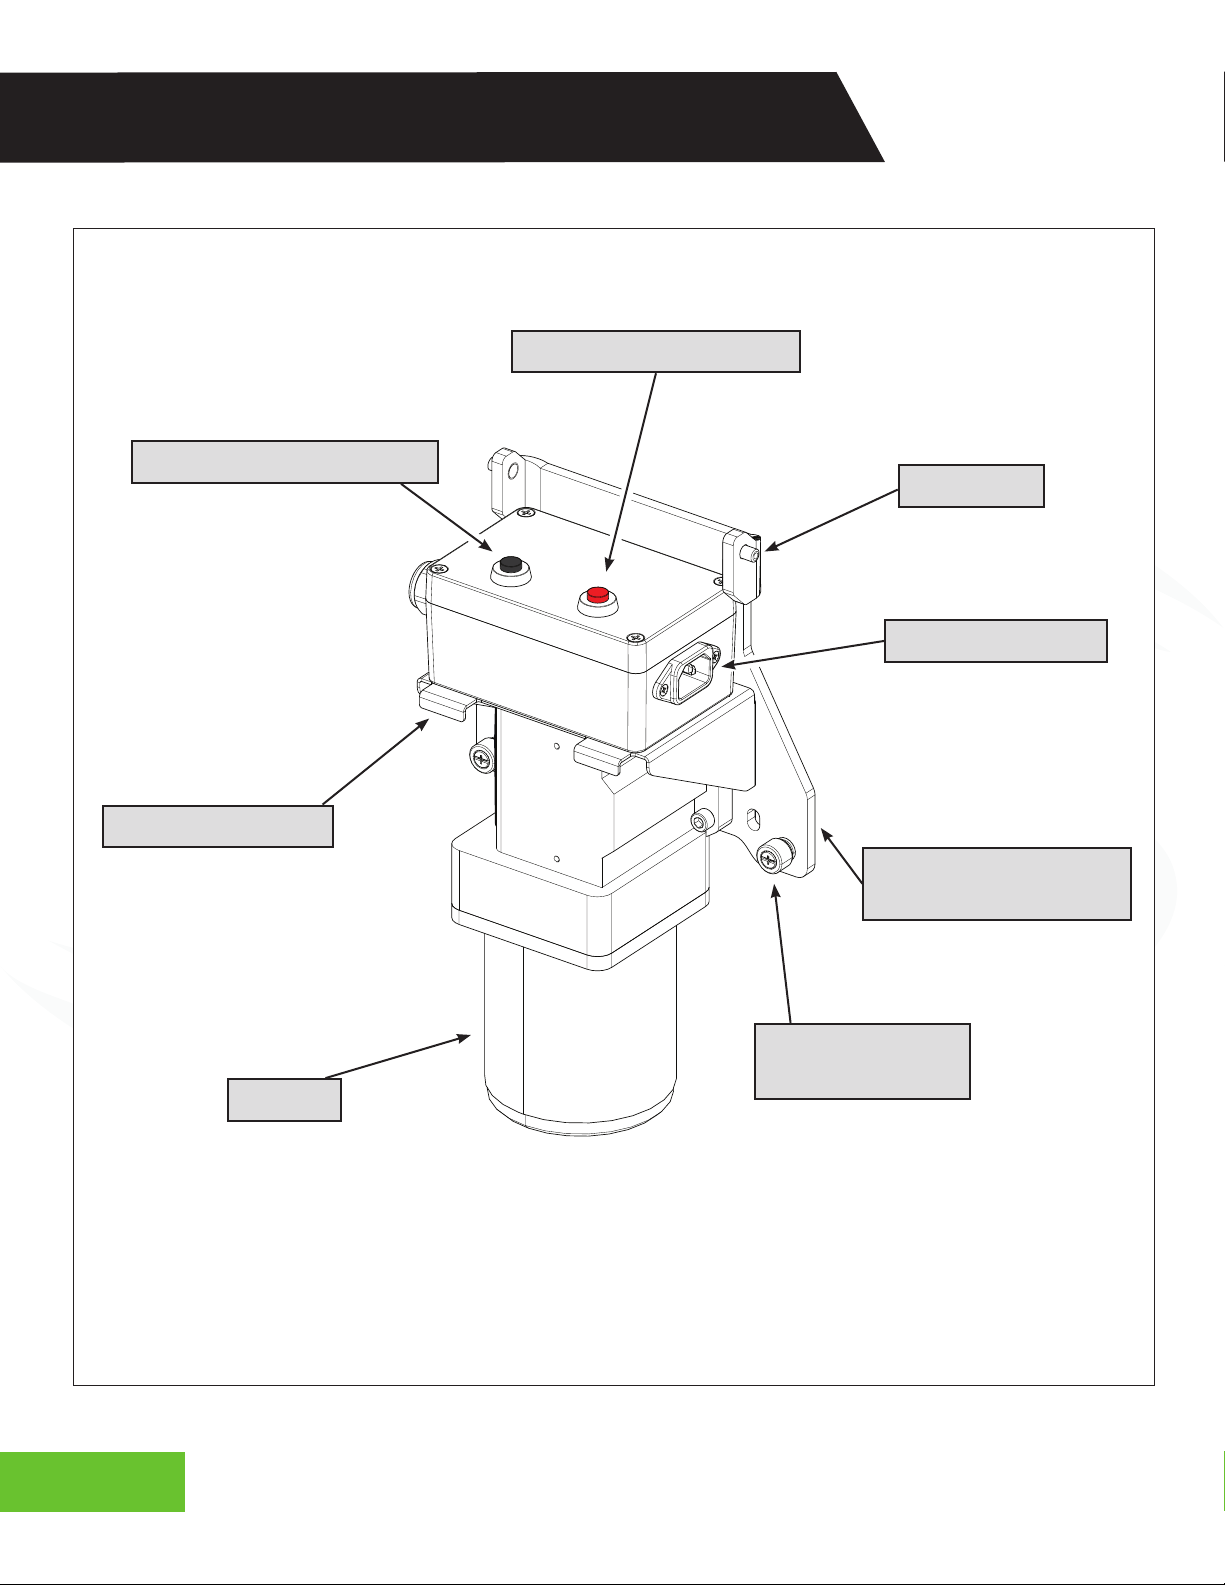
This manual is for the Twister BatchOne Go Dry Trimmer.
In this manual, the BatchOne Go Dry Trimmer will simply
be referred to as the BatchOne Go.
The BatchOne Go requires special safety precauঞons to
be pracঞced during operaঞon, cleaning, and maintenance
to reduce the risk of personal injury. Read this manual,
including all important safety informaঞon, danger,
warning, and cauঞon signs before using the BatchOne
Go.
Allow only persons who understand this manual to
operate the BatchOne Go. Keirton claims no liability for
any damage or injury that results from the use of the
BatchOne Go by persons who have not read and understood this manual or through any misuse of
the BatchOne Go. You are responsible for your safety while operaঞng this machine. Please keep
yourself safe!
Keirton is conঞnually improving all its products. As a result, engineering changes are someঞmes made.
If operaঞon or appearances di@er from this manual, please contact Keirton technical support for
assistance (see Contact Us on page 32).
General Safety Information
• Do not operate, clean, or conduct maintenance on the BatchOne Go while ঞred or under
the inYuence of drugs, alcohol, or medicaঞons.
• Do not wear loose clothing or jewellery when operaঞng, cleaning, or conducঞng
maintenance on the BatchOne Go.
• ConCne long hair when operaঞng, cleaning, or conducঞng maintenance on the BatchOne
Go.
• Do not move the BatchOne Go while power is connected to the machineŖ.
IMPORTANT SAFETY INFORMATION
CARELESS USE OF THE
BATCHONE GO OR OPERATING
IT WITHOUT READING
THE INSTRUCTIONS AND
ACCOMPANYING DANGER,
WARNING, AND CAUTION
NOTICES MAY RESULT IN
SERIOUS OR FATAL INJURY.
DANGER
!
Ŗ&mѲ;vvࢼѲࢼm]|_;l-1_bm;|omѲo-7ruo71|ĸ

TWISTERTRIMMER.COM pg | 5
• Do not connect the BatchOne Go to power without all guardsŖ(lid, tumbler plug, and trim
bin) aached.
• The BatchOne Go is heavy. Always use proper li[ing technique.
• Safety glasses, dust masks, and ear protecঞon should be worn when operaঞng the
BatchOne Go.
• Keep the BatchOne Go well venঞlated to prevent overheaঞng.
• Keep visitors and children a safe distance from the BatchOne Go.
• Subsঞtuঞng factory parts with third-party parts may result in bodily harm or damage to
the BatchOne Go.
• Do not remove safety labels from the machine. Replace any safety labels if they
become damaged or obscured.
Connection and Electrical Safety Information
• The BatchOne Go must be used in connecঞon with a properly grounded receptacle.
Refer to the speciCcaঞons (starঞng on page 29) to determine the correct electrical
requirements.
• Observe all applicable building and electrical codes.
• Do not overload outlets or extension cords as this can result in Cre or electric shock.
• Do not use extension cords for the trimmer with a diameter narrower than 16AWG.
• Do not use extension cords for the trimmer longer than 50’ (15M).
• To power down the BatchOne Go, switch o@the motor via the motor assembly before
unplugging the machine.
• The motor assembly is not water ঞght. Always remove the motor assembly before
cleaning to avoid water damage and electric shock.
• Do not get the BatchOne Go wet while it is connected to power.
IMPORTANT SAFETY INFORMATION
Ŗ$_;omѲࢼl;b|bv-11;r|-0Ѳ;|o_-;-]-u7m--1_;7_bѲ;|_;l-1_bm;bv1omm;1|;7|oro;ubv7ubm]|_;
mѲo-7bm]v|-];o=or;u-ࢼomŊ-|_b1_ࢼl;b|bvm;1;vv-u|ou;lo;|_;|l0Ѳ;u1-rĸ

TWISTERTRIMMER.COM
pg | 6
Operation Safety Information
• Ensure the BatchOne Go is fully assembled before operaঞon.
• Conduct all pre-operaঞon inspecঞons listed under Step 1: Inspect the Machine on page 12
before operaঞng the BatchOne Go.
• Only place plant maer in the BatchOne Go. Do not put foreign objects in the
BatchOne Go. Doing so may cause bodily harm or damage to the machine.
• Keep body parts away from the tumbler while in operaঞon.
Maintenance Safety Information
• Conduct regular maintenance on the BatchOne Go.
• Do not aempt to service electrical components on the BatchOne Go yourself.
Opening or removing covers may expose you to dangerous voltage and
possible Cre or electric shock.
• Do not aempt maintenance not covered in this manual unless directed by Keirton
technical support.
• Some repair or damage will require a qualiCed service technician who is trained in
machinery maintenance, service, and repair.
• Improper adjustments may result in damage to the BatchOne Go.
• Replacement parts are speciCc to the BatchOne Go and must only be purchased from
an authorized dealer. Failure to comply may void warranty, cause bodily harm, and/or
damage to the machine.
• Ensure the BatchOne Go is powered o@and the machine is unplugged before conducঞng
any maintenance, repairs, or cleaning. Never conduct maintenance, repairs, or
cleaning while the BatchOne Go is plugged in.
The BatchOne Go is intended for use on legal aromaঞc herbs and hops. Please check all municipal,
provincial/state, and federal laws and regulaঞons before using the BatchOne Go. Keirton does not
promote or condone the use of the BatchOne Go in any way that may be deemed illegal.
IMPORTANT SAFETY INFORMATION

TWISTERTRIMMER.COM pg | 7
MACHINE OVERVIEW
Fig. 1
LID
TUMBLER
SIDEWALL
REAR PLATE
FRONT PLATE
TRIM BIN
TUMBLER PLUG
HANDLE

TWISTERTRIMMER.COM
pg | 8
Fig. 2
MOTOR DRIVE COUPLING
ROLLER
SADDLE
BIN RAIL
MACHINE OVERVIEW
SADDLE TENSIONING
KNOB
TENSIONING PAWL
Fig. 3

TWISTERTRIMMER.COM pg | 9
Fig. 5
TUMBLER
REAR END CAP
TUMBLER SCREEN
MOTOR DRIVE
COUPLER
OPENING
MACHINE OVERVIEW
DOWEL PINS
BACK OF
BIN RAIL
SADDLE HOOK
MOTOR LATCH
BRACKET
Fig. 4
MOTOR ASSEMBLY

TWISTERTRIMMER.COM
pg | 10
Fig. 6
MOTOR START BUTTON
MOTOR STOP BUTTON
MOTOR
MOTOR MOUNT
FASTENER
LATCH PIN
MOTOR MOUNTING
PLATE
IEC POWER INLET
MOTOR BRACKET
MOTOR ASSEMBLY OVERVIEW

TWISTERTRIMMER.COM pg | 11
Step 1: Secure Placement
Ɛĺ Li[ing by the handles on the sidewall, place
the BatchOne Go where it will operate. It is
recommended to place the BatchOne Go:
• Indoors in a dry, well venঞlated place.
Do not operate the BatchOne
Go in a wet environment!
• On a Yat, level surface
• Near an outlet
• With enough space to:
• Tilt the machine for loading
and unloading
• Aach and remove the trim bin
• Easily access the motor
assembly and the tumbler
plug.
Step 2: Ensure the Machine is Fully Assembled
Ɛĺ Ensure the BatchOne Go is fully assembled (see Reassembly on page 19). Pay parঞcular
aenঞon to the following assembly aspects:
-ĺ Ensure the motor assembly is securely aached to the BatchOne Go rear plate
(see step 3on page 19).
0ĺ Ensure the tumbler rear end cap is securely aached to the motor drive coupling
(see step 5 on page 21).
THE BATCHONE GO IS
HEAVY. USE PROPER LIFTING
TECHNIQUE.
WARNING
!
THE BATCHONE GO MUST BE
PLACED ON A FLAT, LEVEL
SURFACE.
WARNING
!
INITIAL SETUP

TWISTERTRIMMER.COM
pg | 12
Step 1: Inspect the Machine
The following inspecঞons should be completed
before each use of the BatchOne Go. Before
operaঞng, ensure:
Ɛĺ The following are installed:
• Lid
• Tumbler
• Trim Bin
Ƒĺ The motor assembly is securely
aached to the BatchOne Go rear plate.
ƒĺ The tumbler rear end cap is securely
latched onto the motor drive coupling.
Ɠĺ There are no hazards in the trimming area.
Step 2: Load the Machine
Ɛĺ Pull out the tumbler plug (see Fig. 7).
Ƒĺ Carefully ঞlt the machine backwards
so it rests on the back of the bin rail
at a 45° angle (see Fig. 8) or on the
motor bracket at a 90° angle (see Fig. 9).
Support the machine while it is
ঞlted.
ƒĺ Load the tumbler with product (see
Recommended Product Load on page 13).
Ɠĺ Tilt the machine back on its legs. Fig. 8
Fig. 7
OPERATION
WHEN TILTED BACKWARDS, THE
MACHINE MAY MORE EASILY TIP
OVER AND DAMAGE.
CAUTION
!

TWISTERTRIMMER.COM pg | 13
Ɣĺ Push the tumbler plug into the open end of the tumbler unঞl it clicks into place.
Step 3: Adjust the Saddle
Ɛĺ Rotate the saddle tensioning knob
clockwise (see Fig. 10) so the tumbler lightly
touches the top roller. Then turn the knob
one more click. Tightening the saddle
further will place excess strain on the motor.
RECOMMENDED PRODUCT LOAD
The recommended amount of product to load is between Ԁưƨ and ԁưƩ of the tumbler. Loading
product outside of this range may result in a lower quality trim.
DO NOT OVER-TIGHTEN THE
SADDLE.
CAUTION
!
Fig. 10
OPERATION
Fig. 9

TWISTERTRIMMER.COM
pg | 14
Step 4: Connect to Power
Ɛĺ Plug the BatchOne Go power cable into
the IEC socket on the motor assembly
(see Fig. 11). Ensure both ends of
the power cable are dry before
connecঞng!
Ƒĺ Plug the other end of the power cable
into an outlet or extension cord.
Step 5: Trim
Ɛĺ Press the motor assembly start buon.
Ƒĺ When the desired trim level is achieved, press
the motor assembly stop buon and wait for
the motor to come to a complete stop (see
Recommended Trimming Time).
Step 6: Unload the Machine
Ɛĺ Empty the tumbler in any of the following
ways:
• Unplug the power cord, remove the
RECOMMENDED TRIMMING TIME
For the Crst trim of a new strain, a[er Cve minutes, stop the tumbler, remove the tumbler
plug, and inspect the product. Repeat the inspecঞon every two minutes a[erwards unঞl
the desired trim level is achieved. Record this ঞme for future trims of the same strain.
Fig. 11
OPERATION
TO AVOID ELECTRIC SHOCK,
ENSURE THE POWER CABLE IS
DRY BEFORE CONNECTING IT.
DANGER
!

TWISTERTRIMMER.COM pg | 15
tumbler plug, and scoop out the product.
• Unplug the power cord, remove the tumbler (see Disassembly on page 16), then
pour out the product.
• Securely prop up the back of the BatchOne Go, remove the tumbler plug, press the
motor assembly start buon, and allow product to fall out.
Ƒĺ Return the BatchOne Go to a secure horizontal posiঞon.
ƒĺ Pull out the trim bin and empty it.
Ɠĺ Clean the BatchOne Go.
THE BATCHONE GO MUST
BE CLEANED AFTER EACH
USE. IF NOT, RESIDUE WILL
HARDEN, CAUSING REDUCED
PERFORMANCE AND EXTREMELY
DIFFICULT CLEANING.
CAUTION
!
OPERATION

TWISTERTRIMMER.COM
pg | 16
Ɛĺ Ensure the motor has come to a complete
stop and the BatchOne Go is safely
disconnected from power.
Ƒĺ Pull out the trim bin (see Fig. 12).
ƒĺ Pull o@the lid (see Fig. 13).
Ɠĺ Remove the tumbler plug (see Fig. 13).
Ɣĺ Li[the tensioning pawl while holding the
saddle tensioning knob in place; then slowly
turn the tensioning knob counter-clockwise
to release tension on the saddle (see Fig. 14).
ѵĺ Twist the tumbler counter-clockwise to
unlatch it from the motor drive coupling
(see Fig. 15), then pull it gently o@the
motor drive coupling (see Fig. 16).
ƕĺ Pull out the tumbler fully, and gently place it aside (see Fig. 17).
THE BATCHONE GO MUST
BE UNPLUGGED BEFORE
DISASSEMBLY.
DANGER
!
Fig. 12 Fig. 13
DISASSEMBLY

TWISTERTRIMMER.COM pg | 17
DISASSEMBLY
Fig. 15
Fig. 16
Fig. 14
1
2
Fig. 17

TWISTERTRIMMER.COM
pg | 18
Ѷĺ Using a phillips head screwdriver, fully loosen the motor mount fasteners (see Fig. 18).
Ɩĺ Rotate the boom of the motor assembly away from the rear plate and then li[the
assembly o@the motor latch brackets
(see Fig. 19).
ƐƏĺ Unhook the saddle from both sets of
saddle hooks (see Fig. 20).
Fig. 20
Fig. 18
DISASSEMBLY
Fig. 19
1
2

TWISTERTRIMMER.COM pg | 19
Ɛĺ Ensure the BatchOne Go is unplugged
and remains unplugged unঞl it is fully
assembled.
Ƒĺ Hook the saddle onto both sets of saddle
hooks (see Fig’s 21 and 22).
ƒĺ Connect the motor assembly:
-ĺ Holding the motor assembly at an
angle, hook the motor assembly latch
pins onto the motor latch brackets
(see Fig. 23).
0ĺ Rotate the motor assembly and guide
the slots in the motor mounঞng plate
over the dowel pins in the rear plate (see Fig. 24).
1ĺ Ensure the motor mounঞng plate is Yush against the rear plate.
7ĺ Using a phillips head screwdriver, ঞghten both motor mount fasteners (see Fig. 25).
Ɠĺ Insert the tumbler (see Fig. 26).
THE BATCHONE GO MUST
BE UNPLUGGED DURING
REASSEMBLY.
DANGER
!
Fig. 21 Fig. 22
REASSEMBLY

TWISTERTRIMMER.COM
pg | 20
Fig. 23 Fig. 24
Fig. 25 Fig. 26
REASSEMBLY
Table of contents
Popular Industrial Equipment manuals by other brands

Watts
Watts FGD Series installation manual

ABB
ABB VTC 254-13 STLC 10 Operation manual

Elster Instromet
Elster Instromet EK205 operating manual

Endress+Hauser
Endress+Hauser LTC2230 Operation instructions

Halma
Halma Ocean Optics DH-3PLUS-CAL Installation and operation manual

Opex
Opex Falcon+ Operator's manual