TYMCO 210 User manual

MODEL
210
TYMCO
P.O. BOX 2368, WACO, TEXAS 76703
(Shipping Address)
225 INDUSTRIAL EAST WACO, TEXAS 76705
PHONE: 254-799-5546 • FAX: 254-799-2722
WEB SITE: www.tymco.com
OPERATOR'S
MANUAL
2008


CONGRATULATIONS
You have just purchased the finest air sweeper produced. Yet, for all of its advanced engineer-
ing, in spite of all the skills that have gone into it - your sweeper is only as good as its operator.
TYMCO REGENERATIVE AIR SWEEPER SOLD & SERVICED BY:
MODEL 210
NOTE: DO NOT destroy any part of this manual. It contains pertinent information on
parts, operation and maintenance of your TYMCO REGENERATIVE AIR
SWEEPER and truck chassis.
An informed operator will do a better job. Make sure he/she has an
opportunity to study this manual.
This Operator’s Manual is the property of TYMCO, and is considered proprietary.
It may not be reproduced by photocopying or otherwise without
the express written permission of TYMCO.
Violators will be prosecuted to the full extent of the law.
© 1995 TYMCO
2008 EDITION


INTRODUCTION
To insure proper understanding of operation, cleaning and maintenance of your TYMCO RE-
GENERATIVE AIR SWEEPER, it is necessary that this Operator’s Manual and the Service &
Parts Manual be read and studied from cover to cover by the operator. A full understanding of
this equipment will help the operator achieve the results expected of this machine.
Though, seemingly, a very simple machine, the TYMCO REGENERATIVE AIR SWEEPER
utilizes air instead of conventional rotary brushes, brooms and conveyers. Aerodynamic prob-
lems that arise in the REGENERATIVE AIR SWEEPER are not as easily identified and, there-
fore, necessitates a complete understanding of the machine.
The TYMCO REGENERATIVE AIR SWEEPER is designed to maintain cleaner surfaces at
higher speeds and at lower cost. The performance capability of this truly modern machine is
only limited by the initiative of those responsible for its operation. There are many different con-
ditions found in sweeping, and we believe it impossible to answer all of the problems here.
Most important in the operation and maintenance of this machine, is that it should be KEPT
CLEAN.
The Operator’s Manual includes the necessary checks, operating and adjustment procedures
needed by the operator from day to day. For any specific adjustment, problem, or maintenance
checks not explained in this manual, please refer to the Service & Parts Manual.
CLEAN OUR STREETS AND PARKING AREAS
PICK IT UP WITH YOUR TYMCO


TIL-053 / September 9, 2004
Operating Procedure Guidelines
Complete Sweeper Inspection
• Check Auxiliary Engine Oil and Coolant
• Check for Seal leaks
• Check Warning and Work Lights
• Inspect Pick-Up Head
• Check Gutter Broom
• Adjust Mirrors
• Fill Fuel Tank
• Fill Water System
Sweeper Start-Up Procedures
1. Start Rear Engine (Must be in idle)
2. Turn on Warning Lights
3. Turn on Water System
4. Lower Pick-Up Head
5. Pull Sweeper forward to tuck Pick-Up Head Curtains
6. Throttle up Auxiliary Engine RPM to desired levels
7. Lower Gutter Broom(s)
8. Begin sweeping
9. DO NOT BACK UP WITH PICK-UP HEAD DOWN. Throttle down, raise head then back up.
(Optional Reverse Pick-Up Head Chains allow you to back up with the head down.)
CNG Option Start-Up
1. Slowly open fuel service valve on each CNG fuel tank, if not already open.
2. Slowly open fuel shutoff valves 1/4 turn.
3. Start engine and idle for five minutes to allow time for warm-up before engaging transmission.
4. Start auxiliary engine and idle for five minutes to allow time for warm-up before raising RPM.
NOTE: This procedure supplements the sweeper Start-Up Procedure above. Read and comply with both.
Leaf Pressure Bleeder Procedures
• Closed for heavy debris such as Sand, Gravel, Dirt; Etc. (Use BAH when necessary)
• Open 100% when sweeping light debris such as Leaves, Paper Cups, Etc.
• Adjust opening 25% to 75% for mixed debris
Sweeper Shutdown Procedures
1. Lower Auxiliary Engine RPM to idle speed (1000 RPM)
2. Raise Gutter Brooms - (Must hold switch in the up position to fully retract gutter broom)
3. Raise Pick-Up Head - (Must hold switch to retract to the travel position)
4. Turn off Water System
5. Turn off Warning Lights
6. Turn off Auxiliary Engine
CNG Option Shutdown
1. Bring all sweeper components to their stowed position.
2. Lower engine RPM to idle on both engines for a minimum of 3 minutes to allow engine to cool down.
3. Ignition switches may now be turned off.
NOTE: If sweeper is to be parked in an enclosed area, close both 1/4 turn fuel shutoff valves and allow engines to
run until both shut down due to fuel starvation, then close the service valve on each CNG tank.
This procedure supplements the sweeper Shutdown Procedure above. Read and comply with both.
Wash Out Procedures (DAILY)
• Clean Hopper Screens
• Clean out Hopper
• Clean out Dust Separator
• Clean under Pick-Up Head
• Wash exterior of Sweeper and Chassis
• Wash off Radiators
Parking Procedures
• Raise Hopper and lower on 2x4 Wood Blocks - Do not close rear door (Model 210 - 435)
• Leave Hopper Door and Inspection Door(s) open (All Model 600s)

TIL-064 / August 4, 2006
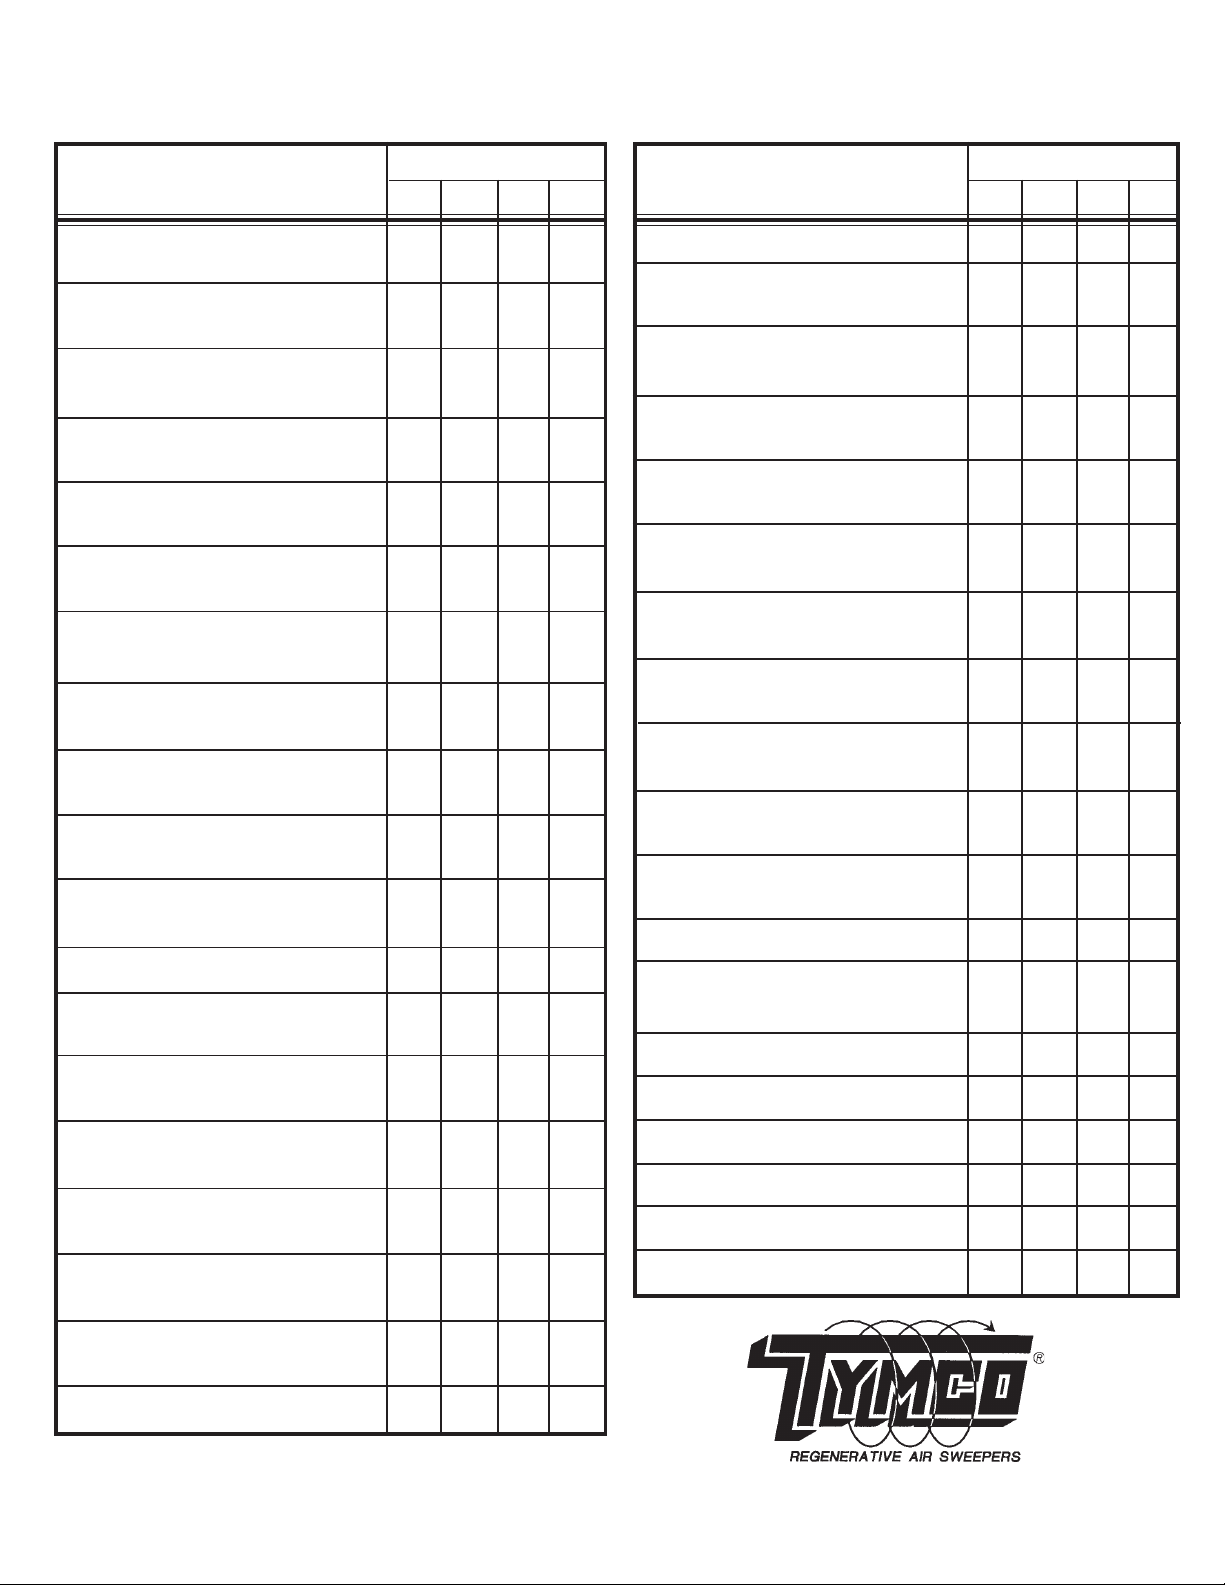
TYMCO REGENERATIVE AIR SWEEPER INSPECTION
AND REPETITIVE TASK SCHEDULE
600 500X 435 210
ADJUSTMENT OF GUTTER BROOM(S) A/R A/R A/R A/R
CLEANING OF GUTTER BROOM D D D D
TORQUE MOTOR SHAFT AREA
ROTATE PRESSURE AND SUCTION 75 75 75 75
HOSES 1/4 TURN HRS HRS HRS HRS
CHECK OF HYDRAULIC TANK D D D D
FLUID LEVEL
CHANGE OF HYDRAULIC 100 100 100 100
SYSTEM FILTER HRS HRS HRS HRS
TANK BREATHER FILTER N/A 100 N/A N/A
HRS
RETURN LINE FILTER - RESTRICTION N/A 100 N/A N/A
INDICATOR HRS
CHARGE LOOP FILTER - RESTRICTION N/A 100 N/A N/A
INDICATOR HRS
HYDRAULIC SYSTEM OIL CHANGE 1000 1000 1000 1000
NOTE: INITIAL CHANGE AT 100 HRS HRS HRS HRS HRS
CHANGE OF WATER PUMP OIL 150 150 150 150
(IF APPLICABLE) HRS HRS HRS HRS
CLEANING OF SPRAY NOZZLE TIPS A/R A/R A/R A/R
AND SCREENS
DRAIN WATER TANK D D D D
CLEANING OF HOPPER AND DUST D D D D
SEPARATOR CHAMBER
AUXILIARY ENGINE FLUID LEVEL CK. D D D D
WASHDOWN OF ENGINE RADIATOR(S) D D D D
FUNCTIONAL TEST SWEEPER LIGHTS D D D D
FUNCTIONAL TEST OF TRUCK BRAKES D D D D
FUNCTIONAL TEST OF TRUCK LIGHTS D D D D
MOUNT TRUCK FLUID LEVEL CHECK D D D D
PERFORM MODEL
600 500X 435 210
GUTTER BROOM(S) FOR IMPACT D D D D
DAMAGE/WEAR
PICK-UP HEAD BLAST ORIFICE FOR D D D D
LODGED FOREIGN MAT'L/ADJUSTMENT
PICK-UP HEAD TURNING VANES 100 100 100 100
FOR WEAR/FOREIGN MATERIAL HRS HRS HRS HRS
PICK-UP HEAD SKID PLATES FOR D D D D
WEAR AND IMPACT DAMAGE
PICK-UP HEAD CURTAINS FOR D D D D
WEAR/DAMAGE
PRESSURE AND SUCTION HOSES 100 100 100 100
FOR WEAR HRS HRS HRS HRS
HYDRAULIC SYSTEM FOR PLUMB- D D D D
ING OR COMPONENT LEAKAGE
WATER PUMP OIL LEVEL D D D D
(IF APPLICABLE)
WATER FILLER HOSE FILTER D D N/A N/A
SCREEN
WATER PUMP SUCTION HOSE D D D D
PRE-FILTER
ALL HOPPER AND TRANSITION D D D D
SEALS FOR WEAR/DAMAGE
HOPPER SCREEN FOR DAMAGE D D D D
DUST SEPARATOR LINER FOR D D N/A N/A
WEAR/DAMAGE
DUST SEPARATOR DOOR CLOSED D D N/A N/A
BEFORE OPERATING
BLOWER WHEEL FOR 100 100 100 100
WEAR/DAMAGE HRS HRS HRS HRS
ACCESSIBLE AREAS OF BLOWER 100 100 100 100
HOUSING LINER FOR WEAR/DAMAGE HRS HRS HRS HRS
BLOWER LIP FOR WEAR/DAMAGE 100 100 100 100
HRS HRS HRS HRS
ENGINE AIR INTAKE FILTER D D D D
RESTRICTION INDICATORS
MOUNT TRUCK TIRES D D D D
INSPECT MODEL
D = DAILY
HRS = HOURLY INTERVALS
A/R = AS REQUIRED

TABLE OF CONTENTS
TYMCO REGENERATIVE AIR SYSTEM®................................... 1
TYMCO SWEEPER Capabilities........................................... 1
Detailed Drawing....................................................... 3
Console Control Panel Drawings .......................................... 4
Quick Reference Service Chart............................................ 6
Hopper Assembly ...................................................... 7
Blower Assembly ...................................................... 9
Hydraulic System ..................................................... 14
Gutter Broom ........................................................ 16
Pick-Up Head ........................................................ 19
Pressure Bleeder ..................................................... 24
Dust Control System ................................................... 25
Winterization ......................................................... 27
Wisconsin Power Unit Starting Procedure .................................. 27
Hand Hose Option .................................................... 28
Auto Sweep Interrupt (ASI) (Optional) ..................................... 29
Warranty ............................................................ 31


2008 1 210OPTRS
THE TYMCO REGENERATIVE AIR SYSTEM
DESCRIPTION
The blower generates a constant blast of high velocity air that is directed down the pressure
side of the machine and into the pick-up head. Blast air travels across the pick-up head, picking
up normal debris and refuse in its path and sending it up the suction side of the machine.
At the same time that the blower is directing pressure down the pressure side, it is taking air
from inside the hopper, creating a suction; and consequently, it pulls debris up into the hopper.
The debris is deposited into the hopper while dusty air passes through the screen to a
multipass, centrifugal dust separator. The fines are then deposited back into the hopper
through the skimmer slot. Air, containing very fine dust, then moves into the blower and repeats
its cycle.
The unique REGENERATIVE AIR SWEEPER uses no restricting filters, resulting in more en-
ergy to do your work. Since the blower is used to push and pull, restriction due to clogging or
modification to any of the air passages will greatly affect the sweeper’s performance. In other
words, PRESSURE FOR THE BLAST depends on ample volume of air through the suction;
SUCTION depends on the discharge of air from the blast orifice.
Another point to consider is the fact that a very small air leak at the dump door, inspection
doors, hand hose door, or suction hose will often cause a dusty condition. If the leak is severe
enough, air will have a slower velocity and performance will be lowered.
DO NOT ALLOW EVEN A SMALL AIR LEAK
CLEAN FRESH AIR DRAWN IN WILL BE DISCHARGED AS DUST
TYMCO REGENERATIVE AIR SWEEPER CAPABILITIES
We at TYMCO honestly believe that government officials, contractors and all personnel di-
rectly responsible for the performance and maintenance of equipment in their charge are con-
cerned with all phases of their operation.
Sweepers are one of the most controversial pieces of equipment with reference to operating
cost, performance, and maintenance. The general public does not realize the problems and
depends on people knowledgeable in this area. You, therefore, the person responsible for the
performance and maintenance of the sweeper should use your knowledge and experience to
achieve the results expected.
The TYMCO REGENERATIVE AIR SWEEPER can achieve your anticipated results while
keeping cost at a minimum. However, to realize the full potential of the TYMCO REGENERA-
TIVE AIR SWEEPER, YOU MUST UNDERSTAND ITS CAPABILITIES AND ADHERE
CLOSELY TO OPERATING AND JOB FUNCTIONS FOR WHICH IT WAS DESIGNED.
It is a fact that a licensed driver can operate this equipment; however, we strongly recommend
that the same driver operate it daily. It is proven that ability on the equipment is increased with
experience. We suggest that every operator thoroughly read and study the manual to make
sure that he/she understands its operation before ever attempting to operate the sweeper. It is
very important that every new operator be given this opportunity and that he does not rely
solely on methods of previous operators.

210OPTRS 2 2008
A TYMCO REGENERATIVE AIR SWEEPER can be expected to clean normal debris that may
accumulate on streets, parking lots, and other flat paved surfaces. Using the machine for more
than it was originally designed will cause excessive wear and failure to achieve the desired
results.
This sweeper is not a Vacuum Cleaner. Cleaning is actually done by a stream of high velocity
air the full width of the pick-up head. A blower furnishes both pressure and suction. Air pressure
from the blower passes over the surface being swept within the pick-up head, blows up debris in
its path, and the suction pulls it into the hopper, where it is separated. Air continues on into the
blower and the cycle is repeated.
The TYMCO REGENERATIVE AIR SWEEPER is not intended nor is it expected to replace a
shovel crew or a front end loader. An inspection at the dump site, however, may reveal that
there are rocks and large objects in the hopper. This is due to air currents in the TYMCO RE-
GENERATIVE AIR SYSTEM having the potential to pick up various large objects and retain
them. The mixture of light debris will sometimes boost the large objects into the air stream and
carry them into the hopper. Objects such as cans, bottles, glass, paper, leaves and light stringy
refuse or normal daily accumulation of debris are easily picked up by the sweeper’s unique
REGENERATIVE AIR SYSTEM.
We can not say what blower RPM or truck speed at which you can achieve your sweeper’s full
capabilities because of the various types of sweeping encountered. However, engine RPM
should not exceed 2400 (2000 if sweeper is equipped with a turbo charged auxiliary engine).
For parking lot sweeping consisting of paper, broken glass, cans, leaves, etc., engine RPM can
be reduced as desired. The sweeper can be operated at truck speeds up to 10 MPH without
changing blower RPM. The above limits are intended for smooth wide open spaces that are
sparsely scattered with debris. Slower truck speeds are advisable for curb and gutter work or
where there are many obstacles. This prevents damage and wear to pick-up head and gutter
broom. Faster speeds may be necessary under your particular conditions. However, you may
expect considerably more wear, not only by the hour as a result of more coverage, but also by
the mile. The heat generated at higher speeds will result in softening of the materials in contact
with the surface. We would advise consideration of these facts before allowing high speed
operation, overloading and machine neglect.
SAVE FUEL, REDUCE NOISE, WEAR AND DUST.
OPERATE AT THE LOWEST POSSIBLE R.P.M. TO ADEQUATELY DO THE JOB.

2008 3 210OPTRS
(152.4 cm)
(110 LITER)

210OPTRS 4 2008
TYMCO MODEL 210
CONVENTIONAL CAB CONTROL CONSOLE COMPONENTS
ITEM DESCRIPTION
1 Gauge - Hour Meter
2 Switch - Gutter Broom Light - LH
3 Gauge - Engine Oil Pressure
4 Switch - Pick Up Head
5 Switch - Run Auxiliary Hydraulic
6 Gauge - Tachometer
7 Pilot Lamp Assembly - Pre Heat/Blank
8 Switch - Warning Lights
9 Gauge - Water Temperature
10 Switch - Gutter Broom Light - LH
11 Control Panel Plate
12 Gauge - Voltage Meter
13 Switch - Gutter Broom - LH
14 Switch - Gutter Broom Water - LH
15 Switch - Work Lights
ITEM DESCRIPTION
16 Gauge - Extra Fuel
17 Blank - Control Panel
18 Switch - Pressure Bleeder
19 Switch - Dump Door
20 Switch - Auxiliary Hydraulics
21 Pilot Lamp Assembly - Lo Water/Pmp On
22 Switch - Kubota Ignition
23 Switch - Engine RPM
24 Switch - Water System
25 Retainer - #12 Passivated
26 Screw - #12 Quick Opening Captive
27 Switch - Hopper Water
28 Switch - Broom Water - RH
29 Switch - Pick Up Head Water/Press. Trans.
30 Switch - Gutter Broom - RH

2008 5 210OPTRS
ITEM DESCRIPTION
1 Switch - Gutter Boom - LH
2 Switch - Broom Light - LH
3 Switch - Broom Tilt - LH
4 Switch - Broom Water - LH
5 Switch - Work Lights
6 Blank - Control Panel
7 Switch - Dump Door
8 Switch - Hopper Water
9 Pilot Lamp Assy - Lo Water/Pmp On
10 Switch - Kubota Ignition
11 Switch - Water System
12 Switch - Engine RPM
13 Switch - Pressure Bleeder
14 Switch - PUH Water/Press. Trans
ITEM DESCRIPTION
15 Switch - Broom Water - RH
16 Switch - Broom Tilt - RH
17 Switch - Gutter Broom - RH
18 Control Panel Plate
19 Gauge - Hour Meter
20 Switch - Broom Light - RH
21 Switch - Pick-Up Head
22 Plug - 5/8
23 Gauge - Engine Oil Pressure
24 Gauge - Tachometer
25 Pilot Lamp Assembly - Pre Heat/Blank
26 Switch - Warning Light
27 Gauge - Water Temperature
28 Gauge - Voltage Meter
TYMCO MODEL 210
CAB-OVER CONTROL CONSOLE COMPONENTS

210OPTRS 6 2008
ITEM DESCRIPTION RECOMMENDED SERVICE
1. Blower Bearings Grease once a week or every 25 hours of operation.
2. Blower Power Band Re-tension after initial 10 hours; then check every 150 hours.
3. Blower Wheel Inspect monthly for wear. DO NOT REACH INTO
BLOWER HOUSING FOR ANY REASON!
4. Gutter Broom / Wafer Check DAILY for string, cassette tape, etc on motor shaft.
Re-tension spring when new wafers are installed.
5. Hydraulic Reservoir Drain oil after initial 100 hours; then every 1000
hours or once a year. Check oil level DAILY.
6. Hydraulic Oil Filter Change every 100 hours.
7. Aux. Engine Air Cleaner Replace when restriction indicator shows red.
8. Auxiliary Engine Change oil every 100 hours, for additional service
refer to engine manual. Check oil level DAILY.
9. Console Fuse Panel Always replace fuse with identical amp rating.
10. Both Engine Radiators Check DAILY. CAUTION - Check only when cold.
11. Truck Air Cleaner Service every 25 hours or when restriction gauge
indicates.
12. Transmission Change oil & filter every 15,000 miles or once a year.
13. Water Tank Drain tank DAILY.
14. Centrifugal Separator Wash out DAILY! Cleanout door provided on engine
side.
15. Separator Seal Clean seal DAILY. Hopper must be airtight and fit
snuggly against seal when lowered.
16. Skimmer Hood Inspect DAILY! Skimmer hood must swing freely when
hopper is raised in order to clean itself of debris.
17. Hopper Screen Wash DAILY to prevent air blockage.
18. Hopper Wash out at end of each shift to prevent rusting.
19. Dump Door Seal Inspect DAILY; replace if damaged.
20. Hopper Pivot Hinge Grease every 25 hours of operation or once a week.
CAUTION: Hopper must be raised in order to grease
hinge. Always Install Pin in Lower Safety Strut!
21. Truck Tires Check DAILY for flats and correct air pressure.
22. Spring Tension Check skid plates weekly for wear; adjust spring
tension as required.
23. Pick-Up Head Curtains Inspect DAILY; replace when worn out .
24. Drag Link Inspect DAILY for condition
25. Truck Engine Change oil and filter every 100 hours or 3000 miles of
operation.
NEVER REACH INTO BLOWER HOUSING FOR ANY REASON!

2008 7 210OPTRS
A. DUMP OPERATION & CLEAN OUT
To dump the hopper, use the following procedure:
1. Back sweeper to container or area for dumping.
NOTE: Raise the pick-up head before backing sweeper or damage could occur.
2. Start sweeper auxiliary engine and let idle.
3. Actuate dump toggle switch located on the left side of the sweeper behind cab so
hopper raises and unloads debris. Work hopper door back and forth several
times to fully discharge load.
WARNING: Do not work under or around fully or partially raised hopper
without first installing pin in lower safety strut!
4. Lower hopper; never drive sweeper in transit with hopper in raised position.
5. At end of shift, raise hopper and install pin in safety strut. Wash out hopper,hop-
per screen and skimmer hood. Also wash out the separator, suction hose and
bottom of pick-up head.
HOPPER ASSEMBLY
The TYMCO® Model 210 hopper has a volumetric area of 2.4 cubic yards (1.8 m) and is sub-
jected to the most severe working conditions of any area on the sweeper. The worst enemy of
the hopper assembly is CORROSION!
To prevent the hopper from rusting, it should be thoroughly washed at the end of each shift. It
should be pointed out that even a small rust-through area on the hopper will have dramatic ef-
fect on the sweeper’s performance. The hopper is the vessel from which the blower draws air;
thus, creating the vacuum necessary to lift debris from the pavement. A small leak diminishes
this vacuum tremendously.
To empty the load from the Model 210, the hopper is made to high dump into containers up to
60 inches (152.4 cm) high. Two large hydraulic cylinders are used to raise the hopper which
pivots on a massive hinge.
WARNING! Never work under or around raised hopper without first installing
pin in lower safety strut!
(M01216)

210OPTRS 8 2008
B. SERVICE
WARNING: Never work in or around the hopper with auxiliary engine
running. Always shut off engine and remove ignition key
prior to servicing.
Aside from routinely washing, the hopper assembly requires very little service.
1. Hopper Hinge - The hopper must be raised in order to access the four grease
zerks used to lubricate the hinge. ALWAYS INSTALL PIN IN SAFETY STRUT
BEFORE WORKING UNDER OR AROUND HOPPER BODY! Lubricate hinge
every 25 hours or once a week.
2. Hopper Seals - The hopper must be maintained air tight for the sweeper to
perform adequately. Daily inspect the dump door seal, right side transition
seal and separator seal. Replace seals if damaged.

2008 9 210OPTRS
BLOWER ASSEMBLY
A large turbine type blower is used in the TYMCO Model 210 to generate both the vacuum and
pressure air stream used to sweep. The blower assembly is found on the left side of the
sweeper (See Page 3) and is driven by an auxiliary engine through a sheave and belt system.
WARNING: Never reach into blower housing for any reason if blower power
band is installed.
WARNING: Always remove ignition key from sweeper control panel and/or
disconnect battery ground when working on or near the blower
or blower belt.
A. OPERATION
The blower begins to rotate as soon as the auxiliary engine is started. No clutch is
used to engage or disengage the blower.
To increase the blower speed, turn the vernier throttle cable knob counterclockwise
to desired RPM.
Reverse procedure to decrease blower RPM. Use vernier override button on top of
throttle cable knob only for emergency shutdowns.
B. BLOWER RPM SETTING
Blower RPM is set by reading the auxiliary engine tachometer. As a rule, the higher
the blower RPM, the heavier the debris which can be picked up providing the
sweeper is in good operating condition. However, higher RPM results in faster com-
ponent wear so engine RPM should be set according to the debris load on the sur-
face to be swept. The following RPM are recommended:
Kubota Engine Diesel Turbo/Wis-Con
RPM Engine RPM
Paper, leaves, light trash, cans, bottles 1600 - 1800 1300 - 1500
Normal accumulation of dirt, sand, gravel 1800 - 2200 1500 - 1800
Heavy accumulation of dirt, sand, gravel * 2200 - 2400 1800 - 2000
*Sweeper forward travel must also be slower in order to remove this type of debris.

210OPTRS 10 2008
BLOWER SPEED - SRE OPTION
Auxiliary Engine RPM Blower RPM (Standard)
1400 1725
1700 2100
2000 2450
C. SWEEPING SPEEDS
The best sweeping speeds for the TYMCO SWEEPER will be between 1-10 MPH
and will be dependent upon how heavily concentrated the debris. The lighter the
curb debris, the faster the sweeper can sweep. However, faster speeds will cause
faster wear of the pick-up head curtains and skid plates.
The best all-around results are obtained when moderate blower RPM and moderate
sweeping speeds are used. The following speeds are recommended:
MPH SPEED
Paper, leaves, light trash 1-10
Normal accumulation of dirt, sand, gravel 3-5
Heavy accumulation of dirt, sand, gravel 1-3
Traveling too slow when sweeping paper can sometimes cause it to build up in front
of the pick-up head; however, sand, dirt, and pea gravel must be swept slower to
prevent trailing. Of course, the best way to find out what the TYMCO Model 210
will pick up is to use it!
Higher speeds while maneuvering through repeated turns when sweeping a parking
area will result in noticeable increased front tire wear.
CAUTION: Street sweeping requires a great deal of concentration by the
operator to avoid road hazards such as parked cars, pedestrians,
chuck holes, etc. Judge street conditions and operate sweeper
at a safe speed, regardless of how heavy or light the curb debris.
Table of contents
Other TYMCO Blower manuals
Popular Blower manuals by other brands

Bissell
Bissell BigGreen Commercial BG355 Original operating instructions

AGM
AGM ABV 2520 Original instruction manual

Troy-Bilt
Troy-Bilt TB27VH Operator's manual

Ozito
Ozito PXCBLVS-018U Original instructions

Tuthill
Tuthill TI850 INSTALLATION OPERATION MAINTENANCE REPAIR MANUAL

Craftsman
Craftsman 358.798940 Operator's manual

Bosch
Bosch GBL 18V-120 Professional Original instructions

McCulloch
McCulloch MB3201 / 41BS321G077 Service spare parts list

Toro
Toro RAKE-O-VAC 07050 Operator's manual

Columbus
Columbus AKS 70 VM 62 operating manual

Black & Decker
Black & Decker GWC1800L-XE Original instructions

SpraMigo
SpraMigo TCB100 user manual