U.S. Solid USS-HMA02 User manual

Instruction Manual
USS-HMA02 Moisture Analyzer

1
Table of Contents
1. Introduction................................................................................................................2
1.1 About Halogen Moisture Analyzer.................................................................... 2
2. Safety Precautions...................................................................................................... 3
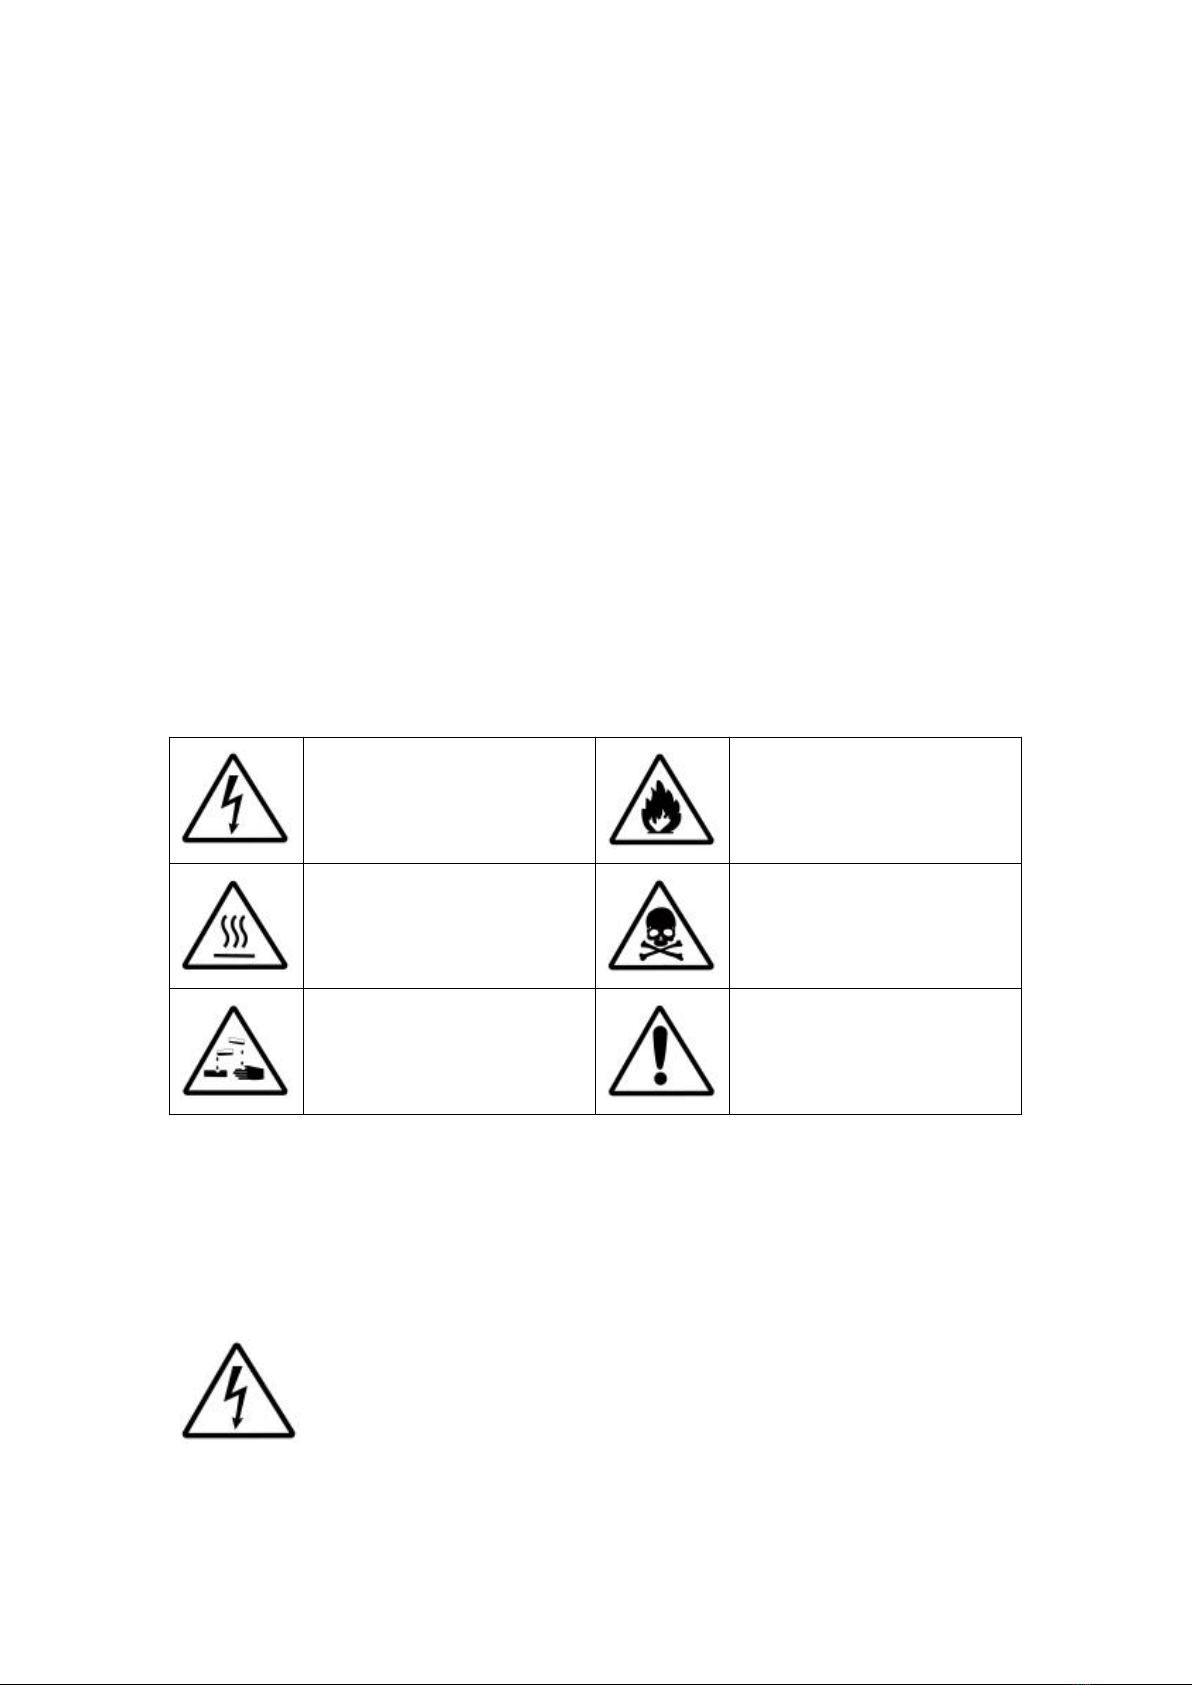
2.1 Definition of Warning Symbols..........................................................................3
2.2 Warnings............................................................................................................3
2.3 Cautions.............................................................................................................5
3. Design and Function...................................................................................................6
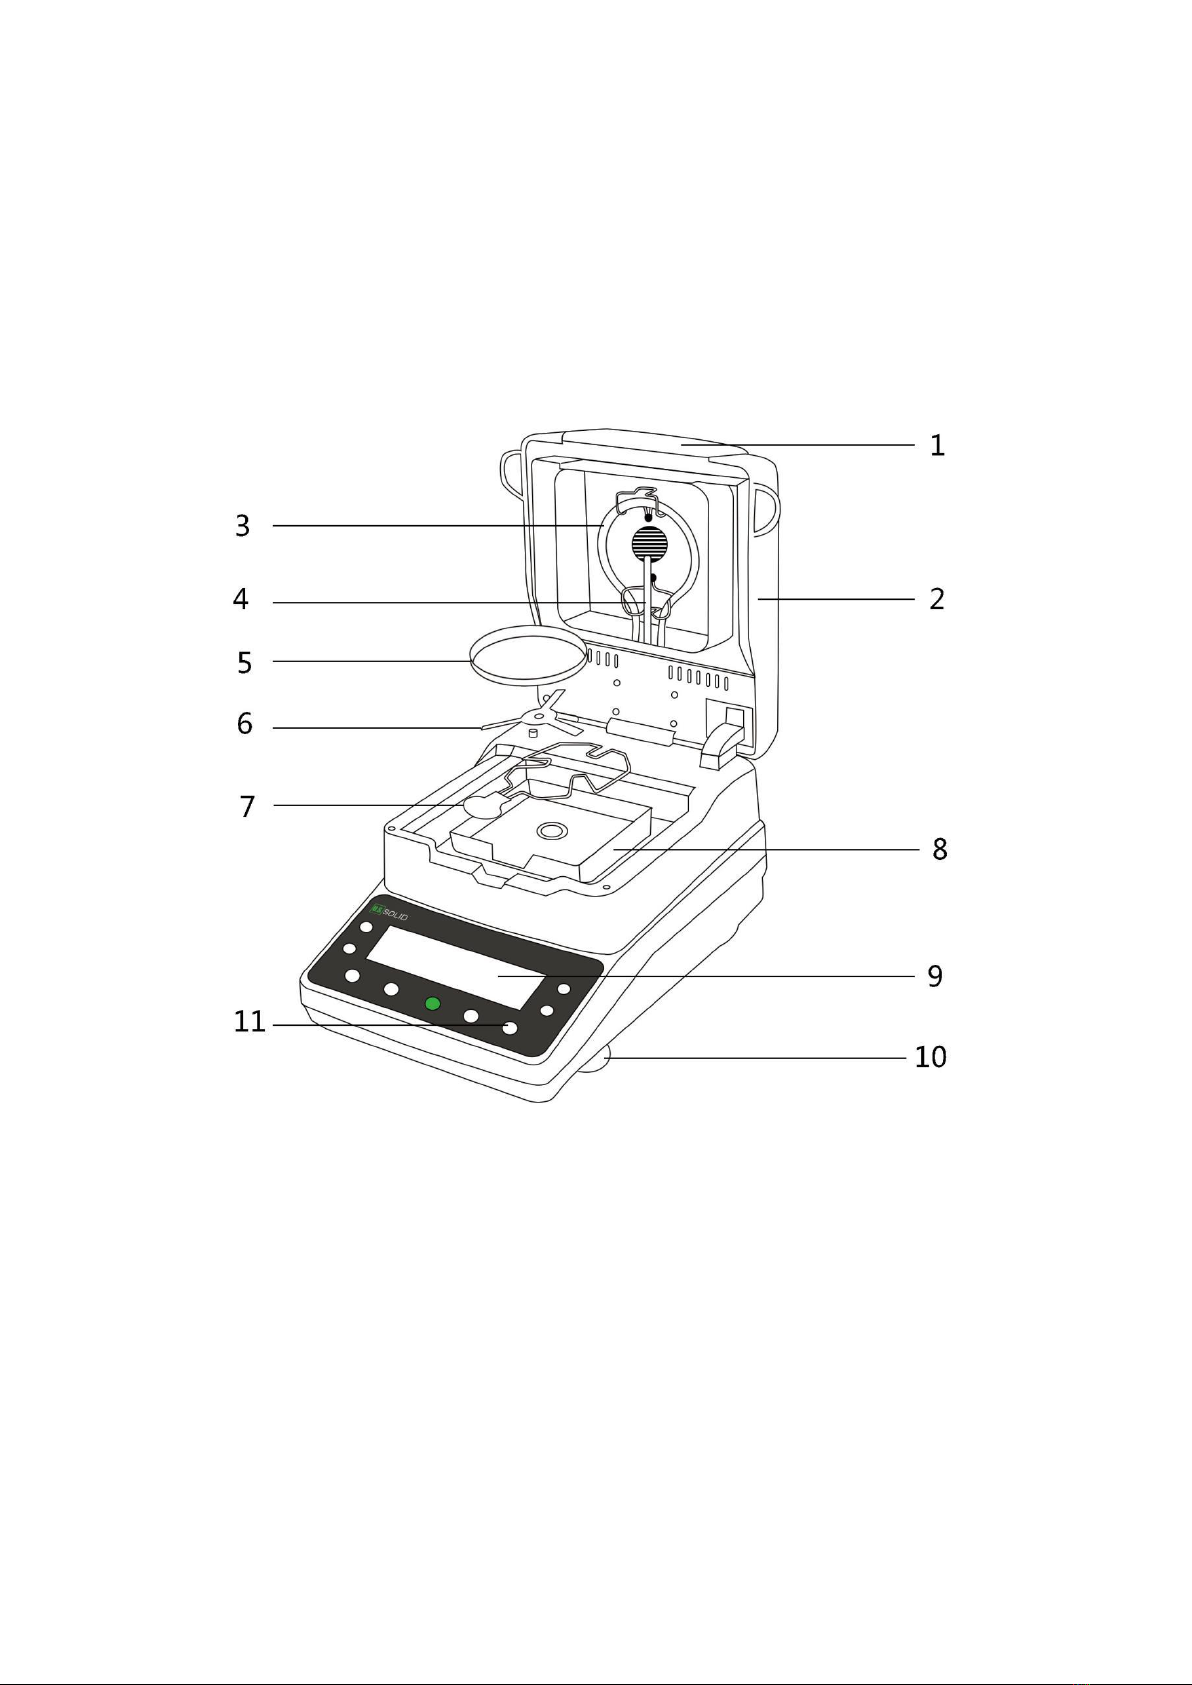
3.1 Components...................................................................................................... 6
3.2 Keyboard............................................................................................................8
3.3 Display Panel......................................................................................................9
4. Installation and Adjustment..................................................................................... 11
4.1 Scope of Delivery.............................................................................................11
4.2 Selecting the location...................................................................................... 12
4.3 Installing parts................................................................................................. 13
4.4 Leveling the moisture analyzer........................................................................13
4.5 Connect to power............................................................................................15
5. Settings and calibration............................................................................................ 16
5.1 Measurement Methods Setting...................................................................... 16
5.1.1 Preset and storage of measurement methods..................................... 16
5.1.2 Drying Mode setting..............................................................................17
5.1.3 Ending Mode setting............................................................................. 18
5.2 Calibration....................................................................................................... 20
6. First Measurement................................................................................................... 21
7. Maintenance.............................................................................................................24
7.1 Cleaning...........................................................................................................24
7.1.1 Cleaning the sample chamber...............................................................24
7.1.2 Cleaning the heating unit...................................................................... 25
7.1.3 Cleaning the display panel and keyboard............................................. 25
7.2 Disposal........................................................................................................... 25
8. Troubleshooting........................................................................................................26
9. Technical Data...........................................................................................................28

2
1. Introduction
Thank you for choosing the U.S. Solid USS-HMA02 Moisture Analyzer.
The USS-HMA02 moisture analyzer is precise and reliable. It provides a
high level of operating convenience and response sensitivity to facilitate
determination of the moisture content of your samples. U.S. Solid’s
dedicated customer service staff are available to answer any inquiries
regarding applications and accessories.
To make full use of the functions and performance of the U.S. Solid
USS-HMA02 moisture analyzer, please read the manual completely and
follow the usage instructions before installation and operation.
1.1 About Halogen Moisture Analyzer
Moisture analyzers work according to the thermogravimetric principle.
Moisture is determined by the direct weight lost by the sample due to
heating from an intense halogen light.
The U.S. Solid USS-HMA02 Halogen Moisture Analyzer determines the
initial weight of the sample. The sample is quickly heated by the internal
halogen dryer unit causing the moisture to vaporize. During the drying
operation, the instrument continuously determines the weight of the
sample and displays the loss of moisture. Upon drying completion, the
moisture content or the dry solids content of the sample is displayed.

3
2. Safety Precautions
U. S. Solid Moisture Analyzer qualifies as state-of-the-art technology and
complies with all recognized safety rules. Improper use or handling,
however, can result in damage and/or injury. Follow the precautions
below to ensure safe and trouble-free operation of your moisture
analyzer.
2.1 Definition of Warning Symbols
Electrical shock
Inflammable/explo
sive substance
Hot surface
Toxic substance
Acid / Corrosion
General hazard
2.2 Warnings
•The Analyzer has a 3-pin power socket equipped with a
ground terminal. To prevent electric shock and to maintain
stability in operation of the analyzer, be sure to ground the analyzer.

4
•Avoid allowing the analyzer to get wet. It is not a water-resistant
structure. Any leakage of liquid into the analyzer may cause damage to
the analyzer or an electric shock to the user.
•Use a power source (voltage, frequency, outlet type)
adapted to the specification of the analyzer. If excessive
voltage is used, the analyzer may overheat and be damaged or cause a
fire.
•Do not measure samples that could cause a dangerous chemical
reaction or create an explosion or poisonous gas when the sample is
dried.
•Keep flammables away from the analyzer. Parts of the analyzer
become very hot. Materials placed near it might catch fire.
•Do not touch the heater cover, the halogen lamp,
glass-housing, pan handle, sample pan or sample without
adequate protection, burns or scalding may result.
•Parts of the analyzer are very hot when a measurement finishes. For
operation, use the specified grips of the heater cover and pan handle.
Use the standard accessory tools.
•Toxic gases produced during the drying process of
substances containing toxic or corrosive ingredients may
cause irritation (eyes, skin, breathing), illness or death. Such substances
may be dried only in a fume cupboard.

5
•For substances that produce corrosive vapors when
heated (e.g. acids), work with small amounts of samples as
the vapor may condense on cooler housing parts and cause corrosion.
2.3 Cautions
•Operate the Analyzer on a stable, rigid and flat table.
•Handle the moisture analyzer carefully. It is a precision
device, subjecting it to impact may result in a malfunction.
•Ensure sufficient free space around the Analyzer as a safety zone.
Allow at least 1 meter of free space above the Analyzer. Do not place
anything on top of the heater cover.
•Use appropriate personal safety equipment, such as safety glasses,
gloves and protective clothing.
•If an abnormal situation occurs ( for example, a burning odor is
smelt), remove the power cable immediately.
•When the device will not be used for a long period of time, turn the
power off and disconnect the power cable.
•The Analyzer must be operated only by trained individuals who are
familiar with the properties of the samples being tested and with the
equipment operation.
•Do not disassemble, remodel or repair this product or accessories.

6
3. Design and Function
3.1 Components
1: Observation window
2: Heater cover
3: Heater
4: Temperature sensor
5: Sample pan
6: Sample pan holder
7: Sample pan handle
8: Draft shield
9: Display panel
10: Leveling foot
11: Keyboard

7
1: Fan
2: Power inlet
3: Level bubble
4: RS-232 connector

8
3.2 Keyboard
Key
Description
POWER
Turns the power on or off
START/STOP
Starts or Stops the measurement
TARE
Clears the display to zero (0) when a sample pan is
placed, and this key is pressed
MENU
Opens the menu during the standby state (measurement
display)
CONVERSION
Switches measurement results
CONFIRM
Applies the setting and advances the next setting
RESET
[short press] Returns to the weighing mode
[long press] calibrates the balance
DOWN
Decreases the value (backlight off)
UP
Increases the value (backlight on)

9
3.3 Display Panel
No.
Name/Display
Description
1
Test status
2
Drying
Mode
Standard
Maintains a constant drying
temperature.
Fast
Increases the drying temperature
rapidly.
Soft
Increases the drying temperature
slowly.
3
Ending
Mode
Automatic
The test will automatically stop at
a certain point in time (when the
moisture content does not
change within 45 seconds) under
the automatic stop mode. This
mode takes effect after 15
seconds of heating.

10
Manual
While the sample is in the test
state and press the
“START/STOP”button to
terminate the test.
Timing
Preset an analysis time, the
heating will stop automatically
when the specified time is
reached.
4
Time
Testing
Length of time the test has been
run
Setting
Preset drying time
5
Temperature
Testing
Current temperature
Setting
Preset drying temperature
6
Percentage
Moisture content
7
Value
Testing
Current moisture content
Setting
Weight of the sample

11
4. Installation and Adjustment
4.1 Scope of Delivery
Unpack and check the completeness of the delivery. The following
accessories are part of the standard equipment for your new Moisture
Analyzer:
·50 Aluminum Sample Pans
·1 Sample Pan Holder
·1 Sample Pan Handle
·1 Draft Shield
·1 Power Cable
·1 100g Calibration Weight
·1 Instruction Manual
·1 Quality Certification
Unpacking and checking the instrument for transport damage.
Immediately inform U.S. Solid customer service if you have any
complaints or parts are missing.
Note:
Keep all all of the packaging. This packaging guarantees the best possible
protection for the transport of your instrument when transporting.

12
4.2 Selecting the location
Measurement performance of your moisture analyzer depends largely
on the surrounding environments.
Follow these guidelines to make sure the proper environmental
conditions are met:
•Operate the instrument only indoors.
•Make sure that all parts of the instrument reach room temperature
(5°C-30°C) before switching it on. Make sure that the relative humidity is
between 20% and 80% and that non-condensing conditions are met.
•The power plug must be easily accessible.
•Select a firm, horizontal location that is free from vibrations as
possible.
•Avoid direct sunlight.
•No excessive temperature fluctuations.
•Surroundings should be as free from dust as possible.
•Sufficient clearance around the instrument to allow warm air to
dissipate.
•Sufficient distance from heat-sensitive materials in the vicinity of the
instrument.

13
4.3 Installing parts
Procedure:
1. Lift the cover straight up
2. Install the draft shield
Place the draft shield into the sample chamber. Align it with the hole.
3. Install the sample pan holder
Place the pan holder on the axis of the moisture analyzer main unit.
Align the pan holder with the draft shield, and insert them onto the
bottom.
4. Place the sample pan handle
5. Place a sample pan
Place a sample pan on the pan holder so that the brim of the holder can
secure the sample pan.
4.4 Leveling the moisture analyzer
Accurate horizontal positioning is a necessary condition for repeatable
measurements and exact results. To compensate for small irregularities
or tilts at this location, the instrument needs to be leveled.

14
Adjust the leveling feet of the Moisture Analyzer until the air bubble in
the indicator is centered. The level indicator is located under the cover
towards the rear of the Moisture Analyzer.
Position of air bubble
Adjustment method
up
Turn both feet clockwise
down
Turn both feet counterclockwise
Left
Turn left foot counterclockwise, right foot
clockwise
Right
Turn left foot clockwise, right foot
counterclockwise

15
4.5 Connect to power
Warning:
•To prevent electric shock, be sure to use the 3-pin power cord with
equipment grounding connector.
•Check to make sure the voltage indicated on the moisture analyzer
data label matches the local line voltage. If it is does not match, do not
connect the moisture analyzer to the power source.
Connect a power cable:
a. Insert the female end of the power cord into the power inlet located
at the rear of the main unit.
b. Plug the male end of the power cord into the outlet.
Note:
To obtain accurate results, the moisture analyzer must be warmed up
for at least 30 minutes each time it is connected to an AC power source
or after a power outage of more than 30 minutes.
Only after this length of time will the analyzer reach the required
operating temperature.

16
5. Settings and calibration
5.1 Measurement Methods Setting
5.1.1 Preset and storage of measurement methods
The analyzer can store a total of 16 groups of measurement methods
from 0 to F. Test settings such as drying mode, ending mode, and drying
time can be set for each group.
1. In the weighing state, press the “MENU”button to set the parameters,
and the serial number “0”will be displayed.
2. Press the “UP”or “DOWN”to select the number, where “0”is the
factory setting (can’t be changed) and “1”-“F”is the adjustable setting.

17
3. Confirm by pressing the “CONFIRM”button, the drying mode flashes.
5.1.2 Drying Mode setting
Press the “UP”or “DOWN”to select the required drying mode and
confirm by pressing “CONFIRM”.
1. Standard drying mode
This mode is the default setting and is suitable for most samples. The
heating temperature can be set, the sample is heated to the set
temperature during the test, and the temperature is maintained until
the test ends automatically.

18
2. Fast drying mode
This mode is suitable for samples with high moisture content. The
heating temperature can be set, and the initial temperature will exceed
the set value, and will later drop to the set temperature and remain until
the test ends automatically.
3. Soft drying mode
This mode is suitable for samples with low moisture content. The time
required for the heater to rise to the set temperature is longer, and the
temperature rises evenly and slowly. The time during the temperature
rise phase can be set manually.
5.1.3 Ending Mode setting
After drying mode is set, the icons for ending mode and the currently set
drying mode flashes. Press the “UP”or “DOWN”to select required ending
mode and confirm by pressing “CONFIRM”.

19
1. Automatic ending mode
The test will automatically stop at a certain point in time (when the
moisture content does not change within 45 seconds) in the automatic
stop mode. This mode takes effect after 15 seconds of heating.
After the test is completed, the display shows the sample moisture
content, heating time and current temperature.
2. Manual ending mode
The sample is in the test state and press the “START/STOP”button to
terminate the test.
After the test is completed, the display shows the sample moisture
content, heating time and current temperature.
Manual stop is only available in this modes.
3. Timing ending mode
Preset an analysis time, the heating will stop automatically when the
specified length of time is reached.
Table of contents
Other U.S. Solid Measuring Instrument manuals