UBERHAUS DESIGN 999-3142990 User manual

12’x10‘ Sunshelter Mural
Operators’ Manual p. XX
12pi x 10pi Abri-soleil Mural
Guide de l'utilisateur p.XX
Model/Modèle : 999-3142990
Customer Service / Service à la clientèle : 1-866-206-0888
Our Customer service sta is available to help you. For help with product assembly, to report damaged or
missing parts, or for any other information about this product, please call our toll-free number.
SAVE THIS MANUAL
Keep this manual and the original sales invoice in a safe, dry place for future reference.
Notre personnel du service à la clientèle est disponible pour vous aider. Pour obtenir de l’aide pour le montage
de votre produit, pour signaler des pièces endommagées ou manquantes, ou pour toute autre information à
proposde ce produit, veuillez composer notre numéro sans frais.
CONSERVEZ CE GUIDE
Conservez ce guide avec la facture d'origine dans un endroit sûr et sec pour référence future.

Warning
1. It is the consumer's responsibility to comply with any building codes, ordinances, zoning limitations, or local
homeowner's restrictions and obtain any required permit, before purchase and installation of the products.
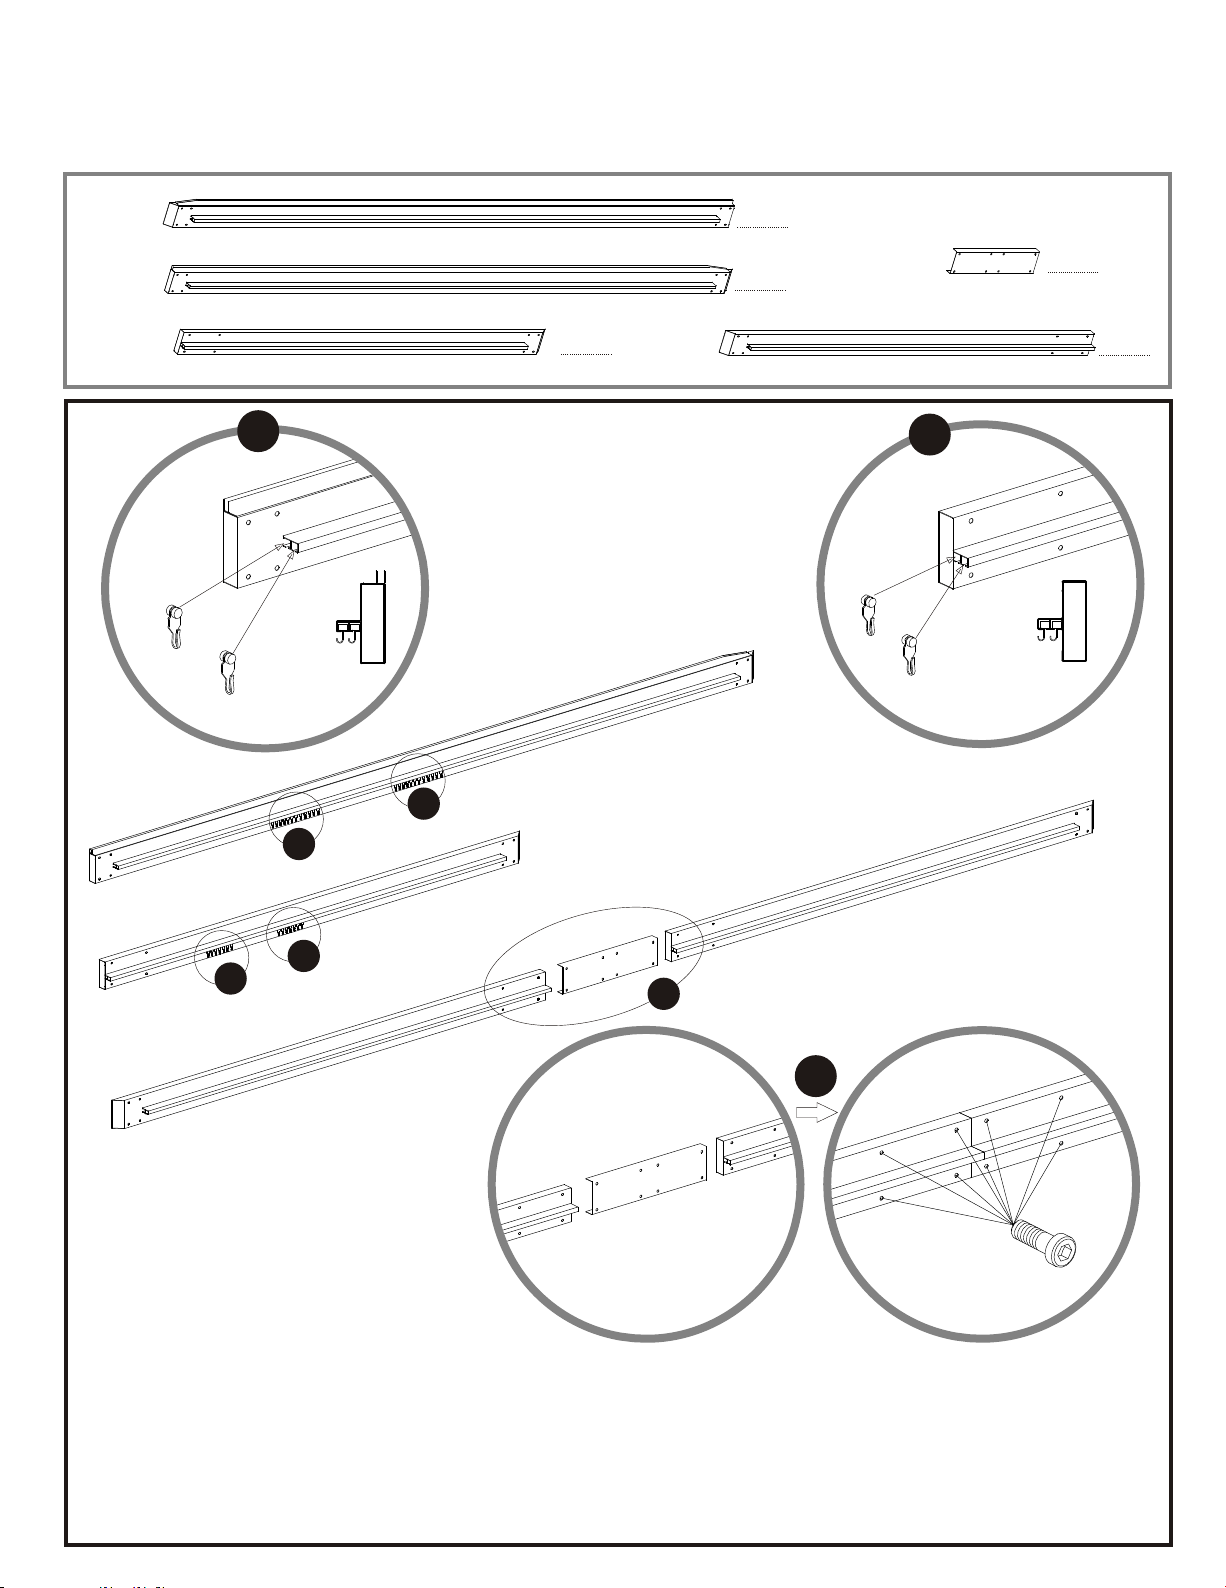
2. Two persons are required for assembly. The tools required, include an Allen key (part Z in hardware kit
instruction), stepladder and other safety items such as gloves, safety eye wear and hardhat. To avoid injury from
exposed sharp edges, it may be necessary to use the above safety equipment.
3. This unit will take at least 5 hours to set up. You must schedule enough time to complete the assembly so you
don't leave it unattended if not fully assembled,even if bolted to the ground.
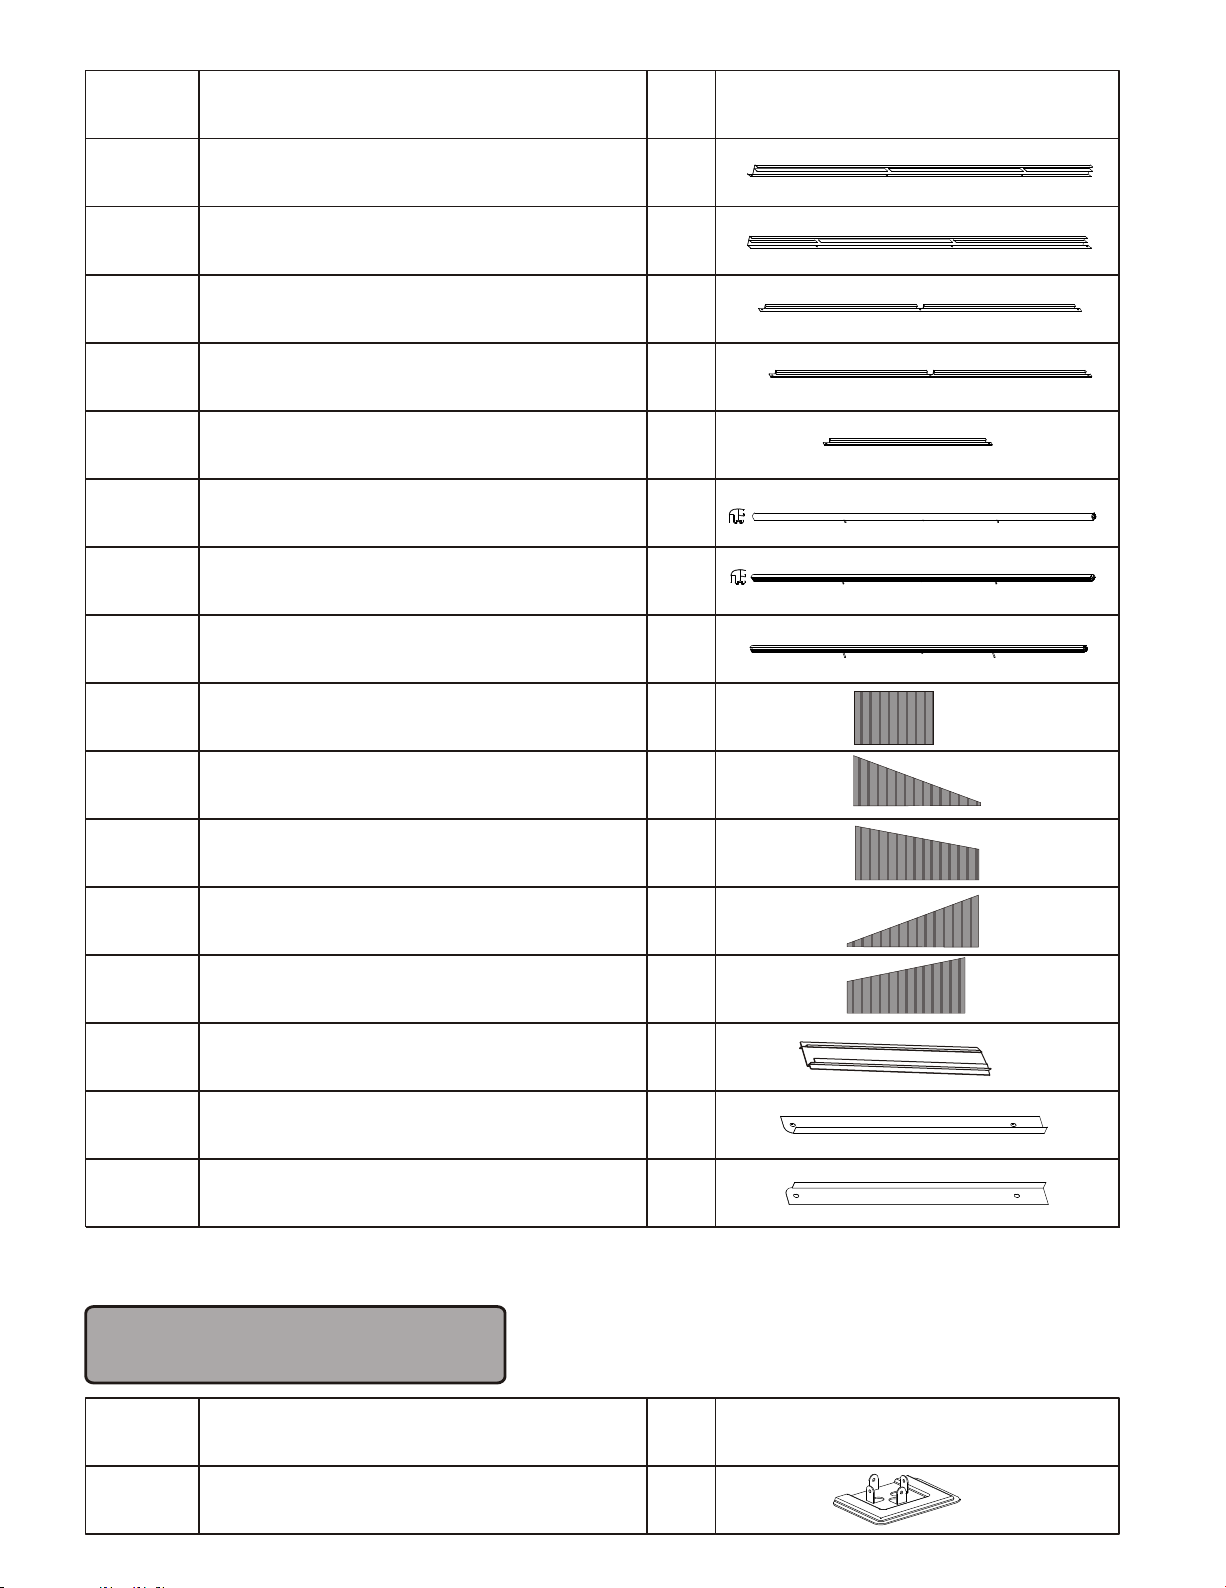
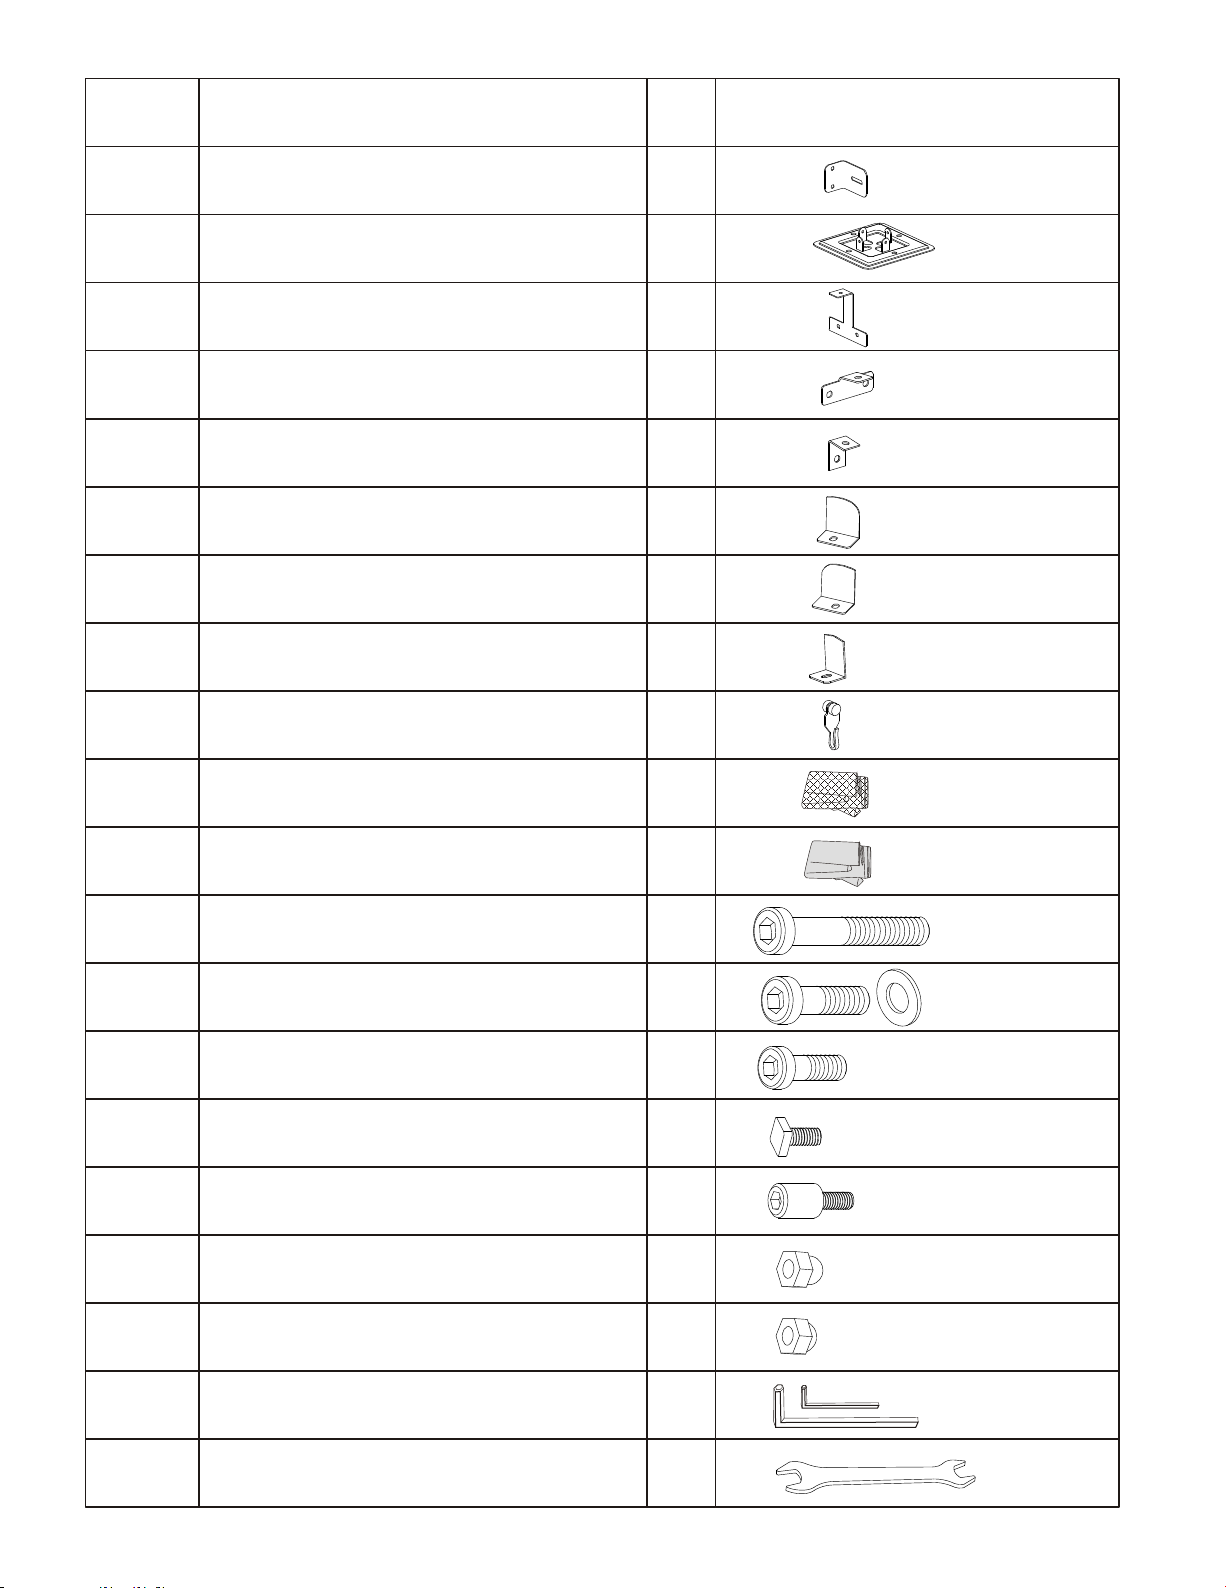
· Make sure that all components are in the box. Read instructions carefully before starting the assembly.
·Follow all instructions to assure the strength of the shelter.
·Help from another person is required to assemble the shelter.
·In order to avoid damage to the shelter and its components, use appropriate tools. Do not use the structure
as a support;a stepladder is recommended.
·Check all screws on a regular basis to maintain the solidity of the structure.
·Keep instructions and parts list for further use.
4. The screws to anchor on wood deck and concrete patio aren't included.
5. DO NOT REMOVE THE PROTECTIVE FILM ON THE POLYCARBONATE ROOF PANELS BEFORE
INSTALLATION ( ). MAKE SURE TO PUT THE UV PROTECTED SIDE FACING UP. IT IS A
VERY IMPORTANT PROCEDURE IF NOT FOLLOWED AS DESCRIBE, YOUR ROOF WILL NOT BE
COVERED BY THE WARRANTY.
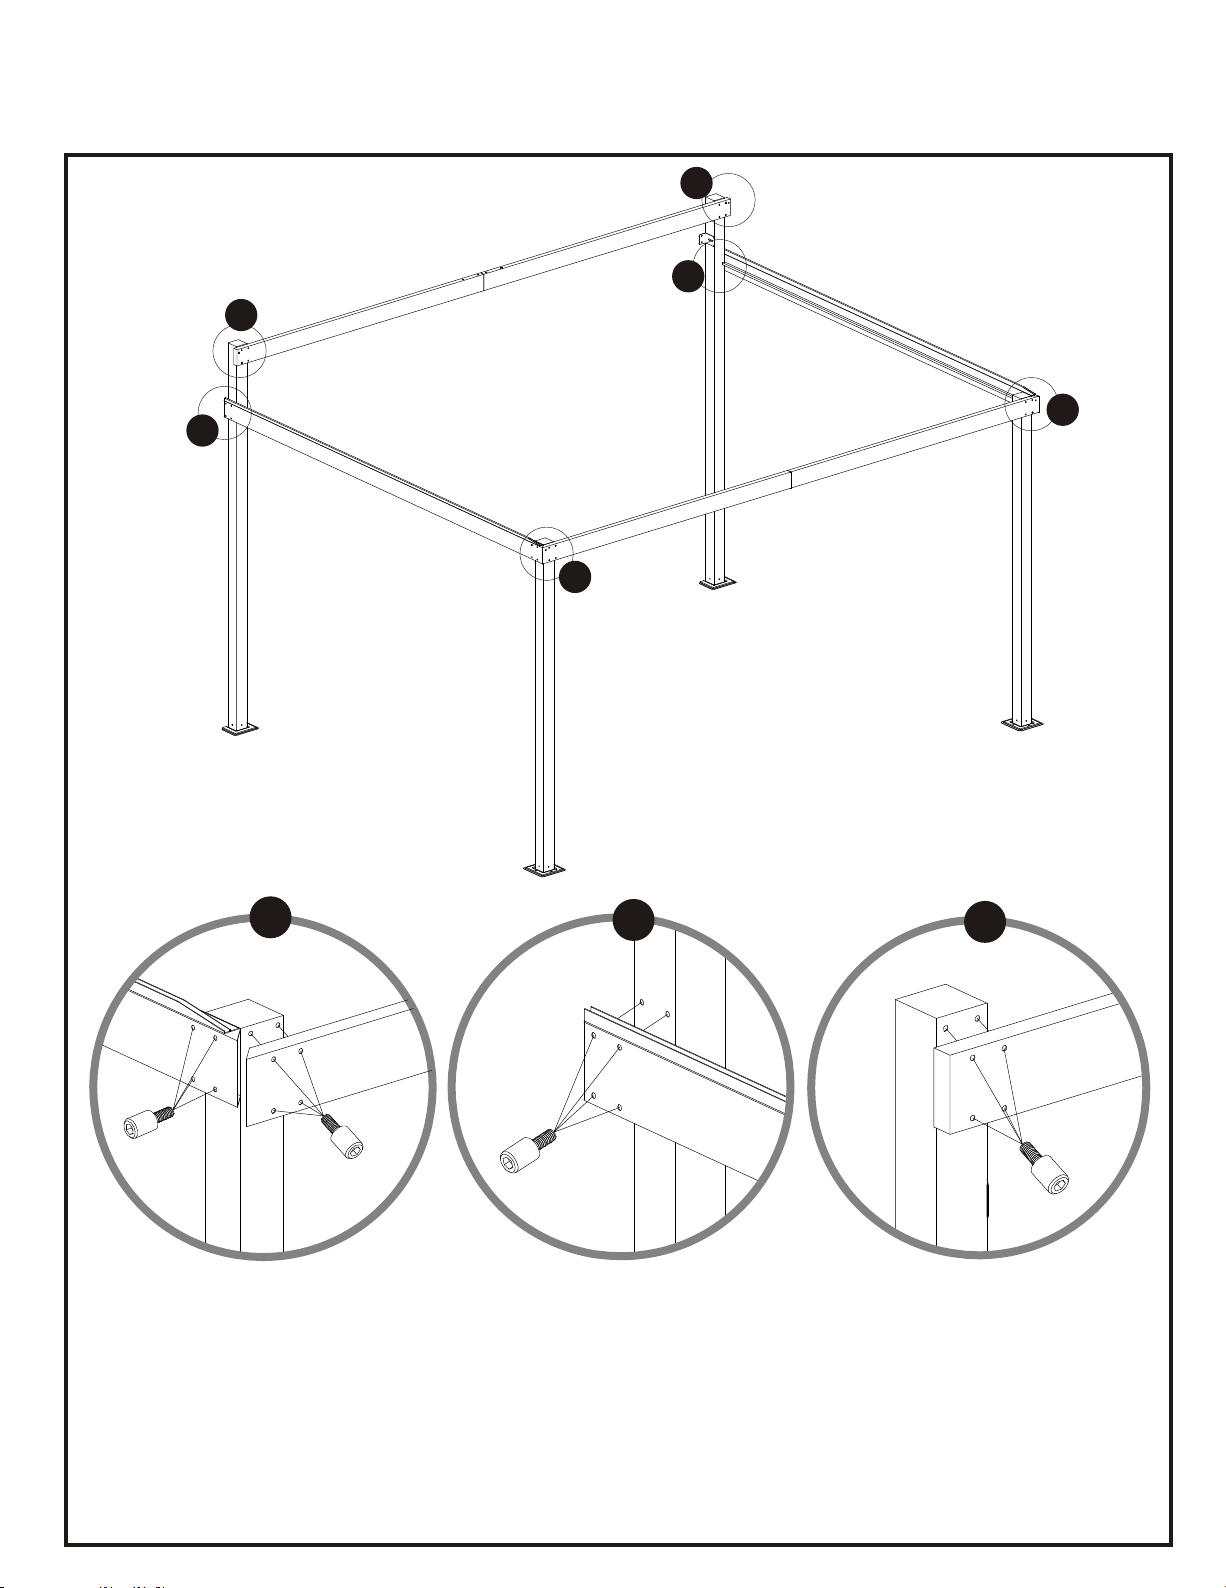
STEP 12
Maintenance
If this shelter needs repairs:
lIn case of a defective part or if a problem occurs while using the product, please contact SOJAG
at 1-866-901-1649.
lService hours and days of operation: Monday to Friday 8:30 a.m.to 12:00 a.m. and 1:00 p.m. to 5:00 p.m. EDT.
lUse the part number on the parts list if you contact customer service for parts and service.
Care instructions
lFor cleaning: Use a mild domestic soap or soft detergent and wash with warm water using a sponge or
microfiber fabric. Rinse with clean water.
Attention
· Your shelter has been created for all four seasons and will resist to snow accumulations of
2000 lb / 907 kg;you need to removing any excess of snow on the roof at all time.
· The mosquito nets must be removed for winter storage.
Warranty
· Limited warranty applicable on parts only.
·Products distributed by SOJAG are built with high standard.
·Products distributed by SOJAG have a one (1) year limited warranty against defective materials.
EXCLUDED:
· Damages due to vandalism, abuse and wrong use of the product.
· Damages due to extreme weather conditions such as thunderstorms, windstorms and hailstorms.
l
l
l
-1-

B
1
Column
Column
Junction bar
Structure bar
F
1
1
Structure bar
Junction bar
Structure bar
Structure bar
G1
F1
F24
G
1
A1
A
D2
Parts List
Item Description Qty Illustration
1
1
2
1
4
Solidifying Bar
Junction bar
G2
G32
Column
B2 Winter solidifying Column 1
Ogee
E
1
Ogee
E1
1
C
C1
D
Track
Track
Track
Track
D1
1
1
1
1
-2-
B3 Winter solidifying Column 1

J11
-3-
Description Qty
Item Illustration
J24
10
1
Roof bar (middle)
KRoof panel
K1a Roof panel
L
M
5
Roof support bar
Side finishing end 1
1
Roof finishing bar (front)
I2
I1
1
Roof bar (corner)
J1
M1Side finishing end 1
K2a 1
1
1
K1b
K2b
Roof panel
Roof panel
Roof panel
Roof bar (corner)
Roof finishing bar (back)
H11
Roof finishing bar (front)
I1
N
Hardware Kit
Item
2
Bases
Illustration
Description Qty
1
Roof finishing bar (back)
H

T10
4
106
Screws and nuts
U
V
W6
4
Finishing end
Hook
R
Q2
76
Curtains
S3
M6 x 42
M6 x 20
M6 x 16
M6 x 10
-4-
P Iron angle 12
P1
Q
6
Iron angle
Finishing end 1
Q1 Finishing end 1
O
N2
Iron angle 2
2
Bases
Screws and nuts
Screws and nuts
Screws and nuts
Y
Y1
12
12
X32 M6 x 15
Screws and nuts
Screws and nuts
Screws and nuts
Allen key
1
Z2
Item Illustration
Description Qty
Z1
Wrench
N14
Anchoring support
3
S1
Mosquito netting

-5-
·
·
·
·
Install anchoring supports (N1) on the
columns (A & A1) using screws (U).
Install columns (A & A1) on bases (N) using
screws (V).
Make sure that the rim of the bases (N)
faces the front of the columns.
Install columns (B) on bases (N2) using
screws (V).
Step-1
A
A1
B
B
N1
U
B
V
N2
A/A1
N
V
1
1
1
1
12
2
2
3
3
3
x1
A1
x1
A
x2
B
x2
N
x4
N1
x2
N2

Step-2
-6-
·
·
·
Insert 12 hooks (R) in each section of the tracks (C & C1).
Insert 7 hooks (R) in each section of the tracks (D & D1).
Insert the junction bar (D2) half way into the track (D) and insert screws (V).
Insert the other half of the junction bar (D2) into the track (D1) and insert
screws (V). Make sure that the screws are tightened.
x1
x1
x1
x1
C
C1
DD1
x1
D2
D1
D
D2
3
1
C/C1
Rx7
2
D/D1
3
D2
V
1
2
Rx12
Rx12
1
Rx7
2

·
·
·
Insert two junction bars (F2) half way into the track (F) and insert screws (V).
Insert the other half of the junction bars (F2) into the track (F1) and insert
screws (V). Make sure that the screws are tightened.
Insert two junction bars (F2) half way into the track (G) and insert screws (V).
Insert the other half of the junction bars (F2) into the track (G1) and insert
screws (V). Make sure that the screws are tightened.
Insert the junction bar (G3) half way into the solidifying bars (G2) and insert
screws (V). Insert the other half of the junction bar (G3) into the solidifying
bars (G2) and insert screws (V). Make sure that the screws are tightened.
Repeat with other solidifying bars (G2).
Step-3
-7-
F
F1
F2
F2
G
G1
G2
G2
G3
1
1
2
F2
G3
V
V
V
1
2
x1
x2
G3
x1
x1
x4
G2
F
x1
F1
x4
F2
G
G1

·
·
·
Install the complete track (D & D1) between two (2)
columns (B) using screws (X).
Install the complete structure bar (F & F1) between
columns (A & A1) using screws (X).
Install track (C) between columns (A & B) and track (C1)
between columns (A1 & B) using screws (X).
Step-4
-8-
F1
F
D
D1
C
C1
A
A1
B
B
1
1
2
2
3
3
123
XXXX

·
·
Install iron angle (O) on the tracks (C & C1) using screws (V).
Install structure bars (G & G1) onto iron angles (O) using screws (V).
Step-5
-9-
G
G1
Ox2
V
O

Step-6
-10-
J
J1
F
F1
G
G1
D
D1
1
1
2
2
3
3
1
2
3
V
P1
P1
V
Y1
P1 V
·
·
·
Install iron angles (P1) on each end of structure bars (D & D1), (F & F1) & (G &
G1) using screws (V).
Install roof bars (J & J1) using screws (V), iron angle (P1) previously installed.
Use nuts (Y) for short pre inserted screws.
The longer pre inserted screws will be used to install solidifying bars in a
future step (step 9).
Jx1
J1x1
P1x6

·
·
Install panels (K1a &K2a) on tracks (J ).
Install panels (K1b &K2b) on tracks (J1 ).
Step-7
-11-
K1a
K2a
K1b
K2b
J
J1
K1a
K1a x1
K2a x1
K1b x1
K2b x1
One side of the roof panels is UV protected. Make
sure the sun protected side faces the sun light.

·
·
Install ogee(E) on tracks (C)using screw (T).
Install ogee(E1) on tracks (C1)using screw (T).
Step-8
-12-
Ex1
E1x1
E
E1
T
D
E
T

Step-9
-13-
J2x4
1
1
1
1
1
1
1
1
2
2
22
1
2
Px12
PP
V
V
Y1
J2
J2
J2 J2
·
·
·
Screw iron angles (P) on structure bars (C, C1, F, F1, G & G1) using
screws (V)
Screw roof bars (J2) one at a time using iron angles (P) and screws (V). To
screw on the structure bar (G & G1), use the short pre inserted screw in
the roof bar with nuts (Y1).
The longer pre inserted screws will be used to install solidifying bars in a
future step (step 9).

Step-10
·
·
Install solidifying bars (G2) using the longer pre inserted screws and
nuts (Y).
Make sure that the solidifying bars are well centered before tightening
nuts (Y).
-14-
11
1
11
1
1
1
1
1
1
1
G2
G2
G2
G2
1Y
G2

·Install roof finishing bars (H & H1) using screws (V).
Step-11
-15-
1
1
2
2
2
2
H1
H
12
V
H
V
H/H1
Hx1
H1x1

·Install side finishing bars (M & M1) using screws (V).
Step-12
-16-
M
M1
M
V
V
Mx1 M1x1

K
K
Step-13
-17-
One side of the roof panels is UV protected. Make sure the sun
protected side faces the sun light.
L
Lx5
Kx10
·
·
·
Slide one panel (K) in upper track of roof bar.
Then slide roof support bar (L).
Then slide one panel (K) in lower track of the roof bar.
K
K
K
K
K
K
K
K
K
K
L
LL
L
L

Step-14
-18-
Ix1
I1x1
I2x1
Qx1
Q1x1
Q2x4
I
I2
I1
122
22
3
123
W
J
J1
J2
W
Q
Y1
IQ2
Y1
W
W
Q1
Y1
I1
·
·W
·
Insert 1 screw (W) in each roof bars and place roof side bar (I) left end of the
shelter, (I1) right end of the shelter and (I2) in middle section.
Place finishing ends (Q) left end, (Q1) right end and (Q2) on each screws( )
remaining.
Secure with nuts (Y1).

·
·
·
Install curtains (T) on outer track's hooks (R).
Install mosquito netting (S) on inner track's hooks (R).
Make sure the corner of the mosquito net and the curtains matches
with columns (B). Wrap Velcro band on mosquito netting around
columns (B).
Step-15
-19-
MADE IN CHINA
S X3 T X3
TS
Other UBERHAUS DESIGN Tent manuals