uhlmann & zacher CX8942 Product guide

CX8942
Clex Online module LAN
868 MHz
Operating and
assembly instructions
Valid from: HW 1.5.3_A | ESP-MOD 5.0.1

CX8942 TABLE OF CONTENTS
1
Legal Notice
Operating and installation instructions (translated version)
CX8942 Clex online module LAN
Document number: 16A8
Version: 1.2
Date: 16.08.2023
Manufacturer
Uhlmann & Zacher GmbH
Gutenbergstraße 2–4
97297 Waldbüttelbrunn
Germany
Tel.: +49 931 40672-0
www.UundZ.de
These operating and installation instructions are protected by copyright. The
information contained here may not be reproduced, distributed or used for
competitive purposes or provided to third parties. It is also prohibited to
manufacture any component using these instructions without prior written
consent.

CX8942 TABLE OF CONTENTS
2
Table of contents
1About this document ........................................................................ 3
1.1 Warnings ............................................................................................3
1.2 Symbols..............................................................................................3
2Safety ............................................................................................ 4
2.1 Proper use ..........................................................................................4
2.2 Improper use.......................................................................................4
2.3 General safety information ...................................................................4
3Product description .......................................................................... 5
3.1 Technical data ....................................................................................5
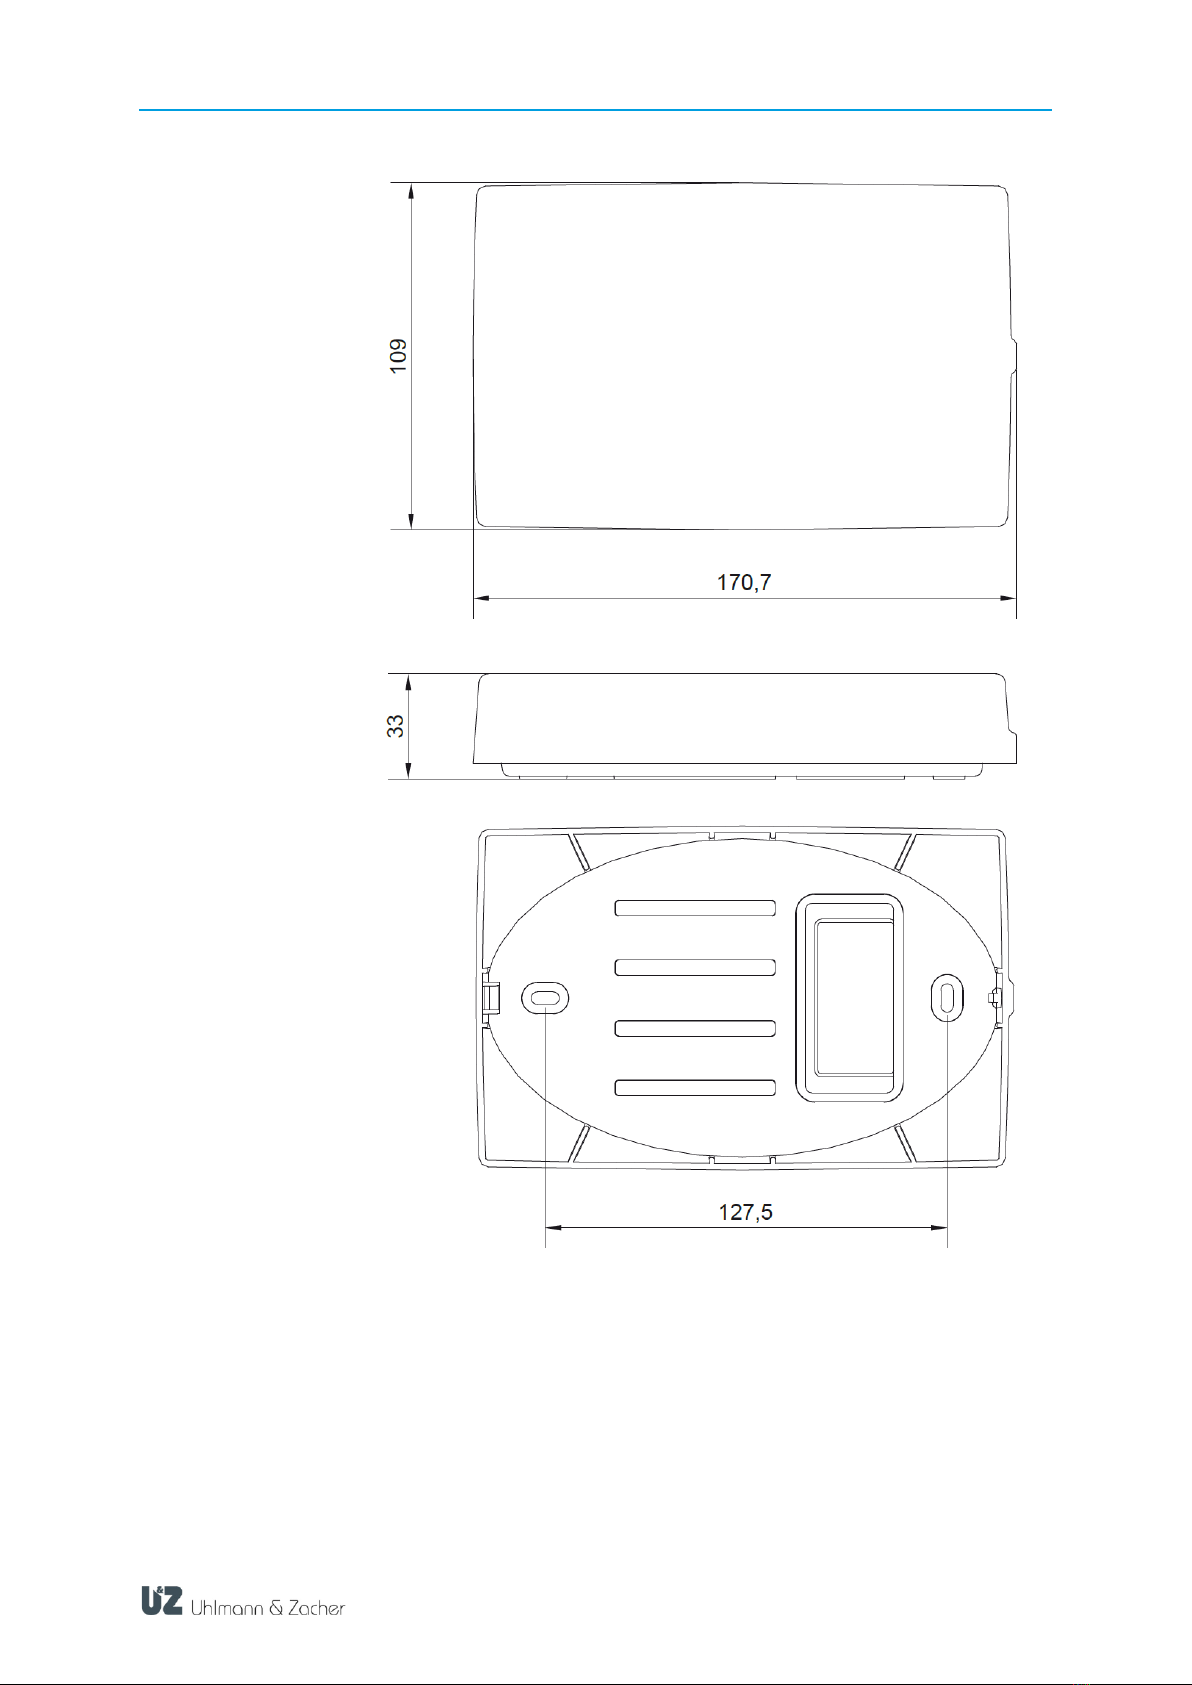
3.2 Overview ............................................................................................6
3.3 Structure and scope of delivery .............................................................7
4Connection and installation ............................................................ 10
4.1 General installation information..........................................................10
4.2 Power supply.....................................................................................10
4.3 Requirements for Ethernet cabling .......................................................10
4.4 Installation ........................................................................................11
5Commissioning ............................................................................. 12
5.1 Connecting locking units ....................................................................12
5.2 Network identification and authentication ............................................13
5.3 Configuring the online module ...........................................................16
6Operation .................................................................................... 17
6.1 Reset ................................................................................................17
6.2 Resetting the configuration (factory reset) .............................................17
6.3 Firmware updates ..............................................................................17
6.4 Signaling ..........................................................................................18
6.5 Malfunctions during operation/error signaling......................................18
6.6 Maintenance .....................................................................................18
6.7 Cleaning...........................................................................................18
7Disassembly and disposal ............................................................... 19
7.1 Disassembly ......................................................................................19
7.2 Disposal ...........................................................................................19
8Glossary....................................................................................... 20

CX8942 ABOUT THIS DOCUMENT
3
1About this document
These operating and installation instructions describe the CX8942 Clex online
module. They are part of the product and contain important information required
for correct operation and maintenance.
These operating and installation instructions apply for all versions of the CX8942
and are intended both for specialist personnel responsible for assembly and
disassembly and for end customers.
To ensure trouble-free and safe operation, read these operating and
installation instructions carefully and observe the information contained there
before putting the online module into operation.
Keep the operating and installation instructions.
After installation, give the instructions to the end customer and familiarize
them with operation.
Uhlmann & Zacher GmbH accepts no liability for malfunctions, such as
impossible access to injured persons, operational malfunctions, damage to
property or other damage resulting from non-observance of these operating and
installation instructions or from incorrectly configured online modules.
If you still have any questions after reading these operating and installation
instructions, please contact your specialist dealer or Uhlmann & Zacher
GmbH directly.
1.1 Warnings
Warning notices warn of hazards that may occur when using the online module.
There are two hazard levels, recognizable by the signal word:
Signal word
Meaning
CAUTION
Indicates a low-risk hazard that may result in minor or
moderate injury if not avoided
ATTENTION
Indicates a hazard that results in damage to property
1.2 Symbols
The following symbols may appear in this manual:
This symbol marks an instruction that has to be carried out by the user.
This symbol marks an entry in a list.
This symbol indicates useful and important information.

CX8942 SAFETY
4
2Safety
2.1 Proper use
The CX8942 online module LAN is used as an interface between 868 MHz-
capable Uhlmann & Zacher products and a third-party system via LAN.
2.2 Improper use
Products from Uhlmann & Zacher GmbH must not be used to lock up persons or
animals, as well as aids that are vital in an emergency (for example, defibrillators,
emergency medication, fire extinguishers, etc.).
It must not be used in potentially explosive atmospheres.
If the housing or the electronics is damaged, the product must not be operated any
longer. Modifications or additions to the product are not permitted. The use of the
online module outside the stated specifications is not permitted.
2.3 General safety information
Observe the following basic safety instructions when handling the product:
Electrical equipment may only be installed and mounted by qualified
electricians. Installation may only be carried out by trained specialists in
accordance with these instructions.
These instructions should be passed on to the user by the person carrying out
the installation.
There is an increased risk of injury (electric shock!) if the connecting cables
are touched when the power supply is switched on. Only perform installation
and maintenance work when the power supply is switched off. Observe VDE
guidelines!
Do not use products in potentially explosive atmospheres.
No modifications of any kind are permitted to the products of Uhlmann &
Zacher GmbH, with the exception of those described in a corresponding
manual.
The online module must not be brought into contact with paints or acids.
Only operate the products within the defined temperature range. Do not heat
the product above the specified storage temperature.
To avoid malfunctions and damage, only use original parts and accessories
from Uhlmann & Zacher GmbH.
No liability is accepted for incorrectly programmed units. Uhlmann & Zacher
GmbH accepts no liability for malfunctions, such as impossible access to
injured persons, damage to property or other damage.
Uhlmann & Zacher accepts no liability for damage resulting from incorrect
installation.

CX8942 PRODUCT DESCRIPTION
5
3Product description
The Clex online module LAN in the Clex public system is used as an interface
between Uhlmann & Zacher locking units with 868 MHz radio and a third-party
system via an Ethernet LAN connection.
The product is used for the realization of radio opening, design of authorization
changes and transfer of event protocols for Clex public or Clex private locking
units.
Housing versions:
Housing in grey
Oval housing in white
Rectangular housing in white
3.1 Technical data
3.1.1 General technical data
Designation
Value
Number of pairable
locking units
16
Frequency range
868.3 MHz
Transmission power
1 mW
Power supply
8-12 V DC 0.5 A max.
8-12 V AC 50-60 Hz
Optional: PoE, class 0 via RJ45 socket
Relay
Optional
Standards
2014/53/EU
3.1.2 Ambient conditions
Designation
Value
Operating
temperature
+10 °C to +55 °C
Storage temperature
-40 °C to +65 °C
Installation location
Indoors

CX8942 PRODUCT DESCRIPTION
6
3.2 Overview
A. Without figure: Housing cover and screw(s)
1 screw for Article number 8942 0000 0000
4 screws for Article numbers 8942 0000 0004 and 8942 0000 0005
B. Screw connection for housing cover
C. Mounting holes (screws not included in the scope of delivery)
1. RS485-B (optional)
2. RS485-A (optional)
3. Power supply
4. Power supply
5. Digital input
6. Relay CO
7. Relay NO
8. RJ45 socket (Ethernet with PoE for power supply)
with green LED - flashes during network traffic
LAN module
9. LEDs (blue, green, red, yellow)
10. Rotary switch
11. Pairing button
12. LAN module
13. Delete button
14. Reset button
15. Data Matrix with MAC address (last 12 characters of the coded text)
16. Green LAN LED
17. Red LAN LED
18. PoE (optional)
19. Relay (optional)

CX8942 PRODUCT DESCRIPTION
7
3.3 Structure and scope of delivery
Variant gray
rectangular housing

CX8942 PRODUCT DESCRIPTION
8
White oval housing

CX8942 PRODUCT DESCRIPTION
9
White rectangular
housing

CX8942 CONNECTION AND INSTALLATION
10
4Connection and installation
4.1 General installation information
The valid national regulations for electronic installations
(e.g. VDE regulations) must be observed.
The connecting cables must be available and laid.
In the case of installation on metal surfaces or in direct proximity to metals,
the range as well as the communication between product and connected
locking units may be influenced negatively.
Avoid direct exposure to strong electromagnetic fields
Do not paint over, paste over or cover the online module.
4.2 Power supply
The CX8942 can be supplied with voltage either via the connections and
or optionally via the Ethernet cable.
8-12 V DC 0.5 A max.
8-12 V AC 50-60 Hz
PoE, class 0 via RJ45
4.3 Requirements for Ethernet cabling
When using the white oval housing and the white rectangular housing, a highly
flexible flat cable or a patch cable with RJ45 angle plug should be used angled
against the latching lug.
Recommended in white
housing:
RJ45 angle plug
Latching lug on outside
3
4

CX8942 CONNECTION AND INSTALLATION
11
4.4 Installation
Specify the installation position. Ensure that the surface is smooth, dry and
firm enough. Do not place the units close to each other to avoid radio
interferences.
Unscrew and remove the housing cover.
Mark the fastening points through the bottom of the housing.
If required, drill mounting holes into the mounting surface.
Hand-tighten the lower part of the device at the planned location using suitable
flat-head screws. Installation material is not included in the scope of delivery. In
case of cable feeding from the side, use additional fitting rubber or plastic
spacers, if necessary. Ensure that the cable is not pinched.
Perform commissioning (see the "Commissioning" chapter).
Put on the housing cover and screw it tight.

CX8942 COMMISSIONING
12
5Commissioning
5.1 Connecting locking units
To connect a locking unit with the online module, you have to perform the
following steps:
Manual pairing
To this purpose users must have access to the circuit board of the module to
operate the rotary switch and be able to press the button.
Turn the rotary switch to position 8.
Set the locking unit, which you want to connect into the service mode by
holding the service key in front of the locking unit.
Within the duration of the service mode of the locking unit (15 seconds),
briefly tap the button. If the locking unit has been successfully coupled,
it automatically leaves the service mode prematurely.
If required, repeat the process by coupling further locking units in service
mode by pressing the button.
Function rotary switch
Position
Function
0
Basic position
4
Start service mode by pressing briefly
8
Manual pairing: Connect the locking unit in service mode by
pressing briefly
Command-driven coupling
In this case coupling is performed via a command to the online module. This
provides the possibility to assign an address explicitly to the knob. Furthermore
this possibility is practical if the online module has been mounted in places that
are difficult to access (e.g. false ceiling). The locking unit to be connected must
be brought to programming mode by using the service key card. Now the bus
master must send the coupling command to the online module which initiates a
coupling.
11
11
10
11

CX8942 COMMISSIONING
13
5.2 Network identification and authentication
5.2.1 Port
The device uses port 1470. On most systems, this port can be used by normal
users without special rights.
5.2.2 MAC address
The online module always has four different directly consecutive MAC addresses,
one for each of the basic functions of the installed LAN module.
Example:
1
E8:31:CD:CD:79:5C = MAC address Station (Wi-Fi)
2
E8:31:CD:CD:79:5D = MAC address Access Point (hotspot for
configuration)
3
E8:31:CD:CD:79:5E = MAC address Bluetooth
4
E8:31:CD:CD:79:5F = MAC address LAN
The MAC address of the online module can be determined in different ways:
You can find the MAC address of the device coded in the data matrix
installed on the LAN module.
Scan the data matrix with a suitable mobile device (e.g. QR code reader of a
smartphone). The last 12 digits of the determined text show the lowest of the
MAC addresses ("MAC address Station (Wi-Fi)").
Two of the four MAC addresses (no. 1+2) can be viewed in the web interface:
Start the web interface as described in the chapter
"Configuration of the network interface"
Tap on the button "Info"
Scroll to the "Wi-Fi" section. This contains the MAC addresses:
Station MAC: MAC address Station (Wi-Fi) next to
Access point MAC: MAC address Access Point
Data matrix
Web interface
15

CX8942 COMMISSIONING
14
5.2.3 Configuration of the network interface
To carry out own settings of the IP addresses, the CX8942 has a web interface.
This can be addressed either via the LAN interface or the Wi-Fi interface of the
CX8942.
For the configuration, the CX8942 acts as a Wi-Fi Access Point (hotspot). You
require a mobile device with activated Wi-Fi for the configuration.
To start the Access Point, button 7 must be held down while the unit performs a
reset. After that all LAN-specific settings are reset to the factory state. The
pairing of the locking units remains
Open the Wi-Fi device menu of your mobile device
Keep the button pressed
Tap the reset button or optionally reconnect the LAN cable.
Continue to hold down the button until a Wi-Fi network with the SSID:
"FSMLanConfig" is displayed in the Wi-Fi menu of your mobile device. This
can take several seconds.
Release the button
Tap on the list entry "FSMLanConfig”
Enter the password StartConfig
The web interface now starts automatically in a browser window.
Alternatively, it can also be opened via the IP address 192.168.4.1 in a web
browser.
For security reasons, be sure to assign a new secure password in the web
interface.
Starting via Wi-Fi
13
14
13
13

CX8942 COMMISSIONING
15
Tap the button "Configure network".
Select the "HTTP Basic Auth" under the item "Configure portal protection".
Select a secure password for the user "admin".
If the module is started by pressing the button in the Wi-Fi configuration mode as
described above, the LAN interface is not active. If the module is started without
pressing the button as described above, the website can be reached via the
address received via DHCP.
5.2.4 IP address in network
By default, the online module can automatically obtain an IP address via DHCP
when it is connected to a network. The automatically assigned address can then,
for example, be displayed with the test application of the UZReader protocol
"ClexSerUZ_ReaderTest". In addition, the module should also appear in the web
interface of the router. The address can be viewed there as well.
Select the option "Static IPv4" in the web interface under "Configure network" in
the "Ethernet settings".
Changing the
password
Access to
configuration tool via
LAN connection
Assignment via DHCP
Manual input of a
static IP address

CX8942 COMMISSIONING
16
5.3 Configuring the online module
The configuration of the online mode normally takes place through the connected
third-party system and the corresponding function of the respective protocols.
Individual parameters of the online module can also be set directly via a 868
MHz-connection or bus commands in the service mode.
Carry out the settings (e.g. LAN/WLAN communication) by means of the
associated software tool (details are available in the respective protocol
description).

CX8942 OPERATION
17
6Operation
If an authorized transponder is held in front of the connected locking unit, a radio
connection is established with the online module and, depending on the version,
the authorization is requested via the corresponding protocol of the third-party
system.
If no radio connection can be established, for example in case of a power failure
or a wireless attack, the electronics of the locking unit drops back into offline
mode. In this mode the door can be opened with any transponder with offline
authorization.
In this case the electronics of the locking unit warns the user, however, before
opening with a distinctive visual and acoustic signaling.
When the locking unit is woken up, for example by a knob cylinder being turned
or a door handle or knob module being actuated, a wireless connection is also
established.
6.1 Reset
Tap the reset button or disconnect the device from the power supply
(here LAN connection).
6.2 Resetting the configuration (factory reset)
Restarting configuration tools via Wi-Fi, as described in more detail in chapter
5.2.3 "Configuration of the network interface", resets the settings made. To this
purpose, the delete button must be held down while the unit performs a
reset.
6.3 Firmware updates
The update tool "Clex FW Prog" is available to update the firmware of
the module. Contact your respective Integration partner.
The LAN interface has its own firmware, which can be updated via the web
interface (see section 5.2.3Fehler! Verweisquelle konnte nicht gefunden werden.).
13
14

CX8942 OPERATION
18
6.4 Signaling
LED
Meaning
Green
rapid flashing
Network connection is established and IP address is
being called
Green
slow flashing
The module can be reached as a Wi-Fi access
point to carry out the initial configuration (see
section 5.2.3Fehler! Verweisquelle konnte nicht
gefunden werden. Configuration of the network
interface)
Green
constant lighting
up
Network connection has been established
(Only for initial connecting. No function for
disconnection during operation)
Red LED
Is currently not used
6.5 Malfunctions during operation/error signaling
LED
Meaning
Red and yellow
flashing after a
reset; after that
service mode
Mode wrong for the available firmware:
Perform a suitable firmware update.
Yellow lights up
constantly after a
reset
Micro-controller of the device is in boot loader mode.
Perform a suitable firmware update.
6.6 Maintenance
Since the device is not protected specially against dust, the product should be
checked regularly for dust deposits. The frequency depends on the dust level at
the operation site.
6.7 Cleaning
Clean the housing with a soft, lint-free and only slightly moistened cloth. When
cleaning do not use corrosive liquids or liquids that decompose plastic such as
benzine, turpentine, etc.
Sharp detergents may damage or discolor the surface. Do not use any
detergents, which act on a mechanical basis (e.g. scouring milk, scouring
sponge).
Free the electronics from dust with a suitable brush or by careful use of
compressed air at a sufficient distance.
16
17
9

CX8942 DISASSEMBLY AND DISPOSAL
19
7Disassembly and disposal
7.1 Disassembly
7.2 Disposal
Do not dispose of the device with household waste, but at a municipal
collection point for special electrical waste in accordance with European
Directive 2002/96/EC.
Dispose of packaging as environmentally friendly recycling.
Table of contents