ULTIM8 FITNESS Active8 User manual

Active8 Treadmill
OWNER’S MANUAL
zSAFETY PRECAUTIONS
zUNPACKING & ASSEMBLY
zCONSOLE OPERATION
zBELT ADJUSTMENT
zCARE & MAINTENANCE
zPART LIST
zEXPLODED DRAWING
RETAINOWNER’SMANUAL
FOR FUTURE REFERENCE
Ultim8 Fitness
Unit 93, 24-28 St Leonards road, Windsor Berkshire SL4 3BB
0845 226 0067

TABLE OF CONTENTS
SAFETY PRECAUTIONS ------------------------------------ 1-2
Important voltage information, grounding instructions, how often you exercise, how hard
you exercise, how long you exercise, beginner treadmill program target heart rate
zone.
TECHNICAL SPECIFICATIONS ----------------------------- 3
UNPACKING & ASSEMBLY -------------------------------- 4-5
Parts, hardware kit and assembly drawing
WARM UP & COOL DOWN -------------------------------- 6
PANEL CONTROL ----------------------------------------- 7
Control panel function and programs
PROGRAMS ------------------------------------------------ 8
BELT ADJUSTMENT ---------------------------------------- 9
CARE & MAINTENANCE -----------------------------------10
TROUBLE SHOOTING ------------------------------------- 11
PARTS LIST ------------------------------------------------ 11
EXPLODED DRAWING ------------------------------------ 13

SAFETY PRECAUTIONS
Thank you for your purchasing our products. Even though we go to great efforts to ensure the quality of
each product, occasional error, and/or omissions do occur. In any event should you find this product to
be defective or missing parts please contact us.
IMPORTANT: Read all instructions and warnings before assembly and operation.
Important Voltage Information
Before plugging the power cord into an electrical outlet, verify that the voltage requirements for your
area match the voltage of the treadmill that you have received. The power requirements for the
treadmill include a grounded, dedicated circuit, rated for one of the following figure. See the serial
number decal for the exact voltage requirements of your treadmill.
WARNING: Don't attempt to use this unit with a voltage adapter. Don't attempt to use this unit
with an extension cord.
Grounding Instructions
This treadmill must be grounded. If it should malfunction or break down, grounding provides
a path of least resistance for electric current to reduce the risk of electric shock.
This product is equipped with a cord having an equipment-grounding conductor and a grounding plug.
The plug must be plugged into an appropriate outlet that is properly installed and grounded in
accordance with all local codes and ordinances.
Please make sure that the treadmill is connected to an outlet having the same configuration as the plug.
Do not use a ground plug adapter to adapt the power cord to a non-grounded outlet.
115V EURO PLUG 208-220V
NEMA 5-20 CEE 7/7 NEMA 6-15
Before beginning
1).Only one person at a time should use this equipment. If dizziness, nausea, chest pains, or any other
abnormal symptoms are experienced while using this treadmill, stop the workout at once.
2).MAX. user weight: 110 kg(243 Ibs ).
3).Always use this treadmill on a clear and level surface. Do not use outdoors or near water.
4).Don't insert any object into any openings.
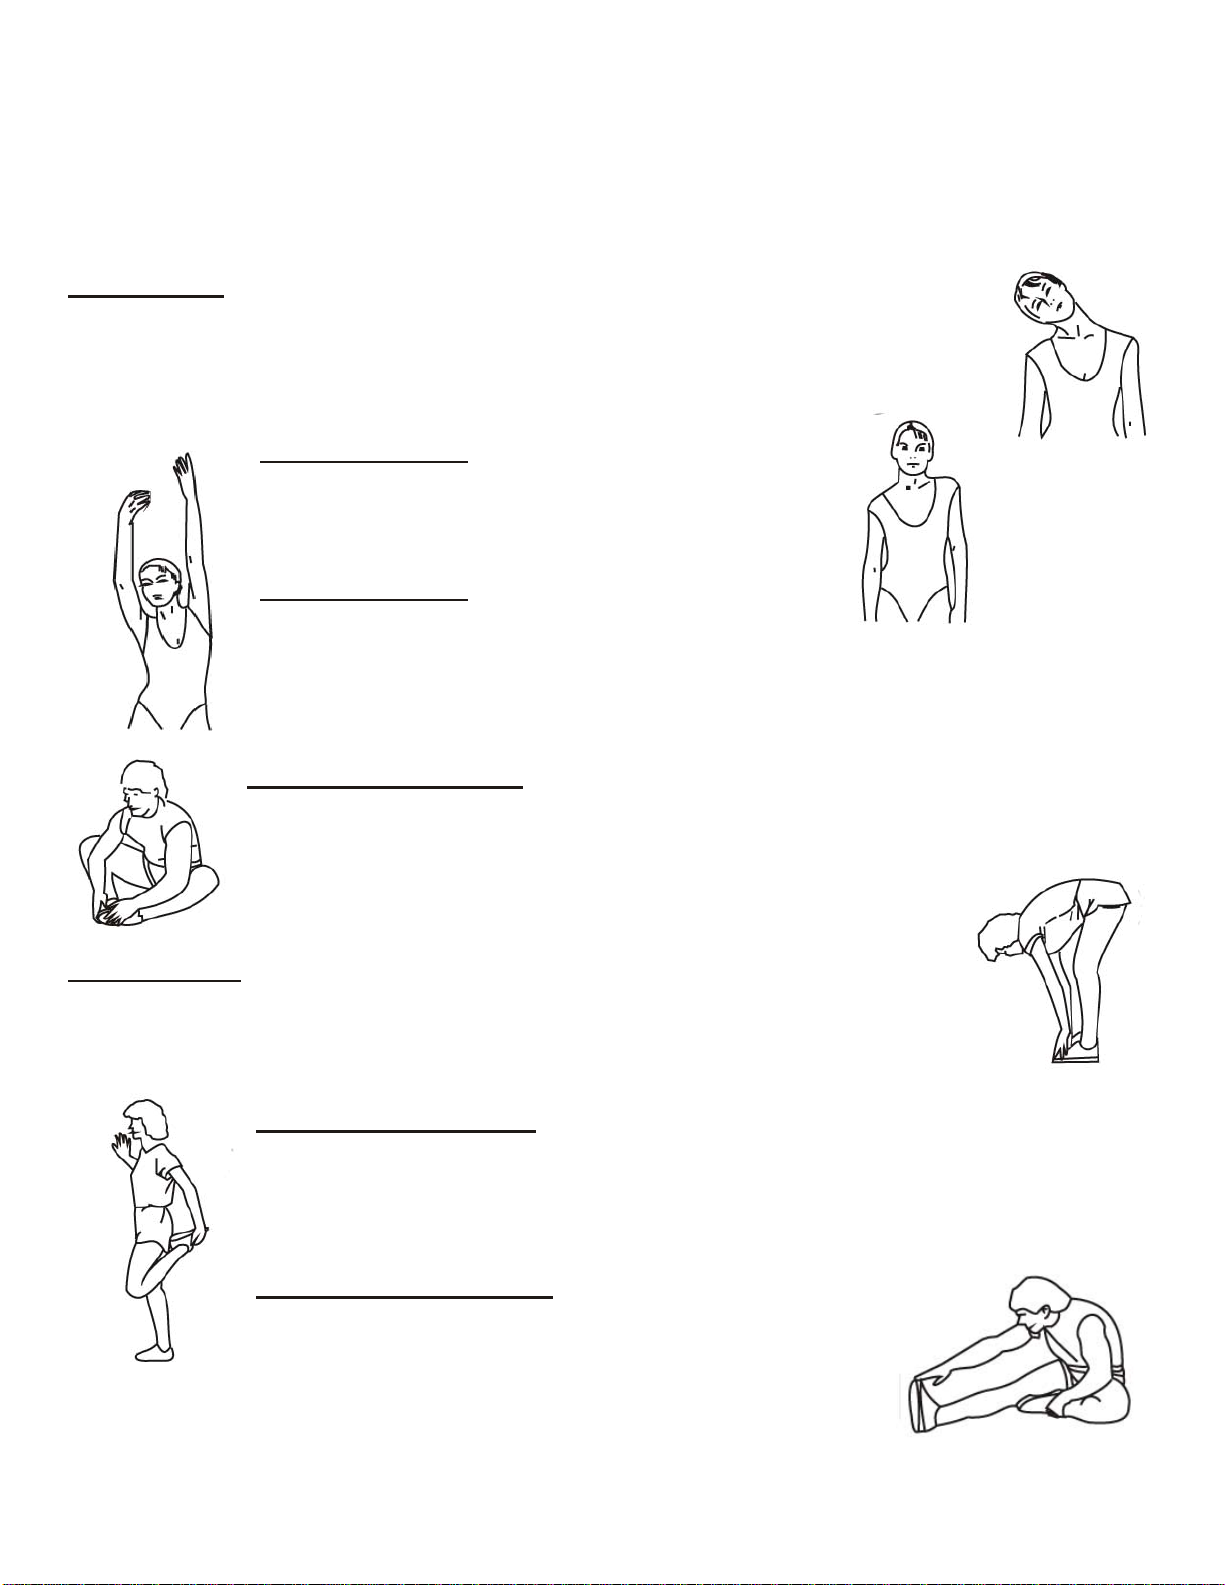
5).Before using this equipment to exercise, always do stretching exercises to properly warm up.
6).Advice to replace defective components immediately and keep the equipment out of use until repair.
7).Always wear appropriate workout clothing and shoes when exercising. Do not wear loose fitting
clothing that could get caught in the equipment.
8).Place on a level surface, with 2mx1m of clearance behind it. Do not place the treadmill on any
surface that blocks air openings. To protect the floor or carpet from damage, place a mat under the
treadmill.
9).Contact your physician before starting a workout or training program. Have your doctor review your
training and diet programs to advise you of a workout routine you should adopt.
The power requirements
for the treadmill include a
grounded, dedicated
circuit, rated for one of the
following:
115 VAC 5%, 60HZ and 20
amps; 208/220 VAC,
60HZ, 15 amps or 230 VAC
5%, 50HZ and 15amps.

Important Safety Instructions
1).Keep children and pets away from this equipment at all times.
2).Make sure that all bolts and nuts are tightened when equipment is in use. Periodic maintenance is
required on all exercise equipment to keep it in good condition.
3).Deposit the safety key properly in order to avoid children to get the safety key and re-start the
treadmill.
4). Stop the treadmill accordingly and take a rest while any discomfort happens during the exercise.
5). Correct steps of stopping your treadmill:
Press STOP button→Both hands hold the handlebars → Feet step on the side reins →Leave the
treadmill
6). If there is any error sign shown on the monitor before/during exercising, please refer to the Trouble
Shooting section in your owner's manual according to the code number of the error sign.
7).Turn off the power after using.
8).If the power cord is damaged, it must be replaced by the manufacturer or its service agent or a
similarly qualified person in order to avoid a hazard.
9).Warning : Incorrect or excessive training may be in juried to health.
SAFETY KEY
The safety key is to prevent falling down or any other
emergencies from runner's not familiar with the speed of
the treadmill. Please always wear safety key in case of
any accident.
CONSULT A PHYSICIAN IMMEDIATELY
Warning: before starting any exercise
program consult your physician. This is
especially important for individuals over the
age of 35 or persons with preexisting health
problems. Read all instructions before using any
fitness equipment. We assume no responsibility for personal injury damage sustained by or
through the use of this treadmill.
How often you exercise:
You should exercise three to four times a week to improve your cardiovascular and muscle fitness.
How hard you exercise:
Intensity of exercise is reflected in your heart rate. Exercise must be sufficiently rigorous to strengthen
your heart muscle and condition your cardiovascular system.
Only your doctor can prescribe the target training heart range for you. Before starting any exercise
program consult your physician.
How long you exercise:
Sustained exercise conditions your heart, lungs and muscles. The longer you are able to sustain
exercise within your target heart range, the greater the aerobic benefits. To begin maintain 2~3
minutes of steady, rhythmic exercise, then check your heart rate.
BEGINNER TREADMILL PROGRAM
EXERTION LEVEL DURATION
WEEK 1 Easy 6~12 minutes
WEEK 2 Easy 10~16 minutes
WEEK 3 Moderate 14~20 minutes
WEEK 4 Moderate 18~24 minutes

WEEK 5 Moderate 22~28 minutes
WEEK 6 Slightly higher or slightly lower 20 minutes
WEEK 7 Add interval training 3 minutes at moderate exertion with 3 minutes at
higher exertion for 24 minutes
220-your age = maximum heart zone
101
TECHNICAL SPECIFICATIONS
Length: 176 cm
Width: 75 cm
Running area:
45 cm x 129 cm
Weight of product:
79 kgs (174.2Ibs)
Power elevation:
0~10 motorized
Levels of difficulty:
10 programs
Manual mode: Yes
Standard features:
Total used time,
Distance memorize,
Hand pulse.
Optional feature:
Handle button, Body
fat.
Emergency stop: Pull
the safety key
You do not want to workout at your
maximum heart rate. The recommended
Heart Rate Zone is a percentage of your
maximum heart rate. Between 60% and
75% of your maximum heart rate.
* Lower limit of Target Heart Rate Zone
=maximum heart rate X 0.6
* Upper limit of Target Heart Rate Zone
=Maximum heart rate X 0.75
(This is recommended by American Heart
Association. Before starting exercise
program, please consult your physician
to understand your physical situation)

UNPACKING & ASSEMBLY
PARTS
Hardware kit

UNPACKING & ASSEMBLY
Unpacking your treadmill where will be using it. Being careful not to damage. Place your treadmill on a
level flat surface. It is recommended that you place a protective covering on your floor.
STEP1- Attach the console masts to the base frame
A. Insert the left console mast (without a wire attached inside) into the base frame. Secure the left
console mast with 3pcs M8X15mm bolts using allen wrench.
B. Put the electronic wire inside and through the right console mast using the wire attached inside the
right console mast.
C. Insert the right console mast into the base frame, secure the right console mast with 3pcs
M8X15mm bolts using allen wrench.
STEP2- Attach the console to the console mast
A.Please unloose the tie of the wires of the handle button.
B. Respectively connect the console wire and ground from the console and right console mast.
C. Put the connector and wire inside the right console mast.
D. Algin the console with the holes in the console mast, the console with 2pcs M8X50mm bolts (see
B&B' on assembly drawing) using allen wrench.
Note: Do not securely tighten the screws until STEP 3D.
STEP 3- Attach the side handlebar to the console mast
A. Respectively connect the wires of the handle button from the console and side handlebars.
B. Insert one end of the side handlebars into the console, algin the side handlebar with the holes in the
console and the console masts, the side handlebar with 2pcs M8X50mm bolts (see A, A' on assembly
drawing) using allen wrench.
C. Align the side handlebar
with the hole in the console
mast, secure the
handlebar with 2pcs
M8X95mm bolts using
allen wrench.
D. Tighten all bolts used
during STEP 2D and 3B.
E. Insert 4pcs of plastic
end caps into the holes on
console.

WARM UP & COOL DOWN
A successful exercise program consists of a warm up, aerobic exercise, and a cool down. Warming up
is an important part of your workout, and should begin every session. It prepares your body for more
strenuous exercise by heating up and stretching out your muscles. At the end of your workout, repeat
these exercises to reduce sore muscle problems. We suggest the following warm-up and cool-down
exercises:
HEAD ROLLS
Rotate your head to the right for one count, feeling the stretch up the left side of your
neck. Next rotate your head back for one count, stretching your chin to the ceiling
and letting your mouth open. Rotate your head to the left for one count, and finally,
drop your head to your chest for one count.
SHOULDER LIFTS
Lift your right shoulder up toward your ear for one
count. Then lift your left shoulder up for one count as
you lower your right shoulder.
SIDE STRETCHES
Open your arms to the side and continue lifting them
until they are over your head. Reach your right arm
as far upward toward the ceiling as you can for one count.
Feel the stretch up your right side. Repeat this action with your left arm.
INNER THIGH STRETCH
Sit with the soles of your feet together with your knees pointing outward. Pull your feet
as close into your groin as possible. Gently push your knees toward the floor. Hold for
15 counts.
TOE TOUCHES
Slowly bend forward from your waist, letting your back and shoulder relax as you
stretch toward your toes. Reach down as far as you can and hold for 15 seconds.
QUADRICEPS STRETCH
With one hand against a wall for balance, reach behind you and pull your right foot up.
Bring your heel as close to your buttocks as possible. Hold for 15 counts and repeat
with left foot up.
HAMSTRING STRETCHES
Lean against a wall with your left leg in front of the right
and your arms forward. Keep your right leg straight and
the left foot on the floor; then bend the left leg and lean
forward by moving your hips toward the wall. Hold, then
repeat on the other side for 15 seconds.

CALF/ACHILLES STRETCH
Step your right foot in front of your body. Lean against a wall with your arms and
stretch your left foot backward your body. Bend forwards your right foot, and slightly
push your buttock toward to the wall for 15 counts. Repeat the action with front left
foot and rear right foot for another 15 counts.
PANEL CONTROL
INCLINE: Indicate current incline level.
TIME: Indicate time you workout.
CALORIES: Indicate estimated calories burned.
PULSE: Estimated heart rate.
DISTANCE: Indicate accumulative traveled distance in km.
SPEED: Indicate current running speed.
MAN/WOMAN/AGE/WEIGHT/HEIGHT: Input data for detecting, use on body fat.
Adjust incline, set programs (P1~P10).
Adjust running speed.
MODE: Enter programs selection ,countdown setting, or display switch of time/calories and pulse
/distance.
STOP: Stop the treadmill.
START: Start the treadmill.
BODY FAT: Use to detect body fat percentage.
PROGRAM

P1 MANUAL
QUICK START:
Press" START"
Adjust speed using
Adjust incline using
P2~P10(SPEED PROGRAMS)
Preset time: 32 minutes
Segment: 8 segments
PROGRAM setting
Press to access P1~P10
TIME setting
Press "MODE" into time setting
Press "TIME" shows 32 minutes
Press to set time
Press "START" to run
Press to adju st speed
Press to adjust incline
BODY FAT SETTING
Press "BODY FAT",
Press to selection male/female.
Press "MODE" again into AGE setting, Press " to input age of user.
Press "MODE" again into WEIGHT setting, Press to input weight of user.
Press "MODE" again into HEIGHT setting, Press to input tall of user.
Press "START" into body fat test. Hold hand pulse sensors around 15 seconds, "BODY FAT" displays
the percentage of your body fat.
BELT ADJUSTMENT
BELT ADJUSTMENT
You may need to adjust the running belt during the first weeks of use. All running belts are properly set
at the factory. It may stretch or be off-center after use. Stretching is normal during the break-in period.
ADJUSTING THE BELT TENSION
If the running belt feel as though it is "slipping" or hesitating when you plant your foot during a run, the
tension on the running belt may have to be increased.
TO INCREASE THE RUNNING BELT TENSION
A). Place 6mm wrench on the left belt tension bolt. Turn the wrench clockwise 1/4 turn to draw the rear
roller and increase the belt tension.
B). Repeat STEP "A" for the right belt tension bolt. You must be sure to run both bolts the same
number of turns, so the rear roller will stay square relative to the frame.
C). Repeat STEP "A" and STEP "B" until the slipping is eliminated.

D). Be careful not to tighten the running belt tension too much as you can create excessively pressure
on the front and rear roller bearings. An excessively tightened running belt may damage the roller
bearings that would result in bearing nosie from the front and rear rollers.
TO DECREASE THE TENSION ON THE RUNNING BELT, TURN BOTH BOLTS
COUNTERCLOCKWISE THE SAME NUMBER OF TURNS.
CENTERING THE RUNNING BELT
When you run, you may push off harder with one foot than with another. The severity of the deflection
depends on the amount of force that one foot exerts in the relation to the other. This deflection can
cause the belt to move off-center. This deflection is normal and the running belt will balanced or no
body is on the running belt. If the running belt remains consistently off-center, you will need to center
the running belt manually.
A). Start the treadmill without anyone on the running belt, press (SPEED UP ) button until speed
reached 6 kph.
B). Observe whether the running belt is toward the right or left side of the deck.
a. If toward the left side of the deck:
Using wrench, turn the left adjustment bolt clockwise 1/4 turn and the right adjustment bolt
counterclockwise 1/4.
b. If toward the right side of the deck:
Using wrench, turn the right adjustment bolt clockwise 1/4 turn and the left adjustment bolt
counterclockwise 1/4.
c. If the belt is still not centered, repeats the above steps until the running belt is on center.
C). After the belt is centered, increase the speed to 16kph and verify that it is running smoothly. Repeat
the above steps if it is necessary.
If the above procedure is unsuccessful in resolving the off-center, you may need to increase the belt
tension.
CARE & MAINTENANCE
CARE & MAINTENANCE
Always remove the key and unplug the power cord before cleaning, lubricating, or performing any
maintenance.
RUNNING BELT AND RUNNING DECK LUBRICATION
Regular maintenance is necessary for best performance and longer treadmill life. The maintenance
procedure will prevent premature wear of the running belt, running deck and drive motor system. It is
difficult to predict exactly when will need lubrication, we recommend the following time table as a guide
to lubricate:
USAGE PERIOD LUBRICATION
Light user Less than 3 hours / week Annually
Medium user 3~5 hours / week Every 6 months
Heavy user More than 5 hours / week Every 3 months
Please contact your dealer for ordering lubricant.

HOW TO SPRAY SILICONE ON DECK
1). Find the silicone bottle. It put into hardware kit package when you purchase this treadmill, and open
the carton box.
2). Find a straw and put on silicone bottle as the drawing showing.
3). Spray silicone on treadmill deck even, the spray area is like the drawing showing.
(ATTENTION : You must stop the treadmill belt completely before spraying the silicone. Failure to do
so could cause injury such as cutting your hand on the edge of the belt and crushing your fingers
between the rear roller and the belt.)Do not put too much silicone on the deck. It can cause the running
belt to slip when in use if there is too much lubrication.
CLEANING
Perspiration should be wiped from the console and treadmill surface after your workout. You
should wipe down this treadmill after each use with a water dampened, soft cloth. Be careful
do not get excessive moisture on the display panel, this might cause an electrical hazard or
electronics to fail.
STORAGE
Store your treadmill in a clean and dry environment. Ensure the master power switch is off and
is unplugged from the electrical wall outlet.
MOVING
This treadmill has been designed and equipped with wheels for easy mobility. Before moving,
ensure the master power switch is in the off position and the power cord is unplugged from the
electrical outlet.
FOR CONSUMER/HOME USE ONLY
This treadmill is designed for home use only. Do not use for light institutional or commercial.
TROUBLE SHOOTING
SYMPTOM CAUSE SOLUTION
Console display LED's do
not illuminate
A).No power to treadmill.
B).Console wire is not
connected or incompletely.
C).Overload, protecting is
started.
Check the on-off switch
turn off, then turn on power. Put
START, if still not illuminate,
service required
Scrambled digitalis on console
LED Damaged console
Service required

Show E1 A).RPM sensor problem.
B).Senor wire do not connect
controller properly.
C).Motor wire is not connected.
Service required
Show E3 Overspeed Service required
Show E6 The wire of incline motor is not
connected properly. Service required
Show E7 The VR wire of incline motor
is not connected properly. Service required
Show E9 A).User didn't input body fat
data includes "MAN/WOMAN,
AGE, Height ,WEIGHT".
B).User didn't put hands on
hand pulse set.
Input data for body and put
hands on hand pulse set.
If the supply cord is damaged, it must be replaced by the manufacturer or its service agent or a
similarly qualified person in order to avoid a hazard.
PART LIST
ITEM DESCRIPTION Q’TY ITEM DESCRIPTION Q’T
Y
1 Console set 1set 54 Nylon nut 3/8” 3
2 Safety key 1 55 Bolt M8 x 45L, locking tube 1
3 Console mast 2 56 Nylon nut M8 3
4 End cap, console mast 2 57 Stud 2 2
5 Handle bar set 2sets 58 Bolt M4 x 15 L 16
6 Pad, base frame 2 59 Bolt M10 x 45L, lift arm 1
7 Base frame 1 60 Nylon nut M10, lift arm 1
8 Lower console wire 1 61 Bolt M8 x 15L, motor 2
9 Stud 1 2 62 Bolt m8 x 125L, motor 1
10 Front mobile wheel 2 63 Bolt 3/8” x 125L, motor 2
11 Front mobile wheel cover 2 64 Bolt M8 x 30L 1
12 Upper locking tube 1 65 Bolt M3 x 6L, sensor wire/ electric plug 4
13 Sleeve, upper locking tube 1 66 Bolt M8 x 40L, rear wheel 2
14 Lower locking tube 1 67 Bolt M8 x 70L, running deck frame 3
15 Spring 1 68 Bolt M6 x 15L, w/ washer 8
16 Foot pedal 1 69 Bolt M5 x 15L, motor control 2
17 Lower motor cover 1 70 Bolt M4 x 6L, motor control 2
18 Lift arm 1 71 Bolt M8 x 25L, running deck 8
19 Washer, stud 4 72 Bolt M5 x 12L, upper motor cover 4
20 Motor 1 73 Air shock 1
21 Fixing bracket, motor 1 74 Spring washer M8 3
22 Incline motor 1 75 End cap, lower locking tube 1
23 Running deck frame 1 76 Sleeve, lower locking tube 1
24 End cap, running deck frame 2 77 Adjust pad, base frame 2
25 Sensor wire 1 78 End cap, lift arm 2
26 Power cord 1 79 Bolt M8 x 15L, lift arm 4
27 Electric plug 1 80 Bolt M8 x 55L, locking tube 1

28 On-off switch 1 81 End cap, running deck frame 2
29 Fuse 1
30 Rubber cushion 8 CONSOLE SET
31 Rear wheel 2 1-1 Upper console case 1
32 Side rein 2 1-2 Upper console cover 1
33 Left roller cover 1 1-3 Lower console cover 1
34 Right roller cover 1 1-4 Overlay 1
35 Rear roller 1 1-5 Sticker 1
36 Running belt 1 1-6 Bolt M4 x 25L, console frame 2
37 Running deck 1 1-7 Panel control, console 1
38 Running belt track 2 1-8 Upper console wire 1
39 Drive belt 1 1-9 Operational PCB 1
40 Front roller 1 1-10 Handle pulse set 1set
41 Magnetic 1 1-11 Console frame 1
42 Iron block 1 1-12 Bolt M3 x 6L, panel 8
43 Upper motor cover 1 1-13 Bolt M4 x 15L 12
44 Sticker, upper motor cover 1 1-14 Upper ground wire 1
45 Fixing bracket, motor control 1 1-15 Hand pulse PCB 1
46 Motor control 1
47 Lower ground wire 1 HANDLE BAR SET
48 End cap, console 4 2-1 Handlebar 2
49 Bolt M8 x 50L, console 5 2-2 Incline handle button 1set
50 Bolt M8 x 95L, console mast 2 2-3 Speed handle button 1set
51 Washer M8 8 2-4 Bolt M3 x 12L, handle button 4
52 Bolt M8 x 15L, base frame 8
53 Bolt 3/8” x 55L 3

EXPLODED DRAWING
Table of contents