Ultra eXo User manual

ULTRA eXo Mouse
2.4GHz Bluetooth Wireless Mouse User Guide
The eXo mouse is designed for Windows OS (Window XP or higher), Mac OS and Linux
OS. It features as a 2.4 GHz Bluetooth Wireless and a laser pointer which can be used for
presentations.
Contact and Support
ULTRA Products
8300 West Flagler St. Suite #121-106
Miami, FL 33144
TEL : 1-888-222-5487
Website : www.ultraproducts.com
I. Setup Options:
Depending if you have a computer with a built-in Bluetooth® transceiver, there are two
methods of connecting with the eXo Mouse:
Transceiver –Free (PC & Mac)
This method requires a computer with built-in
Bluetooth®.
Using the
Bluetooth®
USB Dongle Adaptor (PC Only)
For PCs without
Bluetooth®
connectivity, ULTRA includes a
Bluetooth®
USB dongle.
II. Package Contents
1. eXo Mouse
2. Charging Cable
3. Pen Stand
3. User’s Manual
4. Mouse Pad
5. Bluetooth USB Adapter
6. Installation CD
Page1 Page2

Mminimum System Requirements:
For Windows®-based PCs
Windows® XP
Windows® 7
Windows Vista®
For Apple-based Computers:
Mac OS X v.10.2.6 higher*
*Built-in
Bluetooth®
is required for operation
⑦
⑧
④
①
②
③
⑤
⑥
⑪
⑫
⑬
III. Features:
Page3 Page4
① Page Up Button
② Charging & Laser Pointer Indicators
③ Page Down Button
④ Laser Pointer Button
⑤ Low Battery Indicator
⑥ Motion Indicator
⑦ Right Mouse Button
⑧ Scroll Wheel
⑨ Left Mouse Button (Pen Tip)
⑩ Charger Jack
⑪ Laser Pointer
⑫ DPI Switch
⑬ Power Switch
⑨
⑩

•When the battery is drained, ⑤on the eXo will blink every 2 seconds.
•We recommend fully charging the battery for 3 hours prior to initial use.
•When the charging cable is connected, ②will illuminate red while charging and Switch
to green when charging is complete.
•Charging is possible even when the device is powered off.
VI. Paring the eXo with a PC that Already has a
Bluetooth®
Transmitter:
1. Click on the
Bluetooth®
icon in the Control Panel window.
2. Click on the DEVICE Tab. If the eXo is displayed, registration has already been
completed and no further steps are necessary. If the eXo is not listed, click on Add….
3. Ensure the eXo is in paring mode by follow the steps above entitled Paring
4. Next, check the box for “My device is set up and ready to be found.”
and click Next.
Page5
IV. Paring :
• Pairing varies depending on the type of Bluetooth® connection used. Ensure first that
your Bluetooth® computer supports the HID function before paring.
•For computers that are already paired with the eXo, the paring process is not necessary
after restarting your computer. Reconnection is automatically made when the eXo is
powered and the computer is ready to receive a
Bluetooth®
signal. Also, when the eXo is
powered off, is out of range, or has radio interference, the device can loose its connection
to the PC. Reconnection is made by turning the eXo OFF then back ON.
•In order to pair your device, turn the eXo OFF then back ON and then press both ① ③
simultaneously for 5 seconds . To indicate the device is in pairing mode, the green and
red LEDs will flash.
•If you are not able to enter pairing mode, repeat this procedure.
V. Charging:
In order to charge your eXo, connect it to the charging cable via the port on the
top and connect the cable to any available USB port on your computer.
USB
Page6
①
③

7. Installation is now complete and the below window should appear.
Clicking on Finish will allow you to use the eXo.
8. When the registration is completed, the eXo will appear listed in the
Bluetooth®
devices list.
Page7
5. Turn on the eXo and press both the Page Up and Page Down buttons (① ③)
simultaneously for 5 seconds. The eXo will now be in pairing mode.
If the eXo is not found, confirm if it is in the pairing mode by ensuring the device is in
paring mode and press the Search Again button.
6. You will then be asked for a passkey to register the device. Click on the 3rd Pass Key
option “Let me choose my own pair key:” and input the following code: 0000 . Click on
Next to continue.
Page8

Page9
VII. Pairing the eXo with your MAC (with built in
Bluetooth®
):
1. Click on the Apple Menu and choose System Preferences.
2. Click on the
Bluetooth®
icon.
Page10
3. In the
Bluetooth®
window ensure the following boxes are selected: On and
Discoverable.
4. Click the checkbox next to Show Bluetooth status in the menu bar.
5. Ensure the eXo is in paring mode by follow the steps above entitled Paring
6. Click the Set Up New Device…. button and OS X will attempt to connect to the mouse.
7. When the computer is paired with the eXo, it will list it under Devices on the
Bluetooth®
Setup Assistant window. When this occurs, click on Continue.

Page11
8. The computer will finish pairing the eXo and will indicate when the connection
has been made.
9. Re-opening the
Bluetooth®
preferences window, will show a list of all of the
connected devices.
Page12
VIII. Paring the eXo with a PC that does not have a
Bluetooth®
Transmitter (PC Only):
1.Insert the included CD to your system. Click on the Setup icon.
2.Select your language.
3. Accept terms of license agreement.
4. After installation, connect the
Bluetooth®
USB dongle to your system.
5. Click on the Launch Blue Manager Suite Icon located on your desktop (shown below).
The Blue Manager application will launch.

Page13
6. Under
Bluetooth®
Neighborhood, select Peripheral Devices and
double click the indicated area to perform device discovery.
7. A search for
Bluetooth®
devices will start. In order to become discoverable, the
eXo must be in pairing mode. See section entitled Paring for instructions on how get the
eXo in paring mode.
Page14
8. When the
Bluetooth®
is enabled, the window below will display “Pointing in range” and
“Connectable Mode.”
Click OK to proceed
The
Bluetooth®
mouse driver will be installed.
9. Once the device is properly installed, the
Bluetooth®
icon on the system tray
Will turn from Blue to Green.
IX. LED Indicators:
Status ⑤RED LED ⑥GREEN LED
Standby mode OFF OFF
Power on OFF Blinks Once
When pairing Blinks Alternate RED & GREEN Until Paring is Complete
In-use OFF ON When Device is Being Used
Text Size OFF Blinks Once for 400dpi
Blinks Twice for 800dpi
Low Battery Blinks OFF
Very Low Battery Blinks RED and Green 10 times simultaneously then Power off
Status ② Green/RED LED
Charging Red LED is On
Full Charged Green LED is On
Laser pointer Indicator Red LED is On

Page15
X. Product Specifications
● 2.4GHz
Bluetooth®
Optical Pen Mouse
● Bluetooth 2.0, Bluetooth HID 1.0 Profile Support
● Working Distance: 30ft (maximum)
● Resolution: 800/400 DPI
● Battery: Li-ion 3.7V/300mAh
● Full Charging Time : 3 Hours
● Continuous Use: 40 Hours
● Continuous Standby : 1 Week
● Dimensions: 154mm(L)×19mm(W)×18mm(H)
● Weight: 22g
● Length of Charging Cable: 7 ft
XI. Troubleshooting
Trouble Reason Troubleshooting
eXo Does not Work
Ensure the device is
powered on. By checking
that the Green LED is
blinking.
Switch the power
switch to On.
Battery power is weak. Charge the battery.
eXo isn’t Working After
Rebooting the PC
eXo Is not properly
paired with the computer.
Turn OFF the eXo and
turn it back ON this
should allow the
computer to rediscover
the device.
Can’t Pair the eXo to
the PC
The eXo is not in pairing
mode. (Check LED
indicator status)
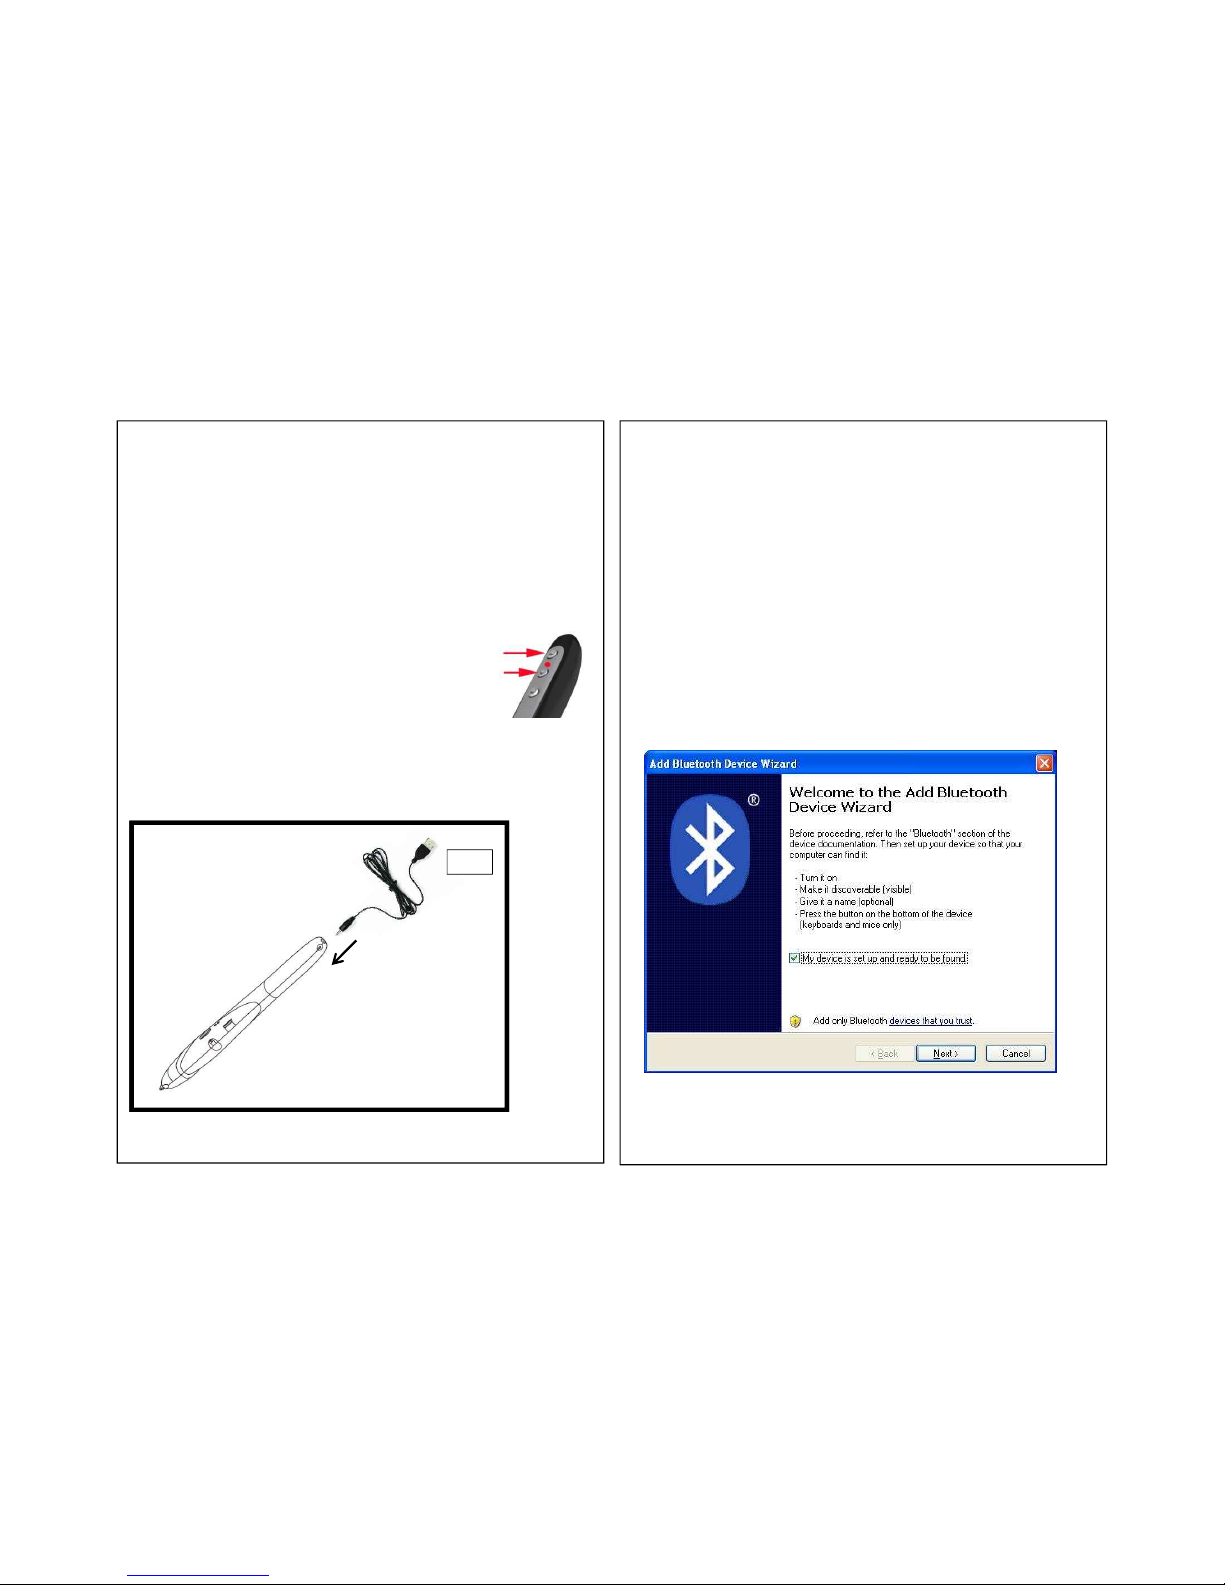
Get the eXo into pairing
mode by depressing
the Page Up button ①
and Page Down Button
③at the same time for
5 seconds. Reinitiate
the paring process on
the PC.
Laser Pointer Does Not
Work
Battery on the unit is
dead. Charge the battery.
eXo Does Not Charge Charging cable is not
properly connected.
Check if the plug on the
charging cable is
properly inserted into
the eXo and check the
Adaptor LED status.
XII. Safety Instructions
When using your equipment, the basic safety precautions should
always be followed to reduce the risk of fire, electric shock, and injury ,
including the following:
1. Read and understand all instructions.
2. Do not use liquid cleaners or aerosol cleaners. Use a damp cloth for cleaning.
3. Do not use this product near water, for example, near a bathtub, washbowl, kitchen
sink, or laundry tub, in a wet basement or near a swimming pool.
4. Do not place this product on an unstable cart, stand, or table. The product may fall,
causing serious damage to the product.
5.To reduce the risk of electric shock, do not disassemble this product, but take it to a
qualified service contract or when some service or repair work is required. Opening or
removing covers may expose you to dangerous voltages or other risks. Incorrect
reassembly can cause electric shock when the appliance is subsequently used.
6. Never point the equipment at people, especially their faces, or look directly in to the
Mouse’s laser beam, to avoid possible eye damage.
7. Avoid pointing the Mouse’s laser beam at a mirror or other highly reflective surface.
8. Keep the Mouse away from young children.
9. Never view the Mouse’s laser beam using telescopic devices, such as a microscope
or binoculars.
10. Any attempt to disassemble, adjust or repair the Mouse may result in exposure to
laser light or other safety hazards.
11. This is Class II Laser Product.
Page16

Page18
XIII. Regulatory Compliance
This device complies with part15 of the FCC Rules. Operation is subject to the following
two conditions: (1) This device may not cause harmful interference, and (2) This device
must accept any interference received, including interference that may cause undesired
operation
XIV. FCC Statement
Tested to comply
This equipment has been tested and found to comply with the limits of a Class B digital
device, pursuant to Part 15 of the FCC Rules. These limits are designed to provide
reasonable protection against harmful interference in a residential installation. This
equipment generates, uses and can radiate radio frequency energy and if not installed
and used in accordance with the instructions, may cause harmful interference to radio
communications. However, there is no guarantee that interference will not occur in a
particular installation.
This equipment does cause harmful interference to radio or television reception, which
can be determined by turning the equipment off and on, the user is encouraged to try to
correct the interference by one or more of the following measures:
-Reorient or relocate the receiving antenna
-Increase the separation between the equipment and receiver
-Consult the dealer of an experienced radio/TV technician for help
Note: The manufacturer is not responsible for any radio or TV interference caused by
unauthorized modifications to this equipment. such modifications could void the user’s
authority to operate equipment.
Page17
Table of contents