UniSky TY-ZQ001 User manual

WarningDisclaimerProductSpecificationsSparePartsListInstallationInstructions0101020203030304●●●●●Bike Confirmation Bike Trainer AssemblyBike Trainer LevelingHub Parts AssemblyBike Installation0405SmartTrainingCareandMaintenanceFAQ060809●●●User Instructions
Item: Power Module
Model number: TY-ZQ001

ThankyouforpurchasingUNISKYDirect-DriveFluidResistanceBikeTrainer.Pleasereadthisinstructioncarefullybeforeuseandfollowtheinstructionforinstallation,operation,andusetoensurethatyourbikerunswellandisnotdamagedwhilepreventingandavoidingunnecessaryaccidentsandinjuries.●Beforeuse,pleasecarefullycheckthatthebottomanchorboltofthisproductisfixed,andthegearsoftheadjustingknobonthemovablesupportarefirmlyengaged.●Beforeuse,pleasemakesurethattheproducthasbeenplacedonthesolidgroundsmoothly.Fourfoot-padsonthebottomtouchthegroundatthesametimetoensurethattheproductisstableandnotshaking.●Beforestartingtraining,pleasebesuretoconfirmyourhealthstatus.Itisrecommendedthatyouconsultyourdoctortoseeifyoucandoabikeexercise.●Ifyoufeelunwellduringuse(physicallytired,weakness,pain,chesttightness,discomfortorabnormalpulsebeating,etc.),pleasestopusingimmediatelyandtakearest.Ifthereispersistentdiscomfort,youareadvisedtoseekmedicaltreatmentimmediately.●Intheabsenceofsupervisionorguidance,personswithphysical,sensory,ormentaldisabilities(includingchildren)orwholackrelevantexperienceorknowledgemaynotusethisproduct.●Donotletchildrenusethisproductasatoywithoutsupervisiontoavoiddangerorinjury.●Pleasetakecareofwhetheryourclothesaretoolong.Itshouldbeavoidedthataccessoriesonclothesaffectcycling,toavoiddanger.●Pleasekeepenoughspacearoundwhenusingthisproduct,ensuringthattherearenoobstacles,children,pets,oranypotentiallyWarning1dangerousgoods(furniture,tables,chairs,etc.)around,toavoidaccidentscausedbyinadvertentcontactwiththebikeandmovingpartsonthebiketrainer.●Pleasebecarefulwhenstandingonthisproductandcycling.Donotshakethebikewhilestandingonit,toavoidfallingordamagetothebike.●Donotdisassembleorrefitthisproductbyyourself.●Pleaseuseoriginalaccessories.Iftheproductfails,pleasecontactUNISKYauthorizeddistributorforhandling.*Duringtheuseofthisproduct,pleasekeepyourbodyinbalanceanddonotshakethebikeviolently.*Beforestartingtheexercise,consultyourphysicianandwarmupproperly.○UNISKYisnotresponsibleforanymalfunctionofthird-partyvendors’software/applications/devicesandisnotliableforanydamagetothebiketrainercausedbyanysoftwarenotdevelopedorrecommendedbyUNISKY.○Usersshallreadtheinstructionscarefullybeforeusingthisproduct,fullyfollowtheinstallationsteps,installationmethods,andinspectionrequirementstoinstallandinspecttheproductandusetheproductbythewarningrequirements.UNISKYisnotliablefortemporaryorpermanentphysicaldamage(directorindirect)orpropertydamagecausedbytheuser'suseoftheproductinviolationofthewarning. DisclaimerRadiation Exposure Statement The device has been evaluated to meet general RF exposure requirement. The device can be used in portable exposure condition without restriction.

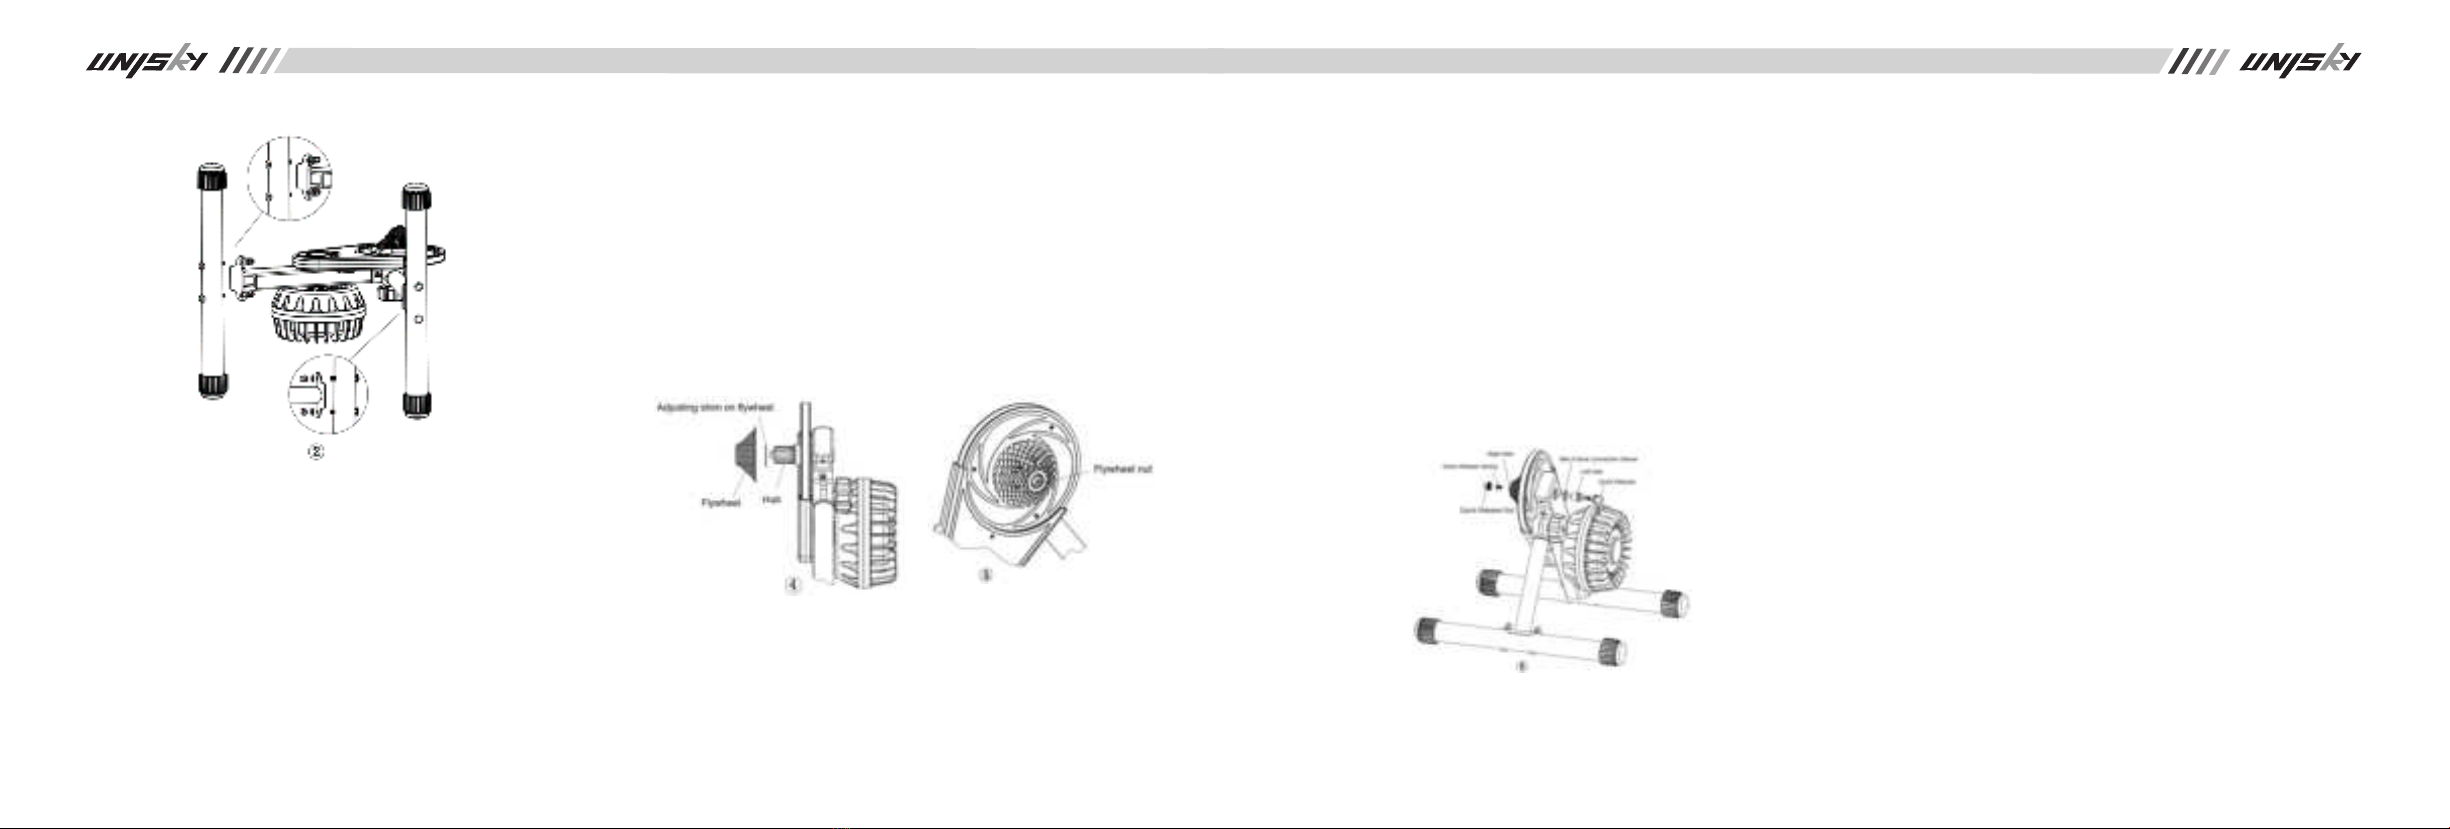
3②Footpipedetermining:1.Thecolorofbasepipe2andFootpipe1shallbethesameasthatofthemainbeam,thecolorofthebasepipe2shallbethesameasthatofthemovablesupport.AsshowninFigure2,twoboltspassthroughthefixedsquareholeonthebasepipe1atthesametime,andthesquareneckontheboltiscompletelyfittedinthefixedsquareholeonthebasepipe1.Pressthecupheadoftheboltwithyourhand,andpierceitintotheinstallationholeofthemainbeam.Placeoneflatshimoneachofthetwoboltheads,screwupthenutwithanopen-endedwrench.Inthesameway,fixthebasepipe2onthemovablesupport.
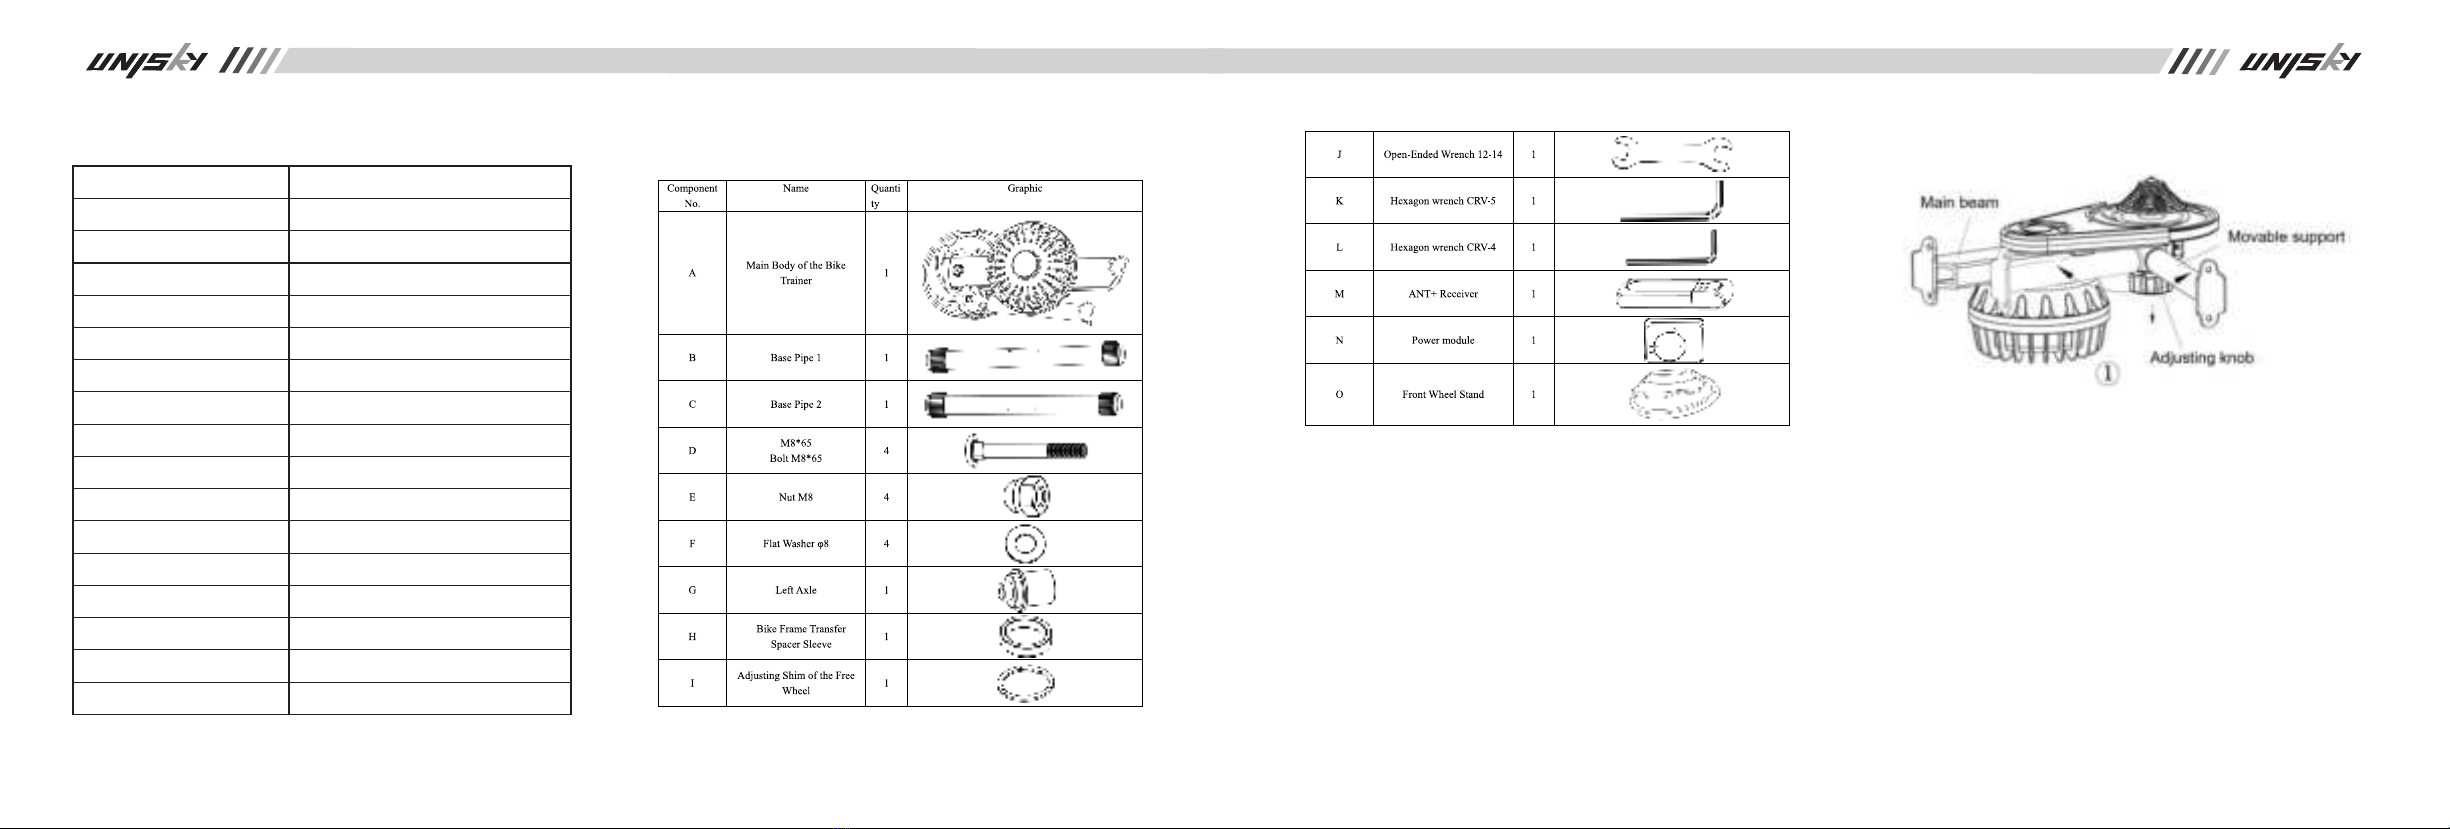
SparePartsList
ProductSpecifications
Maximum Power
Maximum Expansion Size (for 20’’ bike)
Minimum Storage SizeNet WeightInertia Wheel WeightDamper TypeBiker's Weight LimitationAdaptable Bike TypeAdaptable Bike FrameAdaptable Free WheelNoise LevelShell TemperaturePower ModuleWireless Communication
Adoptable Third-Party Cycling Platform
Adoptable Intelligent DevicesFE-C FE-C Prototype1128w(60Km/h)715(length)*570(width)*355(height)mm300(length)*570(width)*522(height)mm16.4Kg5.7KgLiquid resistance damper, stepless adjustment≤130 Kg(bike weight included)20"、22"、"24"、26"、700C、28"、29"130/135 Quick-dismantling bike frame
SHIMANO/SRAM hub flywheel with the speed of 8/9/10/11
≤65db(A weighting、1.5m、30Km/h)
≤60℃(environment temperature 25℃, operating for 10min with the speed of 40 Km/h)
Analog parameters, optionalANT+, BluetoothZwift, Viscene, Onelap, UHfitness, Strava
Computer, tablet computer, mobile phone, ANT+ stopwatch
Unsupported
2
InstallationInstructions
Step1.BikeConfirmationBeforeusingthebiketrainer,pleaseconfirmthespecificationsandbackhubtypeofthebike,andpreparetheflywheelthatmatchesthebike.Step2.BikeTrainerAssembly2-1Opentheboxandcheckallpartsandquantitiesaccordingtothesparepartslist.2-2Installationofthebasepipe①AsshowninFigure1,themainbodyofthebiketrainerisflatontheworkingtable,pulldowntheadjustingknob,turnthemovablesupporttoacertainangle,andslightlyswingthemovablesupportfromsidetoside,thegearsinsidetheadjustingknobarefirmlyengagedwithasoundofclick.

54Step5.BikeInstallation5-1Firstly,confirmthatthespecificationsoftherearwheelhubofthebikematchthehubconfigurationofthebiketrainer.5-2Adjustthegearofthebiketodisassembletherearwheel.Suggestedchainposition:thefrontderailleurisonthechainwheel,therearderailleurisonthesmallestfreewheeltoothplate.Loosentherearwheelquickreleaseandremovetherearwheel.Tip:Ifthereisnoquickreleaseforthebiketrainer,thequickreleaseontherearwheelcanbedisassembledandutilized.5-3Installthebikeonthebiketrainer:thechainattherearderailleurofthebikehangsonthesmallesttoothplateofthefreewheelofthebike,thebackforkofthebikeisplacedlightlyontheleftandrightaxlesofthebiketrainerthatsupportsthequickrelease.Afterconfirmingalignment,pressdownthebike.Thebackforkofthebikeissupportedontheleftandrightaxlesofthebiketrainer.Toensurethatthebackforkofthebikeisfullysupportedonthebiketrainer,thefrontwheelofthebikecanbeliftedoffthegroundandswinggently,andthenputitdown.5-4FixtheQuickRelease:Onehandrotatesthenutattheendofthequickrelease,theotherhandpressesthelockingwrenchofthequickrelease.Asthepressureisappropriate,pressthelockingwrenchofthequickreleasetothefullylockedposition.(Ifthelockingwrenchofthequickreleasecannotbepresseddown,pleasefirstunscrewthenutattheendofthequickrelease,theninstallandfixitaccordingtotheabovemethod.)Step3.BikeTrainerLevelingAfterinstallingthebasepipe,asshowninFigure3,thebiketrainerisplacedonsolidflatground.Itisleveledbyrotatingthebasesleeveonthebasepipesothatthefourbasesleevestouchthegroundcompletelyatthesametime,andthebiketrainerwouldnotshake.Attention:Beforeuse,thebiketrainermustbeleveledtoavoidaccidentalinjurycausedbyshakingofthebiketrainer.Attention:Thenutsconnectingthebasepipe1withthemainbeamandthebasepipe2withthemovablesupportmustbefastenedfirmly!Step4.HubPartsAssembly4-1FreeWheelInstallationThebiketraineriscompatiblewithSHIMANO/SRAMcardtypeflywheelwiththespeedof8/9/10/11.AshowninFigure4,ifyouusethe8/9/10-speedflywheel,ashimmustbeputonthehubbeforetheflywheelisfitted.Ifyouusean11-speedflywheel,theflywheelcandirectlyfitwithoutinstallingtheadjustingshim.Aftertheflywheelisfitted,asshowninFigure5,screwtheflywheelnut,andfastenthenutwithaspecialwrenchforflywheelassembly.fixingjointofthequickrelease,theninsertitintothemainbeamaxlehole.Ifusing130bikeframe,theleftfixingjointofthequickreleasecanbedirectlyinsertedintothemainbeamaxleholewithoutinstallingthebikeframeconversionsleeve.4-3QuickReleaseInstallationThebiketrainerissuitablefor5mmquickrelease.Youcanusethequickreleaseofthebackwheelofyourbikeorequipitseparately(thisproductisnotequippedwiththisaccessory).1)Firstremovethenutandone-sidespringattheendofthequickrelease,andtheotherspringisleftonthequickrelease.2)InthedirectionshowninFig.6,thequickreleaseispenetratedtheleftaxlehole,andtheotherendispenetratedthroughtherightaxle(fixedonthebiketrainer).3)AsshowninFigure6,reinstallthespringandnutremovedbeforetokeepthequickreleaseloosetoinstallthebike.4-2InstallationofFixingJointofQuickReleaseThebiketraineriscompatiblewithbikeframeconversionofwiththebackforkwidthof130/135,asshowninFigure6.Ifusinga135bikeframe,thebikeframeconversionsleeveshallbefirstlyputintheleftAttention:Whileinstallingthequickrelease,theconicalspringheadofthequickreleasemustbeinward(facingthebikebody)!

765-5TestRun:Afterthebikeisinstalled,don’trushtogetonthebikeforoperation.Besuretorotatethecrankataslowspeedtodrivethechainfortrialoperationandcheckforabnormalconditions.Whenrunning,ifthereareotherabnormalnoisesbesideschaindrivingsound,thismeansthebikeisinstalledincorrectly.Pleasereinstallthebikeaccordingtotheabovemethod.5-6PositionAdjustmentofBike:Thebicycleplatformiscompatiblewithbikesofvariousspecificationssuchas20’’,24’’,26’’,700C,28’’and29’’.Becauseofthedifferentwheeldiametersofeachtypeofbike,therewillbepositiondifferences.Itisnecessarytoadjusttheopeningangleofthemovablesupportofthebiketrainertoadjustthepositionofthebikeaccordingtoyourridinghabits.Specificoperation:Pulloutandholdtheadjustingknob(arrowAdirection),rotatethemovablesupportbackandforth(arrowB,Cdirection).Afterthemovablesupportreachestheappropriateangle,releasethefingerthatholdstheadjustingknobandswingthemovablesupportbackandforthslightly.Thegearsinsidetheadjustingknobareengagedwiththesoundoftheclick.Atthesametime,checkthatthegearattheadjustingknobisnotexposed,indicatingthatthemovablesupporthasbeenfirmlylocked.Attention●Ifyouarenotfamiliarwiththecorrectoperationofbikerearwheeldisassembly,pleaseconsultthebikeshopnearbyorreadyourbikeinstruction.●Ifyoufailtograspthecorrectoperationofbikeinstallationonthebiketrainer,pleaseconsulttheprofessionalbikemaintenancepersonnelnearbyorcontactUNISKYdealerdirectly.●Beforegettingonthebike,pleasemakesurethatyourbikeisproperlyinstalled.Otherwise,thebikemayfallfromthebiketrainerbecauseofinfirmfixing,resultinginaccidentalinjuryandpropertyloss.●Beforegettingonthebike,pleasemakesurethatthemovablesupportofthebiketrainerhasbeenfirmlylocked.Otherwise,thebiketrainermayfallbecauseoftheinfirmlockofthemovablesupport,resultinginaccidentalinjuryandpropertyloss.●Wheninstallingthebikeonthebiketrainer,afalseinstallationmethodmaydamagethepaintingofthebike.Itisrecommendedthatyoudoproperprotectionontheframeofyourbikebeforeinstallationtoavoiddamagetothebike.1BikeTrainerPairingThisproductcanbeinstalledwithpowermoduletosimulatethereallineridingorviewtheridingdata(asshowninFigure9).ThisproductsupportsANT+andBluetoothwirelesscommunicationprotocol,andcanbeconnectedtothird-partyridingsoftwareorant+stopwatchwithsmartdevicessuchascomputer,mobilephoneortablet.Ifyouwanttoconnecttothebiketraineroncomputer,youneedtoinstallthepowermoduleandplugtheANT+receiverintotheUSBportofthecomputer.InstallationDiagram:Duetodifferentmanufacturers,theoperationofthethird-partyridingsoftwareorant+stopwatchisslightlydifferent.Accordingtotheoperationinstructionsofeachsoftware,theyshallbepairedandconnectedwiththebiketrainerfirst,andthesubsequentoperationshallbecarriedoutaftertheconnectionisconfirmed.Thisproductsupportspairingwiththefollowingthird-partyridingsoftware:Zwift、Viscene、Onelap、UHfitness、StravaTip:Whenpairing,ifyoucan'tdetectthebiketrainerimmediately,youcanturnthepulleyofthebiketrainer.Asthepowermoduleinthebiketrainerisactivatedafterbeinginducedbythemagneticfield,thenyoucandetecttheequipmentofthebiketrainerafteramoment.2Third-PartySoftwareConfiguration(TakingtheZwiftasanExample)2-1.DownloadtheZwiftsoftwarefromthewebsite:www.zwift.com2-2.ConnectionpreparationConnectthebiketrainertopower,insertANT+USBdiskintocomputerSUBporttoreceivethedatabetweenthetrainerandcomputer.2-3.ClickthedownloadedAPPZwift,andenterin.RegisteritifyouarenewfortheAPP,afterthis,login.OryoucouldlogindirectlyifyouhavealreadyhadanID.2-4.ConnectthetrainerandtheZwiftsoftware.Clickthecontrollableonetoconnectthetrainer.2-5.Choosethetrainingtypeandridingroute.Asitisconnectedsuccessfully,youcanchoosethetrainingtypeandrouteaswhatyoulike,andthen,pleaseclickRIDEtostarttheridingtraining.2-6.Ridingdata.Youcanfindyourridingdataandridingconditionwhenyouaretraining,andtheonesallovertheworldwhousingtheridingappatthesametimewithyoutogether.Ifyouwanttowatchsomeoneridingdetails,justclickhis/hername.2-7.Endriding.ClicktheMENUtocheckyourridingdatasummary,andchooseifyouwanttoendtheriding.2-8.Saveordiscardtheridingdata.Whenyouendtheriding,thereischoicecomeout,youcanchoosesaveordiscardthedata.Attention:Youwillget25kmfreerouteforyourstart.Then,pleasepayforthetrainingandrouteontheZwiftaccordingtoitsrequirement.
SmartTraining

981Care1-1Theproductcanbefoldedforstorage.Operationmethod:pulloutwardandholdtheadjustingknob,rotatethemovablesupportuntilitisperpendiculartotheground;releasethefingerholdingtheadjustingknob,swingthemovablesupportbackandforthslightly;theinternalgearsoftheadjustingknobwillbeinplacewithaclickwhilecheckingthatthegearattheadjustingknobisnotexposed,thenthemovablesupportiscompletelylocked.Attention:theanglewherethemovablesupportisperpendiculartothegroundisalimitingposition.Ifthemovablesupportisbehindthelimitingposition,itiseasytocausethebiketrainertotopplebecauseofinstability,resultinginaccidentalinjuryandpropertyloss.1-2Theproductshallbestoredinacleananddryindoorenvironment,avoidingdirectsunlight,awayfromfireandwatersources,orotherdangerousgoods.1-3Whencleaningthisproduct,justwipeitwithacleancloth.Donotusedetergent,cleaningpowder,orotherchemicalsolventstocleanitsoasnottodamagethepaintonthesurfaceofthebiketrainer.2Maintenance2-1PulleyTensioningAdjustmentThemanufacturerhasadjustedthepulleytensionwhentheproductleavesthefactory.Afterusingtheproductforsometime,thepulleytensionwillbeinsufficient,causingittoslip(it'sperformance:whensteppingonthepedal,thepersonmayfeeldifferentstrength).Atthistime,itisnecessarytoadjustthepulleytension.Thespecific
CareandMaintenance
methodsareasfollows:1)AsshowninFigure9,insertthehexagonwrenchCRV-5(biggerone)intothesideadjustinghole,gentlyrotatethewrenchsothatthewrenchisfullymatchedwiththeinnerhexagonalholeoftheinternalscrew.Turnthewrenchhalf-circlecounterclockwiseuntiltheinternalscrewisloose.2)AsshowninFigure9,insertthehexagonwrenchCRV-4(smallerone)intotheupperadjustinghole,gentlyrotatethewrenchsothatthewrenchisfullymatchedwiththeinnerhexagonalholeoftheinternalscrew.Turnthewrenchhalf-circleclockwiseuntiltheinternalscrewisloose.3) Turn the hexagon wrench CRV-5 (bigger one) half-circle clockwise until the internal screw is firmly locked.4) Test: step on the pedal of the bike installed on the bike trainer; there shall be no feeling of different strength.2-2 Replace the Batteries of the Power Module or Power ModuleAfter using the product for some time, when pairing with the third-party riding software, the riding equipment may not be detected even when rotating the pulley. It is generally because the battery in the power module of the bike trainer is dead. At this time, the battery in the power module needs to be replaced. Refer to UNISKY videos for the battery replacement method. If the riding equipment can not be detected after battery replacement, the replacement of the whole power module should be considered.Tip: Power Module Battery Model CR2032FAQWhen an exception occurs, please check and resolve it according to the table below.Attention:If the abnormal phenomena are still unavoidable, please contact the UNISKY authorized distributor for assistance. Do not disassemble this product by yourself, which may cause product damage and affect after-sales service!

Your feedbackWe would like your feedback to improve our productsWhat is your opinion of this item? Please select your feedback category below.Something is not quite rightSuggestionComplimentPlease leave your feedback belowUpload your feedback to our website: www.uniskyglobal.com
Table of contents
Popular Exercise Bike manuals by other brands

Doufit
Doufit EB-01 instruction manual

SportsArt Fitness
SportsArt Fitness Recumbent Bike SportsArt C520R Repair manual

Weslo
Weslo Pursuit T 169 Bike Gebruiksaanwijzing

Kettler
Kettler Racer GT Assembly instructions

Indoor Cycling
Indoor Cycling TOMAHAWK S Series manual

BH FITNESS
BH FITNESS RC09 TFT G6180TFT manual