Unit UAB-816 User manual

INSTRUCTION MANUAL
РУКОВОДСТВО ПО ЭКСПЛУАТАЦИИ
UNIT®
UAB-816
BREAD MAKER
ХЛЕБОПЕЧЬ
UAB-816 Instr 11/17/08 1:04 PM Page 1

2
5
18
6
10 415
9
11
19
20
21
22
23
1
2
7
13
16
17 19
UAB-816 Instr 11/17/08 1:04 PM Page 2

BREAD MAKER UAB-816
Thank You for buying this UNIT product!
READ ALL THE INSTRUCTIONS BEFORE USING
CONTENTS OF THE INSTRUCTION MANUAL
SAFETY NOTICES . . . . . . . . . . . . . . . . . . . . . . . . . . . . . . . . . . . . . . . . . . . . . . . . . . . . . . . . . . . .3
APPLIANCE DESCRIPTION . . . . . . . . . . . . . . . . . . . . . . . . . . . . . . . . . . . . . . . . . . . . . . . . . . . . .4
PREPARING FOR USE . . . . . . . . . . . . . . . . . . . . . . . . . . . . . . . . . . . . . . . . . . . . . . . . . . . . . . . . .5
OPERATING THE BREAD MAKER . . . . . . . . . . . . . . . . . . . . . . . . . . . . . . . . . . . . . . . . . . . . . . . .6
FUNCTIONING OF THE BREAD MAKER . . . . . . . . . . . . . . . . . . . . . . . . . . . . . . . . . . . . . . . . . . .6
SELECT THE PROGRAM SETTING . . . . . . . . . . . . . . . . . . . . . . . . . . . . . . . . . . . . . . . . . . . . . . .6
PRACTICAL HINTS . . . . . . . . . . . . . . . . . . . . . . . . . . . . . . . . . . . . . . . . . . . . . . . . . . . . . . . . . . .9
CLEANING AND MAINTENANCE . . . . . . . . . . . . . . . . . . . . . . . . . . . . . . . . . . . . . . . . . . . . . . .17
SPECIFICATIONS . . . . . . . . . . . . . . . . . . . . . . . . . . . . . . . . . . . . . . . . . . . . . . . . . . . . . . . . . . .17
SAFETY NOTICES
When using electrical appliances, in order to reduce the risk of fire, electric shock and/or injury to
persons, basic safety notices should always be followed, including the following:
• To protect against the risk of electric shock do not immerse any part of this appliance into the water
or any other liquid.
• This appliance is not intended for use by young children or handycapted persons without supervision.
• This Bread maker is «Cool Touch» but it does get quite warm during the operation. Be careful to keep
your hands and face away from the unit.
• Do not open the Lid (7) or remove the Bread Pan (2) during the operation except as indicated in the
instructions.
• Do not place anything on the bread maker’s Lid (7). Do not cover the vents.
• This bread unit has a built-in Power Interruption Program Protection to maintain your baking cycle, in
the advent of an interruption in your power supply (black out). Any extended power outrage may result
in the program being cancelled.
• Do not touch moving parts.
• Children should be supervised to ensure that they do not play with the appliance.
• Switch off and remove the plug from the power outlet before cleaning or when not in use. To unplug
grasp the plug; never pull the Cord (13). Never carry the appliance by the Cord (13). Return to the
nearest service centre for examination, repair or electrical adjustment.
• Do not operate the appliance with a damaged Cord (13) or plug or after the appliance malfunctions,
or has been dropped or damaged in any manner.
• Do not let the Cord (13) hang over the edge of a table or counter, or touch hot surfaces.
• Do not use this appliance for anything other than its intended use. This product is intended for
household use only. It is not intended for commercial use.
• Do not attempt to repair or dissemble the appliance. There are no user serviceable parts.
• Do not use outdoors, inside the area with a high humidity.
• The use of attachments and accessories not recommended or not sold by this appliance manufacture
may lead to a fire, electric shock or personal injury.
• The appliance should always be operated on a level, heat resistance surface.
• Never use harsh, abrasive or caustic cleaners or oven cleaner to clean this appliance.
• If you do not observe the instructions it can cause damages.
• If the Power Cord (13) is damaged it must be replaced by the manufacture or its service agent or a
similarly qualified person in order to avoid hazard.
• This product has not been designed for any uses other than those specified in this instruction manual.
• Use of extension cord: a sort supply Power Cord (13) has been provided to reduce the risk of injury
resulting from becoming entangled in or tripping over a long cord. Extension cords should be used
with care. The Power Cord (13) should be arranged so that it will not drape over the surface where it
can be pulled by children or tripped over accidentally.
ENGLISH
3
UAB-816 Instr 11/17/08 1:04 PM Page 3

ENGLISH
4
• Electrical power: if the electric circuit is overloaded with other appliances, your bread maker may not
operate properly. The bread maker should be operated on a separate electrical circuit from other
operating appliances.
SAVE THIS INSTRUCTION MANUAL.
APPLIANCE DESCRIPTION
1. Baking Chamber
2. Bread Baking Pan
3. Kneading Blade
4. SIZE Button
5. The Indicator Light of Chosen Size of Bread
6. Crust Color Indicators: Light, Medium, Dark
7. Lid
8. Switch
9. START/STOP Button
10. MENU-SELECT Button
11. Crust COLOR Button
12. Measuring Spoon
13. Power Cord
14. Measuring Cup
15. Delay Button (the time delay)
16. Handles
17. Window
18. Control Panel with the LCD Display
19. The Indicator Light of the pre-heabing processes
20. The Indicator Light of Kneading
21. The Indicator Light of Rising
22. The Indicator Light of Baking
23. The Indicator Light of Keeping Warm
2 Turbo setting:
A unique feature which enables you to cook bread in under 2 hours. Ideal to cater for last minute guests
or when you need bread in a hurry.
Crust colour options:
Choose from dark, medium or light crust colours on most bread settings, to suit your own personal taste.
4 Wheat Rapid setting:
Reduces completion time of Wheat bread, so you can have bread ready in a shorter time.
7 Cake setting:
Make a variety of home-made using this setting.
8 Jam setting:
Simply follow the delicious jam recipes to make sweet or savoury homemade jams.
9 Bake setting:
Use this setting to complete the baking cycle in case of an extended power failure.
10 Damper setting:
Make a variety of traditional damper style bread in only one hour.
11 Pasta setting:
Use this setting to make dough for fresh home-made pasta.
12 Dough setting:
Takes the labour out of kneading dough for pasta, pizza, bread rolls and pastries.
Non-stick removable Bread Pan (2):
For easy removal and quick clean-up.
Cool Touch exterior:
Makes it safer when baking bread, particularly when children are present.
Horizontal Loaf-750g-1kg:
Makes traditional horizontal shaped bread in 2 sizes-ideal for sandwiches.
UAB-816 Instr 11/17/08 1:04 PM Page 4

Bake and Watch monitor:
This special feature monitors exactly which stage your fresh bread is going through – from kneading to
Baking.
Power Interruption Program Protection:
If there is a temporary power outrage during the use of your bread maker, the machine will retain its
memory and continue the baking cycle when the power returns.
Viewing window (17):
Allows you to watch each stage of the bread making cycle.
60 minute Keep-warm function:
Keeps bread warm for 1 hour after baking.
15 hour Time Delay:
Pre-set your bread maker and fresh bread is ready when you want it. You can even wake up to freshly
baked bread.
Fruit and Nut beeper:
Allows you to be more creative with your bread making. The bake house beeps to lets you know when it is
time to add fruit and nuts. This prevents excess crushing during the kneading cycle.
Variety of bread types:
Makes any type of bread you like from a selection of settings including: Basic, Wheat, French, Damper
and Sweet.
550 watts of power:
Optimum amount of power for the perfect loaf of bread.
PREPARING FOR USE
Before using the appliance remove all the stickers, labels, foreign matters from the Bread Pan (2) and
Backing Chamber (1). Wipe over the Bread Pan (2) and Kneading Blade (3) before using.
1. This bread maker is «Cool Touch» but it does get quite warm during the operation. Be careful to keep
your hands and face away from the unit.
2. Do not open the Lid (7) or remove the Bread Pan (2) during the operation except as indicated in the
instructions.
3. Do not place anything on the bread maker’s Lid (7). Do not cover the vents.
4. This bread unit has a built-in Power Interruption Program Protection to maintain your baking cycle, in
the advent of an interruption in your power supply (black out). Any extended power outrage may result
in the program being cancelled.
5. Do not touch moving parts.
After use
1. Always turn the unit off and remove the plug from the power outlet after use, and before cleaning.
2. Use oven mitts when taking out the Baking Pan (2) after baking.
3. Allow the bread maker to cool down before cleaning and storing.
Read instructions before cleaning. Do not immerse the unit or plug into the water. This may cause electric
shock or damage to the unit.
• Remove the Bread Baking Pan (2) by turning the Pan (2) anticlockwise and gently pull it out. Do not
immerse the Baking Pan (2) in water unless necessary. Do not place any parts of your bread maker in
the dishwasher.
• Select the recipe and prepare the ingredients.
• Before using your Bread Maker ensue that the voltage of your electricity supply is the same as
indicated in the rating label on the appliance (230 V, 50 Hz).
• Add ingredients into the Bread Pan (2) in the order listed. All ingredients should be at room
temperature and measured carefully. Wipe all spills from the outside of the Pan (2).
• Insert the Bread Pan (2) into the Baking Chamber (1) of the bread making machine. To do this, position
the Bread Pan (2) in the Baking Chamber (1) to the left angle so that the right end of the Handle (16)
meets the upper right hand corner of the bread machine. When the base of the Bread Pan (2) is
positioned into the base of the Baking Chamber (1), turn the Bread Pan (2) in a clockwise position to
securely lock the Bread Pan (2) into place.
• Lay the Handle (16) flat towards the side of the Bread Pan (2).
• Close the Lid (7) securely, plug the machine into a 230 - 240 volt AC power outlet and turn the power
ON.
ENGLISH
5
UAB-816 Instr 11/17/08 1:04 PM Page 5

Select the desired program setting, size and crust colour. Press Start (9). The Bake house will display
the hours and minutes until the cycle is complete.
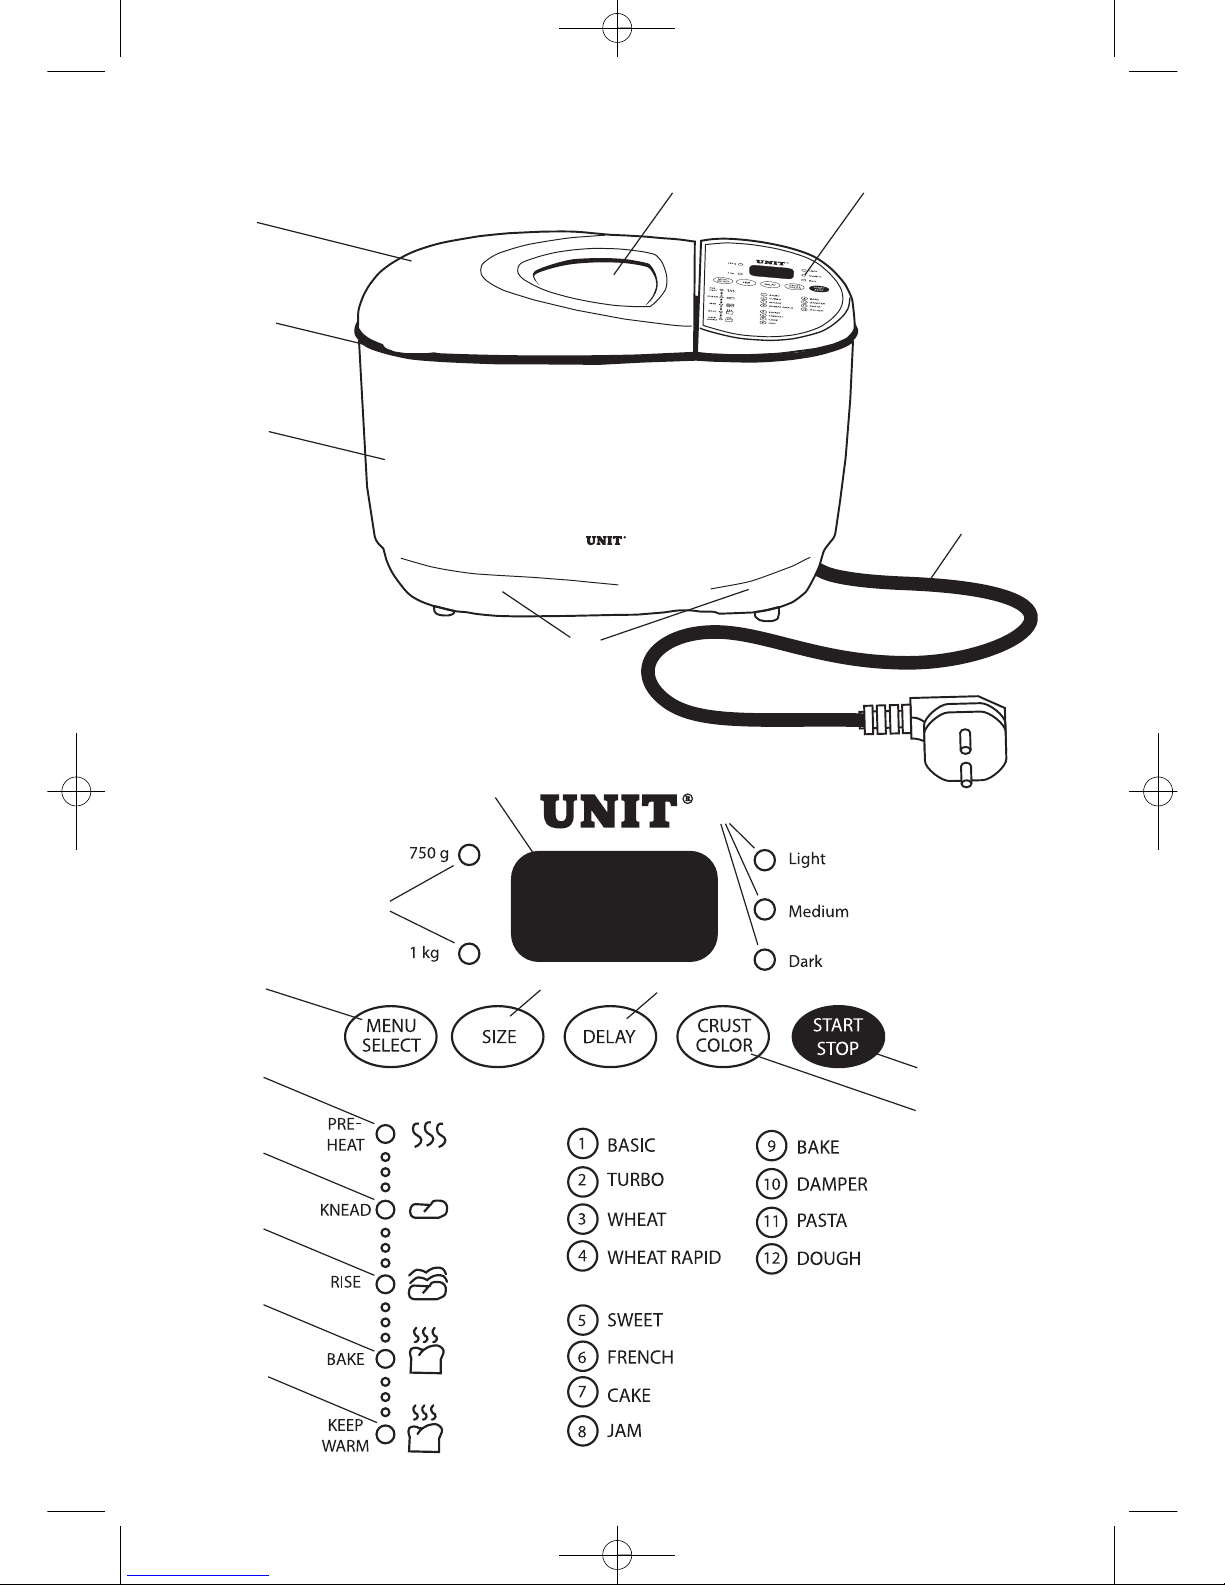
Display window. Indicates the program setting from 1 to 12 and the Crust Colour and the Loaf Size until
the Start Button (9) is pressed. The display will show the number of hours and minutes until the cycle is
complete – «0.00»
Bake and Watch Monitor. The bake house will let you know at what stage the bread baking process is
at until the completion of the cycle. The red light will appear when the machine is Pre-heating, Kneading,
Rising, Baking and when it is on the Keeping - Warm function.
MENU Button (10). Press this Button (10) to select the setting of your choice from 1 to 12. A beep will
sound each time you press the Button.
Delay Button (15). Allows you to delay the beginning of the desired program setting. See the Delay
setting description.
Crust COLOR Button (11). Press to select crust color- Light, Medium or Dark.
START/STOP Button (9). Press to commence selected setting or beginning timer countdown for the
delay timer. To stop the operation or cancel a timer setting, press and hold for 2-3 seconds until you hear
a beep.
OPERATING THE BREAD MAKER
Connect the bread maker to a power outlet. The appliance is plugged in the Display Window (17) will beep
and flash «0.00» until a program is selected. The machine is now ready to operate and is automatically set
to program «1» (normal position), but the program has not yet started. In order to set the program, to
choose the color of the bread, see «Functioning of the Bread maker».
Note: After choosing the Program the appliance will be ready for cooking.
FUNCTIONING OF THE BREAD MAKER
Program Settings:
12 program menu.
1 BASIC – use the setting to make traditional white bread. You have a choice of 3 colors- Light, Medium
or Dark. The Cool Touch Bake house lets you choose your favourite crust for most bread.
2 TURBO – use the setting for ready made bread in approximately 2 hours. This setting lets you save time
on the bread recipes by reducing the completion time and is ideal for when you need bread in a hurry.
Breads made using this setting may be shorter and denser due to the reduced rising time.
3 WHEAT – whole wheat breads require more rising time to accommodate the shower rising action with
whole wheat flour. Therefore, it is normal for whole breads to be heavy and slightly dense in texture.
4 WHEAT RAPID – this setting decreases the completion time of whole wheat bread. Ideal to cater for
last minute guests or when you need bread in a hurry.
5 SWEET – this cycle is for breads that require additional ingredients such as sugar, dried fruits or
chocolate to sweeten the bread. To prevent the crust from becoming too dark, the light crust color is
recommended.
6 FRENCH – this cycle is for breads with crispier crusts, such as French and Italian breads.
7 CAKE – make your favourite cakes or use packaged cake mixes to have warm home cakes any time.
8 JAM – use fresh fruit to make sweet and savour jams. Ideal to store and use all year round.
9 BAKE – this setting can be used to complete the bread baking process if there is an extended power
interruption. Set the program to Bake for an intermediate baking process.
10 DAMPER – make a variety of damper style breads on this setting. The bread will have a heavier and
denser texture than Basic bread.
11 PASTA – this setting is used to prepare the dough for pasta. Feed the pasta through a pasta machine
to make fettucini, ravioli and lasagne.
12 DOUGH – use this setting to make dough only, so that you can knead and shape a variety of breads
to bake in a conventional oven. Make dough for pizzas, dinner rolls and croissants.
Important: every time when you push the MENU-SELECT Button (10), the short sound is produced.
SELECT PROGRAMM SETTING
To select a program setting use the SELECT Button (10) until the desired number of the program from
1 to 12 is displayed on the Control Panel (18). Each time you press the SELECT Button (10), a beep will
sound.
ENGLISH
6
UAB-816 Instr 11/17/08 1:04 PM Page 6

Use the Size Button (4) to select the desired loaf size. At this stage, the Display (18) will show the hours
and minutes until the cycle is complete. This will change when the crust color is selected.
Use the Crust COLOR Button (11) to select your choice of crust color. You are able to choose from the
Light, Medium, or Dark crust colors on selected settings. Unless you select a crust color the Bake house
will automatically default to a Medium crust color.
Note: a choice of Crust Colors is available on the settings except for Program № 8, 9, 10, 11 and 12.
To start, press the START/STOP Button (9). The Bake house will beep and will display the hours and
minutes until the cycle is complete. To cancel the operation at any time you should hold the START/STOP
Button (9) down for 2-3 seconds. Avoid opening the Lid (7) at any time during the bread cycle unless
adding fruit or nuts when indicated.
The table bellow illustrates the Program settings and Crust COLOR options.
Menu Setting Light Medium Dark Time Fruit and 750 g. 1 kg.
Delay (15) Nut Beeper
1 Basic + + + + + + +
2 Turbo + + + + + +
3 Wheat + + + + +
4 Wheat + + + + + +
Rapid
5 Sweet + + + + + + +
6 French + + + + + +
7 Cake + + + + + +
8 Jam +
9 Bake +
10 Damper +
11 Pasta +
12 Dough +
*Time Delay (15) is not recommended for Sweet or Basic breads that require fruit or nuts to be added.
Add fruit or nuts.
You are able to add fruit or nuts on setting 1 basic and 5 Sweet when you hear 8 short beeps
(approximately 15-20 minutes into the cycle). Open the Lid (7) and add any fruit or nuts that the recipe
requires as the machine is kneading. Close the Lid (7) and the Bake house will automatically continue the
cycle. On various settings the machine will beep approximately 50 minutes before the completion of
bread to indicate the commencement of baking.
The machine will beep 5 minutes prior to the completion of backing.
At the end of the baking cycle – the machine will beep and the display will read «0.00». The Bake house
will automatically switch to a Keep-Warm cycle for 60 minutes. Warm air will circulate throughout the
Baking Chamber (1) to help reduce the condensation.
The bread can be removed from the Baking Chamber (1) at the end of the cycle or any time during the
Keep-Warm cycle. Simply press the START/STOP Button (9) to end the Keep-Warm feature.
To remove the bread from the Bake house – the Bread Pan (2) will be hot after the baking cycle. Use
a kitchen mitten to remove the Pan (2) from the baking Chamber (1). Turn the Bread Pan (2) anticlockwise
and gently pull out.
Allow the bread to cool in the Bread Pan (2) for 10 minutes before removing. Turn the Pan (2) upside down
and shake until the bread slides out. It is necessary, use a plastic spatula to loosen bread from the sides
of the Pan (2).
Allow the bread to cool on a wire rack for at least 10 minutes before slicing. For easy slicing we
recommend the use of an electric knife or a quality bread knife.
After using your Bake house – unplug the machine and allow it to cool for 30 minutes before
commencing another program. If you attempt to use the Bake house too soon, it will beep and the Display
ENGLISH
7
UAB-816 Instr 11/17/08 1:04 PM Page 7

(18) will read «E: 01», indicating the Bake house has not cooled sufficiently. Press START/STOP (9) and
wait until the Bake house has cooled.
USING THE TIME DELAY AND OTHER FUNCTIONS
The Cool Touch Bake house allows you to delay the cooking of your bread by up to 15 hours, so you can
wake up to the smell of freshly baked bread or go out for the day while your Bake house does all the work.
Note: Do not use the Time Delay (15) when the recipe has perishable ingredients such as milk, eggs or
cheese as these will spoil. Also, fruit and nuts should only be added manually. Do not use the Time Delay
(15) for recipes that require fruit and nuts to be added during the process. If you do add them on the Time
Delay (15), they will be excessively crushed during the kneading cycle.
1. Follow steps 1 and 2.
2. Press the Delay Button (15) until you reach the number of hours and minutes from now that you want
your bread to be ready.
3. Press the START/STOP Button (9) to begin the cycle. The Timer will start counting down and the
preheat indicator will flash. The bread will be cooked and ready in the hours and minutes displayed.
Note: If you make a mistake, or need to rest the timer, press the START/STOP Button (9) for 2-3 seconds.
Example: Before leaving for work at 8 am, you decide to set the Time Delay (15) so that the bread or
selected program will be ready and completed by 6 pm when you return home – which is 10 hours later.
After following instruction 1 above, press the Delay Button (15) until the Display (18) reads «10.00». Then
press Start (9). This tells that your bread or selected program will be complete in 10 hours. The appliance
will begin counting down and your selected program will be complete by 6 pm.
Note: You do not need to take into account the amount of the time required to cook the program selected.
This is automatically registered in the Bake house when it is selected.
2 TURBO SETTING
If you urgently need bread, the Turbo setting is used. It decreases the overall completion time of your
bread. This is especially handy when you need bread in a hurry. Cooking using this setting may be shorter
and denser because of the decrease in rising times. The Turbo setting should be selected when baking
White, Wheat, Sweet and French breads.
To use the Turbo setting, put ingredients into Bread Pan (2) and then place in the Bake house and select
program setting 2 Turbo, then press START (9).
7 CAKE SETTING
Make a variety of sweet home made cakes on this setting. You can use this setting to mix and bake cakes.
We recommend the use of pre-packed cake mixes. Select the Light crust color to prevent the sides from
burning. Refer to the Cake instructions and follow your experience and tastes.
8 JAM SETTING
Now you can make fresh jam all the year round. Use this setting to make fresh savoury and sweet jams.
9 BAKE SETTING
This setting can be used to complete the bread baking process in case of a power failure. If there has
been a power failure, allow the dough to rise without power until it reaches 3/4of the way up the Bread Pan
(2). Reconnect electricity and select program setting 9 Bake, and press START (9).
When you select the Bake setting, the Bake house will immediately start baking. This setting will bake for
1 hour and can be controlled manually by pressing the START/STOP Button (9) to stop the function at any
time.This setting can also be used to increase cooking time. If your bread is still dough like at the
completion of a cycle or you would like your bread cooked for a longer time, simply select the bake
function to continue cooking.
Note: You may need 10-15 minutes for the machine to cool down, before you select the bake program. If
you attempt to use the Bake option before the machine has cooled down, an error message will appear
on the Display (18) «E: 01».
ENGLISH
8
UAB-816 Instr 11/17/08 1:04 PM Page 8

10 DAMPER SETTING
Have damper style bread ready in less than 1 hour. Make a variety of sweet and savoury damper breads
on this setting. Once the Damper cycle is complete, we recommend you select the Bake function to bake
for a further 15 minutes to ensure a crisp crust.
Due to the self rising flour in the Damper recipes the taste may be similar to that of a scone.
11 PASTA SETTING
This program allows you to make pasta dough for fresh pasta. Feed the pasta through a pasta machine to
make fettuccini, ravioli and lasagne.
12 DOUGH SETTING
This program allows you to create a variety of dough for croissants, bread rolls and pizza to bake in a
convectional oven.
POWER INTERRUPTION PROGRAM PROTECTION
Your Cool Touch Bake house features a 20 minute power interruption protection that protects the program
memory in the advent of power surges, or short term power failure (black-out).
This means that if there is a power interruption during your bread making, the machine will retain its
memory for at least 20 minutes and continue cooking when the power supply returns. This feature is
applicable whether the machine is in the Kneading, Baking or Delay cycle. Without this feature the
machine would rest and the bread making cycle would stop. If you experience a power failure longer than
20 minutes you may need to discard your ingredients and start again.
IMPORTANT MEASURING TIPS
Each ingredient in a loaf of bread plays a specific role, so it is extremely important to measure the
ingredients correctly to get the best results.
For optimum results, we recommend weighing ingredients on a kitchen scale. This is especially important
with flour. Because flour aerates, an accurate amount is needed to achieve an optimum loaf of bread.
Weight measurements are given for each recipe. If kitchen scales are not available, ensure the following
instructions are followed:
Dry ingredients
Use a metric measuring spoon or cup. Do not use tableware spoons or cups. Spoon the dry ingredients
loosely into the spoon or cup and level off with a flat knife. This is particularly important with four. Do not
pack dry ingredients down into the cup or tap unless otherwise stated in the recipe.
Liquids
Fill a metric measurement spoon or cup to the level indicated. Check your cup measurement by placing
the measurement at eye level.
Solid fats
Fill a metric measuring spoon or cups to the level indicated and level off with a flat knife
Last things last
Always place the yeast in the Bread Pan (2) first, the dry ingredients in next, and the liquids in last. This
will ensure a well risen and evenly baked loaf.
Adding Fruits and Nuts
Fruits and nuts are added towards the end of the kneading cycle. The machine will beep to let you know
it is the time to add fruit or nuts. If they are added before the fruit a nut beep, the fruit will be pureed due
to excessive kneading.
PRACTICAL HINTS
Yeast
Yeast is actually a microscopic plant. Without yeast your bread will not rise. When moistened by a liquid,
fed by sugar and carefully warmed, yeast produces gasses that power the dough to rise. If the
temperature is too cold, the yeast will not be activated, if it’s too warm it will die. Your Cool Touch Bake
house takes care of this by maintaining just the right temperature in the Baking Chamber (1) at all times.
Some yeast may require the use of a bread improver. The bread improver will provide additional gluten to
the flour to produce a better loaf.
ENGLISH
9
UAB-816 Instr 11/17/08 1:04 PM Page 9

Note: We do not recommend the use of fresh or compressed yeast in your Bread maker. We recommend
the use of the dry yeast only. Always ensure it is used well within the use-by date, as stale yeast will
prevent the bread from rising.
Flour
For the Bread to rise, the flour has to have a sufficiently high protein content. Use a good quality plain of
bread flour. Do not use self-rising flour in any recipes, except for program 10 Damper.
Unlike white flour, wheat flour contains bran and wheatgerm which inhibit rising. Wheat breads therefore,
tend to be heavier in texture and smaller in size. A lighter larger loaf can be achieved by combining Wheat
flour with white flour for whole wheat bread recipes.
Sugars
Sugars sweeten the bread, brown the crust, lend tenderness to the texture and supply the yeast with food.
White or brown sugar, molasses, maple or golden syrup, honey and other sweeteners may be use in
equivalent quantities.
Artificial sweetener can be substituted in equivalent amounts, however the taste and texture will vary.
Liquids
When liquids are mixed with protein in flour, gluten in formed. Gluten is necessary for the bread to rise.
Most recipes use dry milk and water but other liquids such as milk and fruit juice can be used. Experiment
with quantities of these liquids to obtain optimum results. Liquids should be used at room temperature. A
recipe with too much liquid may cause the bread to fall during baking while a recipe with too little liquid will
not rise.
Salt
In small amounts, salt adds flavour and controls yeast action. Too much salt inhibits rising, so be sure to
measure amounts correctly. Any ordinary table salt may be used.
Fats
Many breads use fats to enhance the flavour and retain moisture. Typically, we use margarine in the
recipes, softened butter or oil may be used in equivalent quantities. If you choose not to add any fat, your
bread may vary in taste and texture.
Order of ingredients
Always put the yeast in first turn, the dry ingredients in the next and liquids in the last. Fruits and nuts are
added later, after the machine has completed the first knead.
Storage of bread
The bread cooked by one does not include the artificial antiseptic. But if you are storing the bread the
clean one, in the airtight good container, then place on the refrigerator. In this way the bread can be stored
for 5-7 days. You can also freeze the bread too, but you need to wait for the bread to cool down, and then
put bread in the plastic bag.
ENGLISH
10
UAB-816 Instr 11/17/08 1:04 PM Page 10

Menu Crust Size Time Preheat Knead Knead Rising Knead Rising Knead Rising Bake Warm
1232 4 3
BASIC Light 2:55 - 3 22 37 15 sec 28 3 sec 35 50 60
BREAD Medium 750g 3:05 - 3 22 37 15 sec 28 3 sec 35 60 60
Dark 3:15 - 3 22 37 15 sec 28 3 sec 35 70 60
Light 3:00 - 3 22 37 15 sec 28 3 sec 35 55 60
Medium 1kg 3:10 - 3 22 37 15 sec 28 3 sec 35 65 60
Dark 3:20 - 3 22 37 15 sec 28 3 sec 35 75 60
TURBO Light 1:54 - 3 20 - 12 2 sec 34 45 60
BREAD Medium 750g 1:57 - 3 20 - - 12 2 sec 34 48 60
Dark 2:02 - 3 20 - - 12 2 sec 34 53 60
Light 1:56 - 3 20 - - 12 2 sec 34 47 60
Medium 1kg 1:59 - 3 20 - - 12 2 sec 34 50 60
Dark 2:04 - 3 20 - - 12 2 sec 34 55 60
WHEAT Light 3:34 30 3 22 50 15 sec 20 3 sec 40 49 60
BREAD Medium 750g 3:44 30 3 22 50 15 sec 20 3 sec 40 59 60
Dark 3:54 30 3 22 50 15 sec 20 3 sec 40 69 60
Light 3:40 30 3 22 50 15 sec 20 3 sec 40 55 60
Medium 1kg 3:50 30 3 22 50 15 sec 20 3 sec 40 65 60
Dark 4:00 30 3 22 50 15 sec 20 3 sec 40 75 60
WHEAT Light 2:22 5 3 20 - - 22 3 sec 40 52 60
RAPID Medium 750g 2:27 5 3 20 - 22 3 sec 40 57 60
BREAD Dark 2:35 5 3 20 - - 22 3 sec 40 65 60
Light 2:25 5 3 20 - - 22 3 sec 40 55 60
Medium 1kg 2:30 5 3 20 - - 22 3 sec 40 60 60
Dark 2:38 5 3 20 - - 22 3 sec 40 68 60
Light 3:09 - 3 22 43 15 sec 27 3 sec 40 54 60
SWEET Medium 750g 3:19 - 3 22 43 15 sec 27 3 sec 40 64 60
BREAD Dark 3:29 - 3 22 43 15 sec 27 3 sec 40 74 60
Light 3:15 - 3 22 43 15 sec 27 3 sec 40 60 60
Medium 1kg 3:25 - 3 22 43 15 sec 27 3 sec 40 70 60
Dark 3:35 - 3 22 43 15 sec 27 3 sec 40 80 60
FRENCH Light 3:15 - 3 22 43 15 sec 27 3 sec 50 50 60
BREAD Medium 750g 3:25 - 3 22 43 15 sec 28 3 sec 50 60 60
Dark 3:35 - 3 22 43 15 sec 28 3 sec 50 70 60
Light 3:20 - 3 22 43 15 sec 28 3 sec 50 55 60
Medium 1kg 3:30 - 3 22 43 15 sec 28 3 sec 50 65 60
Dark 3:40 - 3 22 43 15 sec 28 3 sec 50 75 60
ENGLISH
11
PROGRAM SETTING TIMES AND DISPLAY INFORMATION
UAB-816 Instr 11/17/08 1:04 PM Page 11

ENGLISH
12
CAKE Light 1:15 - 3 16 - - 28 3 sec - 56 22
Medium 750g 1:25 - 3 16 - - - 3 sec - 66 22
Dark 1:35 - 3 16 - - - 3 sec - 76 22
Light 1:20 - 3 16 - - 3 sec - 61 22
Medium 1kg 1:30 - 3 16 - - 3 sec - 71 22
Dark 1:40 - 3 16 - - 3 sec - 81 22
-
JAM 1:20 15 - - - - - - 65 14
-
-
BAKE 1:00 - - - - - - - 60 60
-
-
DAMPER 0:59 - 1 8 - - - 8 42 60
-
-
PASTA 0:13 - 3 5 - - 1 10 sec 4 -
-
-
DOUGH 1:10 - 3 15 52 - - - 52 - -
*All times are in hours and minutes unless otherwise started.
** The time is not the strict rule, it is approximate, a lot depends on the ingredients you use and the desired bread.
The Display (18) will tell you if there is a problem with your Bake house. Always use your Bake house in a room free of drafts. Do not use your Bake house
outdoors, near a heat vent or in a direct sunlight.
UAB-816 Instr 11/17/08 1:04 PM Page 12

DISPLAY READS PROBLEM SOLUTION
«0:00» Colon Flashing Select program setting Use the MENU Button (10) to select program
«E:01» Flashing Bake house is too hot Press START/STOP Button (9) to cancel.
to begin another Open the Lid (7) and allow to cool
program setting. down for 30 minutes.
You will hear a beep when:
The power is turned ON Long beep
Select a setting from the Menu Short beep
Invalid Key-in Long beep
Fruit and Nut Beeper 8 short beeps
Commencement of baking cycle 2 long beeps
Completion of bread baking process Short and Long beeps
Handy Hints.
Order of Ingredients.
Always put the yeast in the first, the dry ingredients in the next and the liquids in last. Fruits and nuts are
added after the machine has completed the 1st knead. This will ensure a crisp and evenly baked loaf
every time.
Freshness.
Ensure all ingredients are fresh and used before the specified use-by date. Avoid using perishable
ingredients such as milk, yogurt, eggs or cheese, with the Time Delay (15) function. Store dry ingredients
in airtight containers in order to prevent drying out.
Slicing bread.
For the best results, wait at least 10 minutes before slicing, as the bread needs time to cool down. Place
loaf on its side and cut in a sawing motion with a bread knife.
Freezing bread.
To freeze fresh bread, let it cool completely and wrap in plastic. Slice bread before freezing and use at
your convenience.
Removing bread from the Bread Pan (2).
Like a cake, the bread needs to cool slightly before removing from the Bread Pan (2). Allow the bread to
sit in the Pan (2) for approximately 10 minutes before removing.
Toppings.
Ingredients such as herbs, sesame seeds and chopped bacon can be added to the top of the bread
during the baking stage. Open the Lid (7) of the Bread house, gently brush top of loaf with a little milk or
egg yolk and sprinkle with topping. (Do not allow ingredients to fall outside the Pan (2)). Close the Lid (7)
and allow baking to continue.
Note: This step needs to be done quickly to prevent bread from sinking.
Crust color.
It is normal for the top of the bread to be lighter in color than the sides. Different combinations of
ingredients can encourage or discourage browning. If you would like the top crust to be slightly darker,
select the 9 Bake program setting and cook until desired color is achieved.
Baking at high altitudes.
At high altitudes above 900 metres, dough rises faster. Therefore, when baking at high altitudes some
experimentation is required. Follow the suggested guidelines. Use one suggestion at a time to write down
which suggestion works best for you.
Suggestions:
Reduce the amount of yeast by 25 %. This will stop the bread from over-rising. Increase the salt by 25 %.
The bread will rise slower and have less of a tendency to sink. Watch your dough as it mixes. Flour stored
at high altitudes tends to be drier. You may have to add a few tablespoons of water, until the dough forms
a nice ball.
ENGLISH
13
UAB-816 Instr 11/17/08 1:04 PM Page 13

RECIPES
Bread Pre-Mix Recipes
Pre-package bread mixes are available from most supermarkets. The recipes in this section are for use
with pre-package bread mixes only.
White Bread Mixes
Procedure
Place ingredients into Bread Pan (2) in the order listed in the recipe.
Wipe spills from the outer edge of Pan (2) and close the Lid (14).
Press the MENU Button (10) to choose the cycle 1 Basic.
Select Size, Crust Color, press START/STOP Button (9).
Whole meal bread mix recipes
Procedure
Place ingredients into Bread Pan (2) in the order listed in the recipe.
Place the Bread Pan (2) into the Bread maker and close the Lid (7)
Press the MENU Button (10) to choose the program 3 Wheat or 4 Wheat Rapid.
Select Size, Crust Color, press START/STOP Button (9).
Bread will be baked in the number of hours indicated.
Wheat Breads.
All Wheat or Wheat Rapid cycles begin with a 30 minute pre-heat of ingredients – No blade movement
occurs in the Pan (2) during this stage.
Procedure
Place ingredients into Bread Pan (2) in the order listed in the recipe. Wipe spills from the outside of the
Pan (2).
Place the Bread Pan (2) into the bread maker and close the Lid (7).
Press the MENU Button (10) to choose the program 3 Wheat, or 4 Wheat Rapid.
Select Size, Crust Color, press START/STOP Button (9).
Note: if using the 2 Turbo program setting, additional baking time may be required. If so, simply select 9
Bake to continue baking.
French Breads.
Procedure
Place ingredients into Bread Pan (2) in the order listed in the recipe. Wipe spills from the outside of the
Pan (2).
Place the Bread Pan (2) into the bread maker and close the Lid (7).
Press the MENU Button (10) to choose the program 6 French.
Select Size, Crust Color, press START/STOP Button (9).
Bread will be baked in the number of hours indicated.
Note: if using the 2 Turbo program setting, additional baking time may be required. If so, simply select 9
Bake to continue baking.
Sweet Breads.
Procedure
For optimum results, always select the Light Color Crust to prevent the crust from burning.
Place ingredients into Bread Pan (2) in the order listed in the recipe. Wipe spills from the outside of the
Pan (2).
Place the Bread Pan (2) into the bread maker and close the Lid (7).
Press the MENU Button (10) to choose the program 5 Sweet.
Select Size, Crust Color, press START/STOP Button (9).
Do not use the Time Delay setting when baking the Sweet breads as the ingredients will spoil.
Note: if using the 2 Turbo program setting, additional baking time may be required. If so, simply select 9
Bake to continue baking.
ENGLISH
14
UAB-816 Instr 11/17/08 1:04 PM Page 14

Cakes.
Place ingredients into the Bread Pan (2) in the order listed. Wipe spills from the outside of the Pan (2).
Place the Bread Pan (2) into the bread maker and close the Lid (7).
Press the MENU Button (10) to program 7 Cake, 750 g loaf size and Light crust color. Press START (9).
Allow to mix for approximately 10 minutes, scraping down the sides of the Bread Pan (2) with a plastic
spatula. Gently fold mixture to ensure ingredients are well combined. Close Lid (7) and allow cycle to
continue.
Note: We recommend you use packet cake mixes, available from all supermarkets.
Handy Hints for Optimum results.
It is normal for cakes to rise only 1/2way up the Bread Pan (2). The texture should be nice and light.
The sugar and fat content in the cake mix will affect the coloring of the cake. We suggest you always
select the Light crust color to prevent the sides from burning.
Avoid using double quantities of cake mix, as the cake may be dense in texture.
Allow the cake to cool in the Bread Pan (2) for at least 15 minutes before removing. Loosen the sides with
a plastic spatula and gently slide it out.
Jam.
Handy Hints for Optimum results.
Use ripe, fresh fruit. Large fruits should be cut into small pieces.
Avoid processing fruit as the jam should be chunky and contain pieces of fruit.
Do not reduces the amount of sugar specified or use substitutes.
Pour the hot jam into sterilized jars, leaving approximately 2 cm from the top of the jar. Seal the jars
immediately.
Label jam, allow to cool and then refrigerate.
Method.
Place ingredients into Bread Pan (2) in the order listed. Wipe spills from the outside of the Pan (2).
Place the Bread Pan (2) into the bread maker and close the Lid (7).
Press the MENU Button (10) to program 8 Jam and press START (9). Allow to mix for 5 minutes, open the
Lid (7) and scrape down sides of Bread Pan (2) with a plastic spatula.
Note: It is normal for excess steam to escape from the steam vent during the cooking process.
Damper.
Method.
1. Place all ingredients into the Bread Pan (2) in the order listed. Wipe spills from the outside of the Pan (2).
2. Place the Bread Pan (2) into the bread maker and close the Lid (7). Press the MENU Button (10) to
program 10 Damper and press START (9).
Important: Allow the machine to mix for 5 minutes. Open the Lid (7). Using a plastic spatula , scrape
down the sides of the Pan (2) gently fold the ingredients together so that they are well combined. Close
the Lid (7) and allow the machine to continue the cycle.
Note: The damper style breads have a rich flovour and are heavy and dense in texture. They should be
approximately 15 cm in height. For a lighter loaf decrease the salt to teaspoon.
If they require more cooking time, simply allow the machine to cool for 10 minutes, then select the 9 Bake
program to bake the bread until desired. You can stop the baking process at any time by processing the
START/STOP Button (9) for a few seconds.
Note: Sometimes the damper will not be the width of the Bread Pan (2). This is normal as the damper will
take its own shape throughout the rising cycle.
Pasta.
Method.
1. Place all ingredients into the Bread Pan (2) in the order listed. Wipe spills from the outside of the Pan (2).
2. Place the Bread Pan (2) into the bread maker and close the Lid (7). Press the MENU Button (10) to
program 11 Pasta, then press START (9).
If Pasta dough appears to be too sticky, knead dough with additional flour.
Spinach Pasta: Add 100 g of very well drained spinach to the dough recipe.
Tomato Pasta: Add 2 tablespoons concentrated tomato paste to dough recipe.
ENGLISH
15
UAB-816 Instr 11/17/08 1:04 PM Page 15

Pizza Dough
11/3cup water
2 tablespoons and 2 teaspoons vegetable oil
1 teaspoon salt
1 tablespoons sugar
41/2cups plain flour
1 tablespoon dry active yeast
• Place all ingredients in the Bread Pan (2) in order listed, select the DOUGH-cycle and press the
START/STOP Button (9).
• Pre-heat oven to 200°C. Grease 2 pizza trays.
• When cycle is complete, remove the dough from the Bread Pan (2). Divide dough in half and spread
onto the pizza trays. Add favorite toppings.
• Bake for 20 minutes or until the crust has browned.
8 JAM
You can prepare a nice jam from berries and fruits. There are different ways of making it. The quantity of
fruits and sugar play a great role. Follow the jam recipes. If the jams are cooked and canned in a right way,
they can be stored all the year round.
Strawberry Jam
500 g, bulled and chopped strawberries
12/3cup sugar
2 tablespoons lemon juice
2 tablespoons jam setter
• Place strawberries, sugar, lemon juice and jam setter in the Bread Pan (2).
• Lock Bread Pan (2) into position in the Backing Chamber (1) and close the Lid (7).
• Press the SELECT Button (10) to set the JAM mode. Press the START/STOP Button (9).
Plum Jam
21/2cups chopped Blood Plums
11/2cup sugar
21/2tablespoons jam setter
• Place plums, sugar and jam setter in the Bread Pan (2).
• Lock Bread Pan (2) into position in the Backing Chamber (1) and close the Lid (7).
• Press the SELECT Button (10) to set the JAM mode. Press the START/STOP Button (9).
Orange Marmalade
500 g oranges, thinly sliced
11/2cup sugar
2 tablespoons jam setter
• Place oranges in a heat proof bowl. Pour over enough boiling water to just cover. Set aside until cool,
and peel has softened, approximately 3 hours. Drain.
• Place orange slices, sugar and jam setter in the Bread Pan (2).
• Lock Bread Pan (2) into position into the Backing Chamber (1) and close the Lid (7).
• Press the SELECT Button (10) to set the JAM mode. Press the START/STOP Button (9).
ENGLISH
16
UAB-816 Instr 11/17/08 1:04 PM Page 16

Problem Cause Solution
The bread maker The appliance is not plugged Always plug correctly into
will not start. in correctly to power outlet. 230 V, 50 Hz power outlet.
Note: There is preheating in the beginning of the baking cycle. It is normal for there to be no activity
during this time.
Bread collapses 1. Salt was reduced or omitted. 1. Measure salt carefully using the
when rise. Measuring Spoon (12) provided.
2. Too much liquid was used. 2. If dough is too wet the bread will
collapse. In future reduce water or liquid
by at least 1 tablespoon and up to 4
tablespoons. Let the machine knead
too dry, add additional water 1
tablespoon at a time, up to 4
tablespoons.
3. Warm weather, high humidity 3. If room temperature is over 27°C try
or overheated liquid all speed up using chilled water. Try reducing the
yeast action which may cause amount of yeast used by 1/4teaspoon.
the dough to rise too fast and
the bread to collapse during
baking.
The bread or dough 1. Not enough sugar was used. 1. Measure sugar carefully. Do not
did not rise enough. reduce amount of sugar or sugar
sweeteners in a recipe. Do not use
artificial sweeteners.
2. Yeast did not activate. 2. Make sure yeast is fresh, check
“used-by” date. Yeast should be placed
in a little hollow well made in the flour.
3. Too much salt inhibited rising. 3. Use amount specified in recipe
and measure carefully using the
Measuring Spoon (12) and the
Measuring Cup (14) provided.
The loaf of bread Too much flour was used. Measure the flour carefully. Spoon flour
is small or out into the Measuring Cup (14) being
careful
of shape. not to pack down. Level Cup (14)
off with a knife.
Bread rose too high, Too much or wrong type Measure yeast carefully using the
touching the Lid (7). of yeast used. Measuring Spoon (12) and the
Measuring Cup (14) provided. Active dry
yeast is recommended for all recipes
in this manual.
Bread did not 1. Lid (7) was opened 1. Do not open the Lid (7) during final
bake thoroughly. during baking. rising and baking cycle.
2. Ingredients were not 2. Measure carefully, remembering
measured correctly. to level off Measuring Spoon (12) and
the Measuring Cup (14) measurements
of dry ingredients.
ENGLISH
17
TROUBLE SHOOTING GUIDE
UAB-816 Instr 11/17/08 1:04 PM Page 17

CLEANING AND MAINTENANCE
• Disconnect the machine from power outlet and allow it cool down completely before you start to clean
it. To unplug the appliance, never pull the Cord (13).
• Clean the inside of the machine with a damp, slightly soapy dish cloth. Wipe over again with a clean
damp cloth to remove any of the soapy residue.
• To clean the Bread Pan (2). Rub the inside and outside of the Pan (2) with a damp cloth.
• To clean the Kneading Blade (3). If the Kneading Blade(s) (3) is difficult to remove form the axle(s),
soak the Bread Pan (2) in water beforehand. Don't soak the Bread Pan (2) in water for a long time. The
maximum time of the soaking is 60 minutes.
• Clean the Lid (7) and the Window (17), the machine inside and outside with a slightly damp cloth.
• Be careful to protect the non-stick surface; don't use the metal apparatus (such as the spatula, the
knife or fork) for cleaning of the Bread Pan (2).
Note: do not use abrasive or strong household cleaners as these will damage the non-stick surface of the
bread maker.
SPECIFICATIONS
Rated voltage: 230 V, 50 Hz
Power: 550 W
Lifetime: not less than 5 years from the date of purchase
The head office of the manufacturer : «UNIT Handelsgesellschaft G.m.b.H.»
131, Gersthofer Str., A-1180, Vienna, Austria
Exported by: «UNIT Electronics (H. K.) Limited»
3905 Two Exchange Square, 8 Connaught Place,
Central, Hong Kong
Made in People’s Republic of China (P.R.C.)
This appliance is to be stored and used under the following conditions: temperature – not less than
+5°C; relative humidity - not higher than 80%; aggressive impurities in the air: not allowable.
As the Manufacturer is constantly working on the improvement of its products, the design and technical
specifications are subject to change without prior notice.
www.unit.ru
ENGLISH
18
UAB-816 Instr 11/17/08 1:04 PM Page 18

ХЛЕБОПЕЧЬ UAB – 816
Благодарим Вас за покупку изделия фирмы UNIT!
Внимание! При покупке изделия фирмы UNIT Вы должны получить от продавца заполненный
гарантийный талон. Только при его наличии Вы сможете воспользоваться гарантией
производителя во всех сервисных центрах бытовой техники UNIT.
ПЕРЕД ИСПОЛЬЗОВАНИЕМ ПРИБОРА ВНИМАТЕЛЬНО ПРОЧИТАЙТЕ ВСЮ ИНСТРУКЦИЮ И
СОХРАНИТЕ ЕЕ НА ВЕСЬ СРОК ЭКСПЛУАТАЦИИ.
НАЗНАЧЕНИЕ ПРИБОРА
Хлебопечь UAB-816 предназначена для выпекания хлеба, замеса теста и приготовления
джема/варенья в домашних условиях.
СОДЕРЖАНИЕ ИНСТРУКЦИИ ПО ЭКСПЛУАТАЦИИ
ОСНОВНЫЕ МЕРЫ БЕЗОПАСНОСТИ . . . . . . . . . . . . . . . . . . . . . . . . . . . . . . . . . . . . . . . . . . . . . . . . .19
ОПИСАНИЕ ПРИБОРА . . . . . . . . . . . . . . . . . . . . . . . . . . . . . . . . . . . . . . . . . . . . . . . . . . . . . . . . . . . . .21
ПОДГОТОВКА К ЭКСПЛУАТАЦИИ . . . . . . . . . . . . . . . . . . . . . . . . . . . . . . . . . . . . . . . . . . . . . . . . . . . .22
ЭКСПЛУАТАЦИЯ ПРИБОРА . . . . . . . . . . . . . . . . . . . . . . . . . . . . . . . . . . . . . . . . . . . . . . . . . . . . . . . . .22
ФУНКЦИИ ХЛЕБОПЕЧКИ . . . . . . . . . . . . . . . . . . . . . . . . . . . . . . . . . . . . . . . . . . . . . . . . . . . . . . . . . . .22
ПРАКТИЧЕСКИЕ СОВЕТЫ . . . . . . . . . . . . . . . . . . . . . . . . . . . . . . . . . . . . . . . . . . . . . . . . . . . . . . . . . .28
РЕЦЕПТЫ . . . . . . . . . . . . . . . . . . . . . . . . . . . . . . . . . . . . . . . . . . . . . . . . . . . . . . . . . . . . . . . . . . . . . . . .43
УХОД И ЧИСТКА . . . . . . . . . . . . . . . . . . . . . . . . . . . . . . . . . . . . . . . . . . . . . . . . . . . . . . . . . . . . . . . . . .49
ОСНОВНЫЕ ТЕХНИЧЕСКИЕ ХАРАКТЕРИСТИКИ . . . . . . . . . . . . . . . . . . . . . . . . . . . . . . . . . . . . . . . .50
ОСНОВНЫЕ МЕРЫ БЕЗОПАСНОСТИ
Когда Вы используете электроприбор, для того чтобы предотвратить возникновение пожара,
удара электрическим током и/или какого-либо другого повреждения, всегда соблюдайте меры
безопасности, включая следующие:
• Для безопасности Вашей и окружающих помните, что любой контакт электроприборов с водой
опасен! Запрещается использование прибора в местах повышенной влажности и там, где он
может случайно упасть в воду, например, около раковины. Не касайтесь прибора влажными
руками!
• Будьте особенно внимательны при эксплуатации прибора в присутствии детей и инвалидов.
Запрещается эксплуатация прибора детьми. Храните прибор в местах недоступных для детей.
Не разрешайте детям играть с прибором.
• Никогда не оставляйте включенный в электросеть прибор без присмотра, особенно когда Вы
используете его в первый раз.
• Всегда отключайте прибор от электросети по окончании эксплуатации и перед чисткой.
Отсоединяя прибор от электросети, держитесь за вилку, а не за Сетевой шнур (13).
Категорически запрещается перемещать или переносить прибор, удерживая его за Сетевой
шнур (13).
• Запрещается использование электроприбора с видимыми механическими повреждениями (в т.
ч. Сетевого шнура (13) или вилки), а также после его падения или какого-либо другого
повреждения. В этом случае обратитесь в сервисный центр UNIT для осмотра или ремонта
прибора. Если Вы заметили какие-либо неполадки в работе прибора, немедленно отключите
его от электросети и обратитесь в авторизованный сервисный центр UNIT.
• Располагайте Сетевой шнур (13) таким образом, чтобы он не касался прибора и не свешивался
с края рабочей поверхности. Располагайте Сетевой шнур (13) на достаточном расстоянии от
источников тепла. При эксплуатации прибора следите за тем, чтобы дети не могли дотянуться
до Сетевого шнура (13).
• Сетевой шнур (13) не следует дергать, перекручивать или тянуть.
• Не размещайте прибор рядом с источниками тепла, такими как отопительные приборы,
газовые и электрические плиты. Не следует размещать прибор на горячей поверхности или над
открытым пламенем.
RUSSIAN
19
UAB-816 Instr 11/17/08 1:04 PM Page 19

• Прибор предназначен только для бытового использования. Запрещается использование
прибора в коммерческих целях. Запрещается эксплуатация прибора вне помещения.
• Используйте прибор только так, как описано в данной инструкции по эксплуатации. Любое
другое использование, не рекомендованное фирмой-изготовителем, а также несоблюдение
рекомендаций, содержащихся в данной инструкции по эксплуатации, может привести к
пожару, удару электрическим током или травмам окружающих.
• Если Вы заметили какие-либо неполадки в работе прибора, немедленно отключите его от
электросети и обратитесь в авторизованный сервисный центр UNIT. Категорически запрещается
самостоятельно разбирать прибор!!! Не пытайтесь самостоятельно починить прибор, так как это
может привести к пожару, удару электрическим током или несчастному случаю.
• Использование устройств, приспособлений и аксессуаров, не входящих в комплектацию
данного прибора, может привести к пожару, удару электрическим током или несчастному
случаю. Используйте только приспособления и аксессуары, поставляемые вместе с прибором.
В противном случае Вы утрачиваете право на гарантию и гарантийное обслуживание.
• Не дотрагивайтесь до горячих поверхностей прибора. Перед тем как приступить к чистке
прибора, отключите его от электросети и дождитесь его полного остывания. Для того чтобы
извлечь Контейнер (2) с горячим хлебом из хлебопечи, используйте прихватку.
• Запрещается эксплуатация и хранение прибора вблизи легковоспламеняющихся материалов и
веществ. Запрещается эксплуатация прибора в местах использования или хранения бензина,
горючих лакокрасочных материалов и других легковоспламеняющихся жидкостей.
• Размещайте прибор на ровной и устойчивой поверхности. Помните, что данный прибор не
является встраиваемой бытовой техникой. Эксплуатация данного прибора разрешается только
при отсутствии контакта корпуса прибора с какими-либо поверхностями и предметами.
• Размещайте прибор на термостойкой поверхности. Нельзя ставить хлебопечь на пластиковую,
виниловую и деревянную поверхности, поскольку это может привести к их возгоранию.
• При эксплуатации хлебопечи ставьте ее в центр стола или рабочей поверхности, оставляя со
всех сторон свободное пространство как минимум 50 см.
• Располагайте прибор на достаточном расстоянии от мебели, штор и других легковоспла-
меняющихся предметов. Не ставьте работающий прибор на полку или стеллаж, а также возле
стен, обитых легковоспламеняющимися материалами.
• Не используйте для чистки прибора абразивные очистители и агрессивные моющие вещества.
Не используйте для чистки прибора (в т. ч. Пекарной камеры (1)) средства для чистки духовок.
• При несоблюдении рекомендаций, описанных в данной инструкции по эксплуатации, Вы
утрачиваете право на гарантию и гарантийное обслуживание в сервисных центрах UNIT.
• Не загораживайте вентиляционные решетки прибора, не помещайте вблизи них какие-либо
предметы. Периодически очищайте вентиляционные решетки от скопившейся пыли.
• Перед подключением прибора убедитесь, что напряжение электросети в Вашем доме
соответствует тому, которое указано на приборе (230 В, 50 Гц).
• Не используйте удлинитель при эксплуатации прибора.
• Прибор разрешается перемещать только после его полного остывания.
• Избегайте попадания ингредиентов внутрь Пекарной камеры (1), так как ингредиенты могут
попасть на нагревательный элемент прибора, что может привести к их возгоранию.
• Категорически запрещается прикасаться к движущимся Ножам для замешивания теста (3).
• Запрещается использование прибора при отсутствии ингредиентов в Контейнере для выпечки
хлеба (2), так как это может привести к повреждению прибора.
• Не используйте Пекарную камеру (1) и Контейнер для выпечки (2) для хранения продуктов.
• Не загораживайте отверстия для выхода пара, расположенные в Крышке (7) прибора.
• Не открывайте Крышку (7) прибора в процессе замеса теста, так как это может привести к
оседанию теста.
• Не вынимайте Контейнер для выпечки (2) во время работы прибора.
СОХРАНИТЕ ЭТУ ИНСТРУКЦИЮ НА ВЕСЬ СРОК ЭКСПЛУАТАЦИИ ПРИБОРА.
RUSSIAN
20
UAB-816 Instr 11/17/08 1:04 PM Page 20
Table of contents
Languages:
Other Unit Bread Maker manuals