Princess TYPE 1935 User manual

TYPE 1935
Gebruiksaanwijzing
Instructions for use
Mode d’emploi
Anleitung
Instrucciones de Uso
Istruzioni d’uso
Bruksanvisning
Brugsanvisning
Bruksanvisning
Käyttöohje
Instruções de utilização
Οδηγίες χρήσεως
SILVER BREADMAKER

2

Gebruiksaanwijzing . . . . . . . . . . . . . . . . . . . . . . . . . . . . . . . . . . 4
Instructions for use . . . . . . . . . . . . . . . . . . . . . . . . . . . . . . . . . 12
Mode d’emploi . . . . . . . . . . . . . . . . . . . . . . . . . . . . . . . . . . . . . . 21
Anleitung . . . . . . . . . . . . . . . . . . . . . . . . . . . . . . . . . . . . . . . . . . . . 30
Instrucciones de Uso . . . . . . . . . . . . . . . . . . . . . . . . . . . . . . . . 39
Istruzioni d’uso . . . . . . . . . . . . . . . . . . . . . . . . . . . . . . . . . . . . . . 48
Bruksanvisning . . . . . . . . . . . . . . . . . . . . . . . . . . . . . . . . . . . . . . 57
Brugsanvisning . . . . . . . . . . . . . . . . . . . . . . . . . . . . . . . . . . . . . . 65
Bruksanvisning . . . . . . . . . . . . . . . . . . . . . . . . . . . . . . . . . . . . . . 74
Käyttöohje . . . . . . . . . . . . . . . . . . . . . . . . . . . . . . . . . . . . . . . . . . . 83
Instruções de utilização . . . . . . . . . . . . . . . . . . . . . . . . . . . . 92
Οδηγίες χρήσεως . . . . . . . . . . . . . . . . . . . . . . . . . . . . . . 101
GARANTIEKAART/GUARANTEE CARD/CARTE DE GARANTIE/ GARANTIEKARTE
CERTIFICADO DI GARANTÍA/CARTOLINA DI GARANZIA/GARANTIKORT/
GARANTIBEVIS/GARANTIKORT/TAKUUTODISTUS . . . . . . . . . . . . . . . . . . . . 113-114
AUGUSTUS 2004
NL
UK
F
D
E
I
S
DK
N
SF
P
GR

4
PRINCESS SILVER BREADMAKER ART. 1935
Lees deze gebruiksaanwijzing eerst geheel door en bewaar de gebruiksaanwijzing om later nog eens te
kunnen raadplegen. Controleer of de netspanning in uw woning overeenkomt met die van het apparaat.
Sluit dit apparaat alleen op een geaard stopcontact aan.
Deze volautomatische broodbakmachine mengt en kneedt het deeg, bakt het brood en schakelt vervolgens
over op de warmhoudfunctie (om het brood lekker knapperig vers te houden). Altijd vers brood naar eigen
smaak. Ook ideaal voor speciale diëten. De kleur van de korst is instelbaar op licht, medium en donker.
Deze broodbakmachine heeft een afneembaar deksel zodat het bakblik gemakkelijk bereikbaar is.
Deze unieke broodbakmachine is voorzien van 9 vaste digitale programma’s, timer (wakker worden met
de geur van vers brood), groot LCD-scherm, uitneembaar bakblik met antiaanbaklaag en 2 kneedhaken
voor een optimaal resultaat. Maatbeker en maatlepel zijn bijgeleverd.
Tevens voorzien van een ‘vrij programmeerbare functie’, hierin kan men zelf de diverse programmastappen,
zoals kneden, rijzen en bakken, instellen, ideaal om uw eigen recept in te stellen.
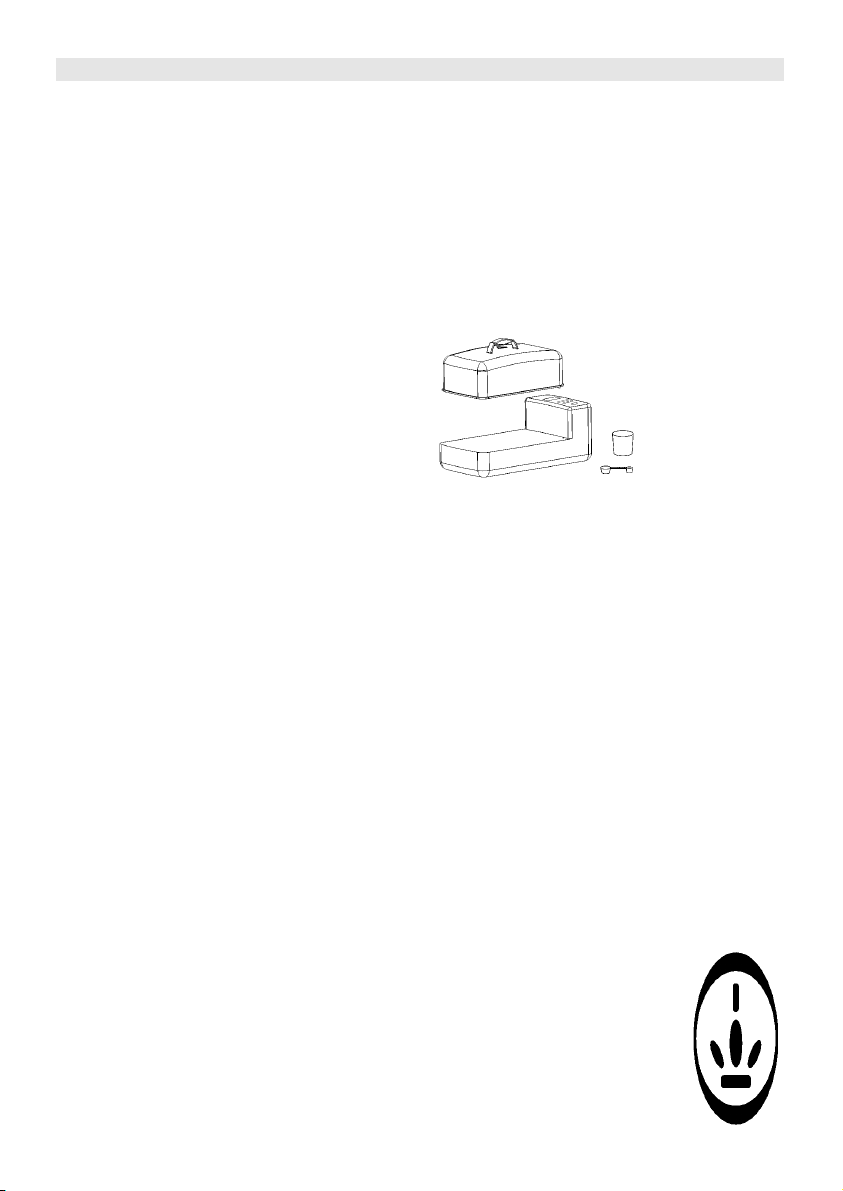
ONDERDELEN BROODBAKMACHINE
1) deksel
2) bedieningspaneel
3) bakblik
4) behuizing onderkant
5) voetjes
GEBRUIK VAN DE BROODBAKMACHINE
Plaats de machine op een stevig, vlak en niet-brandbaar oppervlak (dus niet op een plastic tafelkleed) en
niet dichtbij een oven of fornuis en dergelijke. Houd tussen de machine en de muren tenminste 5 cm
afstand. Plaats de machine ook niet op een vochtige plaats en gebruik de machine niet buiten. Tijdens
gebruik wordt de machine warm, dus pak alleen de handgrepen vast en houd kinderen uit de buurt. Om
het hete bakblik uit de machine te pakken, bevelen wij aan om pannenlappen of ovenwanten te gebruiken.
Gebruik geen metalen (mes e.d.) in het bakblik, dit zal de antiaanbaklaag beschadigen. Pak de machine
altijd met droge handen vast.
Voor het eerste gebruik het bakblik en de kneedarm zorgvuldig wassen in warm water met wat afwasmiddel,
naspoelen en afdrogen. Tijdens het eerste gebruik kan er wat rookontwikkeling ontstaan. Dit is bij nieuwe
verwarmingselementen normaal en zal na korte tijd vanzelf verdwijnen.
Zorg dat de deksel juist op het apparaat is geplaatst! Als dit niet het geval is, wordt er in het display
een melding gegeven (knipperend het woord ‘LID’). Zodra men de deksel juist op het apparaat
terugplaatst zal het apparaat weer verder gaan.
KORTE STAPPEN-BESCHRIJVING
Onderstaande tekst geeft het gehele proces kort weer in verschillende stappen. Gebruikte termen worden
later in de gebruiksaanwijzing toegelicht.
- Neem het bakblik uit de broodbakmachine en plaats de 2 kneedarmen naar elkaar toe gericht op de
assen in het bakblik.
- Weeg de ingrediënten af volgens recept en doe ze in het bakblik. Eerst het meel. Doe de gist in een
kuiltje bovenop het meel. Dan het zout in de ene hoek, de boter of olie in een andere hoek evenals de
suiker. Giet water of melk langs de randen (de gist mag nooit rechtstreeks in contact komen met het
water, het zout en de boter of de olie. Dit is vooral belangrijk wanneer u de baktijd instelt met de
‘Timer’-toets).
- Plaats het bakblik in de broodbakmachine en druk het stevig aan. Het bakblik wordt nu
stevig vastgehouden door de klemhaakjes.
- Sluit het deksel en steek de stekker in het stopcontact. Nu verschijnt er 3:45 op het display.
- Selecteer het gewenste programma met de ‘SELECT COURSE’-toets.
- Selecteer met de ‘CRUST CONTROL’-toets de gewenste bruiningsgraad (light, medium
of dark). Dit is mogelijk bij de programma’s 1, 4, 8 en 10.
- Mocht u gebruik willen maken van de TIMER-functie, dan kunt u deze nu instellen
(alleen mogelijk bij programma 1,2,3,9 & 10).
- Druk op de ‘START’-knop.

5
- Na het 1ste signaal kunnen er eventueel extra ingrediënten voor de vulling worden toegevoegd (zie
recepten achterin deze gebruiksaanwijzing)
- Het 2de piepsignaal geeft aan dat het bakproces is beëindigd.
- PAS OP! De bakvorm en het brood zijn heet! Gebruik ovenwanten als u het bakblik uit de broodbak-
machine haalt en het brood uit het bakblik verwijdert. Laat het brood afkoelen op een rooster.
- LET OP: Het kan zijn dat de kneedarmen in het brood zijn achtergebleven. Als dit het geval is, kunnen
ze er voorzichtig worden uitgenomen. Let wel op dat deze kneedarmen heet zijn!
- Wanneer u nog een brood wilt bakken, dient u een aantal minuten te wachten totdat de machine
voldoende is afgekoeld. De broodbakmachine laat een pieptoon horen en er verschijnt ‘HOT’ in het
display als deze nog niet voldoende afgekoeld is.
- Schakel na het bakken het apparaat uit en haal de stekker uit het stopcontact.
- Het vers gebakken brood snijdt u het gemakkelijkst met het elektrisch mes van Princess (art. 2952)
BEDIENINGSPANEEL
Met de start- / resetknop kunt u de broodbakmachine in- en uitschakelen.
Inschakelen : Druk op de start- / resettoets.
Uitschakelen: 3 tot 5 tellen de start-/resettoets ingedrukt houden.
LET OP: Als u tijdens het bakproces de broodbakmachine uitschakelt wordt het programma niet
afgemaakt, maar begint het programma opnieuw.
SELECT COURSE
Menu select Aanduiding Omschrijving Tijdsduur (met medium
bedieningspaneel bruiningsgraad)
1 Basic Basis 3:45
2 Basic wheat Basis tarwe 3:55
3 Basic dough Basis deeg 2:05
4 Quick Snel 2:08
5 Quick wheat Snel tarwe 2:28
6 Quick dough Snel deeg 0:45
7 Jam Jam 1:20
8 Cake Cake 2:00
9 Sandwich Sandwich 3:35
10 Home made Zelfgemaakt recept instelbaar
• Basic
Voor het bereiden van wit en gemengd brood. Dit programma wordt het meest gebruikt. De
broodbakmachine kneedt het deeg 3 keer. Na de 1e maal kneden hoort u een pieptoon. Na deze
pieptoon kunt u de extra ingrediënten toevoegen. Het complete programma duurt 3 uur en 45 minuten.
• Basic Wheat
Voor het bereiden van volkoren tarwebrood. De broodbakmachine kneedt 2 keer, het deeg rijst en bakt
langer. Het programma duurt 3 uur en 55 minuten.
• Basic dough
Met deze werkwijze kunt u deeg kneden voor onder andere broodjes of pizza’s, of elk ander recept waar u
deeg voor nodig heeft. Ook kan op deze stand jam geroerd worden.
Het programma duurt 2 uur en 05 minuten.
• Quick (veel gebruikt programma)
Voor het bereiden van wit en gemengd brood. De broodbakmachine kneedt het deeg 2 keer
en piept voordat de tweede kneedbeurt begint. U kunt nu de extra ingrediënten toevoegen.
Het rijzen van het deeg wordt verkort en het bakken kost dan minder tijd. Het programma
duurt 2 uur en 08 minuten.
• Quick Wheat
Voor het bereiden van Frans witbrood. Het deeg wordt 2 keer gekneed, de rijstijd wordt
verlengd evenals de baktijd. Hierdoor ontstaat een dikkere korst. Het programma duurt 2
uur en 28 minuten. Dit programma kan overigens ook gebruikt worden voor andere
broodsoorten.

6
• Quick dough
Voor het bereiden van deeg. De broodbakmachine kneedt alleen het deeg.
Het programma duurt 45 minuten.
• Jam
Een programma om jam mee te maken. Het programma duurt 1 uur en 20 minuten.
• Cake
Voor het bereiden van heerlijke cake. De broodbakmachine kneedt 2 keer. Het programma duurt 2 uur.
• Sandwich
Het programma duurt 3 uur en 35 minuten.
• Home made
Hier kunt u zelf de machine instellen. U moet dan het hele programma doorlopen: kneden, rijzen,
kneden, bakken, enz. Bij deze functie kunt u de toetsen ‘CYCLE’ en ‘TIME’ gebruiken.
CRUST CONTROL
Door de toets ‘crust control’ in te drukken kunt u een keuze maken voor de bruiningsgraad van de korst.
- Light
- Medium
- Dark
Bij de tijden aangegeven in het overzicht is uitgegaan van de medium bruiningsgraad van de korst. Als u
een andere bruiningsgraad wenst dan zal de tijd zich aanpassen! Deze functie kan gebruikt worden bij de
programma’s 1, 4, 8 en 10.
TIMER-functie
Met de timer kunt u de broodbakmachine een paar uur later automatisch laten inschakelen. Zo kunt u
bijvoorbeeld de broodbakmachine 's nachts laten beginnen. Deze functie kan gebruikt worden bij de
programma’s 1, 2, 3, 9 en 10.
Voorbeeld:
Doe alle ingrediënten in de broodvorm, zorg ervoor dat de gist niet in aanraking komt met de vloeistof,
het zout en de boter.
Kies met de menutoets het gewenste programma en eventueel met de toets ‘CRUST CONTROL’ de
gewenste bruining.
Het is 22.00 uur en u wilt de volgende morgen om 7.15 uw verse broodje uit de broodbakmachine halen.
Het verschil tussen deze twee tijdstippen bedraagt 9:15 uur. Men moet de timer dus instellen op 9:15.
LOAF SIZE
Met deze functie kunt u het volume van het deeg bepalen.
1.5 lb staat voor 1,5 pound (is geschikt voor het bakken van brood van 600 gram).
2.0 lb staat voor 2,0 pound (is geschikt voor het bakken van brood van 800/900 gram).
Deze functie kunt u alleen bij de programma’s 1, 2 en 9 gebruiken.
PRE-HEATFUNCTIE
Deze broodbakmachine wordt eerst gedurende een aantal minuten (=standaard) voorverwarmd.
Variërend van 5 minuten tot 40 minuten. Op het display verschijnt nu de tekst ‘pre-heat’.
STORINGEN
Wanneer er een stroomstoring optreedt tijdens het proces, wordt schakelt de broodbakma-
chine weer automatisch ingeschakeld wanneer de onderbreking korter is dan 30 minuten.
Het programma gaat verder op het punt waar het gestopt is. Bij een langere onderbreking
dan 30 minuten zal de machine niet verder gaan met het proces en dient u de machine
opnieuw te starten.

7
OPMERKINGEN BETREFFENDE DE RECEPTEN
Om altijd een optimaal resultaat te bereiken, dient u zich te houden aan de verhoudingen tussen de
ingrediënten.
Gebruik de bijgevoegde maatbeker en maatlepel, of gebruik een weegschaal.
De maatbeker is 250 ml. Let op dat het water niet te koud is, de beste temperatuur is handwarm (28° à
30°C).
De grote maatlepel is 15 ml en gelijk aan een eetlepel. De kleine maatlepel is 5 ml en gelijk aan een
theelepel.
In elk recept staat verse gist en gedroogde gist vermeld, waar men een keuze uit dient te maken.
Mogelijke problemen bij het brood bakken
Het brood rijst niet:
* oud gist
* te weinig water
* te veel zout
* verkeerde hoeveelheden
* doe de gist onder de bloem, zodat deze niet in contact kan komen met zout, boter of vloeistof.
Het brood rijst te hoog:
* minder gist gebruiken
* minder water gebruiken
* meer zout gebruiken.
Het brood lijkt op een “krater”:
* te veel water gebruikt
* gebruik 2 eetlepels meer bloem
* het brood is te lang in de bakvorm blijven zitten.
Het brood is te zwaar:
* gebruik 2 eetlepels meer water.
In het brood zitten gaten:
* gebruik 2 eetlepels minder water
* gebruik iets minder gist
* gebruik meer zout.
SCHOONMAKEN EN ONDERHOUD
Reinig de broodbakmachine voor het eerste gebruik altijd met een zacht schoonmaakmiddel en reinig
eveneens de kneedarmen. Laat het apparaat altijd eerst afkoelen, voordat u het reinigt en opbergt. Na
ongeveer een half uur is het apparaat zo ver afgekoeld dat u het opnieuw kunt gebruiken om te bakken of
deeg te bereiden.
Verwijder voor het reinigen altijd de stekker uit de wandcontactdoos en laat het apparaat afkoelen.
Gebruik nooit agressieve reinigingsmiddelen, zoals chemische cleaners, ovenreiniger enz.
Verwijder alle ingrediënten en kruimels van het deksel, de behuizing en het bakblik met een vochtige
doek.
Dompel de broodbakmachine nooit onder in water en vul het apparaat nooit met water.
Reinig de behuizing aan binnen- en buitenzijde met een vochtige doek. Reinig en droog het apparaat
altijd zorgvuldig na ieder gebruik. De kneedarmen en de assen moeten na ieder gebruik
onmiddellijk gereinigd worden.
Als de kneedarmen in het bakblik blijven zitten na het gebruik, kunnen deze later moeilijk
verwijderd worden. Vul in dit geval het bakblik met warm water, laat het water gedurende
30 minuten in het bakblik en verwijder dan de kneedarm om die te kunnen reinigen. Het
bakblik en de kneedarmen zijn met een antikleeflaag bedekt; gebruik daarom nooit metalen
keukengereedschap dat het oppervlak zou kunnen beschadigen. Het is normaal dat de kleur
van de antikleeflaag dof wordt na een aantal keren bakken. Dit verandert echter niets aan
de werking. Overtuig u voor het wegzetten van het apparaat ervan dat het volledig is
afgekoeld, gereinigd en gedroogd. Berg het apparaat altijd met een gesloten deksel op.

8
PROGRAMMA 10 ‘Home Made’
Omschrijving Standaard Kan op de minuut ingesteld worden van
Preheat 22 min Off - 30 min
Knead 1 20 min Off - 25 min
Rise 1 45 min Off - 120 min
Knead 2 Off - 15 min
Rise 2 85 min Off - 120 min
Rise 3 off Off - 120 min
Bake 60 min Off - 60 min
Keep warm 60 min Off / 60 min
Druk "SELECT COURSE" een aantal keren totdat u programma 10 in beeld heeft.
Druk op "CYCLE" totdat "preheat" verschijnt in het display, samen met een getal dat de tijd hiervan
weergeeft.
Druk op "TIME" totdat u de gewenste tijd heeft en bevestig met een druk op "CYCLE".
Door nogmaals op "CYCLE" te drukken, gaat u naar de volgende stap in broodbewerking en drukt u op
“TIME” indien u dit wilt aanpassen.
Doe dit totdat alle tijden naar uw keuze zijn ingesteld en druk op “START/RESET” om de totaaltijd te
zien.
Indien u het programma wilt uitstellen, drukt u op de “TIMER” totdat de gewenste totaaltijd aangegeven
wordt.
Druk nogmaals op “START/RESET” om de broodbakmachine te starten.
(Indien u “START/RESET” nogmaals ingedrukt houdt, wordt het door u ingestelde gereset.)
CONVERSIETABEL
1 theelepel 4 gram 5 ml 1/30 cup
1 eetlepel 12 gram 15 ml 1/10 cup
ENKELE BROODRECEPTEN
PRINCESS-brood
Programma: Basic
Recept voor: 600 gram 600 gram 800 gram 800 gram
Witte bloem 350gram 2 9/10 cup 500 gram 4 1/5 cup
Water210 ml 210 ml 300 ml 300 ml
Margarine 5 gram 1 1/2 theelepel 10 gram 2 1/2 theelepel
Suiker 5 gram 1 1/2 theelepel 10 gram 2 1/2 theelepel
Zout5 gram 1 1/2 theelepel 10 gram 2 1/2 theelepel
Verse gist of 10 gram 2 1/2 theelepel 15 gram 3 1/2 theelepel
gedroogde gist 4 gram 1 theelepel 6 gram 1 1/2 theelepel
Venkel 1/2 theelepel 1/2 theelepel 1 theelepel 1 theelepel
Anijs 1/2 theelepel 1/2 theelepel 1 theelepel 1 theelepel
(beleggen met kaas, ham of jam)
Favoriet brood van de PRINCESS-bakker
Programma: Basic
Recept voor: 600 gram 600 gram 800 gram 800 gram
Witte bloem 320 gram 2 7/10 cup 450 gram 3 1/2 cup
Water of melk 215 ml 215 ml 300 ml 300 ml
Roomboter 5 gram 1 1/2 theelepel 10 gram 2 1/2 theelepel
Suiker 5 gram 1 1/2 theelepel 10 gram 2 1/2 theelepel
Zout 5 gram 1 1/2 theelepel 10 gram 2 1/2 theelepel
Verse gist of 20 gram 5 theelepel 25 gram 2 eetlepel
gedroogde gist 5 gram 1 1/2 theelepel 10 gram 2 1/2 theelepel
Eierdooier 1 stuks 1 2 stuks 2
Kaneel 10 gram 2 1/2 theelepel 10 gram 2 1/2 theelepel

9
Vulling:
Geraspte appel 150 gram 150 gram 250 gram 250 gram
Witbrood
Programma: Basic
Recept voor: 600 gram 600 gram 800 gram 800 gram
Witte bloem 350 gram 350 gram 500 gram 500 gram
Water 210 ml 210 ml 300 ml 300 ml
Margarine 5 gram 1 1/2 theelepel 15 gram 3 1/2 theelepel
Suiker 5 gram 1 1/2 theelepel 10 gram 2 1/2 theelepel
Zout 5 gram 1 1/2 theelepel 10 gram 2 1/2 theelepel
Verse gist of 10 gram 2 1/2 theelepel 15 gram 3 1/2 theelepel
Gedroogde gist 4 gram 1 theelepel 6 gram 1 1/2 theelepel
Melkbrood
Programma: Basic
Recept voor: 600 gram 600 gram 800 gram 800 gram
Witte bloem 350 gram 350 gram 500 gram 500 gram
Melk 210 ml 210 ml 300 ml 300 ml
Margarine 5 gram 1 1/2 theelepel 10 gram 2 1/2 theelepel
Suiker 5 gram 1 1/2 theelepel 10 gram 2 1/2 theelepel
Zout 5 gram 1 1/2 theelepel 10 gram 2 1/2 theelepel
Verse gist of 10 gram 2 1/2 theelepel 15 gram 3 1/2 theelepel
gedroogde gist 4 gram 1 theelepel 6 gram 1 1/2 theelepel
Witroombrood
Programma: Basic
Recept voor: 600 gram 600 gram 800 gram 800 gram
Witte bloem 350 gram 350 gram 500 gram 500 gram
Melk 210 ml 210 ml 300 ml 300 ml
Roomboter 5 gram 1 1/2 theelepel 10 gram 2 1/2 theelepel
Basterdsuiker 5 gram 1 1/2 theelepel 10 gram 2 1/2 theelepel
Zout 5 gram 1 1/2 theelepel 10 gram 2 1/2 theelepel
Verse gist of 10 gram 2 1/2 theelepel 15 gram 3 1/2 theelepel
gedroogde gist 4 gram 1 theelepel 6 gram 1 1/2 theelepel
Tarwebrood
Programma: Basic
Recept voor: 600 gram 600 gram 800 gram 800 gram
Volkoren meel 200 gram 200 gram 300 gram 300 gram
Witte bloem 150 gram 150 gram 200 gram 200 gram
Water 230 ml 230 ml 320 ml 320 ml
Margarine 5 gram 1 1/2 theelepel 10 gram 2 1/2 theelepel
Suiker 5 gram 1 1/2 theelepel 10 gram 2 1/2 theelepel
Zout 5 gram 1 1/2 theelepel 10 gram 2 1/2 theelepel
Verse gist of 10 gram 2 1/2 theelepel 15 gram 3 1/2 theelepel
gedroogde gist 4 gram 1 theelepel 6 gram 1 1/2 theelepel
Volkorenbrood
Programma: Basic
Recept voor: 600 gram 600 gram 800 gram 800 gram
Volkorenmeel 350 gram 350 gram 500 gram 500 gram
Water 225 ml 225 ml 325 ml 325 ml
Margarine 5 gram 1 1/2 theelepel 10 gram 2 1/2 theelepel
Suiker 5 gram 1 1/2 theelepel 10 gram 2 1/2 theelepel
Zout 5 gram 1 1/2 theelepel 10 gram 2 1/2 theelepel
Verse gist of 10 gram 2 1/2 theelepel 15 gram 3 1/2 theelepel
gedroogde gist 4 gram 1 theelepel 6 gram 1 1/2 theelepel

10
Eierbrood
Programma: Basic
Recept voor: 600 gram 600 gram 800 gram 800 gram
Witte bloem 350 gram 350 gram 500 gram 500 gram
Water 200 ml 200 ml 275 ml 275 ml
Margarine 5 gram 1 1/2 theelepel 10 gram 2 1/2 theelepel
Suiker 5 gram 1 1/2 theelepel 10 gram 2 1/2 theelepel
Zout 5 gram 1 1/2 theelepel 10 gram 2 1/2 theelepel
Verse gist of 10 gram 2 1/2 theelepel 15 gram 3 1/2 theelepel
gedroogde gist 4 gram 1 theelepel 6 gram 1 1/2 theelepel
Eierdooier 1 stuks 1 2 stuks 2
Jagersbrood
Programma: Basic
Recept voor: 600 gram 600 gram 800 gram 800 gram
Jagersbloem 350 gram 350 gram 500 gram 500 gram
Water 225 ml 225 ml 325 ml 325 ml
Margarine 5 gram 1 1/2 theelepel 10 gram 2 1/2 theelepel
Suiker 5 gram 1 1/2 theelepel 10 gram 2 1/2 theelepel
Zout 5 gram 1 1/2 theelepel 10 gram 2 1/2 theelepel
Verse gist of 10 gram 2 1/2 theelepel 15 gram 3 1/2 theelepel
gedroogde gist 4 gram 1 theelepel 6 gram 1 1/2 theelepel
Zemelenbrood
Programma: Basic
Recept voor: 600 gram 600 gram 800 gram 800 gram
Volkorenmeel 300 gram 300 gram 450 gram 450 gram
Tarwezemelen 30 gram 1/2 cup 50 gram 1/2 cup
Water 250 ml 250 ml 375 ml 375 ml
Margarine 5 gram 1 1/2 theelepel 10 gram 2 1/2 theelepel
Suiker 5 gram 1 1/2 theelepel 10 gram 2 1/2 theelepel
Zout 5 gram 1 1/2 theelepel 10 gram 2 1/2 theelepel
Verse gist of 15 gram 3 1/2 theelepel 20 gram 1 2/3 eetlepel
gedroogde gist 5 gram 1 1/2 theelepel 8 gram 2 theelepel
Zaadjesbrood
Programma: Basic
Recept voor: 600 gram 600 gram 800 gram 800 gram
Volroggemeel 150 gram 150 gram 225 gram 225 gram
Witte bloem 150 gram 150 gram 225 gram 225 gram
Water 225 ml 225 ml 325 ml 325 ml
Margarine 5 gram 1 1/2 theelepel 10 gram 2 1/2 theelepel
Suiker 5 gram 1 1/2 theelepel 10 gram 2 1/2 theelepel
Zout 5 gram 1 1/2 theelepel 10 gram 2 1/2 theelepel
Verse gist of 10 gram 2 1/2 theelepel 15 gram 3 1/2 theelepel
gedroogde gist 4 gram 1 theelepel 6 gram 1 1/2 theelepel
Azijn 1 1/2 theelepel 1 1/2 theelepel 3 theelepel 3 theelepel
Lijnzaad 50 gram 1/2 cup 60 gram 60 gram
Komijn 1/2 theelepel 1/2 theelepel 1 theelepel 1 theelepel
Rozijnenbrood
Programma: Basic
Recept voor: 600 gram 600 gram 800 gram 800 gram
Witte bloem 320 gram 320 gram 450 gram 450 gram
Water 190 ml 190 ml 270 ml 270 ml
Roomboter 5 gram 1 1/2 theelepel 10 gram 2 1/2 theelepel
Suiker 5 gram 1 1/2 theelepel 10 gram 2 1/2 theelepel
Zout 5 gram 1 1/2 theelepel 10 gram 2 1/2 theelepel
Verse gist of 20 gram 5 theelepel 25 gram 2 eetlepel
gedroogde gist 6 gram 1 1/2 theelepel 10 gram 2 1/2 theelepel

11
Vulling:
Rozijnen 200 gram 1 2/3 cup 250 gram 2 cups
Krenten 100 gram 4/5 cup 100 gram 4/5 cup
Mueslibrood
Programma: Basic
Recept voor: 600 gram 600 gram 800 gram 800 gram
Volkorenmeel 200 gram 200 gram 250 gram 250 gram
Witte bloem 120 gram 120 gram 200 gram 200 gram
Water 215 ml 215 ml 300 ml 300 ml
Margarine 5 gram 1 1/2 theelepel 10 gram 2 1/2 theelepel
Suiker 5 gram 1 1/2 theelepel 10 gram 2 1/2 theelepel
Zout 5 gram 1 1/2 theelepel 10 gram 2 1/2 theelepel
Verse gist of 20 gram 5 theelepel 25 gram 2 eetlepel
gedroogde gist 5 gram 1 1/2 theelepel 10 gram 2 1/2 theelepel
Vulling:
Rozijnen 100 gram 1 1/2 cup 200 gram 1 2/3 cup
Muesli 100 gram 1 1/2 cup 150 gram 1 1/2 cup
Spekbrood
Programma: Basic
Recept voor: 600 gram 600 gram 800 gram 800 gram
Volkorenmeel 200 gram 1 2/3 cup 300 gram 2 1/2 cup
Witte bloem 150 gram 1 1/2 cup 200 gram 1 2/3 cup
Water 210 ml 210 ml 300 ml 300 ml
Margarine 5 gram 1 1/2 theelepel 10 gram 2 1/2 theelepel
Suiker 5 gram 1 1/2 theelepel 10 gram 2 1/2 theelepel
Zout 5 gram 1 1/2 theelepel 10 gram 2 1/2 theelepel
Verse gist of 10 gram 2 1/2 theelepel 15 gram 3 1/2 theelepel
gedroogde gist 4 gram 1 theelepel 6 gram 1 1/2 theelepel
Vulling:
Gekookt spek 75 gram 2/3 cup 100 gram 4/5 cup
Sjalotje 1/2 1/2 1 1
Meergranenbrood
Programma: Basic
Recept voor: 600 gram 600 gram 800 gram 800 gram
Meergranenmeel 350 gram 2 9/10 cup 500 gram 4 1/8 cup
Verse gist of 10 gram 2 1/2 theelepel 15 gram 3 1/2 theelepel
Gedroogde gist 4 gram 1 theelepel 6 gram 1 1/2 theelepel
Zout 5 gram 1 1/2 theelepel 10 gram 2 1/2 theelepel
Suiker 5 gram 1 1/2 theelepel 10 gram 2 1/2 theelepel
Boter 5 gram 1 1/2 theelepel 10 gram 2 1/2 theelepel
Water 225 ml 225 ml 325 ml 325 ml
Probeer het onderstaande eens uit bij een “gewoon brood”:
Sproei na de laatste kneding, voordat de machine gaat bakken, het deeg nat, strooi er nu sesam- of
maanzaad over.
Aardbeienjam
Programma: Jam
Verse aardbeien 900 gram
Suiker voor gelei of jam 500 gram
Citroensap 1 grote maatschep

12
CAKERECEPT
Ingrediënten:
3 eieren
4 eetlepels melk
250 gram cakemeel
200 gram boter (op kamertemperatuur)
200 gram suiker
1 zakje vanillesuiker
Extra ingrediënt voor chocoladecake
50 gram cacaopoeder
Ga als volgt te werk:
Eerst de eieren en de melk opkloppen. Zodra u deze opgeklopt heeft, kunt u het mengsel in het bakblik
doen. Vervolgens doet u de helft van het cakemeel, daarna de boter, suiker, de rest van het cakemeel,
de vanillesuiker en dan de cacaopoeder (voor chocoladecake) in het bakblik. Stel de machine in op
programma 8 (cake) en de ‘crust control’ op medium.
Zodra het bakproces is voltooid, niet direct de cake uit het bakblik halen maar even laten afkoelen!
PRINCESS-TIPS
• Gebruik de machine alleen voor het in de gebruiksaanwijzing beschreven doel.
• Oneigenlijk gebruik kan gevaar opleveren.
• Wees alert als de broodbakmachine gebruikt wordt in de buurt van kinderen.
• Laat kinderen de broodbakmachine nooit bedienen zonder toezicht.
• Dompel de broodbakmachine, het snoer en de stekker nooit onder in water of andere vloeistoffen.
• De broodbakmachine niet buiten gebruiken.
• Zet de broodbakmachine niet op een vochtige doek.
• Plaats de broodbakmachine op een vlakke ondergrond.
• Plaats hem niet op of vlak bij een oven, gasfornuis of iets dergelijks.
• Let op dat het snoer niet over de rand van het aanrecht of de tafel heen hangt, zodat iemand er achter
kan blijven haken.
• Doe de stekker altijd in een geaard stopcontact.
• Pas op dat het snoer niet op of tegen hete voorwerpen aan komt.
• Maak de behuizing van de broodbakmachine nooit open.
• Gebruik de broodbakmachine niet in de buurt van ontvlambare stoffen.
• Gebruikt u een verlengsnoer, let er dan op dat dit aan dezelfde eisen voldoet als uw broodbakmachine.
• Haal altijd de stekker uit het stopcontact wanneer u hem niet gebruikt of schoonmaakt.
• Pas op als de broodbakmachine warm is, want dit kan ernstige brandwonden veroorzaken.
• Gebruik de broodbakmachine niet met natte handen.
• Gebruik in het bakblik geen metalen voorwerpen.
• Gebruik alleen de onderdelen die door de fabrikant worden aanbevolen.
• Sluit de broodbakmachine aan op 230 Volt wisselstroom.
• Gebruik de broodbakmachine niet meer als deze gebreken vertoont, maar laat deze door een erkend
vakman testen.
• Dek de broodbakmachine niet af met een handdoek of ander voorwerp.
• Doe nooit meer dan de aangegeven hoeveelheid in de machine, omdat het deeg anders over het bakblik
heen loopt met alle gevolgen van dien.
PRINCESS SILVER BREADMAKER ART. 1935
Read these instructions thoroughly first and keep them for future reference. Check that
your domestic electricity supply matches that of the appliance. Only connect this appliance
to an earthed socket.
This fully automatic bread maker mixes and kneads the dough, bakes the bread and then
switches to the stay-warm function (to keep the bread appetisingly fresh and crispy). Fresh
bread every time, just as you like it. Also suitable for special diets. Crust colour can be set
to light, medium and dark.

13
This bread maker has a detachable lid, making the baking tin easily reachable.
This unique bread maker comes with 9 fixed digital programmes, timer (wake up to the aroma of freshly
baked bread), large LCD screen, removable baking tin with non-stick coating and 2 mixers for the perfect
results every time. With measuring cup and measuring scoop.
It also comes equipped with a ‘free programming function’ which allows you to set the various phases of
the programme, such as kneading, rising, baking, and is ideal for storing your most favourite recipe!
BREAD MAKER PARTS
1) lid
2) control panel
3) baking tin
4) underside housing
5) feet
USING THE BREAD MAKER
Place the machine on a sturdy, flat and non-flammable surface (not on a plastic table cloth for example)
and at a safe distance from an oven or stove or other heat sources. Keep a distance of at least 5 cm
between the machine and the walls. Never place the machine on a damp surface and do not use the
machine out of doors. During use, the machine will become hot, therefore touch only the hand grips and
keep children out of the vicinity. You are advised to use oven gloves or pot- holders to remove the hot
baking tins from the machine Do not use any metal objects (e.g. knives) to handle the baking tin as this
will damage the non-stick coating. Use the machine with dry hands only.
Before using the baking tins and the kneading arm for the first time, wash them carefully in warm soapy
water and dry them off. The machine may give off a little smoke when used for the first time. This is
normal for new heating elements and will stop after a short time.
Ensure that the lid is placed correctly onto the appliance! If this is not the case, it will be shown in the
display (the word 'LID' will appear on and off) As soon as the lid has been put into the correct position
the appliance will start working again.
STEP BY STEP DESCRIPTION
The whole process is described below in brief on a step by step basis. The terms used will be explained
later in these instructions.
- Take the baking tin out of the breadmaker and put the 2 kneading arms onto the shafts so that they face
each other.
- Weigh the ingredients according to the recipe and place them in the baking tin. First the flour. Put the
yeast in a small hollow in the flour. Then the salt, the butter or oil, and the sugar, all in a different cor-
ner. Pour water or milk along the edges. (The yeast must not come into contact with the water, the salt
or the butter or oil. This is especially important when you set the baking time with the ‘Timer’ button.)
- Place the baking tin into the breadmaker and press it firmly. The baking tin is now held firmly in place
by the clamps.
- Close the lid and plug it in. 3:45 now appears on the display.
- Select the desired programme with the ‘SELECT COURSE’ button.
- Use the ‘CRUST CONTROL’ button to select the desired browning level (light, medium or dark). This
option is available with programmes 1, 4, 8 and 10.
- If you wish to use the TIMER function, you can do so now (only available with programmes 1,2,3,9 &
10).
- Press the ‘START’ button.
- After the 1st signal extra ingredients may be added for the filling, if desired. (see the
recipes at the back of these instructions)
- The second beep will sound when the baking process is finished.
- WARNING: The baking tin and the bread are hot! Use ovengloves when removing the
baking tin from the breadmaker and the bread from the baking tin. Let the bread cool
down on a rack.
- NOTE: The kneading arms may still be inside the bread. If this is the case, they can be
carefully removed. Note that the kneading arms are hot!
- If you wish to bake another loaf, you should wait a few minutes until the appliance has
sufficiently cooled off. The breadmaker will emit a peeping sound and ‘HOT’ will appear
in the display if it has not cooled down sufficiently.

14
- Turn the appliance off when finished and remove the plug from the socket.
- The easiest way to cut the freshly baked bread is with the Princess electrical knife ( art 2952)
CONTROL PANEL
You can switch the breadmaker on and off using the start/reset button.
To switch on: Press the start/ reset switch.
To switch off: Hold the start/reset button in, and count to 5.
NOTE: If you switch off the breadmaker while the baking process is still running the programme will not
be completed, but will start from the beginning.
SELECT COURSE
Select menu Control panel Description Duration
settings (with medium browning)
1 Basic Basis 3:45
2 Basic wheat Basis wheat 3:55
3 Basic dough Basis dough 2:05
4 Quick Quick 2:08
5 Quick wheat Quick wheat 2:28
6 Quick dough Quick dough 0:45
7 Jam Jam 1:20
8 Cake Cake 2:00
9 Sandwich Sandwich 3:35
10 Home made Home-made recipe adjustable
• Basic
To bake white or mixed bread. This is the most often used programme. The breadmaker kneads the bread
3 times. After the first time you will hear a beep. After this beeb you can add the extra ingredients. The
programme takes 3 hours and 45 minutes in total.
• Basic wheat
Preparing the wholemeal wheat bread. The breadmaker kneads the dough twice, the dough rises and takes
longer to bake. The programme takes 3 hours and 55 minutes
• Basic dough
With this method you can knead dough for sandwiches, pizzas, for example, or any other recipe for which
you need dough. You can also use this setting to stir jam.
The programme takes 2 hours and 5 minutes
• Quick (commonly used programme)
To bake white or mixed bread. The breadmaker kneads the dough twice and beeps before the second
kneading session begins. You can now add the ingredients. The rising process of the dough is shortened
and baking will need less time. The programme takes 2 hours and 8 minutes.
• Quick wheat
To bake French white bread. The dough is kneaded twice, the time it takes for the bread to rise is
lengthened, as is the baking time. In this way, a thicker crust is achieved. The programme takes 2 hours
and 28 minutes. This programme can also be used for other types of bread.
• Quick dough
Preparing the dough. The breadmaker kneads only the dough.
The programme takes 45 minutes
• Jam
A programme for making jam. The programme takes 1 hours and 20 minutes
• Cake
Preparing delicious cake. The bread maker kneads twice. The programme takes 2 hours

15
• Sandwich
The programme takes 3 hours and 35 minutes
• Home made
For this, you can adjust the appliance yourself. You must go through the entire programme: kneading,
rising, kneading, baking, etc. With this function you can use the ‘CYCLE’ and ‘TIME’ buttons.
‘CRUST CONTROL’
To choose the level of browning for the crust, press the button ‘ crust control’
- Light
- Medium
- Dark
The times given in the overview are based on medium browning of the crust. If you want a different
browning level the time will adjust itself! This option is available with programmes 1, 4, 8 and 10.
TIMER function
With the timer you can set the breadmaker to switch on automatically a few hours later. This means you
can set it to switch on at night, for example. This option is available with programmes 1, 2, 3, 9 and 10.
Example
Put all the ingredients in the bread tin, make sure the yeast does not come into contact with the liquid.
Use the menu button to select the desired programme and choose the desired browning with the "crust
control" button.
It is 10.00 pm and you would like to have fresh bread ready to take out of the breadmaker at 7.15 am the
following morning. The difference between these times is 9 hours and 15 minutes. The timer should
therefore be set to 9:15.
LOAF SIZE
This function allows you to determine the volume of the dough.
1.5 lb stands for 1.5 pounds (suitable for baking bread of 600 grams).
2.0 lb stands for 2.0 pounds (suitable for baking bread of 800/900 grams).
This option is only available with programmes 1, 2 and 9.
PRE-HEAT FUNCTION
This breadmaker is preheated for a few minutes - this is standard. This varies from 5 minutes to 40 minu-
tes. The text ‘pre-heat’ appears on the display.
FAULTS
If there is a power failure during the process, the bread maker will turn itself on again automatically if the
disturbance is shorter than 30 minutes. The programme will continue from the point it where it was inter-
rupted. If the power failure lasts longer than 30 minutes, the machine will not continue the baking process
and you should start the machine up again.
COMMENTS CONCERNING THE RECIPES
To get the best results, be careful to keep to the correct proportions between the ingredients.
Use the enclosed measuring cup and measuring scoop, or use weighing scales.
The measuring cup is 250 ml Ensure the water is not too cold - the best temperature is hand warm
(28°X to 30°XC)
The large measuring scoop is 15 ml and is equal to a dessert spoon. The small measuring
scoop is 5 ml and is equal to a teaspoon
Every recipe has fresh or dried yeast listed and you should make a choice between the two.
Possible problems when baking bread
The bread does not rise:
* old yeast,
* not enough water,
* too much salt

16
* incorrect amounts,
* put the yeast under the flour so that it doesn’t come into contact with salt, butter or water.
The bread rises too high.
* use less yeast
* use less water
* use more salt
The bread looks like a “crater”:
* too much water has been used
* use 2 more dessertspoons of flour
* The bread has been left too long in the bread mould.
The bread is too heavy:
* Use 2 more dessertspoons of water
There are holes in the bread
* use 2 dessertspoons less water
* use a little less yeast
* use more salt
CLEANING AND MAINTENANCE
Before using the breadmaker for the first time, clean it and the kneading arms with a gentle detergent.
Before cleaning and storing the appliance, always let it cool down first. After cooling down for about half
an hour, the appliance is ready to be used once again for baking or making dough.
Before cleaning, always remove the plug from the wall socket and give the appliance the chance to cool
down.
Never use aggressive detergents such as chemical cleaners, oven cleaner etc.
Remove all ingredients and crumbs from the lid, the housing and the pan with a damp cloth
Never immerse the bread maker in water and never fill the appliance with water.
Clean the housing on the inside and outside with a damp cloth Always clean and dry the appliance
carefully after use. The kneading arms and shafts must be cleaned immediately after each use.
If you leave the kneading arms in position after use, it may be difficult to remove them at a later stage. If
this happens, fill the baking tin with warm water and, after 30 minutes, remove the kneading arm and
clean it. The baking tin and kneading arms are covered with a non-stick layer; you should therefore never
use metal implements that could damage the surface. It is normal that the colour of the non-stick layer
will turn dull after several baking cycles. This will not affect the functioning however. Before storing the
appliance away, ensure that it is has completely cooled down and is clean and dry. Always close the lid of
the appliance when storing it away.
PROGRAMME 10 ‘Home Made’
Description Standard Can be programmed to the minute from
Preheat 22 min Off - 30 min
Knead 1 20 min Off - 25 min
Rise 1 45 min Off - 120 min
Knead 2 Off - 15 min
Rise 2 85 min Off - 120 min
Rise 3 off Off -120 min
Bake 60 min Off - 60 min
Keep warm 60 min Off / 60 min
Press "SELECT COURSE" several times until programme 10 appears.
Press "CYCLE" until "preheat" appears in the display, together with a number giving the
relevant time.
Press on "TIME" until you have the desired time and confirm this by pressing "CYCLE".
By pressing on "CYCLE" again you proceed to the next step in bread preparation and
press on "TIME" if you wish to adjust this.

17
Do this until all the times of your choice have been programmed and press on START/RESET to see the
total time.
If you wish to delay the programme, press on TIMER until the desired total time is indicated.
Press START/RESET again to start the breadmaker.
(If you keep START/RESET pressed in again, your settings will be reset.)
CONVERSION TABLE
1 teaspoon 4 grams 5 ml 1/30 cup
1 dessert spoon 12 grams 15 ml 1/10 cup
A FEW RECIPES FOR BREAD
PRINCESS bread
Programme: Basic
Recipe for: 600 grams 600 grams 800 grams 800 grams
White flour 350 grams 2 9/10 cup 500 grams 4 1/5 cup
Water 210 ml 210 ml 300 ml 300 ml
Margarine 5 grams 1 1/2 teaspoon 10 grams 2 1/2 teaspoon
Sugar 5 grams 1 1/2 teaspoon 10 grams 2 1/2 teaspoon
Salt 5 grams 1 1/2 teaspoon 10 grams 2 1/2 teaspoon
Fresh yeast or 10 grams 2 1/2 teaspoon 15 grams 3 1/2 teaspoon
Dried yeast 4 grams 1 teaspoon 6 grams 1 1/2 teaspoon
Fennel 1/2 teaspoon 1/2 teaspoon 1 teaspoon 1 teaspoon
Aniseed 1/2 teaspoon 1/2 teaspoon 1 teaspoon 1 teaspoon
(spread with cheese, ham or jam)
The PRINCESS baker’s favourite bread
Programme: Basic
Recipe for: 600 grams 600 grams 800 grams 800 grams
White flour 320 grams 2 7/10 cup 450 grams 3 1/2 cup
Water or milk 215 ml 215 ml 300 ml 300 ml
Butter 5 grams 1 1/2 teaspoon 10 grams 2 1/2 teaspoon
Sugar 5 grams 1 1/2 teaspoon 10 grams 2 1/2 teaspoon
Salt 5 grams 1 1/2 teaspoon 10 grams 2 1/2 teaspoon
Fresh yeast or 20 grams 5 teaspoon 25 grams 2 dessert spoon
dried yeast 5 grams 1 1/2 teaspoon 10 grams 2 1/2 teaspoon
Egg yolk 1 1 2 2
Cinnamon 10 grams 2 1/2 teaspoon 10 grams 2 1/2 teaspoon
Filling
Grated Apple 150 grams 150 grams 250 grams 250 grams
White bread
Programme: Basic
Recipe for: 600 grams 600 grams 800 grams 800 grams
White flour 350 grams 350 grams 500 grams 500 grams
Water 210 ml 210 ml 300 ml 300 ml
Margarine 5 grams 1 1/2 teaspoon 15 grams 3 1/2 teaspoon
Sugar 5 grams 1 1/2 teaspoon 10 grams 2 1/2 teaspoon
Salt 5 grams 1 1/2 teaspoon 10 grams 2 1/2 teaspoon
Fresh yeast or 10 grams 2 1/2 teaspoon 15 grams 3 1/2 teaspoon
dried yeast 4 grams 1 teaspoon 6 grams 1 1/2 teaspoon
Milk bread
Programme: Basic
Recipe for: 600 grams 600 grams 800 grams 800 grams
White flour 350 grams 350 grams 500 grams 500 grams
Milk 210 ml 210 ml 300 ml 300 ml
Margarine 5 grams 1 1/2 teaspoon 10 grams 2 1/2 teaspoon

18
Sugar 5 grams 1 1/2 teaspoon 10 grams 2 1/2 teaspoon
Salt 5 grams 1 1/2 teaspoon 10 grams 2 1/2 teaspoon
Fresh yeast or 10 grams 2 1/2 teaspoon 15 grams 3 1/2 teaspoon
dried yeast 4 grams 1 teaspoon 6 grams 1 1/2 teaspoon
White cream bread
Programme: Basic
Recipe for: 600 grams 600 grams 800 grams 800 grams
White flour 350 grams 350 grams 500 grams 500 grams
Milk 210 ml 210 ml 300 ml 300 ml
Butter 5 grams 1 1/2 teaspoon 10 grams 2 1/2 teaspoon
Soft brown sugar 5 grams 1 1/2 teaspoon 10 grams 2 1/2 teaspoon
Salt 5 grams 1 1/2 teaspoon 10 grams 2 1/2 teaspoon
Fresh yeast or 10 grams 2 1/2 teaspoon 15 grams 3 1/2 teaspoon
dried yeast 4 grams 1 teaspoon 6 grams 1 1/2 teaspoon
Wheat bread
Programme: Basic
Recipe for: 600 grams 600 grams 800 grams 800 grams
Whole wheat flour 200 grams 200 grams 300 grams 300 grams
White flour 150 grams 150 grams 200 grams 200 grams
Water 230 ml 230 ml 320 ml 320 ml
Margarine 5 grams 1 1/2 teaspoon 10 grams 2 1/2 teaspoon
Sugar 5 grams 1 1/2 teaspoon 10 grams 2 1/2 teaspoon
Salt 5 grams 1 1/2 teaspoon 10 grams 2 1/2 teaspoon
Fresh yeast or 10 grams 2 1/2 teaspoon 15 grams 3 1/2 teaspoon
dried yeast 4 grams 1 teaspoon 6 grams 1 1/2 teaspoon
Whole meal bread
Programme: Basic
Recipe for: 600 grams 600 grams 800 grams 800 grams
Wholemeal flour 350 grams 350 grams 500 grams 500 grams
Water 225 ml 225 ml 325 ml 325 ml
Margarine 5 grams 1 1/2 teaspoon 10 grams 2 1/2 teaspoon
Sugar 5 grams 1 1/2 teaspoon 10 grams 2 1/2 teaspoon
Salt 5 grams 1 1/2 teaspoon 10 grams 2 1/2 teaspoon
Fresh yeast or 10 grams 2 1/2 teaspoon 15 grams 3 1/2 teaspoon
dried yeast 4 grams 1 teaspoon 6 grams 1 1/2 teaspoon
Egg bread
Programme: Basic
Recipe for: 600 grams 600 grams 800 grams 800 grams
White flour 350 grams 350 grams 500 grams 500 grams
Water 200 ml 200 ml 275 ml 275 ml
Margarine 5 grams 1 1/2 teaspoon 10 grams 2 1/2 teaspoon
Sugar 5 grams 1 1/2 teaspoon 10 grams 2 1/2 teaspoon
Salt 5 grams 1 1/2 teaspoon 10 grams 2 1/2 teaspoon
Fresh yeast or 10 grams 2 1/2 teaspoon 15 grams 3 1/2 teaspoon
dried yeast 4 grams 1 teaspoon 6 grams 1 1/2 teaspoon
Egg yolk 1 1 2 2
Country bread
Programme: Basic
Recipe for: 600 grams 600 grams 800 grams 800 grams
Country flour 350 grams 350 grams 500 grams 500 grams
Water 225 ml 225 ml 325 ml 325 ml
Margarine 5 grams 1 1/2 teaspoon 10 grams 2 1/2 teaspoon
Sugar 5 grams 1 1/2 teaspoon 10 grams 2 1/2 teaspoon
Salt 5 grams 1 1/2 teaspoon 10 grams 2 1/2 teaspoon

19
Fresh yeast or 10 grams 2 1/2 teaspoon 15 grams 3 1/2 teaspoon
dried yeast 4 grams 1 teaspoon 6 grams 1 1/2 teaspoon
Bran bread
Programme: Basic
Recipe for: 600 grams 600 grams 800 grams 800 grams
Wholemeal flour 300 grams 300 grams 450 grams 450 grams
Wheat bran 30 grams 1/2 cup 50 grams 1/2 cup
Water 250 ml 250 ml 375 ml 375 ml
Margarine 5 grams 1 1/2 teaspoon 10 grams 2 1/2 teaspoon
Sugar 5 grams 1 1/2 teaspoon 10 grams 2 1/2 teaspoon
Salt 5 grams 1 1/2 teaspoon 10 grams 2 1/2 teaspoon
Fresh yeast or 15 grams 3 1/2 teaspoon 20 grams 1 2/3 dessertspoon
dried yeast 5 grams 1 1/2 teaspoon 8 grams 2 teaspoon
Seeded bread
Programme: Basic
Recipe for: 600 grams 600 grams 800 grams 800 grams
Rye meal 150 grams 150 grams 225 grams 225 grams
White flour 150 grams 150 grams 225 grams 225 grams
Water 225 ml 225 ml 325 ml 325 ml
Margarine 5 grams 1 1/2 teaspoon 10 grams 2 1/2 teaspoon
Sugar 5 grams 1 1/2 teaspoon 10 grams 2 1/2 teaspoon
Salt 5 grams 1 1/2 teaspoon 10 grams 2 1/2 teaspoon
Fresh yeast or 10 grams 2 1/2 teaspoon 15 grams 3 1/2 teaspoon
dried yeast 4 grams 1 teaspoon 6 grams 1 1/2 teaspoon
vinegar 1 1/2 teaspoon 1 1/2 teaspoon 3 teaspoon 3 teaspoon
Linseed 50 grams 1/2 cup 60 grams 60 grams
Cumin 1/2 teaspoon 1/2 teaspoon 1 teaspoon 1 teaspoon
Raisin bread
Programme: Basic
Recipe for: 600 grams 600 grams 800 grams 800 grams
White flour 320 grams 320 grams 450 grams 450 grams
Water 190 ml 190 ml 270 ml 270 ml
Butter 5 grams 1 1/2 teaspoon 10 grams 2 1/2 teaspoon
Sugar 5 grams 1 1/2 teaspoon 10 grams 2 1/2 teaspoon
Salt 5 grams 1 1/2 teaspoon 10 grams 2 1/2 teaspoon
Fresh yeast or 20 grams 5 teaspoon 25 grams 2 dessert spoon
dried yeast 6 grams 1 1/2 teaspoon 10 grams 2 1/2 teaspoon
Filling
Raisins 200 grams 1 2/3 cup 250 grams 2 cups
Currants 100 grams 4/5 cup 100 grams 4/5 cup
Mueslibread
Programme: Basic
Recipe for: 600 grams 600 grams 800 grams 800 grams
Wholemeal flour 200 grams 200 grams 250 grams 250 grams
White flour 120 grams 120 grams 200 grams 200 grams
Water 215 ml 215 ml 300 ml 300 ml
Margarine 5 grams 1 1/2 teaspoon 10 grams 2 1/2 teaspoon
Sugar 5 grams 1 1/2 teaspoon 10 grams 2 1/2 teaspoon
Salt 5 grams 1 1/2 teaspoon 10 grams 2 1/2 teaspoon
Fresh yeast or 20 grams 5 teaspoon 25 grams 2 dessert spoon
dried yeast 5 grams 1 1/2 teaspoon 10 grams 2 1/2 teaspoon
Filling
Raisins 100 grams 1 1/2 cup 200 grams 1 2/3 cup
Muesli 100 grams 1 1/2 cup 150 grams 1 1/2 cup

20
Bacon bread
Programme: Basic
Recipe for: 600 grams 600 grams 800 grams 800 grams
Wholemeal flour 200 grams 1 2/3 cup 300 grams 2 1/2 cup
White flour 150 grams 1 1/2 cup 200 grams 1 2/3 cup
Water 210 ml 210 ml 300 ml 300 ml
Margarine 5 grams 1 1/2 teaspoon 10 grams 2 1/2 teaspoon
Sugar 5 grams 1 1/2 teaspoon 10 grams 2 1/2 teaspoon
Salt 5 grams 1 1/2 teaspoon 10 grams 2 1/2 teaspoon
Fresh yeast or 10 grams 2 1/2 teaspoon 15 grams 3 1/2 teaspoon
dried yeast 4 grams 1 teaspoon 6 grams 1 1/2 teaspoon
Filling
Boiled bacon 75 grams 2/3 cup 100 grams 4/5 cup
Shallot 1/2 1/2 1 1
Whole grain bread
Programme: Basic
Recipe for: 600 grams 600 grams 800 grams 800 grams
Whole grain flour 350 grams 2 9/10 cup 500 grams 4 1/8 cup
Fresh yeast or 10 grams 2 1/2 teaspoon 15 grams 3 1/2 teaspoon
dried yeast 4 grams 1 teaspoon 6 grams 1 1/2 teaspoon
Salt 5 grams 1 1/2 teaspoon 10 grams 2 1/2 teaspoon
Sugar 5 grams 1 1/2 teaspoon 10 grams 2 1/2 teaspoon
Butter 5 grams 1 1/2 teaspoon 10 grams 2 1/2 teaspoon
Water 225 ml 225 ml 325 ml 325 ml
Try the following with “regular bread”
After the final kneading, sprinkle the dough with water and scatter sesame or moon seeds over it.
Strawberry jam
Programme: Jam
Fresh strawberries 900 grams
Sugar for preserve or jam 500 grams
Lemon juice 1 large tablespoon
CAKE RECIPE
Ingredients
3 eggs
4 tablespoons of milk
250 grams of plain flour
200 grams of butter (at room temperature)
200 grams of sugar
1 sachet of vanilla sugar
Extra ingredient for chocolate cake
50 grams of cocoa powder
This is what you do:
First, beat up the eggs and milk As soon as you have done so, put the mixture in the baking
tin. Next, put half of the plain flour, and then the butter, sugar, the remainder of the plain
flour, the vanilla sugar and then the cocoa powder (for chocolate cake) in the baking tin.
Set the appliance for programme 8 (cake) and the ‘crust control’ on medium.
When the baking process has been completed, do not take the cake out of the baking
tin - allow it to cool off first!
Other manuals for TYPE 1935
1
Table of contents
Languages:
Other Princess Bread Maker manuals

Princess
Princess SILVER BREADMAKER XL User manual

Princess
Princess 1938 User manual

Princess
Princess Bread Maker User manual

Princess
Princess 152000 User manual

Princess
Princess Wake Up 152006 User manual

Princess
Princess TYPE 151938 User manual

Princess
Princess TYPE 1935 User manual

Princess
Princess Silver Fresh User manual

Princess
Princess 151934 User manual

Princess
Princess 152003 User manual