Unitec C-Start User manual

C-Start
Installation Manual
Unitec
443-561-1200 • www.StartwithUnitec.com

C-START
Document Number: CSTART1001
Document Name: C-Start Installation Manual
C-START INSTALLATION MANUAL
This manual provides installation instructions for the C-Start. It includes site planning,
site preparation, the mechanical installation of the C-Start and the electrical wiring of
the unit.
When calling for assistance, you must have the following information available:
C-Start Serial Number:
DistributorName:
DECLARATION OF COMPLIANCE
This equipment has been tested and found to comply with the limits for a Class A
digital device, pursuant to Part 15 of the FCC Rules. These limits are designed to
provide reasonable protection against harmful interference when the equipment is
operated in a commercial environment. This equipment generates, uses, and can
radiate radio frequency energy and, if not installed and used in accordance with the
instruction manual, may cause harmful interference to radio communications.
Operation of this equipment in a residential area is likely to cause harmful interference
in which case the user will be required to correct the interference at his own expense.
COPYRIGHT
© 2012 Unitec, Incorporated. All rights reserved. No part of this book, including text,
screen examples, diagrams, or icons, may be reproduced or transmitted in any form,
by any means (electronic, photocopying, recording, or otherwise) without prior written
permission of Unitec, Incorporated.
TRADEMARKS
C-Start, Unitec, and the Unitec Logo are trademarks, service marks, or registered
trademarks of Unitec, Incorporated.
All other products, services, and company names are trademarks or registered
trademarks of their respective owners.

C-START
Document Number: CST1001 i
Document Name: C-Start Installation Manual
Table of Contents
1Site Planning and Preparation ......................................................................................................1
1.1 Positioning the C-Start...........................................................................................................2
1.2 Electrical ................................................................................................................................3
1.2.1 Power Requirements....................................................................................................................3
1.2.2 Conduit Requirements .................................................................................................................3
1.2.3 Wiring Requirements....................................................................................................................4
2Installation.......................................................................................................................................5
2.1 Installation Hardware.............................................................................................................5
2.2 Recommended Tools.............................................................................................................5
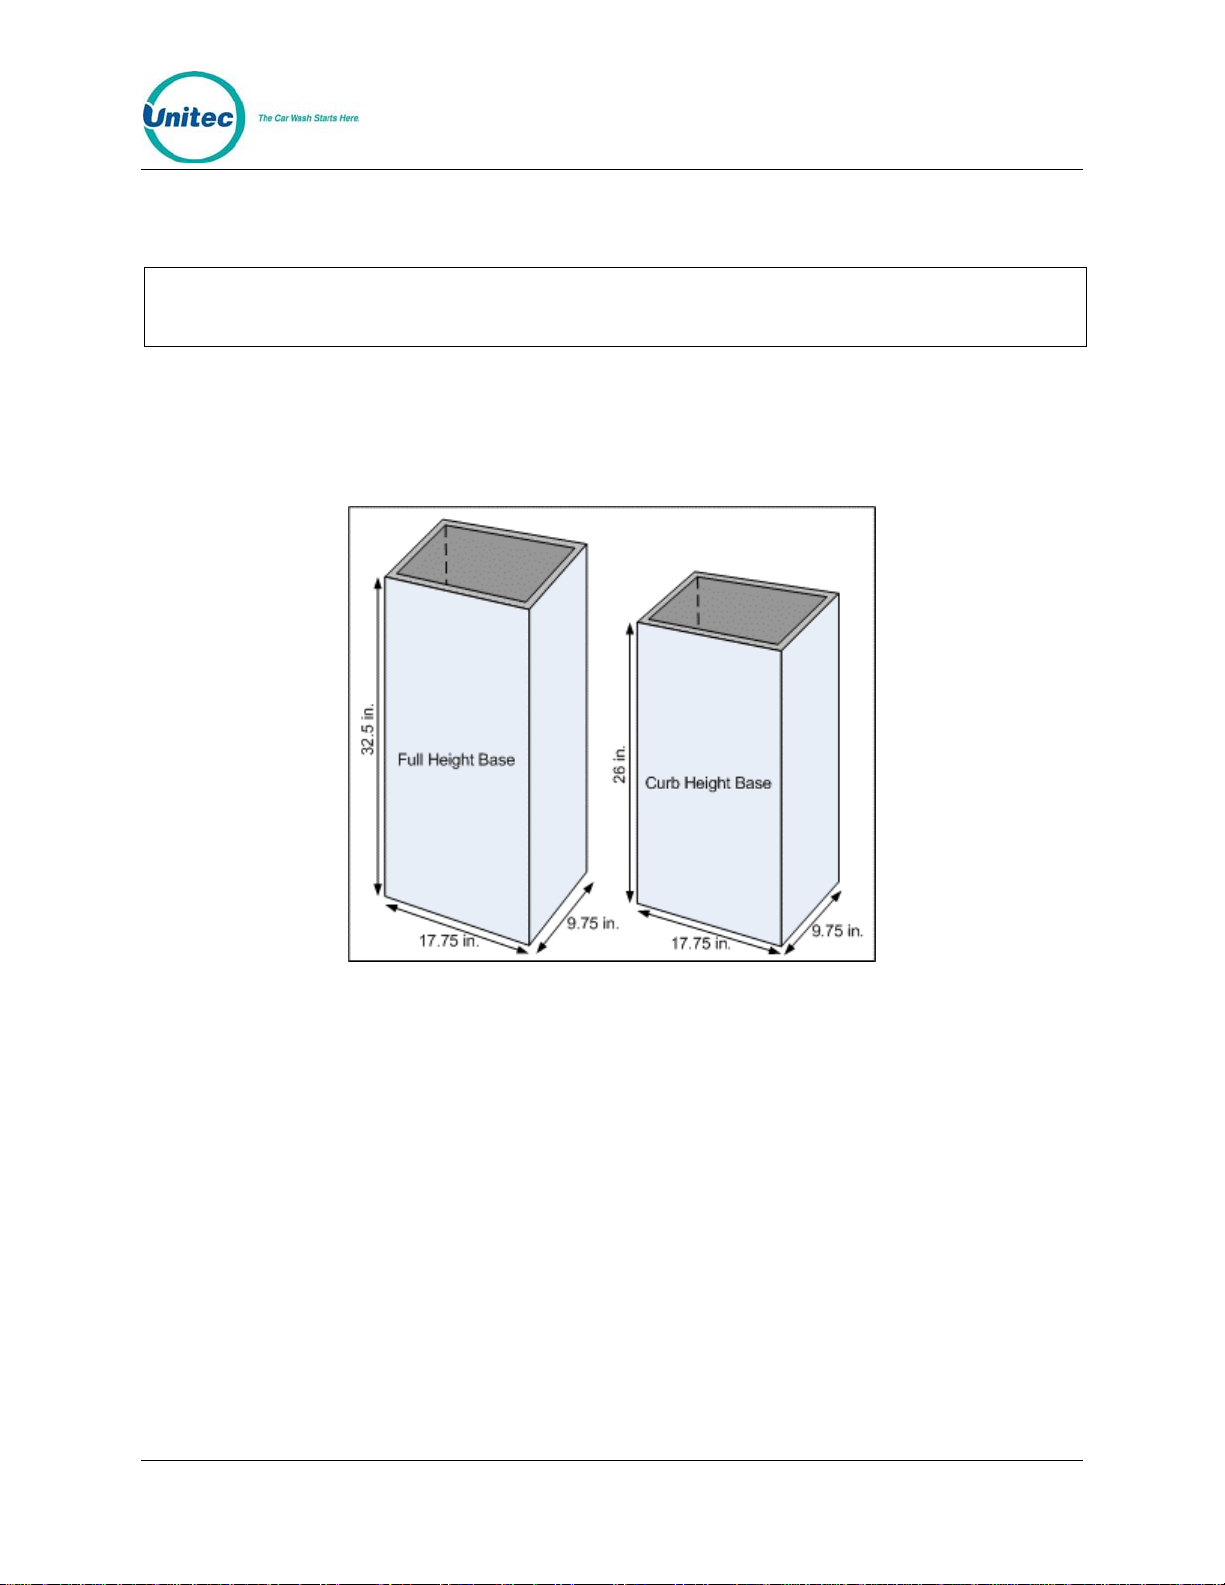
2.3 Base Installation ....................................................................................................................6
2.4 Mounting the C-Start..............................................................................................................7
3Electrical Connections...................................................................................................................7
3.1 General..................................................................................................................................7
3.2 Connecting Power .................................................................................................................8
3.3 Wash Control Wiring..............................................................................................................9
3.3.1 Overview......................................................................................................................................9
3.3.2 Wiring the Wash Relay Interface................................................................................................10
3.3.3 Wiring the Wash-In-Use Interface..............................................................................................10
3.4 Network Cable Connection..................................................................................................11
3.5 Intercom Systems................................................................................................................11
3.5.1 Overview....................................................................................................................................11
3.5.2 Intercom Connections................................................................................................................12
3.5.3 Intercom Adjustments ................................................................................................................12
3.5.4 Connection Overview.................................................................................................................12
4System Startup .............................................................................................................................13
5System Test...................................................................................................................................13
Appendix A - POS Interface Option...................................................................................................15
Appendix B - C-Start Networking ......................................................................................................16
Appendix C – Terminating Ethernet Cables.....................................................................................18

C-START
Document Number: CST1001 ii
Document Name: C-Start Installation Manual
Index of Figures
Figure 1. C-Start Position.................................................................................................................2
Figure 2. Conduit Runs....................................................................................................................4
Figure 3. Straight Bases Dimensions...............................................................................................6
Figure 4. C-Start Interior Connections.............................................................................................7
Figure 5. Neutral - Ground – Line Connections...............................................................................8
Figure 6. Wash I/O Board Connector Pinouts..................................................................................9

C-START
Document Number: CST1001 1
1 Site Planning and Preparation
This chapter provides guidelines for positioning the C-Start and preparing the site.
Site preparation includes:
• Determining how and where the C-Start will be mounted
• Installing conduit runs and required wiring
These instructions serve as general guidelines only. If your wash manufacturer’s
installation requirements differ from these guidelines, always meet the wash
manufacturer’s requirements first.
Requirements specified in local electrical and building codes must be followed and
shall take precedence over the guidelines provided within this document. All units
should be installed by a professional electrician ONLY.
The C-Start is rated for the following environmental specifications:
• Temperature: -20°F to 115°F
• Humidity: 0% to 100%
The following ratings label denotes the use of 120V AC power, Single Phase, 8
Amps, and 50-60 Hz, and is used in the C-Start:
The following symbol is used in the C-Start:
This symbol represents the presence of earth-grounded equipment.
This symbol represents the presence of high voltage in the unit.
Document Name: C-Startl Installation Manual

C-START
Document Number: CST1001 2
1.1 Positioning the C-Start
When installed at the wash entrance, the C-Start should be located at least 12 feet
from the wash. For curb mount applications, the front surface of the C-Start should
be even with the edge of the curb. To achieve this dimension, the base frame should
be installed so its leading edge is 7 in. from the edge of the curb as shown in the
figure 1.
Figure 1. C-Start Position
Document Name: C-Start Installation Manual

C-START
Document Number: CST1001 3
Document Name: C-Start Installation Manual
1.2 Electrical
1.2.1 Power Requirements
C-Start requires 120 VAC, 8 Amps service with a dedicated circuit breaker.
Note: Ensure the protective earth ground wires do not carry any motor return current. Only
the neutral wire should carry return current. Follow local electrical code when wiring
the C-Start.
1.2.2 Conduit Requirements
At a minimum, (3) conduit runs are typically required:
• Power – Conduit run from C-Start to AC Power Service Panel
• Control – Conduit run from C-Start to the Car Wash Controller
• Data – Conduit run to the network router location within the facility. This
conduit may also house Intercom control wires and telephone lines (for dial
credit applications.
Conduit size should be at least ¾ in. Refer to local and national electrical codes to
select the proper conduit type and size. Conduit stubs should be installed to enter the
C-Start base through the oblong conduit opening as shown in Figure 2 and extend at
least 3” above the concrete surface.

C-START
Document Number: CST1001 4
Figure 2. Conduit Runs
1.2.3 Wiring Requirements
Wiring requirements are summarized in the following table. As wires are pulled
through conduit, ensure there is at least 6 ft. of wire extending from the end of the
conduit stub. The Network (CAT-5) cable will need to be terminated with 8 position
RJ-45 connectors per Ethernet standard 568B.
Circuit Description Wire Qty Wire Description
Power (115-120 VAC, 8 Amps). 3 16 AWG (black/white/green)
Network connection (to router) 1 Cat 5 communications cable, 295 ft max length
Wash Control Varies Per wash equipment manufacturer’s instructions
Intercom (Optional) 2-4 22 AWG minimum, Qty varies by intercom model
Document Name: C-Start Installation Manual

C-START
Document Number: CST1001 5
Document Name: C-Start Installation Manual
2 Installation
2.1 Installation Hardware
Prior to beginning the installation, take the time to verify that all the following required
parts are present and accounted for.
• Key set for door
• Allen Wrench For Door
• (4) Bolts and washers to secure the C -Start terminal to its mounting base.
• (4) Anchor bolts for securing the base to concrete (supplied with base)
Additional parts that may be needed include:
• Shims for leveling the base
• Cable straps (or “Tie Wraps”)
• (2) RJ-45 8 Pin Cable Plugs (for Cat 5 cable termination)
2.2 Recommended Tools
The following tools are recommended for the typical mechanical installation of this C-
Start unit and base:
• Hammer drill with ½” concrete drill bits
• ¾” deep well socket and socket wrench
• Open end 9/16” wrench
• Hammer
• Small, thin blade, flat-tip screwdriver
• Wire Strippers (capable of 10 – 22 AWG wire)
• Modular plug crimp tool (if CAT 5 cable needs to be terminated)
• Diagonal Cutters
• Needle Nose Pliers
• Dual-plane Level

C-START
Document Number: CST1001 6
2.3 Base Installation
Note: Pull all wires through conduits before mounting the base. See Electrical Planning for
wiring requirements.
The C-Start bases are available in (2) heights as shown in the illustration below. This
document describes the procedure for installing the straight base. Angled bases are
also available and they are supplied with a manual addendum (MN1001), which
provides additional instructions.
Figure 3. Straight Bases Dimensions
1. Position the base in place and mark the locations of the (4) mounting holes on
the concrete surface. Remove the base and drill (4) ½” diameter holes, 2” to
2 ½” deep in the marked locations.
2. Insert the anchor bolts (supplied with the base) in these holes and carefully
drive them into place with a hammer. When the anchor bolts have been set,
tighten the nut to secure the bolts in the concrete. Remove the nuts from the
anchor bolts
3. Place the base on the anchor bolts, while ensuring the wires pulled
through the conduit are not pinched under the base. Pull the wires
through the top opening of the base and ensure there is at least 48 inches
of wire draped over the top edge of the base.
4. Place the level on top of the base, and verify its level in both directions
(front to back and side to side). Use shims as needed to level the base.
Once the base is level, place the nuts on the anchor bolts and secure the
base to the concrete.
Document Name: C-Start Installation Manual

C-START
Document Number: CST1001 7
2.4 Mounting the C-Start
1. Rest the C-Start enclosure on top of the base and feed the wires through the
rectangular opening in the bottom the enclosure. This opening is partially
covered by a metal plate which can be slid forward or removed completely to
provide greater access.
2. Align the (4) mounting holes on the bottom of the enclosure with the threaded
inserts on the top of the base. Secure the enclosure to the base with the (4)
bolts and washers supplied with the C-Start unit.
3 Electrical Connections
3.1 General
Before starting, verify all required wires have been routed to the C-Start (as specified
in section 1.2.3). The following figure shows the locations inside the C-Start where
the field wires will connect.
Figure 4. C-Start Interior Connections
Document Name: C-Start Installation Manual

C-START
Document Number: CST1001 8
3.2 Connecting Power
1. Route the main power wires to the AC terminal strip on C-Start’s power panel
(as shown below) and trim the wire to remove excess. Strip the insulation
approximately ¼ ” on each conductor.
2. Remove the plastic shield on the power terminal block and loosen the 3
screws where the wires are to be connected. Install the Neutral (White),
Ground (Green), and Line (Black) wires under the screw clamps in the correct
positions (as shown below) and re-tighten the screws to hold the wires in
place.
3. Use wire ties to route and secure any extra cable. Replace the plastic shield.
Figure 5. Neutral - Ground – Line Connections
Warning! For continued protection against risk of fire, replace only with the 8 amp/250V 3AG
SLO BLO fuse for C-Start.
Document Name: C-Start Installation Manual

C-START
Document Number: CST1001 9
3.3 Wash Control Wiring
3.3.1 Overview
In applications where the C-Start will communicate with the Wash Controller, the
wash control wires will need to be connected to the Wash I/O Board. This board is
located on the right wall of the enclosure and is shown in the picture below. The
board is supplied with screw terminal plugs (not shown) installed in the green
connectors to accommodate field wiring. You will need a thin tipped, flat head
screwdriver to open and tighten the screw terminals.
Figure 6. Wash I/O Board Connector Pinouts
Most wash manufacturers use a five-wire system to provide the arming signals for the
selected wash packages. One common line and four arming input wires are fed from
the wash’s PLC to the Wash I/O board. In addition to these five wires, a Wash-In-
Use (WIU) Hot and WIU Neutral are required to reset the wash electronics. Typically,
these are also provided by the PLC.
Each wash manufacturer has its own specific color code system and wash relay pin-
outs; therefore, it is important to review the appropriate wash documentation prior to
beginning this portion of the installation.
Document Name: C-Start Installation Manual

C-START
Document Number: CST1001 10
3.3.2 Wiring the Wash Relay Interface
To wire the wash relays, remove the screw terminal plug from the J17 connector and
install the wires from the PLC to the appropriate pin numbers per the table below.
Replace the plug in J17 when finished.
Table 1. Wash Relays
Pin Signal
Pin 1 Wash Output #1
Pin 2 Wash Output #2
Pin 3 Wash Output #3
Pin 4 Wash Output #4
Pins 5-8 Spare Option Relays (Outputs 5-8
respectively)
Pin 9 Wash Relay Common
Pin 10 N/A
3.3.3 Wiring the Wash-In-Use Interface
Wash equipment requires a reset circuit. This circuit is generally identified as the
“Wash-In-Use” (WIU) signal. It is not uncommon for values of this voltage to be as
much as 115-120 VAC, so it is extremely important to verify that there is no power
applied to any of the wash components before proceeding.
To wire the wash in use and fault inputs, remove the screw terminal plug from the J18
connector and install the wires from the PLC to the appropriate pin numbers per the
table below. Replace the plug in J18 when finished.
Document Name: C-Start Installation Manual

C-START
Document Number: CST1001 11
Document Name: C-Start Installation Manual
Note: Wash equipment wiring may vary, and not all equipment manufacturers use the wash-
fault interface. Refer to the manufacturer’s documentation for additional information.
Table 2. Wash-In-Use Connections
Pin Signal
Pin 1 Wash-In-Use Hot
Pin 2 Wash-In-Use Neutral
Pin 3 Wash-Fault-Hot
Pin 4 Wash-Fault-Neutral
Pin 5 Wash-Complete-Hot
Pin 6 Wash-Complete-Neutral
3.4 Network Cable Connection
The Cat 5 cable will need to be terminated at each end with an RJ-45 modular plug.
This termination should be performed by a technician who is experienced in
assembling network cables, because a slight misalignment in the wire termination can
cause communications problems. For reference, Appendix B provides guidelines for
terminating a network cable with a modular RJ-45 plug.
The Network (Ethernet) connection is located at the bottom edge of the processor
assembly on the left-side wall. There should be a surge suppressor installed in the
Ethernet port. Insert the terminated CAT 5 cable into the other end of the surge
protector. The facility end of the Cat-5 cable connects to one of the LAN ports on the
Unitec router. Refer to 0for details on connecting devices to the router.
3.5 Intercom Systems
3.5.1 Overview
The use of an intercom system allows two-way communications between customers
at the C-Start and staff elsewhere on site. A customer activates the C-Start’s
intercom output by pressing the help button. Without an intercom, the intercom
output can be used to activate a bell, light or other device to alert an attendant that
help is needed.
The intercom wires connect to the Display IO board on the back of the main door.
Jumpers and adjustments to control its operation are also located on that board. 2, 3,
and 4 wire intercoms are supported. A digital intercom is recommended if the

C-START
Document Number: CST1001 12
Document Name: C-Start Installation Manual
intercom wiring is sharing conduit with other communications wiring, but not required.
Unitec does not supply intercom systems.
3.5.2 Intercom Connections
The Intercom has two connectors which control the way in which the intercom is
wired and the mode of operation. J17 is the interface and connects to the customer’s
intercom unit. J23 is used to select mode of operation (two, three, or four wire
intercom systems). Twisted pair / fully shielded cable is recommended for optimum
performance.
3.5.3 Intercom Adjustments
The Intercom system has the ability to sense when voice band audio signals are
present. This allows the speakers in the unit to revert to a passive intercom mode.
This bypasses the internal audio section and allows the left speaker to be used as
an intercom.
3.5.4 Connection Overview
Call Function: The unit will initiate a call function by closing the contacts on RL5. By
default, J17-Pin 1 (H1) and J17-Pin 2 (H2) will always reflect the contact closure of
RL5. This is the default for the four-wire mode when both the call function and audio
are completely separated. More detailed instructions on this follow.
Audio: When the C-Start intercom mode is active, the audio section is floating and is
not relative to ground. By default, J17-Pin 3 (SP+) and J17-Pin 4 (SP-) will always be
connected to the audio section.
Four Wire Intercom Configuration: Two separate pairs (four wires) are used for
both the call function and audio in the four-wire configuration. In this mode, J23
receives no jumpers.
3 Wire Intercom Configuration: This mode requires two conductors for audio and
one additional conductor for the call function. This mode uses a common ground for
both audio and the call function (SP-). Jumper pins 3&4 (bottom 2 pins) of J23 and
connect H1, SP+ and SP- .
2 Wire Intercom Configuration: This type of intercom system has both the Call
Function and audio sharing the two conductors. Jumper pins 3&4 (bottom 2 pins) and
1&2 (top 2 pins) of J23 and connect the two conductors to SP+ & SP-.

C-START
Document Number: CST1001 13
Document Name: C-Start Installation Manual
4 System Startup
For fully detailed instructions, please see the Sierra Management Application
Programming Manual on the www.StartwithUnitec.com website.
1. Power up the C-Start.
2. Using a laptop, login into the Sierra Management System.
3. Enter the Site information and credit networking information, wash information, and
setup a device profile.
4. Download the device profile.
5. The C-Start will reboot and be in full operational mode.
5 System Test
Once the installation is complete, a thorough test should be performed to ensure all
C-Start functions are operational. This test should verify:
• Functionality of hardware devices (through diagnostic tests in maintenance
mode).
• Washes and added services are properly configured and wash outputs are
properly wired.
• The wash fault (Out of Service) signal places the C-Start out of service.
• C-Start Ethernet communications (through the Cat 5 cable).
• Credit card processing (Note: The merchant should confirm credit card
revenues are being properly deposited to their account).
• Functionality of any peripherals (gate/gate controller, RFID Option, etc.).

C-START
Document Number: CST1001 14
Document Name: C-Start Installation Manual
[THIS PAGE INTENTIONALLY LEFT BLANK]

C-START
Document Number: CST1001 15
Appendix A - POS Interface Option
The external POS option allows wash codes to be purchased at Point of Sale (POS registers
or gas pumps. This option includes a port conversion device, which connects between the
Unitec router and the C-store POS System. A 3ft Ethernet cable is included for connecting
the Ethernet port of the converter to the Unitec router (see Appendix B). A standard 9-pin
serial cable is included for connecting the Serial port of the converter to the C-Store POS
however, some POS systems may require an alternate cable (or adapter). Contact the POS
manufacturer for their cabling requirements.
Port Converter of External POS Interface Option
Document Name: C-Start Installation Manual

C-START
Document Number: CST1001 16
Appendix B - C-Start Networking
Unitec supplies a pre-programmed router for connecting devices as a local network.
The networked devices will vary based on options ordered and may include:
• One or more C-Start units
• A C-Start Console
• A POS Interface device (to communicate with a C-store POS System)
• A print server (for connecting a local report printer)
In cases where there will be more than (4) Unitec devices on the network, an
Ethernet switch will need to be added. The WAN port of the switch connects to one
of the LAN ports of the Unitec router. The additional devices can then be connected
to the LAN ports of the switch.
The illustration below provides a sample network diagram.
Example of Networked Unitec Devices
Document Name: C-Start Installation Manual
Table of contents
Popular Washer manuals by other brands

Siemens
Siemens WM12Q390GB Instructions for use

BorMann
BorMann PRO BWR5224 user manual

Vogue
Vogue DG400 Installation & operating manual

Alliance Laundry Systems
Alliance Laundry Systems FLW39H Series Preventative maintenance

Pkm
Pkm WA6-ES1015D instruction manual

Beko
Beko WM 6110 W Installation & operating instructions and washing guidance