Univa U336 NCP Series User manual

Eye-level and Under Counter
Ovens & Hobs
Convection & Multifunction
5607900-G/2021 V2.0
-Instruction Manual -
IN ORDER TO OBTAIN THE GREATEST SATISFACTION FROM
YOUR COOKWARE APPLIANCE, IT IS RECOMMENDED
YOU READ THE INSTRUCTIONS CAREFULLY.

2
Dear Customer:
Thank you for buying a quality Univa Electric Built-In Oven and Hob, designed
to give years of safe, convenient, economical and trouble-free cooking and
baking.
To ensure that you get the best performance from your appliance, please read
this instruction manual carefully. Familiarize yourself with the information as
it contains “How to use and take care of your appliance”, together with other
useful hints.
ALL SPECIFICATIONS ARE SUBJECT TO CHANGE WITHOUT PRIOR NOTICE
IMPORTANT!
Keep this Instruction Manual safe for future reference!
SAFETY WARNINGS--------------------------------------------------3
UNPACKING------------------------------------------------------------4
DISPOSAL OF THE APPLIANCE-------------------------------------4
CONNECTION TO THE POWER SUPPLY------------------------5
INSTALLATION --------------------------------------------------------6
OPERATING INSTRUCTIONS OVENS----------------------------12
OPERATING INSTRUCTIONS HOBS-----------------------------15
HOW TO SAVE ENERGY--------------------------------------------17
CLEANING AND MAINTENANCE---------------------------------18
TROUBLESHOOTING------------------------------------------------23
SPECIFICATIONS-----------------------------------------------------24
UNIVA GUARANTEE------------------------------------------------26
INTRODUCTION
CONTENTS

3
The appliance is not intended for use by persons (including children) with reduced
physical, sensory or mental capabilities, or lack of experience and knowledge, unless
it is done under the supervision of a responsible adult.
Do not allow children to play or tamper with the appliance.
During use the appliance becomes hot. Care should be taken to avoid touching
heated elements inside the oven or on the hob surface (plates).
Do not use harsh abrasive cleaners or sharp metal scrapers to clean the oven and
oven glass as it will scratch the surface, which may result in the inner/outer door
glass shattering.
Do not use a steam cleaner to clean the appliance.
The appliance is not intended to be operated by means of external timer or
separated remote-control system.
Danger of fire: Do not store flammable items inside or close to the appliance.
CAUTION: The cooking/baking process must be supervised continuously.
WARNING: Unattended cooking in the oven or on a hob with fat or oil can be
dangerous and may result in a fire. The appliance must not be installed behind a
decorative door to avoid overheating. The manufacturer shall not be liable for any
damage caused by improper use, installation, or handling.
SAFETY AND WARNINGS
CAUTION! Never use the oven or hob as a heater
Always disconnect the appliance from the mains power supply
before carrying out any maintenance or repairs.
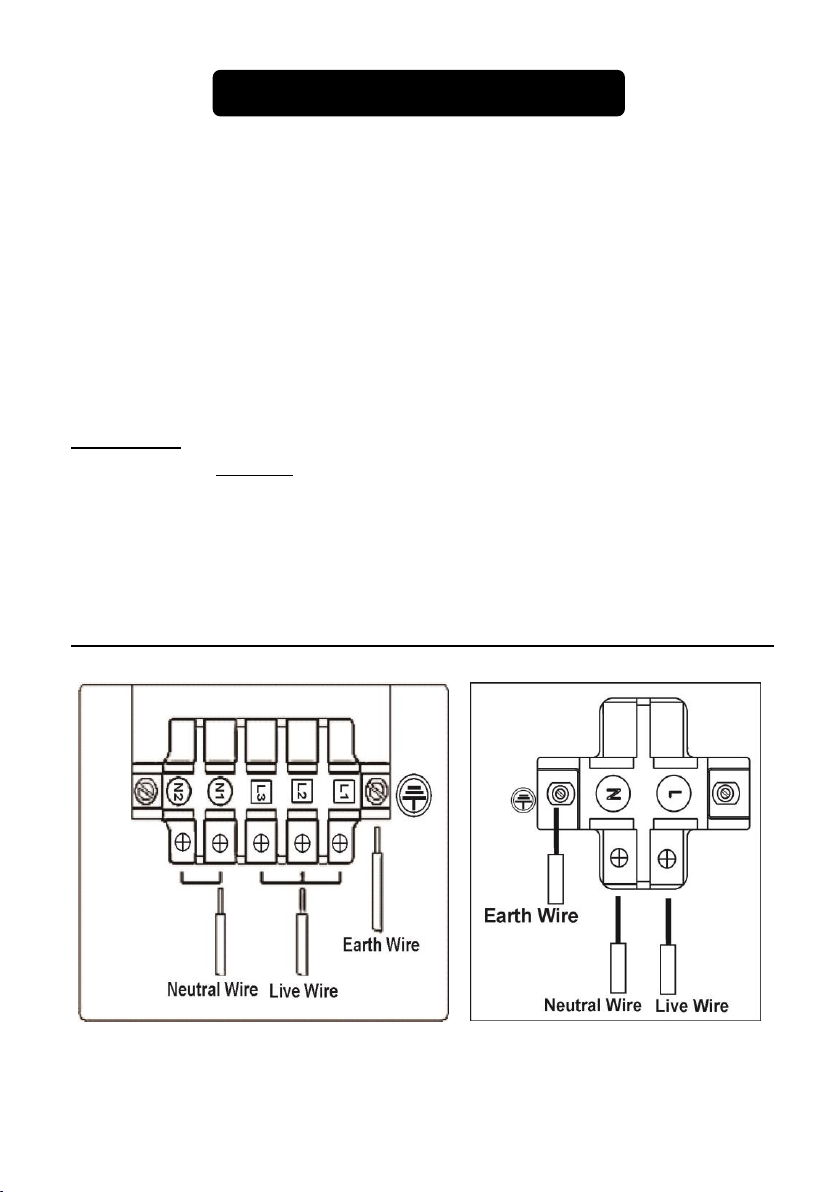
Connection to a good earth wiring system is essential and
mandatory. Alterations to the domestic wiring system must only be
made by a qualified electrician. Failure to follow this advice may
result in electrical shock or death.

4
During transportation, protective packaging was used to protect the
appliance against any damage.
After unpacking, please dispose of all elements of packaging in a way that
will not cause damage to the environment.
All packaging materials used for the appliance are environmentally friendly;
they are 100% recyclable and are marked with the appropriate symbol.
CAUTION!
Keep packaging materials such as polythene bags, polystyrene pieces, etc. out of
reach of children.
Old appliances should not simply be disposed with normal household waste
but should be delivered to a collection and recycling center for electric and
electronic equipment.
A symbol shown on the product, the instruction manual or the packaging
shows if it is suitable for recycling.
Materials used inside the appliance are recyclable and are labelled with the relevant
information. By recycling materials or other parts from used devices you are making
a significant contribution to the protection of our environment.
Information on appropriate disposal centers for used devices can be provided by
your local authority.
UNPACKING
DISPOSAL OF THE APPLIANCE

5
This appliance has a ‘Y’ type supply cord connection and must be installed by a licensed
electrician, who will ensure that the stove is correctly connected and safely earthed.
After installation, inspect the unit to make sure all connections are secured and
professionally installed and tightened.
If the supply cord is damaged for whatever reason, it must be replaced immediately.
The rated current is printed on the serial number label which is attached to the upper
back panel of the stove.
IMPORTANT!
The appliance must not be connected through an earth leakage system, please refer
to S.A.N.S. 10142.
The appliance must be connected to the mains through an isolator switch with a
minimum clearance of 3mm between the contacts.
OVEN and HOB CONNECTION TO POWER SUPPLY (According to different models):
CONNECTION TO THE POWER SUPPLY

6
U336* NCP (No Control Panel
)
HOB
CONNECTION TO U336*OVEN:
IMPORTANT!
Connect four Pairs of socket plugs to the corresponding color make sure the
connections are fit tightly!
U336CERAN NCP (No Control Panel
)
HOB
CONNECTION TO U336*OVEN:
The two wires coming from the Ceran Hob with round connectors should be installed
to the
“L”and
“
N
”terminals on the Oven terminal block.
The unit should be fitted by a qualified electrician or else the guarantee will become null
and void,the manufacturer accepts no liability for any incorrect installation. Installation
is not covered under the guarantee.
INSTALLATION
FROM HOB
FROM OVEN
WARNING!
Do not use adapters, reducers, or extension cords to connect this
appliance to the mains power supply.
Failure to follow this advice may result in overheating, burning, or fire.

7
Kitchen cupboards adjacent to the appliance i.e. synthetic laminates, adhesives and
surrounding edges should be able to withstand temperatures up to 1200Cwithout
discolouring or delaminating.
Ensure adequate ventilation for eye-level or under counter oven and hob
installation.
Remove all packaging materials and wipe the surface of the appliance with a
damp cloth and let the surface dry.
Hobs without a control panel should be installed directly above the oven.
A seal is supplied with the hob to prevent liquid spills penetrating between
the hob and worktop. Do not use silicone.
NOTE:
Heat up the appliance for +- 30 minutes to ensure any protective
coatings or layers are burnt off and removed, then switch the oven off.
Smoke and smell may emit for a couple of hours during the initial
operation. This is quite normal. Ensure that the room is well ventilated
to remove the smoke and smell. Avoid directly inhaling the smoke and
the smell that emits
Ensure
that
sufficient
ventilation
is
provided
for
the
oven
and
hob
Cupboard aperture for Under Counter oven and Eye-level oven:
Under Counter Oven Aperture 598H x 560 W x 565 D

8
IMPORTANT!
For adequate ventilation, a 30mm-40mm space is required between the rear of the
oven and the cabinet. An air vent hole is required in the cabinet
INSTALLATION OF THE OVEN:
1.
Position the oven in the
prepared cavity.
2.
Open the oven door fully.
3.
Use the screws to secure the
oven to the cabinetry.
IMPORTANT!
Do not lift the oven by the door
handle.
Do not over-tighten the screws.
Do not seal the oven into the cabinetry with silicone or glue. This makes future
servicing difficult. UNIVA will not cover the costs of removing the oven, or of
damage caused by this removal.
Eye-level Oven Aperture 598H x 560 W x 565 D

9
INSTALL OVEN RACK:
CUPBOARD APERTURE
FOR MODELS U336* NCP
(
No Control Panel
)
HOBS
:
Oven rack
Oven rack installation for all
ovens
U336* NCP HOB APERTURE
575 W x 480 D
U336* NCP CERAN HOB APERTURE
558 W x 488 D

10
U156* HOB APERTURE
575 W x 480 D
U156 CERAN HOB APERTURE
575 W x 480 D
CUPBOARD APERTURE FOR MODELS U156* CONTROL SWITCHES PANEL HOBS:
IMPORTANT!
Surfaces, synthetic laminates and adhesives used must be heat resistant (120°C
minimum).The materials of the mounting cabinet should take account of these
characteristics.
INSTALL THE SOLID PLATE HOBS and CERAN HOBS:
NOTE:
Use the screws to secure the HOB to the counter.
Do not over-tighten the screws.

11
IMPORTANT!
For adequate ventilation, a minimum space of 30mm (ceran hob) - 50mm
(solid plate hob) is required between the upper part of the oven and the
bottom of the HOB. There needs to be a vent hole in the front of the cabinet.
A gasket seal must be placed between the HOB and the counter to prevent
ablation of the counter surface (solid plate hob only).
INSTALL THE COOKER HOOD:

12
CONTROL KNOBS ON THE OVEN:
1. Oven function selection knob
2. Oven indicator light
3. Temperature control knob
4. Ringer Timer
5. Plate selector (U336 only)
6. Plate in use indicator light (U336 only)
USING OVEN:
The following symbols are indicated on the oven, depending on the model.
Oven Light –Stays on when oven is in use.
Convection Fan –Rapid cooling of the oven.
Defrost Mode –Using the bake-assist element to distribute hot air throughout
the oven.
Pre-heat –Reduces oven heat-up time. Remember to select “bake” when the
selected temperature has been reached.
Grill –Thermostatically controlled grilling. (The thermostat should be adjusted
along with the grill function in order to operate correctly.)
Fan Assisted Grill –Reduces the grill time and ensures succulent meat/ food.
Bake –The top and bottom elements operate together for conventional baking.
Fan Assisted Bake –Hot air is evenly distributed throughout the oven.
Bottom Bake –only bottom element works for moderate baking.
OPERATING INSTRUCTIONS - OVENS

13
Thermostat –All functions of the oven are thermostatically controlled. "H" is
the maximum temperature of 230°C.
Timer –60 Minute ringer timer.
60 MINUTE RINGER TIMER:
Set the time by turning the switch clockwise. The timer is
set for a maximum of 60 minutes and will ring once the
selected time has lapsed. To cancel the timer, turn the
switch to “0” position
NOTE:
The timer must be wind-up to 60 minutes and then
turned back to the required cooking time. Failure to
wind-up the timer will result in the timer not winding
down to zero and the alarm will not sound.
The mechanical ringer timer is only used for timing and it cannot cut off the
power supply of the oven and plates.
The oven is controlled by the function (A) and temperature (B) selection knobs.
NOTE:
Turn the temperature control knob to the required setting when using the oven
for baking or grilling. Remember to select which elements you want to use on
the selector switch, otherwise the oven will not work. The indicator light will go
off when the oven has reached the required temperature and will continue to
go “ON” & “OFF” as the oven is thermostatically controlled.
Remember to turn all switches to the ‘0’ position when oven is not in use.
A - Function
B - Temperature

14
Heat up the appliance for +- 30 minutes to ensure any production
residues or layers are burnt off and removed, then switch the oven off.
WARNING!
When using the pre-heating function, it is recommended that the oven door is closed.
When the grill is in use, accessible parts can become hot - Keep children away from
the oven.
Bake –Convection Oven(U336*/U246*)
Set the oven to the required temperature
Pre-heat the oven until the required temperature is reached
The indicator light will glow and remain on until the oven reached the selected
temperature. The indicator light will switch off at the selected temperature.
It is advisable to place the food in the middle of the oven
Use non-stick coated metal or aluminium baking trays
Select the correct shelf position for baking
The oven door must be closed during baking
The roast pan MUST not be used for baking, only for roasting
Bake –Multifunction Oven(U336*F/U246*F) (The Multifunction Oven uses fan
assist to distribute air evenly through the oven)
Set the oven to the required temperature
Pre-heat the oven until the required temperature is reached
The indicator light will glow and remain on until the oven reaches the selected
temperature. The indicator light will switch off at the selected temperature
It is advisable to place the food in the middle of the oven
Use non-stick coated metal or aluminium baking trays
Select the correct shelf position for baking
The oven door must be closed during baking
The roast pan MUST not be used for baking, only for roasting
Fan assist ovens require a slightly different technique from conventional ovens.
oWith the air flow this allows a lower temperature to be used. This will result
in roasts being more succulent and baked goods will have a better texture.
oWith baking the recipe time will stay the same but a lower temperature
needs to be used. The recommended lower temperature is between 10 and
20 degrees Celsius.
WITH PRACTICE EXCELLENT RESULTS WILL BE ACHIEVED
Grill –Convection and Multifunction Oven(U336*/U246*/U336*F/U246*F)

15
Select the correct shelf position to grill
The oven door must be partially open during grill
USING SOLID PLATES HOB (U336NCP/U156):
Plate Controls:
1. Left Front
2. Left Back
3. Right back
4. Right Front
Turn corresponding knob for selected plate clockwise, the plate indicator light will
show the plate is on. Once cooking is finished, turn off the plate by turning the
knob to ‘’0’’ position.
Caution:The plate will remain hot for a few minutes.
Plate knob
position
Ø145
1000W
(small plate)
Ø180
1500W
(large plate)
Ø180
RAPID 2000W
(Hi-speed plate)
1
100W
145W
177W
2
170W
225W
225W
3
255W
300W
300W
4
510W
865W
865W
5
750W
1150W
1150W
6
1000W
1500W
2000W
NOTE THE FOLLOWING:
To protect your plates and to ensure optimum function especially in coastal towns or
wet climates, do the following:
Switch the new plate on to the highest heat position.
Let it burn for the period of 4 minutes.
Switch the plates off and rub the surface with a small quantity of clean cooking oil.
Do not use previously used fats or cooking oils.
Repeat this treatment immediately after each plate has been used during the first
four weeks after purchase. It is important that this should be done while the plate
is still warm as the heat carbonizes the oil.
If this is repeated a sufficient number of times for each cooking plate, the pores
of the metal become filled by carbonized oil, thus sealing the surface of the plate
against the ingress of moisture or any corrosives such as salt and acid solutions.
OPERATING INSTRUCTIONS - HOBS

16
If any liquid is spilled on the plate while in use, wipe it off as soon as possible.
Never scrub the plate with harsh scouring powders, detergents or agents. Never
use steel wool on the plate.
Do not let moisture lie on a cold plate, wipe it off and switch the plate on for a few
minutes so that it can dry thoroughly.
Try to use all the plates regularly as an infrequently used plate tends to corrode. If
these precautions are taken, no undue rusting of the stove should be experienced,
even under coastal conditions.
Use a flat pan with the same base diameter as the plate.
IMPORTANT!
The warranty does not cover the replacement or repair of rusted or corroded solid
plates. It is the owner’s responsibility to care for them as described above.
USING CERAMIC HOB (U336C NCP/U156C):
RESIDUAL HEAT INDICATOR (HOT SURFACE INDICATOR) (FOR U336C* ONLY)
Each heating element has a corresponding residual heat indicator light. This light
switches on automatically when the temperature of the corresponding cooking
zone exceeds 60℃. Once a cooking zone has been turned off, the corresponding
residual light will stay on until the cooking zone has cooled down to 60℃.
WARNING!
During this time avoid touching the cooking zone and take precautions to
ensure children cannot touch the cooking zone.

17
NOTE THE FOLLOWING:
Before switching on, check which knob controls the desired cooking zone. It is
best to place the pot or pan on the cooking zone before switching on, and remove
it only after switching off.
Use only flat-bottomed pans/pots with a regular surface (caution must be taken
with cast iron pans). Irregular bottoms can scratch and damage the glass-ceramic
surface. Never use aluminum pots on the ceramic hob. Check that the bottom of
the pan / pot is clean and dry.
Recommended base thickness is 2-3mm for enameled steel and 4-6mm for
stainless steel bottom.
Never cook food directly on the glass-ceramic cooktop; always use suitable pots.
Be extra cautious as the cooking zones remain hot even once the plates have
been switched off.
Residual heat indicator light will remain on until cooking zones has sufficiently
cooled down to prevent burns and injuries.
It also helps save energy as it shows which cooking zones have enough residual
heat left for further cooking at a low temperature or to keep a dish warm
Do not use the cooktop if the surface is broken or damaged
Do not allow heavy or sharp objects to fall on the glass-ceramic cooktop.
CAUTION! Never use the hob as a heater!
Using energy in a responsible way, not only saves money but also helps the
environment. Save energy! This is how you can do it:
Use proper pans for cooking.
oPans with thick, flat bases can save up to 33% on electric energy.
Remember to cover pans with a lid if possible, otherwise you will use four
times as much energy!
Match the size of the saucepan to the surface of the heating plates.
oA saucepan should never be smaller than a heating plate.
Ensure heating plates and pan bases are clean.
oSoils can prevent heat transfer-and repeatedly burnt-on spillages can
often only be removed by products which cause damage to the
environment.
HOW TO SAVE ENERGY

18
Do not uncover the pan too often (a watched pot never boils!).
oDo not open the oven door unnecessarily.
Switch off the oven in good time and make use of residual heat.
oFor long cooking times, switch off heating zones 5 to 10 minutes before
cooking is completed. This saves up to 20% on energy.
Adequate cleaning and regular maintenance of the stove can have a significant
influence on the continuing fault free operation of the appliance.
CLEANING AND MAINTENANCE
WARNING!
Before cleaning, the stove must be switched off and all knobs must
be set to the “0” position.
Do not start cleaning until the oven has completely cooled.

19
CAUTION!
Do not use cleaning products containing abrasive materials for the cleaning and
maintenance of the glass front panel.
Do not use any abrasives, steel wool, chloride, etc., to clean the enameled surfaces.
Simply wipe with a damp cloth while the surface is still warm or use one of the
leading brands of oven-enamel cleaners on the market.
CLEANING THE OVEN
The oven should be cleaned after every use.
Cool the oven completely before cleaning.
Never clean the appliance with a pressurized hot steam cleaner!
The oven cavity should only be washed with warm water and a small amount of
dishwashing liquid.
Steam cleaning:
-pour 250ml of water (1 cup) into a bowl placed in the oven on the first level from
the bottom.
-Close the oven door,
-Set the temperature knob to 50 ℃, and the function knob to the bottom bake
position, heat the oven chamber for approximately 30 minutes,
-Open the oven door, wipe the chamber inside with a cloth or sponge and wash
using warm water with dishwashing liquid.
After cleaning the oven cavity, wipe it dry.
CLEANING THE HOB PLATES
For light soiling and everyday cleaning simply wipe with a moist cloth.
For dirty hotplates use a commercial cleaner.
Be careful to completely remove the cleaner and dry the hotplate by running the
element for a short time.
The plates can be then oiled with a thin coating of vegetable oil or a suitable
commercial product.
Some discoloration of the trim ring is normal during use.
CLEANING THE CERAMIC HOB
Regular cleaning after use will prevent dirt build up and ensure that the hob
remains in good condition.

20
1
2
Spillage (especially sugar solution such as jam) should be wiped off
immediately with a damp cloth while the hob is still warm.
If necessary stubborn spills may be removed using a blade scraper and
smooth top cleaner (Scraper can be purchased from most Hardware and
Retail Stores).
Clean the hob with a damped cloth and ‘Smooth top cleaner’.
Wipe the hob surrounds with a hot soapy cloth and dry thoroughly.
CLEANING THE KNOBS AND CONTROL PANELS
As these are specially designed and easy to clean, wipe with a damp cloth only.
HOW TO REMOVE THE OVEN DOOR
To obtain easier access to the oven cavity for cleaning, it is possible to remove the
door.
After the door is fitted to the oven, the safety catch should be carefully
lowered down again. If the safety catch is not set, it may cause damage to
the hinge when closing the door.
This manual suits for next models
1
Table of contents
Other Univa Oven manuals
Popular Oven manuals by other brands

STOVES
STOVES Richmond 55DF Users guide & installation handbook

SCHOLTES
SCHOLTES BC 99 T P XA AUS operating instructions

Atag
Atag CX4695C/A01 Instructions for use

Roller Grill
Roller Grill FCV 280 B Instructions for use and installation

Costway
Costway ES10091US-SL user manual

Harbour
Harbour HBROB605 instruction manual