Univa U336B User manual

Eye-level and Undercounter
Ovens & Hobs
Convection & Multifunction
-Instruction Manual -
Congratulations on your purchase of a Univa
product and to ensure that your product works to
its peak performance please read the instruction
booklet carefully.
5607900-D/2020 V1.0

2
Dear Customer;
To ensure that you get the best performance from your superb quality product, please
read this instruction manual carefully. Familiarize yourself with the information as it
contains “How to use and take care of your product”, together with other useful hints.
ALL SPECIFICATIONS ARE SUBJECT TO CHANGE WITHOUT PRIOR NOTICE
A - SAFETY INSTRUCTIONS
B - CONNECTION TO THE POWER SUPPLY
C - INSTALLATION
D - OPERATING INSTRUCTIONS (Ovens)
E - OPERATING INSTRUCTIONS (Hobs)
F - GENERAL HINTS AND CLEANING NOTES
G - USEFUL HINTS
H - CONVERSION TABLE
I – DIMENSIONS & INSTALLATION OF HOB, OVEN & COOKER HOOD
J - SPECIFICATIONS
K - UNIVA GUARANTEE
INTRODUCTION
CONTENT
A - SAFETY INSTRUCTION

3
The appliance is not intended for use by persons (including children) with reduced
physical, sensory or mental capabilities, or lack of experience and knowledge, unless
it is done under the supervision of a responsible adult.
•
Do not allow children to play or tamper with the appliance.
•
During use the appliances become hot. Care should be taken to avoid touching
heated elements inside the oven or on the hob surface.
•
Do not use the appliance when it is defective.
•
Do not use the appliance if it has any damage.
•
Make sure all switches/functions are switched off after use.
•
Never soak the product by spreading water or pouring water onto it to clean the
product.
•
None of the electrical connections should touch at the rear panel of the oven as
the rear surface gets hot during use. (The wires should be connected to the
terminal block and should not hang down the back of the oven.)
•
Do not repair or make any modifications to the appliance.
•
Do not use harsh abrasive cleaners or sharp metal scrapers to clean the oven and
oven door glass as it will scratch the surface, which may result in the inner/outer
door glass shattering.
•
Do not use a steam cleaner to clean the appliance.
•
The appliance is not intended to be operated by means of an external
timer or a separate remote-control system.
•
Danger of fire: Do not store flammable items close to the appliance.
CAUTION: The cooking/baking process must be supervised continuously.
WARNING: Unattended cooking in the oven with fat or oil can be dangerous and may
result in a fire. The appliance must not be installed behind a decorative door to avoid
overheating. The manufacturer shall not be liable for any damage caused by
improper use or handling.
WARNING: Accessible parts may become hot during use. Do not allow young
children close to the appliance.
B - CONNECTION TO THE POWER SUPPLY

4
The appliance must be installed by a licensed Electrician, who will ensure that the
stove is correctly connected and safely earthed.
After installation, inspect the units to make sure all connections are secured
and properly installed/tightened. If the supply cord is damaged for whatever
reason, it must be replaced immediately.
This appliance must not be connected through an earth leakage system, please refer
S.A.N.S
10142. The appliance must be connected to the main through a double pole
isolating switch.
The unit should be fitted by a qualified electrician or else the guarantee will
become null and void,the manufacturer accepts no liability for any incorrect
installation. Installation is not covered under the guarantee.
Kitchen cupboards adjacent to the appliance i.e. synthetic laminates, adhesives and
surrounding edges should be able to withstand temperatures up to 1000C without
discolouring or delaminating.
•
Ensure adequate ventilation for eye-level or under counter oven
and hob installation.
•Remove all packaging materials and wipe the surface of the appliance with a
damp cloth and let the surface dry.
•
Hobs without a control panel should be installed directly above the oven.
C - INSTALLATION

5
•
A seal is supplied with the hob to prevent liquid spills penetrating between the
hob and worktop. Do not use silicone.
*
Ensure
that
sufficient
ventilation
is
provided
for
the
oven
and
hob
OVENS
Convection Fan – Rapid cooling of the oven.
Defrost Mode –Using the bake-assist element to distribute hot air throughout
the oven
Pre-heat –Reduces oven heat-up time. Remember to select “bake”
when the selected temperature has been reached.
Grill –Thermostatically controlled grilling. (The thermostat should to be adjusted
along with the grill function in order to operate correctly.)
Fan Assisted Grill – Reduces the grill time and allow for succulent meat / food
Bake – The top and bottom elements operate together for conventional
baking.
Fan Assisted Bake – Hot air is evenly distributed throughout the oven.
Thermostat – All functions of the oven are thermostatically controlled.
Timer – Turn clockwise to 60 min then turn anti-clockwise to
the required time
Important: Initial heating before you use your appliance:
Heat up the appliance for +- 30 minutes to ensure any protective coatings or layers
are burnt off and removed, then switch the oven off.
D - OPERATING INSTRUCTIONS - OVENS

6
Bake – Convection Oven
(U336B / U336CB / U336SS / U336CS / U336M/ U246B / U246SS / U246M)
•
Set the oven to the required temperature
•
Pre-heat the oven until the required temperature is reached
•
The indicator light will glow and remain on until the oven reached the selected
temperature. The indicator light will switch off at the selected temperature
•
It is advisable to place the food in the middle of the oven
•
Use non-stick coated metal or aluminium baking trays
•
Select the correct shelf position for baking
•
The oven door must be closed during baking
•
The roast pan MUST not be used for baking, only for roasting
Bake – Multifunction Oven (The Multifunction Oven uses a fan assist to distribute
air evenly through the oven)
(U336BF / U336CF / U336SF / U336MF / U246BF / U246SF / U246MF)
•
Set the oven to the required temperature
•
Pre-heat the oven until the required temperature is reached
•
The indicator light will glow and remain on until the oven reached the selected
temperature. The indicator light will switch off at the selected temperature
•
It is advisable to place the food in the middle of the oven
•
Use non-stick coated metal or aluminium baking trays
•
Select the correct shelf position for baking
•
The oven door must be closed during baking
•
The roast pan MUST not be used for baking, only for roasting
•
Fan assist ovens require a slightly different technique from conventional ovens.
oWith the air flow this allows a lower temperature to be used. This will result in
roasts being more succulent and baked goods will have a better texture.
oWith baking the recipe time will stay the same but a lower temperature needs to
be used. The recommended lower temperature is between 10 and 20 degrees
Celsius.
WITH A LITTLE PRACTISE EXCELLENT RESULTS WILL BE PRODUCED
Grill – Convection Oven
(U336B / U336CB / U336SS / U336CS / U336M/ U246B / U246SS / U246M)
•
Select the correct shelf position to grill
•
The oven door must be partially open during grill

7
Grill – Multifunction Oven (The Multifunction Oven uses a fan assist to distribute air
evenly through the oven)
(U336BF/ U336CF / U336SF / U336MF / U246BF / U246SF / U246MF)
•
Select the correct shelf position to grill
•
The oven door must be partially open during grill
Remember to turn all switches to the ‘0’ position when oven is not in use.
Solid Plates
•
Select the heat level by turning the relevant control knob to the required setting.
(The higher the number, the hotter the temperature of the plate)
•
Use pots with a solid flat base
•
Use pots with a base diameter similar as the plate you select to use, this will allow
for even heat distribution
E – OPERATING INSTRUCTIONS - HOBS

8
For 600mm range Ceramic Hob only
RESIDUAL HEAT INDICATOR (HOT SURFACE INDICATOR)
Each heating element has a corresponding residual heat indicator light. This light
switches on automatically when the temperature of the corresponding cooking zone
exceeds 60℃. Once a cooking zone has been turned off, the corresponding residual
light will stay on until the cooking zone has cooled down to 60℃.
During this time avoid touching the cooking zone and take precautions to ensure
children cannot touch the cooking zone.
Before cleaning or repairing your oven, remember to switch off the electric appliance at
the main switch.
1. Set the oven Rotary Selector switch and all heating plate switches to “0” position
when the stove is not in use.
2. OVEN AND ENAMEL SURFACES
Do not use any abrasives, steel wool, chloride etc., to clean stainless steel or enamel
surfaces.
Simply wipe with a damp cloth while the surface is still warm or use one of the
leading brands of oven-enamel cleaners on the market.
DO NOT USE ALUMINUM FOIL TO COVER THE BOTTOM OF THE OVEN AS
THIS WILL CAUSE DAMAGE TO THE ENAMEL AND ELEMENT
3. KNOBS AND CONTROL PANELS
As these are specially designed and easy to clean, wipe with a damp cloth only.
F - GENERAL HINTS & CLEANING NOTES

9
4. SOLID HEATING PLATES
To protect your plates and ensure the best service especially in coastal towns
or wet climates, do the following:
•Switch the new plate on to the highest heat position.
•Let it burn for the period of 4 minutes.
•Switch the plates off and rub the surface with a small quantity of clean cooking
oil. Do not use previously used fats or cooking oils.
•Repeat this treatment immediately after each plate has been used during the
first four weeks after purchase. It is important that this should be done while the
plate is still warm as the heat carbonizes the oil.
If this is repeated a sufficient number of times for each cooking plate, the pores
of the metal become filled by carbonized oil, thus sealing the surface of the
plate against the ingress of moisture or any corrosives such as salt and acid
solutions. Once a hard, black layer has been formed by treating the plate as
recommended above, the plate needs very little attention other than being kept
clean and dry.
•If any liquid is spilled on the plate while in use, wipe it off as soon as possible.
•Never scrub the plate with harsh scouring powders, detergents or agents,
never use steel wool on the plate.
•Do not let moisture lie on a cold plate, wipe it off and switch the plate on for a
few minutes so that it can dry thoroughly.
•Try to use all the plates regularly as an infrequently used plate tends to
corrode. If these precautions are taken, no undue rusting of the stove should
be experienced, even under coastal conditions.
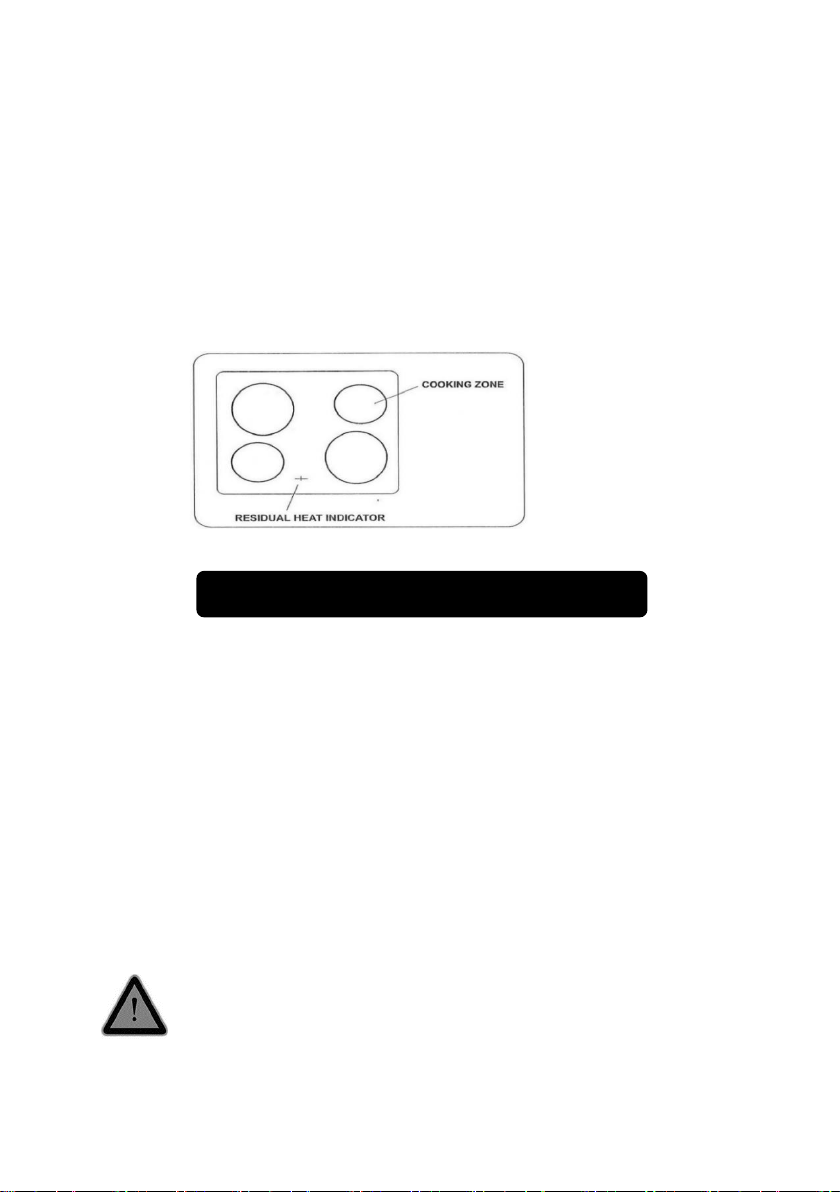
SAFETY TIPS FOR USING THE CERAMIC COOKTOP
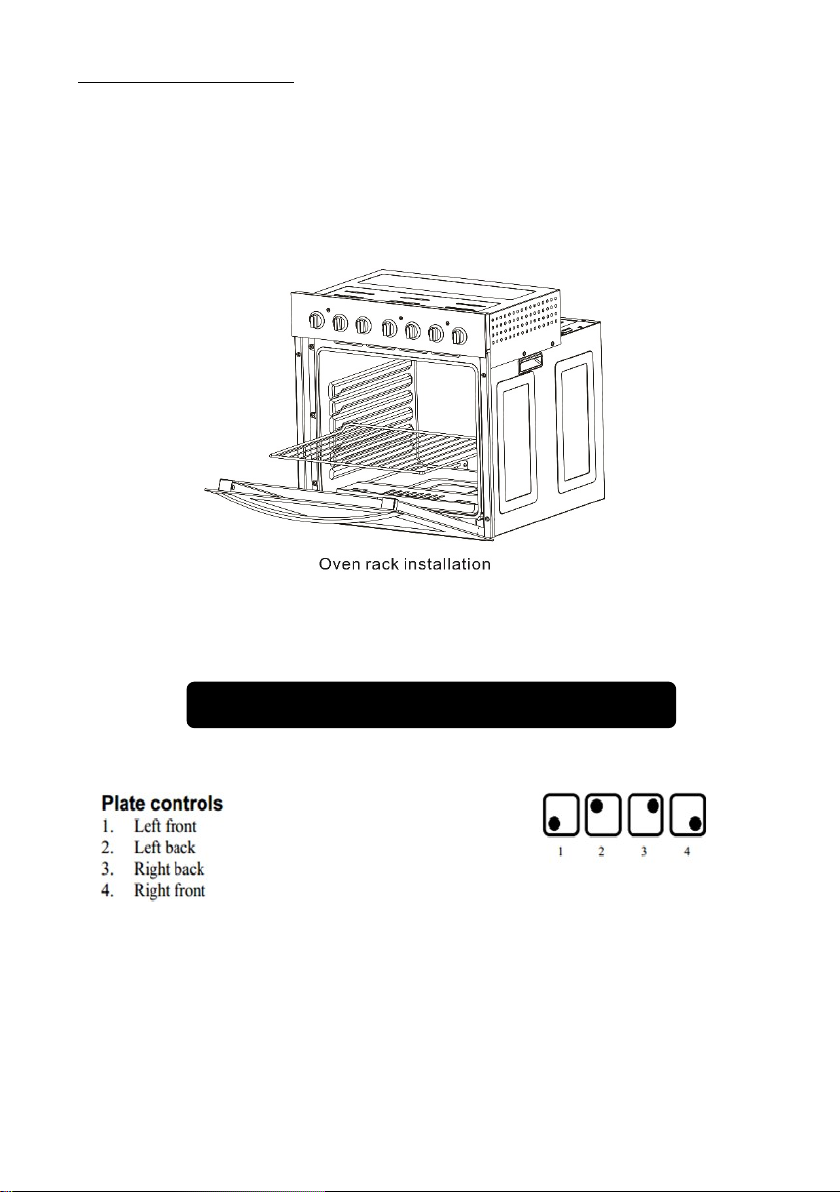
a. Before switching on, check which knob controls the desired cooking zone. It is
best to place the pot or pan on the cooking zone before switching on and
remove it only after switching off.
b. Use only flat-bottomed pans/pots with a regular surface (caution must
be taken with cast iron pans). Irregular bottoms can scratch and damage
the glass-ceramic surface. Check that the bottom is clean and dry.
c. Recommended base thickness 2-3mm for enamelled steel and 4-6mm for
stainless steel with sandwich bottom.
d. Never cook food directly on the glass-ceramic cooktop; always use suitable

10
Pots.
e. Be extra cautious as the cooking zones remain hot for up to 30 minutes
after it has been switched off.
f. Residual heat indicator displays and point out hot cooking zones toprevent
burns and injuries.
g. It also helps save energy as it shows which cooking zones have enough
residual heat left for further cooking at a low temperature or to keep a
dish warm.
h. Do not use the cooktop if the surface is broken or damaged.
i. If you find a crack on the cooktop, disconnect the appliance from the mains
electricity immediately and contact the After-sales Service.
j. Do not allow heavy or sharp objects to fall on the glass-ceramic cooktop.
CAUTION! Never use the hob as a heater!
CLEANING THE CERAMIC HOB
k. Regular cleaning after use will prevent dirt build up and ensure that the hob
remains bright and attractive.
l. Spillage (especially sugar solution such as jam) should be wiped off
immediately with a damp cloth while the hob is still warm.
m. If necessary stubborn spills may be removed using a blade scraper (Scraper can
be purchased from most Hardware and Retail stores).
n. Clean the hob with a damp cloth and smooth top cleaner.
o. Wipe the hob surround with a damp hot soapy cloth and dry.

11
G - USEFUL HINTS
H - CONVERSION TABLES

12
I - DIMENSIONS & INSTALLATION OF HOB, OVEN & COOKER HOOD

13
Ventilation
For adequate ventilation, a 30mm-40mm space is required between the
rear of the oven and the cabinet
Reminder: An air vent hole is required in the cabinet

14
U336B
/M/BF
U336SS
/SF
U336CB
/CF
U336CS
/CSF
DIMENSIONS-OVEN
-Height (mm) 606 606 606 606
-Width (mm) 598 598 598 598
-Depth (mm)
-Weight (kg)
555
32
555
32
555
32
555
32
DIMENSIONS-HOB
-Height (mm) 60 60 60 60
-Width (mm) 600 600 600 600
-Depth (mm)
-Weight (kg)
510
8.7
510
8.7
530
6.6
530
6.6
APERTURE-OVEN
-Height (mm) 600 600 600 600
-Width (mm) 560 560 560 560
-Depth (mm) 580 580 580 580
APERTURE-HOB
-Width (mm) 525 525 558 558
-Depth (mm) 445 445 488 488
PLATE
-1000W Solid Plates 2 2
-1500W Solid Plates
-2000W Solid Plates
1
1
1
1
-1200W Radiant Plates
2 2
-1800W Radiant Plates
2 2
-6 Position Control Switch 4 4 4 4
-Hot Surface Indicator
4 4
J - SPECIFICATIONS

15
U336B/
MF/BF
U336SS
/SF
U336CB
/CF
U336CS
/CSF
OVEN
-Oven Capacity (L) Gross
-Oven Capacity (L) Nett
84
72.8
84
72.8
84
72.8
84
72.8
-Oven Height (mm) 390 390 390 390
-Oven Width (mm) 480 480 480 480
-Oven Depth (mm) 450 450 450 450
-Combination Grill
Element
1800W/300W
•
•
•
•
-Bake Element 1500W • • • •
-Oven Light • • • •
-5 Positions Thermo Control
With Pre-Heat Function
• • • •
-Roast Pan • • • •
-Oven Rack 2 2 2 2
-Easy clean Enamel • • • •
COLOR
-Black • •
-Stainless Steel • •
OTHERS
-Cable • • • •
-Timer • • • •
-Ceramic Hob • •
-Voltage 230Vac/50Hz • • • •
-Max. Power (kW) 8.7 8.7 9.7 9.7

16
U246B
/M/BF
U246SS
/MF/SF
U156B
U156SS
U156CB
TYPE
•
•
•
•
•
-Built-in Hob
-Eye level Oven
DIMENSIONS-OVEN
-Height (mm) 606 606
-Width (mm) 598 598
-Depth (mm)
-Weight (kg)
555
32
555
32
DIMENSIONS-HOB
-Height (mm)
100 100 100
-Width (mm)
600 600 605
-Depth (mm)
510 510 530
APERTURE-OVEN
-Height (mm) 600 600
-Width (mm) 560 560
-Depth (mm) 580 580
APERTURE-HOB
-Width (mm)
572 572 572
-Depth (mm)
480 480 480
PLATE
-1000W Solid Plates
2
2
-1500W Solid Plates
1
1
-2000W Solid Plates
1
1
-1200W Radiate Plates
2
-1800W Radiate Plates
2
-6 Position Control Switch
4
4
4
-Hot Surface Indicator
4

17
U246B/
M/BF
U246SS
/MF/SF
U156B
U156SS
U156CB
OVEN
-Oven Capacity (L) Gross
-Oven Capacity (L) Nett
84
72.8
84
72.8
-Oven Height (mm)
390
390
-Oven Width (mm)
480
480
-Oven Depth (mm)
450
450
-Combination Grill
Element
1800W/300W
• •
-Bake Element 1500W • •
-Oven Light • •
-5 Positions Thermo
Control With Pre-Heat
Function
• •
-Roast Pan • •
-Oven Rack
2 2
-Easy clean Enamel • •
COLOR
•
•
-Black
• •
-Stainless Steel
•
OTHERS
-Cable • • • • •
-Timer • •
-Ceramic Hob
•
-Voltage 230Vac/50Hz • • • • •
-Max. Power (kW)
3.7
3.7
5.5
5.5
6.0

18
This guarantee is issued by Univa in respect of all products manufactured and
sold by Univa. The liability to Univa is limited to the following conditions:
1.
This guarantee operates in favour of the original purchaser of new appliances only
and cannot be ceded, assigned or transferred. Univa shall have no liability in
respect of second hand goods or to second or subsequent purchasers of any
appliances.
2.
This guarantee shall operate for a period of Two Years from the date of original
purchase of the appliance which date shall be proved to the reasonable satisfaction
of a Univa authorized service Agent or consultant.
3.
The liability of Univa shall be limited to the repair or replacement by a Univa
authorized service dealer in its sole discretion of the defective parts of the
appliance at its sole cost. Univa shall not be liable for any loss or damage suffered
by the customer or any other party or caused to the appliance arising from
negligent use.
4.
Should the defective appliance be situated further than 50 km from the nearest
Univa service centre or authorized service agent, Univa shall be entitled to charge
its customer a travelling rate for such distance in excess of 50 km.
5.
The liability of Univa shall be limited in respect of defective parts or material or in
respect of defective workmanship only. Univa authorized service agent shall have no
liability if in its opinion the defect or fault was caused through faulty installation,
accidental damage, incorrect usage, misuse or abuse or failure to follow the
operating instructions and any acts of God, or force majeure. Univa shall not be
obliged to replace light bulbs, fuses, vitreous enamelware, burners, burner parts,
rings and any other items which Univa in its sole discretion determines that the life
of such item depends on the amount of use and care taken in respect of suchitem.
6.
The guarantee shall become void and cease to operate if the appliance is dismantled
by or any repairs to the appliance are affected by any persons not duly authorized
by Univa, or if any non-genuine Univa parts are used in the appliance, or if the serial
number of the appliance is removed.
7.
The product has been designed and manufactured for normal domestic use and the
warranty will accordingly become void and cease to operate if the product is not
used for domestic purposes.
8.
If the customer is unable to prove the date of purchase of the appliance to the
reasonable satisfaction of the representative of a Univa authorized service agent or
if no fault or defects are found in the appliance, a Univa authorized service agent
shall be entitled to charge for the work done and travelling expenses incurred.
K - UNIVA GUARANTEE

19
Univa (Pty) Ltd. adheres to the Consumer Protection Act, 2008 as per the Government
Gazette for the Republic of South Africa. Volume 526, Dated 29 April 2009, Number
32186
*ALL SPECIFICATIONS ARE SUBJECTED TO CHANGE WITHOUT PRIOR NOTICE
This manual suits for next models
14
Table of contents
Other Univa Oven manuals
Popular Oven manuals by other brands

STOVES
STOVES Richmond 55DF Users guide & installation handbook

SCHOLTES
SCHOLTES BC 99 T P XA AUS operating instructions

Atag
Atag CX4695C/A01 Instructions for use

Roller Grill
Roller Grill FCV 280 B Instructions for use and installation

Costway
Costway ES10091US-SL user manual

Harbour
Harbour HBROB605 instruction manual