Uplift Desk MVT003 User manual

®
E3 Under Desk Exercise Bike Instructions
MVT003
MVT003/R02
Package contents
M8x50 bolt
(qty 4)
Main frame
Front foot
Pin
Back foot Seat Back post
Seat post Back cushion
Right & Left pedals Handlebars M8 acorn nut
(qty 6)
Arc washer
(qty 6)
Flat washer
(qty 9)
Back height knob
M8 nut
(qty 3)
Back foot cover
M8x16 screw
(qty 4)
Wrench
M8x45 screw
(qty 2)
Allen wrench
Step 1
Unfold the bike so that it rests upright on the oor with both legs
steady on the ground. Then insert the pin into the middle hole at the
axis of the Main frame.
Step 2
Attach the Front foot with two (2) M8x50 bolts and two (2) Arc
washers and lock them in place with two (2) M8 acorn nuts.
Tighten using the Wrench.
Attach the Back foot to the Main frame with two (2) M8x50 bolts
and two (2) Arc washers and lock them in place with two (2) M8
acorn nuts. Finish by clipping the Back foot cover over the Back
foot.
Step 3
It’s now time to thread the wires for the heart rate monitor through
the back and seat of the bike. Insert the lower wires of the Back post
into the large hole on the Seat post and feed them through to the
opening at the bottom. When you start to see the wires come out of
the bottom, hold the wire end still, and slide the Seat post up closer
to the Back post to reduce the slack between the parts.
NOTE: Be careful to not pull the top end of the wire inside the Back
post. Both ends of the wire should be accessible.
Align the holes as shown, and insert four (4) M8x16 screws and four
(4) Flat washers, and tighten using the Allen wrench.
Step 4
Connect the wires on the Handlebars to the top end of the wires in
the Back post. Hold on to the lower end of the wires and pull it in
enough to bring the Handlebar and Back post together and attach
using two (2) M8x45 screws, two (2) Arc washers, and two (2) M8
nuts and tighten using the Wrench.
+4 scerws
+4 scerws
+4 scerws
+4 scerws
+4 scerws
+4 scerws
+4 scerws
+4 scerws
+4 scerws
+4 scerws
+4 scerws
+4 scerws
+4 scerws
+4 scerws
+4 scerws
+4 scerws
+4 scerws
+4 scerws

Step 7
Slide the Back cushion over the Back post and insert the Back height
knob. Allow spring-loaded pin on Back height knob to engage in the
hole at the height you prefer. Tighten the Back height knob to secure
it in place.
Step 8
Attach the Right and Left pedals to each crank arm, and tighten them
with the Wrench. Tighten the Right pedal clockwise, and tighten the
Left pedal counterclockwise. Each foot’s pedal straps can be adjusted
to t different users’ feet sizes.
NOTE: Pedaling backwards will loosen pedals.
Step 5
Connect the wires from the Main frame to those in the seat and back
assembly. Tuck all the wires down into the Main frame.
Insert the seat assembly by pulling the Seat height knob out,
squeeze the spring-loaded balls on the Seat post together, and slide
the Seat post into the Main frame.
Allow spring-loaded pin on Seat height knob to engage in a hole at
the height you prefer. Tighten the Seat height knob to lock in place.
Step 6
Attach the Seat to the Seat post with three (3) M8 Nuts and three
(3) Flat washers, and tighten using the Wrench.

Cycling tension: Turn the resistance
dial in the + direction to increase the
resistance and in the - direction to
reduce the resistance.
Back height: Turn counterclockwise to
unlock, and raise or lower the Back to
your ideal back height. Spring loaded
pin should engage in a hole.
Turn clockwise to tighten.
Seat height: Turn counterclockwise to unlock,
and pull out to free the seat for height adjustment.
Spring loaded pin should engage in a hole.
Turn clockwise to tighten.
Foot Straps: Adjust the
straps to t your foot.
To turn on the Console, insert two (2) AA 1.5V batteries.
Mode Key under the LCD Display lets you select a desired function.
Reset the data to zero by pressing the Mode Key for several seconds.
To reset the odometer, remove and replace the batteries.
The processor turns off automatically when the spin sensor has
no signal input or no key is pressed for approximately 4 minutes.
The LCD Display can be activated again by pressing the Mode Key
or by rotating the pedals.
Modes:
SCAN: Scans through all functions
TMR: Timer
SPD: Speed (MPH)
DIS: Distance (miles)
CAL: Calories burned
ODO: Odometer (total miles pedaled in multiple sessions)
RPM: Revolutions per minute
P: Pulse - Place the palms of your hands on the pulse sensors
on the handlebars for 4-5 seconds. It will display your current
heart rate in beats per minute (bpm).
LCD Display
Mode Key
Adjustment Guide
Console and settings
8.8:8.8
font DS-Digital
SCAN TMR SPD DIS CAL ODO RPM P
KM
ML
8.8:8.8
font DS-Digital
SCAN TMR SPD DIS CAL ODO RPM P
KM
ML
8.8:8.8
font DS-Digital
SCAN TMR SPD DIS CAL ODO RPM P
KM
ML

Copyright Notice: These instructions are a component of the UPLIFT Desk E3 Under Desk Exercise Bike. These instructions are part of the scope of delivery, even if the item is resold. These instructions are also
available on the UPLIFT Desk website: upliftdesk.com. Excerpts or copies may not be forwarded to third parties or used in any other published form without the prior written consent of UPLIFT Desk.
These instructions are subject to United States copyright law.
©
!
!
!
!
!
!
!
!
!
!
!
!
CAUTION:
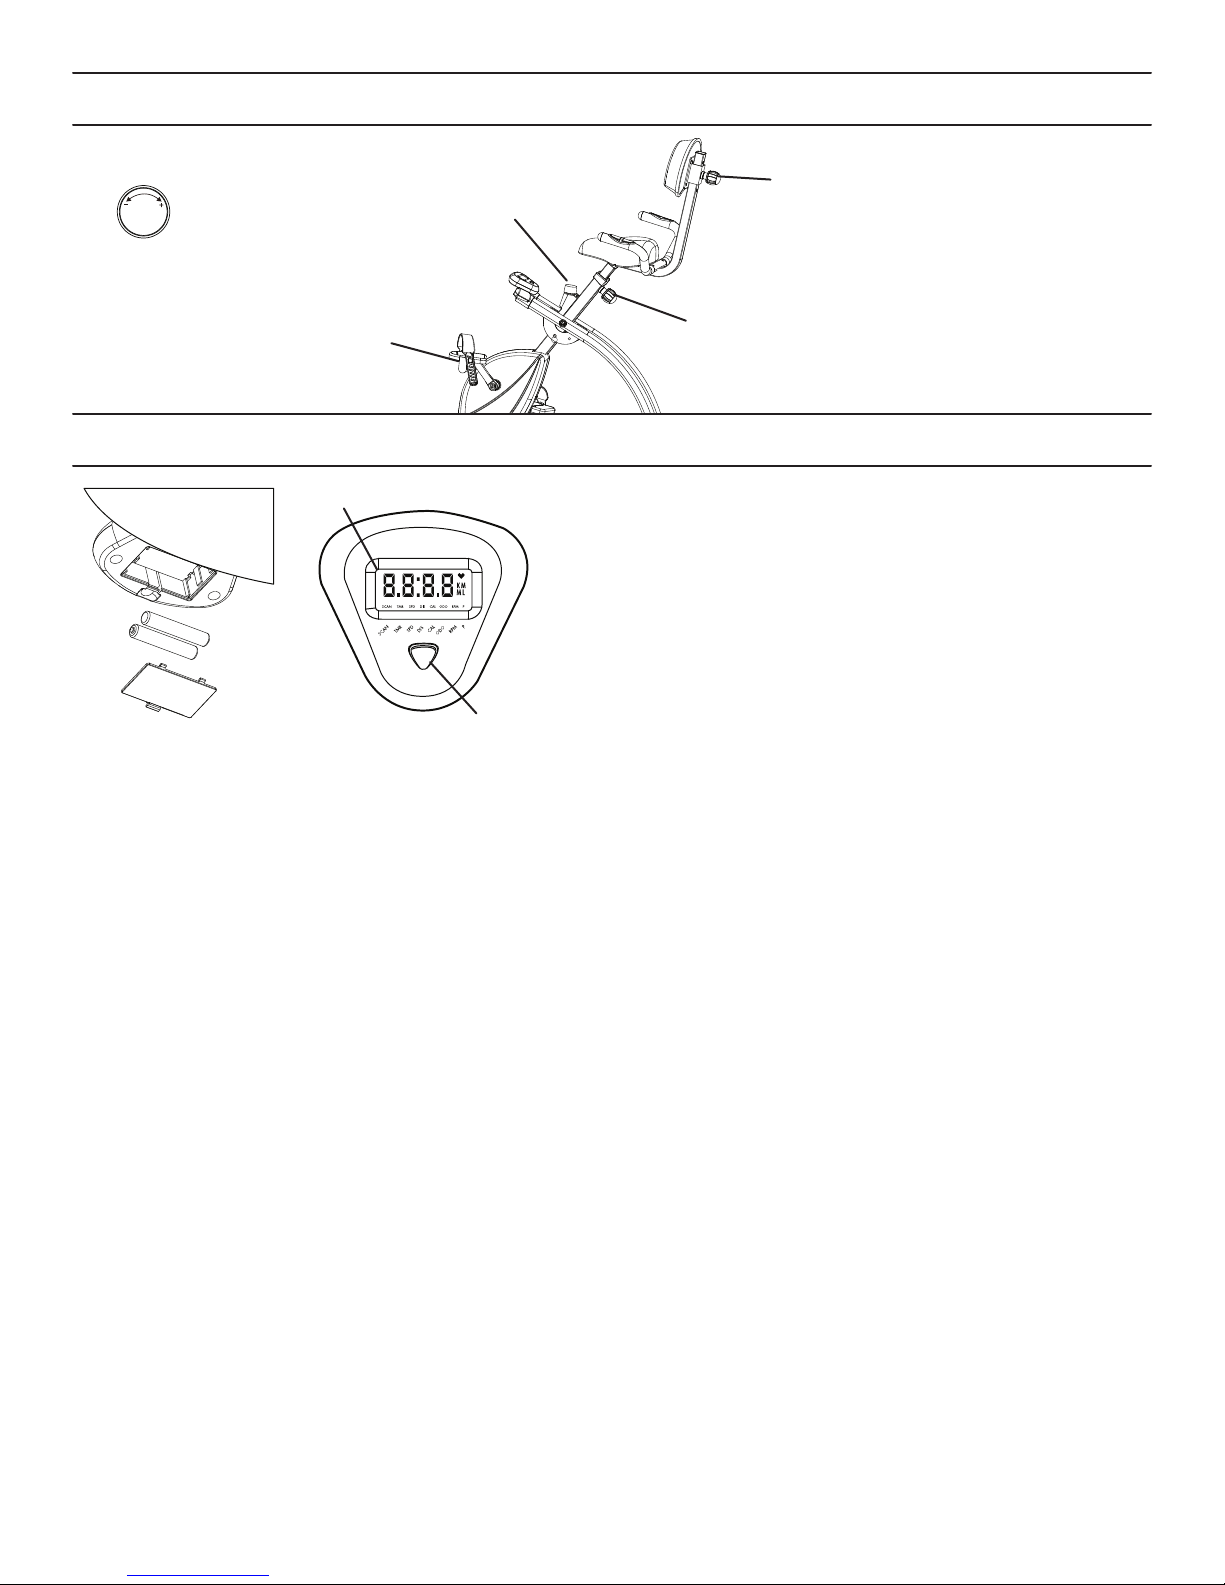
Make sure you read and fully understand this instruction manual.
CAUTION:
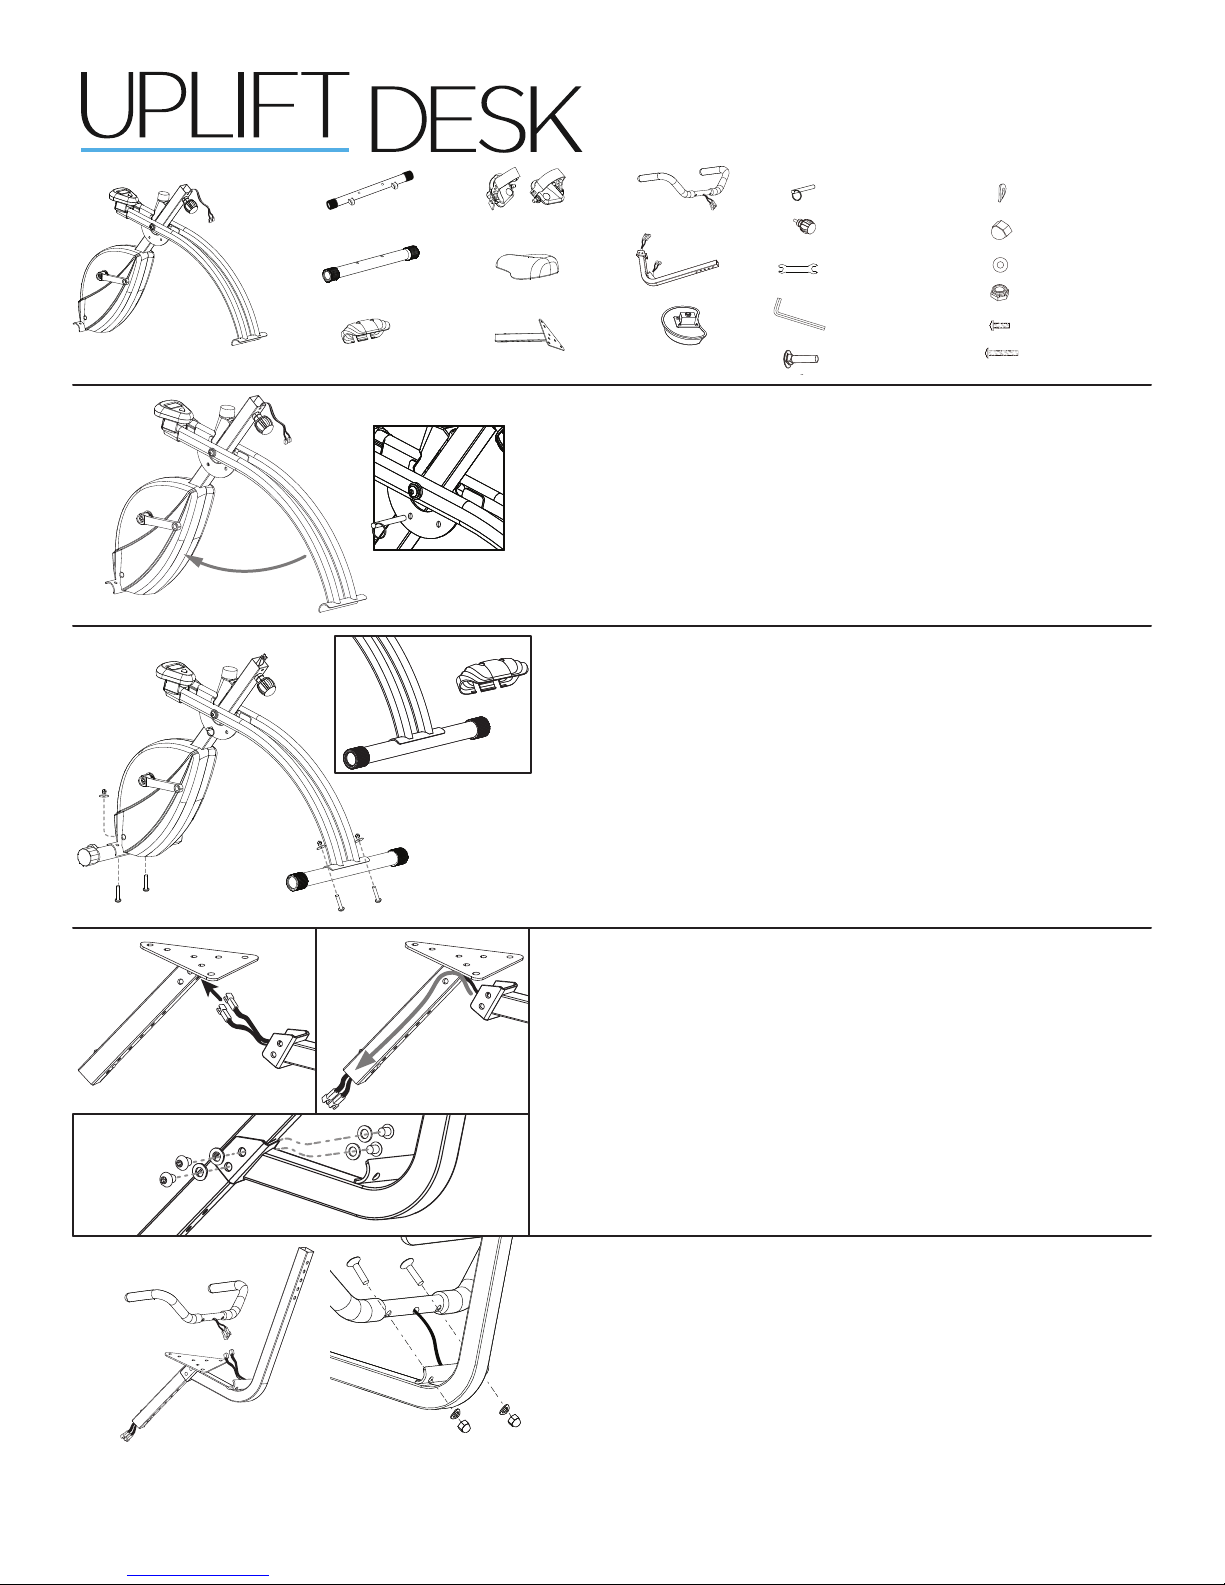
Read all instructions before assembly. Failure to assemble properly may result
in damage or personal injury.
CAUTION:
It is the user’s responsibility to read and understand all potential hazards of
this exercise equipment.
CAUTION:
Consult a physician before you begin a new exercise program. If you should
experience pain, or you feel faint, short of breath, or dizzy, stop exercising and consult
a physician. Incorrect or excessive use of this machine can result in injury.
CAUTION:
This machine is not a toy. Keep children away from this exercise bike, espe-
cially while in use. Children should be taught to never put their ngers near any moving
parts on this machine.
CAUTION:
Your exercise bike should be operated on a stable, level surface.
CAUTION:
Please keep children away from this exercise bike, especially while in use.
Minors are strongly recommended not to use this product, since it’s designed for adults.
CAUTION:
You should mount and dismount your exercise bike carefully.
CAUTION:
Remain seated while using the bike, do not stand on pedals.
CAUTION: Pedal forward only.
Pedaling backwards will loosen pedals, and may cause
damage to your bike.
CAUTION:
Loose clothing, untied shoelaces, jewelry and towels should be kept away
from the bike pedals.
CAUTION:
Maximum weight capacity of this bike is 300 Ib (135 kg). Ignoring the warnings
in this manual could lead to hazardous situations that might result in serious injury or death.
CAUTIONS & WARNINGS
!
Table of contents
Other Uplift Desk Exercise Bike manuals
Popular Exercise Bike manuals by other brands

RAD Cycle Products
RAD Cycle Products RAD MAX Prozone 1102 instruction manual

Stamina
Stamina AVARI 2000C Upright Bike owner's manual

Star Shaper
Star Shaper KC-1422 manual

Spokey
Spokey TIDAL user guide

ICON Health & Fitness
ICON Health & Fitness Pro-Form PFEX78918.1 user manual

cecotec
cecotec FIT X-BIKE PRO instruction manual