Uponor ProPEX 200 User manual

RADIANT HEATING AND
PLUMBING SYSTEMS
PROPEX®200 BATTERY
EXPANDER TOOL
OPERATION MANUAL
For connections to
Wirsbo AQUAPEX® tubing

ProPEX® 200 Battery Expander Tool Operation Manual
is published by
Uponor, Inc.
5925 148th Street West
Apple Valley, MN 55124
Phone: (952) 891-2000
Fax: (952) 891-1409
www.uponor-usa.com
©2006 Uponor, Inc.
All rights reserved
First Edition
First Printing December 2006
Printed in the United States

This Operation Manual is published for building officials and plumbing
professionals interested in Uponor plumbing systems. This manual describes
general installation recommendations that use Wirsbo AQUAPEX® tubing
products. Be sure to follow local code requirements.
Uponor has used reasonable efforts in collecting, preparing and providing
quality information and material in this manual. However, system enhancements
may result in modification of features or specifications without notice. For the
most current technical information, go to the Uponor website at
www.uponor-usa.com.
Uponor is not liable for installation practices that deviate from this manual or are
not acceptable practices within the mechanical trades. Refer to the Wirsbo
AQUAPEX Professional Plumbing Installation Guide to install Wirsbo AQUAPEX
tubing in plumbing systems.
Please direct any questions regarding the suitability of an application or a
specific design to your local Uponor representative. For the name of your local
representative, please call toll free (800) 321-4739.


Table of Contents
Section 1 — Overview
Tool Kit Components . . . . . . . . . . . . . . . . . . . . . . . . . . . . . . . . . . . . . . 1
Important Information . . . . . . . . . . . . . . . . . . . . . . . . . . . . . . . . . . . . . 1
Section 2 — Technical Data ................................2
Section 3 — Battery Operation
Charging the Battery . . . . . . . . . . . . . . . . . . . . . . . . . . . . . . . . . . . . . . . 3
Battery Handling. . . . . . . . . . . . . . . . . . . . . . . . . . . . . . . . . . . . . . . . . . . 3
Section 4 — Expander Tool Operation and Guidelines
Operating Instructions . . . . . . . . . . . . . . . . . . . . . . . . . . . . . . . . . . . . . . 5
Indicators . . . . . . . . . . . . . . . . . . . . . . . . . . . . . . . . . . . . . . . . . . . . . . . . 5
Proper Tool and Head Maintenance . . . . . . . . . . . . . . . . . . . . . . . . . . . . 7
Troubleshooting . . . . . . . . . . . . . . . . . . . . . . . . . . . . . . . . . . . . . . . . . . . 8
Safety Guidelines . . . . . . . . . . . . . . . . . . . . . . . . . . . . . . . . . . . . . . . . . . 9
Repairs . . . . . . . . . . . . . . . . . . . . . . . . . . . . . . . . . . . . . . . . . . . . . . . . . . 9
Warranty . . . . . . . . . . . . . . . . . . . . . . . . . . . . . . . . . . . . . . . . . . . . . . . . 10
Section 5 — Making ProPEX Connections
ToolsNeeded ............................................11
Important Tips . . . . . . . . . . . . . . . . . . . . . . . . . . . . . . . . . . . . . . . . . . . 13
Making 3⁄8"ProPEX Connections . . . . . . . . . . . . . . . . . . . . . . . . . . . . . . 13
Disconnecting a ProPEX Brass Fitting. . . . . . . . . . . . . . . . . . . . . . . . . . 13
ProPEX Connection Troubleshooting Guide . . . . . . . . . . . . . . . . . . . . . 14
Cold-weather Expansions . . . . . . . . . . . . . . . . . . . . . . . . . . . . . . . . . . . 15


Section 1 – Overview
The ProPEX® 200 Battery Expander Tool
(Q6262000) is an electro-hydraulic tool with
microprocessor-based intelligence that makes fast,
easy connections to 3⁄8"through 2" Wirsbo
AQUAPEX® tubing.
The tool includes a 11⁄2" pistol for making
connections to 3⁄8" through 11⁄2" tubing and a 2"
pistol with a 2" H-series expander head for
making connections to 2" tubing.
Note: Expander heads for 3⁄8" through 11⁄2"
tubing are sold separately.
Tool Kit Components
The ProPEX 200 Battery Expander Tool Kit features the following
components.
• ProPEX 200 Battery Expander Tool
- 2" Pistol (replacement part (Q6262020)
- 11⁄2"Pistol (replacement part Q6262015)
- 2" H-series Expander Head (replacement part Q6282000)
-10-foot Hydraulic Hose (replacement part Q6262010)
- Hydraulic Pump
• Two Batteries (replacement part Q6260200)
• Battery Charger (replacement part Q6260700)
•Expander Head Lubricant (MolykoteG-n plus)
•Operation Manual
• Carrying Case
Note: If any contents listed are missing or damaged, please contact your
Uponor sales representative or distributor for assistance.
Keep all tool components in the carrying case, which can also store several
optional expander heads. To protect the internal driver, store the tool with an
expansion head in place.
Important Information
• For safety reasons, always start the tool with an expander head on it.
• Remove the batteryfrom the tool when storing for more than one
hour. A fully charged battery will drain in 20 days if left attached to
the tool and unused.
• Do not keep the battery attached to the tool for longer than 20 days.
This could hinder the battery’s ability to recharge in the future.
1

2
Section 2 – Technical Data
ProPEX 200 Battery Expander Tool
Dimensions 131⁄2"x7" x 13" (340mm x 180mm x 330mm)
Weight 19.3 lbs. (8.8 kg) with full oil tank and battery
Maximum Tubing Size 2"
Rated Pressure 8,000 psi (550 bar)
Motor 400-watt, DC motor, equipped with thermal
protection
Recommended Oil Texaco AW 32 Hydraulic Oil or equivalent
Operating Range 32 to 100°F (0 to 38°C)
Storage Range* 32 to 100°F (0 to 38°C)
Sound Level < 80 decibels (dB)
Protection Level IP43 according to NF EN60529, DIN40050,
IEC529 and BS5490
Note: Storing the battery in temperatures below 50°F (10°C) greatly reduces
battery capacity.
Rapid Charger
Power Supply 110VAC
Output Voltage 24VDC
Recharging Time 70 minutes
Weight 4 lbs.
Operating Range 50 to104°F (10 to40°C)
Battery
Output 24VDC, 3.3Ah
Type Nickel Metal Hydride (NiMH)
Weight 3.3 lbs.
Operating Range 50 to104°F (10 to 40°C)
Expander Head
Weight 0.3 lb. (average)
Working Range
2" tubing ~16 to 18 fittings per charge
Optional Expander Heads
3⁄8"tubing ~80 to 90 fittings per charge
1⁄2"tubing ~80 to 90 fittings per charge
5⁄8"tubing ~80 to 90 fittings per charge
3⁄4"tubing ~80 to 90 fittings per charge
1" tubing ~80 to 90 fittings per charge
11⁄4"tubing ~60 to 65 fittings per charge
11⁄2"tubing ~45 to 50 fittings per charge

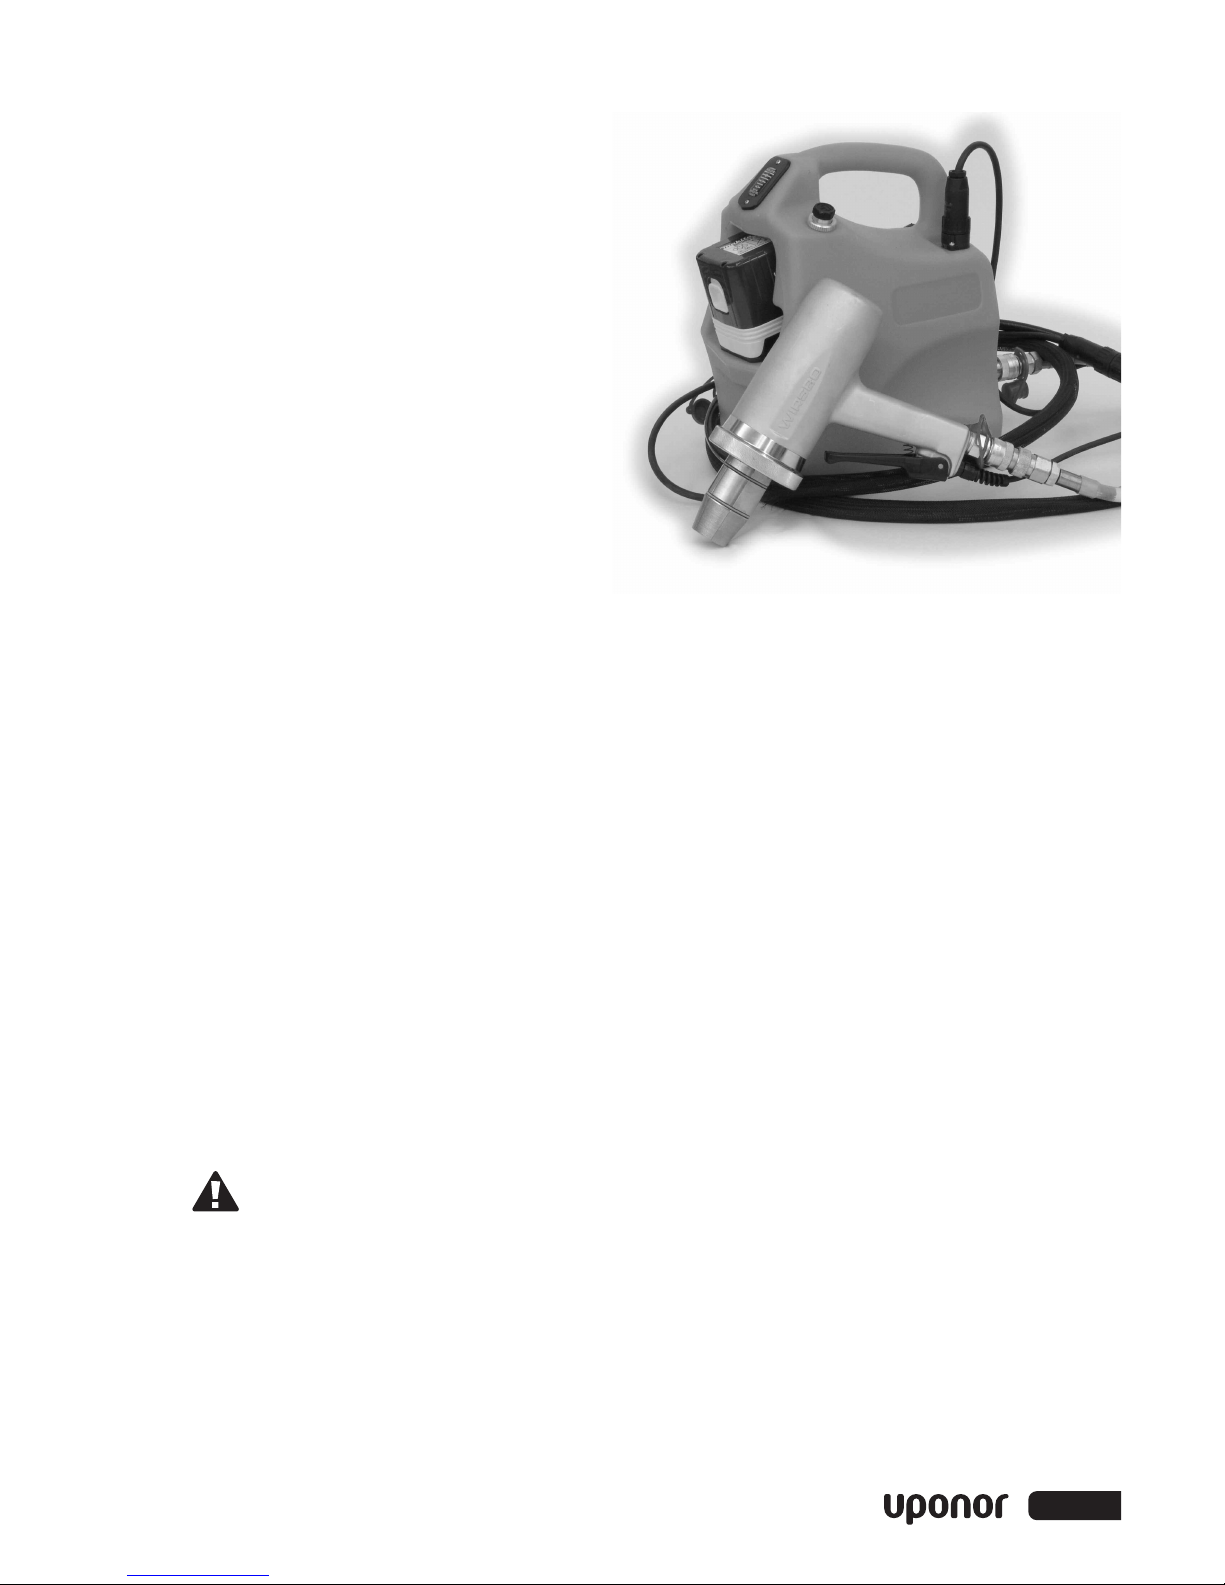
Section 3 – Battery Operation
Charging the Battery
Only use the charger provided in the tool kit to charge the battery for the
ProPEX 200 Battery Expander Tool. Charge the battery before initial operation.
1. Remove the charger from the case.
2. Plug the charger into a standard outlet.
3. Ensure the vent slots in the top and bottom of the charger are
not obstructed.
4. Insert the battery into the charger (+ pole to + pole) with
minimum force.
5. A flashing red light on the battery charger indicates the battery
is charging.
6. Recharge time takes about one hour (the red indicator light on the
charger stops flashing and remains on when the charge is complete).
Note: Battery temperature increases during and shortly after use. Batteries may
not accept a full charge if they are charged immediately after use. Allow the
batterypack to cool to room temperature before charging.
Caution: Do not use the charger at ambient temperatures of less than
50°F (10°C) or greater than 104°F (40°C).
Battery Handling
The ProPEX 200 Battery Expander Tool uses rechargeable batteries containing
nickel metal hydride (NiMH) cells. To effectively and properly use the batteries,
keep the following in mind.
• Recharge cool batteries only.
• The battery can recharge 1,000 times, and reaches full capacity after
several charges.
•Store batteries at temperatures greater than 50°F (10°C), but less
than 104°F (40°C), to optimize battery life.
•Only recharge the battery after it is completely drained of power.
•Do not use the charger if dropped or damaged.
• Do not connect two chargers together.
• Keep the battery in a frost-free, dry place.
• Do not allow metal objects (e.g., screws, cutlery, nails) to come in
contact with the battery contacts.
• Use only the provided charger to charge the batteries.
Using any other charger will void the warranty.
• Use only the batteries provided. Using any other battery will
void the warranty.
3

4
• Use Uponor-recommended charging procedures. Incorrect use leads to
short circuits, overheating or battery fluid leakage.
• To prolong the battery’s life, avoid overcharging. Do not charge for
more than two days.
• Remove the battery from the tool when storing for more than one
hour. A fully charged battery will drain in 20 days if left attached to
the tool and unused.
• Do not keep the battery attached to the tool for longer than 20 days.
This could hinder the battery’s ability to recharge in the future.
• Replace the battery if there is a substantially reduced operating time
after proper charging.
• This symbol, located on the underside of the battery pack, signifies
the battery needs to be disposed of properly in accordance with local
environmental regulations. Do not incinerate the battery or dispose
the battery in common waste-removal containers.

Section 4 – Expander Tool Operation
and Guidelines
Operating Instructions
1. Slide the battery into its housing until you hear a click.
2. Remove the protection cap from the hydraulic hose and connect the
hydraulic hose to the hydraulic pump.
Note: Always ensure connecting surfaces are clean.
3. Insert and fasten the electrical plug on the hydraulic pump.
4. Connect the pistol to the hydraulic hose, then connect and lock the
electrical connection.
5. Check the cone for dirt. Clean and lube the cone as described in the
Proper Tool Maintenance section.
6. Attach the appropriate ProPEX 200 Expander Head onto the
expander tool. Be sure to screw on the expander head snugly.
7. Use the tool for expanding Wirsbo AQUAPEX tubing only.
8. Refer to Section 5 for detailed instructions on making proper
ProPEX connections.
9. When finished working with the tool, unscrew and remove the
electrical plug.
10. Disconnect the hydraulic hose from the pistol and the hydraulic pump.
11. Wipe the hose couplings and replace the cap on the hose. Be sure not
to let any dirt or debris enter the couplings as this can damage the
pump or pistol.
Note: Disconnect the pistol from the hose before disconnecting the
hose from the hydraulic pump to avoid damage to the pistol.
12. Remove the battery by pulling the lock off the battery and removing
the battery from its support.
Note: The ProPEX 200 Battery Expander Tool includes thermal protection,
which shuts down the tool when the tool starts to overheat. If this happens,
let the tool cool down for one hour before resuming operation.
Warning: Never use the pistol without an expander head attached to
avoid a rise in pressureon the pistol. Also, never use the tool without
apistol attached.
Indicators
Apanel located near the hydraulic pump handle features three light-emitting
diodes (LEDs) which flash or illuminate to show the status of the tool and battery.
Note: The LEDs will continually illuminate to signal the battery status unless the
pistol is expanding tubing. When the pistol is expanding tubing, the LEDs will
change to show the status of the expansion. After the expansion is complete,
the LEDs will return toshowing the batterystatus.
5

6
Refer to the following tables for information about each LED.
Battery Power Load Indicators
Refer to the following table for information about the battery power load
indicators.
LED Definition
Green If the green LED is on, 50 to 100% of the battery
capacity remains.
Yellow If the yellow LED is on, 5 to 25% of the battery
capacity remains.
Red If the red LED is on, less than 5% of the battery
capacity remains.
Red Once the red LED begins flashing, the battery is
(Flashing) empty and must be recharged.
Table 1: Battery Power Load Indicators
Expansion State Indicators
Refer to the following table for information about the expansion state
indicators.
LED Definition
Green Aflashing green LED signals the expansion is
completed correctly.
Red Aflashing red LED signals the expansion is not
complete.
Table 2: Expansion State Indicators
Service Indicators
All three LEDs flashing together signals the tool has reached 20,000 cycles and
needs service. The flashing LEDs display appears for 20 seconds (after
displaying the expansion status).
When it is time for service, send the tool to Uponor’s Tool Depot. The Tool
Depot is a convenient way to repair or replace tools quickly and easily. For more
information, contact Uponor Technical Services toll-free at (888) 594-7726 or
go to www.uponor-usa.com,and click on Online Services.
For access to the Tool Depot, use the following login names.
Username — tool
Password — depot
First-time users must complete a registration form. Please note that contractors
with existing accounts do not need to re-register.

Proper ProPEX 200 Battery Expander Tool and Head
Maintenance
The ProPEX 200 Battery Expander Tool comes with a 2" H-series Expander Head.
Optional expander heads come in sizes ranging from 3⁄8"to 11⁄2". All heads contain
six segment fingers, one attachment ring and one spring. It is very important to
keep the head on the tool or in the tool case at all times as dirt and other debris
can affect the connection process.
1. Remove and clean the segment fingers as needed. Remove the segments
from the attachment ring by pushing the segment finger down toward
the opening in the ring. Once the first segment is removed, the rest
follow easily.
2. Place the segments on a flat surface with the ridges facing up. The
fingers should lay flat without any curve in the middle. If the segments
are bent, replace the head immediately.
3. To reassemble, replace the segment fingers one at a time to the
attachment ring by sliding the grooved portion of the segment fingers
over the spring in the attachment ring. The narrow end of the segment
fingers points away from the solid side of the attachment ring. Hold
these segment fingers in placewith your thumb as the remaining
segment fingers are inserted.
4. Once the expander head is cleaned and reassembled, use a clean,
lint-free cloth to apply a light coat of Molykote g-n plus lubricant
to the expander cone prior to making any ProPEX connections.
5. Apply the lubricant daily if used regularly.
6. Keep all other parts of the tool free from lubricant.
Note: Failure to properly lubricate the tool may result in improper connections.
Caution: Excessive lubrication may result in improper connections. Only
use a small amount of lubricant to keep the tool working properly.
7. Monthly,soak the heads in a degreasing agent to remove any grease from
between the segments. Clean the cone using a clean, drycloth.
8. Store the tool and expander heads in the case. Store the tool with an
expansion head in place to protect the cone.
9. Store the tool in a drylocation toprevent rust.
Refilling Hydraulic Oil Reservoir
Check the level of hydraulic oil in the reservoir daily. The oil level should reach the
top threads of the filling hole. If the oil level is low, refer to the following
instructions to refill the reservoir.
1. Ensure the tool is on a flat, stable surface.
2. Unscrew the cap from the filling hole on the reservoir.
3. Fill the tank with Texaco AW 32 Hydraulic Oil or equivalent to the top
threads of the filling hole.
4. Replace the cap.
Note: Due to oil expansion from temperature changes, oil may overflow
when opening the reservoir cap. This is normal.
7

8
Troubleshooting
Difficulty Making Connections
If you experience difficulty making connections, follow the steps below.
1. Ensure the battery is fully charged.
2. Do not overload the tool’s capacity. (Do not expand tubing larger
than 2".)
3. Check if the expander head needs lubrication. Lubricate the head
with Uponor-recommended Molykote G-n plus lubricant only.
Troubleshooting Table
Refer to the following troubleshooting table for instructions about
troubleshooting the ProPEX 200 Battery Expander Tool.
Problem Cause Remedy
Tool does not start Thermal stop due to Wait one hour for the
motor overheating motor to cool, then
resume operation.
Electrical component Return the tool to the
problem Tool Depot.
Tool does not advance, Air in the system Drain the air from the
advances slowly or system by holding the
only intermittently hydraulic pump higher
than the pistol and
cycling the tool several
times.
Insufficient level of Fill the hydraulic oil
hydraulic oil tank with Texaco AW
32 Hydraulic Oil or
equivalent.
Tool piston seized up Return the tool to the
Tool Depot.
External or internal leak Return the tool to the
Tool Depot.
Tool advances but External or internal leak Return the tool to the
does not maintain Tool Depot.
pressure
Table 3: Troubleshooting Table

Safety Guidelines
To reduce the risk of electric shock, personal injury and fire, always follow basic
safety precautions. Read and comply with all these guidelines before operating
the ProPEX 200 Battery Expander Tool.
Failure to follow the instructions and installation guidelines as defined in this
manual can result in the failure of the ProPEX 200 Battery Expander Tool.
• Always start the tool with an expander head in place.
• Keep fingers and hands away from the moving head area.
• Remove the battery when the tool is not in use, before servicing and
when changing expander heads.
• Lay the tool on its side when not in use. The tool is not designed
to sit upright.
• Do not operate or expose the tool and the charger to moisture,
combustible fluids or gases (danger of explosion).
• Do not use the tool for any function other than expanding
PEX tubing.
• Do not obstruct or place anything in the vent holes of the
tool housing.
• Always wear protective eyewear and clothing when operating the tool.
• Use original replacement parts only.
• Only professional contractors should operate the ProPEX 200 Battery
Expander Tool. Keep this tool away from children.
•Keep the ProPEX 200 Battery Expander Tool clean. Dirt and rust
may hinder proper and safe tool operation.
Important: The ProPEX 200 Battery Expander Tool complies with
relevant safety regulations. To avoid injuries, all maintenance and
repair work, particularly when involving electrical systems, should only
be performed by an authorized expert or trained personnel using
genuine spare parts. All unauthorized modifications to the equipment
are prohibited for safety reasons and will void the warranty.
Repairs
Send all warranty repairs to the Tool Depot. The Tool Depot is a convenient
way to repair or replace tools quickly and easily. For more information,
contact Uponor Technical Services toll-free at (888) 594-7726 or go to
www.uponor-usa.com, and click on Online Services.
For access to the Tool Depot, use the following login names.
Username — tool
Password — depot
First-time users must complete a registration form. Please note that contractors
with existing accounts do not need to re-register.
9

10
Warranty
The ProPEX 200 Battery Expander Tool has a two-year or 20,000-cycle
warranty from the date of delivery (verified by invoice or delivery note).
Damage caused by normal wear and tear, overloading or improper handling are
excluded from the warranty.
For further warranty information, go to www.uponor-usa.com,and click on
Online Services. Login using your username and password and click on User
Tools. Go to Documents and Files, click on Warranties and select Uponor
Plumbing Systems Limited Warranty to view the plumbing systems warranty.
Send all warranty repairs to the Tool Depot (refer to Repairs section). Note that
warranty claims are only accepted if the complete ProPEX 200 Battery Expander
Tool with all hardware, parts and accessories are returned to the Tool Depot.
Note: Failure to read and comply with operation and maintenance instructions
in this manual voids the warranty.

Section 5 – Making ProPEX
Connections
Tools Needed
• ProPEX 200 Battery Expander Tool
• Properly sized expander head, hand-tightened onto the tool
• Tubing cutter designed for PEX tubing
11
1. Square-cut the PEX tubing
perpendicular to the length of the
tubing. Remove all excess material
or burrs that might affect the
fitting connection.
2. Slide the ProPEX Ring over the end
of the tubing. Extend the end of
the ring over the end of the tubing
no more than 1⁄16"(1mm).
3. Slide the expander head intothe
tubing until it stops. Full
expansions are necessary to make
a proper connection. Press the
trigger to expand. Release the
trigger, remove the head from the
tubing and rotate it 1⁄8turn. Slide
the tool head intothe tubing in
the newly rotated position and
expand again.
Important: Rotating the tool 1⁄8
turn expands the tubing smoothly
and evenly. If the head is not
repositioned after each expansion,
the segments on the tool head
may cause deep grooves in the
tubing, resulting in potential
leak paths.
max 1⁄16"

12
Note: It is not necessary to rotate the tool in only one direction. Alternating
the turning direction will ease expansion in confined spaces. The photos above
show enlarged views inside expanded tubing.
4. Repeat the expansion process until
the tubing and ring aresnug against
the shoulder on the expander head.
See Table 4 for the recommended
number of expansions for each
tubing size.
Note: The ‘’H’’ in the table refers to the H-series expander heads, which are
only used with the ProPEX BatteryExpander Tools. Only use the 2" H-series
Expander Head on the ProPEX 200 Battery Expander Tool.
5. Immediately remove the ProPEX 200
BatteryExpander Tool. As you slide
the tubing over the fitting, you
should feel some resistance. If the
tubing reaches the shoulder of the
fitting without any resistance, the
tubing may be over-expanded and
may requireadditional time tofully
shrink over the fitting. The tubing
and ProPEX Ring should seat against
the shoulder of the fitting for a
proper connection.
Expansion without proper rotation Expansion with proper rotation
Tubing Ring Head Marking Number of Expansions
Size Marking Manual Air Exp Battery Exp Manual Air Exp Battery Exp
3⁄8"3⁄8"3⁄8"3⁄8"3⁄8"4-5 4-5 6-7
1⁄2"1⁄2"1⁄2"1⁄2"1⁄2"3-4 3-4 3-4
3⁄4"3⁄4"3⁄4"3⁄4"3⁄4"H 7-9 7-9 8-9H
1" 1" 1" 1" 1"H 12-14 12-14 6-7H
11⁄4"11⁄4"— — 11⁄4" H —— 6-7H
11⁄2"1
1⁄2"——1
1⁄2"H — — 7-8H
2" 2" — — 2" H — — 4-5H
Table 4: Recommended Expansions

Important Tips for a Proper ProPEX Connection
• If the fitting does not slide into the tubing all the way to the stop,
immediately remove it from the tubing and expand the tubing one
final time.
Note: To avoid over-expanding the tubing, do not hold the tubing in
the expanded position.
•Table 4 lists the recommended number of expansions for the various
sizes of PEX tubing. Experience, technique and weather conditions
influence the actual number of expansions. Fewer expansions may be
necessary under certain conditions. The correct number of expansions
is the amount necessary for the tubing and the shoulder of the fitting
to fit snugly together.
• A good connection is when the ProPEX Ring rests snugly against
the stop of the ProPEX fitting shoulder. If there is more than 1⁄16"
between the ring and the shoulder of the fitting, square-cut the
tubing 2" away from the fitting, and make another connection
using a new ProPEX Ring.
Making 3⁄8"ProPEX Connections
The 3⁄8"ProPEX Ring is smaller and thicker than the ProPEX rings used for other
tubing sizes. The 3⁄8"ProPEX Ring must be expanded once on each side to
properly fit over the tubing. Expansion of the ProPEX Ring is only necessary for
3⁄8"Wirsbo AQUAPEX.
1. Square-cut the 3⁄8" Wirsbo AQUAPEX tubing perpendicular to the
length of the tubing.
2. Expand each side of the 3⁄8" ProPEX Ring with the ProPEX 200 Battery
Expander Tool once.
3. Slide the expanded 3⁄8" ProPEX Ring over the end of the tubing.
Extend the end of the ring over the end of the tubing no more than
1⁄16" (1mm).
Once the 3⁄8"ProPEX Ring is properly expanded and on the tubing, refer to
Steps 3-5 on pages 11 and 12 for further instruction.
Important Tips for a Proper 3⁄8"ProPEX Connection
• When the temperature is above 40°F (5°C), ProPEX connections to 3⁄8"
Wirsbo AQUAPEX tubing require four to five expansions. When the
temperature is below 40°F (5°C), only four expansions are necessary.
• The thicker ProPEX Ring used for 3⁄8"ProPEX connections shrinks over
the fitting faster than other size rings.
Disconnecting a ProPEX Brass Fitting
ProPEX brass fittings aremanufactured connections and can be concealed in
walls, ceilings and floors. However, when necessary, ProPEX Brass Fittings can
be disconnected. To disconnect a brass fitting:
1. Make sure the system is not pressurized.
2. Use a heat gun toheat one side of the ProPEX Ring. When the ring
13

14
is clear, use a utility knife to carefully cut through the ring. Care
should be taken to cut only the ring and not the tubing. This will
protect the fitting from becoming gouged by the knife. Remove the
ProPEX Ring from the tubing with pliers or another tool to avoid
touching the hot ring.
Note: Do not gouge the fitting when cutting the ProPEX Ring.
Nicks and gouges in the fitting may result in leaks. If nicked,
discard the fitting.
3. When the ProPEX Ring is removed, apply heat directly around the
fitting and tubing connection. Gently work the tubing back and forth
while pulling slightly away from the fitting until the tubing separates
from the fitting.
4. When the tubing is removed from the fitting, square cut the tubing
2" (minimum) from the end of the tubing.
5. Use a new ProPEX Ring and follow the steps to make a new ProPEX
connection. Allow the fitting to cool before attempting to make
another connection.
ProPEX Connection Troubleshooting Guide
Trouble-free ProPEX installations begin with a ProPEX 200 Battery Expander
Tool that is maintained in proper working condition. If the tool or segment
fingers are damaged, it is very difficult to make a proper connection. The
following troubleshooting guide is designed toassist with problems in the field.
Fittings Do Not Seal
For fittings that do not seal, follow the steps below.
1. Ensure the expander head is securely hand-tightened onto the tool.
2. Makesure the segment fingers are not bent. If the head does not
completely close when the electro-hydraulic drive unit is fully
retracted, replace the head.
3. Remove any excess grease on the segment fingers.
4. Examine the fitting for damage. Nicks and gouges on the fitting will
cause the fitting toleak.
5. Ensure the internal driver is not damaged or bent.
6. Make sure the last expansion is not held in the expanded position for
more than three seconds before the fitting is inserted. The longer the
tubing and ring are held in the expanded position, the greater chance
for a leak.
7. Be sure to rotate the tool 1⁄8turn after each expansion.
Expansion is Difficult
If it is difficult tomakean expansion, check toensure the internal cone is
properly greased with Uponor-recommended Molykote G-n plus.
This manual suits for next models
1
Table of contents
Other Uponor Power Tools manuals