UPP PetroTechnik EF1 User manual

protecting your liquid assets
User Manual
EF1 - 230V
Hand-held Welder
IMPORTANT - READ THIS FIRST!
Please read this document carefully
Version 1 17/07/08
!

EF1-MAN-01-07/08
2
Bridging cables
(x2)
EF1 Electrofusion
Welder
7 pin Secondary
welding cable
Power cable
7 pin Primary welding
cable
7 pin Weld cable
connector
Fault indicator
Weld progress LED’s
START / STOP
button
Temperature sensor
Power on Indicator
ON / OFF Switch
(on side of unit)
NOTE: EF1 welding cables use special 7 pin connectors
NOT regular 4 pin connectors
7 Pin Fusion chamber
welding cable
Delivered Items:
EF1 Welding Unit
Carrying Case (Tool Roll)
Red, Primary welding cable
Green, Secondary welding cable
White, Fusion Chamber welding cable
2 x Red, Primary link cables
Manual
NB: when parts are missing or damaged, please contact your dealer.

EF1-MAN-01-07/08 3
Introduction
This manual gives instructions on the correct use of the EF1 welding unit. It is important that these instructions are
read and understood prior to use of this equipment and that they are kept with the welder for the life of this unit.
The EF1 automatically recognises the fitting when connected with the correct welding cable and applies the correct
amount of energy for a successful weld. It also checks the ambient temperature using a sensor positioned on the main
supply cable and adjusts the energy level to balance with the local environment.
The EF1 has an ON / OFF button, a weld start button and an LED display showing the weld progress and fault
indication
Safety Notes
• RISK OF EXPLOSION! - This welding unit must not be used in a gaseous atmosphere.
• RISK OF ELECTRIC SHOCK! - Do not open. No user serviceable parts inside.
• This welding unit is only to be used by trained persons, certified by PetroTechnik .
• Visually inspect welding unit, cables and connectors and replace any damaged parts prior to use.
• For use outside of hazardous areas (ATEX zones 0, 1 and 2)
• To avoid damage to the welding unit, do not interrupt the supply voltage or disconnect the output lead, while the
unit is in operation.
• Never lift or pull the welder by its cables.
• Never disconnect welding cables by pulling them always pull on the connectors.
• Keep bystanders a safe distance from welder during welding operations.
• Always use safety equipment ( Hi-visibility jacket, Safety Boots, Safety Helmut and Safety Goggles) when
operating on site.
• Always isolate welding unit from its power supply before adjusting, cleaning, un-tangling cables or leaving
unattended for any period.
• The operator is responsible for accidents or hazards occurring to other people or their property while using this
equipment (Keep the WorkArea Safe).
• Weld only in daylight or good artificial light.
• Do not weld in the rain or leave equipment outdoors while it is raining.
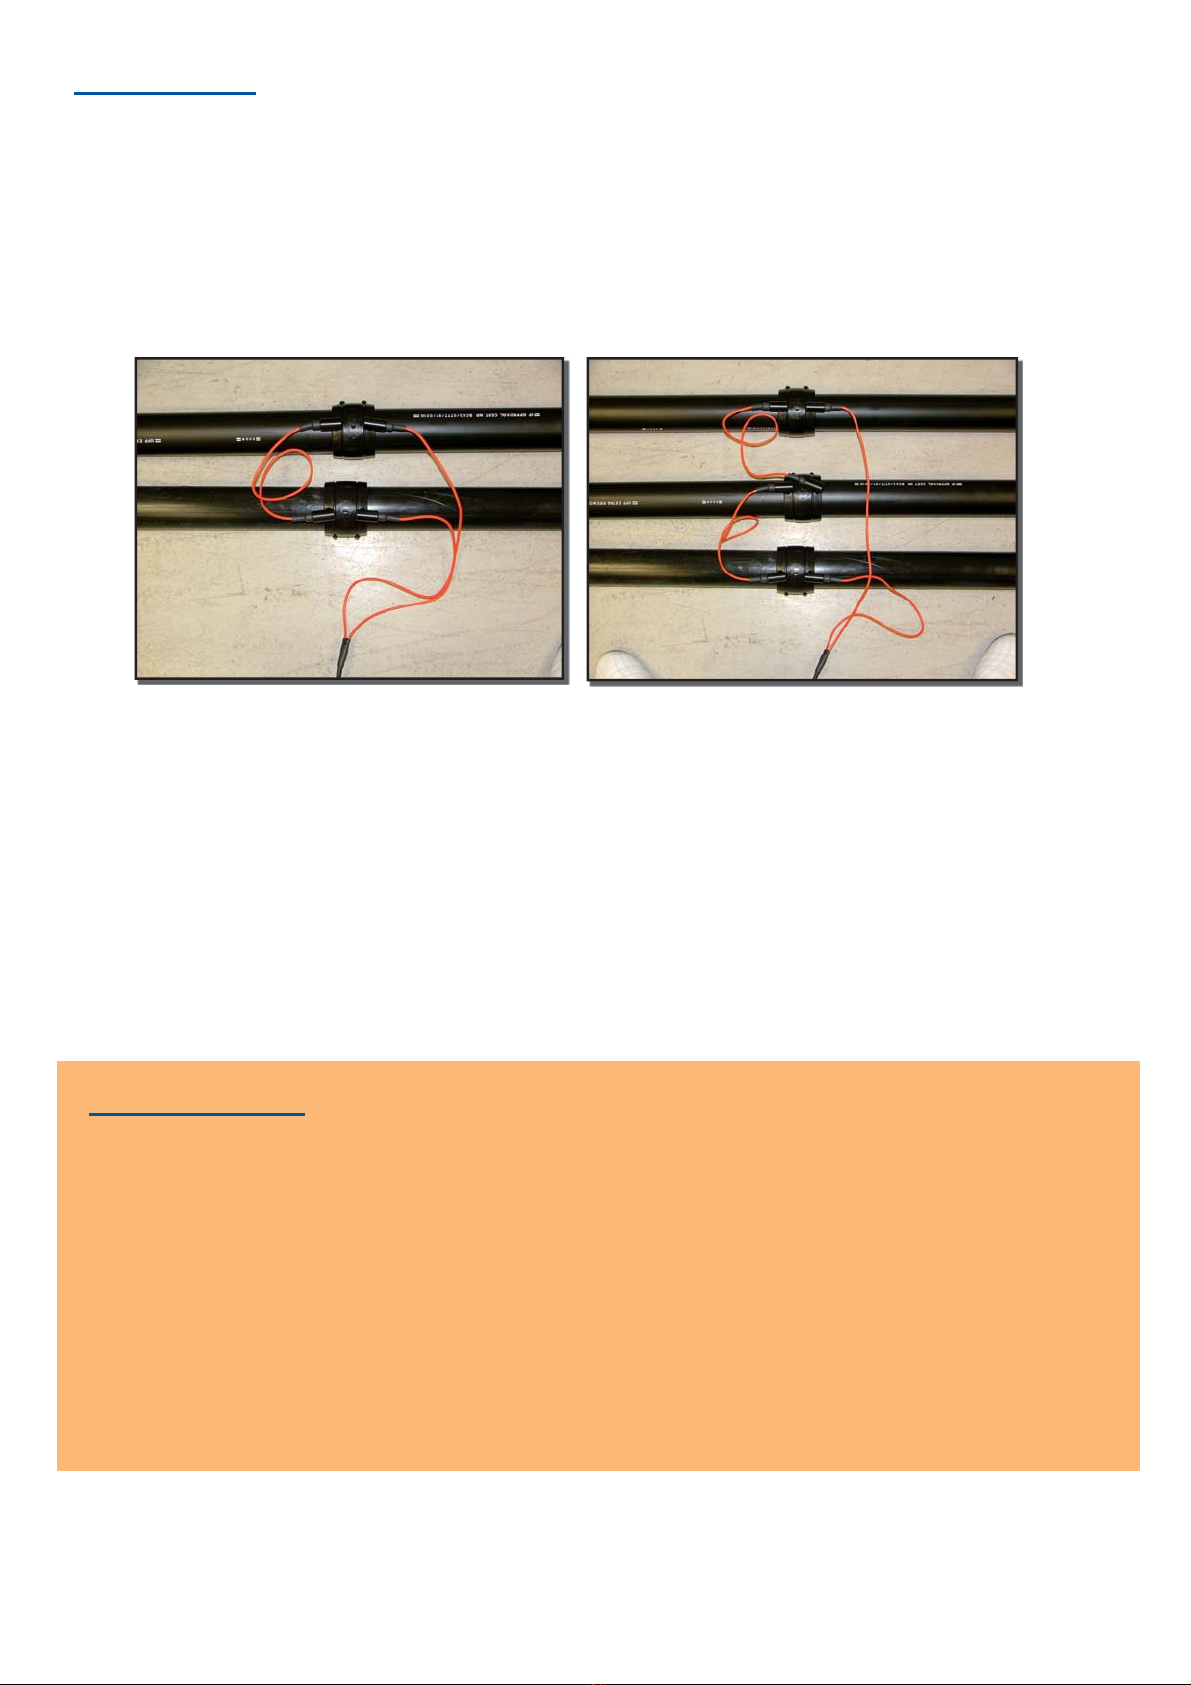
• Do not start welder without connecting welding cables to a properly prepared fitting assembly.
• Do not touch the fitting during the welding cycle.
• Ensure the EF1 is positioned in the environment it is to be used in prior to welding so that the temperature sensor
has opportunity to reach the ambient temperature prior to use.
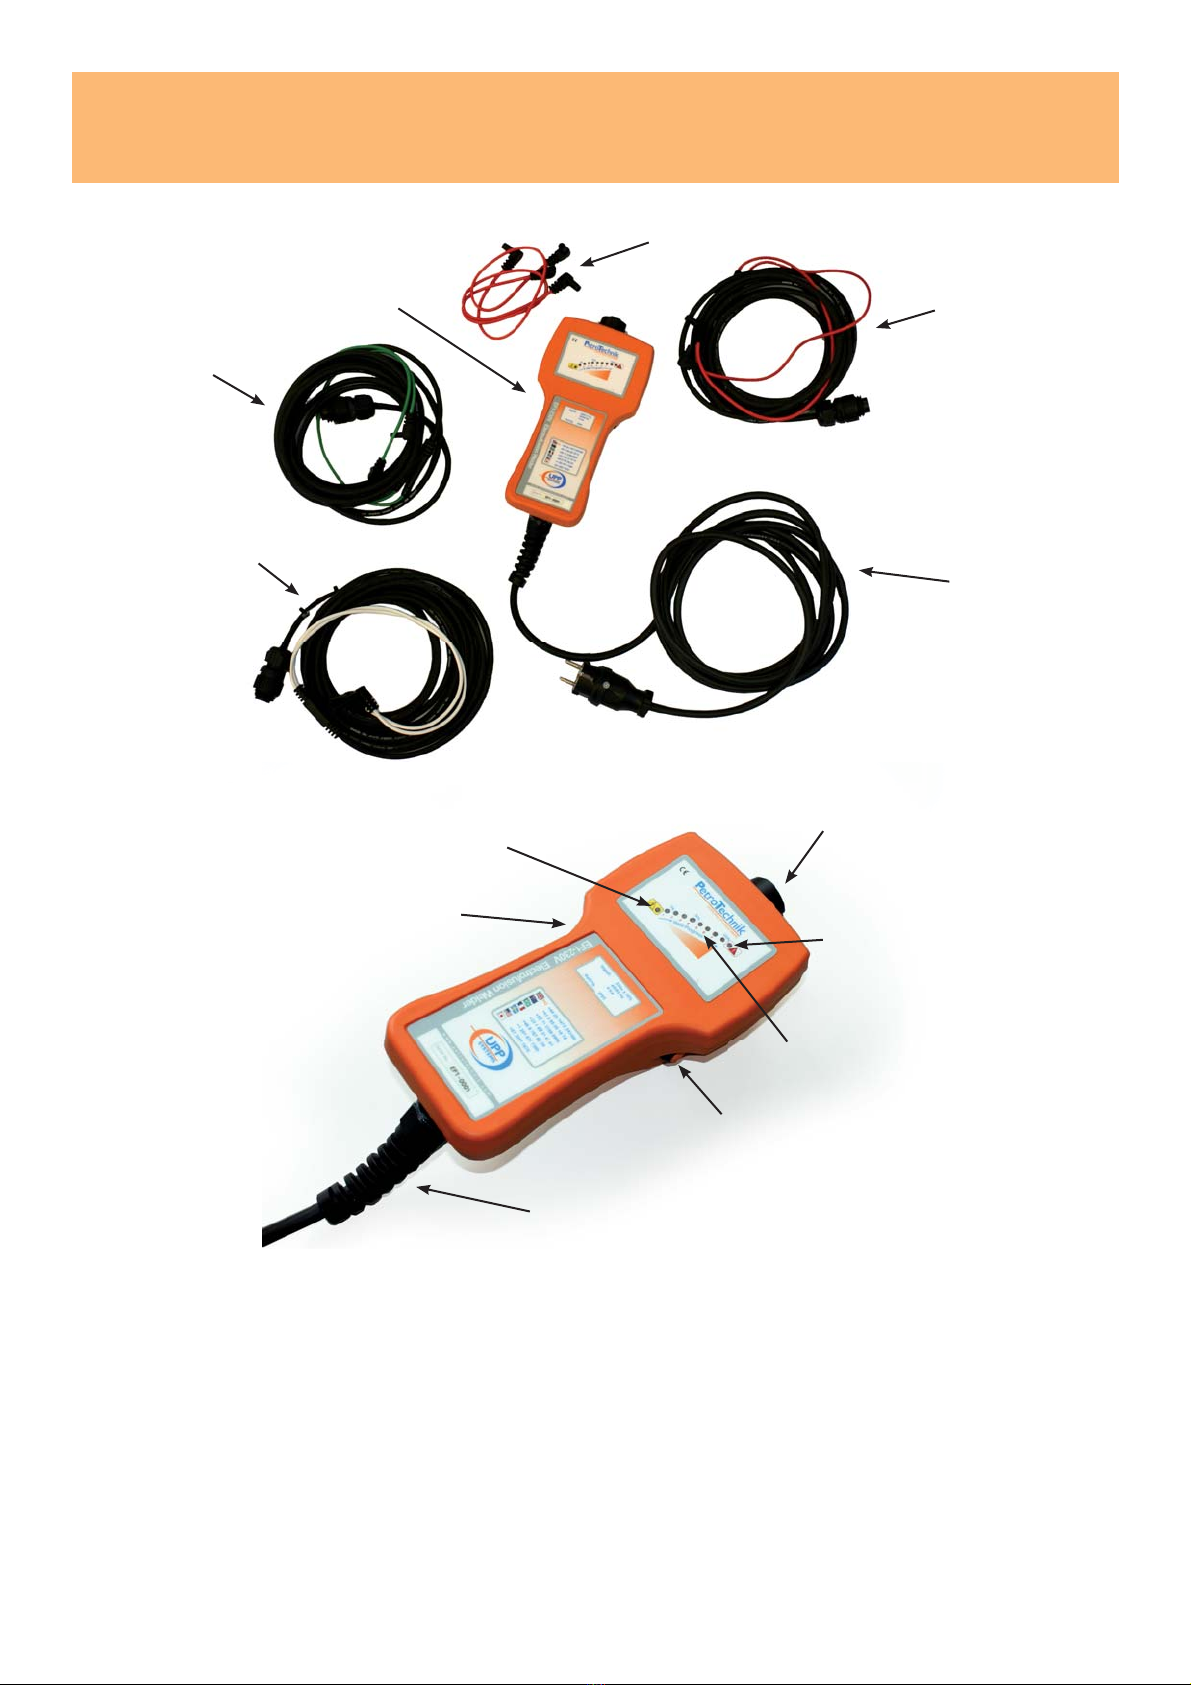
Application
The EF1 is designed to automatically weld UPP Primary and Secondary Containment electrofusion fittings,
Electrofusion Chambers and Large diameter 10 amp fittings. This is achieved by using colour coded
welding leads as shown below.
Type of Fitting Welding Cable
Colour Size of Welding Pin
(mm) Crrent
(amps) Weld Time @ 20C
(Seconds)
Primary Red 4 4 184
Secondary Green 2 5 80
Fusion Chamber White 2.3 7 360
Large Diameter
(10 amp) Black 2 10 365
The EF1 can be used in ambient temperatures between -15°C and +45°C
Only personnel fully trained and certified in the use and installation of the UPP system should use this
equipment.

EF1-MAN-01-07/08
4
Liability Restrictions
All liabilities of the supplier are invalidated in the following cases:
• The EF1 is used outside the indicated application area
• Non-UPP fittings or pipe are used
• The operator has not been trained to use the EF1 or the UPP system
• Operating instructions have not been observed
•
•
Unauthorised repairs, maintenance or modifications have been carried out
•
•
The EF1 has been used outside of its technical specification
•
•
Safety instructions have not been observed
• Imp
• Imp
roper or inadequate maintenance
• Misuse or any use not in accordance with the operating manual or good industry practice
• Physical abuse
• Physical abuse
of the product
of the product
• Improper site preparation or site maintenance
Using the EF1
Ensure that the machine is positioned outside hazardous zones ATEX 0, 1 and 2
Allow the machine and fittings to reach the ambient temperature of the site.
Keep the machine out of direct sunlight and free of any obstruction.
Make sure fittings and pipe have been prepared in accordance with UPP Installation instructions.
Step Action Information on Display
1
Connect the required welding lead to the EF1Welder
PRIMARY fittings = RED cable
SECONDARY fittings = GREEN cable
FUSION CHAMBER = WHITE cable
10 AMP fittings = BLACK cable
None
2Connect welding lead to the UPP fusion fitting(s), making
sure connectors are firmly pushed onto pins None
3 Connect the EF1 Welder to a suitable 230v power supply None
4 Switch ON All LEDs light in sequence, then green Power LED remains
on
5Press and hold orange START button until first weld light
illuminates
First weld light comes on then successive LEDs light up
until green 100% LED is lit, showing weld is complete
6 Disconnect welding lead from fitting 100% LED and Power LED remains on
7ALWAYS Reset for next weld by holding START button
for 3 seconds
All LEDs light in sequence, then green power LED
remains on

EF1-MAN-01-07/08 5
Multiple Welds
In Primary mode the EF1 can simultaneously weld up to three UPP fittings, provided that:
• The sum of the resistance values (circled number on UPP fittings) does not exceed 10
• The UPP fittings are connected to the EF1 in series using the bridging leads provided (see photos
below).
You can ensure that you have connected the fittings correctly and that the welds are successful by checking
that all of the connected fittings get warm and that all of the indicator pins are exposed at the end of the
welding time.
For multiple welds on secondary fittings refer to Technical Bulletin No. TB29.
Other Useful Tips
Switch off the machine during breaks and at the end of the job.
The weld cycle can be stopped at any time be pressing the START / STOP button. This will generate an
error code and you must wait for the fitting to cool before attempting to continue.
If you have any doubt about a welded joint, UPP fittings can be welded again provided they are left to cool
to ambient temperature.
NEVER RE-WELD A FITTING THAT IS STILL WARM

EF1-MAN-01-07/08
6
Fault Indicators
When an error has occurred during the weld cycle that will have an effect on the success of the joint, the
red warning LED on the right side of the display will light up. Also one of the “weld progress” lights will light
up at the same time to show what type of fault has occurred.
Error
Led Fault Indicated Meaning Solution
1Power supply failure
during weld The power supply was off at
sometime during the weld
Check and rectify power supply
Check plug connection
Check cables are not damaged or
broken
Re-weld fitting only after it is allowed
to cool to ambient temperature
2Stop button pressed
during weld Re-weld fitting only after it is allowed
to cool to ambient temperature
3Power supply out of
limits
Supply frequency not between 45
and 65 Hz,
or Voltage not between 194 &
264V
Check and rectify generator output
Check mains supply
Make sure supply is to required
specification
4Ambient temperature
out of range Temperature of the EF1 is not
between -15°c and +45°c
Allow EF1 and fitting to cool in the
shade
Wait for ambient temperature to
return to range
5No output current
(open circuit)
Loose connection to terminal pin
Loose contact in the welding circuit
Faulty fitting
Start button not depressed for long
enough
Make sure connectors are pushed
firmly on to terminal pins
Check welding cable connection and
continuity
Replace fitting
See operating sequence, step 5
6 Low output current
Resistance value of fitting is too
high
Too many fittings connected in
series (Primary mode only)
Input voltage too low
Use only UPP electrofusion fittings
and correct welding cable
Check resistance codes on fittings -
do not exceed a sum total of 10
Check supply voltage
Check extension leads being used
are to specification
7 High output current Regulation error in electronics
Switch off machine and switch on
again after 10 seconds.
Ensure welder is within temperature
range
If problem persists, return EF1 to
supplier
The EF1 can be reset after a fault has been rectified by pressing and holding the START / STOP button for
3 seconds.

EF1-MAN-01-07/08 7
Operating Requirements
WARNING!
WARNING!
This machine is for the electrofusion welding of UPP Systems products only
Power Supply
This machine must be powered with
• A good quality 230V AC, 50Hz power supply with maximum tolerance of ± 15%
• A good quality generator capable of supplying a minimum of 3,500 Watts
(An Earth Spike must be used with Generators).
• If used with a 110v to 230v step-up transformer the following specification should be used:-
Safety Isolating Transformer minimum 4,000 watts
Auto Transformer minimum 2,000 watts
Extension Leads
Extension cables should comply with H07RNF or equivalent and should be free from any damage.
The maximum input lead lengths are as follows:
1.5mm2(AWG 15) Cable : 25m
2.5mm2(AWG 13) Cable : 50m
4.0mm2 (AWG 11) Cable : 75m
Note: All cable must be unwound from the reel to stop inductive heating effects
Technical Details
UPP Stock Code Number EF1-230V
Operating Voltage 230v +/-15% (194 to 264v)
Supply Current 10A ac maximum
Supply Power 4,000 W
Supply Protection Class 1 - Earthed
Operating Frequency 45 to 65Hz
Welding Power Rating 1670VA
Protection Class IP65
Operating Temperature -15°C to +45°C
Shipping Dimensions 460mm wide x 210mm deep x 210mm high
Shipping Weight 3.60kg

Maintenance
• There are no user serviceable parts inside the EF1 welding unit.
• Damaged or defective products should be returned to an approved service agent for repair or calibration.
• The EF1 welding unit should be tested for electrical safety and calibrated every twelve months.
• Welding unit and cables should be checked for damage or defects and parts repaired or replaced prior to
each use.
• The welding unit can be cleaned using a soft brush or cloth.
• After use carefully coil cables and store in the compartments provided in the carry case.
• Electrical Safety Testing “PortableAppliance Test” (PAT) should be carried out in accordance with local
legislation
According to the European Directive 2002/96/EC Waste Electrical and Electronic
Equipment (WEEE), when no longer suitable for use, this equipment must be
separately collected and sent for recycling.
According to the European Directive 2005/95/EC Restriction of Hazardous
Substances (RoHS), this equipment does not contain more than the agreed
levels of Lead, Cadmium, Mercury, Hexavalent Chromium, Polybrominated
Biphenyl (PBB) and Polybrominated Diphenyl Ether (PBDE) flame retardants.
Declaration of Conformity
This welding unit has been designed to comply with the harmonised standards under “New Approach”
directives and has been CE Marked accordingly.
The applicable standards are:
89/336/EEC Electromagnetic compatibility
73/23/EEC Low voltage equipment
98/37/EC Machinery Safety
Signed on behalf of PetroTechnik
Andrea Ticci
Disposal
RoHS Compliant
Directive 2005/ 95/ EC
The equipment and packaging should be sorted for environmentally friendly
recycling.
DO NOT DISPOSE OF THIS EQUIPMENT INTO HOUSEHOLD WASTE!
protecting your liquid assets
PetroTechnik Ltd (HO)
PetroTechnik House, Olympus Close, Whitehouse Industrial Estate,
Ipswich, Suffolk, IP1 5LN, United Kingdom
www.petrotechnik.com
PetroTechnik Australia
PetroTechnik do Brasil
PetroTechnik France
PetroTeknik AB
+61 3 95 50 18 74
+55 11 3159 0909
+33 1 69 21 41 41
+46 8 767 86 34
PetroTechnik Inc. +1 201 871 7300
P&D Japan +81 3 3297 7870
Table of contents
Popular Welding System manuals by other brands

Lincoln Electric
Lincoln Electric LF-72 WIRE FEEDER IM847-D Operator's manual

Migatronic
Migatronic SIGMA 300 Compact instruction manual

Kühtreiber
Kühtreiber 150 TIG LA RS Instructions for use and maintenance

TOP GUN WELDING
TOP GUN WELDING TGWTIG195DCPULSE user manual

Amada
Amada WELD CHECKER MM-400A Operation manual

stud welding products
stud welding products StudPro 2500 Operation manual