
10 To disconnect, turn all controls to the
position, then remove plug form outlet.
11 The appliance is only to be used with
the power supply unit provided with the
appliance.
12 This appliance is not intended for use
by persons with reduces physical,
sensory or mental capabilities, or lack
of experience and knowledge, unless
they have been given supervision or
instruction concerning use of the
appliance by a person responsible for
their safety. Keep children under the
age of 13 away from this machine.
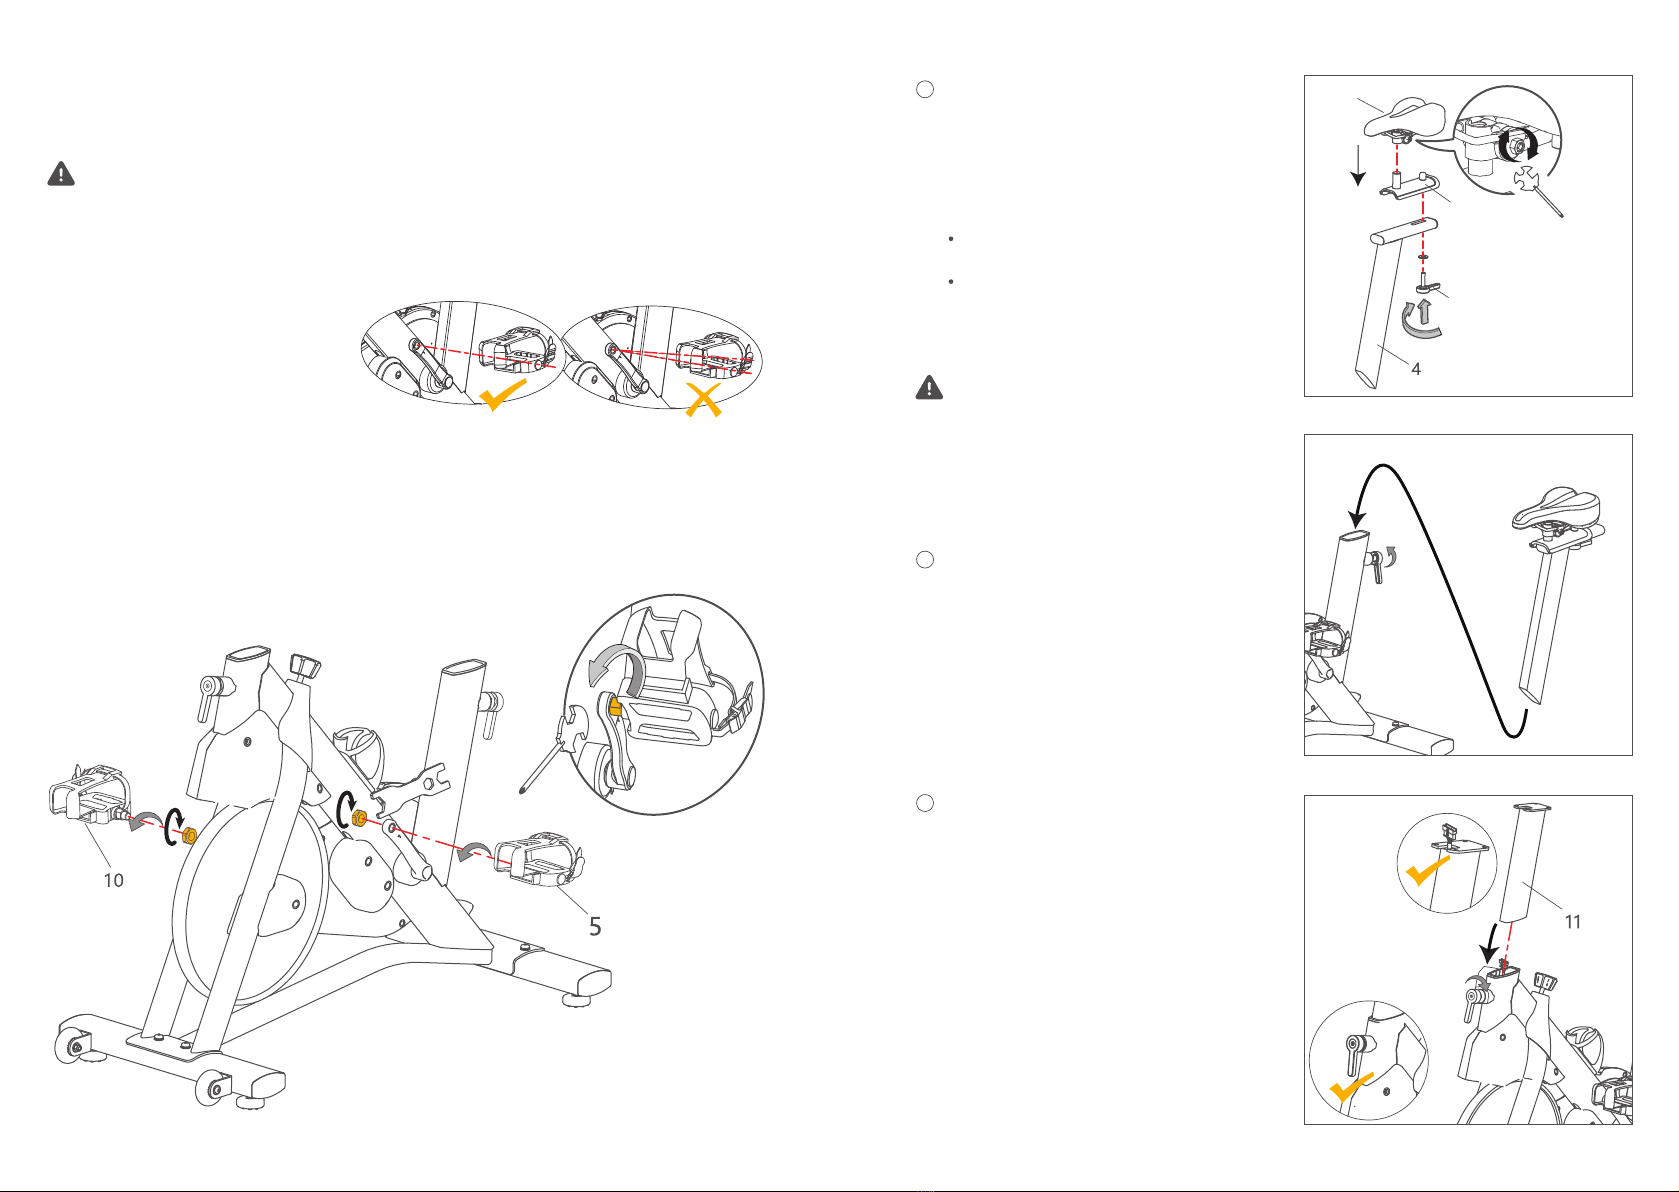
13 Caution - To reduce the risk of injury
from moving parts - Unplug before
servicing.
14 Warning - To reduce the risk of Electric
shock - Unplug before cleaning or
servicing.
15 Warning - Risk of personal injury -
Keep children under the age of 13
away from machine.
16 Warning—This stationary training
equipment is not suitable for high
accuracy purposes.
SAVE THESE INSTRUCTIONS
03 04
3SPECIFICATIONS
1 An appliance should never be
left-unattended plugged in.
Unplug from outlet when not in use,
and before putting on or taking off parts.
2 Do not operate under blanket or pillow.
Excessive heating can occur and cause
fire, electric shock, or injury to persons.
3 Close supervision is necessary when
this appliance is used by, on, or near
children, invalids, or disabled persons.
4 Use this appliance only for its intended
use as described in this manual.
Do not use attachments not
recommended by the manufacturer.
5 Never operate this appliance if it has a
damaged cord or plug, if it is not
working properly, if it has been dropped
or damaged, or dropped into water.
Return the appliance to a service center
for examination and repair.
6 Keep the cord away from heated
surfaces.
7 Never drop or insert any object into any
opening.
8 Do not use outdoors.
9 Do not operate where aerosol (spray)
products are being used or where
oxygen is being administered.
Before Assembly
Select the area where you are going to set
up and operate your machine. For safe
operation, the location must be on a hard,
level surface. Allow a workout area of a
minimum 92.7'' X 67 .1" ( 2.4m X 1.7m ).
Basic Assembly Tips
Follow these basic points when you
assemble your machine:
1. Read and understand the “IMPORT-
ANT SAFETY GUIDELINES” before
assembly.
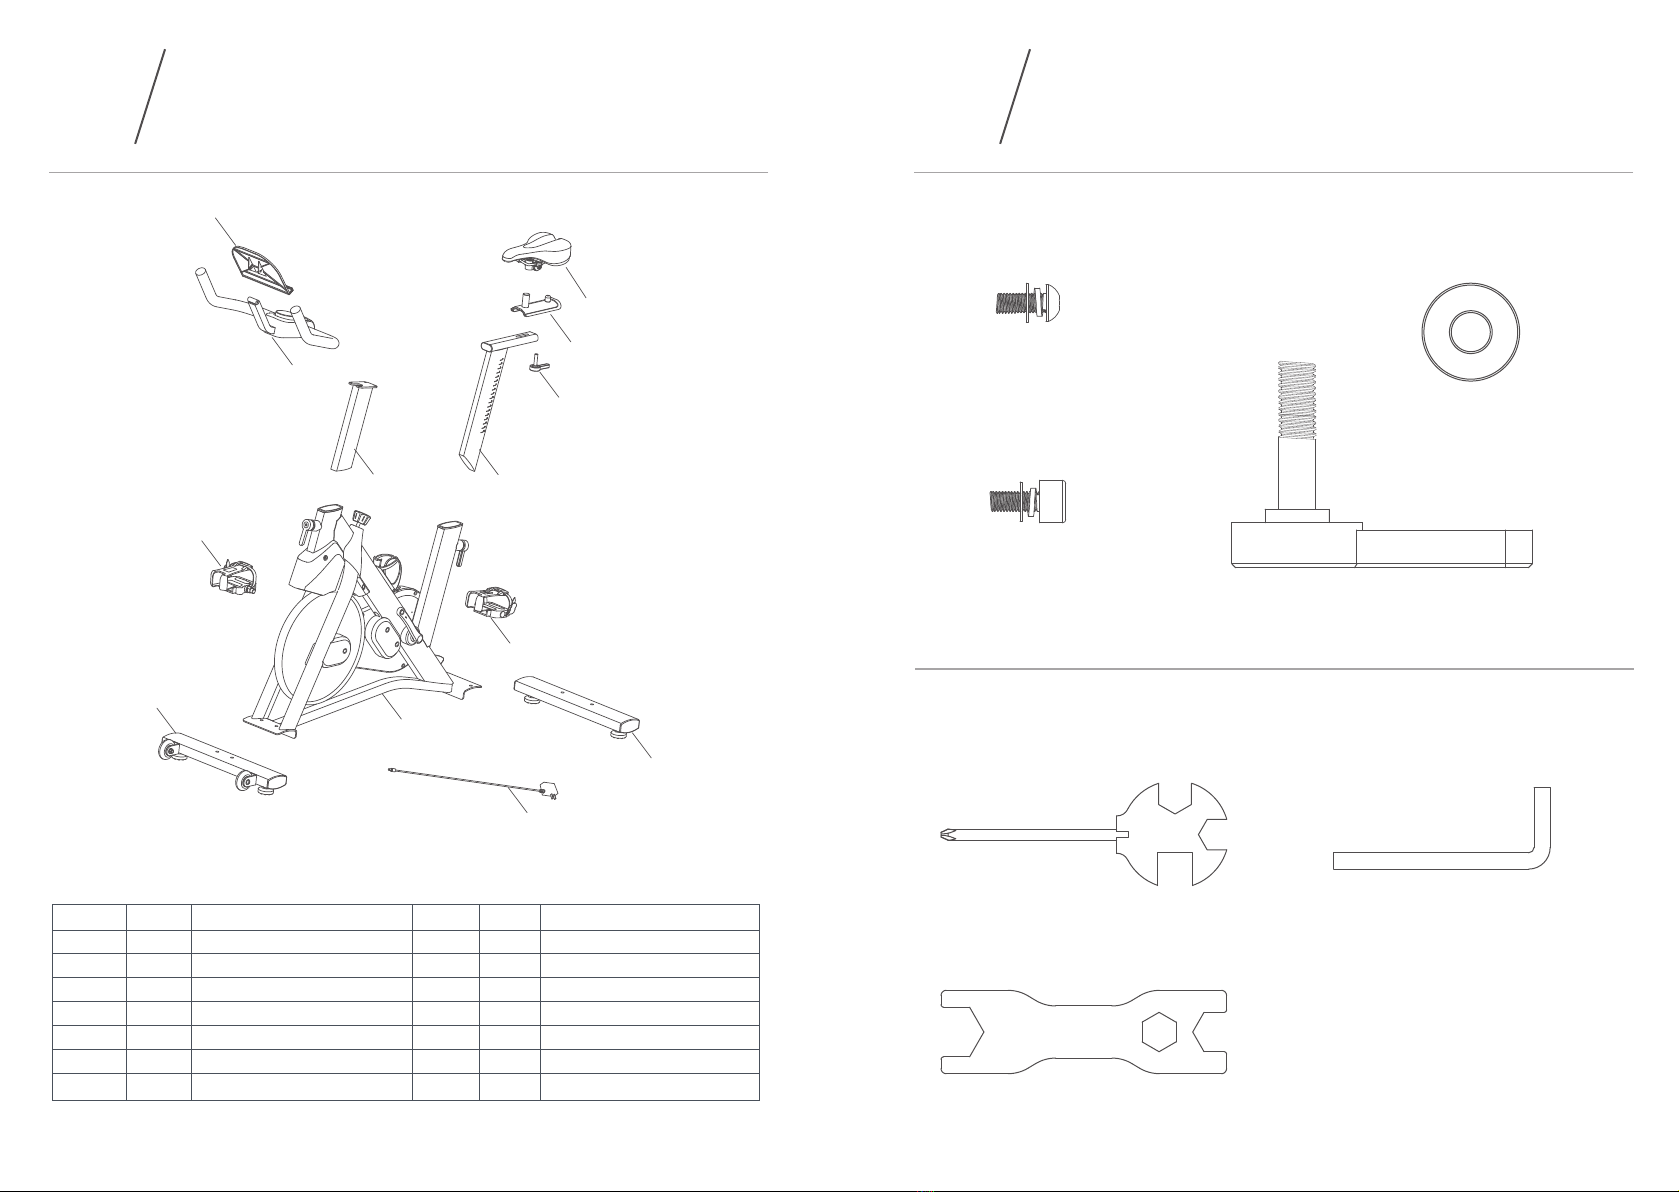
2. Collect all the pieces necessary for
each assembly step.
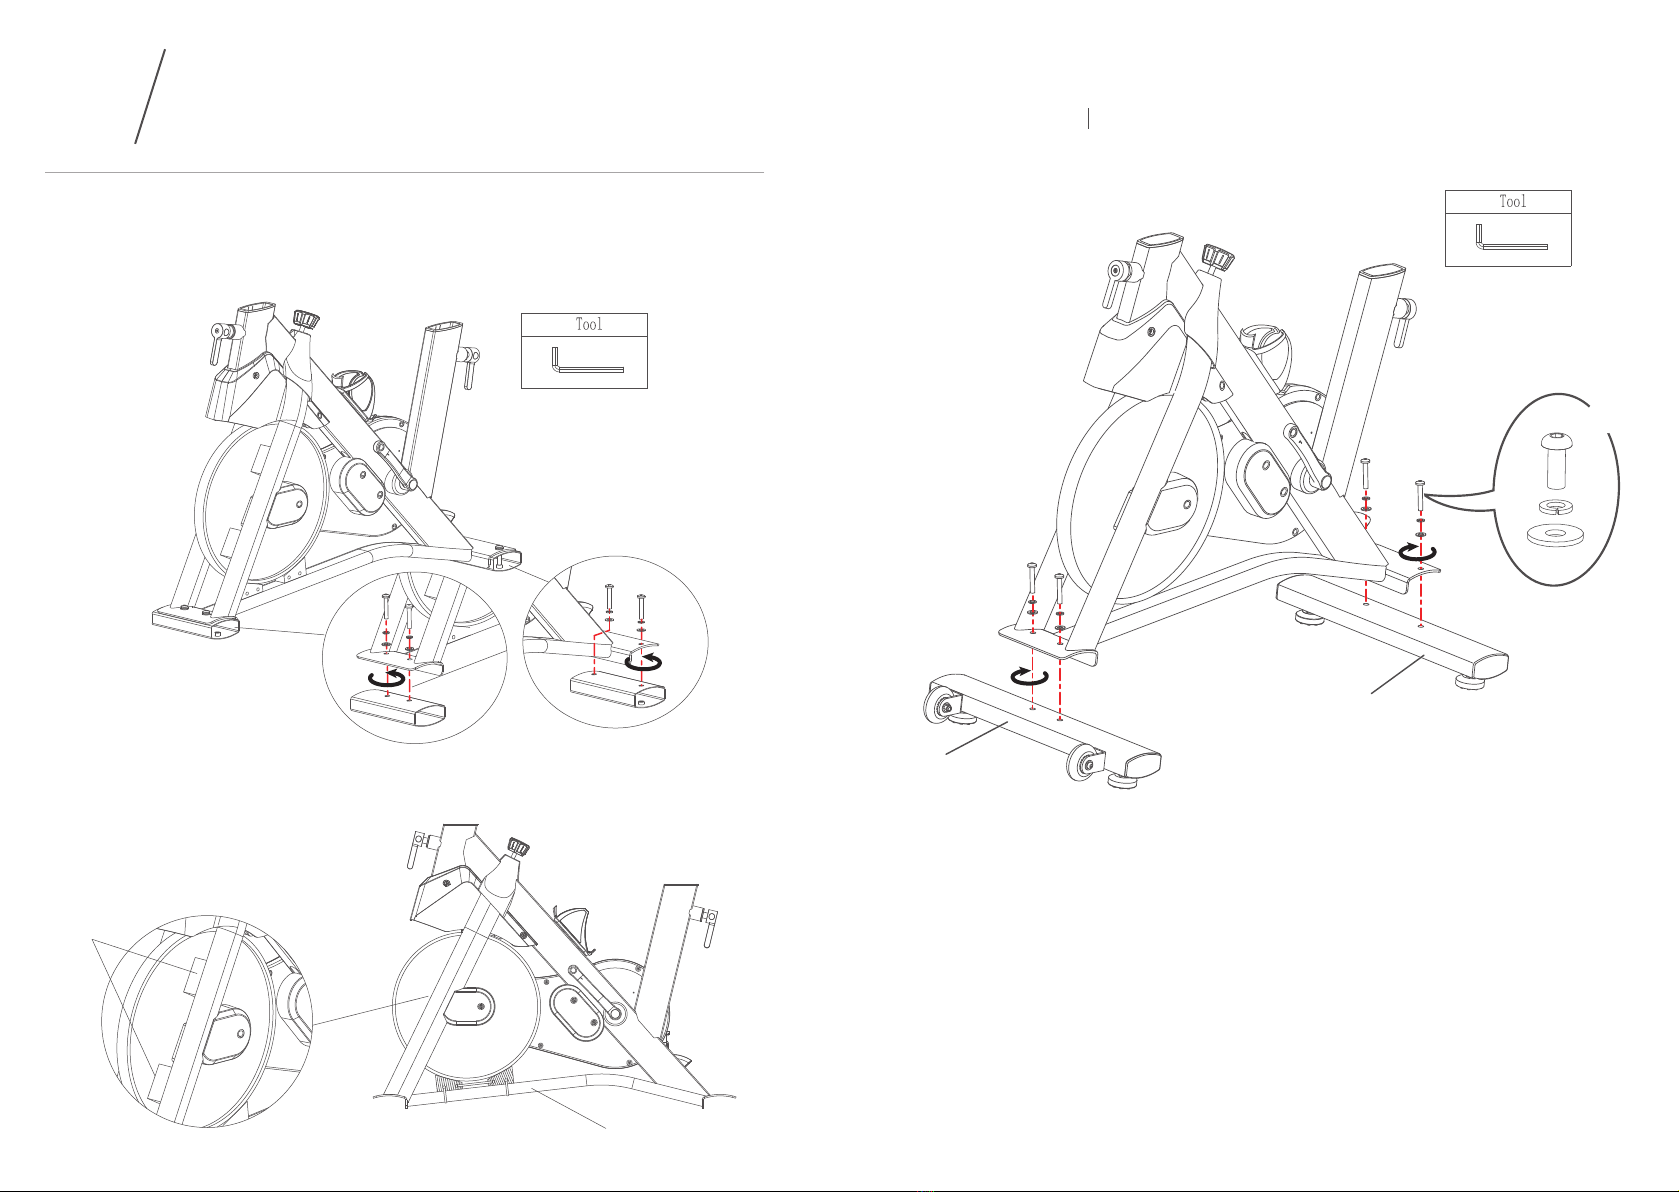
3. Using the recommended wrenches,
turn the bolts and nuts.
4. The assembly requires 2 people.
Maximum User Weight:
330 lbs. (150kg)
External power supply
( AC Adaptor ) : 9V DC, 1A
19.9”
45.5”
47.2”120cm
50.5cm
115.5cm
FCC STATEMENT:
Operation is subject to the following two
conditions:
(1) This device may not cause harmful
(2) This device must accept any interfer-
interference, and
ence received, including interference
that may cause undesired operation.
Note:
Any Changes or modifications not
expressly approved by the party
responsible for compliance could void
the user's authority to operate
the equipment.
This equipment has been tested and
found to comply with the limits for a Class
B digital device, pursuant to part 15 of the
FCC Rules. These limits are designed to
provide reasonable protection against
harmful interference in a residential
installation. This equipment generates,
uses and can radiate radio frequency
energy and, if not installed and used in
accordance with the instructions, may
cause harmful interference to radio
communications. However, there is no
guarantee that interference will not occur
in a particular installation. If this equip-
ment does cause harmful interference to
radio or television reception, which can
be determined by turning the equipment
off and on, the user is encouraged to try
to correct the interference by one or more
of the following measures:
• Reorient or relocate the receiving
antenna.
• Increase the separation between the
equipment and receiver.
• Connect the equipment into an outlet on
a circuit different from that to which the
receiver is connected.
• Consult the dealer or an experienced
radio/TV technician for help.
Product name Kardio T2S spin bike
Model NO URSB005
Resistance mechanism Magnetic resistance
Connection field Bluetooth® 5.0
Drive system Belt
User Height range recommendation 4’11’‘- 6‘5’‘
Maximum User weight 330lbs
Power supply unit (Adaptor )
Input 100-240V AC,50/60Hz,0.6A
Output 9V DC 1A
Product Specification
This equipment should be installed
and operated with minimum distance
20cm between the radiator& your body.


 Service manual")


