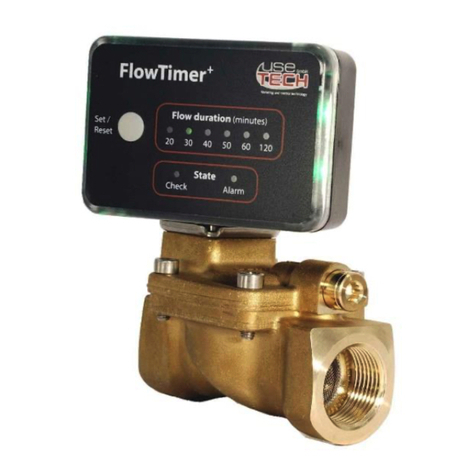
UseTECH FlowTimer+ Set XL User manual

FlowTimer+ Set XL
the Fuse in the Pipe
Innovative monitoring method for piping systems
Operating manual

Publisher
usetech GmbH
Tanzplatz 10
D- 55130 Mainz
Phone:
+49 6131 –921325
Website:
www.use-tech.com
Document
number
FlowTimer+ Set_XL_V4.2_Manual_EN_V3
Original Operating Manual
Date of issuance
04.03.2019
Printing date
04.03.2019
Copyright
usetech GmbH
This documentation including all its parts is protected by copyright.
Any use or modification outside the narrow limits of copyright law
without the consent of the company usetech GmbH is prohibited
and punishable by law.
This applies in particular to duplications, translations, microfilming
and storage in electronic systems as well as processing in these.

Table of contents
03/19 FlowTimer+ Set XL 1
Table of contents
Table of contents.........................................................................1
1General information.............................................................3
1.1 Explanation of symbols .........................................................3
2Technical data......................................................................5
2.1 Electrical data........................................................................5
2.2 Fluidic data............................................................................5
2.3 Environmental and climate conditions...................................5
2.4 Lifetime..................................................................................5
3Intended Use ........................................................................6
3.1 Non-approved use.................................................................7
3.2 Main differences to PPC 3000 Basic.....................................8
4Basic safety instructions.....................................................9
5System description FlowTimer+ Set XL ...........................10
5.1 Content of the FlowTimer+ Set XL......................................10
5.2 FlowTimer+ front view.........................................................11
5.3 FlowTimer+ rear view..........................................................12
6Installation..........................................................................13
6.1 Measures before installation ...............................................13
6.2 Installation position..............................................................14
6.3 Installation of the Shut-off valve..........................................15
6.4 Installing the Pressure Sensor ............................................16
6.5 Mounting the FlowTimer+ on the Shut-off valve .................17
6.6 Electrical connection ...........................................................18
7Getting Started...................................................................19
7.1 Checking the Hot Water Preparation ..................................20
7.2 Sensitivity check..................................................................21

Table of contents
03/19 FlowTimer+ Set XL 2
8Operation and Function.....................................................22
8.1 Operating conditions ...........................................................22
8.1.1 normal operation ...........................................................................22
8.1.2 Restarting the system....................................................................22
8.1.3 Bypass operation...........................................................................23
8.1.4 Sensor operation (flow duration ∞)................................................23
8.1.5 Test mode .....................................................................................24
8.1.6 Changing the Flow duration ..........................................................25
8.1.7 Changing the Sensitivity................................................................26
8.2 Status display......................................................................28
9Troubleshooting, Maintenance .........................................29
9.1 No display............................................................................29
9.2 Alarm signals.......................................................................30
9.2.1 Status display permanently red.....................................................30
9.2.2 Status display permanent yellow...................................................32
9.3 Maintenance........................................................................33
10 Shutting down....................................................................34
11 Packaging, Transport, Storage .........................................35
12 Disposal..............................................................................36
13 EC Declaration of Conformity ...........................................37
14 Conformity Pressure Transmitter .....................................38
15 Declaration of Conformity Valve.......................................39

General information
03/19 FlowTimer+ Set XL 3
1 General information
The operating manual describe the entire life cycle of the system.
Keep this manual in such a way that it is easily accessible to any
user and available to any new owner of the system.
NOTE
The operating manual contain important information on
safety!
Non-observance of these instructions can lead to dangerous
situations.
The operating manual must be read and understood.
1.1 Explanation of symbols
DANGER
Warns of imminent danger!
Failure to do so will result in death or serious injury.
WARNING
Warns of a potentially dangerous situation!
Failure to do so could result in serious injury or death.
CAUTION
Warns of a possible hazard!
Failure to do so may result in moderate or minor injury.
NOTE
Warns of material damage!
Failure to do so may result in damage to the system or
equipment.

General information
03/19 FlowTimer+ Set XL 4
indicates important additional information, tips and
recommendations that are important for your safety and the
proper functioning of the system.
refers to information in this operating manual or other
documentation.
Action steps
The defined sequence of steps makes it easier for you to
use the system correctly and safely.
Result
Here you will find the result of a sequence of steps
described.

Technical data
03/19 FlowTimer+ Set XL 5
2 Technical data
2.1 Electrical data
Input voltage: 100 - 240 V~
Power consumption: Ø max. 6 W
Frequency: 50 - 60 Hz
Connection: Euro plug power supply unit
2.2 Fluidic data
Inlet pressure: 1 - 10 bar
Kv value (valve): 24.0 m³/h
Sealing material: EPDM
Connection: G 1/1/2 inch IT (XL version)
2.3 Environmental and climate conditions
Ambient temperature: +5°C - 40°C
Media temperature (drinking water): 5 - 30°C
Protection class: IP20
Location: only suitable for indoor use
2.4 Lifetime
The function of FlowTimer+ must be checked by a qualified
technician at the scheduled intervals (see also chapter 9.3).
If the fluidic part of the unit shows a fault due to wear, this is
indicated by a fault in the overall system (incl. downstream
piping system) via the control electronics.

Intended Use
03/19 FlowTimer+ Set XL 6
3 Intended Use
Please observe the notes in this operating manual as well as the
operating conditions and permissible data in the data sheet so that
the system functions perfectly and remains operational for a long
time. In case of non-observance of these instructions as well as in
case of inadmissible interventions into the system, any liability on
our part is void, as is the warranty on the system and accessories!
The FlowTimer+ is used for permanent monitoring of piping
systems for drinking water (see also chapter 2 "Technical data"). A
permanent water flow should be prevented without interruption
after a previously set duration and size and thus damage limitation
should be achieved by minimizing the amount of water flowing out.
Any other use or use going beyond this shall be deemed improper
use. The usetech GmbH is not liable for damages resulting from
this. The risk is borne solely by the user.

Intended Use
03/19 FlowTimer+ Set XL 7
3.1 Non-approved use
Unapproved use in the sense of a foreseeable misuse shall be
deemed to be improper use:
It has to be checked whether the existing installation allows a
smooth function of FlowTimer+ at all, e.g. permanent consumers
etc.
The FlowTimer+ may only be used with the components in the
set or other FlowTimer+ products, unless explicitly stated
otherwise! If components of other manufacturers are used,
usetech GmbH is not liable for damages and the warranty also
expires.
FlowTimer+ was designed exclusively for drinking water. The
system is not suitable for rainwater, other liquids or gases.
FlowTimer+ is not suitable for use within hot water preparation
or heating installation!

Intended Use
03/19 FlowTimer+ Set XL 8
3.2 Main differences to PPC 3000 Basic
FlowTimer+ does not shut off the water supply in case of a micro
leakage, but only displays it for comfort reasons!
The shut-off valve of the FlowTimer+ is open without power supply!
Thus the water supply can be restored comfortably only by
switching off the power supply if required or during a power failure.
An active bypass mode is therefore no longer included.
The FlowTimer+ can also be installed upstream of the filter or
backwash filter by means of an integrated filter system.
A configuration of the system is no longer necessary in most
applications, which means that the system is immediately ready for
operation after proper installation!
If required, however, the maximum permanent flow duration can be
set very simply by pressing a button.
A test mode is also available to assist the customer or installer in
troubleshooting a potential leak.

Basic safety instructions
03/19 FlowTimer+ Set XL 9
4 Basic safety instructions
WARNING
Electrical voltage can be life-threatening.
The installation of a stationary power supply must be
carried out by a qualified electrician.
The system must be commissioned and, if necessary,
adapted by a specialist. The local conditions must be
observed.
The FlowTimer+ system may only be installed in the cold
water pipe.
The measures before installation must be observed (see
also chapter 6.1 "Measures before installation").

System description FlowTimer+ Set XL
03/19 FlowTimer+ Set XL 10
5 System description FlowTimer+ Set XL
5.1 Content of the FlowTimer+ Set XL
Fig. 5.1: Content of the FlowTimer+ Set XL
1
Plug-in power supply
2
Shut-off valve
3
Directional flow arrow
4
Pressure sensor - Cable
5
Pressure sensor
6
FlowTimer+
7
Anchor pipe

System description FlowTimer+ Set XL
03/19 FlowTimer+ Set XL 11
5.2 FlowTimer+ front view
Fig. 5.2: FlowTimer+ front view
8
Set / Reset button
9
Device illuminated rim / status display
10
Flow duration display
11
Nameplate
12
Check display
13
Alarm display

System description FlowTimer+ Set XL
03/19 FlowTimer+ Set XL 12
5.3 FlowTimer+ rear view
Fig. 5.3: FlowTimer+ rear view
14
I/O connection
15
Solenoid
16
Year of construction / Serial number
17
Pressure sensor connection
18
Power supply connection

Installation
03/19 FlowTimer+ Set XL 13
6 Installation
The FlowTimer+ must be installed in the piping system by a
trained technician according to the installation instructions.
6.1 Measures before installation
The operating pressure must always be greater than 1 bar. If the
pressure exceeds 10 bar, a pressure reducer must be installed
upstream of the FlowTimer+.
Existing KFR valves, non-return valves or non-return valves
must be tested for function and tightness and replaced if
necessary.
All loads must be checked for visible leaks and repaired or
replaced if necessary prior to installation.
If a water heater with an expansion tank is installed behind the
FlowTimer+ system, it must be checked for function.
Due to different equipment variants of a cold and hot water
supply and the associated variation possibilities of an
installation, special testing of existing pressure conditions is
required. A check for possible air inclusions within the cold and
hot water pipes, the hot water preparation and any existing hot
water storage tank is absolutely necessary. If necessary, venting
must be carried out. Existing self-venting devices must be
checked for proper function and replaced if necessary. Check
and ensure that hot water does not run after the cold water
supply has been interrupted (see also chapter 7.1 "Sensitivity
check the hot water preparation").
In the case of hot water preparation without an expansion tank
with an existing pressure relief valve, this must be checked for
proper function.

Installation
03/19 FlowTimer+ Set XL 14
6.2 Installation position
The FlowTimer+ is always installed upstream of the pipeline
section and consumer to be monitored.
A backflow preventer or KFR valve must be installed upstream
of each FlowTimer+. Normally this valve must already be
present behind the water meter.
However, if multiple FlowTimer+ (such as fuses) are used, each
requires such a valve.

Installation
03/19 FlowTimer+ Set XL 15
6.3 Installation of the Shut-off valve
The shut-off valve (2) can be installed in any position, it only has
to be installed in the correct direction (observe the flow direction
arrow on the valve).
The valve body must be easy to open for maintenance work. The
Allen screws on the valve upper body must be accessible from
the outside.
The selected mounting position must allow the assembly and
disassembly of the control electronics (6) with solenoid coil (15).
The shut-off valve may only be screwed into the pipeline at the
flange connections using a fork wrench.
First install the shut-off valve (2) and the pressure sensor
(5)!
Observe the cable lengths and the visibility of the front side
of the FlowTimer+ when installing the valve and pressure
sensor.
The upper part of the system (FlowTimer+ [6]) and the plug
connections must not be subjected to mechanical stress
(danger of destruction)!

Installation
03/19 FlowTimer+ Set XL 16
6.4 Installing the Pressure Sensor
The pressure sensor (5) must be installed downstream of the shut-
off valve (2). This can usually be screwed in directly instead of
existing 1/4 inch vent valves or installed in the pipeline using a T-
piece with reduced outlet.
Only tighten the pressure sensor (5) with a fork wrench!
The body of the pressure sensor or the connector area must
not be rotated using e.g. a water pump pliers (danger of
destruction)!

Installation
03/19 FlowTimer+ Set XL 17
6.5 Mounting the FlowTimer+ on the Shut-off valve
The FlowTimer+ electronics (6) is firmly screwed to the
solenoid coil (15) and forms a unit which must never be
separated (loss of warranty).
To mount the FlowTimer+ on the shut-off valve, place the solenoid
coil (15) on the armature tube of the valve (7). Then press briefly
and forcefully on top of the solenoid coil (not on the electronics)
until the coil audibly engages in the holder. Thus the coil is mounted
correctly.
The supplied O-ring between valve body and coil is important. In
case of loss or defect please contact our support.
To disassemble, push one or two screwdrivers between valve body
(2) and solenoid coil (15). Then lever the coil away from the valve
body. This requires a little more force than the previous pressing.

Installation
03/19 FlowTimer+ Set XL 18
Never use tools to lever between the valve and the
FlowTimer+ electronics! (danger of destruction)
6.6 Electrical connection
Connect the pressure sensor (5) with the connection cable (4) to
the FlowTimer+ pressure sensor connection (17).
The plug-in screw connection on the pressure sensor is polarized
(polarization contact in the plug) and can therefore only be plugged
in one position!
Connect any accessories to the I/O connector (14) of the
FlowTimer (for further information please refer to the accessory
instructions).
Plug the power supply unit into a suitable socket and connect the
power supply unit to the power supply connection (18) of the
FlowTimer+.
Table of contents
Other UseTECH Measuring Instrument manuals