USM Haller User manual

Instruction manual
Haller
Haller
Lock C
Lock C

3
43 mm
34 mm
USM Haller lock C
Instruction manual
Date
05.22/en
Data sheet
3
1 Product information
4
2 Product parts
6
Power User
3 Start-up
10
4 Management
with the USM app
12
5 Deprogramming
Admin cards
19
6 Changing the batteries
20
7 Flashing signals
22
User
8 Operating lock C
23
9 Disposal, transport
and alterations
26
10 Compliance
27
11 FAQ
28
Data sheet
Dimensions
Ø 43 mm × 34 mm
(diameter × height)
Operating temperature
5˚ – 50˚C
The USM Haller lock C is intended for indoor use only.
Power supply
2 × ½ AA batteries, 3 V e.g. of the “Varta”
brand with 950 mAh
Already included in lock C on initial purchase.
Service life: 15,000 locking cycles or 2 years
Power consumption
max. 110 mA
Radio frequency
RFID 13.56 MHz
Bluetooth 2.4 – 2.4835 GHz
Transmitter power
RFID 345 mW
Bluetooth +4 dBm
Radio range
RFID max. 50 mm
Bluetooth max. 20 m
Radio modulation
BLE: GFSK

4
5
USM Haller lock C
Instruction manual
Date
05.22/en
1.1 Cooperation between
USM and BURG
USM and BURG jointly developed the USM Haller
lock C in close cooperation by drawing on their
respective in-depth know-how and experience.
Both companies have a great passion for innovation
and technology.
Like USM, BURG is also a fourth-generation family
business. The company is best known for its pad-
locks. The first hand-made BURG lock was sold in
1890. Today, over 130 years later, BURG develops,
designs and manufactures mechanical and electro-
mechanical locking systems including firmware and
the associated apps and cloud applications.
1.2 General information
The USM Haller modular furniture system and all of
its associated product parts are intended for indoor
use only. USM is not liable for any damage caused
by incorrect or improper use or operation.
Do not remove the battery separator strip until
you start up the product.
Do not remove the nameplates.
1.3 Power User
Designate a Power User and his/her proxy.
The Power User is responsible for the following tasks:
— Starting up the locks
— Managing and maintaining the locks
— Briefing the lock C users
— Managing the product accessories
Read this instruction manual carefully before
starting up the USM Haller lock C. It is important
that you familiarise yourself with the product and
its features.
1.4 Operating modes
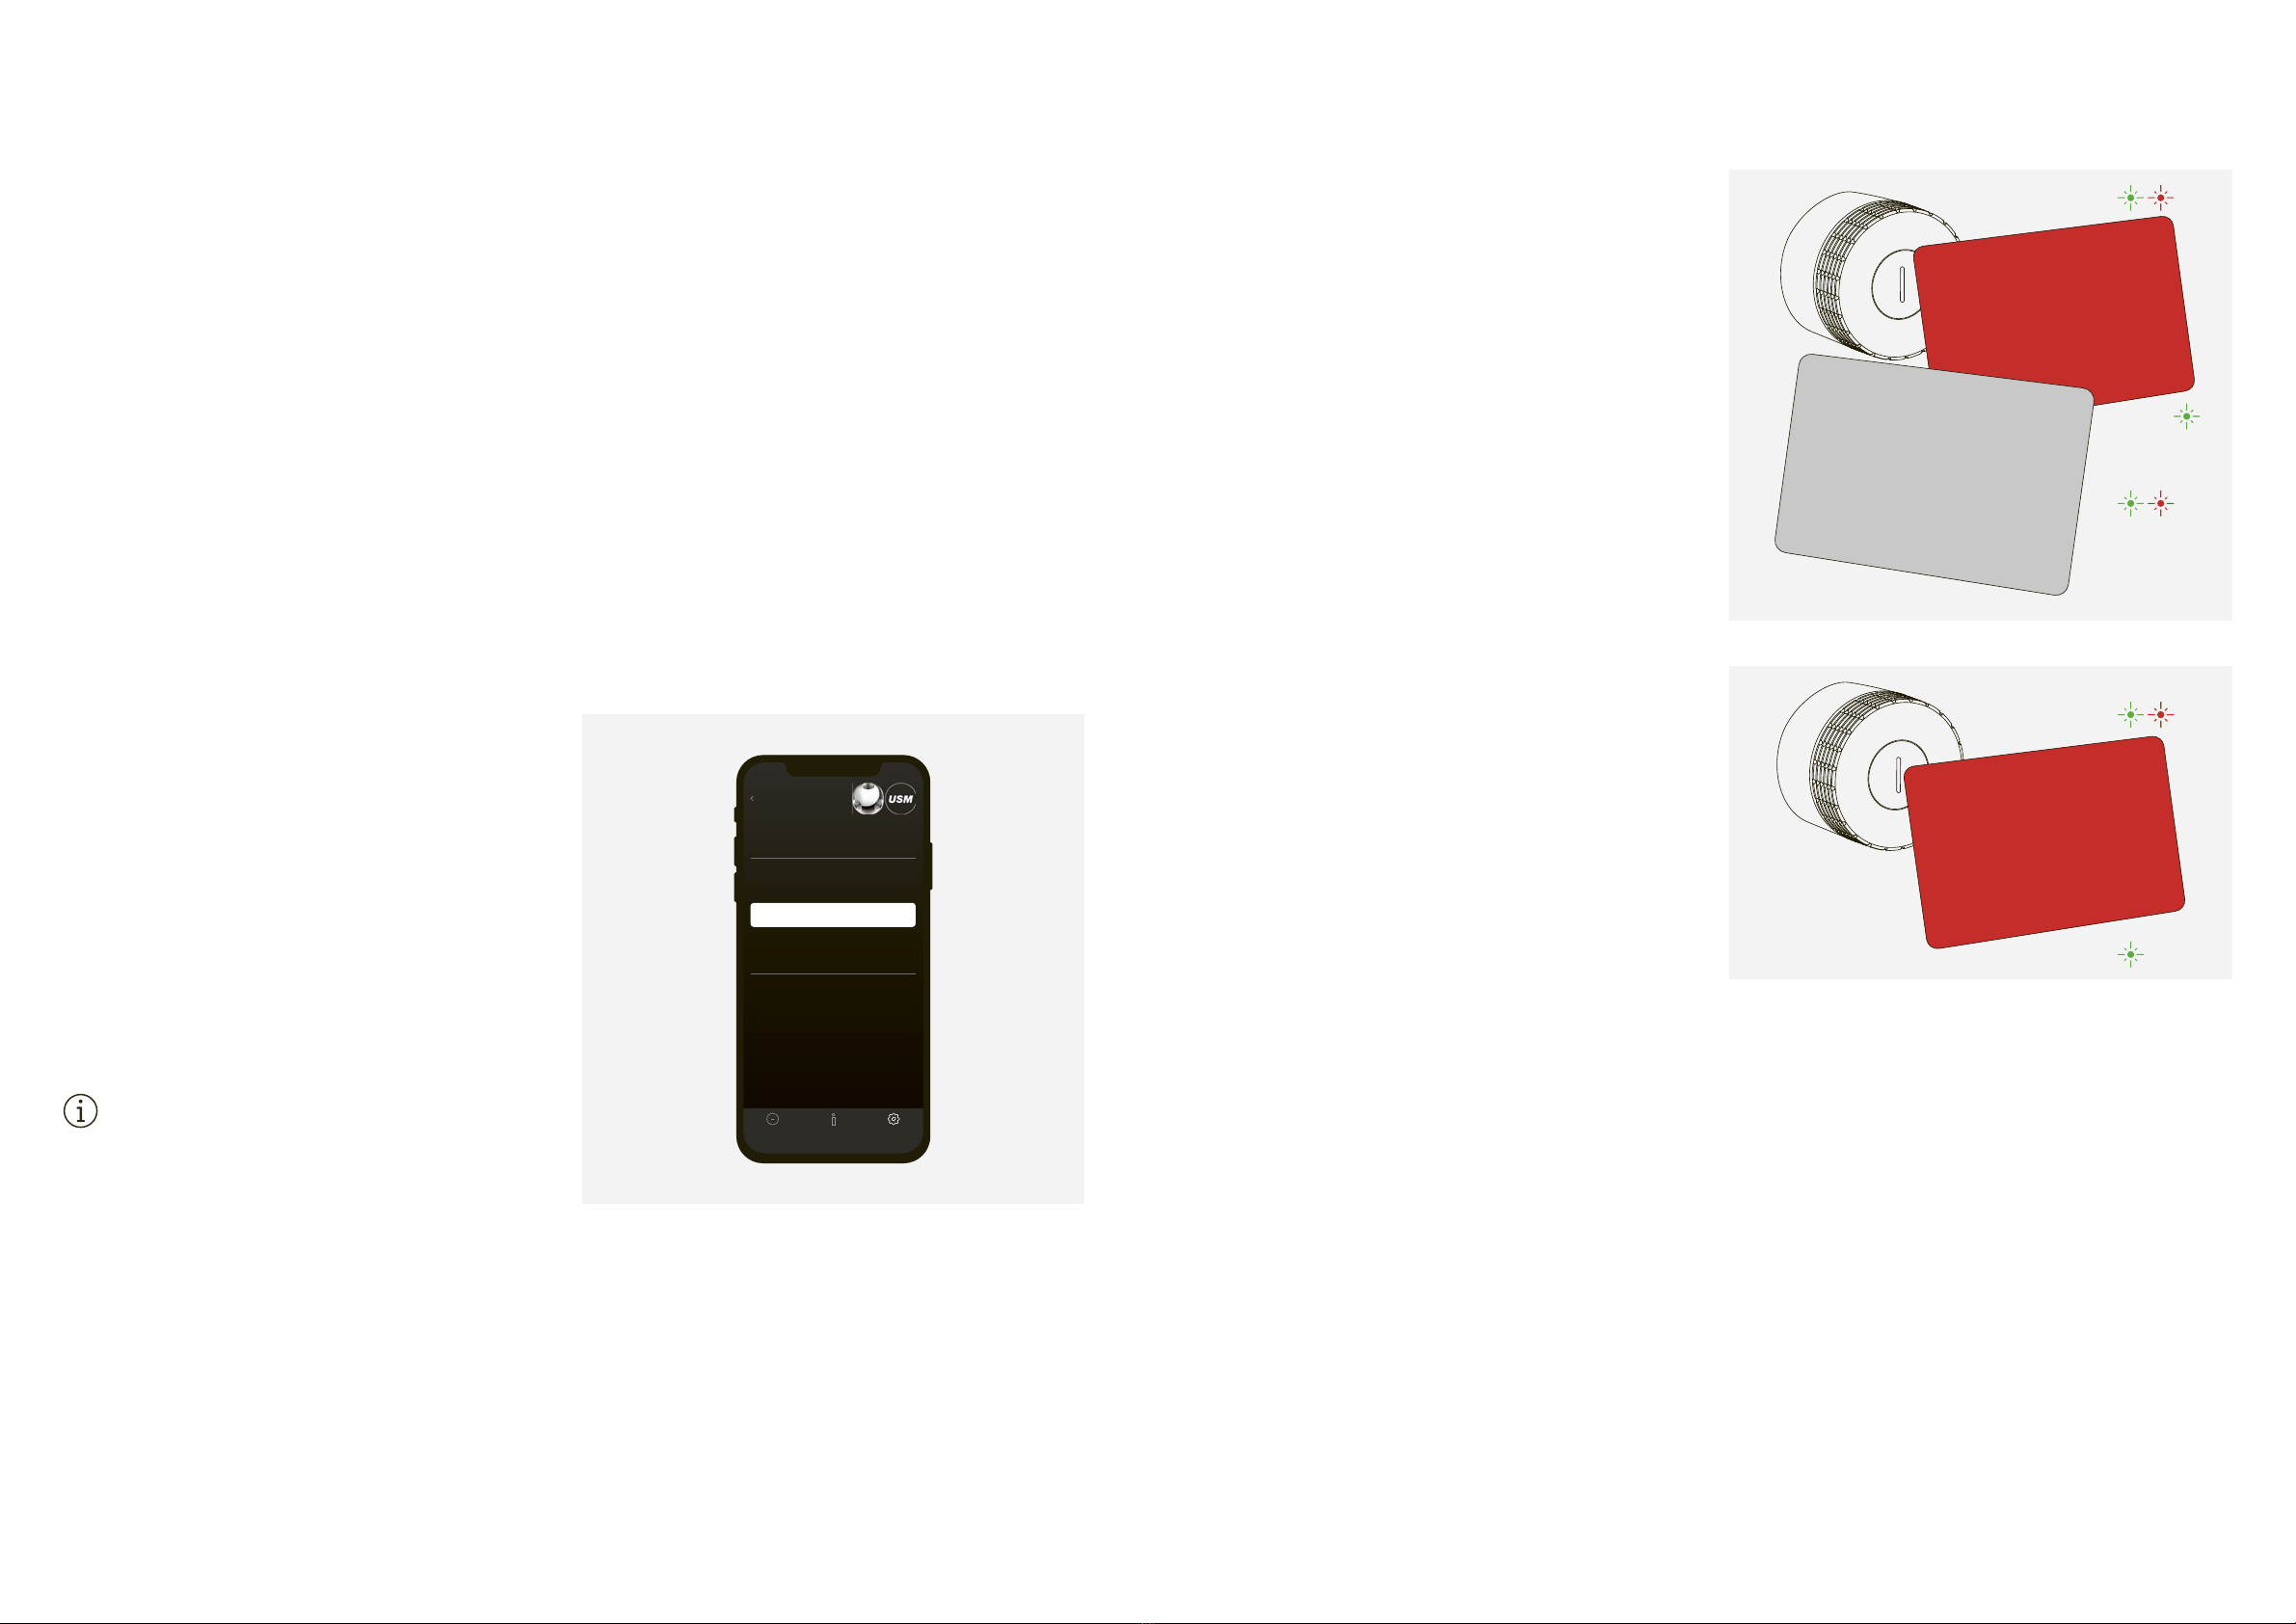
The USM Haller lock C can be operated using key
cards (RFID) or smartphones and the “USM App”
(Bluetooth).
1 Product information
1.5 User modes
The USM Haller lock C has up to three user modes.
“Public Locker mode” is the basic mode and can be
operated using both key cards and smartphones.
In this mode, lockers are not permanently assigned
and can therefore be chosen freely.
The other two user modes – “Personal Locker
mode” and “Shared Locker mode” are also available
for operation via smartphone. As such, lockers
can either be personalised (Personal Locker mode)
or shared with others for joint use (Shared Locker
mode).
Public Locker mode
A row of lockers is available to several
users.
The key card/smartphone is valid for just
one locking operation and is deleted from
the lock once the locker is re-opened.
— Free choice of locker
— Temporary use*
Application examples: open spaces,
desk-sharing, cloakrooms in reception
areas, etc.
* Technically, Public Locker mode can also be used
in the long term provided the same person always
uses the same locker.
Personal Locker mode
In this mode, the lock is personalised. It is
permanently assigned to one user for long-
term use. Other users cannot operate (i.e.
open or lock) this locker.
Personal Locker mode is a prerequisite for
the use of Shared Locker mode.
— Assigned lockers
—
Safe and long-term storage
of docu-
ments, equipment and/or personal
belongings.
Application examples: fixed workstations,
storage of confidential documents, man-
agers’ offices
Shared Locker mode
A personalised locker is assigned to one
person or a group of people. Access to the
lock is then enabled via the app.
The person who personalised the lock
remains the owner. This person can with-
draw access or grant access to other
people at any time.
— Shared lockers
— Temporary or long-term access
Application examples: storage location
for group projects, exchange of docu-
ments in a safe place, access if someone
is on holiday or absent (access can also
be granted remotely).
Home
Overview
Public Locker
Shared Locker
Personal Locker
Logout
Locks
Help
Settings
User

6
7
USM Haller lock C
Instruction manual
Date
05.22/en
2 Product parts
2.1 Lock C
Lock C comprises an end cap with an indication
slot and a light ring.
1 The indication slot shows if the lock is open
or closed.
2 The light ring gives feedback via light signals.
Closed lock C:
If the indication slot is in vertical position, the lock bolt
is extended.
Open lock C:
If the indication slot is in horizontal position, the lock bolt
is retracted.
2.2 Service tool
The service tool is used for changing the batteries
by simply placing it over the lock C. The service tool
contains a magnet that helps to remove the batter-
ies from the battery compartment.
Changing the batteries p. 20
1 Markers indicating the correct service tool alignment
on lock C
2 Marker for the magnet
2.3 Main Admin card
The Main Admin card identifies you as the owner of
your locks and is used for administrative manage-
ment purposes (Admin cards).
During start-up, once the battery separator strip has been
removed, the card which first makes contact with lock C is
defined as the Main Admin card.
Once a Main Admin card has been programmed
(saved), it can no longer be deleted.
The Main Admin card cannot be used for opening
or locking the locks.
2.4 Admin card
The Admin card can be used for an emergency
opening.
All locks which have been programmed on the card
can be opened in an emergency.
Unlike the Main Admin card, the assignment of Admin cards
can be cancelled or modified.
Between one (min.) and three (max.) Admin cards
must be programmed per USM Haller lock C.
The Admin card also connects the locks to the USM app.
That way, the Power User can easily manage the locks via
the admin area of the app, and up to three user modes can
be used at the user’s end.
The Admin card cannot be used for locking the
locks.
2.5 Key cards
Key cards are used for opening and locking the
locks.
Area of use: Public Locker mode
Key cards are optional and can be ordered at the customer’s
request.
In addition to USM key cards, companies can also use their
own RFID cards provided they support the ISO 14443A,
13.56MHz radio standard (e.g. MIFARE Classic, MIFARE
DESFire EV1 + EV2, MIFARE Ultralight EV1, LEGIC prime,
LEGIC advant).
If companies wish to use their own RFID cards, we recom-
mend checking compatibility in advance.
Main Admin
Admin
User
1
2
1
2

8
9
USM Haller lock C
Instruction manual
Date
05.22/en
2.6 USM app
The USM app is available in iOS and Android
versions.
User area
The USM app can be used for opening and locking the locks.
Area of use: Public, Personal and Shared Locker modes
With the intuitive, user-friendly app, users can easily manage,
personalise or share one lock C or several locks.
— Key function (locking and opening function)
— Management of personalised locks (personal and shared)
— Overview of users’ locks (public, personal and shared)
Admin area
In the admin area, the Power User has an overview of all of
the locks assigned to him/her and can manage/maintain these
or read the relevant activity information.
— Power User access
— Manage and maintain locks
— Distribute Grants
2.7 Delivery scope
and management
Product accessories are recommended depending
on the number of locks purchased. The following
basic equipment is supplied as standard with your
first lock C order:
The Power User should keep this in a safe place.
USM recommends having one Main Admin card per site.
Storage: 1 × Power User, 1 × Power User proxy, 1 × safe,
boss or receptionist
For security purposes and to simplify management, USM
recommends programming three Admin cards per lock and
setting up just one lock pool which is then represented by
the 3 x Admin cards.
The Power User is responsible for storage.
USM recommends having one service tool per site.
The Power User is responsible for storage.
USM recommends having one key card per site to check
that the functions are working properly.
Key cards are optional for users and are only ordered at the
customer’s request. The number of cards depends on the
customer’s order. As a general rule, one card is calculated
per user.
The number of individual components can be increased
if necessary. You can reorder these individually from your
USM retailer.
Home
Overview
Public Locker
Personal Locker
Shared Locker
Locks
Help
Settings
Logout
iOS
Android
Main Admin
1 ×
Admin
3 ×
1 ×
User
1 ×

10
11
USM Haller lock C
Instruction manual
Date
05.22/en
Follow the steps below to start up a lock.
Designate a Power User and his/her proxy.
The Power User is responsible for the following tasks:
— Starting up the locks
— Managing and maintaining the locks
— Briefing the lock C users
— Managing the product accessories
Take extra care when carrying out these steps. If you
start up the lock correctly, you will have no problems
using your lock C.
Step 1 —
initiating lock C
Make sure that the indication slot on the front of the lock
is vertical.
Remove the separator strip by pulling on it. Lock C start-up
begins.
Flashing signal: 3 × green
Step 2 —
programming the Main Admin card
Take the Main Admin card (red) and hold it briefly in front
of the lock.
Flashing signal: 1 × green, 1 × red
Briefly hold the card in front of the lock again to confirm this.
Flashing signal: 1 × green, 1 × red
The Main Admin card is now programmed. You are
now the lock owner.
3 Start-up
Step 3 —
programming the Admin cards
Pick up the Main Admin card (red) and the Admin cards to
be programmed (grey).
1. Hold the Main Admin card on the lock.
Flashing signal: 1 × green, 1 × red
2. Now hold all of the Admin cards to be programmed on
the lock, one after the other.
Flashing signal per card: 1 × green, 1 × red
3. Afterwards, hold the Main Admin card on the lock
once again.
Flashing signal: 1 × green
The same process can also be carried out
with
just one Admin card
.
Step 4 —
check if start-up worked
Hold the supplied key card in front of the lock. The lock is
now locked.
Flashing signal: 1 × green
Hold the key card in front of the lock again to unlock it.
Flashing signal: 1 × green
Now turn the lock handle 90° clockwise to open the locker.
The Admin cards are now programmed.
Carry out the same start-up procedure for all locks.
Once the locks have been started up, they will be
in “Public Locker mode” and can be operated in
principle using key cards or smartphones.
However, we recommend installing the USM app in
advance and using this to manage the locks.
Management with the USM app p. 12
Main Admin
Main Admin
Main Admin
Admin
User
1.
2.
3.

12
13
USM Haller lock C
Instruction manual
Date
05.22/en
4.1 Admin area
As the Power User, USM recommends that you
use the USM app in any event. With your Power User
account, you can easily manage and maintain the
locks via the admin area.
Registering as Power User
1. Download the USM app.
2. Select the desired language.
3. Register.
4. Once you have registered, log in to the app.
Before logging in, make sure that you tick the
“Power User” tick box.
5. Once you have logged in, tap on “Change contact
information” in the admin area.
6. Fill in your details (e-mail, name, address, city, country).
Press “Update settings” to confirm.
You will then return to the admin area.
You are now the Power User with access to the admin
area.
If, as Power User, you also wish to use a lock C
yourself, untick the “Power User” tick box when
logging in. That way you can log in as a user.
“Operating lock C” p. 23
4 Management with the USM app
4.2 Lock pool
Under “Lock pool” you can see an overview of the
locks you manage as Power User. These locks are
linked to your Admin card and your admin area.
You can view the data and settings of each lock,
set additional functions or carry out actions per
lock.
Including a lock C in a lock pool
1. Press “Lock pool” in the admin area.
2. Then tap on the + symbol and follow the instructions in
the app.
The lock has been successfully included in the lock
pool and is displayed in the app.
3. Check if a firmware update is available in the relevant
“Lock settings” and if so, carry it out.
“Lock settings” p. 15
“Firmware Update” p. 17
Repeat this procedure for all locks.
Back
Locks
Help
Settings
Change contact
information
Email Adress
Update settings
Power User
Name Surname
Adress
City
Country
To become a power user, you must have at least
one admin card.
Locks
Help
Settings
Admin area
Grants
Lock pool
Admin rights
Logout
Change contact information
Login
Email Adress
Password
Remember me
Login
Power User
Forgot your password?
Back
Lock pool
PR00001
PR00001
PR00002
PR00002
PR00003
PR00003

14
15
USM Haller lock C
Instruction manual
Date
05.22/en
4.3 Personalisation with Grants
You need Grants to use “Personal Locker mode”.
A user can personalise a lock C with a Grant.
Example:
A user needs a locker on site for a long period of time
and wants to make sure that no one else can close or
open the lock. The user needs a Grant for this.
As Power User, you can assign the user the appropri-
ate number of Grants.
Distributing Grants to users
1. Go to “Grants” in the admin area.
2. Press “Distribute Grant(s) to user” and follow the instructions
in the app.
Once one or more Grants have been successfully
distributed, the user will see this on his/her home
screen. A Grant is deducted as soon as a user
personalises a lock C.
You can also revoke Grants.
Only distribute Grants if you intend to use “Personal
Locker mode”.
Always consult with the relevant lock C user before
revoking Grants. That way he/she can empty the
locker and depersonalise it him/herself. Revoke the
Grant afterwards.
If a user wishes to grant access to his/her locker to another
user and thus use the lock C in “Shared Locker mode”, this is
possible just after a lock C has been personalised. The user
can do this him/herself in the app.
Now inform the users about the product and how to
use it correctly.
“Operating lock C” p. 23
If key cards are used for operating the locks, distrib-
ute them to the relevant users.
4.4 Lock settings
The “Lock settings” are displayed per lock. These
settings include additional functions as well as
maintenance and management tasks.
Displaying the lock settings
1. Tap on the desired lock. You will then be taken to the
“Lock settings” of the selected lock C.
2. Update the data by tapping on the “Update” icon and
following the instructions in the app.
If you don’t know which is the desired lock in the
list, don’t select any of the locks in the “Lock pool”
area and tap on the “Update” icon directly there,
then follow the instructions in the app.
Back
Locks
Help
Settings
Grants
Distributed Grants
muster@muster.com
With a Grant a user can personalise a lock C
(Personal Locker mode). Personalised lockers can be shared
with others.
4
4
Revoke
Distribute Grants to user
Locks
Help
Settings
Back
Lock pool
PR00001
PR00001
PR00002
PR00002
PR00003
PR00003
Back
Lock Settings
PR00001
Last Scan: 01-05-2022 08:15
Rename

16
17
USM Haller lock C
Instruction manual
Date
05.22/en
4.4.1 Renaming a lock
In “Lock settings” you can change the name of the
lock. This can help you to find your way around and
locate your locks; it is also helpful when managing
several locks. The serial number of the relevant lock
is retained and can still be seen in the “Lock pool”
area below the new name. You can name the lock as
you wish.
Examples:
— Number the locks: 1, 2, 3, etc.
— Describe the location:
row 2 locker 3, top-left locker, lock 5 in green unit
— For permanently assigned locks, you could also add details
such as: the person’s name, department, site
Renaming a lock
1. Go to the “Lock settings” of the desired lock.
2. Press “Rename” and change the name.
3. Then tap on “Save” to save the new name.
4.4.2 Auto Close
This function speeds up the closing process for
users.
If this function is activated, end users only need to
hold their smartphone on the lock to open the locker.
To close it, end users simply turn the lock handle 90°
counterclockwise without needing to use the smart-
phone again. If the handle isn’t turned 90°, it locks
automatically after 4 seconds.
Flashing signal: 2 × green
(1 × green, after 4 seconds 1 × green)
This function can only be activated in “Personal
Locker mode” and “Shared Locker mode”.
In earthquake-prone countries, we recommend using
the snap turning lock C. Do not activate the “Auto
Close” function if you are using snap turning lock Cs.
4.4.3 Firmware updates
As Power User, you can carry out firmware updates
by yourself. If you already have the latest firmware
version, the “Update firmware” button will be greyed
out.
If a new firmware update is available, the button will
be white.
The update can be performed while locks are open
or locked.
Updating firmware
1. Tap on the “Update firmware” button and follow the
instructions in the app.
Make sure your smartphone doesn’t go into sleep
state during the process. Keep your smartphone
near the lock the entire time.
Once the firmware has been successfully updated, the lock
will restart after around 30 seconds. Wait for the flashing
signal.
Flashing signal: 3 × green
The lock is now updated. All previous programming
remains saved.
4.4.4 Battery charge
In “Lock settings” you can also find a battery charge
display for the selected lock C batteries.
Green: Batteries are sufficiently charged
Orange: Replace the batteries at the next opportunity
p. 20
4.4.5 Log entries
You can view the latest log entries in this list. When
the lock was open or closed and which device was
used (ID code of the key card or smartphone).
4.4.6 Emergency opening with
“Open the locker”
As Power User, you can open any of the lock Cs in
your lock pool using the “Open the locker” function,
similarly to the Admin card.
Home
Overview
Public Locker
Shared Locker
Personal Locker
Logout
Locks
Help
Settings
Firmware:
Hardware:
00.05.077
01.60
Update Firmware

18
19
USM Haller lock C
Instruction manual
Date
05.22/en
4.4.7 Switch to “Public
Locker mode”
Locks in “Personal Locker mode” or “Shared Locker
mode” can be restored to “Public Locker mode”
using this function.
As a general rule, you should only complete this step
in consultation with the user. Once it has been per-
formed, the lock will be open.
This function is useful if an employee leaves the
company and the lock is still personalised for them.
4.4.8 Deleting a lock
You can use this function to delete all the locks from
your lock pool. Under normal circumstances you
shouldn’t have to use this function.
Potential scenarios include: division of a lock pool or
reorganisation of the locks into different lock pools in
the event of several Power Users, a faulty lock, etc.
4.5 Transferring admin rights
You can use this function to transfer the management
and maintenance of your locks to another person. In
this case, all of the locks assigned to your lock pool
are transferred to the new Power User. The locks are
thus assigned to him/her together with the admin
rights. This does not affect the personalisation and
programming of the locks.
Transferring admin rights
1. Press “Admin rights” in the admin area.
2. Then tap on “Transfer admin rights” and follow the
instructions in the app.
The new Power User will receive an invitation in the
“Admin rights” area of his/her account. He/she needs
to accept this invitation for the transfer to take place.
You can deprogram (delete) Admin cards.
To do so, proceed as follows:
Deprogramming Admin cards individually
1. Hold the Main Admin card on the lock.
Flashing signal: 1 × green, 1 × red
2. Hold each of the Admin cards to be deleted on the lock.
Flashing signal: 1 × green, after around 10 sec. 1 × red
3. Afterwards, hold the Main Admin card in front of the lock
once again.
Flashing signal: 1 × green
Deprogramming all Admin cards
If an Admin card gets lost or you wish to reset an entire lock
pool, you can delete all of the programmed (saved) Admin
cards in one go.
1. Hold the Main Admin card in front of the lock for around
30 seconds.
Flashing signal: 1 × green, 1 × red
2. Wait 30 seconds for the green flashing signal.
Flashing signal: 1 × green
5 Deprogramming
Admin cards
Back
Locks
Help
Settings
Transfer admin rights
Transfer
Transfer your look pool and its admin rights to an
another person. After that, your "Lock pool" will be empty.
Transfer admin rights
Invitations
The following user wants to transfer you his lock pool and
its admin rights.
Deny
Accept
Main Admin
Admin
Main Admin
1.
2.
1.
2.
3.

20
21
USM Haller lock C
Instruction manual
Date
05.22/en
As Power User, you can view the battery status of
each individual lock C using the app. A lock C also
warns you via a flashing signal when the batteries are
nearly empty and need to be replaced. This flashing
signal appears after an action (i.e. opening or clos-
ing). After the first warning signal, only a few more
actions can be performed.
Flashing signal: 3 × orange
Replacing the batteries
1. Place the service tool over the lock C
making sure that the markers are aligned vertically. Once the
tool is correctly positioned, the safety mechanism of the end
cap will be released.
2. Remove the cap by gently pulling it towards you.
3. Then remove the disassembly tool.
4. The battery compartment is at the top right.
Open the battery cover by lifting up the left side with
a tool then flipping the cover outwards to the right.
6 Changing the batteries
5. Hold the triangle symbol of the service tool towards the
battery to be removed.
The battery will be removed from the lock magnetically.
Repeat this step for the second battery.
6. Insert new batteries.
The inscription on the front shows the right direction for
both batteries (+ / –).
7. Close the battery cover.
Flashing signal: 3 × green
8. Align the small clasp on the inside of the end cap with the
opening on the left of the lock.
9. Put the end cap back onto the lock making sure that
the front slot is completely vertical. The end cap will
automatically click into place.

22
23
USM Haller lock C
Instruction manual
Date
05.22/en
Flashing signal
Situation | Cause
Troubleshooting
1 × green
— When locking or opening a lock C with an
authorised key card or smartphone
— When opening a lock C with an emergency
opening card (Admin card)
—
1 × green long
— When a lock C is added to the lock pool
— When a lock C is depersonalised
— When the “Auto Close” function is activated
or deactivated
—
2 × green
— When opening or closing a lock with the
“Auto Close” function activated
— When personalising a lock
—
3 × green
— When a lock C restarts
— During initial start-up
— After a battery change
— After a firmware update
—
1 × green running light
— During a lock C firmware update
—
1 × green, 1 × red
— When programming a Main Admin card or
holding it in front of the lock
— When programming or deprogramming Admin
cards
—
1 × red
— An attempt to open the lock without
authorisation/access rights
— Time-out if too much time elapses during
programming
—
1 × red, 1 × green
— When locking or opening a lock C shared
with another person in “Shared Locker mode”.
—
3 × orange
This flashing signal appears after an action
(i.e. opening or closing)
— Batteries are almost empty
Replace the batteries at the next
opportunity.
After the first warning signal, only a
few more actions can be performed.
No flashing signal
— Batteries are empty
— Lock has frozen
Restart the lock by opening and closing
the battery cover. If the lock still doesn’t
respond, replace the batteries.
7 Flashing signals
8 Operating lock C
8.1 User mode summary
As a user, you can operate the lock C with a key
card or your smartphone. The USM Haller lock C
has up to three user modes.
Public Locker mode
— Free choice of locker
— Temporary use
Personal Locker mode
— Assigned lockers
— Safe and long-term storage of documents, equipment
or personal belongings.
Shared Locker mode
— Shared lockers
— Temporary or long-term access
8.2 User area of the USM app
If you use a key card, you can skip to the next point.
The USM app is required for both “Personal Locker
mode” and “Shared Locker mode”.
Registering as a user
1. Download the USM app.
2. Select the desired language.
3. Register.
4. Once you have registered, log in to the app.
Before logging in, untick the “Power User” tick box.
Leave this tick box unticked at all times!
You are now a user with access to the user area.
Login
Back
Email Adress
Password
Remember me
Don't have an account?
Register here
Activation mail not received?
Request a new one
Login
Forgot your password?
Power User
iOS
Android

24
25
USM Haller lock C
Instruction manual
Date
05.22/en
8.3 Operating lock C
Locking lock C*
1. Hold your key card or your smartphone (with the app open)
in the middle of the lock C that you wish to lock.
Flashing signal: 1 × green
2. Turn the lock handle 90° counterclockwise so that the slot
is in vertical position and the bolt inside moves upwards.
3. The lock is now locked.
* If the “Auto Close” function is activated, end users only
need to hold their smartphone on the lock to open the
locker. To close it, end users simply turn the lock handle 90°
counterclockwise without needing to use the smartphone
again. The lock locks automatically after 4 seconds.
This function is enabled by the Power User and is available
in both “Personal Locker mode” and “Shared Locker mode”.
Opening lock C
1. Hold your key card or your smartphone (with the app open)
in the middle of the lock C that you wish to open.
Flashing signal: 1 × green
(if the “Auto Close” function is activated)
Flashing signal: 2 × green
(1 × green,
after 4 sec. 1 × green)
2. Turn the lock handle 90° clockwise so that the slot is in
horizontal position and the bolt is retracted.
3. The lock is now open.
The lock can only be opened with the same key card
or smartphone that it was locked with (except in
“Shared Locker mode”).
All locks can be opened by the Power User in an
emergency.
8.4 Naming lock C
You have the option of naming your lock or chang-
ing the names of your locks.
This can help you to find your way around and
locate your locks; it is also helpful when managing
several locks. You can choose the names as you
wish.
Examples:
— Describe the location:
row 2 locker 3, top-left locker, lock 5 in green unit
— Describe the type of use:
private, office, XY group project, team locker
Naming lock C
1. Go to the home screen in the relevant mode, i.e. “Public
Locker”, “Personal Locker” or “Shared Locker” mode.
2. Select the desired lock C by tapping on the relevant tile.
3. Press “Rename” and change the name.
4. Then tap on “Save” to save the new name.
Home
Public Locker
Personal Locker
Logout
1.
3.
2.
Home
Public Locker
Personal Locker
Logout
1.
3.
2.

26
27
USM Haller lock C
Instruction manual
Date
05.22/en
Disposal
Do not dispose of your item or furniture, or parts thereof, in
household waste. Use your local collection point to return and
recycle old electric and electronic appliances. Please remove
the batteries beforehand and dispose of them appropriately.
The separate collection of old electric and electronic devices
ensures that these items are correctly re-used, recycled
and disposed of without having a negative impact on the
environment or human health due to hazardous substances.
The crossed-out dustbin indicates that the product
must not be disposed of in household waste.
Transport and alterations
Any delivery and relocation work or any alterations to USM
Haller furniture units must be carried out by USM or by
authorised USM retail partners.
9 Disposal, transport and alterations
10 Compliance
EU Declaration of Conformity
We hereby declare that the following product, in the version placed on the market by us, complies
with the test specifications indicated below. If the product is modified or used inappropriately, this
declaration shall become invalid.
Description: Office furniture
Product/model: USM Haller/electronic lock LEGIC
Manufacturer: USM U. Schärer Söhne AG
Thunstrasse 55
3110 Münsingen, Switzerland
Authorised representative for technical documents …………………………………………………………….
Deputy Technology Manager
Stefan Krenger
This Declaration of Conformity is issued under the sole responsibility of the manufacturer.
The product complies with the relevant Community harmonisation legislation:
RED 20144/53/EU
REACH 1907/2006/EC
ROHS 2011/65/EU
Test specifications applied:
ETSI EN 301 489-1 V2.2.3 (2019-11) -EMC
ETSI EN 301 489-3 V2.1.1 (2019-03) -EMC
ETSI EN 301 489-17 V3.2.4 (2020-09) -EMC
IEC EN 62311:2020 -human exposure
ETSI EN 300 328 v2.2.2 (2019-07) -BLE radio
ETSI EN 300 330 v2.1.1 (2017-02) -RFID radio
UNE-EN 62368-1:2014 + ACl:2015 + AC2:2015 + AC:2017 + All:2017 -Safety
Münsingen, 30 March 2022 ………………………………………...………………………
Group Product Development Director
Thomas Dienes

28
29
USM Haller lock C
Instruction manual
Date
05.22/en
Where should I keep the
Main Admin card and the other
accessories?
USM recommends that you, the Power User, keep
these items in safe custody, preferably in a safe or
something similar.
As this card cannot be replaced, you should choose
the safest possible storage location. You and the
assigned card holders should keep the Admin cards
in a safe place to prevent them from being used by
unauthorised persons. Keep any accessories in the
Power User kit so that all of the product parts remain
together.
“Delivery scope and management” p. 9
Can Grants be distributed
remotely?
Yes, Grants can be sent remotely. The user needs a
user account. The Grants are displayed to the user
upon receipt.
Can I change the batteries
when a locker is closed?
Yes, you can because the batteries are changed on
the outside. This does not affect the programming
and the lock remains locked if it was closed before
the battery change.
Can the service tool be kept
together with the cards?
Yes, the service tool with its integrated magnet
and the RFID cards can be stored together.
Why does my lock C make noises
when I’m not even using it?
Lock Cs regularly move their gear unit to keep the
mechanical lock components in good working order.
During these movements, a locked lock C always
remains locked and an open one remains open. If the
lock is operated on a regular basis, i.e. it is opened or
locked within 24 hours, these extra movements are
no longer necessary.
Can I be logged into the same
Power User account on several
smartphones and carry out
firmware updates simultaneously?
Yes, you can.
Why was the firmware update
aborted?
When carrying out an update, make sure that your
smartphone is always within 2 metres of the lock and
that it doesn’t go into sleep state.
Can the lock C be reset to
factory settings?
No,
but thanks to its smart implementation the
USM Haller lock C offers various solutions if your
requirements change or a user loses his/her card,
etc.
1. If a user loses his/her key card or an employee forgets his/
her smartphone, the Power User can carry out an emergency
opening using his/her Admin card or smartphone.
2. You also have the option of deleting Admin cards from a
lock and linking new Admin cards to it, even if an Admin
card is misplaced.
3. The Power User can pass on his/her admin rights.
All programmings and saved cards can be deleted,
except for the Main Admin card, which remains
saved. To reset this card, the lock needs to be sent
back to the factory.
Why does USM recommend
programming three Admin cards
per lock?
In case an Admin card gets lost or to carry out an
emergency opening if the Power User isn’t on site.
Furthermore, the locks can be divided into different
areas of responsibility by allocating different Admin
cards.
Which operating systems are
supported?
The USM app supports the following operating sys-
tems: iPhone iOS 13 and above or Android 7 and
above.
How can I reload processes in
the USM app?
Swipe your thumb from top to bottom of the screen.
This reactivates the connectivity and can therefore
speed up processes.
11 FAQ

Switzerland
USM U. Schärer Söhne AG
Thunstrasse 55, 3110 Münsingen
Phone +41 31 720 72 72, info.ch@usm.com
Germany
USM U. Schärer Söhne GmbH
Siemensstraße 4a, 77815 Bühl
Phone +49 7223 80 94 0, info.de@usm.com
France
USM U. Schärer Fils SA, Showroom
23, rue de Bourgogne, 75007 Paris
Phone +33 1 53 59 30 37, info.fr@usm.com
United Kingdom
USM U. Schaerer Sons Ltd., London Showroom
Ground Floor, 49 – 51 Central St., London, EC1V 8AB
Phone +44 207 183 3470, info.uk@usm.com
USA
USM U. Schaerer Sons Inc., New York Showroom
28 – 30 Greene Street, New York, NY 10013
Phone +1 212 371 1230, info.us@usm.com
Japan
USM U. Schaerer Sons K.K., Tokyo Showroom
Marunouchi MY PLAZA 1 · 2F
2-1-1 Marunouchi, Chiyoda-ku, Tokyo 100-0005
Phone +81 3 5220 2221, info.jp@usm.com
All other countries
contact USM Switzerland.
www.usm.com
Table of contents
Other USM Lock manuals