FingerTec TL40B User manual

TL40B
Fingerprint Lock with Voice Guide Feature
Admin & User Guide

3
CONTENTS
4-5 Chapter 1 • READ BEFORE USE
Safety Caution
Structure
6-8 Chapter 2 • BASICS
User Introduction
Operation and Voice Prompt
Initialization
Random Password
Voice Guide
Normal Open
User Data Synchronization
Low Battery Alarm
Volume
9V External Battery
Emergency Mechanical Key
9-13 Chapter 3 • THE TIMETEC SECURITY APP
Download TimeTec Security App
Register & Sign In to TimeTec Security App
Add Smart Lock
Unlock Smart Lock
Remove Smart Lock
Configure Smart Lock
Create Admin & Users
Create Access Group
Create Temporary Pass
14-19 Chapter 4 • HOW TO USE
Register First Administrator
Register Other Administrators
Register Normal User
Delete by User Number
Delete Administrator Group
Delete Normal User Group
Supplemental Register
Upload User Data
Download User Data
Enable Normal Open
Volume

4
1• READ BEFORE USE
The Smart Lock is designed to work independently or with TimeTec Security
Mobile App. To use the Smart Lock with TimeTec Security Mobile App, you must
first create an account on TimeTec Security. Next, you will need to pair the Blue-
tooth communication between the Smart Lock and TimeTec Security Mobile App
with a pairing password and admin password.
With TimeTec Security Mobile App, you do not have to store any user information
within the Smart Lock. By using the app, you can:
• Send unlock command to Smart Lock via Bluetooth.
• Add and manage additional unit(s) of Smart Lock into the App.
• Create login account for other users to use the App to unlock Smart Lock.
• Create temporary passes for users to unlock Smart Lock at a specific date and
time.
• Create passcodes and sync with Smart Lock for other users to unlock Smart
Lock via passcode.
• Receive push notification whenever Smart Lock is unlocked.
Safety Caution
1. The default setting of the device allows ANY fingerprint to unlock.
2. Please register at least one administrator for the newly installed lock. Without ad-
ministrator, no registration for any normal user is allowed.
3. The lock is equipped with mechanical keys for manually unlocking. Please keep
themechanical keys in a safe place.
4. To power on the lock, four alkaline AA batteries (not included) are required. Non-
alkaline and rechargeable batteries ARE NOT RECOMMENDED.
5. Do not remove batteries when the lock is in working state.
6. Please replace the battery soon when the lock prompts the voice of low battery.
7. There are 7 seconds stand-by time limits for all setting operations, without any
activity within the time limits, the lock will automatically shut off.
8. Keep your fingers clean when using this lock.
5
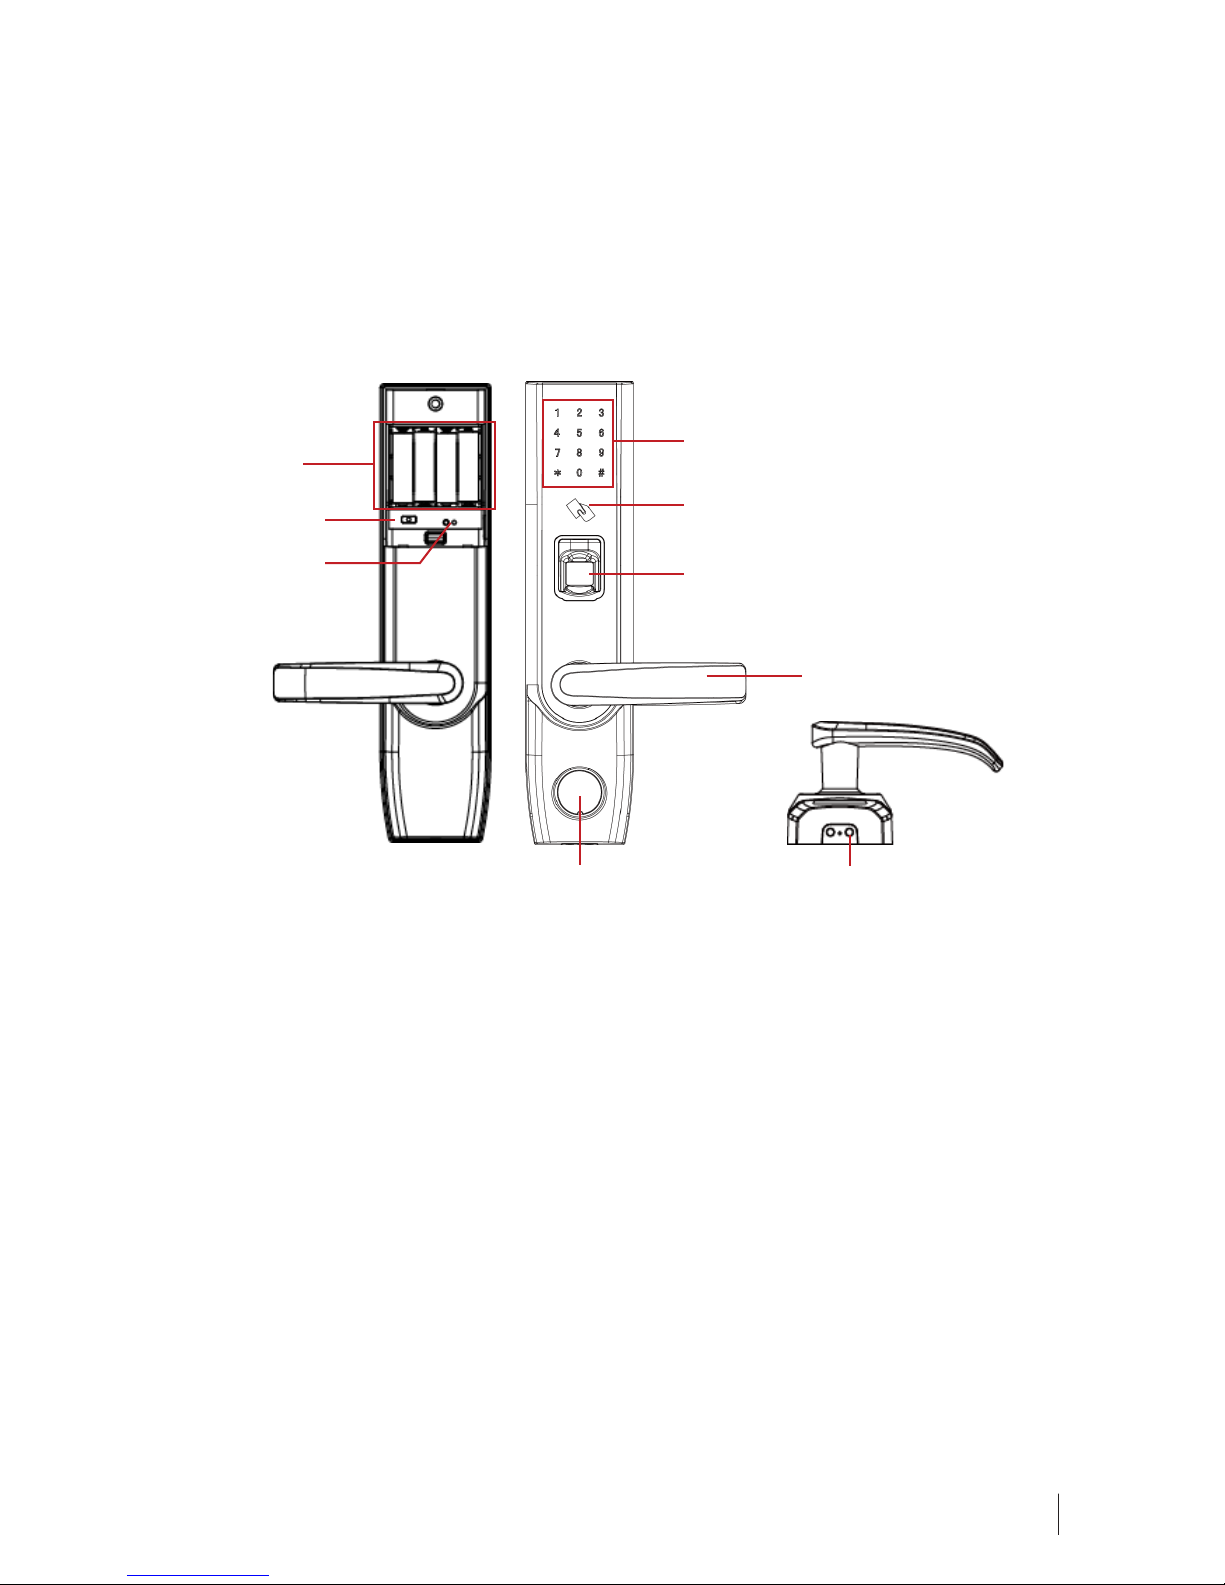
Keypad Area
Card Detection Area
Fingerprint Sensor
Handle
Mechanical Key Hole 9V battery Interface
Battery Area
USB Port
Reset Button
Structure

6
USER
Administrator
Normal User
VERIFICATION MODE
Fingerprint
Password
ID Card
FUNCTION
Menu Operation,Open The Door
OPERATION
Verification Succeed
Verification Failed
Registration Succeed
Deletion Succeed
Registration Failed
Fingerprint has already registered
Password has already registered
ID Card has already registered
User Number has already registered
VOICE PROMPT
“Thank you”
“Verification Failed”
“Registered”
“Deleted”
“Operation Failed”
“This fingerprint is already used”
“This password is already used”
“This card is already used”
“This user number is already used”
2 • BASICS
User Introduction
Note:
1) The maximum capacity of fingerprint or password or ID card is100.
2) The length of password is 6 digits.
Operation and Voice Prompt
Initialization
Initializing the lock means all data will be deleted and restored to factory default set-
ting.
Operation Instruction: Press the reset button, then touch the keypad to power on the
lock, and holding the reset button for 5 seconds until the lock prompts the voice of
“Restore to default settings, wait a moment”. After around 30 seconds, the lock prompts
the voice of “completed”, and then the initialization is finished completely.
7
Random Password
Random password = random digits + correct password + random digits.
Users may enter any random digits in front of and behind the correct password to
create random password to open the door. The maximum length of the random pass-
word is 32 digits.
For example:
If the correct password is 123456, the random password can be
89123456807, 1234562363, 389123456, etc.
Voice Guide
After access into the menu, the lock will prompt voice before and after each opera-
tion. It is quite easy for user to know how to operate each step.
Normal Open
Normal open mode is to keep lock always unlocked, which is fit for meeting room
andsome places free to in or out.
User Data Synchronization
The user data can be downloaded/uploaded via U-disk from one lock to other locks,
it will help users to save time in some repeated registrations.
Low Battery Alarm
When the lock is in low battery status, it will trigger the alarm with the sound of short-
beep and the voice of “Battery is low, please replace”. After triggering low battery
alarm, the lock will be out of battery in approx. 200 operations.
Note: Access to operation steps is not allowed in low battery status.
Volume
Users can set volume level in accordance with individual preference and requirement.
The default volume level is 3 and the adjustable range is 0-7.

8
9V External Battery
9V external battery is used to open door when the
lock is out of battery.
Note: The above battery must be 9V alkaline battery (6LR61).
Emergency Mechanical Key
The mechanical key is used to open
door when the lock has electronic mal-
function.
Note: Keep the mechanical key in a safe place.
Insert the key into key hole and rotate
90°, then press down the handle to
open the door.
Note: AB key system is available for this model, if
you need this function, please contact the sales.
iOS
Android
3 • THE TIMETEC SECURITY APP
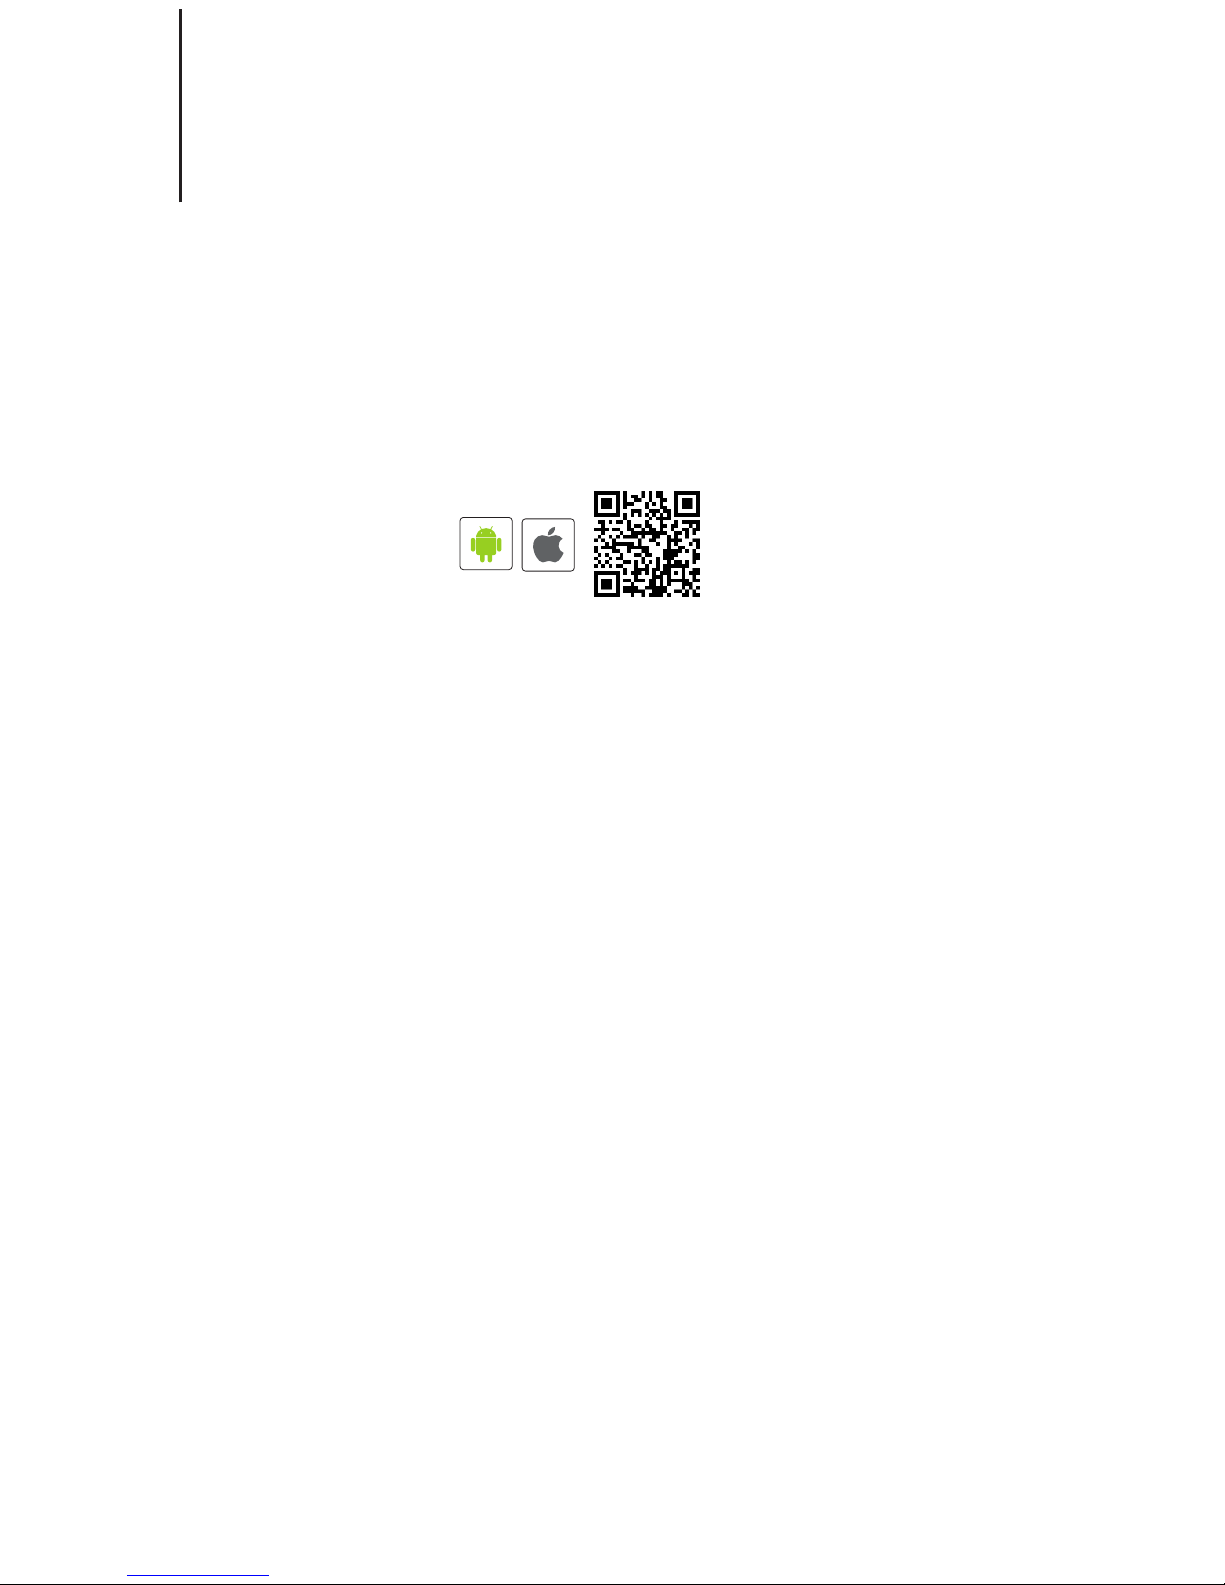
Download TimeTec Security App
You must download TimeTec Security App in order to manage Smart Lock. Please
scan the QR code below to download TimeTec Security App from the Appstore or
Play Store.
Note: The above battery must be 9V alkaline battery (6LR61).
Register & Sign In To TimeTec Security App
1. Register an account using your email address from TimeTec Security App. You
will then receive an email from TimeTec Security. Therefore, please follow the
instructions in the email to activate your account.
2. Login to TimeTec Security App by using the registered email address and pass-
word.
Add Smart Lock
To add smart lock into your account, please follow the steps below:
1. Tap Menu > Smart Access > Configure Locks.
2. Under Nearby Lock > Tap Search to look for nearby smart lock.
3. Tap the smart lock name that appears on screen to add it into the list.
4. Scan the QR code (find it at the packing box or lock body) to get the smart lock
serial number. Otherwise, you can also insert the serial number by referring to
the serial number.
5. Tap Add Lock > App will validate the serial number with the server.
6. Insert the Pairing Password to connect to the smart lock. The default password
is 000000(6 ‘zero’). This is the first protection to block unauthorised Bluetooth
connection from accessing the smart lock.
7. Insert the Admin Password to continue adding the smart lock. The default
password is 12345678. This is the second protection to block unauthorised ac-
cess from accessing the smart lock.

8. After smart lock is added into the list, you can then start to use the App to
manage the smart lock.
Repeat the steps above to add another smart lock into the list.
Unlock Smart Lock
You can use the App to send unlock command to smart lock via Bluetooth connec-
tion. Please follow the steps below:
1. Tap Menu >Smart Access >Unlock Doors.
2. App starts to search for nearby smart locks and display it on screen.
3. Tap Unlock next to the smart lock name in order to trigger unlock command.
Remove Smart Lock
When smart lock is no longer in use, you can remove it from the list. Please follow
the steps below:
1. Tap Menu >Smart Access >Configure Locks.
2. Select the smart lock to remove > Swipe from right to left.
3. Tap Remove to remove the smart lock from the list.
Congure Smart Lock
This portion is for Super Admin to change the smart lock pairing password and ad-
min password. It is recommended that you change these passwords during initial
installation. Please follow the steps below:
1. Tap Menu >Smart Access >Configure Locks.
2. Tap Bluetooth to start connecting the smart lock (you can only configure the
smart lock after the App is connected to the smart lock).
3. Tap the smart lock name to configure > Settings
4. Tap Pairing Password to change it.
5. Tap Admin Password to change it.
Note: Server will update the changes to all admins and users accounts accordingly.

Create Admin & Users
You can assign your families, relatives, friends and etc. to download the App and use it
to manage the smart lock.
There are 3 levels which are:
• Super Admin: The smart lock owner (or the first person who adds the smart lock
into the Mobile App) has the highest authority and he/she can add new Admin
and User to access or manage the individual lock.
• Admin: The person assigned by Super Admin to use and manage the smart lock.
Admin can add new Admin or User but is restricted to only allow for the usage or
management of the supposed smart lock.
•User: The person assigned by Super Admin or Admin and can access the smart
lock only.
To assign Admin and User, you must first create new user accounts. Please follow the
steps below to create users.
1. Tap Menu >Manage Users.
2. Tap Add to start adding users.
3. Name the users and insert his/her email address.
4. Server will send invitation email to the user in order to notify him/her to regis-
ter.
5. User registers and signs into the App to use it.
Note: The Mobile App will display a P to indicate users who have yet to create account and sign into the
App. The P icon will disappear after the users sign into the Mobile App.
To grant the users access as Admin or User, please follow the steps below:
1. Tap Menu >Manage Users.
2. Tap the new create user name from the list
3. Tap Smart Access > Select the lock to assign this user to
4. Tap toggle to select User (if you want to assign this user as the Admin for this
lock, tap to change their role into Admin).
5. Tap Back to save settings.
To have a quick check in determining the admins or users assigned to a smart lock,
please follow the steps below:
1. Tap Menu >Configure Locks
2. Tap the smart lock to check > Manage Users
Note: You will find the list that displays all admins and users assigned to this smart lock. You can add
new admin or new user from this page.

Create Access Group
You must configure Access Group in order to grant users access via the smart lock. For
example, you can create the group ‘Family’ to allow your families to access the smart
lock anytime; or you can create the group ‘Maid’ to allow your maid to only access
during Saturday 10 am to 2pm for housekeeping purposes.
Please follow the steps below:
1. Tap Menu >Configure Locks > Tap the smart lock to configure access group.
2. Tap Access Group >Add > Name the access group.
3. Tap Access Time > Set the start and end time to allow access, or tap Full Day to
grant full day access.
4. Tap Users > Select the users from the list to assign them into this access
group
5. Tap Save.
Note: Server will notify these users about the changes done.
Create Temporary Pass
You can grant temporary access to an individual, whereby he/she can only unlock
the smart lock at specific date and time. This is a One Time pass. In case you want to
allow the individual to access the premise for multiple days, you will have to repeat
the same steps. For example, if you want to allow your friend to stay at your home for
3 days due to his/her business trip.
Please follow the steps below:
1. Tap Menu >Configure Locks > Tap the smart lock to configure temporary
pass.
2. Tap Temporary Pass >Add > Name the temporary pass.
3. Tap Access Time > Set the date, start and end time
4. Tap User > Select the user to assign the individual to this temporary pass.
5. Tap Save to save settings.
Note: Server will send notification to this person regarding the details of the temporary pass.
FOR USER TO USE TIMETEC SECURITY TO UNLOCK DOOR
1. Make sure admin already created your login account.
2. Register an account using your email address from TimeTec Security App. You
will then receive an email from TimeTec Security. Therefore, please follow the
instructions in the email to activate your account.

3. Login to TimeTec Security App by using the registered email address and pass-
word.
4. Tap Menu >Smart Access >Unlock Doors
5. App starts to search for nearby smart locks and display it on screen.
6. Tap Unlock next to the smart lock name in order to trigger unlock command.

14
4• HOW TO USE
Register First Administrator
Note:
1) Place one finger 3 times on fingerprint sensor to register fingerprint.
2) The length of password is 6 digits.
3) The regular length of user number is 3 digits. However, it is also correct to enter 1 digit or 2 digits
with the end of #as the user number. For example, 001 is equal to 1# or 01#.
4) Press *to cancel registration before the registration is complete.
Register Other Administrators
15
Note:
1) Place one finger 3 times on fingerprint sensor to register fingerprint.
2) The length of password is 6 digits. When verify administrator by password, press # to end.
3) The regular length of user number is 3 digits. However, it is also correct to enter 1 digit or 2 digits
with the end of #as the user number. For example, 001 is equal to 1# or 01#.
4) Press *to cancel registration before the registration is complete.
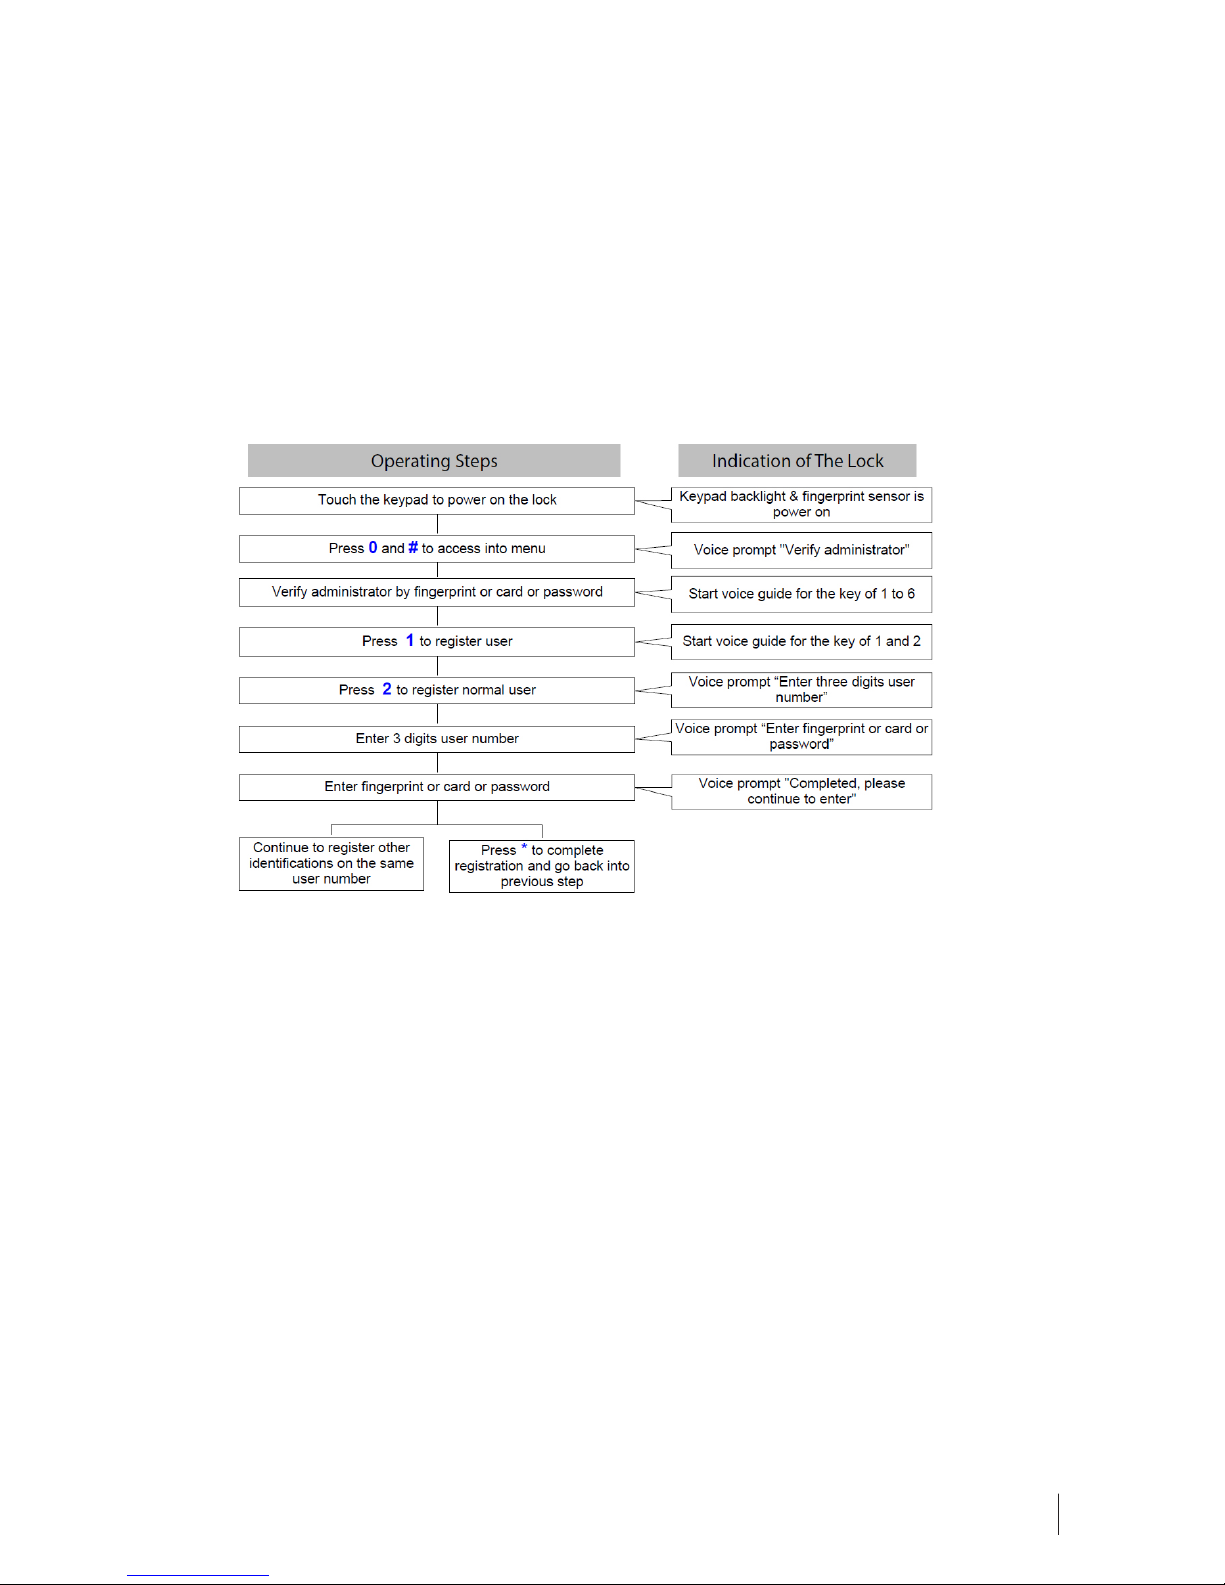
Register Normal User
Note:
1) Place one finger 3 times on fingerprint sensor to register fingerprint.
2) The length of password is 6 digits. When verify administrator by password, press # to end.
3) The regular length of user number is 3 digits. However, it is also correct to enter 1 digit or 2 digits with
the end of #as the user number. For example, 001 is equal to 1# or 01#.
4) Press *to cancel registration before the registration is complete.

16
Delete by User Number
Note:
1) The regular length of user number is 3 digits. However, it is also correct to enter 1 digit or 2 digits with
the end of #as the user number. For example, 001 is equal to 1# or 01#.
2) When verify administrator by password, press #to end.
3) Press *to cancel registration before the registration is complete.
Delete Administrator Group
Note:
1) When verify administrator by password, press #to end.
2) Press *to cancel registration before the registration is complete

17
Delete Normal User Group
Note:
1) When verify administrator by password, press # to end.
2) Press *to cancel registration before the registration is complete.
Supplemental Register
Note:
1) The regular length of user number is 3 digits. However, it is also correct to enter 1 digit or 2 digits with
the end of #as the user number. For example, 001 is equal to 1# or 01#.
2) When verify administrator by password, press #to end.
18
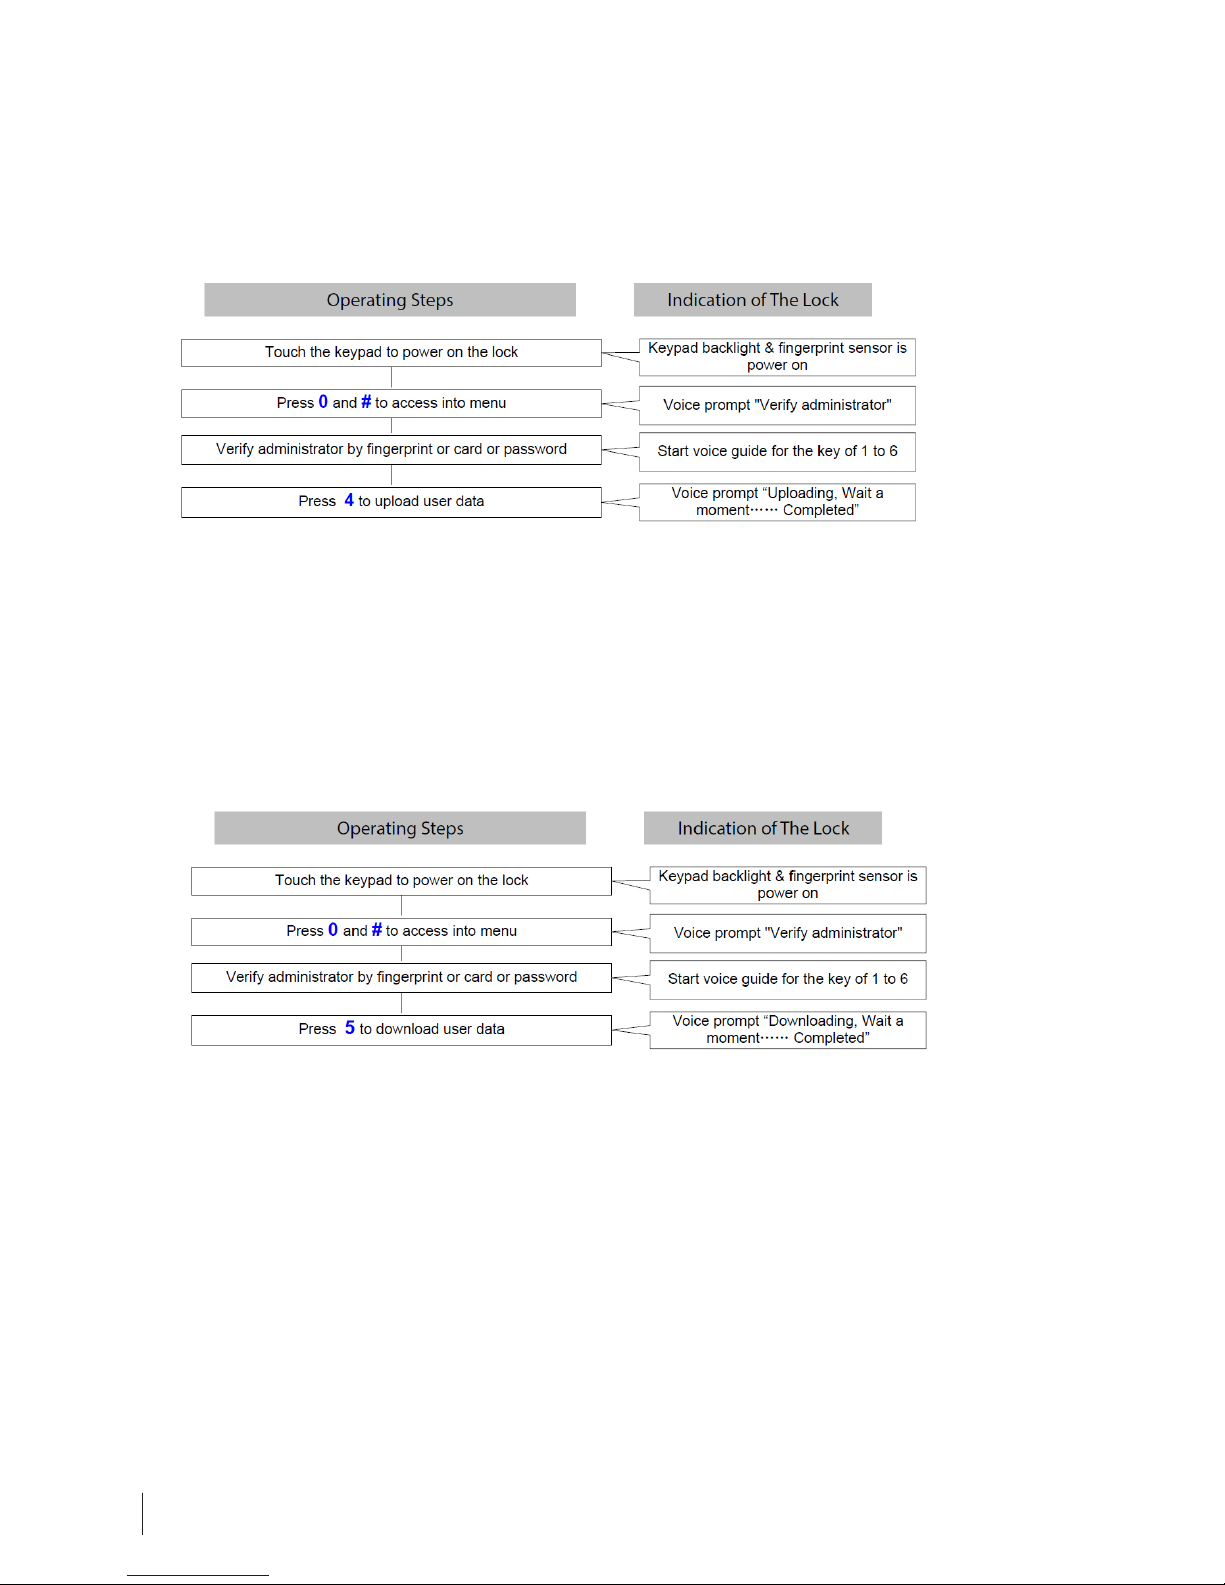
Upload User Data
Note:
1) Please insert U-disk at first before above operations.
2) When verify administrator by password, press #to end.
Download User Data
Note:
1) Please insert U-disk at first before above operations.
2) When verify administrator by password, press #to end.
19
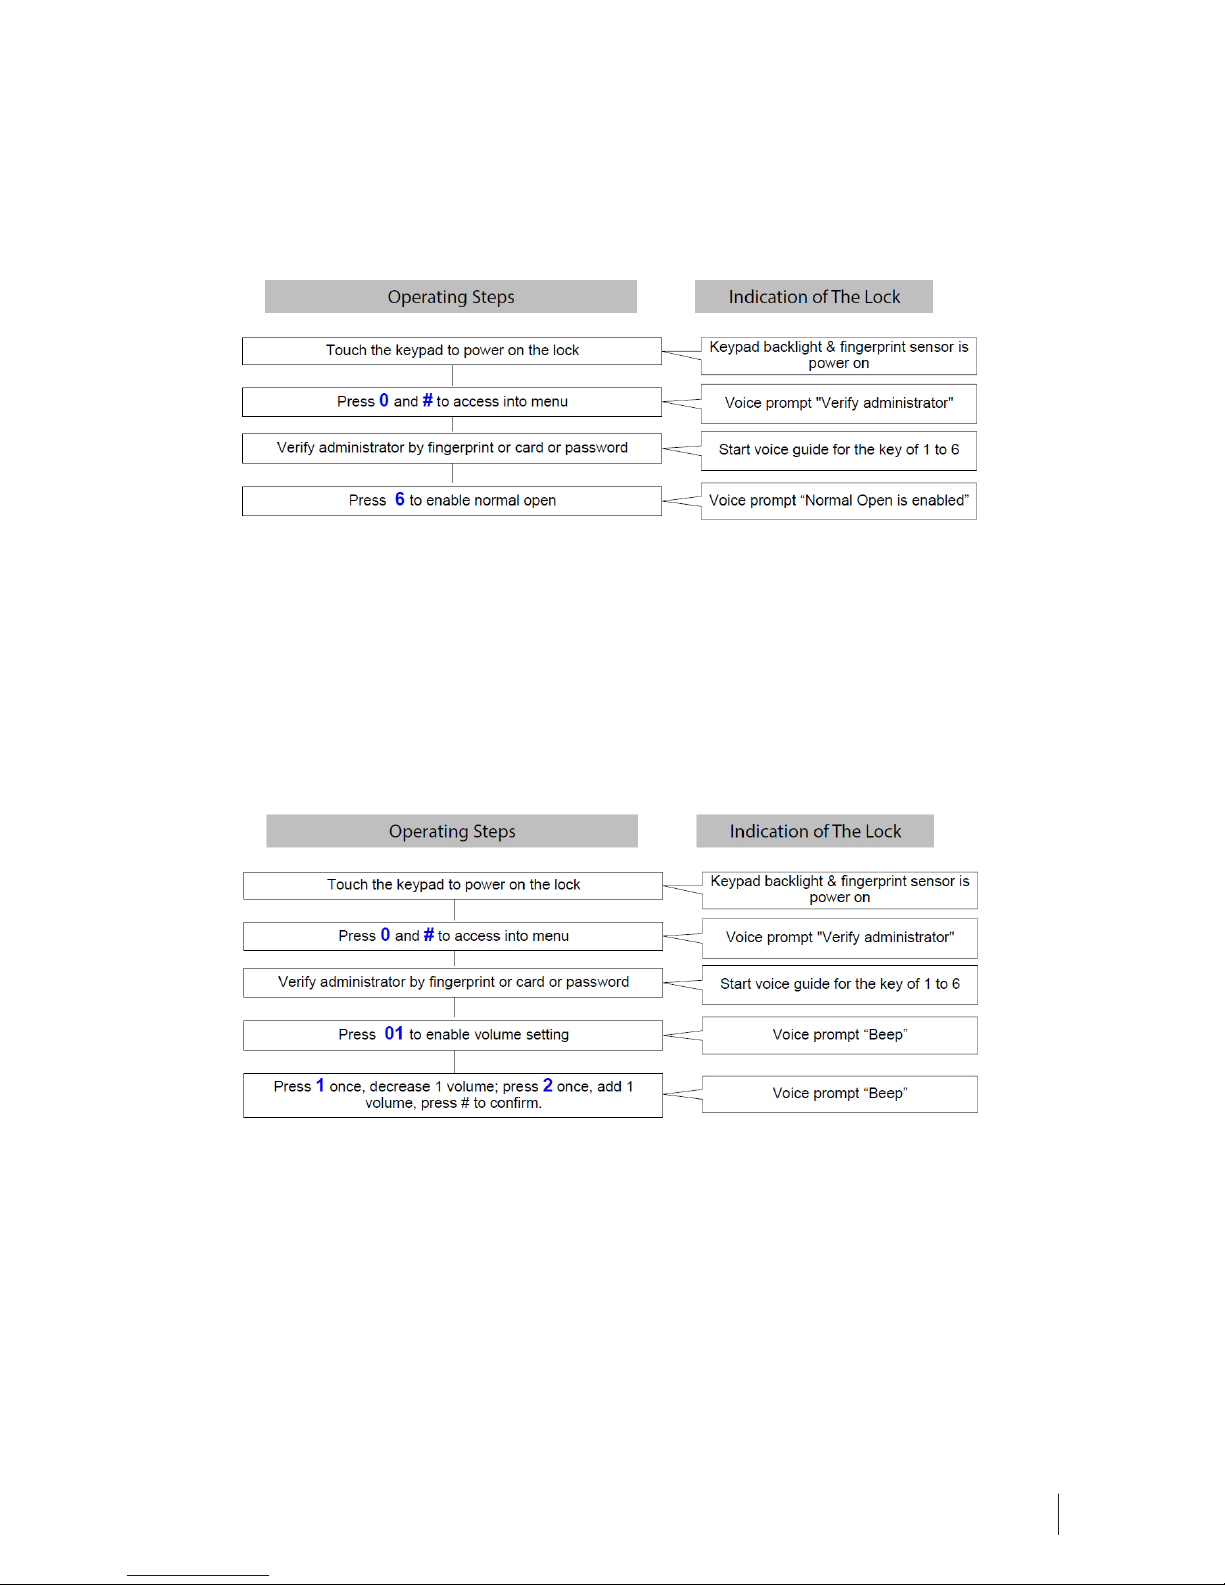
Enable Normal Open
Note:
1) To disable normal open, please use any registered fingerprint / card / password to unlock the door.
2) When verify administrator by password, press #to end.
Volume
Note:
1) The volume of the “Beep” is the current volume.
2) When verify administrator by password, press #to end.

© 2018 Timetec Computing Sdn Bhd. All rights reserved • 012018
Other manuals for TL40B
1
Table of contents
Other FingerTec Lock manuals


