USSC USG295SS Operation and maintenance manual

853888C-0704K
USG295SS
Model Number:
* All Pictures In This Manual Are For Illustrative Purposes Only. Actual Product May Vary.
© 2021 United States Stove Company, 227 Industrial Park Rd., South Pittsburg, TN 37380 Ph. 800-750-2723
THIS MANUAL IS SUBJECT TO CHANGE WITHOUT NOTICE.
Owner’s Instruction and Operation Manual
Save These Instructions In A Safe Place For Future Reference.
SAFETY NOTICE: FOR OUTDOOR USE ONLY! Please read this entire manual before
installation and use of this pellet fuel-burning appliance. Failure to follow these
instructions could result in property damage, bodily injury or even death. Contact local
building or fire ocials about restrictions and installation inspection requirements in
your area. Save these instructions.
CALIFORNIAPROPOSITION65WARNING:
This product can expose you to chemicals including carbon
monoxide, which is known to the State of California to cause
cancer, birth defects, and/or other reproductive harm. For
more information, go to www.P65warnings.ca.gov
CAUTION! Pleasereadthis entiremanualbeforeyouuseyournewtabletopgrill.Failure
to follow instructions may result in property damage and/or bodily injury. A major
cause of fires is failure to maintain required clearances (air space) to combustible
materials. It is of utmost importance that this product be installed only in accordance
with these instructions.

INTRODUCTION
Use only wood cooking pellets specified by the
manufacturer. It is important to use only cooking pellets
that is dry and free from dirt or other impurities. The
cooking pellet industry has established standards for
wood pellet manufacturers. We recommend that cooking
pellets used in all U.S. Stove pellet burning grills meet or
exceed the following specifications:
Use ONLY pelletized fuel formulated for cooking
Do Not Use Cooking Pellets Labeled as Having
Additives
Fines (fine particles) Max through a 1/8” screen
Bulk Density Min 40 lbs per cubic foot
Size Max 3/8” Diameter by 1-1/2”
length
Ash Content 1% Max (Premium grade)
3% Max (Standard grade)
Moisture Content 8% Max
Heat Content Min 8,200 btu’s per hour
Use only wood pellets formulated for cooking in this
pellet grill.
It is important to note that the ash content of the fuel and
the frequency of operation will determine the frequency
of required cleaning for this pellet grill. A high ash fuel
may result in daily cleaning, while a low ash fuel may
result in less frequent cleaning. Occasionally, impurities
in the fuel will cause a hard mass build up in the burn pot
of this pellet grill. Impurities, such as silica, can virtually
form little glass balls when subjected to the high heat
generated in the burn pot. When allowed to collect, a
hard base build up may block air flow through the burn
pot, which will significantly aect the performance and
eciency of this pellet grill. It is a good idea to check the
burn pot for any hard mass buildup or other blockage on
a daily basis, and if necessary, let the burn pot cool and
then clean the burn pot.
U.S. Stove Company realizes that it cannot control the
quality of cooking pellets you choose to use in your
pellet grill; U.S. Stove assumes no responsibility for
that choice.
CAUTION:
BE SURE TO STORE COOKING PELLETS A
MINIMUM OF 3 FEET (914.5mm) AWAY FROM THE
PELLET GRILL. RADIANT HEAT CAN IGNITE THE
FUEL.
UNPACKING
The items included with this unit are listed below:
1
2
3
4
5
6
7
8
11 9
10
1 Griddle
2 Small Rack
3 Large Rack
4 Hopper Finger Guard
5 Small Shield
6 Main Shield
7 Grease Pan
8 Lid Handle
9Leg
10 1/4”-20 X 1 Leveling Mount
11 Meat Probe
2
© 2021 United States Stove Company

SAFETY INFORMATION
WARNING:
• IMPORTANT: READ ALL INSTRUCTIONS
BEFORE INSTALLING AND USING THE
APPLIANCE. FAILURE TO DO SO MAY RESULT
IN PROPERTY DAMAGE, BODILY INJURY, OR
EVEN DEATH. PROPER UTILIZATION OF THIS
GRILL IS CRUCIAL FOR SAFE AND EFFICIENT
OPERATION.
• DO NOT THROW THIS MANUAL AWAY. THIS
MANUAL HAS IMPORTANT OPERATING AND
MAINTENANCE INSTRUCTIONS THAT YOU
WILL NEED AT A LATER TIME. ALWAYS FOLLOW
THE INSTRUCTIONS IN THIS MANUAL.
• WHEN GREASE OR CREOSOTE HAS
ACCUMULATED, IT SHOULD BE REMOVED TO
REDUCE RISK OF FIRE.
• DO NOT USE ACCESSORIES NOT SPECIFIED
FOR USE WITH THIS APPLIANCE.
• DO NOT OPERATE THIS GRILL UNDER A CEILING
OR OVERHANG.
• THIS APPLIANCE IS DESIGNED FOR THE USE
OF PELLETIZED FUEL THAT IS SPECIFICITY
MADE FOR COOKING. THE USE OF OTHER
THAN COOKING PELLETS WILL NOT GIVE
SATISFACTORY RESULTS.
• NEVER USE GASOLINE, GASOLINE-TYPE
LANTERN FUEL, KEROSENE, CHARCOAL
LIGHTER FLUID, OR SIMILAR LIQUIDS TO START
OR “FRESHEN UP” A FIRE IN THIS APPLIANCE.
KEEP ALL SUCH LIQUIDS WELL AWAY FROM
THE APPLIANCE WHEN IN USE.
WARNING:
• ALLOW THE GRILL TO COOL BEFORE
PERFORMING ANY MAINTENANCE OR
CLEANING.
• YOUR GRILL REQUIRES PERIODIC
MAINTENANCE AND CLEANING (SEE THE
“MAINTENANCE” SECTION OF THIS MANUAL).
FAILURE TO MAINTAIN YOUR GRILL MAY LEAD
TO IMPROPER AND/OR UNSAFE OPERATION.
• NEVER TRY TO REPAIR OR REPLACE ANY PART
OF THE GRILL UNLESS INSTRUCTIONS FOR
DOING SO ARE GIVEN IN THIS MANUAL. ALL
OTHER WORK SHOULD BE DONE BY A TRAINED
TECHNICIAN.
WARNING:
• DO NOT TOUCH THE HOT SURFACES OF THE
GRILL. EDUCATE ALL CHILDREN ON THE
DANGERS OF A HIGH-TEMPERATURE GRILL.
YOUNG CHILDREN SHOULD BE SUPERVISED
WHEN THEY ARE IN THE SAME VICINITY AS
THE GRILL.
• KEEP FOREIGN OBJECTS OUT OF THE HOPPER.
• THE HOPPER AND GRILL TOP WILL BE HOT
DURING OPERATION; THEREFORE, YOU
SHOULD ALWAYS USE SOME TYPE OF HAND
PROTECTION WHEN REFUELING YOUR GRILL.
• NEVER BLOCK FREE AIRFLOW THROUGH THE
OPEN VENTS OF THE UNIT.
• DO NOT PLACE CLOTHING OR OTHER
FLAMMABLE ITEMS ON OR NEAR THIS GRILL.
• THIS APPLIANCE IS NOT INTENDED FOR
COMMERCIAL USE.
WARNING:
• KNOW THE SYMPTOMS OF CARBON MONOXIDE
POISONING: HEADACHE, DIZZINESS,
WEAKNESS, NAUSEA, VOMITING, SLEEPINESS,
AND CONFUSION. CARBON MONOXIDE
REDUCES THE BLOOD’S ABILITY TO CARRY
OXYGEN. LOW BLOOD OXYGEN LEVELS CAN
RESULT IN LOSS OF CONSCIOUSNESS AND
DEATH.
• CARBON MONOXIDE IS ESPECIALLY TOXIC TO
MOTHER AND CHILD DURING PREGNANCY,
INFANTS, THE ELDERLY, SMOKERS, AND
PEOPLE WITH BLOOD OR CIRCULATORY
SYSTEM PROBLEMS, SUCH AS ANEMIA, OR
HEART DISEASE.
• SEE A DOCTOR IF YOU OR OTHERS DEVELOP
COLD OR FLU-LIKE SYMPTOMS WHILE
COOKING OR IN THE VICINITY OF THIS
APPLIANCE. CARBON MONOXIDE POISONING,
WHICH CAN EASILY BE MISTAKEN FOR A COLD
OR FLU, IS OFTEN DETECTED TOO LATE.
• ALCOHOL CONSUMPTION AND DRUG USE
INCREASE THE EFFECTS OF CARBON
MONOXIDE POISONING.
© 2021 United States Stove Company
3

CLEARANCE TO COMBUSTIBLES
WARNING:
• DO NOT UNPLUG THE GRILL IF YOU SUSPECT A
MALFUNCTION. TURN THE “ON/OFF” SWITCH
TO “OFF” AND CONTACT YOUR DEALER.
• DISCONNECT THE POWER CORD BEFORE
PERFORMING ANY MAINTENANCE! NOTE:
TURNING THE “ON/OFF” SWITCH TO “OFF”
DOES NOT DISCONNECT ALL POWER TO THE
ELECTRICAL COMPONENTS OF THE GRILL.
• A POWER SURGE PROTECTOR IS REQUIRED.
THIS UNIT MUST BE PLUGGED INTO A 110 -
120V, 60 HZ GROUNDED ELECTRICAL OUTLET.
DO NOT USE AN ADAPTER PLUG OR SEVER
THE GROUNDING PLUG. DO NOT ROUTE THE
ELECTRICAL CORD UNDERNEATH, IN FRONT
OF, OR OVER THE GRILL. DO NOT ROUTE THE
CORD IN FOOT TRAFFIC AREAS OR PINCH THE
CORD UNDER ANY OBJECT.
WARNING:
• UNPLUG THE GRILL WHEN NOT IN USE.
• THE GRILL WILL NOT OPERATE DURING
A POWER OUTAGE. IF A POWER OUTAGE
DOES OCCUR, CHECK FOR UNSAFE BURN
CONDITIONS THAT MIGHT HAVE OCCURRED.
• THE MOVING PARTS OF THIS GRILL ARE
PROPELLED BY HIGH TORQUE ELECTRIC
MOTORS. KEEP ALL BODY PARTS AWAY FROM
THE AUGER WHILE THE GRILL IS PLUGGED
INTO AN ELECTRICAL OUTLET. THESE MOVING
PARTS MAY BEGIN TO MOVE AT ANY TIME
WHILE THE GRILL IS PLUGGED IN.
SAVE THESE INSTRUCTION
WARNING:
THIS PELLET GRILL MUST BE INSTALLED WITH
THE CLEARANCE TO COMBUSTIBLES AS SHOWN
IN THIS MANUAL. WARNING: DO NOT OPERATE
THIS GRILL UNDER A CEILING OR OVERHANG.
WARNING:
OPERATE YOUR PELLET GRILL ONLY ON A
NONCOMBUSTIBLE FLOOR OR PROVIDE FLOOR
PROTECTION ADEQUATE TO PROVIDE EMBER
PROTECTION AROUND GRILL.
24”
12” 12”
24-11/16”
15”
OVERALL DIMENSIONS
4
© 2021 United States Stove Company

READ ALL INSTRUCTIONS BEFORE USE
Use proper assembly technique when installing bolts,
start all bolts first and then tighten appropriately.
Remove the grill and hopper contents for assembly.
LEG ASSEMBLY
Ensure the lids are latched shut and tilt the grill back. Be
careful not to scratch the grill or the surface the grill is
sitting on. Use the provided screws, lock washers, and flat
washers to attach both legs to the bottom of the unit as
shown.
Note: Use the four rubber leg levelers to level the grill.
Make sure the grill is always sitting level or is slightly
tilted towards the drip pan.
HANDLE ASSEMBLY
The screws and washers that are required to attach the
handle to the grill are already in the handle. Remove the
screws and washers and attach the handle to the grill as
shown.
DRIP PAN
Slide the grease pan onto the holes on the left-hand side
of the grill. Once it is in position slide the drip pan down
diagonally to the left to secure it to the grill.
INITIAL FIRING SYSTEM CHECK
IMPORTANT:
DO NOT PUT ANY PELLETS INTO THE HOPPER
OR GRILL DURING THE INITIAL FIRING SYSTEM
CHECK.
• Open the pellet hopper lid to check for foreign objects
in the hopper.
ASSEMBLY INSTRUCTIONS
© 2021 United States Stove Company
5

• Plug the grill into a three-wire, grounded wall outlet.
• Press the power button to turn the unit on. DO NOT
TOUCH THE AUGER OR THE IGNITOR! Open the
hopper lid and check to see that the auger is turning
freely - approximately 2 rpm. LOOK TO SEE THAT THE
AUGER IS TURNING. DO NOT TOUCH.
• Place your fingers over the burn pot and feel the air
movement from the combustion blower. Ignitor will
glow within 1 minute.
• Press the power button to turn the unit o.
• Clean the small rack, large rack, small shield, large
shield, and griddle with soap and water, then rinse.
Allow the components to dry before continuing the
assembly. DO NOT TOUCH THE IGNITOR OR THE
AUGER.
GRILL GRATES, DRIP PAN, & FLAME PLATE
INSTALLATION
Insert the main shield into the grill. Ensure the slot in the
left side of the main shield hooks onto the corresponding
tab The right side of the main shield will rest on the
grease trap.
Place the small shield onto the main shield.
IMPORTANT:
KEEP THE SMALL SHIELD IN THE CLOSED
POSITION AT ALL TIMES. WHEN THE SMALL
SHIELD IS IN THE OPENED POSITION THE FLAME
WILL HAVE DIRECT CONTACT WITH THE FOOD.
CLOSED
OPEN
GRILLING GRATES AND GRIDDLE
The large and small racks can be installed in two dierent
ways. The first is to stack the small rack on top of the
large rack.
The second is to put the large rack into position and
attach the small rack to the side of the grill as shown. The
small rack can be attached on left or right side of the grill.
ASSEMBLY INSTRUCTIONS
6
© 2021 United States Stove Company

To use the griddle remove the two racks from inside the
grill. Note the small rack can remain on the side of the grill
while the griddle is in use. If the small shield is in the open
position it will create a hot spot.
PREPARING THE GRILL FOR USE
SEASONING THE GRILL
IMPORTANT:
THE GRILL MUST BE SEASONED BEFORE COOKING
ANY FOOD ON IT FOR THE FIRST TIME.
The grill is now fully assembled and it is time to season
the grill. The seasoning process is an important part of
preparing your grill for use. It allows any oil residue from
the manufacturing process to burn o and it allows the
high-temperature paint to cure. Do Not place anything
on the unit during the seasoning process as the paint
could be permanently damaged. Once you have read and
understood the “Standard Use And Operation” section of
this manual follow the steps below to season the grill:
a. Fill the hopper 1/2 full with cooking pellets.
b. Press the power button to turn the grill on.
c. Prime the auger by pressing and holding the “Temp
Display” button for two minutes.
Temp
Display
d. Close the grill’s lid.
e. When smoke is visible use the “Cook Temp” buttons
to adjust the grill to the maximum temperature
(500°F).
f. Run the grill at maximum temperature for a minimum
of 1 hour.
SAVE THESE INSTRUCTIONS
ASSEMBLY INSTRUCTIONS
© 2021 United States Stove Company
7

Temp
Display
USSCGRILLS.COM
Meat Probe
Increase
Temperature
Decrease
Temperature
Power
Prime /
Temp Display
ATTENTION:
FOR OUTDOOR USE ONLY. DO NOT USE THIS GRILL
INDOORS.
• Make sure the grill is always sitting level or is slightly
tilted towards the drip pan.
ATTENTION:
ENSURE EXHAUST OPENINGS ARE CLEAN AND
CLEAR PRIOR TO EACH USE. NOTE: THE EXHAUST
OPENINGS ARE LOCATED ON REAR OF THE GRILL
LID.
STANDARD STARTUP SEQUENCE
1. Fill the hopper with pellet fuel. Never leave pellets
in the hopper and only use the minimum amount of
pellets needed for cooking. Be sure to close and latch
the hopper lid. Only burn pellet fuel that is specifically
manufactured for use in pellet grills and cookers.
2. Prime your auger press the button found on the
control panel labeled “Temp Display” When pressed,
the auger spins and feeds pellet fuel to the burn pot.
Hold the “Temp Display” button in for up to 1 minute
to prime the auger tube with pellets.
3. Open the grill lid and press the “Power” button. The grill
will automatically light 5 to 8 minutes after pressing
the “Power” button. Remember, start-up times may
vary based on outside ambient temperature and fuel
quality).
NOTE: The startup mode will last approximately 15
minutes. Excessive smoke during startup is typical.
4. Set the control board to the desired cooking
temperature using the “Cook Temp” buttons on
the control board. Temperature settings are in 5°F
increments.
5. Once the grill ignites, you can hear a flowing sound
slightly louder than the blower motor of the grill. At
this point, the grill produces significantly less smoke.
Close the grill lid once ignition has occurred.
NOTE: Allow the grill lid to remain closed during
the pre-heat and as much as possible during cook
time. Feed rates during run mode are determined by
temperature readings. Each time the lid opens, the
temperature goes down, causing the auger to feed
more. This can lead to potential overcooking of food.
6. Check the actual temperature compared to the set-
point temperature by using the “Temp Display” button
on the control board. The display button helps to
determine when the grill has preheated to the desired
cooking temperature.
NOTE: During the startup, the grill temperature can
exceed the set-point temperature. It is advisable
to keep the display in “Actual” mode to check the
temperature readings and avoid overcooking or
burning.
7. Once the grill has reached its set-point temperature,
the grill is ready to have food added.
NOTE: As previously mentioned, keep the lid closed
as much as possible to maintain constant cooking
temperature. The temperature may fluctuate slightly.
NOTICE !! During operation, the technology in this
grill’s programming learns the fuel rate needed to
sustain the selected cooking temperature. Therefore,
start-up times may vary based on outside ambient
temperature and fuel quality or type (flavored or not).
Using the “Temp Display” button may help facilitate a
quicker start-up time.
STANDARD SHUTDOWN SEQUENCE
1. To turn the grill o.
2. Press the power button.
3. The word “Cool” will show on the display, and the grill
will enter a shutdown mode. The blower will continue
to run until it has reached a safe temperature.
NOTE: Shutdown sequence can take up to 1 hour
depending on the cooking temperature and the outside
temperature.
DO NOT TURN THE GRILL OFF BY UNPLUGGING IT.
SAVE THESE INSTRUCTIONS.
STANDARD USE AND OPERATION
8
© 2021 United States Stove Company

• When the grill is plugged in, the control board will flash
through a sequence of letters and numbers before
going to a blank display screen.
• When the grill is turned on, there will be three flashing
lights found between the numbers of the display. The
three lights will continue to flash until the grill reaches
180°F, then the startup sequence will be finished.
• Grill operating temperatures are 180°F to 500°F.
• When the grill is first turned on, the control board will
go to 350°F on the first ignition. If the grill has been
used, the control board will go to the last setting used.
• “Smoke” mode ranges from 180°F to 230°F. The
concentration of smoke will vary depending on
the temperature selected. There will be a higher
concentration of smoke at lower settings than there is
when operating at higher temperatures while smoking.
• The combustion blower is on constantly while cooking
and does not vary in speed.
• If the grill is turned o during “Startup” mode,
everything shuts o without a shutdown sequence.
• If the flame plate is installed improperly, a burn back
may occur due to the airflow restrictions at the burn
pot.
Note: These are suggested approximations only and intended as guidelines only. For best results please follow
appropriate recipe.
Meat Type Cut Cooking Temp. Approximate Cook Time
Beef
Hamburgers 425°F 10 min on each side
T-Bone/Ribeye 450°F 10 to 20 min (depending on degree of doneness desired)
turning once
Tenderloin 400°F 25 to 30 min (depending on degree of doneness desired)
Brisket 225°F 4-6 hrs
Filet Mignon 450°F 10 to 15 min (depending on degree of doneness desired)
turning once
Flank Steak 450°F 10 to 15 min (depending on degree of doneness desired)
turning once
Ribs 225°F 3-4 hrs
Pork
Loin 350°F 1 to 1.5 hrs
Baby Back Ribs 325°F 2 hrs
Shoulder Steak 325°F 35 to 40 min
Ground Pork 300°F 45 min
Pork Chops 325°F 45-50 min
Chicken
Breast 350°F 25-30 min, turning once 1/2 way through
Thighs 350°F 40-45 min
Whole Chicken 4-5lbs 450°F 70-90 min
Turkey 10-12lb Turkey 325°F 3 hrs
Legs 225°F 4-5 hrs
Lamb
Rack of Lamb 400°F 30 min, for Rare, longer if desired
Lamb Chops 450°F 12 min, turn once 1/2 way through
Salmon Filet 350°F 25-30 min
Cod Loin 400°F 20 min
Scallops Scallop 450°F 8-10 min
Shrimp Whole Shrimp 450°F 2-3 min/side
Lobster Tail 400°F 25-30 min
OPERATING TIPS
© 2021 United States Stove Company
9

Failure to clean and maintain this unit as described in
this manual may cause poor performance and hazardous
situations. Adjust the maintenance schedules based on
the frequency of usage to ensure the proper operation and
maximum eciency of this pellet grill. When performing
any maintenance on this grill, make sure the unit has
powered o, allowed full shutdown sequence, and then
unplugged from the power source.
Maintenance Schedule
Operation Interval
Clean main shield and small shield After Each Use
Inspect and clean burn pot After Each Use
Inspect hopper for fines (sawdust) Biweekly
Ash removal After Each Use
Inspect/clean combustion air blower Annually
Exhaust openings (rear of grill lid) After Each Use
CLEAN DRIP PAN
Note: Allow the unit to cool to ambient temperature
before inspecting or cleaning the grill.
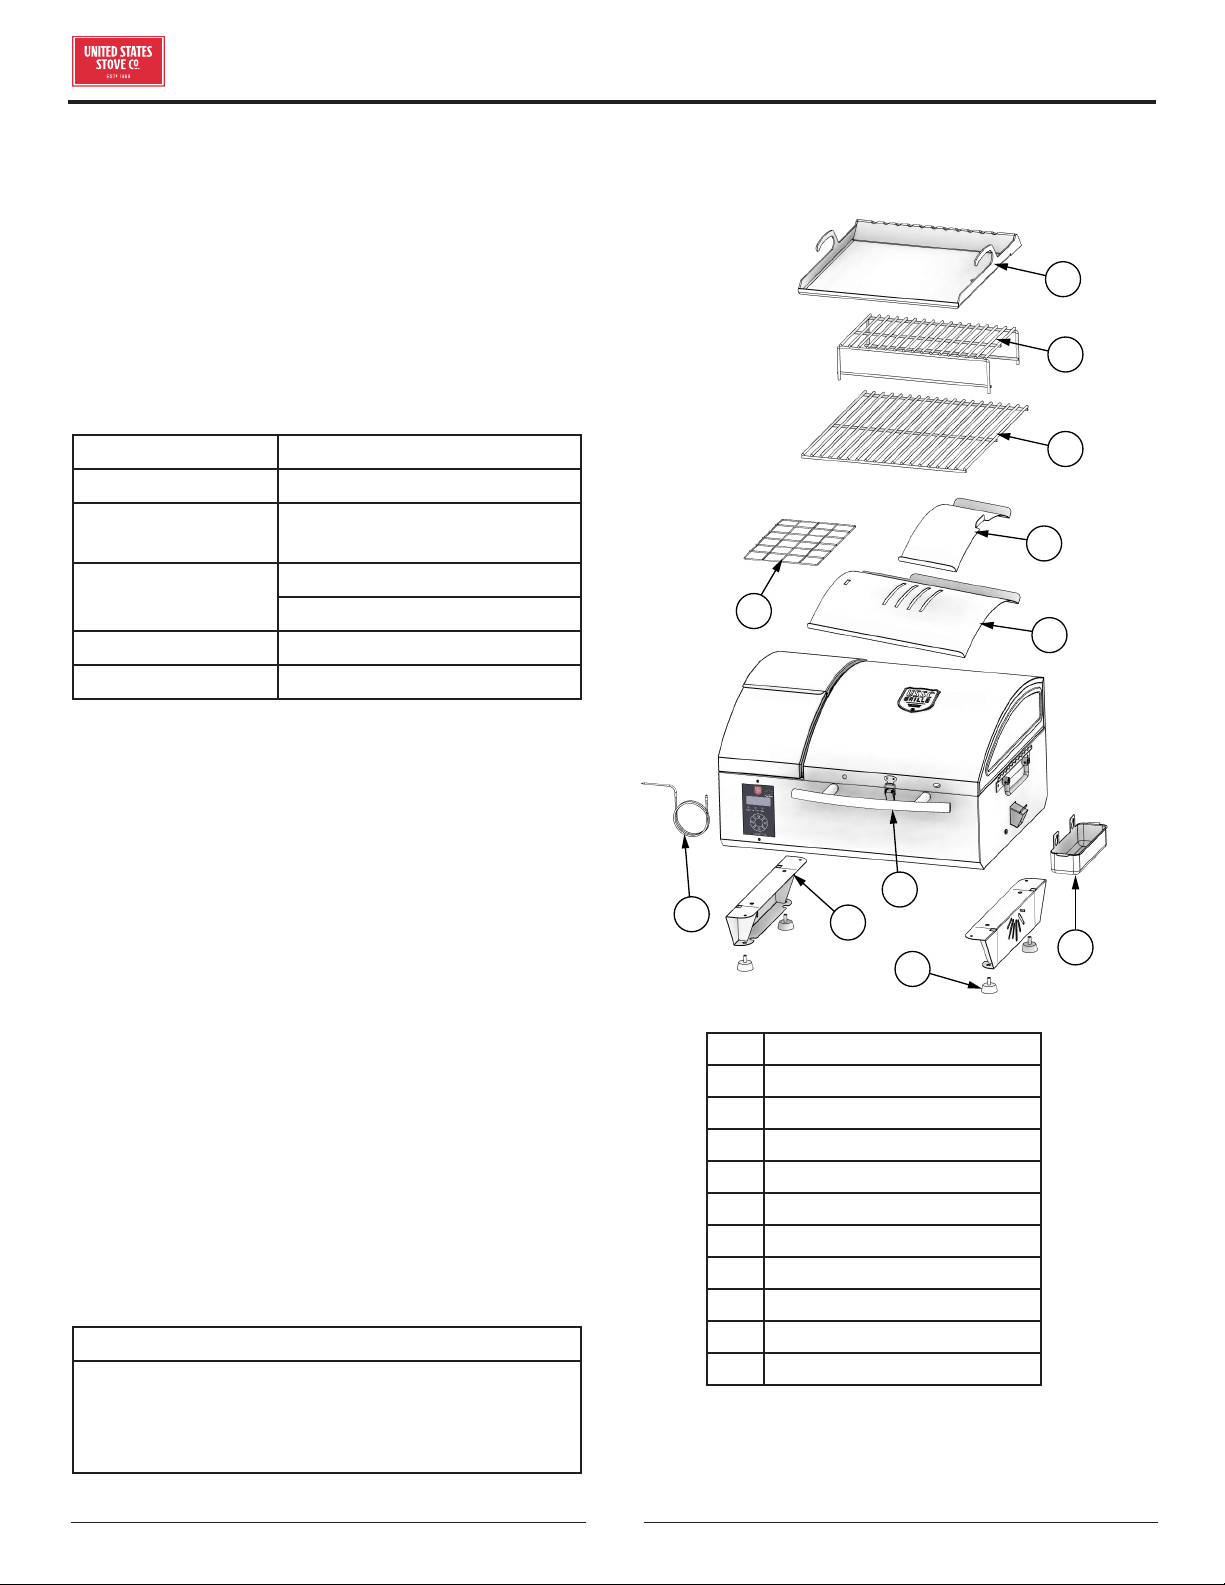
1. Take out the large rack.
2. Scrape drippings down the grease drain and into the
grease pan provided.
3. Clean the main shield and small shield with a food-
safe de-greasing agent and ensure all the cleaning
solvents and chemicals are thoroughly rinsed o
after cleaning.
4. Empty the grease pan if necessary.
5. Reinstall the large rack.
INSPECT AND CLEAN BURN POT
Note: Allow the unit to cool to ambient temperature
before inspecting or cleaning the grill.
1. Remove the large rack, small shield, and main shield.
2. Inspect the burn pot to check that the combustion air
holes have not become plugged. If necessary, clean
thoroughly.
3. Replace the main shield, small shield, and large rack.
INSPECT HOPPER FOR FINES
Note: Allow the unit to cool to ambient temperature before
inspecting or cleaning the grill. Periodically check the
hopper for pellet dust (fines) build-up. The accumulation
of fines can reduce the eciency of the grill, increase
the chance of hopper fires, and other unsafe operating
conditions. If dust (fines) accumulate suciently,
vacuum out and reload the hopper with new pellets.
MAINTENANCE
OPERATING TIPS
• If the grill is in “Smoke” mode and change to “Cook”
mode, the temperature will automatically go to 450°F.
• Temperature control doesn’t begin to control the feed
rate for 15 minutes, due to the 15-minute start-up
sequence.
• Make sure to unplug the grill only after it has gone
through the shutdown sequence, cooled o, and is not
in use.
• DO NOT unplug the grill during use or to shorten the
shutdown sequence.
MEAT PROBE
The grills meat probe will track the temperature of the
food as it cooks without having open the grill lid several
times to test the food with an instant-read thermometer.
The correct placement of the meat probe is especially
important when cooking at a higher heat as opposed to
low and slow; because there is such a large dierence
within just one inch of space in the food. When inserting
the meat probe, avoid the bone because it will give
inaccurate readings. After inserting the probe, make sure
it is secured into place. As the thermometer nears its
target temperature, spot-check other areas to see if they
are also close. Be careful, the meat probe and its wires
are hot.
To use the meat probe, first follow the startup
instructions in this manual. Bring the grill up to the
desired temperature. Once preheating is complete, place
the meat onto the grill surface with the probe inserted
into the best section of meat. Plug the meat probe into
the display panel and push the “Temp Display” button
until both the “Actual” and “Setpoint” lights are not lit.
The temperature shown on the display will be the internal
meat temperature. Using the meat probe will prevent
the need of opening and checking the internal meat
temperature, therefore preserving heat and pellet usage.
10
© 2021 United States Stove Company

MAINTENANCE
ASH REMOVAL
Note: Allow the unit to cool to ambient temperature
before inspecting or cleaning the grill.
1. Use an ash vacuum to remove ashes from the burn
pot and the bottom of the grill’s body. We suggest
using the AV15E AshVac vacuum. The AV15E AshVac
is designed for ash removal. Some regular vacuum
cleaner (i.e. shop vacs) may leak ash into the room.
DO NOT VACUUM HOT ASH.
WARNING:
BE SURE ALL ASH EMBERS ARE EXTINGUISHED
AND ALL ASHES ARE COOL TO THE TOUCH BEFORE
VACUUMING.
2. Dispose of ashes into a metal container.
DISPOSAL OF ASHES
Ashes should be placed in a steel metal container with
a tight-fitting lid. The closed container of ashes should
be placed on a non-combustible floor or on the ground
well away from all combustible materials, pending final
disposal. If the ashes are disposed of by burial in soil or
otherwise locally dispersed, they should be retained in the
closed container until all cinders have been thoroughly
cooled. Do not place other waste in the same container.
INSPECT AND CLEAN COMBUSTION AIR
BLOWER
Note: Let the unit cool to ambient temperature before
inspecting or cleaning the grill.
DANGER:
RISK OF ELECTRIC SHOCK. DISCONNECT POWER
BEFORE SERVICING UNIT.
Over time, ash or dust may accumulate on the blades
of the fans. Inspect the fans and if any accumulation is
present vacuum clean. The accumulated ash or dust can
impede the fan’s performance.
1. Open the service panel by removing the four screws.
2. Inspect the fan for dust or ash build-up and clean if
necessary.
3. Close the service panel and reinsert screws.
INSPECT AND CLEAN EXHAUST VENTS
Note: Let the unit cool to ambient temperature before
inspecting or cleaning the grill.
Over time the exhaust vents at the rear of the grill may
get clogged. IT IS VERY IMPORTANT that these are
cleaned properly and checked often.
© 2021 United States Stove Company
11

ERROR CODES
Possible Causes Possible Remedies (Unplug grill first when possible)
Error Code 1 - Power Failure - The power
failed while the grill was operating
and the grill temperature was below
the warm set point when power was
returned
Call Customer service (800) 750-2723 if the error doesn’t go away by
restarting.
Error Code 2 - Grill Temperature drops
significantly / Failure to Ignite - Grill has
ran out of pellets, Auger is not turning.
Igniter did not ignite pellets.
Check to see if the grill has ran out of pellets. If there are still pellets in the
hopper check to see if the auger is turning. If the auger is not turning it may
be jammed or the auger motor has failed. If the grill does not ignite check
to see if the Igniter is working. If the igniter is not getting hot call customer
service at (800) 750-2723
Error Code 3 - The circuit for the
temperature probe (temperature probe
mounted in the grill) is open.
Check to see if the wires for the temperature probe have come unplugged.
If they are not unplugged the temperature probe has failed.
GRILL WILL NO IGNITE
Possible Causes Possible Remedies (Unplug grill first when possible)
Verify power at the electrical outlet Plug another electrical device into that outlet to confirm power
If the power cord is connected to a GFI
(Ground Fault Interrupter), check and
reset if necessary
Reset the GFI and initiate startup procedure
GRILL ENTERS SHUTDOWN MODE UNEXPECTEDLY
Possible Causes Possible Remedies (Unplug grill first when possible)
The convection blower is overheating
and tripping the internal temperature
shuto
Clean any dust o of the fan blades. If oiling the blower does not help, the
blower may be bad.
Fuel other than wood pellets is being
burned in the grill
This pellet grill is designed and tested to use cooking wood pellets. Check
for signs of fuel other than wood pellets. No other types of fuel have been
approved for this pellet grill. If there are signs of other types of fuel being
used, stop using them immediately.
Power surge or brown out situation A power surge, spike, or voltage drop could cause the temperature probe
to malfunction. Use a surge protector
Temperature probe is malfunctioning If the other items check out good, replace the temperature probe.
POWER FAILURE DURING USE
Possible Causes Possible Remedies (Unplug grill first when possible)
Power goes out during operation Observe the grill to make certain unsafe burning conditions do not occur
during the outage.
TROUBLESHOOTING
12
© 2021 United States Stove Company

AFTER GRILL HAS BEEN ON FOR A WHILE, THE BURN POT OVERFILLS
Possible Causes Possible Remedies (Unplug grill first when possible)
Grill is dirty, which restricts airflow
through the burnpot
Follow all cleaning procedures in the “Maintenance” section of the owner’s
manual.
Burnpot holes are blocked Remove the burnpot and thoroughly clean it.
Blockage in air intake pipe Visually inspect the air intake that leads into the burnpot for foreign
material.
Combustion blower is not spinning fast
enough
Clean fan blades and inspect bearings for wear. Ensure the fan is free of
any obstructions.
Bad Pellets
The brand of pellets or the batch of pellets that is being used may be of poor
quality. If possible, try a dierent brand of pellets. It is advisable to try a
brand that is made from a dierent type of wood (softwood vs. hardwood).
Dierent woods have dierent characteristics when being burned.
GRILL FEEDS PELLETS, BUT WILL NOT IGNITE
Possible Causes Possible Remedies (Unplug grill first when possible)
Bad igniter element
Put power directly to the igniter element. Watch the tip of the igniter from
the front of the grill. After about 2 minutes the tip should glow. If it does
not, the element is bad.
The control board is not sending power
to the igniter
Check the voltage going to the igniter during startup. It should be 110-115
volts. If the voltage is lower than full voltage, check the wiring. If the wiring
checks out good, the board could be bad.
GRILL WILL NOT FEED PELLETS
Possible Causes Possible Remedies (Unplug grill first when possible)
Temperature probe is defective Wait for the grill to cool for about 30 - 45 minutes. Check the temperature
probe to see if it’s bad. Check resistance with volt meter.
Bad auger motor
Remove the six retaining screws in the service panel. Remove the auger
motor from the auger shaft and try to run the unit. If the motor will turn,
the shaft is jammed on something. If the motor will not turn, the motor is
bad.
Auger jam
Start by emptying the hopper. Then remove the auger motor by removing
the auger pin. Remove the two screws holding the auger bushing. Gently
pull the auger shaft straight out so that the end of the auger shaft comes
out. After the shaft is removed, inspect it for bent flights, burrs, or broken
welds. Remove any foreign material that might have caused the jam. Also,
check the auger tube for signs of damage such as burrs, rough spots, or
grooves cut into the metal that could have caused a jam.
Loose wire or connector Check all wires and connectors that connect to the auger motor,
temperature probe, and fan.
Bad control board
If the fuse and the wires and connectors check out good, and if the high
limit switch did not trip, test for power going to the auger motor. If there
is not a full current going to the auger motor when the fuel feed light is on,
the control board is bad.
TROUBLESHOOTING
© 2021 United States Stove Company
13

1
2
3
45
7
8
6
10
11
12
9
IN ORDER TO MAINTAIN WARRANTY, COMPONENTS MUST BE REPLACED USING ORIGINAL USSC PARTS
PURCHASED THROUGH YOUR DEALER OR DIRECTLY FROM USSC. USE OF THIRD PARTY COMPONENTS
WILL VOID THE WARRANTY.
Key Part # Description Qty
1893554 Small Rack 1
2893553 Large Rack 1
3893556 Small Shield 1
4893555 Main Shield 1
5893552 Grease Pan 1
6 83689 1/4”-20 X 1 Leveling Mount 4
780870 Control Board 1
880830 Ignitor Cartridge (Ceramic) 1
9893322 Auger 1
10 80878 RTD Temperature Probe 1
11 80877 Exhaust Fan 1
12 80879 Auger Motor 1
N/S 80843 Meat Probe 1
REPLACEMENT PARTS
To order parts:
Call 1-800-750-2723 Ext 5051 or
Email to: parts@usstove.com
14
© 2021 United States Stove Company

WHITE
IGNFAN AUG
IGNITOR
AUGER
MOTOR
INDUCTION
FAN
M
F
RED
YELLOW
PURPLE
POWER SUPPLY
115 VOLTS AC
WHITE
BLACK
TEMPERATURE
PROBE
GND
CONTROL BOARD
YELLOW
WHITE
HOT
WHITE
GRILL
WHITE
RED
853642
COM
WIRING DIAGRAM
For Parts Assistance Call: 800-750-2723 Ext 5051 or Email: parts@usstove.com
The information in this owner’s manual is specific to your unit. When ordering replacement parts the information
in this manual will help to ensure the correct items are ordered. Before contacting customer service write down the
model number and the serial number of this unit. That information can be found on the certification label attached
to the back of the unit. Other information that may be needed would be the part number and part description of the
item(s) in question. Part numbers and descriptions can be found in the “Repair Parts” section of this manual. Once
this information has been gathered you can contact customer service by phone 1-800-750-2723 Ext 5051 or Email
parts@usstove.com.
Model Information
Model Number
Serial Number
HOW TO ORDER REPAIR PARTS
© 2021 United States Stove Company
15

NOTES
16
© 2021 United States Stove Company
Table of contents
Other USSC Grill manuals
Popular Grill manuals by other brands

SILESIA VELOX
SILESIA VELOX CG1 Operating instructions and general guide

Kuuma
Kuuma 83715 owner's manual

Magma
Magma Cabo A10-703E owner's manual

Gaggenau
Gaggenau VR 414 111 instruction manual

Blaze Outdoor Products
Blaze Outdoor Products BLZ-3NG Use & care guide

Char-Broil
Char-Broil Commercial 463257010 Product guide

TEFAL
TEFAL CB2300BBQ - 11-08 manual

Vision grills
Vision grills KAMADO CLASSIC P SERIES quick start guide

VonHaus
VonHaus 2500546 instruction manual

Barbecook
Barbecook Brahma 4.2 Inox installation instructions

KitchenAid
KitchenAid 730-0336D Installation Instructions and Use & Care Guide

MasterChef
MasterChef E500 Assembly manual