UTEPO CP5-450 User manual

CP5-450
User Manual

CONTENT
Introduction........................................................................................................................................3
1. Terms of Use.........................................................................................................................3
Overview............................................................................................................................................ 3
Device Management........................................................................................................................3
1. Interface Instruction............................................................................................................. 4
2. LED Indicator Instruction.................................................................................................... 4
3. Pairing Configuration...........................................................................................................5
(1) Point-to-point Pairing................................................................................................. 5
(2) Point-to-multipoint Pairing.........................................................................................5
(3) Radio Channel Comparison Table.......................................................................... 5
WEB Management........................................................................................................................... 5
Status..................................................................................................................................................6
1. Overview................................................................................................................................6
WLAN................................................................................................................................................. 7
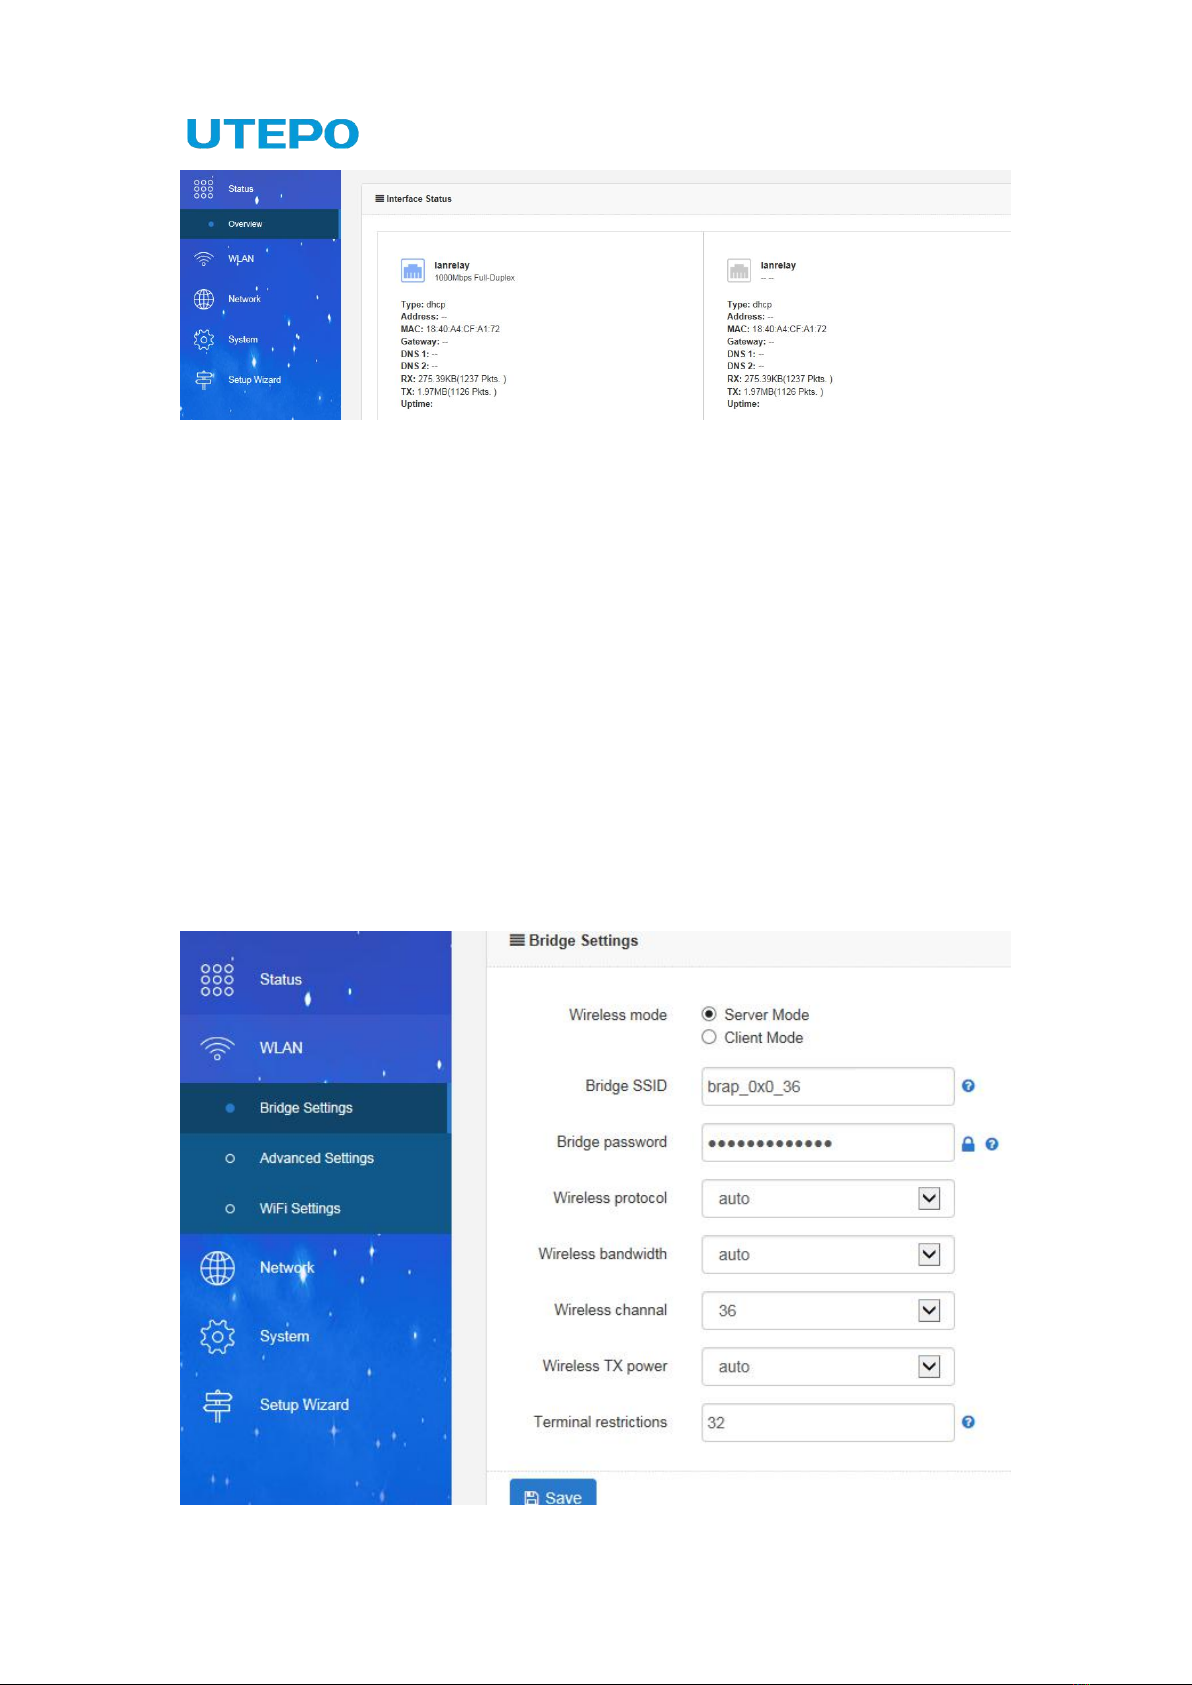
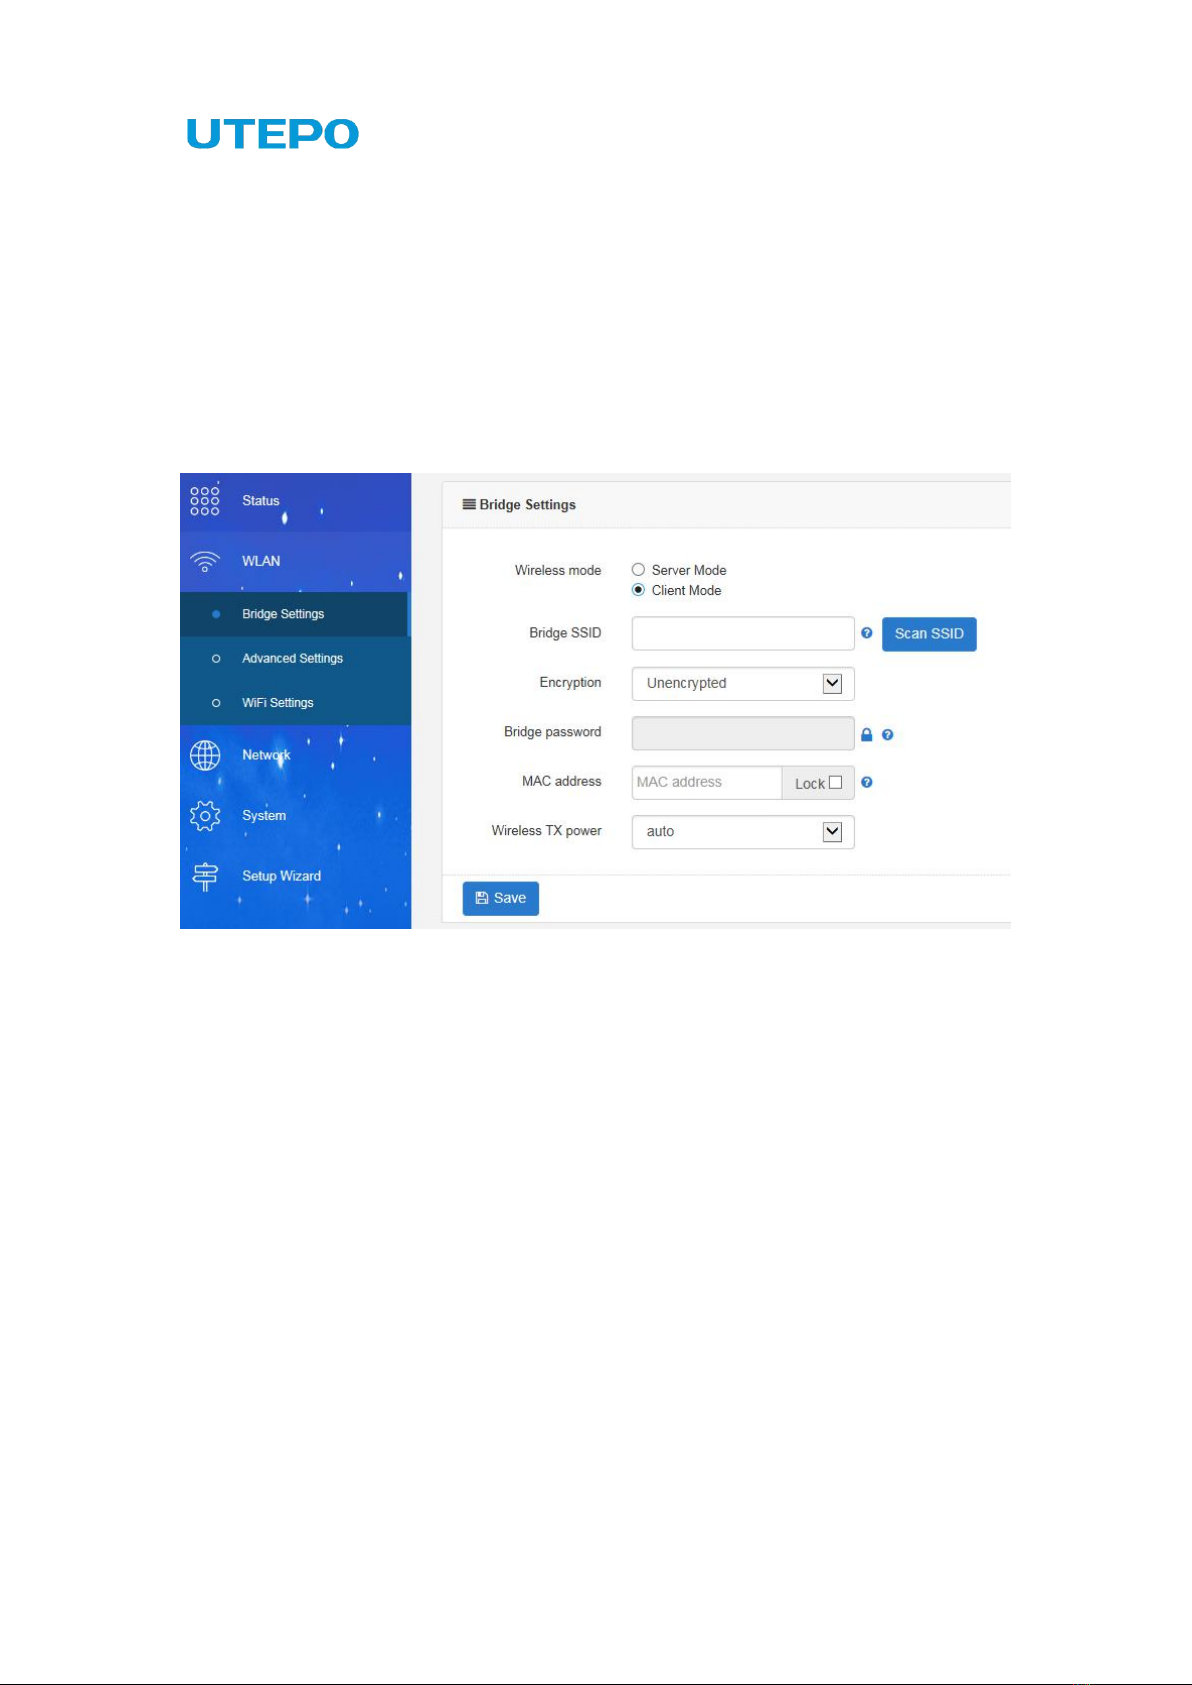
1. Bridge Settings..................................................................................................................... 7
(1) Bridge Access Point...................................................................................................8
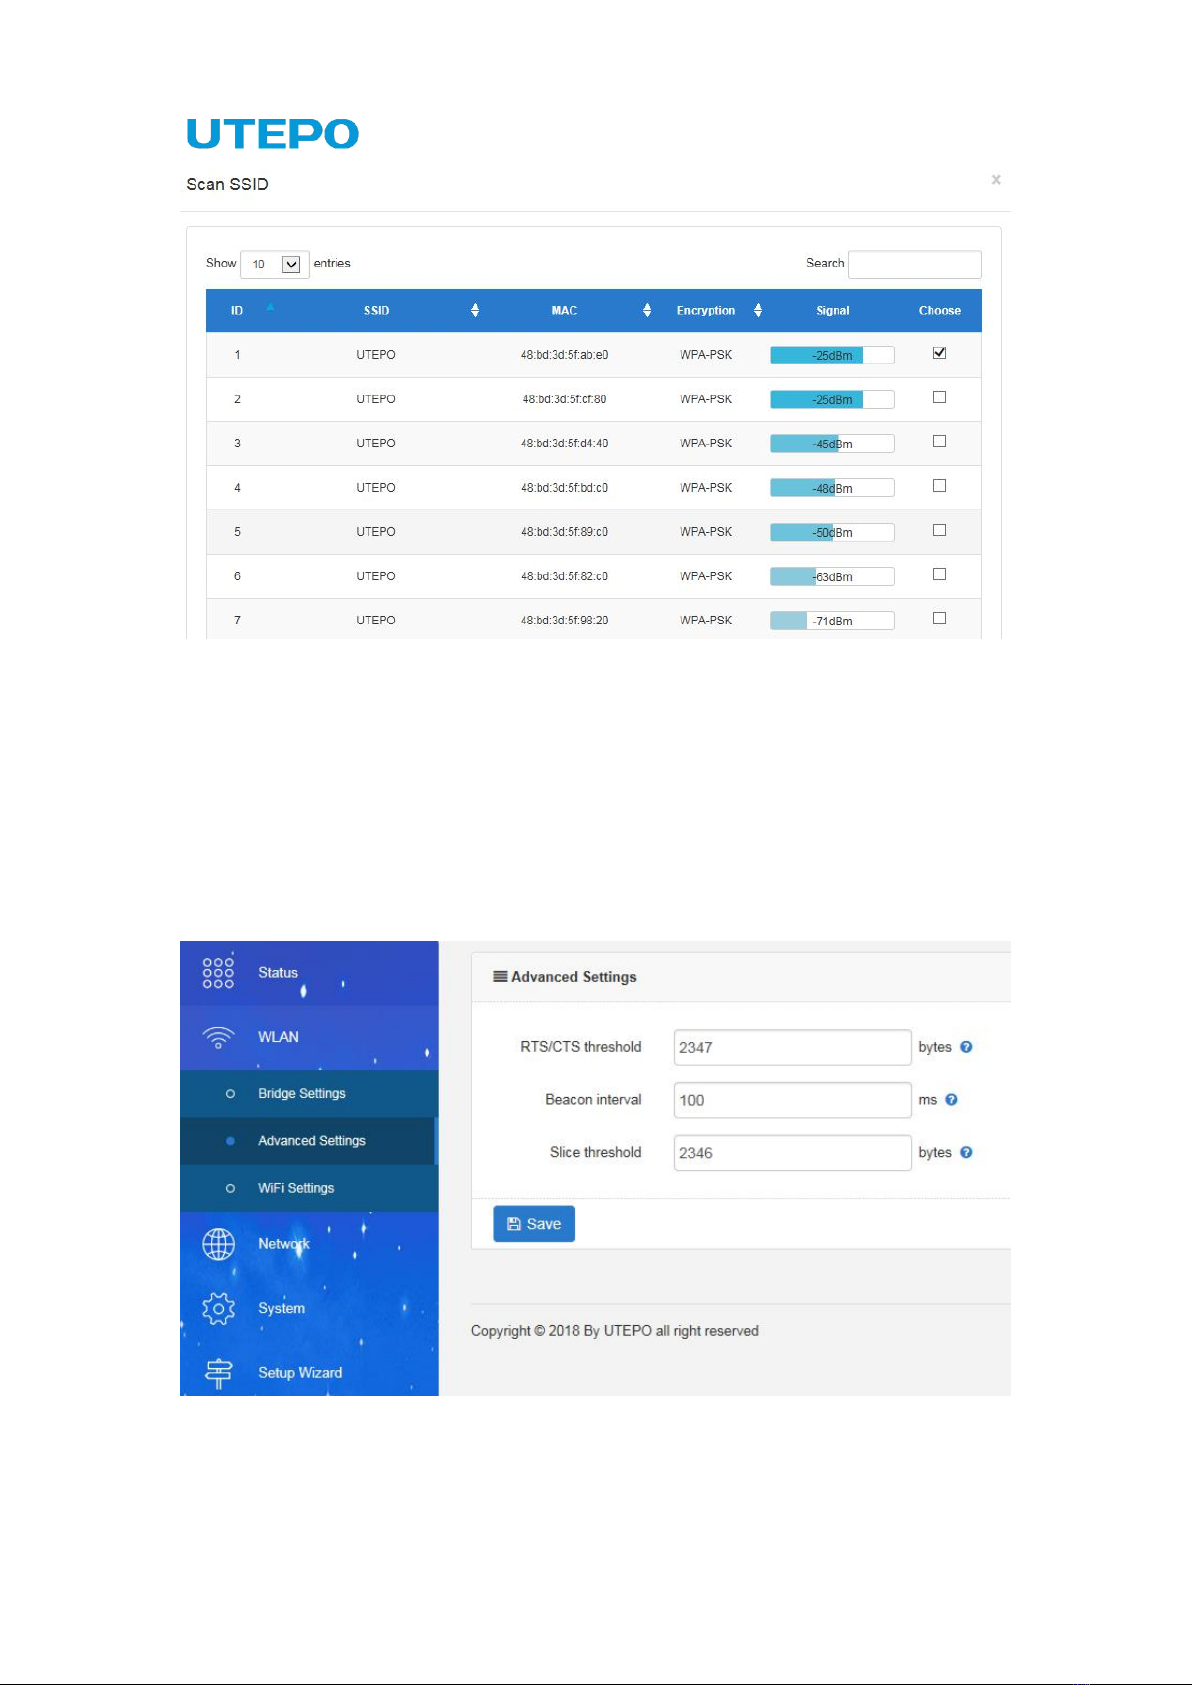
(2) Bridge Client................................................................................................................8
2. Advanced Settings...............................................................................................................9
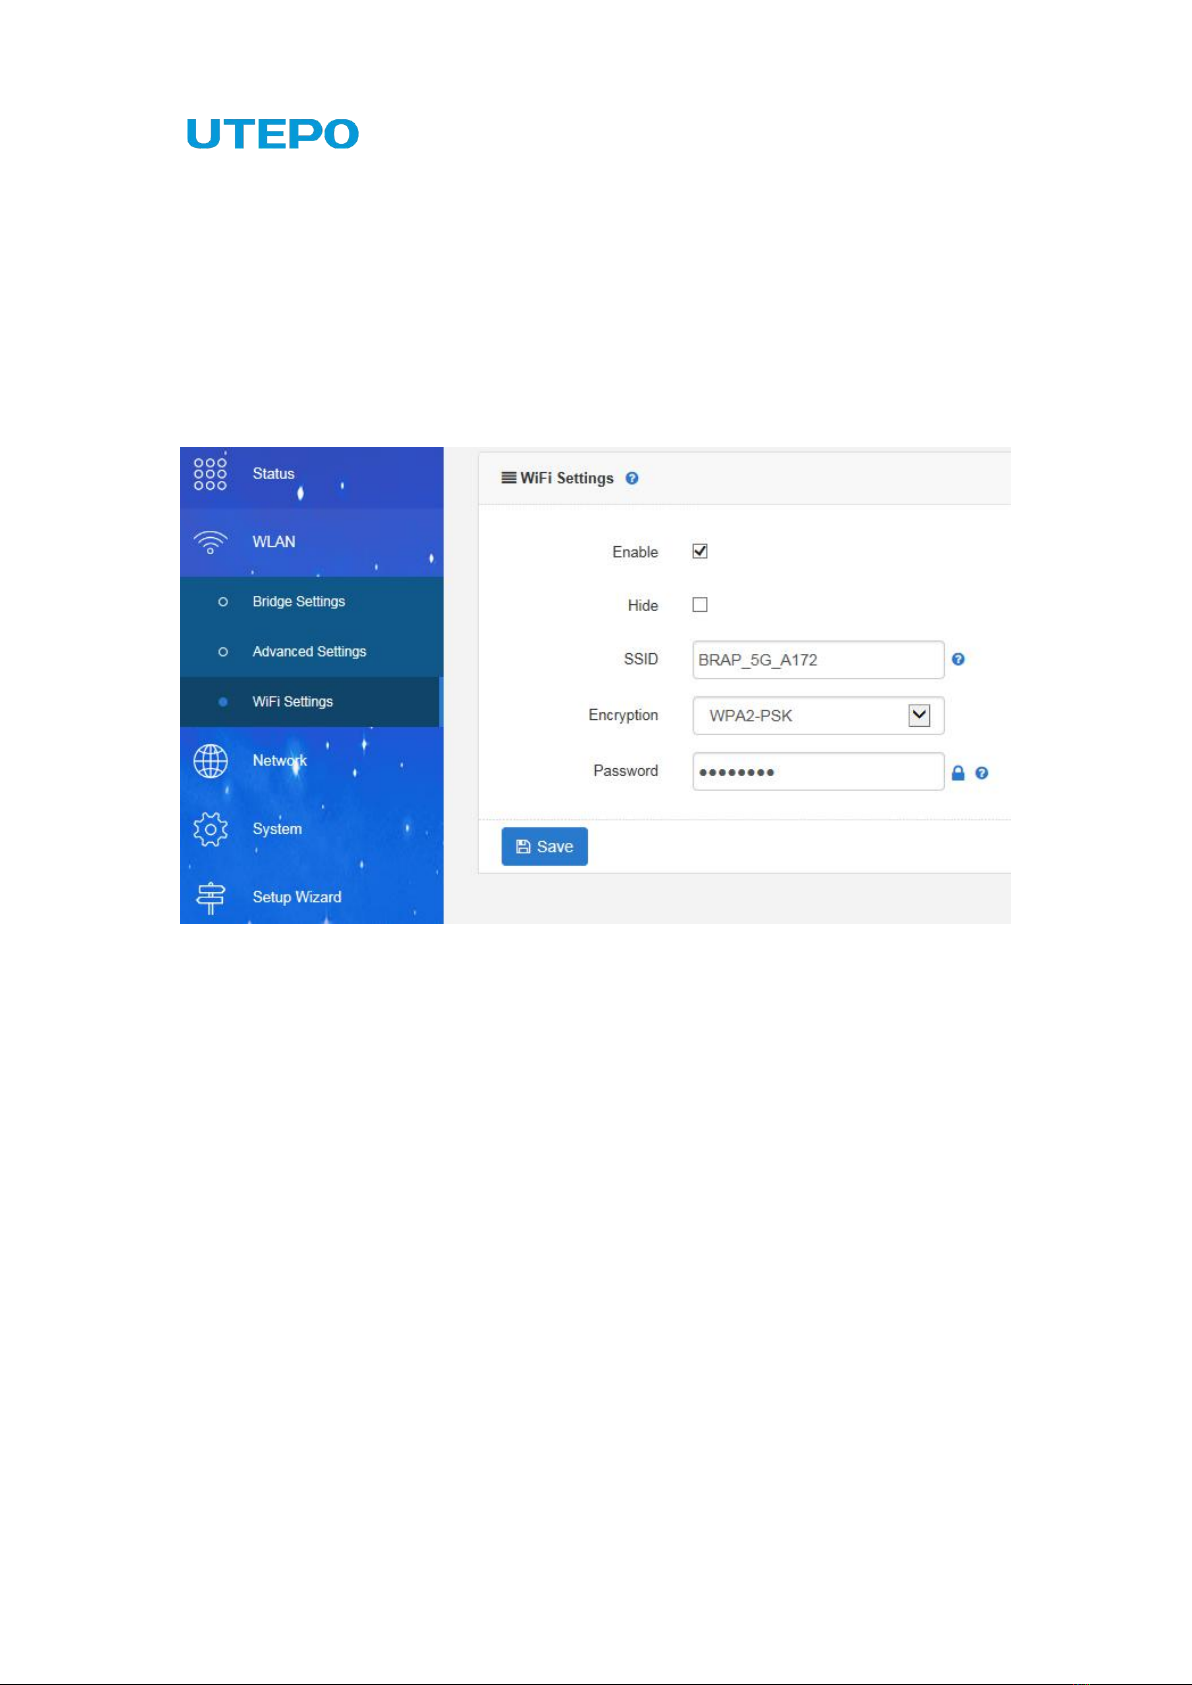
3. WiFi Settings...................................................................................................................... 10
Network............................................................................................................................................10
1. Network............................................................................................................................... 10
(1) Bridge Mode..............................................................................................................11
(2) Route Mode...............................................................................................................12
2. Cloud Management...........................................................................................................15
System............................................................................................................................................. 16
1. System.................................................................................................................................16
2. Change Password............................................................................................................. 16
3. Backup / Flash Firmware..................................................................................................17
4. Reboot................................................................................................................................. 18
Setup Wizard...................................................................................................................................18

Introduction
Thank you for choosing our product! This user manual is designed to guide you
through installation, management and maintenance of product.
1. Terms of Use
The “equipment”, “device” and “product” refer to the bridge if there is no other special
instructions. The configuration information, such as IP address, mentioned in the user
manual is just for reference, please configure the value according to practical application.
Please note that the product pictures showed in the manual are for reference, we would
update both hardware and software from time to time.
Overview
The product is suitable for various environment, like the elevator, power high-voltage lines,
wharf and expressway etc.
Feature:
Provide 2*10/100Mbps RJ45 ports.
Support cloud remote management.
Support launching function of radio signal.
Device Management
The user manual is for use with several models, the configuration steps are same.

1. Interface Instruction
DIP Switch: Bridge Access Point, Bridge Client
DC: Power input port, DC12V/1A.
Digital Switch / Reset: Channel 1 would be added by short pressing (the matching
configuration time is about 5s), reset to factory defaults by pressing in 15s.
LAN1/POE Port: PoE port for handling all user traffic and powering the device. The
port is used as the LAN port under bridge mode, and as WAN port under gateway mode.
LAN2 Port: For handling all user traffic, could connect with PC, cameras and
switches.
2. LED Indicator Instruction
SIG1、SIG2、SIG3、SIG4
Signal Indicator:
Bridge Access Point: Output Power
Indicator
< 17dBm (SIG1 ON)
17~19dBm (SIG1-SIG2 ON),
20~22dBm (SIG1-SIG3 ON),
> 23dBm (SIG1-SIG4 ON).
Bridge Client: Signal Strength Indicator
Failure Connection: Flowing
Successful Connection:
0~-65dBm (SIG1-SIG4 ON),
-66~-75dBm (SIG1-SIG3 ON),
-76~-85dBm (SIG1-SIG2 ON),
≤ -86dBm (SIG1 ON).
LAN1
Connected and data is under transmission
(Flicker)
Disconnection (OFF)
LAN2
Connected and data is under transmission
(Flicker)
Disconnection (OFF)
The device is under normal operation
(Flicker)
Power ON (ON)
Power OFF (OFF)
Digital Switch / Reset: Channel 1 would be
added by short pressing (Value Circulation:
0-9-A-F)

3. Pairing Configuration
(1) Point-to-point Pairing
①Configure one to bridge access point, and the other one to bridge client.
②Short pressing the “Digital Switch / Reset”, Channel 1 would be added by short
pressing (Value Circulation: 0-9-A-F).
③Set the same channel value for both two devices, then finished the pairing.
(2) Point-to-multipoint Pairing
①Configure one to bridge access point, and the another to bridge client.
②Short pressing the “Digital Switch / Reset”, Channel 1 would be added by short
pressing (Value Circulation: 0-9-A-F).
③Set the same channel value for both two devices, then finished the pairing.
④The max number of Client for 1 AP is 8.
(3) Radio Channel Comparison Table
Value
0
1
2
3
4
5
6
7
8
9
A
b
C
d
E
F
Channel
No.
1
2
3
4
5
6
7
8
9
10
11
28
32
36
40
44
Note: Please connect the device with the standard power cable in the package. The
device supports powered by PoE, which is convenient for wring deployment.
WEB Management
Login Steps for WEB Management:
1. Please connect the PC to the LAN port of the device.
2. Set static IP address as 169.254.254.253/16 to the PC
3. Open the browser and input the IP address 169.254.254.254 to enter the login UI.
4. Enter the bridge device list, which shows the bridges under same LAN. Click
corresponding address to login the device.

5. Input the user name and password to login (Default user name/ password: utepo/
utepo)
Status
It contains two parts, overview and routing list.
1. Overview
The page is including the status of system, bridge and interface, shown as below:

Note: the information of system status and interface traffic status would be updated in
every 5 seconds.
①CPU: Showing the current occupied CPU.
②Memory: Showing the current occupied memory.
WLAN
It contains three parts, bridge settings, advanced settings & WiFi settings.
1. Bridge Settings
User can set the wireless mode to bridge access point or bridge client from this page.

(1) Bridge Access Point
①Bridge SSID: name of bridge SSID.
②Bridge Password: Need to enter the same password to ensure the pairing.
③Wireless Protocol
④Wireless Bandwidth: 20MHz, 40MHz
⑤Wireless Channel
⑥Wireless TX Power
⑦Terminal Restrictions: Client Access Numbers. (Range: 1-8)
(2) Bridge Client
①Bridge SSID: Name of Bridged SSID, support manual filling or click “scanning
bridged network” to choose the SSID.

②Encryption: Encryption type of Bridged SSID (N/A, WPA2-PSK, WPA-PSK).
③Bridge Password: Password of bridged device.
④MAC: Used to bridge locked MAC address devices when the same bridge SSID
configuration exists.
⑤Wireless TX Power.
2. Advanced Settings
The default configuration for this page is as below:
①RTS/CTS Threshold: When the packet length exceeds the set threshold, the device
sends an RTS signal to the destination site for negotiation to prevent signal conflicts. Note:
Definition of input numbers: -1 (off) or 0-2347.
②Beacon Interval: Time interval of sending radio package. It is used to search for

wireless of client. Input number range: 15-65535.
③Slice Threshold: When the length of the packet exceeds the slice threshold, it will
be automatically divided into multiple packets. Too many packets will cause network
performance degradation. It is suggested that the slice threshold should not be set too low.
Note: Definition of input numbers: -1 (off) or 256-2346.
3. WiFi Settings
WiFi Configuration of the bridge itself.
①Enable: Enable/ Disable WiFi.
②Hide: Hide/ Show WiFi. If hide the WiFi, then you can not search for it.
③SSID: WiFi Name of the bridge.
④Encryption: Encryption type of WiFi Password. (N/A, WPA2-PSK, WPA-PSK)
⑤Password: Password of WiFi.
Network
It contains two parts, network & cloud management.
1. Network
Configuration for network in this page.

(1) Bridge Mode
Under the mode, the device works as a wireless HUB, achieving the communication
between wireless devices, wireless and wire devices, or wireless and WAN network.
There are two types of the access network, Obtain IP address and static IP address.

①Obtain IP address: Under the mode, it automatically gets the IP address assigned by
the superior gateway.
②Static IP Address: Under the mode, you need to set the information manually, including
IPv4 address, netmask, Gateway, DNS.
(2) Route Mode
Under the mode, the device works as a wireless router. Configuration information shown
as below:

①IP address and Netmask: The default IP address of LAN port is 172.16.0.1/16.
Please modify the IP address of the LAN port in the basic configuration list if needed, and
access the device with the new IP address.
②Enable DHCP: Enable / Disable DHCP. The default address range is from
172.16.0.100 to 172.16.8.99, total 2048 addresses.
③First IP address: The start IP address of DHCP.
④Last IP address: The end IP address of the DHCP.
⑤Leasetime: The lease of DHCP
⑥DHCP Client: Under the mode, it automatically gets the IP address assigned by the
superior router.
⑦PPPoE: Dial-up access, under this mode, you need to input the user name and
password provided by broadband providers.

⑧Static Address: Under the mode, you need to set the information manually,
including IPv4 address, netmask, Gateway, DNS.

⑨Gateway Hop: It needs to set the different hops for WANs, the smaller hop value
is , the higher priority is.
⑩MAC address & MTU: You can manually modify the MAC address and MTU of the
WAN
Note: Under the bridge client, there is only Bridge Mode in network of the bridge.
2. Cloud Management
It can add the device to cloud, which is convenient for remote access and management.

System
It contains four parts, system, change password, backup/ flash firmware & reboot.
1. System
Basic information can be set in this page, including local time, model & time zone.
2. Change Password
Change the login password of web management.

Note: it is recommended to change the router login password for network security.
3. Backup / Flash Firmware
Factory reset, download back up, restore backup and flash firmware.
①Factory reset: reset the device to factory default settings.
②Download backup: Download backup of current configuration
③Restore backup: Restore the backup to cover current configuration.

④Flash firmware: Click “Select” to upload the firmware to upgrade. When Click “Keep
settings”, the system would keep the all current settings, otherwise it will reset to factory
default.
⑤Cloud Upgrade: Online upgrade when there is a new version on the cloud server.
4. Reboot
It includes reboot immediately and timing reboot. There are three types in timing reboot,
according to day, week and month.
①Perform reboot: Click for reboot immediately
②Reboot: Set the timing for reboot according to demand.
Setup Wizard
The setup wizard facilitates the simple operation of the user on the device. It will
automatically pop up when users login for the first time. After that, if you want to conduct it,
you need to manually click "setup wizard".

①After clicking “next”, there are two wireless modes showing up, server mode & client
mode. You can select one according to your demand, then click “next”.

②There are two modes in network mode. You can select one according to your
demand, and finish the configuration then click “finish”.
a. DHCP Client: It automatically gets the IP address assigned by the superior router.
Table of contents
Other UTEPO Network Hardware manuals
Popular Network Hardware manuals by other brands

Allied Telesis
Allied Telesis AT-GS900/8 installation guide

IEI Technology
IEI Technology eMerge Enterprise Install and Setup Guide

Epiq Solutions
Epiq Solutions Sidekiq Z2 Getting started guide

MKC
MKC eNetIO-1-a quick guide

Wisstar
Wisstar WP-N6508-E2 user manual

PROEMION
PROEMION CANlink wireless 3000 Series Device manual

D-Link
D-Link MYDLINK DNR-322L datasheet

PMC-Sierra
PMC-Sierra PM7347 Features

BridgeWave
BridgeWave SLE100 installation manual

Cisco
Cisco Rack-Mount and Cable Mgmt. 7505/7010 installation instructions

Cambium Networks
Cambium Networks RFU-C installation guide

Ruijie
Ruijie RG-MUX-8LC Hardware installation and reference guide