ADJETIVO EN EN EE.UU.
Pieza #321906-000
• Tuberías de agua exibles de 12 pulg., manguitos, conectores de
compresión y cinta para roscas
Kit para instalación de
calentador de agua universal
HERRAMIENTAS NECESARIAS:
Dos llaves ajustables
PIEZAS:
Manguera para jardín
ARTÍCULO #0185259
MODELO #9008084046
Conectores de
compresión de
¾ pulg.
Llave para tubos
Destornillador de
cabeza plana
C. Método #3 Tubería PEX (polietileno reticulado)
Enrolle cinta para roscas en las roscas expuestas de los
conectores de tuberías del tamaño adecuado.
Con una llave para tubos, apriete los conectores de la tubería en
el extremo de los conectores de agua flexibles. Retire la tuerca de
compresión, el manguito y el accesorio de latón para la tubería
PEX. Coloque la tuerca en el extremo de la tubería PEX y fije el
manguito sobre la tubería. Inserte el accesorio de latón para la
tubería PEX en el extremo de la tubería PEX, como se muestra.
Coloque la tuerca, el manguito e inserte el ensamble de conexión sobre las roscas del conector y
apriete. Deslice el conector de la tubería de agua flexible sobre las roscas del ensamble de conectores
completo y apriete, como se muestra. Asegurándose de que está conectando caliente con caliente y
frío con frío, apriete los conectores flexibles a los manguitos recubiertos de plástico instalados en el
calentador de agua. Asegúrese de que todas las conexiones estén bien apretadas.
8. Verifique que la válvula de drenaje del calentador de agua nuevo esté cerrada. Luego, abra el suministro
de agua fría y deje que el calentador de agua se llene. Cuando el agua esté corriendo en un flujo
constante del grifo de agua caliente, ciérrela.
9. Verifique que no haya fugas, apriete si es necesario.
A. Método #1 Tubería roscada
Si tiene una tubería roscada de agua caliente y fría de ¾ pulg., los
conectores flexibles se conectan directamente. Envuelva la cinta
para roscas en las roscas de las tuberías de agua caliente y fría
de ¾ pulg. y luego, con una llave inglesa, atornille el conector de
agua flexible en forma hermética a cada tubería. A continuación,
use el mismo procedimiento (verificando que está conectando
caliente con caliente y frío con frío) y conecte los conectores
flexibles a los manguitos recubiertos de plástico instalados en el
calentador de agua, asegurándose de apretarlos para crear un sello hermético tanto en las conexiones
como en el calentador de agua.
B. Método #2 Tuberías de cobre
Enrolle cinta para roscas en las roscas expuestas de los conectores
de tuberías del tamaño adecuado. Con una llave inglesa, apriete
los conectores de la tubería en el extremo de los conectores de
agua flexibles. Retire la tuerca de compresión y el manguito de
compresión y colóquelos sobre el extremo de la tubería de agua
de cobre, como se muestra. Inserte el extremo del conector de
tuberías y el ensamble del conector de agua flexible en el extremo
de la tubería de agua. Deslice la tuerca de compresión y el manguito de compresión sobre las roscas
del conector de tuberías y apriete. Asegurándose de que está conectando caliente con caliente y frío
con frío, apriete los conectores flexibles a los manguitos recubiertos de plástico instalados en el
calentador de agua. Asegúrese de que todas las conexiones estén bien apretadas.
Extremo roscado
Conexiones de la tubería roscada
Conector flexible para
tuberías de agua
Conexiones de tuberías de cobre
Cuerpo del conector
Tuerca de
compresión con
manguito
Tubería de cobre
Conector flexible
para tuberías
de agua
IMPORTANTE: El calentador de agua debe contar con puesta a tierra mediante el tornillo verde de
puesta a tierra cercano a la abertura de acceso. Si su cableado de servicio tiene sólo 2 cables, se debe
conectar un cable del tamaño adecuado desde el tornillo verde de puesta a tierra hasta un dispositivo
de puesta a tierra metálico ininterrumpido.
Conexiones de la tubería PEX
Cuerpo del conector
Tuerca de
compresión con
manguito
Tubería PEX
Flexible Connector
For Water Lines
Cubierta De
La Caja De
Unión
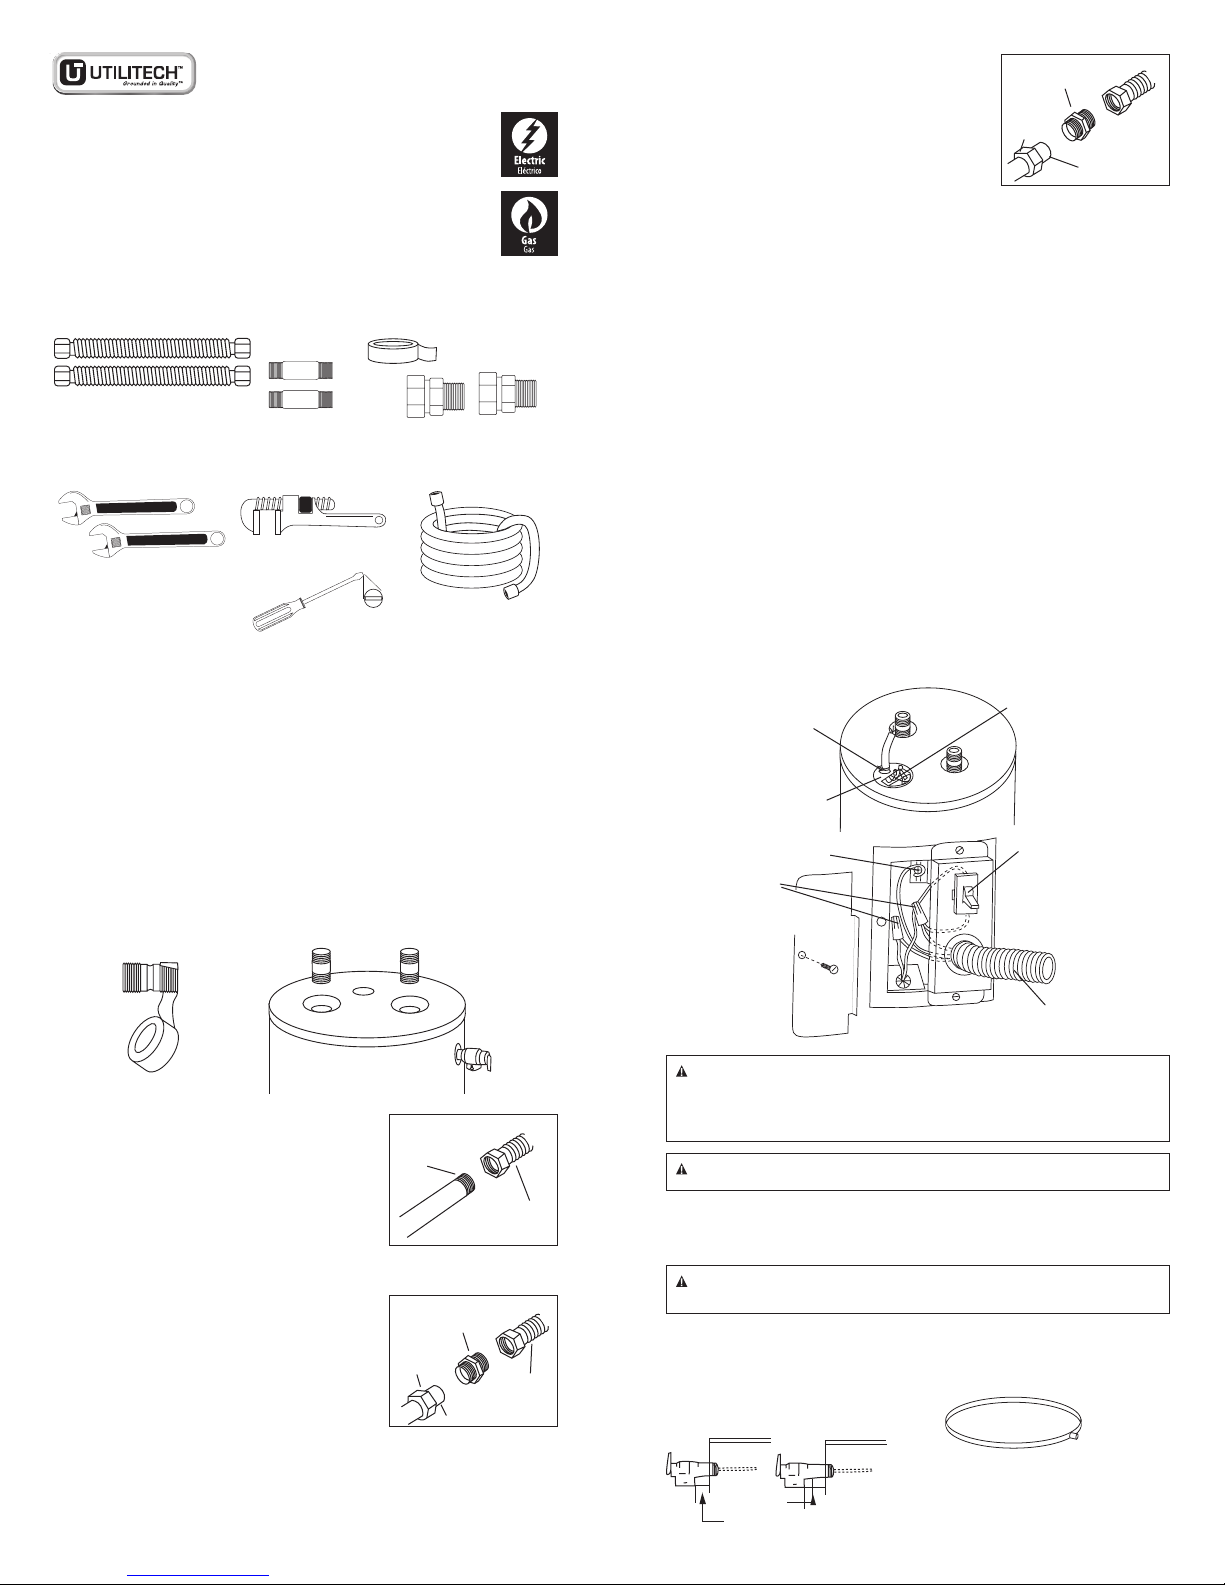
CONEXIÓN DE LA ALIMENTACIÓN ELÉCTRICA AL CALENTADOR DE AGUA NUEVO
Asegúrese de que la alimentación eléctrica esté APAGADA antes de trabajar en el calentador de agua.
1. Retire la cubierta de la abertura de acceso de la caja de unión en el calentador eléctrico de agua nuevo.
2. Retire la tuerca de la abrazadera para conducto e inserte el extremo roscado de la abrazadera en
el orificio pequeño cercano a la abertura de acceso. Con la tuerca en la mano, atornille la tuerca
en la abrazadera para conducto desde la parte inferior de la abertura. Apriete la tuerca usando un
destornillador de cabeza plana para presionar el borde ranurado.
3. Verifique que la electricidad esté CORTADA. Inserte el cable de suministro eléctrico por la abrazadera de modo
que 7,62 a 10,16 cm del cable se asome por la abertura de acceso. Apriete los dos tornillos de la abrazadera
para asegurar el cableado.
4. De ser necesario, pele el revestimiento y el aislamiento de los cables para que se expongan 1,27 cm
de ambos cables. Con los empalmes plásticos provistos, conecte los cables de suministro al cableado
del calentador de agua. (Consulte las instrucciones del cableado del calentador de agua nuevo para
asegurarse de que conectará los correctos).
5. Mire la placa de clasificación del calentador de agua nuevo para determinar su clasificación de voltaje.
6. Si el calentador de agua está dentro del rango de 208 a 240 voltios, consulte los diagramas de cableado para 240
voltios del manual de instrucciones.
7. Si el calentador de agua está dentro del rango de 110 a 120 voltios, consulte los diagramas de cableado para 120
voltios del manual de instrucciones.
PRECAUCIÓN: Algunas tuberías de agua pueden tener tubos y conectores no metálicos.
Conexiones Con
Empalmes Plásticos
Tornillo Verde De
Puesta A Tierra
Abrazadera De
Cables
Interruptor De
Encendido/Apagado
(Sólo En Los Modelos
De 120 Voltios)
Conducto Al Suministro
De Electricidad
Verifique que la válvula de drenaje del calentador de agua nuevo esté cerrada. Luego, abra el suministro de
agua fría y deje que el calentador de agua se llene. Cuando el agua esté corriendo en un flujo constante del
grifo de agua caliente, ciérrela. Revise que no haya fugas en todas las conexiones y apriete si es necesario
PRECAUCIÓN: No active la electricidad hasta que el calentador de agua esté completamente lleno de
agua y el aire se haya purgado del tanque.
OTRAS CONSIDERACIONES
1. Si su calentador de agua nuevo no viene
equipado con una válvula de descarga de
temperatura y presión, deberá comprar
una e instalarla en el calentador de agua.
2. Es posible que deba instalar una bandeja de drenaje
debajo del calentador de agua nuevo para evitar daños
causados por agua si el tanque o cualquier conexión
tienen una fuga.
Largo Del
Vástago
INSTRUCCIONES DE INSTALACIÓN
1. Corte el suministro eléctrico o de gas del calentador de agua.
2. Corte el suministro de entrada de agua fría del calentador de agua.
3. Abra un grifo de agua caliente cercano y déjelo abierto.
4. Conecte una manguera de drenaje a la válvula de drenaje del calentador de agua y hágalo correr a un
drenaje adecuado. Abra la válvula de drenaje y deje que el calentador de agua se drene.
5. Encontrará instrucciones detalladas para la extracción del calentador de agua antiguo y ubicar el nuevo
en el manual de instalación e instrucciones del calentador de agua nuevo. Con el calentador de agua
nuevo en su lugar, continúe con estas instrucciones para las tuberías de agua. NOTA: Si tiene tuberías
de cobre que desconectar, córtelas aproximadamente 30,48 cm desde la parte superior del calentador
de agua.
6. Envuelva la cinta para roscas en las roscas de los dos manguitos recubiertos de plástico y atorníllelos
en los conectores de agua caliente y fría del calentador de agua, a menos que su calentador de agua ya
cuente con retenedores de calor o si los manguitos ya están instalados (consulte las instrucciones del
calentador de agua nuevo).
7. Este kit para instalación conecta el calentador de agua con las tuberías de agua caliente y fría mediante
uno de los tres métodos que se describen a continuación:
Conectores de agua flexibles Manguitos de
conservación
de calor
Cinta para roscas


