Vacron VFH-8335I User manual

Speed Dome
OSD Operation Manual
(Using VFH-8330M 2.0M 33X Zoom Module)
2016 JUN V1.0

CONTENTS
1. Speed Dome OSD MENU Tree ................................................................................ 1
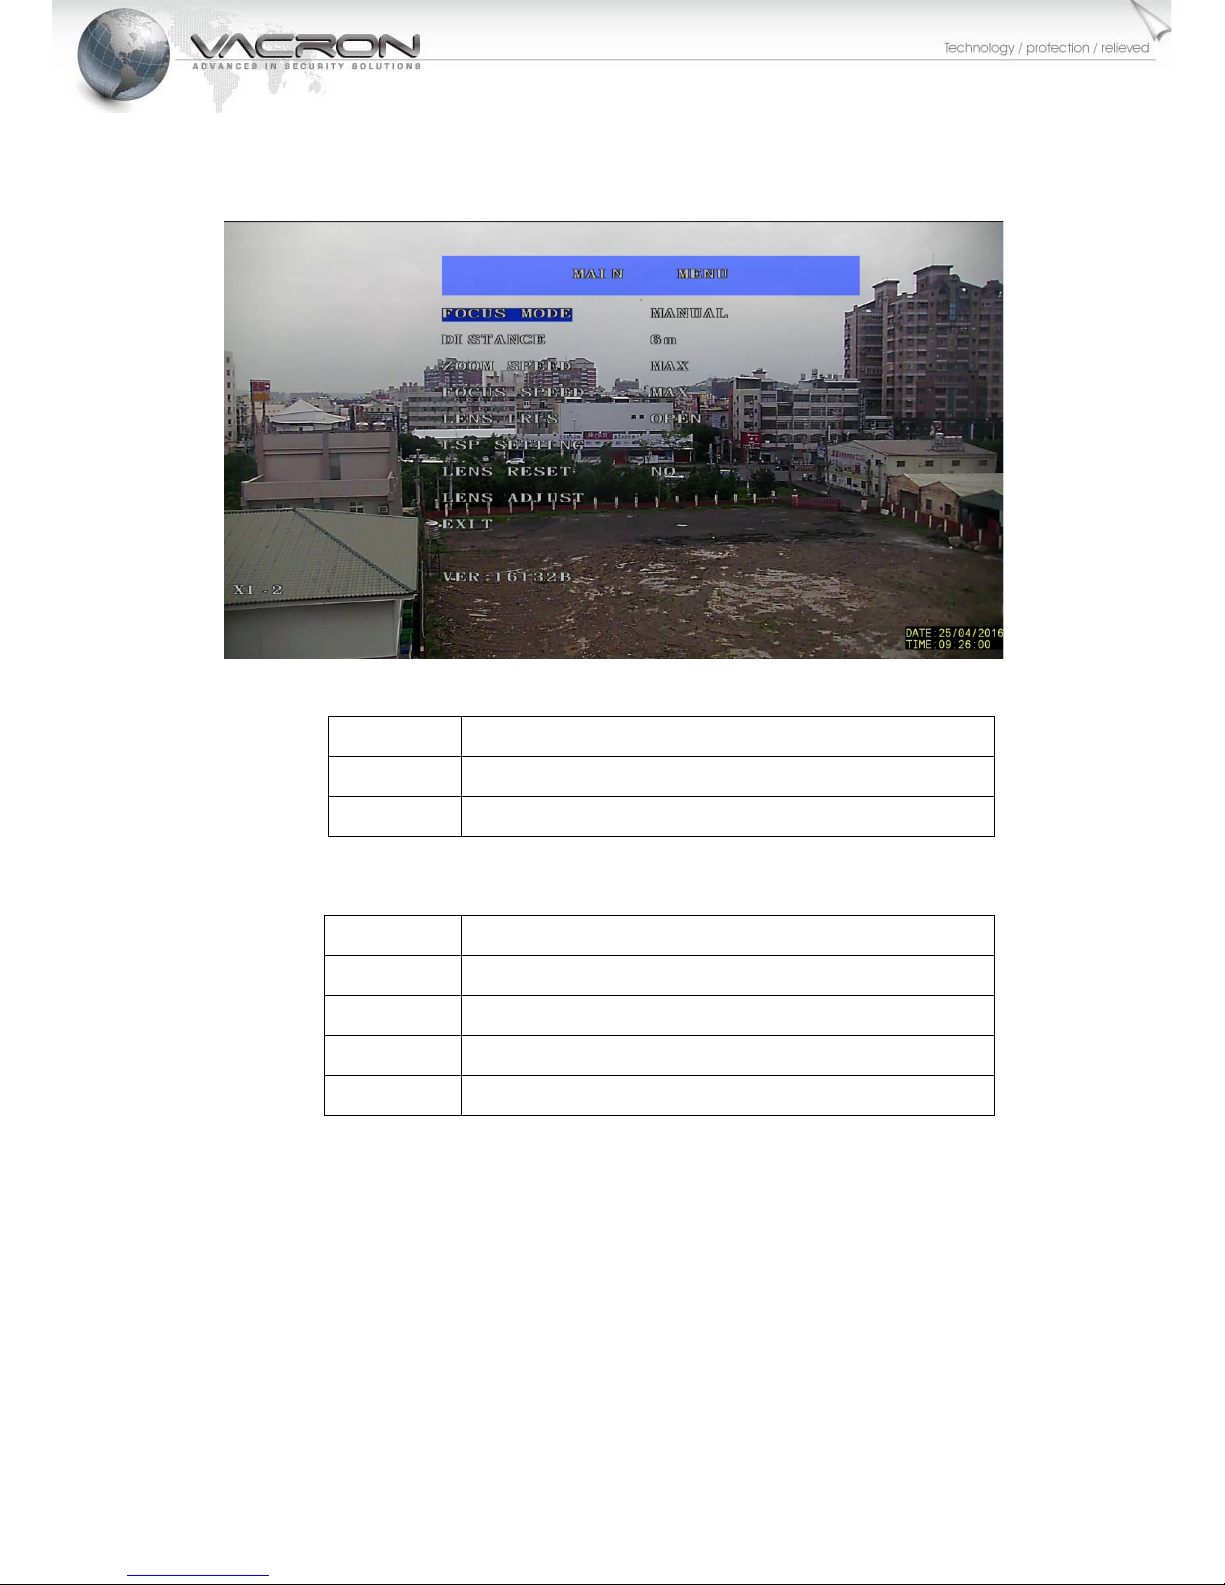
2. Speed Dome Main Menu(OSD MENU) ................................................................ 5
2.1 FOCUS MODE ........................................................................................................... 5
2.2 DISTANCE .................................................................................................................. 5
2.3 ZOOM SPEED ........................................................................................................... 5
2.4 FOCUS SPEED ........................................................................................................... 5
2.5 LENS IRIS .................................................................................................................... 6
2.6 ISP SETTING............................................................................................................... 6
2.7 LENS RESET ................................................................................................................ 6
2.8 LENS ADJUST ............................................................................................................ 6
2.9 EXIT ............................................................................................................................... 6
3. Speed Dome ISP MENU ............................................................................................. 7
3.1 EXPOSURE ................................................................................................................. 7
3.2 BACKLIGHT ................................................................................................................ 9
3.3 WHITE BAL .............................................................................................................. 12
3.4 DAY & NIGHT ........................................................................................................ 14
3.5 NR Noise Reduction function. ........................................................................ 14
3.6 SPECIAL Special functions. ............................................................................... 16
3.7 ADJUST ..................................................................................................................... 27

1
1. Speed Dome OSD MENU Tree
Main Menu Settings
FOCUS MODE AUTO (always focus)
PUSHAF (one focus)
MANUAL
DISTANCE 0.1m
1m
2m
3m
6m
ZOOM SPEED MIN
+1
+2
+3
MAX
FOCUS SPEED MIN
+1
+2
+3
MAX
LENS IRIS OPEN
F1.6
F2.8
F4.0
F5.6
F8.0
F11
F16
F22
F32
CLOSE
ISP SETTING Image Processing Menu (ISP MENU)
LENS RESET Optic Setting Default(Not Including ISP MENU)

2
LENS ADJUST Developer Mode(Do Not Change)
EXIT Leave Main Menu
ISP MENU
EXPOSURE SHUTTER 1/30 ~ 1/50000, X2~X30, FLK,AUTO
AGC 1~15
SENS-UP OFF / AUTO SENS-UP X2~X30
BRIGHTNESS 1~100
D-WDR ON / OFF
DEFOG OFF / ON POS/SIZE
GRADATION:OFF/LOW/MI
DDLE/HIGH
DEFAULT
BACKLIGHT WDR GAIN : LOW/MIDDLE/HIGH
WDR OFFSET : 0~60
BLC GAIN : LOW/MIDLE/HIGH
AREA
DEFAULT
HSBLC SELECT : AREA1~AREA4
DISPLAY:OFF/
ON
POSITION
SIZE
LEVEL 1~100
MODE ALL DAY / NIGHT
BLACK MASK ON/OFF
DEFAULT
OFF
WHITE BAL AWB
ATW
AWC --> SET
INDOOR
OUTDOOR
MENUAL BLUE :1~100
RED:1~100
DAY&NIGHT COLOR
B/W

3
NR 2DNR
3DNR
SPECIAL CAM TITLE
D-EFFECT
FREEZE : OFF / ON
MIRROR MIRROR
V-FLIP
ROTATE
D-ZOOM D-ZOOM X1.0~ X62
PAN & TILT
DEFAULT
SMART
D-ZOOM
SELECT: AREA1, AREA2
DISPLAY ON
SENSITIVITY 0~60
D-ZOOM X1.0 ~ X62
TIME 0~15
DEFAULT
NEG. IMAGE OFF / ON
DIS OFF / ON
MOTION OFF / ON SELECT : AREA1 ~ AREA 4
DISPLAY : OFF / ON
SENSITIVITY :
MOTION VIEW ON / OFF
DEFAULT
PROVACY OFF/ ON SELECT: AREA1 ~ AREA 8
DISPLAY: COLOR / INV.
/MOSAIC
COLOR : 0~15
TRANS.: 0~3
DEFAULT
LANGUAGE ENG/JPN/CHN1/CHN2/KOR/GER/FRA/ITA/SP
A/POL/RUS/POR/NED/TUR/HEB/ARB
DEFECT LIVE DPC
AUTO/OFF/ON
LEVEL 1~100
STATIC DPC START
LEVEL : 0~60
SENS – UP : X2~X30
AGC : 0~8
VERSION

4
RETURN
ADJUST SHARPNESS 0~15
MONITOR LCD / CRT GAMMA
ADAPT.LEVEL
BLUE GAIN
RED GAIN
LSC ON / OFF
VIDEO.OUT NTSC / PAL
RESET FACTORY RESET(Default value) / CHANGE(Use current
settings as default value)
EXIT

5
2. Speed Dome Main Menu(OSD MENU)
2.1 FOCUS MODE
AUTO Automatically re-focus when object changes.
PUSHAF Focus once at same location.
MANUAL Fixed focus, no automatic re-focusing.
2.2 DISTANCE
0.1m The distance of object is at 0.1 meter.
1m The distance of object is at 1 meter.
2m The distance of object is at 2 meter.
3m The distance of object is at 3 meter.
6m The distance of object is at 6 meter or above.
2.3 ZOOM SPEED
MIN / +1 / +2 / +3 / MAX
Change optical zoom adjusting speed settings.
2.4 FOCUS SPEED
MIN / +1 / +2 / +3 / MAX
Manually change re-focus adjusting speed settings.

6
2.5 LENS IRIS
CLOSE/F32/F22/F16/F11/F8.0/F5.6/F4.0/F2.8/F2.0/F1.6/OPEN
Change Aperture size.
2.6 ISP SETTING
Enter ISP MENU(Image Processing Menu) (Visit Chapter 3.ISP
MENU for more info).)
2.7 LENS RESET
Switch to YES then hit ENTER to restore main menu default value
(except ISP value), the system will also default its optic position.
(Please avoid lens reset under strong lighting condition).
2.8 LENS ADJUST
Hit ENTER 6 times consecutively (on keyboard) to enter Developer
Mode, this will disable some advance functions. (Please do not
enter this mode without consulting your supplier)
2.9 EXIT
Leave OSD MENU Main Menu. (OSD MENU will close after 20
seconds of inactivity)

7
3. Speed Dome ISP MENU
(Choose ISP SETTING in Main Menu to display below functions)
3.1 EXPOSURE
Press ENTER to display below functions:
3.1.1 SHUTTER : AUTO, 1/60, FLK, 1/240, 1/480, 1/1000, 1/2000,
1/5000, 1/10000, 1/50000, X2, X4, X6, X8, X10, X15, X20, X25,
X30。
Adjust shutter exposure time (seconds), FLK is used for
flicker control (need aperture changed accordingly)
X2 ~ X30 is slow shutter function (This function will increase
image visibility in very dark environment).

8
3.1.2 AGC : 0 ~ 15
Auto Gain Control, it will automatically increase brightness
when image becomes too dark, the noise signals could also
be increased as a result.
3.1.3 SENS-UP: AUTO , OFF
OFF is to turn off this function.
AUTO is to automatically turn on SLOW SHUTTER
function,press ENTER to adjust the illumination level
settings (X2 ~ X30).
3.1.4 BRIGHTNESS : 1 ~ 100
Overall brightness setting.
3.1.5 D-WDR : ON, OFF
OFF is turn off Wide Dynamic Range function.
ON is turn on the Wide Dynamic Range function, this will
improve image quality under strong overcastting shadow.

9
3.1.6 DEFOG : ON, OFF
OFF is turn off this function
ON is turn on the defog function, useful in image obscured
by foggy, smoky and dusty condition.
3.1.7 RETURN:RET, END
Choose RET then press ENTER will go back to the previous
page of ISP MENU.
Choose END then press ENTER will go back to Main Menu.
3.2 BACKLIGHT
OFF, WDR, BLC, HSBLC
Image processing functions.
(a) Original lmage (b) DWDR ON

10
3.2.1 OFF: Turn off the Backlight compensation function.
3.2.2 WDR : GAIN, WDR OFFSET
Wide Dynamic Range compensation function, press ENTER to
access WDR Settings below.
GAIN : LOW, MIDDLE, HIGH, adjust WDR enhancement level.
WDR OFFSET : Adjust WDR calibration range between 0 ~ 60.

11
3.2.3 BLC : GAIN, AREA, DEFAULT.
Backlight compensation, press ENTER to access BLC settings.
GAIN : Choose LOW, MIDDLE, HIGH to adjust back light
compensation level.
AREA : Press ENTER to adjust compensating area, BLC function
will start when the selected area becomes too dark.
DEFAULT : Press ENTER to restore BLC setting to default value.
3.2.4 HSBLC : SELECT, DISPLAY, LEVEL, MODE, BLACK MASK,
DEFAULT
When Highlight Suppression Back Light Compensation is
enabled, camera will mask highlight sources in black color
(suppress) and initiate BLC function, this function is ideal for
license plate recognition. Press ENTER to access HSBLC
settings.
SELECT:AERA1, AERA2, AERA3, AERA4 select from 4 HSBLC

12
area types.
DISPLAY: OFF is to turn off the HSBLC function for a certain
area.
ON press ENTER to turn on and adjust area sizes and
positions.
LEVEL: Select illumination threshold (0~100) to start HSBLC
function.
MODE:NIGHT NIGHT turn on HSBLC only at night time.
ALL DAY turn on HSBLC for day and night.
BLACK MASK: OFF is to turn off black mask function.
ON is to turn on black mash function.
DEFAULT: press ENTER to restore HSBLC setting to default
value.
3.3 WHITE BAL
AWB, ATW, AWC->SET, INDOOR, OUTDOOR, MANUAL
Automatic White Balance setting page as below.
3.3.1 AWB: Auto White Balance, balance white shade level to
make the picture closer to a balanced color
temperature, the setting will adjust when reaching
threshold.
3.3.2 ATW: Auto Tracking White Balance, the sensor will

13
automatically track changes in color temperature, and
adjust until reaching white balance.
3.3.3 AWC->SET : Auto White Balance Capture, press to ENTER to
capture current color temperature as AWB
value.
3.3.4 INDOOR: Use the default indoor color temperature setting
for AWB.
3.3.5 OUTDOOR: Use the default indoor color temperature setting
for AWB.
3.3.6 MANUAL: Press ENTER to manually select blue/red ratio on
color temperature scale.
BLUE Blue color inclination setting value 0~100.
RED Red color inclination setting value 0~100.

14
3.4 DAY & NIGHT
Day & Night mode switches, this is control by the sensor
onboard Speed Dome automatically.
AUTO : Auto mode, let sensors onboard Speed Dome decide.
Color : When good lighting condition is present, Speed Dome will
set to color mode and filter out infrared light.
B/W : When lighting condition is poor, Speed Dome will set to
black & white, and switch to accept infrared light.
EXT: Exit without change, let Speed Dome sensor decide.
3.5 NR Noise Reduction function.

15
Press ENTER to access Noise Reduction function setting page
below.
2DNR : Choose OFF to turn off 2D de-noise function.
Choose ON to turn ON 2D de-noise function.
3DNR : Choose OFF to turn off 3D de-noise function.
Choose ON to turn on 3D de-noise function, press ENTER
to access 3D de-noise function settings.

16
3.6 SPECIAL Special functions.
Press ENTER to access special function as page below.
3.6.1 CAM TITLE : Camera displayed name settings.
OFF Turn off camera name display.
ON Turn on camera name display, press ENTER to access
character selection as below page.

17
Choose or : Press ENTER to edit character.
Choose CLR: Press ENTER to clear all character selected.
Choose POS: Press ENTER to change camera name position.
Choose END: Press END to exist camera naming function.
3.6.2 D-EFFECT : Digital Effect settings.
Press ENTER to access digital effect settings as page below.

18
3.6.2.1 FREEZE : Choose ON to freeze on current frame, the
camera does not record new frame.
3.6.2.2 MIRROR: OFF, MIRROR, V-FLIP, ROTATE
Choose OFF: No rotate effect.
Choose MIRROR : Display footage in mirror (left side
becomes right side).
Choose V-FLIP: Vertical Flip footage.
Choose ROTATE : Rotate picture 180 degree.
P.S. Speed Dome will automatically choose suitable display method according
to CPU performance.
3.6.2.3 D-ZOOM : Digital zoom function.
OFF is to turn off the digital zoom.
ON is to turn on the digital zoom, press ENTER to access
digital zoom setting as below.
Table of contents
Other Vacron Security Camera manuals