Valex DE2700 User manual

Final dimension: A5
S491998
13.12.2018
DE2700
ATTENZIONE! Prima di usare la macchina, leggete e comprendete le istruzioni di sicurezza e le istruzioni d’uso fornite
WARNING! Before using the machine, read and understand the supplied safety instructions and operating instructions
Decespugliatore elettrico
ISTRUZIONI D’USO
Istruzioni originali
Electric brushcutter
OPERATING INSTRUCTIONS
Translation of the original instructions


- 8 -
i
Prima di impiegare questo prodotto legge-
te tutte le istruzioni di sicurezza e le istruzioni
d’uso allegate.
Prima di iniziare il lavoro prendete familiarità
con i comandi e con il corretto uso della
macchina assicurandovi di saperla arrestare
in caso di emergenza. L’uso improprio della
macchina può provocare gravi ferite.
Pensate sempre alla vostra e altrui sicurezza e
comportatevi di conseguenza. Conservate con
cura ed a portata di mano queste istruzioni.
ATTENZIONE! La macchina è idonea solo per
tagliare erba nei giardini e lungo i bordi delle
aiuole. Ogni altro impiego, diverso da quello
indicato in queste istruzioni, può recare danno
alla macchina e costituire serio pericolo per
l’utilizzatore.
ATTENZIONE! Esclusivamente per uso hob-
bistico.
DESCRIZIONE MACCHINA (FIG.A)
1 Impugnatura superiore
2 Interruttore
3 Fermacavo
4 Cavo di alimentazione
5 Impugnatura centrale
6 Scocca
7 Rocchetto e coprirocchetto
8 Feritoie di ventilazione
9 Protezione
10 Lametta tagliafilo
11 Tracolla
12 Elemento di taglio
13 Pulsante di sicurezza
14 Nottolino blocca tubo
15 Utensile cambio organo di taglio
16 Barriera
17 Volantino di bloccaggio
DESCRIZIONE MARCATURE E SIMBOLI (FIG. B)
1 Modello macchina
2 Dati tecnici
3 Numero di matricola e anno di fabbricazione
della macchina
4 Marcatura di conformità CE
5 Macchina a doppio isolamento elettrico
6 I rifiuti elettrici ed elettronici possono con-
tenere sostanze pericolose per l’ambiente e
per la salute umana; non devono pertanto
essere smaltiti con quelli domestici ma me-
diante una raccolta separata negli appositi
centri di raccolta o riconsegnati al venditore
nel caso di acquisto di una apparecchiatura
nuova anologa. Lo smaltimento abusivo dei
rifiuti comporta l’applicazione di sanzioni
amministative
7 Livello di potenza sonora
MESSA IN SERVIZIO (FIGG.C1, C2, C3, C4, C5)
ATTENZIONE ! Prima di ogni controllo o ma-
nutenzione, staccate la spina dalla presa di
alimentazione.
ATTENZIONE! Durante questa operazione fate
attenzione alla lametta tagliafilo, potreste ferirvi.
La macchina può essere fornita con alcuni com-
ponenti smontati. Per il loro montaggio seguite
le seguenti istruzioni.
MONTAGGIO IMPUGNATURA CENTRALE (FIG. C1)
a. Fissare la barriera sulla maniglia centrale con
le viti in dotazione
b. Inserire la maniglia nel tubo centrale
c. Bloccarla nella posizione desiderata tramite
il volantino.
Nota: Verificare che la barriera (fig.A, 19) sia
montata a sinistra del tubo.
MONTAGGIO DELLA PROTEZIONE (FIG. C2)
ATTENZIONE! Nella protezione lato interno
è fissata una lametta che ha la funzione di
tagliare il filo troppo lungo. Maneggiatela con
attenzione ed indossate i guanti protettivi.
ATTENZIONE! Prima di utilizzare la macchina,
rimuovere la protezione della lametta tagliafilo
a. Fissare il supporto della protezione alla
coppia conica con le viti i dotazione.
b. Fissare la protezione al supporto con le viti in
dotazione e rimuovere la copertura protettiva
sul tagliente della lametta.

- 9 -
MONTAGGIO TUBO INFERIORE (FIG. C3)
Premere il nottolino (14) e inserire il tubo in-
feriore in quello superiore fino all’innesto del
nottolino nel foro. Avvitare a fondo il volantino
di bloccaggio (17).
NOTA: Ruotare a mano il rocchetto durante
la fase di inserimento del tubo per facilitare
l’operazione.
MONTAGGIO DEL ROCCHETTO (FIG. C4)
a. capovolgete la macchina con la protezione
rivolta verso l’alto e inserite il distanziatore (1)
b. inserire e la flangia (2)
c. inserite la chiave a brugola in dotazione
attraverso il foro di bloccaggio presente
sulla flangia
d. avvitare il rocchetto in senso anti orario
mantenendo la chiave in posizione
AGGANCIO DELLA TRACOLLA (FIG. C5)
Aprite il moschettone posto sulla tracolla (11) ed
agganciatelo alla macchina come indicato in figura.
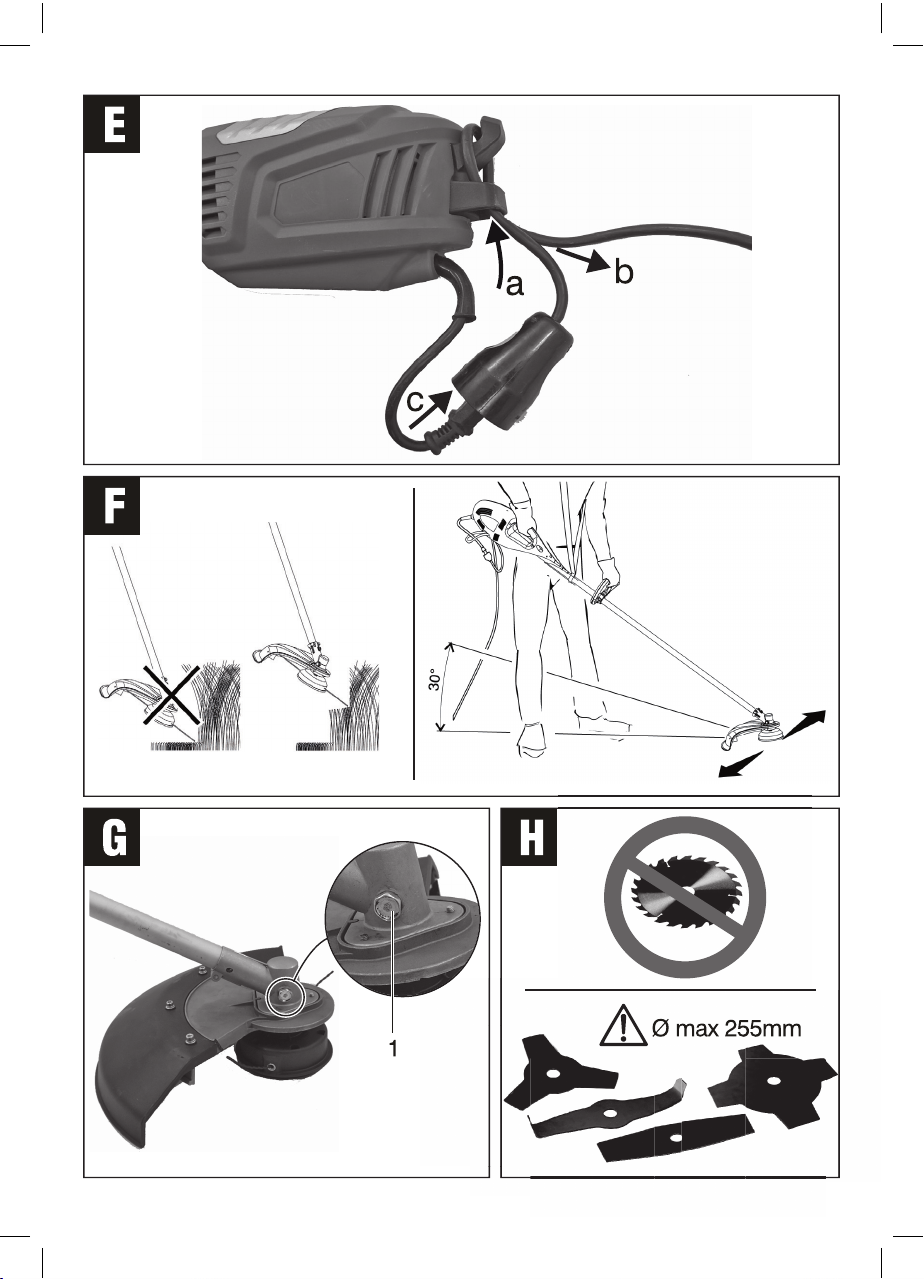
MONTAGGIO DELLE LAME (OPZIONALI)
Attenzione! È vietato installare dischi sega.
Sulla macchina possono essere installate lame
metalliche di vario tipo purché il diametro mas-
simo non superi i 255mm.
Per installare le lame è necessario utilizzare il
kit fissaggio fornito separatamente (codice
riportato nelle specifiche tecniche) e seguire le
figure ‘MONTAGGIO LAME’
AVVIAMENTO E ARRESTO
Prima di ogni uso verificate l’integrità della mac-
china e la lunghezza del filo di taglio seguendo
le indicazioni di seguito riportate:
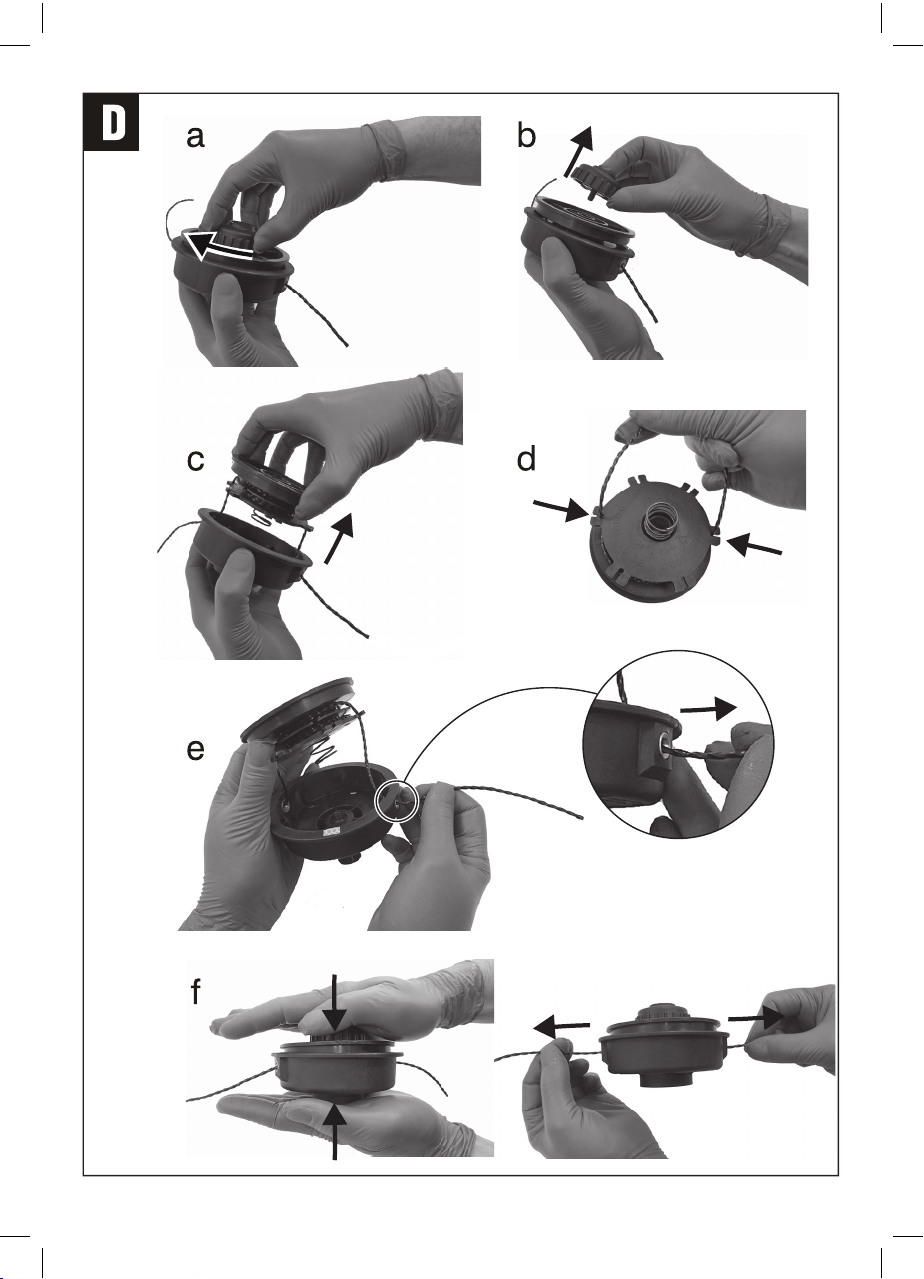
a. Verificate che il filo di taglio tocchi od oltre-
passi il bordo della protezione. Se il filo di
taglio non raggiunge la lunghezza necessa-
ria, premete il tasto con un dito e contem-
poraneamente tirate il filo di nylon (fig. Df).
Per le regolazioni successive durante l’uso
della macchina, battete leggermente il tasto
del rocchetto sul terreno mantenendo la
macchina in funzione. Otterrete così l’auto-
regolazione della lunghezza del filo di nylon.
b. Effettuate le eventuali regolazioni di lunghez-
za macchina e inclinazione testa di taglio.
c. Collegate la spina della macchina alla presa
del cavo prolunga ed agganciate la stessa
all’agganciocavo (fig.E). Impugnate con
sicurezza la macchina e, senza farla entrare
in contatto con l’erba da tagliare, premete
l’interruttore (2) situato nell’impugnatura
superiore; se presente premete prima il
pulsante di sicurezza (13). Fate funzionare
a vuoto per alcuni istanti la macchina: effet-
tuerete così l’assestamento del filo di taglio.
d. Eseguite il lavoro di taglio erba.
e. Spegnete la macchina rilasciando l’interrut-
tore di accensione.
ATTENZIONE! Dopo lo spegnimento della
macchina l’elemento di taglio ruota ancora
per alcuni secondi.
AVVERTENZE E CONSIGLI D’USO
ATTENZIONE! Non utilizzate la macchina senza
protezione (se fornita separata).
ATTENZIONE! Il filo corto od usurato dà un bas-
so rendimento di taglio quindi, a seconda del
caso, seguite le istruzioni per la regolazione
della sua lunghezza come indicato nel capitolo
“AVVIAMENTO E ARRESTO” o sostituitelo se-
guendo le indicazioni del capitolo successivo.
Procedete con calma e seguite attentamente le
indicazioni di seguito riportante:
- prima di iniziare il lavoro assicuratevi che l’area
da tagliare sia priva di sassi, detriti, fili ed altri
oggetti estranei.
- avviate la macchina prima di avvicinarvi all’erba
da tagliare.
- tagliate l’erba facendo oscillare a destra e a sinistra
la macchina ed avanzate lentamente tenendola
inclinata in avanti di circa 30° (fig.F).
- l’erba alta va tagliata a strati partendo sempre
dall’alto (fig.F).
- non tagliate erba umida o bagnata.
- non lavorate in modo da sovraccaricare la
macchina.
- non usurate rapidamente il filo urtando contro
ostacoli rigidi (sassi, muri, staccionate ecc.)
ma usate il bordo della protezione per mante-
nere la macchina alla giusta distanza.
- Prestate attenzione al contraccolpo e alla
reazione della lama nel caso di urto contro
ostacoli rigidi.
- Per non danneggiare il cavo di prolunga, evitate
di passarci sopra con la macchina in moto e
mantenetelo sempre in posizione sicura dietro
alle vostre spalle.

- 10 -
SOSTITUZIONE DEL ROCCHETTO (FIG.D)
ATTENZIONE! Per la sostituzione, utilizzate
solamente parti originali.
Prima di procedere osservate attentamente i
componenti e la fig.D.
Se non avete dimestichezza con la manipolazio-
ne e l’assemblaggio di componenti meccanici, vi
consigliamo di rivolgervi ad un centro assistenza
autorizzato.
Indossate i guanti a protezione delle mani.
1) Togliete la presa di corrente dalla macchina.
2) Capovolgete la macchina con la protezione
rivolta verso l’alto.
3) Sostituite il dispositivo di taglio come di
seguito indicato:
- Con una mano tenete bloccato il porta roc-
chetto e con l’altra svitate completamente il
volantino centrale ruotandolo in senso orario
(fig.Da).
- Estraete il volantino (fig.Db) e togliete il roc-
chetto vuoto (fig.Dc).
- Pulite accuratamente l’interno del porta roc-
chetto e della cuffia mantenendolo la molla
nella sua posizione.
- Approntate il nuovo rocchetto bloccando i fili
nelle relative sedi (fig.Dd) e inseritelo nella
cuffia infilando le estremità dei fili negli appositi
fori (fig.De).
- Assemblate i componenti rimanenti e ripristi-
nate la lunghezza del filo di taglio (fig. Df).
ATTENZIONE! Non improvvisate altri sistemi di
taglio, recuperando gli originali usurati. Utiliz-
zate esclusivamente ricambi originali. L’uso di
filo con caratteristiche diverse dall’originale
può causare danni irreparabili alla macchina
e fa decadere immediatamente i termini della
garanzia.
ATTENZIONE! È vietato installare dischi
di acciaio, dischi lama e dischi sega (fig.H).
MANUTENZIONE
ATTENZIONE! Prima di ogni controllo o ma-
nutenzione, scollegate la macchina dalla
alimentazione elettrica.
ATTENZIONE! La lametta tagliafilo (se presen-
te) può causare tagli profondi.
- Pulite regolarmente ed abbiate cura della vostra
macchina, vi garantirete una perfetta efficienza
ed una lunga durata della stessa.
- Dopo ogni taglio, pulite da erba e terra il di-
spositivo di taglio e la protezione. Se utilizzate
il rocchetto manuale professionale, svitate
completamente il pomolo e togliete il rocchetto
per avere così accesso alla zona da pulire.
- Durante l’uso tenete pulite e sgombre dall’erba
le feritoie di ventilazione del motore.
- Pulite la macchina con una spazzola morbida
o un panno.
- Non spruzzate o bagnate d’acqua l’apparec-
chio.
- Non usate detergenti o solventi vari, potreste
rovinare irrimediabilmente la macchina. Le
parti in plastica sono facilmente aggredibili da
agenti chimici.
- Se la lametta tagliafilo si rompe, rivolgetevi ad
un centro di assistenza autorizzato.
Ogni 10 ore di funzionamento, lubrificate gli
ingranaggi della testa di taglio attraverso il
punto di ingrassaggio presente nella testa
di taglio (fig.G, 1); lubrificare con grasso per
ingranaggi meccanici, fino al riempimento
della camera.
RICERCA GUASTI
Se la macchina vibra:
- scollegate la macchina dalla rete di alimenta-
zione
- smontate il rocchetto (se sostituibile)
- pulite con cura la sede del rocchetto togliendo
eventuali residui d’erba o altro. Se una volta ri-
montato il tutto la vibrazione persiste, sostituite
il rocchetto con uno nuovo.
Se la macchina non si avvia:
- controllate gli allacciamenti elettrici
- controllate la prolunga o cambiate presa di
alimentazione
- controllate l’interruttore generale della casa
Se il taglio è insoddisfacente o le prestazioni
della macchina diminuiscono:
- regolate la lunghezza dell’elemento di taglio.
ATTENZIONE! Se dopo aver eseguito gli inter-
venti sopra descritti la macchina non funziona
ancora correttamente o in caso di anomalie
diverse da quelle sopra indicate, portatela
presso un centro di assistenza autorizzato.
Fate riferimento al modello macchina e nu-
mero di matricola riportati sull’etichetta dati
tecnici e sul foglio allegato.

- 11 -
IMMAGAZZINAMENTO
- Dopo ogni utilizzo effettuate una accurata puli-
zia di tutta la macchina e sue parti accessorie
(vedi paragrafo manutenzione), eviterete così
l’insorgere di eventuali muffe.
- Riponete la macchina lontano dalla portata dei
bambini; in posizione stabile e sicura e in luogo
asciutto, temperato e libero da polveri.
- Proteggete la macchina dalla luce diretta, tenetela
possibilmente al buio o in penombra.
- Non chiudete la macchina in sacchi di plastica,
potrebbe formarsi dell’umidità.
- Finita la stagione di utilizzo la macchina deve
essere sottoposta ad una accurata pulizia e
verifica dell’efficienza dei suoi componenti.
- Non lasciate la macchina appoggiata a terra
ma sospendetela in modo che la protezione
non tocchi nulla. Se la protezione rimane
appoggiata ad una superficie, potrebbe defor-
marsi e modificare così le sue caratteristiche
dimensionali e di sicurezza.
DEMOLIZIONE
I rifiuti elettrici ed elettronici possono contenere
sostanze pericolose per l’ambiente e la salute
umana; non devono pertanto essere smaltiti
con quelli domestici ma mediante una raccolta
separata negli appositi centri di raccolta o ricon-
segnati al venditore nel caso di acquisto di una
apparecchiatura nuova analoga. Lo smaltimento
abusivo dei rifiuti comporta l’applicazione di
sanzioni amministrative.
GARANZIA
Il prodotto è tutelato a norma di legge contro non
conformità rispetto alle caratteristiche dichiarate
purché sia stato utilizzato esclusivamente nel
modo descritto dalle istruzioni, non sia stato
manomesso in alcun modo, sia stato conser-
vato correttamente, sia stato riparato da tecnici
autorizzati e, ove previsto, siano stati utilizzati
solo ricambi originali.
In caso di utilizzo industriale o professionale
oppure in caso di impiego simile la garanzia ha
validità di 12 mesi.
Per emettere una richiesta di intervento in garan-
zia è necessario presentare la prova di acquisto
al rivenditore o ad centro assistenza autorizzato.

- 12 -
g
Before using this product read all the
enclosed safety instructions and instructions
for use.
Before operating the machine familiarise
yourself with the commands and with the
correct use of the machine, ensuring that you
are aware of how to switch it off in case of an
emergency. Improper use of the machine could
cause serious injury.
Always consider your safety and the safety
of others and act accordingly. Carefully keep
this instruction handbook in a safe and handy
place.
WARNING! The machine is only for cutting
grass in gardens and along the edges of flower
beds. Any other use not indicated in these
instructions can cause damage to the machine
and constitute a serious risk to the user.
ATTENTION! FOR D.I.Y. USE ONLY.
MACHINE DESCRIPTION (FIG. A)
1 Upper hand grip
2 Switch
3 Cable clip
4 Power supply cable
5 Central hand grip
6 Casing
7 Spool and spool cover
8 Air vents
9 Protection
10 Wire cutter
11 Shoulder strap
12 Cutting element
13 Safety button
14 Pawl for locking the tube
15 Tool for changing the cutting tool
16 Barrier
17 Locking knob
DESCRIPTION OF MARKS AND SYMBOLS
(Fig. B)
1 Machine model
2 Technical data
3 Machine serial number and year of manu-
facture
4 Certification mark
5 Machine with double insulation
6 Electric and electronic waste may contain
substances that are dangerous for the
environment and for human health. For this
reason they must never be disposed of
together with domestic waste, but collected
separately in specific collection centres or
returned to the retailer when similar new
equipment has been purchased. The illegal
disposal of such equipment may result in
prosecution to the full extent of the law
7 Noise level
STARTING UP (FIG. C1, C2, C3, C4, C5)
WARNING! Before carrying out any checks or
maintenance operations, disconnect the plug
from the electric power supply.
WARNING! During this operation take care of the
wire cutter, as you could be injured.
The machine may be supplied with some loose
components. For their assembly, observe the
following instructions.
CENTRAL HAND GRIP ASSEMBLY (FIG. C1)
a. Secure the barrier on the side handle with
the provided screws
b. Insert the handle in the central tube
c. Lock it in the desired position by the handwheel.
Note: Check that the barrier (fig.A, 19) is
mounted to the left of the tube.
FITTING THE SAFETY DEVICES ( FIG. C2)
WARNING! In the protection inner side is fixed
a razor blade which has the function to cut the
thread too long. Treat it with care and wear
protective gloves.
WARNING! Before using the machine, remove
the protection of the string cutter blade
a. Fix the holder of protection to the bevel gear
with the provided screws.
b. Secure the protection to the stand with the
supplied screws and remove the protective
cover of the blade.

- 13 -
LOWER TUBE ASSEMBLY (FIG. C3)
Press the pawl (14) and the lower tube in the top
one until you feel the pawl into the hole. Tighten
the locking knob (17).
NOTE: manually rotating the spool during the
phase of insertion of the tube to facilitate the
operation.
FITTING THE SPOOL (FIG. C4)
a. flip the machine with the protection upwards
and insert the spacer (1)
b. insert and the flange (2)
c. insert the supplied allen key through the
locking hole of the flange
d. screw the spool counterclockwise while
keeping the key in position
SHOULDER STRAP (FIG. C5)
Open the carabiner place on the shoulder strap
(11) and hook it to the machine as shown in figure.
ASSEMBLY OF BLADES (OPTIONAL)
Warning! It is forbidden to install saw discs.
Various types of metal blades can be installed on
the machine as long as the maximum diameter
does not exceed 255mm.
To install the blades it is necessary to use the
fixing kit supplied separately (code reported
in the technical specifications) and follow the
figures ‘BLADE ASSEMBLY’
STARTING AND STOPPING
Before use, always check that the machine is
in good working order, check the length of the
trimmer line and follow the instructions:
a. check that the nylon line touches or goes
beyond the edge of the guard. If the nylon
line does not reach the required length, press
the button with one finger and at the same
time pull on the line (fig. Df).
For subsequent adjustments when the ma-
chine is in use, gently tap the spool button
against the ground whilst continuing to run
the machine. The length of the nylon line will
thus be automatically adjusted.
b. Adjust the length of the machine and the
cutting head inclination.
c. Connect the machine plug to the socket of
the extension cable and hook it to the cable
hook (Fig.E). Safely grasp the machine and,
without putting it in contact with the grass
to be trimmed, press the switch (2) situated
on the upper hand grip; if present, first press
the safety button (pos. 13). Operate the
machine idle for a short while, so as to set
the cutting wire.
d. Carry out the work.
e. Turn off the machine releasing the ignition
switch.
WARNING! After the machine switches off,
the cutting element continues to rotate for a
few seconds.
WARNINGS AND ADVICE
WARNING! Do use the machine without pro-
tection (if provided separately).
WARNING! A short or worn cutting wire means a
lower cutting performance so, depending on the
situation, follow the instructions for regulating
its length as indicated in the chapter “STARTING
AND STOPPING” or replace it following the
instructions given in the next chapter.
Proceed calmly and carefully follow the instruc-
tions below:
- Before beginning work make sure that the area
to be cut is free of stones, debris, wires and
other foreign bodies.
- Start the machine before approaching the
grass to be cut.
- Cut grass making sure you swing the machine
from right to left and proceed slowly holding it at
on a forwards slope of approximately 30% (Fig. F).
- The grass is to be cut in layers starting from
the top (Fig. F).
- Do not cut damp or wet grass.
- Do not work so that the machine is overloaded.
- Do not wear the wire by hitting against hard
objects (stones, walls, fences etc.) but use the
edge of the protection to keep the machine at
the correct distance.
- Be aware of the blade recoil and the reaction
of the blade in case it should hit against hard
objects.
- So as not to damage the extension cable, avoid
stepping on it with the machine switched on
and always keep it in a safe position behind
your back.

- 14 -
SPOOL REPLACEMENT (FIG. D)
WARNING! Only use original spare parts for
replacement.
Before proceeding, please observe the compo-
nents and fig. D.
If you are not familiar with handling and assem-
bly of mechanical components, we recommend
that you contact an authorized service center.
Wear gloves to protect hands.
1) Remove the plug from the machine.
2) Turn the machine with cap facing upwards.
3) Replace the cutting unit as follows:
- With one hand, keep the spool housing locked
and with the other hand completely unscrew
the knob by turning it clockwise (fig. Da).
- Pull the knob (fig. Db) and remove the empty
spool (fig. Dc).
- Carefully clean the inside of the spool housing
and of the spool cover keeping the spring in
its position.
- Prepare the new spool blocking the wires in their
seats (fig. Dd) and insert it into the spool housing
tucking the wire ends into the holes (fig. De).
- Assemble the remaining components and
reset the length of the cutting wire (fig. Df).
WARNING! Do not use makeshift trimming
systems by re-using worn originals. Use only
approved replacements. The use of line with
different characteristics to those of the original
can permanently damage the machine as well
as annulling the terms of the guarantee.
WARNING! It is prohibited to install steel
discs, blade discs and saw blades (Fig. H).
MAINTENANCE
WARNING! Before checking or carrying out
maintenance on the machine, disconnect it
from the power supply.
WARNING! The wire cutter (where fitted) may
cause deep cuts.
- Clean and maintain your machine regularly, to
ensure that it remains perfectly efficient and
has a long working life.
- After every cutting process, clean the cutting
device and protection so that they are free from
grass and earth. If you are using a professional
manual spool, unscrew the knob completely
and remove the spool to access the area to
be cleaned.
- During use, keep motor ventilation grids clean
and free from grass.
- Clean the machine with a soft brush or cloth.
- Do not wet or spray water over the tool.
- Do not use any detergents or solvents as
these may damage the machine beyond re-
pair. Chemical agents can easily damage the
plastic parts.
- If the wire cutter breaks, contact an authorised
service centre.
Every 10 hours of operation, lubricate the
gears of the cutting head through the point
of lubrication in the cutting head (fig.G, 1);
lubricate with grease for mechanical gears
up to fill the room.
TROUBLESHOOTING
If the machine vibrates:
- disconnect the machine from the power supply
- disassemble the spool (if replaceable)
- carefully clean the spool housing removing any
possible residual of grass or other residue. If
after reassembling everything the vibration
persists, replace the spool with a new one.
If the machine fails to start:
- check the electrical connections
- check the extension cable or change the power
supply socket
- check the mains switch in your home
If the cut is unsatisfactory or the machine
performances decrease:
- adjust the length of the cutting element.
WARNING! If the machine still fails to function
correctly after you have carried out the above
operations, or in the event of anomalies other
than those described above, take the machine
to an authorised service centre. Provide the
machine model and serial number shown
on the technical data label and the enclosed
sheet.
STORAGE
- After use, clean the entire machine and its
accessories carefully (see maintenance
paragraph), thus preventing any mould from
forming.
- Keep the machine out of reach of children, in a
stable safe position, in a dry place not subject
to extreme temperatures and free from dust.
- Protect the machine from direct sunlight,

- 15 -
keeping it in the dark where possible, or in
the shade.
- Do not close the machine in plastic bags as
damp could form.
- Once the mowing season is over, the machine
should be cleaned thoroughly and you should
ensure that all its components are in good
working order.
- Do not leave the machine resting on the ground,
but hang it so that the protection does not touch
anything. If the protection rests on a surface, it
could get deformed and modify its dimensional
and safety characteristics.
DEMOLITION
Electric and electronic waste may contain
potentially hazardous substances for the envi-
ronment and human health. It should therefore
not be disposed of with domestic waste, but
by means of differentiated collection at specific
centres or returned to the vendor in the event of
purchasing new equipment of the same type.
The illegal disposal of such equipment may
result in prosecution to the full extent of the law.
WARRANTY
The product is protected by law against non-
compliance with the declared characteristics
provided it is used only in the manner described
in the instructions, it has not been tampered with
in any way, it has been stored properly, has been
repaired by authorized and, where applicable,
have been used only original spare parts.
In the case of industrial or professional use or
when using such a guarantee is valid for 12
months.
To issue a claim under warranty you must
present proof of purchase to your dealer or
authorized service center.

DICHIARAZIONE DI CONFORMITA’
La ditta indicata in etichetta dichiara sotto la
propria responsabilità che il prodotto ivi citato
è conforme ai requisiti essenziali di sicurezza e
salute contenuti nelle seguenti direttive europee:
2006/42/CE,2014/30/CE,2005/88/CE,2014/35/CE
DECLARATION OF CONFORMITY
The firm indicated on the label declares, under its own
responsibility, that the product cited there complies
with the essential health and safety requirements
contained in the following European directives:
2006/42/EC,2014/30/EC,2005/88/EC,2014/35/EC
Persona autorizzata a costituire il fascicolo tecnico
presso:
The person authorized to compile the technical
file is in:
Valex SpA
Via Lago Maggiore, 24
36015 Schio (VI) - Italy
Schio, 01.2017
Un procuratore - Attorney
SMIDERLE STEFANO
1 230V~50Hz
2 1000 W
3 400 mm
4 21400 min-1
5 4,4 kg
6 II
7 6,715 m/s2K=1,5
8 83,9 dB(A) K=3
9 V
10 94,2 dB(A) K=2,03
11 96 dB(A)
12 TÜV SÜD Certification and Testing
(China) Co., Ltd. Shanghai Branch
Notified Body 0036
13 1489197 - 1489248
14 1452808
15 2,4 mm
DATI TECNICI
1. Tensione e frequenza nominale
2. Potenza nominale
3. Diametro di taglio
4. Giri motore a vuoto
5. Peso
6. Classe di isolamento
7. Vibrazioni al livello impugnatura
8.
Livello pressione acustica al posto operatore LpA
9.Procedura di valutazione della conformità
seguita: allegato
10. Livello di potenza sonora misurato LwA
11. Livello di potenza sonora garantito LwA
12. Ente notificato preposto per 2005/88/CE
13. Codice rocchetto di ricambio
14. Kit montaggio lama
15. Diametro del filo di taglio
TECHNICAL DATA
1. Rated voltage and frequency
2. Rated input power
3. Cut diameter
4. Motor revolution
5. Weight
6. Machine insulation class
7. Vibrations at the point of the handgrip
8. Sound pressure level at operator level LpA
9. Compliance evaluation procedure observed:
attachment
10. Measured sound power level LwA
11. Guaranteed sound power level LwA
12. Notified body responsible for the 2005/88 /EC
13. Spare spool code
14. Blade assembly kit
15. Diameter of the cutting line
Table of contents
Languages:
Other Valex Brush Cutter manuals