Valex ET301 User manual

S493953
06.02.2020
Final dimension: A5
ET 301
ATTENZIONE! Questa è una elettrosega per potatura e deve essere usata solo da operatori addestrati
IMPORTANT! This is a pruning chainsaw. It must only be used by trained operators
Elettrosega telescopica
ISTRUZIONI PER L’USO
Istruzioni originali
Electric pole chainsaw
INSTRUCTION MANUAL
Translation of the original instructions
ATTENZIONE! Prima di usare la macchina, leggete e comprendete le istruzioni di sicurezza e le istruzioni d’uso fornite
WARNING! Before using the machine, read and understand the supplied safety instructions and operating instructions

- 2 -

- 3 -

- 4 -

- 5 -

- 6 -
i
SIMBOLOGIA
Osservate con attenzione la simbologia della fig.B e memo-
rizzate il rispettivo significato. Una corretta interpretazione
dei simboli consente un uso più sicuro dell’utensile elettrico.
1. Modello, dati tecnici
2. Attenzione!
3. Leggete con attenzione tutte le istruzioni prima dell’uso.
4. Doppio isolamento elettrico.
5. I rifiuti elettrici ed elettronici possono contenere
sostanze pericolose per l’ambiente e per la salute
umana; non devono pertanto essere smaltiti con quelli
domestici ma mediante una raccolta separata negli
appositi centri di raccolta o riconsegnati al venditore
nel caso di acquisto di una utensile nuovo analogo. Lo
smaltimento abusivo dei rifiuti comporta l’applicazione
di sanzioni amministrative.
6. Numero del lotto di costruzione. Le prime 2 cifre del
lotto indicano l’anno di costruzione.
7. Marchio di certificazione.
V Volt
Hz Hertz
~ corrente alternata
W Watt
m metri
mm millimetri
s secondi
l litri
kg chilogrammi
dB decibel
Vi ringraziamo per averci preferito nella scelta di questo
elettoutensile, di seguito chiamato “elettrosega a catena
telescopica”.
!ATTENZIONE! L’elettrosega a catena telescopica è
idonea a tagliare i rami degli alberi con operatore a terra.
Ogni altro utilizzo è vietato; in particolare è vietato tagliare
rami di eccessive dimensioni, abbattere alberi e tagliare
tronchi su cavalletti.
Questo istruzioni riportano le informazioni e quanto ritenuto
necessario per il buon uso, la conoscenza e la normale ma-
nutenzione dell’utensile. Esse non riportano le informazioni
sulle tecniche di potatura; l’utilizzatore troverà maggiori
notizie su libri e pubblicazioni specifiche o partecipando a
corsi di specializzazione.
COMPONENTI
Fare riferimento alla fig. A e seguenti, allegate alle presenti
istruzioni.
1. Spina e cavo di alimentazione
2. Impugnatura posteriore
3. Interruttore di avvio/arresto
4. Pulsante di sblocco interruttore
5. Tubo telescopico / Impugnatura anteriore
6. Ghiera regolazione tubo telescopico
7. Ghiera fissaggio impugnatura posteriore
8. Ghiera fissaggio testa di taglio
9. Perno di bloccaggio
10. Tappo serbatoio olio
11. Carter
12. Feritoie di raffreddamento motore elettrico
13. Barra
14. Catena di taglio
15. Copribarra
16. Ruota dentata
17. Foro di passaggio olio
18. Sede del perno filettato
19. Volantino fissaggio barra
20. Ghiera tensionamento catena
21. Foro inferiore della barra
22. Foro di passaggio olio sulla barra
23. Scanalatura della barra
24. Foro ingrassaggio barra
25. Piolo tensionamento catena
26. Foro per sblocco componenti
INSTALLAZIONE
!ATTENZIONE! La Ditta costruttrice declina ogni respon-
sabilità per gli eventuali danni diretti e/o indiretti causati
da un errato allacciamento elettrico.
!ATTENZIONE! Prima di effettuare le seguenti operazioni
assicuratevi che la spina sia scollegata dalla presa di
alimentazione elettrica.
!ATTENZIONE! Indossate guanti a protezione delle mani.
TRASPORTO
Per trasportare l’utensile utilizzate sempre il suo imballo;
questo lo preserverà da urti, polvere e umidità che ne pos-
sono compromettere il regolare funzionamento.
Accorciate al minimo la lunghezza del tubo telescopico
(pos.6) e infilate il copribarra di protezione (pos.15).
MOVIMENTAZIONE
La movimentazione deve avvenire sempre a utensile spento.
Afferrate l’utensile con entrambe le mani nelle due impugna-
ture (pos.2-5), portatelo al fianco con barra rivolta verso il
basso e lontana dal vostro corpo.
Sostenetelo sollevato da terra e non fate strisciare la punta
sul terreno. A causa della lunghezza ragguardevole fate
attenzione a non colpire i piedi, le gambe oppure persone
o oggetti.
Dopo l’uso appoggiate l’utensile senza battere e con tappo
dell’olio rivolto verso l’alto; evitate di appoggiarlo su piani in
pendenza o su veicoli in quanto potrebbe rotolare e cadere.
Non appoggiare la punta sul terreno per evitare che la barra
si fletta fino a piegarsi in modo permanente.

- 7 -
MESSA IN SERVIZIO
Nel luogo che utilizzerete l’utensile elettrico è opportuno
considerare:
- che la zona non sia umida e che agenti atmosferici avversi
non siano presenti.
- che attorno sia prevista un’ampia zona operativa libera da
impedimenti.
- che vi sia una buona illuminazione.
- che sia utilizzata in vicinanza dell’interruttore generale con
differenziale.
- che l’impianto di alimentazione sia dotato di messa a terra
conforme alle norme (solo se l’utensile elettrico è di classe
I, cioè dotato di spina con cavo di terra).
- che la temperatura ambiente sia compresa tra 10° e 35° C.
- che l’ambiente non sia in atmosfera infiammabile/esplo-
siva.
- che non siano presenti linee elettriche aeree.
Estraete l’utensile ed i componenti e verificate visivamente
la loro perfetta integrità; a questo punto procedete ad una
accurata pulizia.
MONTAGGIO
1 ASSEMBLAGGIO DELLA BARRA E DELLA CATENA (Fig.C)
!ATTENZIONE! Il montaggio deve essere eseguito a per-
fetta regola d’arte. Un montaggio errato genera pericoli.
Prima di procedere osservate attentamente i componenti
dell’utensile e le figure. Se non avete dimestichezza con la
manipolazione e l’assemblaggio di componenti meccanici, vi
consigliamo di rivolgervi ad un centro assistenza autorizzato.
- indossare guanti a protezione delle mani
- immergere la catena (pos.14) in olio lubrificante (non in-
cluso) e lasciarla a bagno per alcune ore; successivamente
asciugate la catena con uno straccio lasciando un sottile
velo d’olio
- Porre la macchina su una superficie piana e togliere il
carter (11) svitando il volantino (19).
- Inserire la catena (14) attorno alla barra (13) facendo
attenzione a rispettare il corretto senso di direzione del
tagliente.
- Passare la catena attorno alla ruota dentata (16) e posi-
zionare la barra sopra il foro del perno filettato (18).
- Tirare la barra verso destra per tendere leggermente la
catena.
- Montare il carter (11) ruotando il volantino (19) ma fissarlo
solo leggermente.
- Ruotare la ghiera di tensionamento (20) in modo che il
piolo tendicatena (25) sia allineato al foro inferiore della
barra (21)
- Avvitare il volantino (19) facendo entrare il piolo (25) sul
foro (21) lasciando un paio di giri prima del fissaggio
completo.
- Ruotare in senso antiorario la ghiera (20) per tenere la
catena (vedere capitolo tensionamento catena)
- Fissare il carter girando il volantino (19) fino a finecorsa.
ATTENZIONE! Non usare la macchina prima di avere
tensionato la catena.
2 TENSIONAMENTO DELLA CATENA (Fig.C)
- Allentare di un giro il volantino di fissaggio (19).
- Ruotare in senso antiorario la ghiera tendicatena (20)
fino a raggiungere il corretto tensionamento. La tensione
della catena risulta corretta quando si riesce a sollevare
manualmente 3-4 mm dal centro della barra.
- Se la catena risultasse troppo tesa, girare di poco la ghiera
tendicatena (20) in senso orario per allentare la tensione
- A regolazione ultimata, stringere manualmente (non usare
pinze o attrezzi) in modo sicuro il volantino centrale (19).
- Ripetere il controllo del corretto tensionamento.
- Al primo avvio, lubrificare la catena e la rotaia della barra
con olio specifico.
ATTENZIONE! La tensione della catena deve essere con-
trollata ogni volta che si inizia il lavoro, dopo i primi tagli
e regolarmente ogni 10 minuti.
ATTENZIONE! Durante i primi tagli, quando la macchina
è ancora nuova, la catena si allenterà abbastanza fre-
quentemente, ma questo è normale durante il periodo
di rodaggio.
ATTENZIONE! Non lasciate mai la catena allentata perché
può uscire dalla barra mentre si sta tagliando.
Non tendere troppo la catena perché l’impianto di lubrifica-
zione potrebbe non funzionare correttamente.
ATTENZIONE! Non avviare! È vietato fare funzionarel’u-
tensile senza olio lubrificante per la catena (vedi capitolo
seguente).
3 RIEMPIMENTO SERBATOIO DELL’OLIO PER LUBRIFICA-
ZIONE CATENA (Fig.A)
L’ utensile elettrico viene fornito con il serbatoio vuoto. Non
avviare mai l’utensile se manca l’olio o con il livello sotto
il minimo.
ATTENZIONE! Prima di eseguire il riempimento è importante
pulire con un pennellino nella zona del tappo, in modo da
eliminare lo sporco.
Svitare il tappo dell’olio (pos.10) e riempire il serbatoio con
olio biodegradabile per catene (non incluso); non utilizzare
olio vecchio o riciclato. Utilizzare l’ampollina in dotazione
(se presente) per evitare di versare olio sulla macchina.
Riempire il serbatoio fino al livello max (se è presente l’indi-
catore), oppure ad un livello di 2cm sotto il bordo superiore
del serbatoio, facendo attenzione a non introdurre sporcizia,
trucioli o polvere al suo interno. Al termine chiudere il tappo
e pulire con uno straccio.
ATTENZIONE! Il livello dell’olio deve essere controllato
frequentemente durante il funzionamento, per evitare
che la catena rimanga senza lubrificante. Se la catena
viene fatta funzionare senza olio vi sarà una rapida
usura della catena e della barra e la durata dell’utensile
si ridurrà. Controllare frequentemente il livello dell’olio
durante l’uso.
ATTENZIONE! L’autonomia con un pieno d’olio può variare
a seconda di quanto è stata tensionata la catena, dal tipo
di legno che si sta tagliando, dalla temperatura ambiente,
dalla densità dell’olio e dal modo di impiego.
4. MONTAGGIO DELLA TESTA DI TAGLIO SULL’ASTA TE-
LESCOPICA (Fig.E)
- Accoppiare la prolunga telescopica con l’etichetta ‘’lato
motore’’ seguendo le immagini di fig.E
5. MONTAGGIO DELL’IMPUGNATURA SULL’ASTA TELE-
SCOPICA (Fig.F)
- Accoppiare la prolunga telescopica con l’etichetta ‘’lato
impugnatura’’ seguendo le immagini di Fig.F
RIMOZIONE DELLA TESTA DI TAGLIO O DELL’IMPUGNA-
TURA (Fig.E-F)
Per separare l’asta telescopica dal motore/impugnatura, pre-

- 8 -
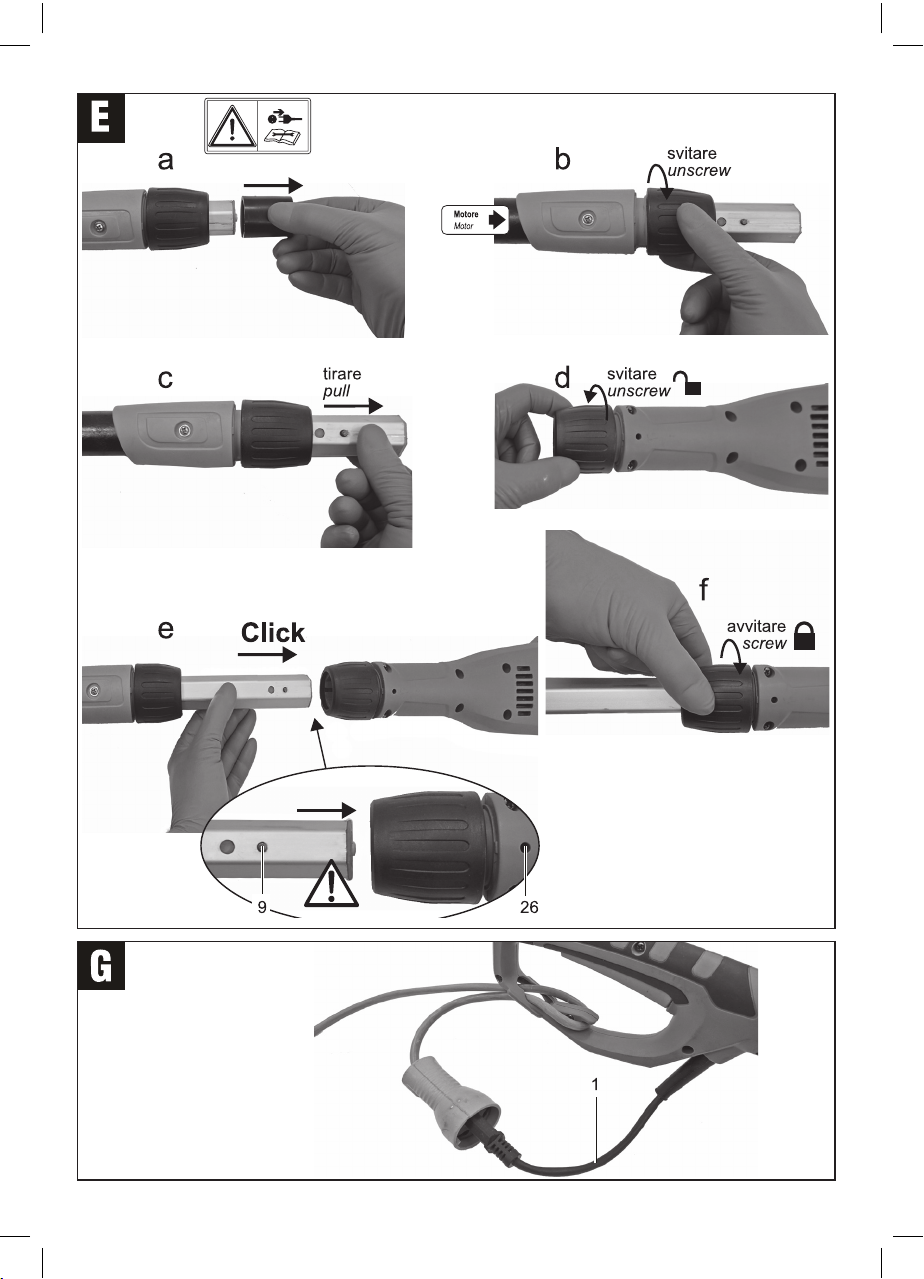
mere con un cacciavite sottile all’interno del foro di sblocco
(26) per comprimere il perno (9) e contemporaneamente
estrarre il tubo.
AGGANCIO DELLA PROLUNGA DI ALIMENTAZIONE (Fig.G)
Agganciare la prolunga di alimentazione (non inclusa) come
illustrato in fig.G ed inserite la spina alla presa.
AVVIAMENTO E ARRESTO (FIG.A)
!ATTENZIONE! Prima di avviare l’utensile elettrico è ob-
bligatorio indossare i dispositivi di protezione individuali
citati nel cap. Avvertenze (non inclusi).
!ATTENZIONE! Durante l’utilizzo fate in modo che nes-
suno si avvicini alla vostra zona di lavoro.
Avviamento
1. Afferrate saldamente entrambe le impugnature (pos.2-5)
2. Per avviare premete in sequenza il pulsante di sblocco
(pos.4) e poi l’interruttore (pos.3)
L’interruttore è del tipo ad “azione mantenuta”; pertanto
l’utensile elettrico rimarrà acceso per il tempo che voi
mantenete premuto l’interruttore.
Arresto
1. Per spegnere rilasciate l’interruttore (pos.3) e il pulsante
di sblocco (pos.4), mantenendo ben saldo l’utensile.
Vi consigliamo di ripetere queste operazioni alcune volte
prima di iniziare il lavoro in modo da familiarizzare il più
possibile con i comandi.
Se osservate delle anomalie di funzionamento spegnete
l’utensile elettrico e consultate il capitolo “Problemi, cause
e rimedi”.
ISTRUZIONI D’USO
Dopo aver letto attentamente i capitoli precedenti, seguite
scrupolosamente queste istruzioni che vi permetteranno di
ottenere il massimo delle prestazioni.
Procedete con calma in modo da prendere familiarità con tutti
i comandi; solo dopo aver acquisito una buona esperienza
riuscirete a sfruttarne a fondo tutte le potenzialità.
L’operazione di potatura è una operazione molto importante
per la vita e la crescita degli alberi; questa determinerà la
forma estetica della chioma o la produzione dei frutti. Effet-
tuatela nel periodo idoneo e con le modalità che vi suggerirà
un esperto in materia.
Fig.H: prima di iniziare il lavoro assicuratevi che l’area
sia priva di oggetti nascosti come fili, cavi elettrici ecc.;
allontanate anche gli estranei e gli animali. Non operate su
terreni e scale che offrono poca stabilità e sicurezza. Non
operate sopra un veicolo.
Per evitare problemi muscolari derivanti da una postura
scorretta, cercate di mantenere diritta la schiena, evitate
di piegarvi in avanti, non inarcate la schiena all’indietro,
non sbilanciatevi e tenete l’equilibrio. Mantenete le gambe
leggermente divaricate in modo da distribuire uniformemente
il peso. Appoggiate i piedi su una superficie piana e non
scivolosa.
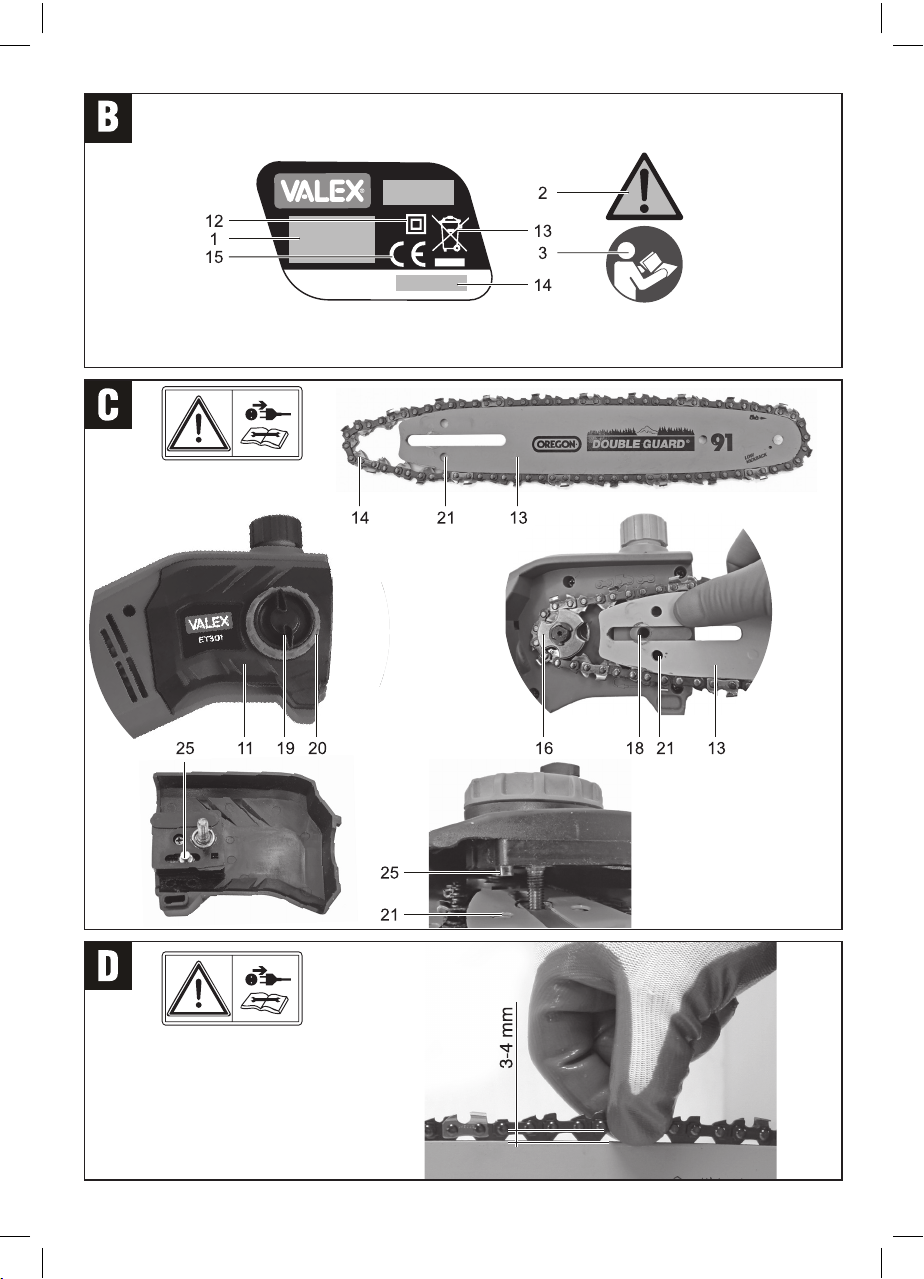
CONTROLLO DEL CORRETTO FUNZIONAMENTO DELL’O-
LIATORE AUTOMATICO
Oltre a controllare visivamente l’olio depositato sulla catena,
è possibile verificare praticamente se l’olio è presente in
giusta quantità:
1. Avviare la macchina e dirigere la punta della barra verso il
pavimento senza toccarlo a circa 4-5cm di distanza; a tale
scopo è utile posizionare un foglio di cartone.
2. Se la catena è lubrificata correttamente ed entro un minuto
si noterà nel cartone una riga di olio in corrispondenza
della barra. Se non si riscontra nessuna traccia leggete il
capitolo “Problemi, cause e rimedi”.
Per i modelli provvisti di regolatore dosaggio olio è possibile,
in base alla necessità, regolare la quantità d’olio erogata sulla
catena, ruotando la vite di regolazione.
REGOLAZIONE DELLA LUNGHEZZA DEL TUBO TELESCO-
PICO (fig.A)
Determinate la lunghezza totale dell’utensile in base all’altez-
za del ramo e alla distanza di sicurezza da esso.
1. Allentare la ghiera di regolazione (pos.6)
2. Trattenere con una mano il tubo fisso e con l’altra sfilare
il tubo telescopico per accorciare/allungare.
3. Fissare la ghiera di regolazione.
PROCEDURE DI SICUREZZA
1) Consigli a chi utilizza una motosega per la prima volta
Colui che utilizza l’utensile per la prima volta deve ricevere
istruzioni pratiche inerenti all’uso di una sega a catena e
sull’equipaggiamento da parte di un operatore esperto; la
pratica iniziale dovrebbe essere il taglio di rami di piccole
dimensioni.
2) Consigli sugli indumenti di sicurezza
Per la protezione dai rischi residui presenti nell’uso dell’u-
tensile, si devono utilizzare adeguati indumenti ed accessori.
In genere i dispositivi da utilizzare sono:
- Casco con visiera, per la protezione dai rami in caduta e
dalla proiezione dei trucioli.
- Cuffia insonorizzante per la protezione dell’udito.
- Giacca o tuta ad alta visibilità per assicurare la visibilità
dell’operatore.
- Guanti antitaglio ed eventualmente, antivibranti per lo
smorzamento delle vibrazioni.
- Pantaloni ad alta visibilità con imbottitura antitaglio
- Ghette resistenti al taglio e calzature con suola antiscivolo,
punta antischiacciamento e antitaglio.
3) Limitazione d’accesso alle zone pericolose
Delimitare l’accesso dell’area con appositi cartelli di pericolo
e barriere.
4) Precauzioni per le condizioni meteorologiche, per le
persone circostanti ed eventuali regolamenti locali.
- Non utilizzare l’utensile con condizioni ambientali avverse
es: pioggia, neve, scarsa visibilità, vicino a cavi elettrici o
dove c’è pericolo di incendio/esplosione.
- Non tagliate in presenza di persone o animali.
- Informatevi su eventuali restrizioni al taglio emesse da enti
forestali, comunali, ecc.
5. Preparazione ed uso delle vie di fuga (vedi anche punto 6)
Prima di iniziare le operazioni di taglio bisogna scegliere
la direzione di caduta, identificare le vie di fuga, liberare le
vie di fuga dagli ostacoli. Non posizionatevi sotto il ramo
da tagliare.

- 9 -
Osservare sempre il movimento del ramo e spostarsi
immediatamente non appena il ramo cade verso il terreno.
6. Effetto del suolo in pendenza
Quando si sta tagliando su un terreno in pendenza, l’ope-
ratore deve posizionarsi sul lato a monte in quanto il ramo
rotolerà a valle una volta tagliato.
7. Abbattimento in relazione alla capacità di taglio della sega
Non eseguite tagli su rami che superano la capacità di taglio
utile dell’utensile (vedi dati tecnici).
Si raccomanda inoltre di valutare caso per caso le dimensioni
(diametro ramo, lunghezza ramo, estensione della fronda) e
il peso previsto del ramo.
In linea di massima effettuate il taglio solo per quei rami che
vengono tagliati in pochi istanti; per rami di una certa con-
sistenza è necessario operare con motoseghe da potatura.
ESECUZIONE DEL TAGLIO
!ATTENZIONE! Pericolo di taglio. Non toccare la catena.
!ATTENZIONE! Pericolo di contraccolpo. Non tagliare
mai con la parte frontale della barra.
!ATTENZIONE! Pericolo di caduta. Il ramo può improv-
visamente spezzarsi e cadere.
Infilate la cinghia a tracolla tra spalla e fianco; afferrate sal-
damente entrambe le impugnature e posizionate l’utensile al
vostro fianco con la barra rivolta in avanti verso l’albero. Non
posizionate mai l’utensile in verticale o capovolto.
Individuate la parte da potare, avviate l’utensile ed eseguite
il taglio. E’ importante che l’utensile sia in funzione prima di
entrare a contatto con il ramo e nel momento che si allontana
l’utensile a fine taglio.
Iniziate il taglio nella parte superiore del ramo appoggiando
la parte di catena che si trova sotto la barra.
Non applicate una eccessiva pressione contro il ramo
per non sovraccaricare l’utensile e per evitare che il tubo
telescopico si fletta, in modo particolare quando l’utensile
è alla sua massima estensione.
Potate l’albero in modo da ottenere la forma desiderata, ini-
ziando dai lati per poi terminare tagliando la parte superiore.
Iniziate a tagliare i rami bassi per poi procedere con quelli alti;
i rami cadranno liberamente a terra e avrete così una migliore
visione del taglio effettuato. Interrompete periodicamente
la fase di taglio per liberare il terreno ed avere la massima
possibilità di muovervi in ogni direzione.
Se dovete togliere dei rami tagliati ed impigliati sull’albero,
spegnete l’utensile, agganciate il ramo con l’arpione (pos.16,
se presente) e tirate.
Durante l’uso mantenete lubrificata la catena, vedi capitolo
“Manutenzione”.
MANUTENZIONE
!ATTENZIONE! Prima di effettuare le seguenti operazioni
staccate l’alimentazione elettrica scollegando la spina.
!ATTENZIONE! Non manomettete o tentate di riparare
l’utensile elettrico.
!ATTENZIONE! Proteggete le mani con i guanti.
La durata dell’utensile e il costo d’esercizio dipendono anche
da una costante e scrupolosa manutenzione.
Pulite regolarmente ed abbiate cura del vostro utensile
elettrico, vi garantirete una perfetta efficienza ed una lunga
durata dello stesso.
- Con uno straccio eliminate la polvere depositata sull’uten-
sile.
- Rimuovete eventuali corpi estranei e lo sporco dalle feritoie
di ventilazione del motore.
- Non spruzzate o bagnate d’acqua l’utensile elettrico,
pericolo di infiltrazioni interne.
- Non usate infiammabili, detergenti o solventi vari.
- Le parti in plastica sono aggredibili da agenti chimici.
Catena, barra e condotti dell’olio:
- Al termine del lavoro rimuovere lo sporco con un pennello
o una spazzola non metallica e petrolio bianco. Non pulire
con acqua o sgrassanti. Dopo la pulizia asciugare bene i
componenti.
- Pulire con cura i fori nella barra in cui scorre l’olio.
- Lubrificare con olio la lama e nella gola di scorrimento
della barra. Dopo aver lubrificato fate funzionare l’utensile
per alcuni secondi. Non sporcate di olio le parti in plastica
che potrebbero deteriorarsi.
- Lubrificare periodicamente il cuscinetto posto sulla punta
della barra attraverso il foro di ingrassaggio (pos.24).
- Effettuate la registrazione della tensione catena.
- Se la forma della barra lo consente, si consiglia di girare la
barra di 180° dopo un uso prolungato, in modo da avere
un usura uniforme.
- Durante la pulizia verificare lo stato dei taglienti; se usurati
rivolgetevi ad un centro assistenza autorizzato per l’affila-
tura. Sostituire la catena quando, dopo varie affilature, la
lunghezza del dente ha raggiunto 3-4 millimetri o quando
le maglie della catena si saranno usurate.
- Nell’utensile rimuovere con cura lo sporco nella ruota
dentata (pos.16), nel foro di passaggio olio (pos.22) e
nella zona di rabbocco olio (pos.10).
- Pulire il foro di sfiato presente sul tappo dell’olio.

- 10 -
PROBLEMI, CAUSE E RIMEDI
PROBLEMA CAUSE RIMEDI
L’utensile elettri-
co non si avvia
Linea di alimenta-
zione scollegata
Verificate la linea di
alimentazione elettrica
Spina non inserita Inserire la spina nella
presa di alimentazione
elettrica e premere il
pulsante di avvio
Il pulsante di
sblocco interrut-
tore non è premuto
Premere e mantenere
premuto il pulsante di
sblocco e poi l’inter-
ruttore
L’interruttore non è
premuto
Premere e mantenere
premuto il pulsante di
sblocco e poi l’interruttore
Corpo estraneo
che blocca il mo-
vimento della lama
Eliminate il corpo estra-
neo ed effettuate una
accurata pulizia della
zona di taglio, vedi cap.
Manutenzione
Spazzole motore
usurate (non visi-
bili esternamente)
Rivolgetevi ad un centro
di assistenza autoriz-
zato
Guasto elettrico Rivolgetevi ad un centro
di assistenza autorizzato
L’utensile si arre-
sta durante l’uso
Corpo estraneo
che blocca il movi-
mento della catena
Eliminate il corpo estra-
neo ed effettuate una
accurata pulizia della
zona di taglio, vedi cap.
Manutenzione
Mancanza di lu-
brificazione nella
catena
Serbatoio dell’olio
vuoto
Riempire il serbatoio
con olio per catene
Sfiato del tappo olio
ostruito dallo sporco
Pulire nel tappo il foro
di sfiato
Nell’utensile il foro di
uscita olio è ostruito
Pulire il foro di uscita
olio
Nella barra il foro/i
di passaggio olio è
ostruito
Pulire il foro/i di pas-
saggio olio
Olio non idoneo e
troppo denso
Utilizzare un olio spe-
cifico per catene più
fluido
Catena e barra
surriscaldate.
La catena ha
difficoltà allo
scorrimento
Catena troppo tesa Regolare la tensione
catena
Catena e barra
sporche
Effettuare una accurata
pulizia della zona di
taglio, vedi cap.Manu-
tenzione
La catena taglia
poco, è rumo-
rosa, si inceppa
Catena senza ta-
gliente
Affilare o sostituire
Catena allentata Regolare la tensione
catena
Catena usurata Sostituire
ATTENZIONE! Se dopo aver eseguito gli interventi sopra
descritti l’utensile elettrico non funziona correttamente o
in caso di anomalie diverse da quelle indicate, portatelo
presso un centro di assistenza autorizzato esibendo la
prova di acquisto e richiedendo ricambi originali. Fate
sempre riferimento alle informazioni riportate sull’eti-
chetta dati tecnici.
IMMAGAZZINAMENTO
Effettuate una accurata pulizia di tutto l’utensile e sue parti
accessorie (vedi cap. Manutenzione); infilate il fodero sulla
barra/catena ed utilizzate l’imballo originale per proteggere
l’utensile.
Se l’ utensile non verrà usato per un lungo tempo si consiglia
di svuotare il serbatoio dell’olio e riporre la catena e la barra
avvolte in carta oleata.
Riponete l’utensile lontano dalla portata dei bambini, in
posizione stabile e sicura. Il luogo dovrà essere asciutto,
privo da polveri, temperato e protetto dai raggi solari diretti.
Al locale di rimessaggio non devono avere accesso i bambini
e gli estranei.
SMALTIMENTO
Per la salvaguardia ambientale procedete secondo le leggi
vigenti del Paese in cui vi trovate. Rivolgetevi alle autorità
competenti per maggiori notizie in merito.
Quando l’utensile non è più utilizzabile né riparabile, conse-
gnatelo con l’imballo ad un punto di raccolta per il riciclaggio.
Non smaltite l’olio esausto con i rifiuti domestici ma conse-
gnatelo negli appositi centri di raccolta.
I rifiuti elettrici ed elettronici possono contenere sostanze
pericolose per l’ambiente e la salute umana; non devono
pertanto essere smaltiti con quelli domestici ma mediante
una raccolta separata negli appositi centri di raccolta o
riconsegnati al venditore nel caso di acquisto di un utensile
nuovo analogo. Lo smaltimento abusivo dei rifiuti comporta
l’applicazione di sanzioni amministrative.
GARANZIA
Il prodotto è tutelato a norma di legge contro non conformità
rispetto alle caratteristiche dichiarate purché sia stato utiliz-
zato esclusivamente nel modo descritto dalle istruzioni, non
sia stato manomesso in alcun modo, sia stato conservato
correttamente, sia stato riparato da tecnici autorizzati e, ove
previsto, siano stati utilizzati solo ricambi originali.
In caso di utilizzo industriale o professionale oppure in caso
di impiego simile la garanzia ha validità di 12 mesi.
Per emettere una richiesta di intervento in garanzia è ne-
cessario presentare la prova di acquisto al rivenditore o ad
centro assistenza autorizzato.

- 11 -
g
SYMBOLS
Carefully observe the symbols in fig. B and memorise their
respective meanings. Correct interpretation of the symbols
allows safer use of the power tool.
1. Model, technical data
2. Warning!
3. Carefully read all instructions before use.
4. Double electric insulation.
5. Electric and electronic waste may contain potentially
hazardous substances for the environment and human
health. It should therefore not be disposed of with do-
mestic waste, but by means of differentiated collection
at specific centres or returned to the vendor in the event
of purchasing a new similar tool. The illegal disposal of
waste will result in administrative sanctions.
6. Manufacturing lot number. The first 2 figures of the lot
number indicate the year of manufacture.
7. Certification mark.
V Volt
Hz Hertz
~ alternating current
W Watt
m metres
mm millimetres
s seconds
l litres
kg kilograms
dB decibel
We thank you for having purchased this product that will
hereafter also be referred to as “electric pole chainsaw”.
!IMPORTANT! The electric pole chainsaw is suitable for
cutting tree branches with the operator on the ground.
Any other use is prohibited; in particular, cutting excessi-
vely large branches, felling trees and cutting tree trunks
on trestles is prohibited.
These instructions contain information deemed necessary for
proper use, knowledge and standard appliance maintenance.
They do not include information on pruning techniques; the
user can find additional information in specific books or
publications or by attending specialised training courses.
COMPONENTS
Refer to fig. A and the following figures, attached to these
instructions.
1. Power supply plug and cable
2. Rear hand grip
3. Start/stop switch
4. Switch release button
5. Extension pole / Front hand grip
6. Telescopic tube adjustment ring nut
7. Rear handle fixing ring nut
8. Cutting head fixing ring nut
9. Locking pin
10. Oil tank cap
11. Housing
12. Electric motor cooling vents
13. Bar
14. Saw chain
15. Bar cover
16. Sprocket
17. Oil hole
18. Seat of the threaded pin
19. Bar fixing screw
20. Chain tensioning screw
21. Bar lower hole
22. Oil hole
23. Bar groove
24. Bar greasing hole
25. Chain tensioning pin
26. Hole for unlocking components
INSTALLATION
!IMPORTANT! The manufacturer is not liable for any
direct and/or indirect damage caused by incorrect elec-
trical connections.
!IMPORTANT! Before you perform the following steps,
make sure that the plug is disconnected from the AC
power supply.
!IMPORTANT! Wear protective gloves.
TRANSPORT
Always use the packaging when transporting the tool; this
will protect it from impact, dust and humidity which can
compromise normal operation.
Shorten the length of the extension pole (pos. 6) to its
minimum length and slip the bar cover protection (pos. 15).
HANDLING
Always carry the tool with the engine off. Hold the tool with
both hands using both hand grips (pos.2-5), carry it by your
side, with the bar facing downwards and away from your body.
Keep it raised off the ground and do not let the tip drag on
the ground. Due to its considerable length, make sure you
do not hit feet, legs, persons or objects.
After use, set the tool down carefully without dropping it,
with the fuel tank cap facing upwards; avoid setting the tool
down on sloped inclines or on vehicles as it could roll off and
fall. Never set the tip on the ground, to prevent the bar from
bending until it becomes permanently deformed.
SWITCHING ON
When choosing where to use the power tool, the following
should be considered:
- the area must not be damp and there is no bad weather.
- the working area is sufficiently large and free from obstacles.
- the area is well lit.
- the tool is used close to the main differential switch.
- the power supply system is earthed and conforms with
standards (only if the power tool is Class I, and equipped
with a plug with earth cable).
- room temperature is between 10° and 35° C.
- the environment is not in a flammable/explosive atmosphere.
- there are no overhead power lines.
Take out the tool and its components and visually check
that they are perfectly intact; then proceed to thoroughly
clean them.

- 12 -
ASSEMBLING
1. ASSEMBLING THE BAR AND CHAIN (Fig. C)
!IMPORTANT! Installation must be carried out with
absolute precision. Incorrect assembly causes danger.
Before proceeding, carefully examine the tool’s components
and all figures. If you are not familiar with handling and
assembling mechanical components, we recommend that
you contact an authorised service centre.
- Wear protective gloves.
- Submerge the chain (pos. 14) in lubricant oil (not included)
and let it soak for a few hours; then dry the chain with a
cloth, leaving a thin layer of oil.
- Place the machine on a flat surface and remove the casing
(11) by unscrewing the handwheel (19).
- Insert the chain (14) around the bar (13) taking care to
respect the correct direction of direction of the cutting
edge.
- Pass the chain around the gear wheel (16) and position
the bar over the hole of the threaded pin (18).
- Pull the bar to the right to slightly tension the chain.
- Mount the casing (11) by turning the handwheel (19) but
fasten it only slightly.
- Turn the tension ring nut (20) so that the chain tightening
pin (25) is aligned with the lower hole of the bar (21)
- Screw the handwheel (19) by inserting the peg (25) on
the hole (21) leaving a couple of turns before complete
fixing.
- Turn the ring nut (20) anticlockwise to hold the chain (see
chapter on chain tensioning)
- Fasten the crankcase by turning the handwheel (19) to the
end stop.
WARNING! Do not use the machine before having ten-
sioned the chain.
2 CHAIN TENSION (Fig.C)
- Loosen the fixing handwheel (19) one turn.
- Turn the chain tightening ring nut (20) anticlockwise
until the correct tension is reached. The chain tension
is correct when you can manually lift 3-4 mm from the
center of the bar.
- If the chain is too tight, turn the chain tightening ring nut
(20) slightly clockwise to release the tension
- When the adjustment is complete, tighten the central han-
dwheel (19) securely (do not use pliers or tools).
- Repeat the check for correct tension.
- When starting for the first time, lubricate the bar chain and
rail with specific oil.
WARNING! The chain tension must be checked every
time work is started, after the first cuts and regularly
every 10 minutes.
WARNING! During the first cuts, when the machine is
still new, the chain will loosen quite frequently, but this
is normal during the break-in period.
WARNING! Never leave the chain loose because it can
come out of the bar while you are cutting.
Do not overstretch the chain because the lubrication system
may not work properly.
WARNING! Don’t start! It is forbidden to operate the
tool without lubricating oil for the chain (see following
chapter).
3 FILLING THE OIL TANK FOR CHAIN LUBRICATION (Fig.A)
The electric tool is supplied with the tank empty. Never start
the tool if there is no oil or with the level below the minimum.
WARNING! Before filling it is important to clean with a
brush in the area of the cap, in order to eliminate dirt.
Unscrew the oil cap (pos. 10) and fill the tank with biode-
gradable chain oil (not included); do not use old or recycled
oil. Use the cruet supplied (if present) to avoid spilling oil
on the machine.
Fill the tank up to the maximum level (if there is an indicator),
or at a level of 2cm below the upper edge of the tank, taking
care not to introduce dirt, shavings or dust into it. At the end,
close the cap and clean with a rag.
WARNING! The oil level must be checked frequently during
operation, to prevent the chain from remaining without
lubricant. If the chain is operated without oil there will be
rapid wear of the chain and bar and the tool life will be
reduced. Check the oil level frequently during use.
WARNING! The autonomy with a full oil can vary depen-
ding on how much the chain has been tensioned, the type
of wood being cut, the ambient temperature, the density
of the oil and the way of use.
4. MOUNTING THE CUTTING HEAD ON THE TELESCOPIC
ROD (Fig.E)
- Couple the telescopic extension with the label ‘’motor side‘’
following the images in fig.E
5. ASSEMBLY OF THE HANDLE ON THE TELESCOPIC
ROD (Fig.F)
- Couple the telescopic extension with the label ‘’handle
side‘’ following the images in fig.F
REMOVAL OF THE CUTTING HEAD OR THE HANDLE (Fig.E-F)
To separate the telescopic rod from the motor / handle,
press with a thin screwdriver inside the release hole (26) to
compress the pin (9) and simultaneously extract the tube.
ATTACHING THE POWER EXTENSION (Fig.G)
Attach the power extension (not included) as shown in fig.
G and insert the plug into the socket.
STARTING AND STOPPING (FIG.A)
!IMPORTANT! Before switching on the power tool it is
mandatory to wear personal protective equipment (not
included) listed in the chapter Warnings.
!IMPORTANT! Make sure nobody is approaching the
working area during use.
Switching on
1. Grip both handles firmly (pos. 2-5)
2. To start, in sequence press the release button (pos. 4)
and then press the switch (pos. 3).
The switch is a ‘maintained action’ switch so the electrical
tool will stay on when you keep the switch pressed.
Switching off
1. To switch off, release the switch (pos. 3) and the release
button (pos.4), holding the tool firmly.
We recommend repeating these operations several times
before starting work, in order to familiarise yourself with
the controls as much as possible.
If you notice any working defects, switch off the power tool
and consult the chapter “Problems, causes and solutions”.

USER INSTRUCTIONS
After reading the previous chapters carefully, apply these
instructions scrupulously to obtain maximum performance.
Proceed calmly so as to become familiar with all the controls;
after having gained sufficient experience, you will be able to
make full use of its capacities.
Pruning is a very important operation for the growth and
longevity of trees; it defines the aesthetic shape of the crown
and the production of fruit. Prune in season following the
methods recommended by an expert on the subject.
Fig. H: Before starting, make sure there are no hidden
objects in the area, such as wires, power lines, etc.; keep
unauthorised persons and animals away. Do not work on
ground and ladders that offer poor stability and safety. Do
not work on top of a vehicle.
To prevent muscular problems due to incorrect posture,
try to keep your back straight and avoid leaning forwards,
do not arch your back backwards, do not overreach and
keep your balance. Keep your legs slightly apart in order to
distribute your weight evenly. Position your feet on a level,
non-slippery surface.
CHECKING THAT THE AUTOMATIC OILER FUNCTIONS
CORRECTLY
In addition to visually checking the oil on the chain, it is
possible in practice to check that the oil is present in the
right quantity.
1. Start the machine and aim the tip of the bar towards the
ground without touching it, at a distance of around 4-5 cm;
for this purpose, positioning a cardboard sheet is helpful.
2. If the chain is correctly lubricated, within one minute a line
of oil will appear on the cardboard, right below the bar. If
you see no traces of oil, consult the chapter “Problems,
causes and solutions”.
For models equipped with an oil regulator it is possible,
according to the operator’s needs, to regulate the quantity of
oil distributed on the chain by turning the adjustment screw.
ADJUSTING THE LENGTH OF THE EXTENSION POLE (fig.F)
Determine how long the total length of the tool should be,
based on the height of the branch and the safety distance
from it.
1. Loosen the handwheel (pos.6)
2. With one hand, hold the permanent pole and with the other
hand, slide the extension pole to lengthen/shorten the tool.
3. Firmly secure the handwheel.
SAFETY PROCEDURES
1) Advice for those using the chainsaw for the first time
Those who are using the chainsaw for the first time should
receive practical instructions concerning its use and gear by an
expert. A beginner should first practice by cutting small branches.
2) Recommendations concerning protective clothing
For protection from other risks related to the use of this tool,
adequate clothing and gear must be used. In general, the
following devices should be used:
- Helmet with visor for protection from falling branches and
sawdust.
- Soundproof earmuffs to protect hearing.
- High visibility jacket or overalls to ensure that the operator
is easily visible.
- Cut-resistant gloves and, if possible, anti-vibration gloves
to dampen vibrations.
- High visibility, padded, cut-resistant trousers.
- Cut-resistant gaiters and safety shoes with anti-slip soles,
crush-resistant and cut-resistant toe caps.
3) Limiting access to danger zones
Limit access to the area using special warning signs and barriers.
4) Precautions to take according to weather conditions,
people in the area and any local regulations.
- Do not use the chainsaw in bad weather, e.g.: rain, snow,
low visibility, near power lines, or where there may be a
risk of fire/explosions.
- Do not cut in the presence of persons or animals.
- Inquire on any restriction on cutting issued by forestry,
municipal, etc. entities.
5) Preparing and using escape routes (see point 6, as well)
Before you begin pruning a tree, you must decide the fall
direction, identify the escape route and then eliminate all
obstacles along it. Do not stand under the branch to cut.
Always keep an eye on the movement of the branch and
immediately move out of the way once the branch starts
to fall to the ground.
6) Pruning on slopes
When pruning on a slope, the operator must position himself/
herself on the upper side because, once the branch is cut,
it will roll downhill.
7) Pruning trees in relation to the saw’s cutting capacity.
Do not prune branches with diameters greater than the effec-
tive cutting capacity of the tool (see technical specifications).
We also recommend assessing on a case by case basis,
the size (branch diameter, length, extent of foliage) and the
estimated weight of the branch.
By and large, only cut those branches that can be cut in a
few moments; for branches of a certain size, it is best to
use a pruning chainsaw.
PERFORMING THE CUT
!IMPORTANT! Danger of cutting. Do not touch the chain.
!IMPORTANT! Kickback danger. Never cut with the front
part of the bar.
!IMPORTANT! Falling hazard. The branch can suddenly
snap and fall.
Slip the shoulder strap between the shoulder and your side;
firmly grip both handles and position the tool to your side,
with the bar facing forwards, in the direction of the tree. Never
position the tool vertically or upside down.
Select where to prune, start the tool and cut the branch. It
is important that the tool is switched on before touching the
branch, and that it is still on when moving the tool away from
the branch after cutting.
Start cutting from the upper part of the branch, placing the
part of the chain that’s under the bar against the branch.
Do not use excessive pressure against the branch in order
to not overload the tool and to prevent the extension pole
from bending, especially when the tool is extended to its
maximum length.
Prune the tree in order to obtain the desired shape, starting
from the sides and then pruning the upper part. Start from
the lower branches and then proceed with the upper ones;
the branches cut will easily fall to the ground giving you a
better view of the cut performed. Regularly stop cutting to
clear the ground so you can move as freely as possible in
any direction.

- 14 -
If you have to remove cut branches that got snagged on the
tree, turn the tool off, seize the branch with the branch hook
(pos. 16, where fitted), and pull.
During use, keep the chain lubricated: see chapter “Main-
tenance”.
MAINTENANCE
!IMPORTANT! Before doing the following steps, always
disconnect the tool from the power supply by unplugging it.
!IMPORTANT! Do not tamper or attempt to repair the
power tool.
!IMPORTANT! Protect your hands with safety gloves.
The working life of the tool and operating costs also depend
on constant and meticulous maintenance.
Take good care of your power tool and clean it regularly. In this
way its efficiency will be ensured and its lifespan extended.
- Using a cloth, wipe the dirt deposited on the tool.
- Regularly remove any dirt and foreign objects from the
motor cooling vents.
- Do not wet or spray water over the power tool - risk of
internal infiltrations.
- Do not use any flammables, detergents or solvents.
- The plastic parts can easily be damaged by chemical agents.
Chain, bar and oil lines:
- At the end of your work, remove dirt with a brush or non-
metallic brush and white petrol. Never clean with water
or degreasing agents. After cleaning, thoroughly dry the
components.
- Carefully clean the holes in the bar where the oil flows.
- Lubricate with oil the blade and the the bar raceway. After
lubricating, operate the tool for a few seconds. Do no
contaminate with oil the plastic parts of the machine, as
they could deteriorate.
- Regularly lubricate the ball bearings on the tip of the bar
through the greasing hole (pos. 24).
- Tension the chain.
- If the shape of the bar allows it, we recommend turning the
bar by 180° after extensive use, in order to have uniform
wear.
- When cleaning, check the state of the cutting edges; if
worn, contact an assistance centre authorised to sharpen
them. Replace the chain when, after repeated sharpenings,
the length of the tooth has reached 3-4 mm or when the
links are worn.
- In the tool, carefully remove the dirt from the sprocket
(pos.16), the oil passage hole (pos.22) and the engine
oil top up area (pos.10).
- Clean the breather hole on the oil cap.
PROBLEMS, CAUSES AND SOLUTIONS
PROBLEM CAUSES SOLUTIONS
The electrical
tool fails to start
Power supply line
disconnected
Check the electric
power supply line
Plug not inserted Insert the plug in the
electric power supply
socket and press the
start button
The switch re-
lease button is not
pressed
Press and keep press-
ing the release button
and then the switch
The switch is not
pressed
Press and keep pressing
the release button and
then the switch
Foreign object
blocking the
movement of the
blade
Remove the foreign ob-
ject and thoroughly clean
the cutting area, see
chapter “Maintenance”
Motor brushes
worn (not visible
from the outside)
Contact an authorised
service centre.
Electrical fault Contact an authorised
service centre.
The tool stops dur-
ing use Foreign object
blocking the
movement of the
chain
Remove the foreign ob-
ject and thoroughly clean
the cutting area, see
chapter “Maintenance”
Lack of lubrica-
tion in the chain
Empty oil tank Refill the tank with
chain oil
Oil cap breather ob-
structed with dirt
Clean the breather hole
In the tool, the oil
outlet is obstructed
Clean the oil outlet
In the bar, the oil
passage hole(s)
is obstructed
Clean the oil passage
hole(s)
The oil is not suit-
able and is too thick
Use a more fluid oil for
chains
Overheated
chain and bar
The chain does
not slide well
The chain is too
tight
Adjust the chain tension
Dirty chain and bar Thoroughly clean the
cutting area, see chap-
ter “Maintenance”
The chain does
not cut well,
is noisy, gets
jammed
The chain has no
cutting edge
Sharpen or replace
The chain is loose Adjust the chain tension
The chain is worn Replace
IMPORTANT! If the power tool still fails to operate correctly
after you have carried out the above operations, or in the
event of anomalies other than those described above, take
it to an authorised service centre with proof of purchase
and ask for original spare parts. Always refer to the
information shown on the technical data label.

- 15 -
STORAGE
Clean the whole tool and all its accessories thoroughly (see
Maintenance chapter); slip the sleeve over the bar/chain and
use the original packaging to protect the tool.
If the chainsaw is not used for a long period of time, we
recommend that you empty the oil tank and store the chain
and the bar in greaseproof paper.
Keep the tool out of reach of children, in a stable and safe
position. The place must be dry, free from dust, temperate
and protected from direct sunlight. Keep children and unau-
thorised personnel out of the storage room.
DISPOSAL
In order to protect the environment, proceed according to
the local laws in force. Contact the relevant authorities for
more information.
When the tool is no longer usable or repairable, deliver it and
all of its packaging to a recycling centre.
Do not dispose of used oil with domestic waste, but take it
to the special Collection Centres.
Electric and electronic waste may contain poten-
tially hazardous substances for the environment and human
health. It should therefore not be disposed of with domestic
waste, but by means of differentiated collection at specific
centres or returned to the vendor in the event of purchasing
a new similar tool. The illegal disposal of waste will result
in administrative sanctions.
WARRANTY
The product is protected by law against non-compliance
with the declared characteristics provided it is used only
in the manner described in the instructions, it has not been
tampered with in any way, it has been stored properly, has
been repaired by authorized and, where applicable, have
been used only original spare parts.
In the case of industrial or professional use or when using
such a guarantee is valid for 12 months.
To issue a claim under warranty you must present proof of
purchase to your dealer or authorized service center.

1230V~50Hz
2750 W
3II
4250 mm
575 ml
611 m/s
72060 / 2850 mm
8OREGON cod. 91 P040X
988 dB(A) K=3
10 104 dB(A) K=3
11 107 dB(A)
12 V
13 3,21 m/s2K=1,5
14 3,73 kg
DATI TECNICI
1. Tensione e frequenza nominale
2. Potenza nominale
3. Classe isolamento macchina
4. Lunghezza massima di taglio
5. Capacità serbatoio olio
6. Velocità di taglio
7. Lunghezza totale
8. Tipo catena
9. Livello di pressione acustica al posto operat. LpA
10. Livello di potenza sonora misurato LwA
11. Livello di potenza sonora garantito LwA
12. Procedura di valutazione della conformità seguita per 2005/88/CE
13. Vibrazione
14. Peso
TECHNICAL DATA
1. Voltage and rated frequency
2. Rated power
3. Machine insulation class
4. Maximum cutting length
5. Oil tank capacity
6. Cutting speed
7. Total length
8. Chain Type
9. Sound pressure level at operator LpA
10. Measured sound power level LWA
11. Guaranteed sound power level LWA
12.
Conformity assessment procedure followed for 2005/88/EC
13. Vibration
14. Weight
DICHIARAZIONE DI CONFORMITA’
La ditta indicata in etichetta dichiara sotto la propria
responsabilità che il prodotto ivi citato è conforme ai
requisiti essenziali di sicurezza e salute contenuti nelle
seguenti direttive europee:
2006/42/CE, 2006/95/CE, 2014/30/CE, 2011/65/CE
DECLARATION OF CONFORMITY
The firm indicated on the label declares, under its own
responsibility, that the product cited there complies with
the essential health and safety requirements contained in
the following European directives:
2006/42/EC, 2006/95/EC, 2014/30/EC, 2011/65/EC
Persona autorizzata a costituire il fascicolo tecnico
presso/ The person authorized to compile the
technical file is in
Valex SpA - Via Lago Maggiore 24
36015 Schio (VI) - Italy
02.2020
Un procuratore - Attorney
SMIDERLE STEFANO
Table of contents
Languages:
Other Valex Chainsaw manuals