Valex M-LP 18 User manual

M-LP 18
S429211
29-11-2019
Final dimension: A5
ATTENZIONE! Prima di usare la macchina, leggete e comprendete le istruzioni di sicurezza e le istruzioni d’uso fornite
WARNING! Before using the machine, read and understand the supplied safety instructions and operating instructions
Levigatrice palmare a batteria
ISTRUZIONI D’USO
Istruzioni originali
Cordless orbital sander
OPERATING INSTRUCTIONS
Translation of the original instructions

- 2 -
A
B
2
54
1
8
7
6
423

- 3 -
C
F G
D E
1
b
a
8
a
b

- 4 -
i
SIMBOLOGIA
Osservate con attenzione la simbologia della
fig.B e memorizzate il rispettivo significato. Una
corretta interpretazione dei simboli consente un
uso più sicuro della macchina.
1 Modello macchina
2 Dati tecnici
3 Numero di lotto (le prime 2 cifre del lotto
indicano l’anno di costruzione)
V Volt
Hz Hertz
~ corrente alternata
Corrente continua
W Watt
mm millimetri
m metri
s secondi
kg chilogrammi
novelocità a vuoto
min-1 giri al minuto
dB decibel
___________________________________________
Vi ringraziamo per averci preferito nella scelta
di questo utensile elettrico, di seguito chiamato
“levigatrice”.
! ATTENZIONE! Prima di usare questo
utensile elettrico, leggete ed applicate atten-
tamente le norme di sicurezza e le istruzioni
di seguito riportate. Prima di iniziare il lavoro
assicuratevi, in caso di emergenza, di saper
arrestare l’utensile. L’uso improprio della
levigatrice può provocare ferite.
Conservate con cura ed a portata di mano queste
istruzioni in modo da poterle consultare in caso
di necessità.
ATTENZIONE! La levigatrice è idonea a
levigare a secco superfici di legno, plastica,
metalli, stucco e superfici verniciate. E’ vieta-
to l’utilizzo di materiali pericolosi e in ambienti
con pericolo di incendio.
La levigatrice è destinata ad un utilizzo
hobbystico e non professionale.
Questo istruzioni riportano le informazioni e
quanto ritenuto necessario per il buon uso,
la conoscenza e la normale manutenzione
dell’utensile. Esse non riportano le informazioni
sulle tecniche di lavorazione dei vari materiali;
l’utilizzatore troverà maggiori notizie su libri e
pubblicazioni specifiche o partecipando a corsi
di specializzazione.
COMPONENTI
Fare riferimento alla fig. A e seguenti, allegate
alle presenti istruzioni.
1 Alloggiamento batteria
2 Impugnature
3 Interruttore avvio/arresto
4 Feritoie di ventilazione
5 Piastra vibrante / Platorello
6 Connettore aspirazione polveri
7 Sacchetto raccoglipolvere
8 Abrasivo
INSTALLAZIONE
! ATTENZIONE! La Ditta costruttrice declina
ogni responsabilità per gli eventuali danni
diretti e/o indiretti causati da un errato al-
lacciamento.
! ATTENZIONE! Prima di effettuare le se-

- 5 -
guenti operazioni assicuratevi che la batteria
sia scollegata dall’apparecchio.
TRASPORTO
Per trasportare l’utensile utilizzate sempre il suo
imballo o la sua valigetta (se presente); questo lo
preserverà da urti, polvere e umidità che ne pos-
sono compromettere il regolare funzionamento.
Durante il trasporto togliete il disco abrasivo/
spazzola ecc. dalla macchina.
MOVIMENTAZIONE
Afferrate saldamente l’impugnatura (Fig.A, 2)
senza azionare l’interruttore, mantenete l’utensile
lontano dal vostro corpo e dopo l’uso appoggia-
telo senza battere.
MESSA IN SERVIZIO
Nel luogo che utilizzerete l’utensile elettrico è
opportuno considerare:
-che la zona non sia umida e sia al riparo dagli
agenti atmosferici.
-che attorno sia prevista un’ampia zona opera-
tiva libera da impedimenti.
-che vi sia una buona illuminazione.
-che sia utilizzata in vicinanza dell’interruttore
generale con differenziale.
-che l’impianto di alimentazione sia dotato di
messa a terra conforme alle norme (solo se
l’utensile elettrico è di classe I, cioè dotato di
spina con cavo di terra).
-che la temperatura ambiente sia compresa tra
10° e 35° C.
-che l’ambiente non sia in atmosfera infiamma-
bile/esplosiva.
Estraete la macchina ed i componenti e verificate
visivamente la loro perfetta integrità; a questo
punto procedete ad una accurata pulizia per
togliere gli eventuali oli protettivi dalle superfici
metalliche.
Fissaggio dei fogli abrasivi (Fig.E)
Il foglio abrasivo si applica esercitando una
leggera pressione sul velcro, si sostituisce
tirandolo.
Montaggio sacchetto raccoglipolvere (Fig.D)
L’innesto è a baionetta. Seguite quanto in figura.
CARICA DELLA BATTERIA (seguire le istruzioni
allegate al caricabatterie)
! ATTENZIONE! Prima di utilizzare l’appa-
recchio è necessario effettuare una carica
completa della batteria.
! ATTENZIONE! Ricaricare soltanto con
un caricabatterie previsto per questo tipo di
apparecchio. Un caricabatterie che è adeguato
per un tipo di gruppo di batterie può creare un
rischio di incendio quando viene utilizzato con
altri gruppi di batterie.
Per mantenere efficiente la batteria, non
scaricarla completamente.
Eseguite una successiva ricarica completa:
- Dopo ogni utilizzo.
- Almeno ogni 4 mesi, anche in caso di inutilizzo.
- Se durante il lavoro notate un calo evidente
delle prestazioni dell’apparecchio.
INSERIMENTO E RIMOZIONE DELLA BATTERIA
(Fig.C)
- Inserite la batteria attraverso le guide presenti
sull’alloggiamento batteria (1).
- Estraete la batteria dalla sede dell’utensile
agendo sul dispositivo di sgancio (8).
AVVIAMENTO E ARRESTO
! ATTENZIONE! Prima di avviare l’utensile
elettrico è obbligatorio indossare i dispositivi
di protezione individuale (non inclusi).
! ATTENZIONE! Prima dell’avviamento e
durante la fase di lavoro, afferrare saldamente
l’utensile con entrambe le mani senza mai
abbandonare la presa, in modo tale che, in
caso di pericolo, possiate arrestarla imme-
diatamente.
! ATTENZIONE! Durante l’utilizzo fate in
modo che nessuno si avvicini alla vostra zona
di lavoro.
! ATTENZIONE! Prima di collegare la batteria
all’elettroutensile, verificare che l’interruttore
sia in posizione OFF (“0”).
AVVIAMENTO
1) Inserite la batteria carica nell’alloggiamento
dell’apparecchio (Fig.A, 1).
2) Afferrate l’utensile usando entrambe le impu-
gnature (Fig.A, 2)
3) Per avviare l’utensile spostate il pulsante
dell’interruttore (Fig.A, 3) in ON (“I”).

- 6 -
ARRESTO
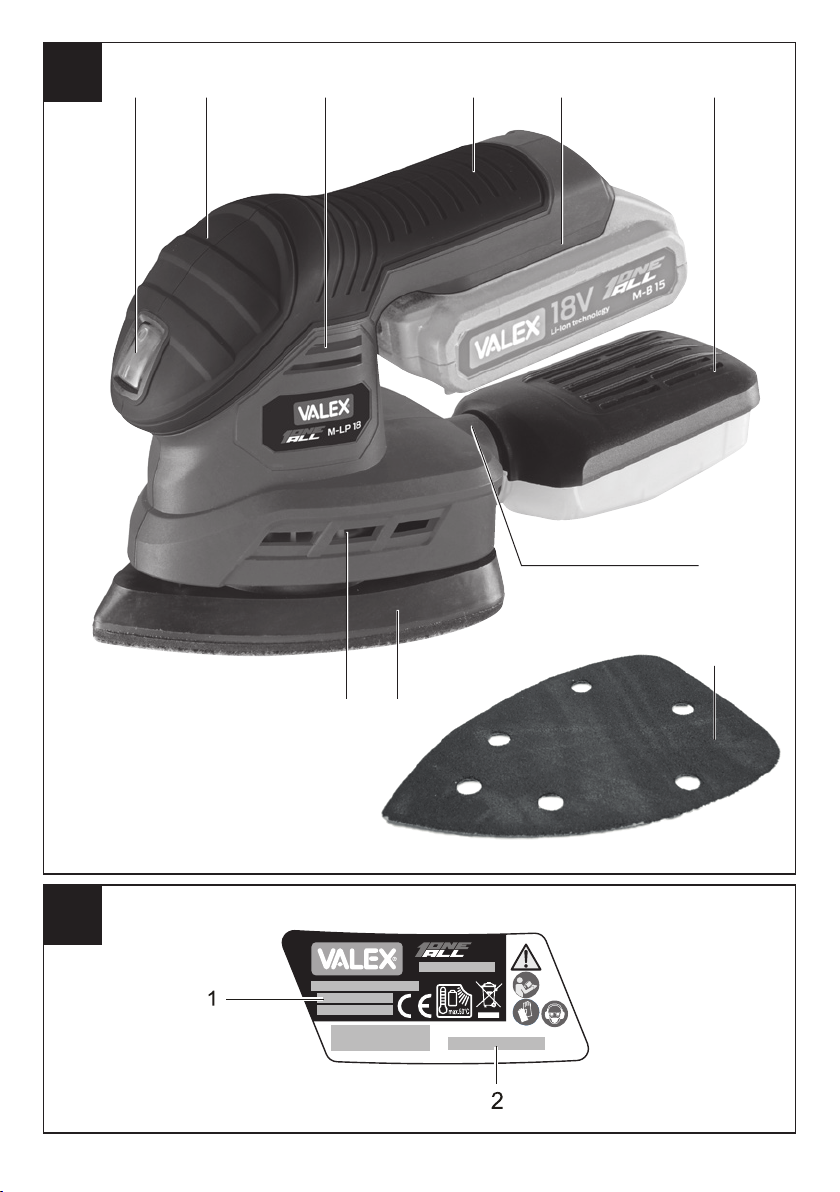
Per arrestare l’utensile spostate l’interruttore
(Fig.A, 3) in OFF(“0”)mantenendo ben saldo
l’utensile.
Vi consigliamo di ripetere queste operazioni
alcune volte prima di iniziare il lavoro in modo
da familiarizzare il più possibile con i comandi.
Se osservate delle anomalie di funzionamento
spegnete l’utensile elettrico e consultate il capi-
tolo “Problemi, cause e rimedi”.
Quando non lavorate spegnete e staccate la
batteria dall’utensile.
CONSIGLI D’USO
Dopo aver letto attentamente i capitoli prece-
denti, seguite scrupolosamente questi consigli
che vi permetteranno di ottenere il massimo
delle prestazioni.
Procedete con calma in modo da prendere
familiarità con tutti i comandi; solo dopo aver
acquisito una buona esperienza riuscirete a
sfruttarne a fondo tutte le potenzialità.
ABRASIVO
Utilizzate l’abrasivo adatto all’operazione di
levigatura da eseguire. La scelta dipende dal
materiale in lavorazione e dal grado di finitura
richiesto; in commercio ne esistono diversi
tipi contraddistinti da un numero che definisce
la “grana” superficiale, stampigliato sul retro
della stessa. Rivolgetevi al vostro rivenditore di
fiducia che potrà consigliarvi al meglio. La nostra
azienda produce un’ampia gamma di abrasivi
adatti ai più svariati impieghi.
Materiale Operazione Grana
Numero
Legno, me-
tallo, stuc-
co, vernice,
plastica
Sgrossatura con
finitura grosso-
lana
Grossa 40
60
Levigatura con
finitura media
Media 80
100
120
Levigatura con
finitura fine
Fine da 150 a
400
Lucidatura Molto fine 600 e
superiori
OPERAZIONE DI LEVIGATURA
- Prima di operare su oggetti importanti (esem-
pio mobili, veicoli ecc.) effettuate una prova
di levigatura per verificare di aver installato
l’abrasivo adatto.
- Se il pezzo è piccolo e leggero fissatelo sempre
con una morsa durante la lavorazione; se non
ben fissato l’azione della macchina potrebbe
scagliarlo contro di voi.
- Non lavorate pezzi umidi o bagnati o con
abrasivo umido.
- Di norma utilizzate inizialmente un abrasivo con
grana più grossa (esempio 40), poi rifinite le
superficie lavorata con un abrasivo di grana
più fine (esempio 120 o maggiore).
- Assicuratevi che l’abrasivo sia correttamente
montato e perfettamente aderente alla piastra
orbitante.
- Usate sempre la levigatrice collegata ad un impianto
di aspirazione provvisto di filtro per le polveri o al
sacchetto in dotazione.
- Avviate la levigatrice solo dopo averla impu-
gnata saldamente nell’impugnatura/e. Appog-
giatela sul pezzo e azionatela con movimenti
circolari esercitando una pressione leggera.
Non insistere nella levigatura mantenendo
costantemente ferma la macchina.
- Una eccessiva pressione della mano/i sulla
levigatrice non migliora le prestazioni e rischia
di surriscaldare il motore con successivi guasti
non coperti dalla garanzia, o può provocare
un incendio a causa delle alte temperature
prodotte sul pezzo.
- Non coprite con la mano/i le feritoie di ventila-
zione della levigatrice.
- Sostituite l’abrasivo non appena è consumato
o deteriorato, eviterete di far lavorare la le-
vigatrice sotto carico eccessivo, eviterete di
danneggiare il platorello ed otterrete un risultato
migliore con un minor sforzo e tempo.
MANUTENZIONE
! ATTENZIONE! Prima di ogni controllo o
regolazione scollegate la batteria dal suo
alloggiamento.
! ATTENZIONE! Non manomettete o tentate
di riparare l’utensile elettrico.
La durata e il costo d’esercizio dipendono anche
da una costante e scrupolosa manutenzione.
Pulite regolarmente ed abbiate cura del vostro
utensile elettrico, vi garantirete una perfetta
efficienza ed una lunga durata dello stesso.
- Rimuovete la polvere e i residui di lavorazione
con un pennello a setole morbide.
- Non spruzzate o bagnate d’acqua l’utensile
elettrico, pericolo di infiltrazioni interne.

- 7 -
- Non usate infiammabili, detergenti o solventi
vari.
- Le parti in plastica sono aggredibili da agenti
chimici.
- Non utilizzate un getto d’aria compressa per la
pulizia: pericolo lancio materiale!
- Prestate particolare attenzione alla pulizia
dell’interruttore, alle feritoie di ventilazione del
motore, ai fori presenti sul platorello, ai rulli di
trascinamento dell’abrasivo.
- Aprite il coperchio del contenitore di raccolta
polvere (fig.G) per svuotare il contenuto. Pulire
l’interno con un pennellino e rimontare.
- Eliminate eventuali tracce di resina da legno.
SOSTITUZIONE ABRASIVO (fig.E)
Capovolgere la macchina, strappare l’abrasivo
dal platorello, pulire, attaccare il nuovo abrasivo,
verificare che il foglio sia ben teso e che i fori
corrispondano ai fori del platorello.
Al termine effettuare una prova di funzionamento
a vuoto.
MONTAGGIO/SOSTITUZIONE PIASTRA
VIBRANTE/PLATORELLO (fig.F)
Per il montaggio osservate attentamente la fig.F
IMMAGAZZINAMENTO
Effettuate una accurata pulizia di tutta la mac-
china e sue parti accessorie (vedi paragrafo
Manutenzione). Proteggete le parti non verniciate
con un olio protettivo ed utilizzate l’imballo origi-
nale o la valigetta (se presente) per proteggerla.
Riponete la macchina lontano dalla portata dei
bambini, in posizione stabile e sicura. Il luogo
dovrà essere asciutto, privo da polveri, tempe-
rato e protetto dai raggi solari diretti.
Al locale di rimessaggio non devono avere
accesso i bambini e gli estranei.
SMALTIMENTO
Per la salvaguardia ambientale procedete se-
condo le leggi vigenti del Paese in cui vi trovate.
Rivolgetevi alle autorità competenti per maggiori
notizie in merito.
Quando la macchina non è più utilizzabile né
riparabile, consegnatela con l’imballo ad un
punto di raccolta per il riciclaggio.
I rifiuti elettrici ed elettronici possono con-
tenere sostanze pericolose per l’ambiente e
la salute umana; non devono pertanto essere
smaltiti con quelli domestici ma mediante una
raccolta separata negli appositi centri di raccolta
o riconsegnati al venditore nel caso di acquisto di
una apparecchiatura nuova analoga. Lo smalti-
mento abusivo dei rifiuti comporta l’applicazione
di sanzioni amministrative.
Smaltimento batterie: Le batterie incluse
nell’apparecchio possono essere smaltite
assieme ad esso. Non gettate nel fuoco e non
disperdete nell’ambiente le batterie esauste ma
consegnatele agli appositi centri per il loro
smaltimento. Non smaltire assieme ai rifiuti
domestici.
GARANZIA
Il prodotto è tutelato a norma di legge contro non
conformità rispetto alle caratteristiche dichiarate
purché sia stato utilizzato esclusivamente nel
modo descritto dalle istruzioni, non sia stato
manomesso in alcun modo, sia stato conser-
vato correttamente, sia stato riparato da tecnici
autorizzati e, ove previsto, siano stati utilizzati
solo ricambi originali.
In caso di utilizzo industriale o professionale
oppure in caso di impiego simile la garanzia ha
validità di 12 mesi.
Per emettere una richiesta di intervento in garan-
zia è necessario presentare la prova di acquisto
al rivenditore o ad centro assistenza autorizzato.

- 8 -
PROBLEMI, CAUSE E RIMEDI
PROBLEMA CAUSE RIMEDI
L’utensile elet-
trico non si
avvia
Interruttore in posizione OFF “O” Azionare l’interruttore in posizione acceso “I”
Batteria scarica Effettuare una ricarica completa alla batteria
Batteria non inserita correttamente nell’allog-
giamento dell’utensile
Sganciate la batteria e inseritela correttamente
La batteria è surriscaldata ed è intervenuta la
protezione interna autoripristinabile
Attendere che la batteria si raffreddi
Utensile elettrico o batteria guasti Sostituite la batteria o/e rivolgetevi ad un centro di
assistenza autorizzato
L’utensile si av-
via ma non levi-
ga il materiale o
leviga poco
Abrasivo usurato Sostituite l'abrasivo
Abrasivo non idoneo Cambiate tipo e grana dell'abrasivo
Abrasivo non teso Riposizionate correttamente l'abrasivo
La batteria non
si ricarica
Batteria non inserita correttamente nell’allog-
giamento del caricabatterie
Sganciate la batteria e inseritela correttamente
Caricabatteria o batteria non pronto per la
carica.
Batteria surriscaldata.
Attendere che la batteria si raffreddi
Caricabatterie o batteria guasti Sostituite la batteria o/e rivolgetevi ad un centro di
assistenza autorizzato
L’utensile si
arresta duran-
te una fase di
lavorazione
Batteria scarica Se disponibile inserire un nuova batteria carica,
oppure sganciare la batteria ed effettuare una
ricarica completa.
La batteria è surriscaldata ed è intervenuta la
protezione interna autoripristinabile
Attendere che la batteria si raffreddi
Intervento del dispositivo di protezione che
limita la corrente
Ridurre la pressione esercitata sul pezzo in lavo-
razione
! ATTENZIONE! Se dopo aver eseguito gli interventi sopra descritti l’utensile non funziona
correttamente o in caso di anomalie diverse da quelle indicate, portatelo presso un centro
di assistenza autorizzato esibendo la prova di acquisto e richiedendo ricambi originali. Fate
sempre riferimento alle informazioni riportate sull’etichetta dati tecnici.

- 9 -

- 10 -
g
SYMBOLS
Carefully observe the symbols in fig. B and
memorise their respective meanings. Correct
interpretation of the symbols allows safer use
of the machine.
1 Machine model
2 Technical data
3 Batch number (the first 2 figures of the batch
number indicate the year of manufacture)
V Volt
Hz Hertz
~ alternating current
Direct current
W Watt
mm millimetres
m metres
s seconds
kg kilograms
no no load speed
min-1 revolutions per minute
dB decibel
___________________________________________
We thank you for having purchased this elec-
trical tool that will hereafter also be referred to
as “sander”.
! WARNING! Before using this power tool,
read and apply the safety rules and instruc-
tions carefully. Before starting work make
sure, in case of emergency, that you know how
to stop the tool. Improper use of the sander
can cause injury.
Keep these instructions carefully and at hand so
that you can consult them if necessary.
IMPORTANT! The sander is suitable for
dry sanding of wood, plastic, metal, plaster
and painted surfaces. It is prohibited to use
dangerous materials in environments with
risk of fire.
The sander is made for DIY and not profes-
sional use.
This manual contains information deemed ne-
cessary for proper use, knowledge and standard
tool maintenance. It does not include information
on the working techniques of the various mate-
rials; the user can find additional information in
specific books or publications or by attending
special training courses.
COMPONENTS
Refer to fig. A and the following figures, attached
to these instructions.
1 Battery compartment
2 Main handle
3 Start / stop switch
4 Ventilation slots
5 Vibrating plate / pad
6 Dust extraction connector
7 Dust bag
8 Abrasive
INSTALLATION
! WARNING! The manufacturer is not liable
for any direct and/or indirect damage caused
by incorrect connections.
! WARNING! Before carrying out the fol-
lowing operations, make sure that the battery
is disconnected from the tool.

- 11 -
TRANSPORT
Always use the packaging or case (when provi-
ded) when transporting the tool; this will protect
it from impact, dust and humidity which can
compromise normal operation.
During transport, remove the abrasive disc,
brush, etc. from the machine.
HANDLING
Firmly grasp the handgrip (Fig.A, 2) without
using the switch; keep the tool well away from
your body and after use place it down gently
without hitting.
SWITCHING ON
When choosing where to use the power tool, the
following should be considered:
- that the place is not damp and is protected
from the weather.
- that there is a large working area free from
obstacles.
- that there is good lighting.
- that it is used close to the main switch with
residual current device.
- that the power supply system is earthed and
conforms to the standards (only if the power
tool is class I, which is equipped with an earth
cable plug).
- that the room temperature is between 10°
and 35°C.
- that the environment is not in a flammable/
explosive atmosphere.
Take out the machine and components and
visually check that they are perfectly intact; then
proceed to thoroughly clean them in order to
remove any protective oils from metal surfaces.
Fastening of abrasive sheets (Fig.E)
The abrasive sheet is applied by exerting a slight
pressure on the velcro, replacing it by pulling it.
Dust bag assembly (Fig.D)
The graft is bayonet. Follow the figure.
CHARGING THE BATTERY (follow the instruc-
tions attached to the battery charger)
! WARNING! Before using the apparatus it is
necessary to fully charge the battery.
! WARNING! Recharge only with a battery
charger designed for this type of tool. An
inappropriate battery charger can cause a
fire hazard when used with other battery units.
To keep the battery in good working order, do
not discharge it completely.
Fully charge the battery:
- After each use.
- At least every 4 months, even if not used.
- If while working you notice a clear drop in the
performance of the tool.
INSERTING AND REMOVING THE BATTERY
(Fig. C)
- Insert the battery through the guides in the
battery compartment (1).
- Take out the battery from its housing in the tool
by operating the release device (8).
STARTING AND STOPPING
! WARNING! Before starting the electric tool,
it is mandatory to wear the personal protective
equipment (not included).
! WARNING! Before starting and during the
work phase, grasp the tool firmly with both
hands without ever leaving the socket, so that,
in case of danger, you can stop it immediately.
! WARNING! During use, make sure that
nobody approaches your work area.
! WARNING! Before connecting the battery
to the power tool, make sure that the switch
is in the OFF position (“0”).
STARTING
1) Insert the charged battery into the housing of
the appliance (Fig.A, 1).
2) Grasp the tool using both handles (Fig.A, 2)
3) To start the tool, move the switch button
(Fig.A, 3) to ON (“I”).
STOPPING
To stop the tool, move the switch (Fig. A, 3) to
OFF (“0”) keeping the tool firmly in place.
We recommend that you repeat these steps a
few times before starting work so as to become
as familiar with the commands as possible.
If you observe malfunctions, turn off the tool
electric and consult the chapter “Problems,
causes and remedies”.
When not working, switch off and unplug the
battery from the tool.

- 12 -
OPERATIONAL TIPS
OPERATIONAL TIPS
After reading the previous chapters carefully,
apply these tips scrupulously to obtain maximum
performance.
Proceed calmly so as to become familiar with
all the controls; after having gained sufficient
experience you will be able to make full use of
its potential.
ABRASIVE SUPPORT
Use the suitable abrasive support for the sanding
operation to be carried out. The choice depends
on the material to be processed and the required
finishing degree; there are different types on
the market marked with a number defining the
surface “grain”, printed on the back. Ask your
retailer to give you the best advice on this. Our
company produces a wide range of abrasive
supports suitable for the various uses.
Material Operation Grain Numero
Wood, me-
tal, plaster,
paint, pla-
stic
Roughing out
with rough fi-
nish
Coarse 40
60
Sanding with
medium finish
Medium 80
100
120
Sanding with
fine finish
Fine from 150
to 400
Polishing Very fine 600 and
over
SANDING OPERATION
- Before working on important objects (e.g. furni-
ture, vehicles, etc.) do a sanding test to ensure
you have installed the right abrasive support.
- If the item is small and light always fasten it
with a vice while working; if it is not fastened
well, the action of the machine could throw it
against you.
- Do not work on damp or wet items or with wet
abrasive supports.
- Initially use an abrasive support with a coarse
grain (e.g. 40), then finish processed surfaces
with a finer grain abrasive support (e.g. 120
or higher).
- Make sure the abrasive support is correctly
assembled and perfectly flat against the orbital
plate.
- Always use the sander connected to a vacu-
um system with a filter for dust or to the bag
provided.
- Only start the sander once you have a firm
grip on the handle(s). Rest it on the item and
operate it with circular movements exerting
light pressure. Do not insist on sanding one
point keeping the machine still.
- Excessive pressure with the hand(s) on the
sander does not improve its performance and
causes a risk of the motor overheating with
subsequent breakdowns not covered by the
warranty, or can cause fire due to the high
temperatures produced on the item.
- Do not cover the sander’s ventilation slots with
your hand(s).
- Replace the abrasive support as soon as it
is worn or deteriorated; do not let the sander
work under excessive loads, avoid damaging
the backing plate and you will obtain a better
result with less effort and time.
MAINTENANCE
! IMPORTANT! Before any inspection,
adjustment or maintenance, always discon-
nect the battery from its housing.
! IMPORTANT! Do not tamper or attempt to
repair the electrical tool.
The working life and costs also depend on con-
stant and meticulous maintenance.
Take good care of your electrical tool and clean it
regularly. In this way its efficiency will be ensured
and its lifespan extended.
- Remove dust and machining residuals with a
brush with soft bristles.
- Do not wet or spray water over the electrical
tool - risk of internal infiltrations.
- Do not use any inflammables, detergents or
solvents.
- The plastic parts can easily be damaged by
chemical agents.
- Do not use compressed air for cleaning: Risk
of material ejection!
- Pay particular attention to cleaning the switch,
the motor ventilation slots, the holes on the
backing plate and the abrasive support driving
rollers.
- Open the dust box cover (fig. G) to empty the
contents. Clean the inside with a small brush
and reassemble.
- Remove any traces of wood resin.

- 13 -
ABRASIVE SUPPORT REPLACEMENT (fig.E)
Turn the machine over, rip the abrasive support
off the backing plate, clean, attach the new
abrasive support, check that the sheet is taut
and that the holes correspond to the holes on
the backing plate.
At the end, carry out a trial run.
ASSEMBLY/REPLACEMENT OF THE VIBRATING
PLATE/PAD (fig.F)
Carefully follow fig. F for assembly
STORAGE
Clean the machine and all its accessories
thoroughly (see Maintenance section). Protect
the unpainted parts with protective oil and use
the original packaging or case (where fitted) to
protect it.
Store the machine in a stable and safe position
out of the reach of children. The place must be
dry, free from dust, temperate and protected
from direct sunlight.
Keep children and unauthorised personnel out
of the storage room.
DISPOSAL
In order to protect the environment, proceed
according to the local laws in force. Contact the
relevant authorities for more information.
When the machine is no longer usable or repai-
rable, take the machine and its packaging to a
recycling centre.
Electric and electronic waste may contain
substances hazardous to the environment and
human health. It should therefore not be dispo-
sed of with household waste, but by means of
separate collection at special collection centres
or returned to the vendor in the event of purcha-
sing a new similar tool. Illegal disposal of waste
will result in administrative sanctions.
Battery disposal: The batteries included in the
equipment can be disposed of along with it.
Do not dispose of used batteries in fire and do
not dispose of them in the environment, but
take them to special disposal centres. Do not
dispose of them with domestic waste.
WARRANTY
The product is protected by law against all non-
conformities with regard to its stated characte-
ristics, provided that it has been used solely in
the way described in these user’s instructions,
it has not been tampered with in any way, it has
been stored correctly, it has been repaired by
authorised personnel and, where necessary, only
original spare parts have been used.
In the event of industrial or professional use or
similar, the warranty is valid for 12 months.
To issue a request for intervention covered by
warranty, proof of purchase must be shown to
the retailer or authorised service centre.

- 14 -
PROBLEMS, CAUSES AND SOLUTIONS
PROBLEM CAUSES SOLUTIONS
The power tool
fails to start
ISwitch in the OFF “O” position Flip the switch to the ON “I” position
Flat battery Fully charge the battery
Battery not correctly inserted in the tool
housing
Take out the battery and insert it correctly
The battery has overheated and the internal
auto reset protection has cut in
Wait for the battery to cool down
Power tool or battery faulty Replace the battery and/or contact an authorised
service centre
The tool starts
but does not
smooth the
material or
smoothes
slightly.
Abrasive worn out Replace the abrasive
Unsuitable abrasive Change the type and texture of the abrasive
Non-tensed abrasive Reposition the abrasive correctly
The battery
does not
charge
Battery not correctly inserted in the battery
charger housing
Take out the battery and insert it correctly
Battery charger or battery not ready for
charging. Battery is overheated.
Wait for the battery to cool down
Battery charger or battery faulty Replace the battery and/or contact an authorised
service centre
The tool stops
while working
Flat battery If available insert a new charged battery, or take out
the battery and fully charge it.
The battery has overheated and the internal
auto reset protection has cut in
Wait for the battery to cool down
The protective device that limits current tripped Reduce the pressure applied to the workpiece
! WARNING! If the tool still fails to operate correctly after you have carried out the above
operations, or in the event of anomalies other than those described above, take it to an au-
thorised service centre with proof of purchase and ask for original spare parts. Always refer
to the information shown on the technical data label.

- 15 -

DICHIARAZIONE DI CONFORMITA’
La ditta indicata in etichetta dichiara sotto la
propria responsabilità che il prodotto ivi citato
è conforme ai requisiti essenziali di sicurezza e
salute contenuti nelle seguenti direttive europee:
2006/42/CE, 2014/30/CE, 2011/65/CE
DECLARATION OF CONFORMITY
The firm indicated on the label declares, under
its own responsibility, that the product cited
there complies with the essential health and
safety requirements contained in the following
European directives:
2006/42/CE, 2014/30/CE, 2011/65/CE
Persona autorizzata a costituire il fascicolo tecnico
presso
The person authorized to compile the technical
file is in
Valex SpA - Via Lago Maggiore, 24
36015 Schio (VI) - Italy
11-2019
Un procuratore - Attorney
SMIDERLE STEFANO
1 18 V
2 12000 min-1
3 140x100 mm
4 70,3 dB(A) K=3
5 81,3 dB(A) K=3
6 11,24 m/s2 K=1,5
7 0,76 kg
DATI TECNICI
1 Tensione
2 Numero di giri motore a vuoto
3 Dimensioni platorello
4 Livello di pressione acustica LpA
5 Livello di potenza acustica LwA
6 Livello di vibrazioni
7 Peso
TECHNICAL DATA
1 Voltage
2 No load motor rpm
3 Sanding pad size
4 Acoustic pressure level LpA
5 Acoustic power level LwA
6 Vibration emission
7 Weight
Table of contents
Languages:
Other Valex Sander manuals