Vanico Maronyx HOME 1 FB040A00 User manual

0M040A00
www.vanicomaronyx.com 11/14
INSTALLATION
BAIGNOIRE HOME 1 BATHTUB FB040A00
BAIGNOIRE HOME 2 BATHTUB FB240A02
Considérations:
1- Nous recommandons un accès à l’étage en-dessous.
Cela vous facilite la connection du drain. Il est par contre
possible d’installer la baignoire sans avoir accès à l’étage
en-dessous.
2- Déterminer la position de votre baignoire en tenant
compte la position du robinet, des conduits d’eau et de
la connection du drain.
3- Il faut installer la plomberie et le drainage avant de
xer la baignoire en place.
4- Avant de découper le trou au plancher pour le
drainage, assurez-vous que l’espace est libre de
conduits d’eau, de tuyauteries de ventilation ou de ls
électriques.
5- Il est fortement recommandé de faire installer la
baignoire par un plombier professionnel.
General considerations:
1- We strongly recommend to have access from the
oor below, it will help you to connect the piping much
more easily. Connecting without having access is also
possible.
2- Determine the location of the bathtub, taking the
position for the faucets into account as well as the
water supply piping and the drain .
3- Install the plumbing and drainage before securing
the unit in place.
4- Before cutting a hole in the in the oor for drain
piping, ensure the space is free of pipes, oor joists,
heating ducts an electrical wires. If the location for the
bathtub is not free of these please contact a building
structure expert prior to cutting any joist.
5- It is recommended to have the plumbing installed by
a professional plumber.
HOME 1 63" x 30 ¾" x 22 ½"
0M240A02
HOME 2 70" x 34" x 24"

Floor opening: HOME 1 M040A00
1- Determine the position of the bathtub allowing
enough space for the plumbing and making sure that
the drain and plumbing are not directly above the
floor joists.
2- On the floor, trace the bottom of the bathtub
(length & width) and mark the position of the drain.
Next, mark the cutting line around the drain for
connection for the piping, the drain and p-trap. Cut
the opening in the floor along the red mark as shown.
www.vanicomaronyx.com 11/14
INSTALLATION
BAIGNOIRE HOME 1 BATHTUB FB040A00
BAIGNOIRE HOME 2 BATHTUB FB240A02
5"
10"
12"
1 ¼"
2 ¼"
DRAIN
LIGNE DE DÉCOUPAGE/CUTTING LINE
FOND DU BAIN
BOTTOM OF BATHTUB
63"
46 ½"
30 ¾"
22 ¾"
22 ½"
2 ⁄"
22 ¾"
46 ½"
=
7"
Ouverture dans le plancher: HOME 1
OM040A00
1- Déterminer l’emplacement de la baignoire en
prévoyant l’espace susant pour la robinetterie et
assurez-vous que l’emplacement du drain et de la
robinetterie ne sont pas au-dessus des solives du
plancher.
2- Tracez le fond de la baignoire (largeur & longueur) sur
le plancher et marquez la position du drain. Ensuite,
marquez la ligne de découpage autour du drain pour la
connection du drain et du siphon (p-trap).
3- Découpez le plancher en suivant la ligne de décou-
page tel qu’indiqué.

www.vanicomaronyx.com 11/14
INSTALLATION
BAIGNOIRE HOME 1 BATHTUB FB040A00
BAIGNOIRE HOME 2 BATHTUB FB240A02
Floor opening: HOME 2 OM240A02
1- Determine the position of the bathtub allowing enough
space for the plumbing and making sure that the drain and
plumbing are not directly above the floor joists.
2- On the floor, trace the bottom of the bathtub (length &
width) and mark the position of the drain . Next, mark the
cutting line around the drain for connection for the piping, the
drain and p-trap. Cut the opening in the floor along the red
mark as shown.
Ouverture dans le plancher: HOME 2
OM240A02
1- Déterminer l’emplacement de la baignoire en
prévoyant l’espace susant pour la robinetterie et
assurez-vous que l’emplacement du drain et de la
robinetterie ne sont pas au-dessus des solives du
plancher.
2- Tracez le fond de la baignoire (largeur & longueur) sur
le plancher et marquez la position du drain. Ensuite,
marquez la ligne de découpage autour du drain pour la
connection du drain et du siphon (p-trap).
3- Découpez le plancher en suivant la ligne de découpage
tel qu’indiqué.
centered / DRAIN / centré
LIGNE DE DÉCOUPAGE/CUTTING LINE
Centré sur le drain / centered on the drain
FOND DU BAIN
BOTTOM OF BATHTUB
=
17"
70"
35"
49"
34"
24"
23 ¾"
2¾ "
49"
23 ¾" 12"
12"

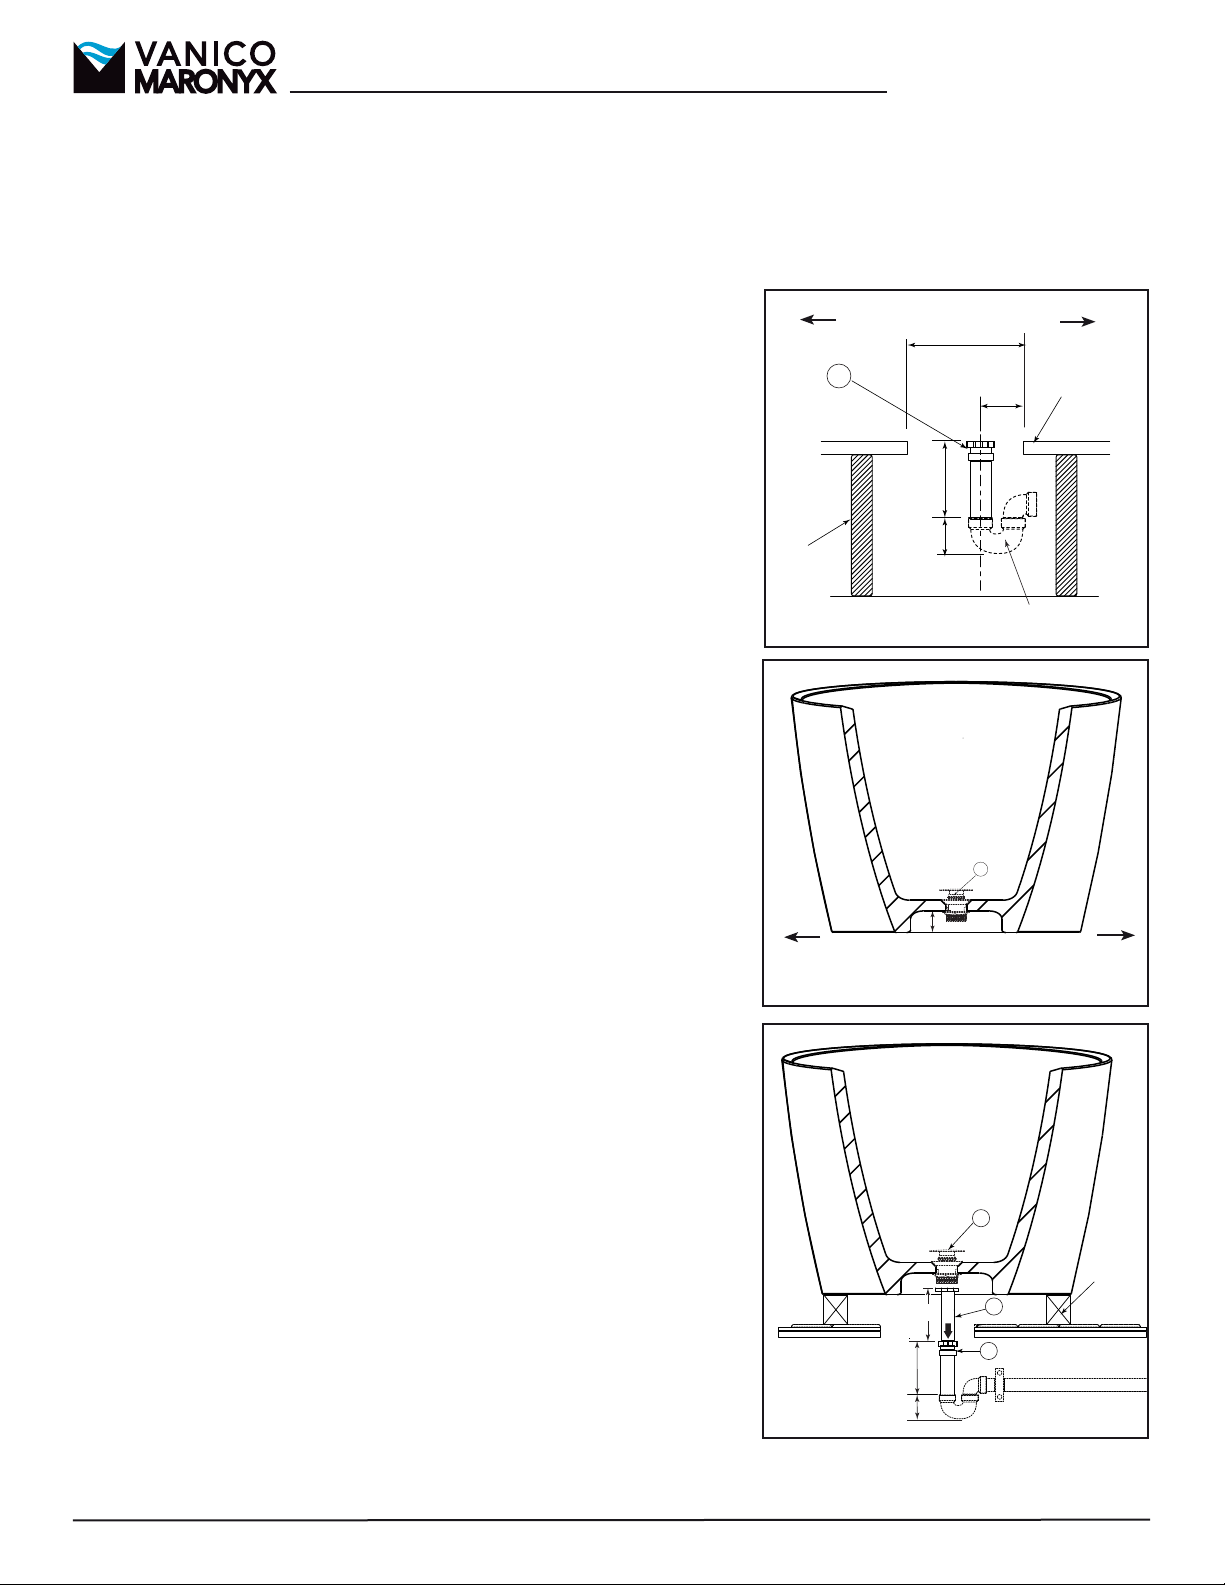
1- Place the female part (2) of the
expansion joint as shown (Fig.1).
Make sure it is flush with the
finished oor. Use the steel trap to
fasten the expansion joint to the
joists.
2a- Next, lay the bathtub on its
side carefully to prevent scratches.
Take the measurement of distance
“D” from the bottom of the drain to
the bottom of the bathtub (Fig.2).
Cut the male part of the expansion
joint (1) halfway to the female part
(2).
If you don’t have access from the
room below:
2b- Before placing the bathtub,
insert the male part of the expan-
sion joint (1) halfway to the female
part (2).
3b- Place the bathtub by raising it
up 3 1/2” with 4X4 pieces of
lumber so you can still can have
access from the bottom of the
bathtub. Align the drain (3)to the
expansion joint(1) (fig.3). From the
bottom of the bathtub, tighten the
collars of the expansion joint (1) to
the drain (3) (don’t forget to use
the seal washer in between).
Tighten the collars of the expan-
sion joint (2) just tight enough so
the male part (1) can still slide in.
(Fig.3)
4- Fill the water in the bathtub and
let it drain out. From the bottom,
make sure that all the joints are
watertight.
5- Move the bathtub down slowly
by removing the pieces of lumber.
Fill the spaces with silicone.
www.vanicomaronyx.com 11/14
INSTALLATION
BAIGNOIRE HOME 1 BATHTUB FB040A00
BAIGNOIRE HOME 2 BATHTUB FB240A02
4x4
5”
D + 4 1/2”
3”
1
2
3
Fig.3
D
3
Fig.2
AVANT/FRONT ARRIÈRE/BACK
12”
4”
3”
5”
MIN.
Ptrap
2
Fig.1
AVANT/FRONT ARRIÈRE/BACK
plancher fini
finished floor
solive/joist
1- Placez la partie femelle (2) du
joint d’expansion comme illustré
(Fig.1). Assurez-vous qu’il soit au
même niveau que le plancher (ni).
Utilisez un feuillard troué pour xer
le joint d’expansion aux solives.
2a- Placez soigneusement votre
baignoire sur le côté pour éviter
d’endommager la surface
extérieure. Prenez la mesure de la
distance ‘’D’’ du bas du drain
jusqu‘au bas de la baignoire (Fig.2).
Coupez la partie mâle du joint
d’expansion (1) à la moitié de la
partie femelle (2).
Si vous n’avez pas accès à l’étage
en-dessous:
2b- Avant de placer le bain, insérez
partiellement la partie mâle (1) du
joint d’expansion dans la partie
femelle (2).
3b- Placez le bain à sa place en
surélevant le bain de 3 1/2” à l’aide
de madriers 4x4. Cela vous donne
un accès en dessous du bain pour
la connection du drain. Alignez le
drain avec le joint d’expansion (1)
(Fig.3). En-dessous du bain, serrez
le bague du joint d’expansion (1)
au drain (3) (N’OUBLIEZ PAS DE
METTRE LA RONDELLE
D’ÉTANCHÉITÉ).
Puis, serrez la bague du joint
d’expansion (2) juste assez pour
permettre à la partie mâle de
glisser dans la partie femelle (Fig.3).
4- Remplir le bain d’eau et videz-le.
Assurez vous que tous les joints
sous le bain sont étanches.
5- Descendez le bain lentement sur
le plancher en retirant les madriers
et comblez d’espace avec du
silicone.
This manual suits for next models
3
Popular Bathtub manuals by other brands

Clou
Clou First CL/05.13010 installation instructions

DURAVIT
DURAVIT Paiova 700264 Mounting instructions

Teuco
Teuco HYDROSONIC installation manual

agape
agape AVAS0910Z Assembly instructions

American Standard
American Standard Green Tea Whirlpool and Bathing Pool... Specifications

Kallista
Kallista P50035 Homeowner's guide

Jason International
Jason International Integrity B3060 owner's manual

miseno
miseno MT6333FSO installation manual

Swiss Madison
Swiss Madison Avancer SM-AB590 installation instructions

Mirolin
Mirolin ASHFORD installation instructions

BAGNODESIGN
BAGNODESIGN BDB-MAL-53175-A-WH installation guide

Kohler
Kohler Tercet K-1160-GLA manual